Язык программирования Rust
от Стива Клабника, Кэрол Николс и Криса Кричо, при поддержке Сообщества Rust
This version of the text assumes you’re using Rust 1.90.0 (released 2025-09-18) or later with edition = "2024" in the Cargo.toml file of all projects to configure them to use Rust 2024 Edition idioms. See the “Installation” section of Chapter 1 for instructions on installing or updating Rust, and see Appendix E for information on editions.
Оригинальная английская веб-версия доступна онлайн на https://doc.rust-lang.org/stable/book/ и оффлайн, если вы установили Rust с помощью rustup. Выполните команду rustup doc --book, чтобы открыть вашу локальную копию книги.
Также доступны несколько переводов от сообщества. (Примечание переводчика: вы можете налету переключаться между переводами, сделанными в этой системе, открыв меню на кнопку глобуса. Кроме того, переводчик на русский язык настоятельно просит вас писать о замеченных проблемах в чат в Телеграм — замеченные вами ошибки будут исправляться. Заранее большое спасибо!)
This text is available in paperback and ebook format from No Starch Press.
🚨 Предпочитаете более интерактивное обучение? Попробуйте другую версию этой книги, включающую в себя вопросы, комментирование текста, визуализации, и многое другое: https://rust-book.cs.brown.edu
Предисловие
The Rust programming language has come a long way in a few short years, from its creation and incubation by a small and nascent community of enthusiasts, to becoming one of the most loved and in-demand programming languages in the world. Looking back, it was inevitable that the power and promise of Rust would turn heads and gain a foothold in systems programming. What was not inevitable was the global growth in interest and innovation that permeated through open source communities and catalyzed wide-scale adoption across industries.
At this point in time, it is easy to point to the wonderful features that Rust has to offer to explain this explosion in interest and adoption. Who doesn’t want memory safety, and fast performance, and a friendly compiler, and great tooling, among a host of other wonderful features? The Rust language you see today combines years of research in systems programming with the practical wisdom of a vibrant and passionate community. This language was designed with purpose and crafted with care, offering developers a tool that makes it easier to write safe, fast, and reliable code.
But what makes Rust truly special is its roots in empowering you, the user, to achieve your goals. This is a language that wants you to succeed, and the principle of empowerment runs through the core of the community that builds, maintains, and advocates for this language. Since the previous edition of this definitive text, Rust has further developed into a truly global and trusted language. The Rust Project is now robustly supported by the Rust Foundation, which also invests in key initiatives to ensure that Rust is secure, stable, and sustainable.
This edition of The Rust Programming Language is a comprehensive update, reflecting the language’s evolution over the years and providing valuable new information. But it is not just a guide to syntax and libraries—it’s an invitation to join a community that values quality, performance, and thoughtful design. Whether you’re a seasoned developer looking to explore Rust for the first time or an experienced Rustacean looking to refine your skills, this edition offers something for everyone.
The Rust journey has been one of collaboration, learning, and iteration. The growth of the language and its ecosystem is a direct reflection of the vibrant, diverse community behind it. The contributions of thousands of developers, from core language designers to casual contributors, are what make Rust such a unique and powerful tool. By picking up this book, you’re not just learning a new programming language—you’re joining a movement to make software better, safer, and more enjoyable to work with.
Welcome to the Rust community!
- Bec Rumbul, Executive Director of the Rust Foundation
Введение
Note: This edition of the book is the same as The Rust Programming Language available in print and ebook format from No Starch Press.
Добро пожаловать в The Rust Programming Language — ознакомительную книгу о Rust. Язык программирования Rust поможет вам быстро писать более надёжное программное обеспечение. Высокоуровневая эргономика и низкоуровневый контроль часто становятся несовместимыми целями при разработке нового языка программирования. Rust бросает вызов этому противоречию. Балансируя между мощной технической выразительностью и простотой логики программ, Rust даёт вам возможность управлять низкоуровневыми деталями (например, использованием памяти) без хлопот, обычно ожидаемых от необходимости подобного контроля.
Кому Rust придётся по душе
Ряд особенностей Rust делает его превосходным для многих групп людей. Взглянем на некоторые наиболее важные из них.
Команды разработчиков
Rust is proving to be a productive tool for collaborating among large teams of developers with varying levels of systems programming knowledge. Low-level code is prone to various subtle bugs, which in most other languages can only be caught through extensive testing and careful code review by experienced developers. In Rust, the compiler plays a gatekeeper role by refusing to compile code with these elusive bugs, including concurrency bugs. By working alongside the compiler, the team can spend its time focusing on the program’s logic rather than chasing down bugs.
Rust также привносит современные инструменты разработки в мир системного программирования:
- Cargo — встроенный менеджер зависимостей и инструмент сборки, делающий добавление,компиляцию и управление зависимостей безпроблемным и согласованным в рамках всей экосистемыRust.
- The
rustfmtformatting tool ensures a consistent coding style across developers. - The Rust Language Server powers integrated development environment (IDE) integration for code completion and inline error messages.
Благодаря применению этих и других инструментов экосистемы Rust, разработчики способны продуктивно работать над программами системного уровня.
Учащиеся
Rust is for students and those who are interested in learning about systems concepts. Using Rust, many people have learned about topics like operating systems development. The community is very welcoming and happy to answer students’ questions. Through efforts such as this book, the Rust teams want to make systems concepts more accessible to more people, especially those new to programming.
Компании
Сотни компаний, больших и маленьких, применяют Rust для множества задач, таких как разработка инструментов командной строки, веб-сервисов, инструментов DevOps, встраиваемых устройств; анализ и обработка аудио и видео; создание криптовалют; биоинформатика; разработка поисковых систем, приложений интернета вещей; машинное обучение; и, наконец и например, разработка основных частей браузера Firefox.
Разработчики открытого программного обеспечения
Мир Rust с радостью примет людей, желающих развить этот язык, построить сплочённое Сообщество, создать библиотеки и средства разработки. Мы будем благодарны за ваш вклад в Rust.
Люди, ценящие скорость и устойчивость
Rust будет приятен для людей, требующих от языка скорости и стабильности. Под скоростью мы понимаем как скорость исполения программ, так и скорость их разработки. Проверки компилятора Rust гарантируют стабильность при развитии и рефакторинге. Это выгодно отличает Rust от языков, не поддерживающих эти проверки, и потому накопивших большие кодовые базы, которые разработчики часто опасаются редактировать. Благодаря абстракциям с нулевой стоимостью (высокоуровневым механизмам, компилирующимся в низкоуровневый код, столь же быстрый, как и написанный вручную), Rust стремится сделать код и безопасным, и быстрым.
The Rust language hopes to support many other users as well; those mentioned here are merely some of the biggest stakeholders. Overall, Rust’s greatest ambition is to eliminate the trade-offs that programmers have accepted for decades by providing safety and productivity, speed and ergonomics. Give Rust a try, and see if its choices work for you.
Кому будет полезна эта книга
This book assumes that you’ve written code in another programming language, but it doesn’t make any assumptions about which one. We’ve tried to make the material broadly accessible to those from a wide variety of programming backgrounds. We don’t spend a lot of time talking about what programming is or how to think about it. If you’re entirely new to programming, you would be better served by reading a book that specifically provides an introduction to programming.
Как читать эту книгу
Эта книга предполагает, что вы будете её читать последовательно, от начала до конца. Последующие главы опираются на изученное в предыдущих, и более ранние могут охватывать отдельные темы лишь поверхностно, с учётом того, что всё пропущенное будет подробно рассмотрено далее.
You’ll find two kinds of chapters in this book: concept chapters and project chapters. In concept chapters, you’ll learn about an aspect of Rust. In project chapters, we’ll build small programs together, applying what you’ve learned so far. Chapter 2, Chapter 12, and Chapter 21 are project chapters; the rest are concept chapters.
Chapter 1 explains how to install Rust, how to write a “Hello, world!” program, and how to use Cargo, Rust’s package manager and build tool. Chapter 2 is a hands-on introduction to writing a program in Rust, having you build up a number-guessing game. Here, we cover concepts at a high level, and later chapters will provide additional detail. If you want to get your hands dirty right away, Chapter 2 is the place for that. If you’re a particularly meticulous learner who prefers to learn every detail before moving on to the next, you might want to skip Chapter 2 and go straight to Chapter 3, which covers Rust features that are similar to those of other programming languages; then, you can return to Chapter 2 when you’d like to work on a project applying the details you’ve learned.
In Chapter 4, you’ll learn about Rust’s ownership system. Chapter 5 discusses structs and methods. Chapter 6 covers enums, match expressions, and the if let and let...else control flow constructs. You’ll use structs and enums to make custom types.
In Chapter 7, you’ll learn about Rust’s module system and about privacy rules for organizing your code and its public application programming interface (API). Chapter 8 discusses some common collection data structures that the standard library provides: vectors, strings, and hash maps. Chapter 9 explores Rust’s error-handling philosophy and techniques.
Chapter 10 digs into generics, traits, and lifetimes, which give you the power to define code that applies to multiple types. Chapter 11 is all about testing, which even with Rust’s safety guarantees is necessary to ensure that your program’s logic is correct. In Chapter 12, we’ll build our own implementation of a subset of functionality from the grep command line tool that searches for text within files. For this, we’ll use many of the concepts we discussed in the previous chapters.
Chapter 13 explores closures and iterators: features of Rust that come from functional programming languages. In Chapter 14, we’ll examine Cargo in more depth and talk about best practices for sharing your libraries with others. Chapter 15 discusses smart pointers that the standard library provides and the traits that enable their functionality.
In Chapter 16, we’ll walk through different models of concurrent programming and talk about how Rust helps you program in multiple threads fearlessly. In Chapter 17, we build on that by exploring Rust’s async and await syntax, along with tasks, futures, and streams, and the lightweight concurrency model they enable.
Chapter 18 looks at how Rust idioms compare to object-oriented programming principles you might be familiar with. Chapter 19 is a reference on patterns and pattern matching, which are powerful ways of expressing ideas throughout Rust programs. Chapter 20 contains a smorgasbord of advanced topics of interest, including unsafe Rust, macros, and more about lifetimes, traits, types, functions, and closures.
In Chapter 21, we’ll complete a project in which we’ll implement a low-level multithreaded web server!
Наконец, есть несколько приложений, содержащих полезную информацию о языке в более сухом, справочном виде. В Приложении A рассматриваются ключевые слова Rust; в Приложении B — операторы и символы; в Приложении C — выводимые трейты, предоставляемые стандартной библиотекой; в Приложении D — некоторые полезные инструменты разработки; в Приложении E — редакции Rust. В Приложении F вы найдёте переводы этой книги, а в Приложении G вы узнаете, как разрабатывается Rust и что такое Nightly Rust. (Примечание переводчика: переводы, перечисленные в Приложении F, выполнены в сторонних разрозненных репозиториях. Переводы, выполненные в этой системе, всегда доступны в меню по кнопке глобуса справа сверху.)
There is no wrong way to read this book: If you want to skip ahead, go for it! You might have to jump back to earlier chapters if you experience any confusion. But do whatever works for you.
An important part of the process of learning Rust is learning how to read the error messages the compiler displays: These will guide you toward working code. As such, we’ll provide many examples that don’t compile along with the error message the compiler will show you in each situation. Know that if you enter and run a random example, it may not compile! Make sure you read the surrounding text to see whether the example you’re trying to run is meant to error. In most situations, we’ll lead you to the correct version of any code that doesn’t compile. Ferris will also help you distinguish code that isn’t meant to work:
| Феррис | Что имеет в виду |
|---|---|
 | Этот код не компилируется! |
 | Этот код приведёт к панике! |
 | Этот код ведёт себя не так, как задумано. |
В большинстве случаев, мы приведём вас к исправленной версии неправильных примеров.
Исходный код
Исходные файлы, из которых сгенерирована эта книга, можно найти на GitHub.
Начало
Начнём ваше путешествие в мир Rust! Нам предстоит изучить очень многое, но с каждым перейдённым рубежом вам будет легче. В этой главе мы обсудим:
- Установку Rust на Linux, macOS и Windows
- Создание программы, печатающей
Hello, world! - Применение
cargo— пакетного менеджера и системы сборки Rust
Установка
Установка
Первым делом установим Rust. Для этого мы используем rustup — приложение командной строки, позволяющее управлять версиями Rust и некоторыми другими основными инструментами. Вам понадобится подключение к интернету.
Примечание: Если по какой-то причине вы предпочитаете не использовать rustup, обратитесь к странице других методов установки Rust.
Следуя инструкции ниже, вы установите последнюю стабильную версию компилятора Rust. Стабильность Rust включает в себя гарантии того, что все компилирующиеся примеры из этой книги будут компилироваться и с более новой версией Rust. Сообщения компилятора могут несколько отличаться от версии к версии, поскольку Rust постоянно совершенствует своё общение с программистом и меняет предупреждения и сообщения об ошибках. Иными словами, любая более новая и стабильная версия Rust, установленная по инструкции ниже, будет реализовывать описанное в этой книге так, как ожидается.
Договорённость о стиле консольных команд пользователя
В этой и последующих главах книги мы будем использовать некоторые консольные команды. Строки, которые вам нужно будет вводить в терминал, начинаются с $. Вам не нужно вводить сам символ $, это лишь обозначение начала отдельной команды. Строки, не начинающиеся с $, обычно являются выходом предыдущей команды. Кроме того, мы будем использовать знак > для примеров, специфичных для PowerShell.
Установка rustup на Linux и macOS
Если вы используете Linux или macOS, откройте терминал и введите следующую команду:
$ curl --proto '=https' --tlsv1.2 https://sh.rustup.rs -sSf | sh
Эта команда скачивает скрипт и запускает установку инструмента rustup, который установит последнюю стабильную версию Rust. В процессе установки с вас может потребоваться пароль. Если установка пройдёт успешно, вы увидите такое сообщение:
Rust is installed now. Great!
Вам также понадобится компоновщик (linker) — программа, используемая Rust для связывания компилируемого кода в один файл. Скорее всего, один у вас уже есть. Но если вы всё же получаете ошибки компоновки, вам нужно установить компилятор C, который обычно включает в себя и компоновщик. Компилятор C будет также полезен тем, что некоторые распространённые пакеты Rust опираются на код на C, а потому требуют его компилятор.
На macOS, вы можете установить компилятор C, выполнив эту команду:
$ xcode-select --install
Пользователям Linux, в общем случае, понадобится установить GCC или Clang — в соответствии с документацией конкретного дистрибутива. Например, если вы используете Ubuntu, то можете установить пакет build-essential.
Установка rustup на Windows
On Windows, go to https://www.rust-lang.org/tools/install and follow the instructions for installing Rust. At some point in the installation, you’ll be prompted to install Visual Studio. This provides a linker and the native libraries needed to compile programs. If you need more help with this step, see https://rust-lang.github.io/rustup/installation/windows-msvc.html.
Оставшаяся часть этой книги использует команды, которые будут работать как в cmd.exe, так и в PowerShell. Если будут какие-то специфические отличия, мы объясним, что именно использовать.
Решение проблем
Чтобы проверить, что вы правильно установили Rust, откройте терминал и введите эту команду:
$ rustc --version
Вы должны увидеть номер версии, хеш коммита и дату коммита последней выпущенной стабильной версии вот в таком формате:
rustc x.y.z (abcabcabc yyyy-mm-dd)
Если вы видите эти данные, значит, вы успешно установили Rust! Если же не видите, то проверьте, есть и Rust в вашей системной переменной %PATH%:
В Windows CMD введите:
> echo %PATH%
В PowerShell введите:
> echo $env:Path
На Linux и macOS введите:
$ echo $PATH
Если всё выглядит верно, но Rust всё ещё не работает, есть несколько мест, где вам могут помочь. Вы можете найти площадки для общения с другими программистами на Rust на странице Сообщества.
Обновление и деинсталляция
Однажды установив Rust через rustup, вы можете легко его обновить. Откройте консоль и выполните следующую команду:
$ rustup update
Для удаления Rust и rustup запустите скрипт деинсталляции:
$ rustup self uninstall
Reading the Local Documentation
Установка Rust включает в себя установку локальной копии всей документации, так что вы можете читать её без доступа к сети. Запустите rustup doc, чтобы открыть локально установленную документацию в своём браузере.
Если вы встречаете тип или функцию, предоставляемые стандартной библиотекой, и не знаете, как их использовать, изучите их API в документации!
Using Text Editors and IDEs
Эта книга не подразумевает использование какого-либо конкретного инструмента для разбработки на Rust. Вам будет достаточно даже лишь любого текстового редактора! Тем не менее, многие текстовые редакторы и IDE (integrated development environment) имеют встроенную поддержку Rust. Вы можете список различных редакторов и IDE на странице инструментов разработки.
Working Offline with This Book
In several examples, we will use Rust packages beyond the standard library. To work through those examples, you will either need to have an internet connection or to have downloaded those dependencies ahead of time. To download the dependencies ahead of time, you can run the following commands. (We’ll explain what cargo is and what each of these commands does in detail later.)
$ cargo new get-dependencies
$ cd get-dependencies
$ cargo add rand@0.8.5 trpl@0.2.0
This will cache the downloads for these packages so you will not need to download them later. Once you have run this command, you do not need to keep the get-dependencies folder. If you have run this command, you can use the --offline flag with all cargo commands in the rest of the book to use these cached versions instead of attempting to use the network.
Hello, World!
Hello, World!
Итак, поскольку вы установили Rust, приступим к написанию вашей первой программы на нём. По традиции, при изучении нового языка программирования первой программой пишется вывод текста Hello, world! на экран. Этой программой мы сейчас и займёмся.
Note: This book assumes basic familiarity with the command line. Rust makes no specific demands about your editing or tooling or where your code lives, so if you prefer to use an IDE instead of the command line, feel free to use your favorite IDE. Many IDEs now have some degree of Rust support; check the IDE’s documentation for details. The Rust team has been focusing on enabling great IDE support via rust-analyzer. See Appendix D for more details.
Project Directory Setup
Первым делом, создадим директорию для хранения вашего кода на Rust. Неважно, где вы хотите располагать свой код, но мы предлагаем вам выделить отдельную директорию для упражнений и проектов из этой книги.
Откройте терминал и введите следующие команды, чтобы создать директорию “projects” и директорию для проекта “Hello, world!” внутри директории projects.
Для Linux, macOS и PowerShell на Windows, введите это:
$ mkdir ~/projects
$ cd ~/projects
$ mkdir hello_world
$ cd hello_world
Для Windows CMD, введите это:
> mkdir "%USERPROFILE%\projects"
> cd /d "%USERPROFILE%\projects"
> mkdir hello_world
> cd hello_world
Rust Program Basics
Далее. Создадим исходный файл и назовём его main.rs. Файлы Rust всегда оканчиваются расширением .rs. Если вы используете больше одного слова в названии файла, следует отбивать слова друг от друга нижним подчёркиванием. Например, вместо helloworld.rs лучше напишите hello_world.rs.
Теперь откройте только что созданный файл main.rs и заполните его кодом из Листинга 1-1.
fn main() {
    println!("Hello, world!");
}Hello, world!Сохраните файл и вернитесь к консоли. Убедитесь, что вы находитесь в директории ~/projects/hello_world. На Linux и macOS, введите следующие команды, чтобы скомпилировать и запустить файл:
$ rustc main.rs
$ ./main
Hello, world!
On Windows, enter the command .\main instead of ./main:
> rustc main.rs
> .\main
Hello, world!
Независимо от вашей операционной системы, в консоли должна напечататься строка Hello, world!. Если этого не произошло, обратитесь к пункту “Решение проблем” раздела “Установка”, чтобы найти возможное решение.
Если же вы видите Hello, world!, примите поздравления! Вы написали свою первую программу на Rust, и стали Rust-программистом. Добро пожаловать!
The Anatomy of a Rust Program
Давайте детально рассмотрим нашу программу. Вот первая деталька пазла:
fn main() {
Если у вас есть опыт работы с C или C++, вам могут вспомниться `gcc` или `clang`. После успешной компиляции Rust создаст исполняемый бинарный файл.
}
These lines define a function named main. The main function is special: It is always the first code that runs in every executable Rust program. Here, the first line declares a function named main that has no parameters and returns nothing. If there were parameters, they would go inside the parentheses (()).
Тело функции заключено в {}. Rust требует использовать фигурные скобки для определения тела функций. Принятым стилем является поставить открывающую фигурную скобку на той же строке, где объявляется функция, отделив объявление от скобки пробелом.
Примечание: Если вы хотите всюду соблюдать стандартный единообразный стиль, вы можете воспользоваться инструментом форматирования rustfmt. (больше о rustfmt можно узнать в Приложении D ). Это инструмент поставляется вместе с rustc, так что он должен быть уже на вашем компьютере!
Тело функции main содержит следующий код:
#![allow(unused)]
fn main() {
println!("Hello, world!");
}
This line does all the work in this little program: It prints text to the screen. There are three important details to notice here.
First, println! calls a Rust macro. If it had called a function instead, it would be entered as println (without the !). Rust macros are a way to write code that generates code to extend Rust syntax, and we’ll discuss them in more detail in Chapter 20. For now, you just need to know that using a ! means that you’re calling a macro instead of a normal function and that macros don’t always follow the same rules as functions.
Во-вторых, вы видите строку "Hello, world!". Мы передаём эту строку как аргумент макросу println!, и она же выводится на экран.
Third, we end the line with a semicolon (;), which indicates that this expression is over, and the next one is ready to begin. Most lines of Rust code end with a semicolon.
Compilation and Execution
Давайте рассмотрим каждый шаг процесса запуска программы.
Перед запуском программы на Rust, вы должны её скомпилировать, используя компилятор Rust. Введите команду rustc в терминал и передайте в качестве ей аргумента имя файла исходного кода:
$ rustc main.rs
If you have a C or C++ background, you’ll notice that this is similar to gcc or clang. After compiling successfully, Rust outputs a binary executable.
В Linux, macOS и PowerShell на Windows, вы можете увидеть исполняемый файл, введя команду ls в консоль:
$ ls
main  main.rs
На Linux и macOS вы увидите два файла. На Windows вы увидите три. Если вы используете CMD на Windows, введите это:
> dir /B %= the /B option says to only show the file names =%
main.exe
main.pdb
main.rs
Вы увидите файл исходного кода с расширением .rs, исполняемый файл (main.exe на Windows и main на других операционных системах), и, если используете Windows, файл отладочной информации с расширением .pdb. Заупстите файл main или main.exe; вот так:
$ ./main # or .\main on Windows
Если ваш main.rs содержит программу “Hello, world!”, то исполняемый файл выведет Hello, world! в консоль.
Если вы более знакомы с динамическими языками программирования, такими как Ruby, Python или JavaScript, вам может быть непривычно выполнять сборку и исполнение программы как отдельные шаги. Rust — язык с предварительной компиляцией, что означает, что вы можете скомпилировать программу и отдать исполняемый файл другому человеку, и он сможет его запустить без необходимости устанавливать Rust. Если же вы дадите кому-то файл .rb, .py или .js, другому человеку потребуется сначала установить (соответственно) Ruby, Python или JavaScript. Однако, в этих языках вам нужна лишь одна команда для сборки и запуска ваших программ. Всё в дизайне языков программирования — компромисс.
Прямая компиляция через rustc достаточна для небольших программ, но по мере их роста вам потребуется управлять различными настройками и делать ваш код лёгким для распространения. В следующем разделе мы покажем вам Cargo — инструмент, используемый для написания прикладных программ на Rust.
Hello, Cargo!
Hello, Cargo!
Cargo — это система сборки и менеджер пакетов языка Rust. Многие программисты на Rust используют его для управления своими проектами, поскольку Cargo принимает на себя большое количество забот, таких как сборка вашего кода, загрузка необходимых вашему коду библиотек и их же сборка. (Мы будем называть библиотеки, необходимые вашему коду, зависимостями.)
Простейшие программы на Rust (вроде той, что мы написали), не имеют никаких зависимостей. Если бы мы использовали Cargo для сборки нашего проекта “Hello, world!”, он использовал бы лишь тот функционал Cargo, который отвечает за сборку кода. По мере того, как вы будете писать всё более сложные программы на Rust, вы начнёте использовать зависимости; так что если вы будете во всех своих проектах использовать Cargo с самого начала, вам будет легче добавлять зависимости.
Поскольку подавляющее большинство проектов на Rust использует Cargo, оставшаяся часть этой книги будет предполагать его использование и вами. Cargo поставляется вместе с Rust, если вы используете официальный метод установки, описанный в разделе “Установка”. Если вы устанавливали Rust иными средствами, вы можете проверить, установлен ли у вас Cargo, введя эту команду:
$ cargo --version
Если вы видите номер версии, то Cargo у вас есть! Если же видите ошибку, вроде command not found, обратитесь к документации вашего метода установки, чтобы узнать, как отдельно установить Cargo.
Создание проекта через Cargo
Создадим новый проект через Cargo и посмотрим, чем он будет отличаться от проекта “Hello, world!”, написанного нами ранее. Перейдите в директорию projects (или туда, куда вы решили сохранять свой код) и выполните (независимо от вашей операционной системы) эти команды:
$ cargo new hello_cargo
$ cd hello_cargo
Первая команда создаёт новую директорию и проект под названием hello_cargo. Мы назвали проект hello_cargo, так что Cargo создал его файлы в директории с таким же названием.
Перейдите в директорию hello_cargo и посмотрите список файлов. Вы увидите, что Cargo также сгенерировал два файла и одну директорию: файл Cargo.toml и директорию src с файлом main.rs внутри.
Cargo также инициализировал новый Git-репозиторий и создал файл .gitignore. Файлы Git не будут генерироваться, если вы выполните cargo new в уже существующем репозитории. Впрочем, вы можете переписать это поведение, используя cargo new --vcs=git.
Примечание: По умолчанию, в качестве системы версионирования используется Git. Вы изменить cargo new и использовать другую систему версионирования (version control system) или вовсе отказаться от использования системы версионирования, используя флаг --vcs. Выполните cargo new --help, чтобы увидеть доступные варианты.
Откройте файл Cargo.toml в вашем текстовом редакторе. Он должен выглядеть как код в Листинге 1-2.
[package]
name = "hello_cargo"
version = "0.1.0"
edition = "2024"
Если у вас есть опыт работы с C или C++, вам могут вспомниться `gcc` или `clang`. После успешной компиляции Rust создаст исполняемый бинарный файл.
[dependencies]
cargo newЭтот файл использует формат TOML (Tom’s Obvious, Minimal Language), принятый в Cargo для файлов конфигурации.
Первая строчка, [package] — это заголовок раздела, обозначающий, что все следующие строчки задают конфигурации пакета. Позже мы добавим больше информации в этот раздел, а также добавим новые разделы.
Следующие три строчки устанавливают конфигурационную информацию, необходимую Cargo для компиляции вашей программы: название, версию и используемую редакцию Rust. Мы обсудим ключ конфигурации edition в Приложении E.
Последняя строчка, [dependencies] — это начало раздела, где вам нужно указывать зависимости вагего проекта. Пакеты кода на Rust называются крейтами (crates). Для нашего текущего проекта нам не нужны никакие другие крейты, но в Главе 2 они нам понадобятся, и тогда же мы воспользуемся разделом зависимостей.
Теперь откройте src/main.rs и взгляните на код:
Файл: src/main.rs
fn main() {
    println!("Hello, world!");
}
Cargo has generated a “Hello, world!” program for you, just like the one we wrote in Listing 1-1! So far, the differences between our project and the project Cargo generated are that Cargo placed the code in the src directory, and we have a Cargo.toml configuration file in the top directory.
Cargo ожидает, что ваши исходные файлы будут находиться в директории src. Корневая директория проекта предназначена лишь для файлов README, информации о лицензиях, конфигурационных файлов и всего прочего, что не относится к непосредственно коду. Использование Cargo поможет вам организовывать свои проекты. С ним для всего найдётся место, и всё разместится на своих местах.
Если вы создали свой проект без Cargo (например, как мы ранее сделали с проектом “Hello, world!”), вы можете преобразовать его в проект, использующий Cargo. Переместите код проекта в директорию src и создайте правильный файл Cargo.toml. Проще всего получить такой файл можно, использовав команду cargo init — она создаст его автоматически.
Сборка и запуск проекта с помощью Cargo
Посмотрим, чем особенны сборка и запуск программы “Hello, world!” с помощью Cargo! Перейдите в директорию hello_cargo и соберите проект, введя следующую команду:
$ cargo build
   Compiling hello_cargo v0.1.0 (file:///projects/hello_cargo)
    Finished dev [unoptimized + debuginfo] target(s) in 2.85 secs
Эта команда создаёт исполняемый файл по пути target/debug/hello_cargo (или target\debug\hello_cargo.exe на Windows), а не корневой директории проекта. Поскольку по умолчанию используется сборка в режиме отладки (debug), Cargo положил бинарный файл в директорию под названием debug. Вы можете запустить исполняемый файл, написав в консоли:
$ ./target/debug/hello_cargo # or .\target\debug\hello_cargo.exe on Windows
Hello, world!
Если всё хорошо, вы увидите Hello, world! в терминале. Запуск cargo build в первый раз приводит к появлению нового файла в директории проекта: Cargo.lock. Этот файл хранит точные версии зависимостей, используемых в вашем проекте. Наш проект не имеет зависимостей, так что этот файл слегка пуст. Вам никогда не понадобится редактировать этот файл вручную; Cargo будет управлять им самостоятельно.
Мы только что собрали проект с помощью cargo build и запустили его через ./target/debug/hello_cargo, но мы также можем использовать cargo run, чтобы одной командой скомпилировать код и затем запустить полученный исполняемый файл:
$ cargo run
    Finished dev [unoptimized + debuginfo] target(s) in 0.0 secs
     Running `target/debug/hello_cargo`
Hello, world!
Использование cargo run удобнее, чем необоходимость помнить выполнять cargo build и затем запускать программу, обращаясь по полному пути, так что большинство программистов применяют cargo run.
Отметим, что в этот раз мы не увидели сообщений Cargo о компиляции hello_cargo. Cargo понял, что файлы проекта не поменялись, так что он не стал проводить пересборку и просто запустил имеющийся бинарный файл. Если бы вы отредактировали исходный код, Cargo бы пересобрал проект перед запуском, и вы бы увидели сообщение вроде такого:
$ cargo run
   Compiling hello_cargo v0.1.0 (file:///projects/hello_cargo)
    Finished dev [unoptimized + debuginfo] target(s) in 0.33 secs
     Running `target/debug/hello_cargo`
Hello, world!
Cargo также предоставляет команду cargo check. Эта команда быстро проверяет ваш код, чтобы убедиться, что он компилируется; однако, она не создаёт исполняемый файл:
$ cargo check
   Checking hello_cargo v0.1.0 (file:///projects/hello_cargo)
    Finished dev [unoptimized + debuginfo] target(s) in 0.32 secs
Why would you not want an executable? Often, cargo check is much faster than cargo build because it skips the step of producing an executable. If you’re continually checking your work while writing the code, using cargo check will speed up the process of letting you know if your project is still compiling! As such, many Rustaceans run cargo check periodically as they write their program to make sure it compiles. Then, they run cargo build when they’re ready to use the executable.
Повторим то, что мы узнали о Cargo:
- Мы можем создавать проекты, используя
cargo new. - Мы можем собирать проекты, используя
cargo build. - Мы можем собирать и запускать проекты одной командой
cargo run. - Мы можем проверить код на ошибки компиляции, не создавая исполняемый файл, используя
cargo check. - Cargo сохраняет результаты сборки не в корневую директорию проекта, а в директорию target/debug.
Дополнительным преимуществом использования Cargo является то, что его команды будут одинаковы для любых операционных систем. Так что с этого моменты мы более не будем предоставлять инструкции, специфичные для Linux и macOS или Windows.
Создание релизной версии
Когда ваш проект наконец-то готов в релизу, вы можете использовать cargo build --release, чтобы собрать его с оптимизациями. Эта команда создаст исполняемый файл не в target/debug, а в target/release. Оптимизации делают ваш код на Rust более быстрым, но их включение также увеличивает время компиляции. Поэтому есть два профиля компиляции: один для разработки, когда вы хотите быстро и часто пересобирать проект; и другой, для сборки окончательной версии программы, которая будет распространяться среди конечных пользователей и которая потому должна работать предельно быстро. Если вы замеряете быстродействие своего кода, не забудьте собрать его через cargo build --release, а замеры проводите над исполняемым файлом из директории target/release.
Leveraging Cargo’s Conventions
При работе с маленькими проектами, Cargo не сильно полезнее rustc, но он будет полезен, когда ваши программы станут более сложными. Когда ваша программа разрастётся до нескольких файлов или ей понадобится зависимость, стоит дать Cargo управлять сборкой.
Пусть проект hello_cargo и простой, но на его примере видно применение реального инструмента, который будет с вами на протяжении всего вашего пути в Rust. Когда вам понадобится работать над проектами, размещёнными в сети, вы можете использовать следующие команды, чтобы получить код из репозитория Git, перейти в его директорию, и собрать:
$ git clone example.org/someproject
$ cd someproject
$ cargo build
Больше информации о Cargo можно найти в его документации.
Подведём итоги
You’re already off to a great start on your Rust journey! In this chapter, you learned how to:
- Install the latest stable version of Rust using
rustup. - Update to a newer Rust version.
- Open locally installed documentation.
- Write and run a “Hello, world!” program using
rustcdirectly. - Create and run a new project using the conventions of Cargo.
Отличная возможность создать более существенную программу и научиться читать и писать код на Rust. В Главе 2 мы напишем игру в угадайку. Но, если вы хотели бы изучить, как в Rust устроены общие понятия программирования, посмотрите Главу 3 и потом вернитесь к Главе 2.
Программирование игры в угадайку
Окунёмся в мир Rust, вместе создав прикладной проект! Эта глава познакомит вас с несколькими наиболее важными концепциями Rust, показав, как их использовать в реальной программе. Вы узнаете о let, match, методах, ассоциированных функциях, внешних крейтах и многом другом! В дальнейших главах мы изучим всё перечисленное подробнее. В этой главе вы прикоснётесь только к самым основам.
We’ll implement a classic beginner programming problem: a guessing game. Here’s how it works: The program will generate a random integer between 1 and 100. It will then prompt the player to enter a guess. After a guess is entered, the program will indicate whether the guess is too low or too high. If the guess is correct, the game will print a congratulatory message and exit.
Создание нового проекта
Чтобы создать новый проект, перейдите в директорию projects, созданную вами в Главе 1, и воспользуйтесь Cargo, вот так:
$ cargo new guessing_game
$ cd guessing_game
Первая команда (cargo new) принимает имя проекта (guessing_game) в качестве первого аргумента. Вторая команда осуществляет переход в директорию проекта.
Посмотрим на сгенерированный файл Cargo.toml:
Файл: Cargo.toml
[package]
name = "guessing_game"
version = "0.1.0"
edition = "2024"
Если у вас есть опыт работы с C или C++, вам могут вспомниться `gcc` или `clang`. После успешной компиляции Rust создаст исполняемый бинарный файл.
[dependencies]
Как вы увидели в Главе 1, cargo new начинает новый проект созданием программы “Hello, world!”. Посмотрите в файл src/main.rs:
Файл: src/main.rs
fn main() {
    println!("Hello, world!");
}
Теперь скомпилируем и запустим эту программу одной командой — cargo run:
$ cargo run
   Compiling guessing_game v0.1.0 (file:///projects/guessing_game)
    Finished `dev` profile [unoptimized + debuginfo] target(s) in 0.08s
     Running `target/debug/guessing_game`
Hello, world!
Команда run особенно полезна тогда, когда вы разрабатываете проект мелкими изменениями (именно так мы и будем делать нашу игру!), тестируя каждую итерацию перед тем, как идти дальше.
Снова откройте файл src/main.rs. Весь код нашего проекта вы будете писать именно в нём.
Обработка догадки
Первая часть игры в угадайку будет просить от пользователя ввод, обрабатывать его, и проверять, имеет ли ввод ожидаемый вид. Для начала, позволим игроку ввести догадку. Поместите код из Листинга 2-1 в src/main.rs.
use std::io;
Если у вас есть опыт работы с C или C++, вам могут вспомниться `gcc` или `clang`. После успешной компиляции Rust создаст исполняемый бинарный файл.
fn main() {
    println!("Угадайте число!");
Если у вас есть опыт работы с C или C++, вам могут вспомниться `gcc` или `clang`. После успешной компиляции Rust создаст исполняемый бинарный файл.
    println!("Введите свою догадку.");
Если у вас есть опыт работы с C или C++, вам могут вспомниться `gcc` или `clang`. После успешной компиляции Rust создаст исполняемый бинарный файл.
    let mut guess = String::new();
Если у вас есть опыт работы с C или C++, вам могут вспомниться `gcc` или `clang`. После успешной компиляции Rust создаст исполняемый бинарный файл.
    io::stdin()
        .read_line(&mut guess)
        .expect("Не удалось прочесть ввод.");
Если у вас есть опыт работы с C или C++, вам могут вспомниться `gcc` или `clang`. После успешной компиляции Rust создаст исполняемый бинарный файл.
    println!("Вы предположили: {guess}");
}В этом коде много нового, так что давайте изучим его строчка за строчкой. Чтобы получить пользовательский ввод и затем (по возможности) напечатать его, нам нужно подключить библиотеку ввода-вывода io в область видимости. Библиотека io входит в стандартную библиотеку, также известную как std:
use std::io;
Если у вас есть опыт работы с C или C++, вам могут вспомниться `gcc` или `clang`. После успешной компиляции Rust создаст исполняемый бинарный файл.
fn main() {
    println!("Угадайте число!");
Если у вас есть опыт работы с C или C++, вам могут вспомниться `gcc` или `clang`. После успешной компиляции Rust создаст исполняемый бинарный файл.
    println!("Введите свою догадку.");
Если у вас есть опыт работы с C или C++, вам могут вспомниться `gcc` или `clang`. После успешной компиляции Rust создаст исполняемый бинарный файл.
    let mut guess = String::new();
Если у вас есть опыт работы с C или C++, вам могут вспомниться `gcc` или `clang`. После успешной компиляции Rust создаст исполняемый бинарный файл.
    io::stdin()
        .read_line(&mut guess)
        .expect("Не удалось прочесть ввод.");
Если у вас есть опыт работы с C или C++, вам могут вспомниться `gcc` или `clang`. После успешной компиляции Rust создаст исполняемый бинарный файл.
    println!("Вы предположили: {guess}");
}
Rust по умолчанию подключает некоторые важные части стандартной библиотеки в каждую программу. Это подмножество называется prelude, и с его составом вы можете ознакомиться в документации стандартной библиотеки.
Если тип, который вы хотите использовать, не входит в prelude, вам нужно явно подключить этот тип к области видимости программы, используя инструкцию use. Библиотека std::io даст вам набор полезных возможностей, включая получение пользовательского ввода.
Как вы увидели в Главе 1, функция main — это точка входа в программу:
use std::io;
Если у вас есть опыт работы с C или C++, вам могут вспомниться `gcc` или `clang`. После успешной компиляции Rust создаст исполняемый бинарный файл.
fn main() {
    println!("Угадайте число!");
Если у вас есть опыт работы с C или C++, вам могут вспомниться `gcc` или `clang`. После успешной компиляции Rust создаст исполняемый бинарный файл.
    println!("Введите свою догадку.");
Если у вас есть опыт работы с C или C++, вам могут вспомниться `gcc` или `clang`. После успешной компиляции Rust создаст исполняемый бинарный файл.
    let mut guess = String::new();
Если у вас есть опыт работы с C или C++, вам могут вспомниться `gcc` или `clang`. После успешной компиляции Rust создаст исполняемый бинарный файл.
    io::stdin()
        .read_line(&mut guess)
        .expect("Не удалось прочесть ввод.");
Если у вас есть опыт работы с C или C++, вам могут вспомниться `gcc` или `clang`. После успешной компиляции Rust создаст исполняемый бинарный файл.
    println!("Вы предположили: {guess}");
}
Новая функция объявляется ключевым словом fn. Пустые круглые скобки () обозначают, что эта функция не имеет параметов. Открывающая игурная скобка { определяет начало тела функции.
Как вы также узнали в Главе 1, println! — это макрос, печатающий строку на экран:
use std::io;
Если у вас есть опыт работы с C или C++, вам могут вспомниться `gcc` или `clang`. После успешной компиляции Rust создаст исполняемый бинарный файл.
fn main() {
    println!("Угадайте число!");
Если у вас есть опыт работы с C или C++, вам могут вспомниться `gcc` или `clang`. После успешной компиляции Rust создаст исполняемый бинарный файл.
    println!("Введите свою догадку.");
Если у вас есть опыт работы с C или C++, вам могут вспомниться `gcc` или `clang`. После успешной компиляции Rust создаст исполняемый бинарный файл.
    let mut guess = String::new();
Если у вас есть опыт работы с C или C++, вам могут вспомниться `gcc` или `clang`. После успешной компиляции Rust создаст исполняемый бинарный файл.
    io::stdin()
        .read_line(&mut guess)
        .expect("Не удалось прочесть ввод.");
Если у вас есть опыт работы с C или C++, вам могут вспомниться `gcc` или `clang`. После успешной компиляции Rust создаст исполняемый бинарный файл.
    println!("Вы предположили: {guess}");
}
Этот код печатает фразы: сообщающую о сути игры и запрашивающую ввод от пользователя
Хранение значений с помощью переменных
Далее! Создадим переменную для хранения пользовательского ввода, вот так:
use std::io;
Если у вас есть опыт работы с C или C++, вам могут вспомниться `gcc` или `clang`. После успешной компиляции Rust создаст исполняемый бинарный файл.
fn main() {
    println!("Угадайте число!");
Если у вас есть опыт работы с C или C++, вам могут вспомниться `gcc` или `clang`. После успешной компиляции Rust создаст исполняемый бинарный файл.
    println!("Введите свою догадку.");
Если у вас есть опыт работы с C или C++, вам могут вспомниться `gcc` или `clang`. После успешной компиляции Rust создаст исполняемый бинарный файл.
    let mut guess = String::new();
Если у вас есть опыт работы с C или C++, вам могут вспомниться `gcc` или `clang`. После успешной компиляции Rust создаст исполняемый бинарный файл.
    io::stdin()
        .read_line(&mut guess)
        .expect("Не удалось прочесть ввод.");
Если у вас есть опыт работы с C или C++, вам могут вспомниться `gcc` или `clang`. После успешной компиляции Rust создаст исполняемый бинарный файл.
    println!("Вы предположили: {guess}");
}
Программа становится интереснее! В этой строчке, на самом деле, происходит очень многое. Мы используем инструкцию let для создания переменной. Вот ещё пример:
let apples = 5;This line creates a new variable named apples and binds it to the value 5. In Rust, variables are immutable by default, meaning once we give the variable a value, the value won’t change. We’ll be discussing this concept in detail in the “Variables and Mutability” section in Chapter 3. To make a variable mutable, we add mut before the variable name:
let apples = 5; // неизменяема
let mut bananas = 5; // изменяема
Примечание: символы // обозначают начало комментария, продолжающегося до конца строки. Rust игнорирует весь текст в комментариях. Мы детальнее обсудим комментирование в Главе 3.
Вернёмся к программе игры в угадайку. Теперь вы знаете, что let mut guess создаёт изменяемую переменную guess. Знак равенства (=) говорит о том, что мы хотим связать что бы то ни было с данной переменной. Значение, с которым связывается переменная guess, располагается справа от знака равенства; оно является результатом вызова функции String::new — функции, возвращающей новое значение типа String. [String](https://doc.rust-lang.org/std/string/struct. String.html) — это тип строки, предоставляемый стандартной библиотекой. Он представляет собой строку текста переменной длины в кодировке UTF-8.
Символы “::” в части ::new показывают, что new — функция, ассоциированная с типом String. Ассоциированная функция — это функция, реализованная на типе (в данном случае — на String). Функция new создаёт новую, пустую строку. Многие типы имеют ассоциированную функцию new, поскольку это стандартное, типичное имя для функции, создающей некое значение типа, которое можно назвать новым.
В совокупности, строчка let mut guess = String::new(); создаёт изменяемую переменную, связанную с новым, пустым экземпляром типа String. Фух!
Получение пользовательского ввода
Напомним, что мы подключили функциональность ввода-вывода из стандартной библиотеки, написав use std::io; в первой строчке программы. Теперь вызовем функцию stdin из модуля io, которая позволит нам получать пользовательский ввод:
use std::io;
Если у вас есть опыт работы с C или C++, вам могут вспомниться `gcc` или `clang`. После успешной компиляции Rust создаст исполняемый бинарный файл.
fn main() {
    println!("Угадайте число!");
Если у вас есть опыт работы с C или C++, вам могут вспомниться `gcc` или `clang`. После успешной компиляции Rust создаст исполняемый бинарный файл.
    println!("Введите свою догадку.");
Если у вас есть опыт работы с C или C++, вам могут вспомниться `gcc` или `clang`. После успешной компиляции Rust создаст исполняемый бинарный файл.
    let mut guess = String::new();
Если у вас есть опыт работы с C или C++, вам могут вспомниться `gcc` или `clang`. После успешной компиляции Rust создаст исполняемый бинарный файл.
    io::stdin()
        .read_line(&mut guess)
        .expect("Не удалось прочесть ввод.");
Если у вас есть опыт работы с C или C++, вам могут вспомниться `gcc` или `clang`. После успешной компиляции Rust создаст исполняемый бинарный файл.
    println!("Вы предположили: {guess}");
}
If we hadn’t imported the io module with use std::io; at the beginning of the program, we could still use the function by writing this function call as std::io::stdin. The stdin function returns an instance of std::io::Stdin, which is a type that represents a handle to the standard input for your terminal.
Next, the line .read_line(&mut guess) calls the read_line method on the standard input handle to get input from the user. We’re also passing &mut guess as the argument to read_line to tell it what string to store the user input in. The full job of read_line is to take whatever the user types into standard input and append that into a string (without overwriting its contents), so we therefore pass that string as an argument. The string argument needs to be mutable so that the method can change the string’s content.
Знак & означает, что мы передаём методу не само значение, а ссылку на его область памяти. Это позволяет давать нескольким частям программы доступ к одной и той же информации, без необоходимости многократно копировать её. Ссылки — вещь многогранная, и одним из основных преимуществ Rust является безопасность и простота их использования. Касательно всего, что мы обсудили: на данный момент вам достаточно знать, что по умолчанию переменные и ссылки неизменяемы. Поэтому нам пришлось написать &mut guess вместо &guess, чтобы сделать получить возможность изменять нужную нам область памяти. (В Главе 4 ссылки будут рассмотрены подробнее.)
Обработка возможных ошибок с помощью Result
Мы ещё не закончили с той строчкой, той последовательностью методов. Теперь мы обсудим третью строчку, однако стоит отметить, что, логически, это всё одна строка кода. Вот строчка, о которой мы говорим:
use std::io;
Если у вас есть опыт работы с C или C++, вам могут вспомниться `gcc` или `clang`. После успешной компиляции Rust создаст исполняемый бинарный файл.
fn main() {
    println!("Угадайте число!");
Если у вас есть опыт работы с C или C++, вам могут вспомниться `gcc` или `clang`. После успешной компиляции Rust создаст исполняемый бинарный файл.
    println!("Введите свою догадку.");
Если у вас есть опыт работы с C или C++, вам могут вспомниться `gcc` или `clang`. После успешной компиляции Rust создаст исполняемый бинарный файл.
    let mut guess = String::new();
Если у вас есть опыт работы с C или C++, вам могут вспомниться `gcc` или `clang`. После успешной компиляции Rust создаст исполняемый бинарный файл.
    io::stdin()
        .read_line(&mut guess)
        .expect("Не удалось прочесть ввод.");
Если у вас есть опыт работы с C или C++, вам могут вспомниться `gcc` или `clang`. После успешной компиляции Rust создаст исполняемый бинарный файл.
    println!("Вы предположили: {guess}");
}
Мы могли бы переписать всю строку кода вот так:
io::stdin().read_line(&mut guess).expect("Не удалось прочесть ввод.");Однако, одну длинную строчку читать было бы тяжело, так что мы её разделили, перенеся вызовы методов (.method_name()) на новые строчки и отбив их пробелами от края. Теперь обсудим, что именно делает эта строка.
Как ранее упоминалось, read_line помещает всё, что пользователь ввёл в стандартный поток вывода, в строку, получаемую как аргумент. Но он также возвращает значение типа Result. Result — это перечисление, то есть тип, который может быть представлен одним из возможных состояний. Мы называем каждое такое возможное состояние вариантом.
В Главе 6 мы в деталях обсудим перечисления. Пока вам достаточно знать, что тип Result — это тип, варианты которого хранят информацию для обработки ошибок.
Вариантами типа Result являются Ok и Err. Вариант Ok означает успешное исполнение операции и содержит в себе результат её исполнения. Вариант Err означает, что операцию не удалось исполнить, и содержит информацию об ошибке.
Values of the Result type, like values of any type, have methods defined on them. An instance of Result has an expect method that you can call. If this instance of Result is an Err value, expect will cause the program to crash and display the message that you passed as an argument to expect. If the read_line method returns an Err, it would likely be the result of an error coming from the underlying operating system. If this instance of Result is an Ok value, expect will take the return value that Ok is holding and return just that value to you so that you can use it. In this case, that value is the number of bytes in the user’s input.
Если вы не вызовите expect, то программа скомпилируется, но вы получите предупреждение:
$ cargo build
   Compiling guessing_game v0.1.0 (file:///projects/guessing_game)
warning: unused `Result` that must be used
  --> src/main.rs:10:5
   |
10 |     io::stdin().read_line(&mut guess);
   |     ^^^^^^^^^^^^^^^^^^^^^^^^^^^^^^^^^
   |
   = note: this `Result` may be an `Err` variant, which should be handled
   = note: `#[warn(unused_must_use)]` on by default
help: use `let _ = ...` to ignore the resulting value
   |
10 |     let _ = io::stdin().read_line(&mut guess);
   |     +++++++
Если у вас есть опыт работы с C или C++, вам могут вспомниться `gcc` или `clang`. После успешной компиляции Rust создаст исполняемый бинарный файл.
warning: `guessing_game` (bin "guessing_game") generated 1 warning
    Finished `dev` profile [unoptimized + debuginfo] target(s) in 0.59s
Rust предупреждает вас, что: 1) вы не используете значение типа Result, возвращаемое методом read_line, и 2) вы не обрабатываете возможную ошибку, с которой может завершиться вызов этого метода.
Правильный способ избавиться от таких предупреждений — это писать код с обработками ошибок. Однако, в нашем случае, мы хотим просто аварийно завершить нашу программу, если что-то пойдёт не так, поэтому использование expect допустимо. Больше об обработке ошибок вы узнаете в [Главе 9] (ch09-02-recoverable-errors-with-result.html).
Печать значений переменных с помощью меток подстановки println!
Не считая закрывающей фигурной скобки, нам пока что осталось обсудить лишь одну строчку:
use std::io;
Если у вас есть опыт работы с C или C++, вам могут вспомниться `gcc` или `clang`. После успешной компиляции Rust создаст исполняемый бинарный файл.
fn main() {
    println!("Угадайте число!");
Если у вас есть опыт работы с C или C++, вам могут вспомниться `gcc` или `clang`. После успешной компиляции Rust создаст исполняемый бинарный файл.
    println!("Введите свою догадку.");
Если у вас есть опыт работы с C или C++, вам могут вспомниться `gcc` или `clang`. После успешной компиляции Rust создаст исполняемый бинарный файл.
    let mut guess = String::new();
Если у вас есть опыт работы с C или C++, вам могут вспомниться `gcc` или `clang`. После успешной компиляции Rust создаст исполняемый бинарный файл.
    io::stdin()
        .read_line(&mut guess)
        .expect("Не удалось прочесть ввод.");
Если у вас есть опыт работы с C или C++, вам могут вспомниться `gcc` или `clang`. После успешной компиляции Rust создаст исполняемый бинарный файл.
    println!("Вы предположили: {guess}");
}
This line prints the string that now contains the user’s input. The {} set of curly brackets is a placeholder: Think of {} as little crab pincers that hold a value in place. When printing the value of a variable, the variable name can go inside the curly brackets. When printing the result of evaluating an expression, place empty curly brackets in the format string, then follow the format string with a comma-separated list of expressions to print in each empty curly bracket placeholder in the same order. Printing a variable and the result of an expression in one call to println! would look like this:
#![allow(unused)]
fn main() {
let x = 5;
let y = 10;
Если у вас есть опыт работы с C или C++, вам могут вспомниться `gcc` или `clang`. После успешной компиляции Rust создаст исполняемый бинарный файл.
println!("x = {x} и y + 2 = {}", y + 2);
}
Этот код напечатает x = 5 и y + 2 = 12.
Проверяем первую часть
Проверим первую часть игры в угадайку. Запустим её, используя cargo run:
$ cargo run
   Compiling guessing_game v0.1.0 (file:///projects/guessing_game)
    Finished `dev` profile [unoptimized + debuginfo] target(s) in 6.44s
     Running `target/debug/guessing_game`
Угадайте число!
Введите свою догадку.
6
Вы предположили: 6
At this point, the first part of the game is done: We’re getting input from the keyboard and then printing it.
Генерация секретного числа
Next, we need to generate a secret number that the user will try to guess. The secret number should be different every time so that the game is fun to play more than once. We’ll use a random number between 1 and 100 so that the game isn’t too difficult. Rust doesn’t yet include random number functionality in its standard library. However, the Rust team does provide a rand crate with said functionality.
Increasing Functionality with a Crate
Remember that a crate is a collection of Rust source code files. The project we’ve been building is a binary crate, which is an executable. The rand crate is a library crate, which contains code that is intended to be used in other programs and can’t be executed on its own.
Управление внешними крейтами — это конёк Cargo. Чтобы получить возможность использовать крейт rand, нам нужно отредактировать файл Cargo.toml, чтобы включить этот крейт как зависимость. Откройте этот файл и добавьте строчки ниже в его конец (то есть под [dependencies] — заголовком раздела зависимостей). Убедитесь, что вы подключили версию rand ровно такую же, что и мы, иначе наши примеры могут не заработать у вас.
Файл: Cargo.toml
[dependencies]
rand = "0.8.5"
In the Cargo.toml file, everything that follows a header is part of that section that continues until another section starts. In [dependencies], you tell Cargo which external crates your project depends on and which versions of those crates you require. In this case, we specify the rand crate with the semantic version specifier 0.8.5. Cargo understands Semantic Versioning (sometimes called SemVer), which is a standard for writing version numbers. The specifier 0.8.5 is actually shorthand for ^0.8.5, which means any version that is at least 0.8.5 but below 0.9.0.
Cargo considers these versions to have public APIs compatible with version 0.8.5, and this specification ensures that you’ll get the latest patch release that will still compile with the code in this chapter. Any version 0.9.0 or greater is not guaranteed to have the same API as what the following examples use.
Теперь, ничего не меняя в программе, давайте соберём проект, как показано в Листинге 2-2.
$ cargo build
  Updating crates.io index
   Locking 15 packages to latest Rust 1.85.0 compatible versions
    Adding rand v0.8.5 (available: v0.9.0)
 Compiling proc-macro2 v1.0.93
 Compiling unicode-ident v1.0.17
 Compiling libc v0.2.170
 Compiling cfg-if v1.0.0
 Compiling byteorder v1.5.0
 Compiling getrandom v0.2.15
 Compiling rand_core v0.6.4
 Compiling quote v1.0.38
 Compiling syn v2.0.98
 Compiling zerocopy-derive v0.7.35
 Compiling zerocopy v0.7.35
 Compiling ppv-lite86 v0.2.20
 Compiling rand_chacha v0.3.1
 Compiling rand v0.8.5
 Compiling guessing_game v0.1.0 (file:///projects/guessing_game)
  Finished `dev` profile [unoptimized + debuginfo] target(s) in 2.48s
cargo build after adding the rand crate as a dependencyЕсли вы проделаете всё на своей машине, вы можете увидеть другие (но всё ещё обратно совместимые; спасибо SemVer!) версии крейтов и другие печатаемые строчки (в зависимости от вашей операционной системы), и они могут быть расположены в другом порядке.
Когда мы подключаем зависимость, Cargo собирает всё, что она сама требует, используя реестр (registry), представляющий собой копию данных с сайта Crates.io. Crates.io — это часть экосистемы Rust, место для публикации проектов с открытым исходным кодом, доступных каждому.
После обновления реестра, Cargo проверяет раздел [dependencies] и скачивает все крейты, которые ещё не скачаны. В нашем случае, мы подключаем как зависимость лишь крейт rand, однако Cargo также загружает всё, что требуется уже самому крейту rand. После скачивания крейтов, Rust компилирует их, а затем компилирует и проект.
Если вы сразу же вновь запустите cargo build, ничего не изменив в проекте, вы не увидите ничего, кроме строки Finished. Cargo видит, что вы ничего не поменяли в файле Cargo.toml, и он помнит, что зависимости уже были скачаны и скомпилированы. Cargo также видит, что вы ничего не поменяли и в исходном коде, так что он совершенно ничего не перекомпилирует. Поскольку делать ему больше и нечего, он просто сообщает об успешной сборке.
Если вы откроете файл src/main.rs и внесёте какие-нибудь изменения, сохраните их и ещё раз запуситите сборку, вы увидите лишь две строчки вывода:
$ cargo build
   Compiling guessing_game v0.1.0 (file:///projects/guessing_game)
    Finished `dev` profile [unoptimized + debuginfo] target(s) in 0.13s
Эти строчки показывают, что Cargo пересобрал лишь ваш код, поскольку увидел небольшое изменение в файле src/main.rs. Ваши зависимости не поменялись, поэтому Cargo не стал их ещё раз загружать и компилировать.
Ensuring Reproducible Builds
Cargo has a mechanism that ensures that you can rebuild the same artifact every time you or anyone else builds your code: Cargo will use only the versions of the dependencies you specified until you indicate otherwise. For example, say that next week version 0.8.6 of the rand crate comes out, and that version contains an important bug fix, but it also contains a regression that will break your code. To handle this, Rust creates the Cargo.lock file the first time you run cargo build, so we now have this in the guessing_game directory.
Когда вы впервые собираете проект, Cargo выясняет всё о версиях зависимостей, которые удовлетворяют требованиям, и записывает информацию о них в файл Cargo.lock. Когда вы ещё раз соберёте проект, Cargo увидит, что файл Cargo.lock уже существует, и воспользуется указанными в нём версиями. Это автоматически делает ваш код воспроизводимым. Иными словами, ваш проект продолжит использовать версию 0.8.5 до тех пор, пока вы не обновитесь явно — и всё благодаря файлу Cargo.lock. Поскольку файл Cargo.lock важен для обеспечения воспроизводимости сборок, он часто включается в систему управления версиями вместе с остальным кодом вашего проекта.
Обновление крейта до новейшей версии
When you do want to update a crate, Cargo provides the command update, which will ignore the Cargo.lock file and figure out all the latest versions that fit your specifications in Cargo.toml. Cargo will then write those versions to the Cargo.lock file. Otherwise, by default, Cargo will only look for versions greater than 0.8.5 and less than 0.9.0. If the rand crate has released the two new versions 0.8.6 and 0.999.0, you would see the following if you ran cargo update:
$ cargo update
    Updating crates.io index
     Locking 1 package to latest Rust 1.85.0 compatible version
    Updating rand v0.8.5 -> v0.8.6 (available: v0.999.0)
Cargo ignores the 0.999.0 release. At this point, you would also notice a change in your Cargo.lock file noting that the version of the rand crate you are now using is 0.8.6. To use rand version 0.999.0 or any version in the 0.999.x series, you’d have to update the Cargo.toml file to look like this instead (don’t actually make this change because the following examples assume you’re using rand 0.8):
[dependencies]
rand = "0.999.0"
В следующий раз, когда вы запустите cargo build, Cargo обновит реестр доступных крейтов и обновит вашу зависимость rand согласно определённой вами новой версии.
Мы оставим подробности о [Cargo](https://rust-lang-translations.org/ cargo/) и [его экосистеме](https://rust-lang-translations.org/cargo/ reference/publishing.html) до Главы 14. Cargo делает переиспользование вашего кода другими людьми (и наоборот) значительно более простым, так что у программистов на Rust есть отличная возможность писать небольшие проекты, собранные на основе нескольких пакетов.
Генерация случайного числа
Применим rand для загадывания числа. Обновите файл src/main.rs, поместив в него код Листинга 2-3.
use std::io;
Если у вас есть опыт работы с C или C++, вам могут вспомниться `gcc` или `clang`. После успешной компиляции Rust создаст исполняемый бинарный файл.
use rand::Rng;
Если у вас есть опыт работы с C или C++, вам могут вспомниться `gcc` или `clang`. После успешной компиляции Rust создаст исполняемый бинарный файл.
fn main() {
    println!("Угадайте число!");
Если у вас есть опыт работы с C или C++, вам могут вспомниться `gcc` или `clang`. После успешной компиляции Rust создаст исполняемый бинарный файл.
    let secret_number = rand::thread_rng().gen_range(1..=100);
Если у вас есть опыт работы с C или C++, вам могут вспомниться `gcc` или `clang`. После успешной компиляции Rust создаст исполняемый бинарный файл.
    println!("Загаданное число: {secret_number}");
Если у вас есть опыт работы с C или C++, вам могут вспомниться `gcc` или `clang`. После успешной компиляции Rust создаст исполняемый бинарный файл.
    println!("Введите свою догадку.");
Если у вас есть опыт работы с C или C++, вам могут вспомниться `gcc` или `clang`. После успешной компиляции Rust создаст исполняемый бинарный файл.
    let mut guess = String::new();
Если у вас есть опыт работы с C или C++, вам могут вспомниться `gcc` или `clang`. После успешной компиляции Rust создаст исполняемый бинарный файл.
    io::stdin()
        .read_line(&mut guess)
        .expect("Не удалось прочесть ввод.");
Если у вас есть опыт работы с C или C++, вам могут вспомниться `gcc` или `clang`. После успешной компиляции Rust создаст исполняемый бинарный файл.
    println!("Вы предположили: {guess}");
}First, we add the line use rand::Rng;. The Rng trait defines methods that random number generators implement, and this trait must be in scope for us to use those methods. Chapter 10 will cover traits in detail.
Next, we’re adding two lines in the middle. In the first line, we call the rand::thread_rng function that gives us the particular random number generator we’re going to use: one that is local to the current thread of execution and is seeded by the operating system. Then, we call the gen_range method on the random number generator. This method is defined by the Rng trait that we brought into scope with the use rand::Rng; statement. The gen_range method takes a range expression as an argument and generates a random number in the range. The kind of range expression we’re using here takes the form start..=end and is inclusive on the lower and upper bounds, so we need to specify 1..=100 to request a number between 1 and 100.
Примечание: Вы почти наверняка не будете знать, какие трейты использовать и какие методы и функции вызывать из крейта. В этом случае вам поможет документация крейта. С ней связана ещё одна приятная особенность Cargo: комманда cargo doc --open соберёт всю документацию, предоставляемую вашими крейтами-зависимостями, и откроет её автономную копию в браузере. Так, если вам интересная другая функциональность крейта rand, вы можете найти её в документации: выполните cargo doc --open и кликните по rand на левой панели.
Вторая новая строчка печатает секретное число. Это полезно, когда мы разрабатываем программу, но мы удалим это поведение программы из финальной версии. Но очень-то и игрой будет программа, сообщающая ответ сразу при запуске!
Попробуйте запустить программу несколько раз:
$ cargo run
   Compiling guessing_game v0.1.0 (file:///projects/guessing_game)
    Finished `dev` profile [unoptimized + debuginfo] target(s) in 0.02s
     Running `target/debug/guessing_game`
Угадайте число!
Загаданное число: 7
Введите свою догадку.
4
Вы предположили: 4
Если у вас есть опыт работы с C или C++, вам могут вспомниться `gcc` или `clang`. После успешной компиляции Rust создаст исполняемый бинарный файл.
$ cargo run
    Finished `dev` profile [unoptimized + debuginfo] target(s) in 0.02s
     Running `target/debug/guessing_game`
Угадайте число!
Загаданное число: 83
Введите свою догадку.
5
Вы предположили: 5
Вы должны увидеть разные случайные числа, и они должны быть в пределах от 1 до 100. Отличная работа!
Сравнение догадки с загаданным числом
Теперь мы имеем пользовательский ввод и случайное число, а значит, мы можем их сравнить. Этот шаг показан в Листинге 2-4. Обратите внимание, что этот код не скомпилируется.
use std::cmp::Ordering;
use std::io;
Если у вас есть опыт работы с C или C++, вам могут вспомниться `gcc` или `clang`. После успешной компиляции Rust создаст исполняемый бинарный файл.
use rand::Rng;
Если у вас есть опыт работы с C или C++, вам могут вспомниться `gcc` или `clang`. После успешной компиляции Rust создаст исполняемый бинарный файл.
fn main() {
    // --код сокращён--
    println!("Угадайте число!");
Если у вас есть опыт работы с C или C++, вам могут вспомниться `gcc` или `clang`. После успешной компиляции Rust создаст исполняемый бинарный файл.
    let secret_number = rand::thread_rng().gen_range(1..=100);
Если у вас есть опыт работы с C или C++, вам могут вспомниться `gcc` или `clang`. После успешной компиляции Rust создаст исполняемый бинарный файл.
    println!("Загаданное число: {secret_number}");
Если у вас есть опыт работы с C или C++, вам могут вспомниться `gcc` или `clang`. После успешной компиляции Rust создаст исполняемый бинарный файл.
    println!("Введите свою догадку.");
Если у вас есть опыт работы с C или C++, вам могут вспомниться `gcc` или `clang`. После успешной компиляции Rust создаст исполняемый бинарный файл.
    let mut guess = String::new();
Если у вас есть опыт работы с C или C++, вам могут вспомниться `gcc` или `clang`. После успешной компиляции Rust создаст исполняемый бинарный файл.
    io::stdin()
        .read_line(&mut guess)
        .expect("Не удалось прочесть ввод.");
Если у вас есть опыт работы с C или C++, вам могут вспомниться `gcc` или `clang`. После успешной компиляции Rust создаст исполняемый бинарный файл.
    println!("Вы предположили: {guess}");
Если у вас есть опыт работы с C или C++, вам могут вспомниться `gcc` или `clang`. После успешной компиляции Rust создаст исполняемый бинарный файл.
    match guess.cmp(&secret_number) {
        Ordering::Less => println!("Слишком маленькое!"),
        Ordering::Greater => println!("Слишком большое!"),
        Ordering::Equal => println!("Вы победили!"),
    }
}First, we add another use statement, bringing a type called std::cmp::Ordering into scope from the standard library. The Ordering type is another enum and has the variants Less, Greater, and Equal. These are the three outcomes that are possible when you compare two values.
Then, we add five new lines at the bottom that use the Ordering type. The cmp method compares two values and can be called on anything that can be compared. It takes a reference to whatever you want to compare with: Here, it’s comparing guess to secret_number. Then, it returns a variant of the Ordering enum we brought into scope with the use statement. We use a match expression to decide what to do next based on which variant of Ordering was returned from the call to cmp with the values in guess and secret_number.
A match expression is made up of arms. An arm consists of a pattern to match against, and the code that should be run if the value given to match fits that arm’s pattern. Rust takes the value given to match and looks through each arm’s pattern in turn. Patterns and the match construct are powerful Rust features: They let you express a variety of situations your code might encounter, and they make sure you handle them all. These features will be covered in detail in Chapter 6 and Chapter 19, respectively.
Рассмотрим наш вышеприведённый пример с выражением match. Предположим, что пользователь дал догадку 50, а загадано было число 38.
Если мы сравним 50 с 38, метод cmp вернёт Ordering::Greater, поскольку 50 больше 38. Выражение match берёт значение Ordering::Greater и начинает последовательно проверять каждый шаблон. Оно смотрит на первый шаблон — Ordering::Less — и видит, что значение Ordering::Greater не сопоставимо с ним, а потому код этой ветви игнорируется, и сравнение с шаблонами идёт дальше. Следующий шаблон — Ordering::Greater, и он сопоставляется с Ordering::Greater! Связанный с шаблоном код исполняется, и на экран печатается Too big!. Выражение match завершается после первого успешного сопоставления, и проверок с оставшимися шаблонами не происходит.
Однако, код Листина 2-4 всё ещё не будет компилироваться:
$ cargo build
   Compiling libc v0.2.86
   Compiling getrandom v0.2.2
   Compiling cfg-if v1.0.0
   Compiling ppv-lite86 v0.2.10
   Compiling rand_core v0.6.2
   Compiling rand_chacha v0.3.0
   Compiling rand v0.8.5
   Compiling guessing_game v0.1.0 (file:///projects/guessing_game)
error[E0308]: mismatched types
  --> src/main.rs:23:21
   |
23 |     match guess.cmp(&secret_number) {
   |                 --- ^^^^^^^^^^^^^^ expected `&String`, found `&{integer}`
   |                 |
   |                 arguments to this method are incorrect
   |
   = note: expected reference `&String`
              found reference `&{integer}`
note: method defined here
  --> /rustc/1159e78c4747b02ef996e55082b704c09b970588/library/core/src/cmp.rs:979:8
Если у вас есть опыт работы с C или C++, вам могут вспомниться `gcc` или `clang`. После успешной компиляции Rust создаст исполняемый бинарный файл.
For more information about this error, try `rustc --explain E0308`.
error: could not compile `guessing_game` (bin "guessing_game") due to 1 previous error
В сердце ошибки находится в несоответствии типов. Rust — язык с сильной статической типизацией. Однако, он также способен самостоятельно вывести тип. Когда мы пишем let mut guess = String::new(), Rust может вывести, что guess должна быть типа String, а потому с нас не требуется уточнять тип. secret_number же — это целочисленный тип. Типов Rust, которые могут представлять числа от 1 до 100, множество: i32, знаковое 32-битное число; u32, беззнаковое 32-битное число; i64, знаковое 64-битное число; и так далее. В случае равновозможности использования нескольких числовых типов, Rust выводит для числа тип i32. Это он и делает с secret_number — выводит i32, пока не появится дополнительная информация, которая заставила бы Rust вывести другой тип. Причиной же ошибки является невозможность в Rust сравнить значения строкового и числового типов.
Ultimately, we want to convert the String the program reads as input into a number type so that we can compare it numerically to the secret number. We do so by adding this line to the main function body:
Файл: src/main.rs
use std::cmp::Ordering;
use std::io;
Если у вас есть опыт работы с C или C++, вам могут вспомниться `gcc` или `clang`. После успешной компиляции Rust создаст исполняемый бинарный файл.
use rand::Rng;
Если у вас есть опыт работы с C или C++, вам могут вспомниться `gcc` или `clang`. После успешной компиляции Rust создаст исполняемый бинарный файл.
fn main() {
    println!("Угадайте число!");
Если у вас есть опыт работы с C или C++, вам могут вспомниться `gcc` или `clang`. После успешной компиляции Rust создаст исполняемый бинарный файл.
    let secret_number = rand::thread_rng().gen_range(1..=100);
Если у вас есть опыт работы с C или C++, вам могут вспомниться `gcc` или `clang`. После успешной компиляции Rust создаст исполняемый бинарный файл.
    println!("Загаданное число: {secret_number}");
Если у вас есть опыт работы с C или C++, вам могут вспомниться `gcc` или `clang`. После успешной компиляции Rust создаст исполняемый бинарный файл.
    println!("Введите свою догадку.");
Если у вас есть опыт работы с C или C++, вам могут вспомниться `gcc` или `clang`. После успешной компиляции Rust создаст исполняемый бинарный файл.
    // --код сокращён--
Если у вас есть опыт работы с C или C++, вам могут вспомниться `gcc` или `clang`. После успешной компиляции Rust создаст исполняемый бинарный файл.
    let mut guess = String::new();
Если у вас есть опыт работы с C или C++, вам могут вспомниться `gcc` или `clang`. После успешной компиляции Rust создаст исполняемый бинарный файл.
    io::stdin()
        .read_line(&mut guess)
        .expect("Не удалось прочесть ввод.");
Если у вас есть опыт работы с C или C++, вам могут вспомниться `gcc` или `clang`. После успешной компиляции Rust создаст исполняемый бинарный файл.
    let guess: u32 = guess.trim().parse().expect("Пожалуйста, введите число!");
Если у вас есть опыт работы с C или C++, вам могут вспомниться `gcc` или `clang`. После успешной компиляции Rust создаст исполняемый бинарный файл.
    println!("Вы предположили: {guess}");
Если у вас есть опыт работы с C или C++, вам могут вспомниться `gcc` или `clang`. После успешной компиляции Rust создаст исполняемый бинарный файл.
    match guess.cmp(&secret_number) {
        Ordering::Less => println!("Слишком маленькое!"),
        Ordering::Greater => println!("Слишком большое!"),
        Ordering::Equal => println!("Вы победили!"),
    }
}
… вот эту строчку:
let guess: u32 = guess.trim().parse().expect("Пожалуйста, введите число!");Здесь мы создаём переменную guess. Но только… в программе же уже есть переменная guess, верно? Да, это так, в самом деле; но Rust позволяет переобъявлять переменные, присваивая им новые значения (и даже других типов). Это называется затенением; оно позволяет переиспользовать имя переменной вместо того, чтобы создавать несколько переменных одинакового смысла, но разных типов (например, guess_str и guess). Мы обсудим это детальнее в Главе 3, а пока просто знайте, что затенение часто полезно, когда вам нужно преобразовать значение из одного типа в другой.
Мы связываем эту новую переменную со значением выражения guess.trim().parse(). В нём, guess — это название уже ранее существующей переменной: нашей изначальной guess, содержащей ввод в виде строки. Метод trim, реализованный для экземпляров String, убирает начальные и конечные пробелы — нам нужно это сделать перед конвертацией строки в число типа u32 (целое, беззнаковое, 32-битное). Пользователь должен нажать Enter, чтобы read_line исполнился и считал введённую информацию. Однако считанная строка будет включать в себя символ начала новой строки. Например, если пользователь напечатает 5 и потом нажмёт Enter, guess будет выглядеть вот так: 5\n. \n — это обозначение для символа начала новой строки. (Стоит отметить, что на Windows нажатие Enter сопровождается возвратом каретки, и только потом символом начала новой строки, что всё вместе даёт \r\n.) Метод trim сможет убрать как \n, так и \r\n, и вернёт просто строку 5.
Метод parse строк преобразует строку к другому типу. В нашем случае, мы используем его для приведения строки к числу. Нам нужно указать Rust, к какому конкретному числовому типу мы хотим привести наш ввод, и для этого мы явно указываем тип переменной: let guess: u32. Двоеточие (:) после guess используется для аннотирования типа переменной. В Rust есть встроенные числовые типы; использованный нами тип u32 означает целое беззнаковое 32-битное число — хороший выбор для относительно небольших положительных чисел. Вы узнаете больше о других числовых типах в Главе 3.
Additionally, the u32 annotation in this example program and the comparison with secret_number means Rust will infer that secret_number should be a u32 as well. So, now the comparison will be between two values of the same type!
The parse method will only work on characters that can logically be converted into numbers and so can easily cause errors. If, for example, the string contained A👍%, there would be no way to convert that to a number. Because it might fail, the parse method returns a Result type, much as the read_line method does (discussed earlier in “Handling Potential Failure with Result”). We’ll treat this Result the same way by using the expect method again. If parse returns an Err Result variant because it couldn’t create a number from the string, the expect call will crash the game and print the message we give it. If parse can successfully convert the string to a number, it will return the Ok variant of Result, and expect will return the number that we want from the Ok value.
Теперь запустим нашу программу:
$ cargo run
   Compiling guessing_game v0.1.0 (file:///projects/guessing_game)
    Finished `dev` profile [unoptimized + debuginfo] target(s) in 0.26s
     Running `target/debug/guessing_game`
Угадайте число!
Загаданное число: 58
Введите свою догадку.
  76
Вы предположили: 76
Слишком большое!
Nice! Even though spaces were added before the guess, the program still figured out that the user guessed 76. Run the program a few times to verify the different behavior with different kinds of input: Guess the number correctly, guess a number that is too high, and guess a number that is too low.
Большая часть игры готова, но пользователь пока что может сделать дать одну догадку. Изменим это, добавив цикл!
Возможность дать догадку не один раз с помощью циклов
Ключевое слово loop создаёт бесконечный цикл. Мы добавим цикл, чтобы дать пользователю больше попыток угадать число:
Файл: src/main.rs
use std::cmp::Ordering;
use std::io;
Если у вас есть опыт работы с C или C++, вам могут вспомниться `gcc` или `clang`. После успешной компиляции Rust создаст исполняемый бинарный файл.
use rand::Rng;
Если у вас есть опыт работы с C или C++, вам могут вспомниться `gcc` или `clang`. После успешной компиляции Rust создаст исполняемый бинарный файл.
fn main() {
    println!("Угадайте число!");
Если у вас есть опыт работы с C или C++, вам могут вспомниться `gcc` или `clang`. После успешной компиляции Rust создаст исполняемый бинарный файл.
    let secret_number = rand::thread_rng().gen_range(1..=100);
Если у вас есть опыт работы с C или C++, вам могут вспомниться `gcc` или `clang`. После успешной компиляции Rust создаст исполняемый бинарный файл.
    // --код сокращён--
Если у вас есть опыт работы с C или C++, вам могут вспомниться `gcc` или `clang`. После успешной компиляции Rust создаст исполняемый бинарный файл.
    println!("Загаданное число: {secret_number}");
Если у вас есть опыт работы с C или C++, вам могут вспомниться `gcc` или `clang`. После успешной компиляции Rust создаст исполняемый бинарный файл.
    loop {
        println!("Введите свою догадку.");
Если у вас есть опыт работы с C или C++, вам могут вспомниться `gcc` или `clang`. После успешной компиляции Rust создаст исполняемый бинарный файл.
        // --код сокращён--
Если у вас есть опыт работы с C или C++, вам могут вспомниться `gcc` или `clang`. После успешной компиляции Rust создаст исполняемый бинарный файл.
Если у вас есть опыт работы с C или C++, вам могут вспомниться `gcc` или `clang`. После успешной компиляции Rust создаст исполняемый бинарный файл.
        let mut guess = String::new();
Если у вас есть опыт работы с C или C++, вам могут вспомниться `gcc` или `clang`. После успешной компиляции Rust создаст исполняемый бинарный файл.
        io::stdin()
            .read_line(&mut guess)
            .expect("Не удалось прочесть ввод.");
Если у вас есть опыт работы с C или C++, вам могут вспомниться `gcc` или `clang`. После успешной компиляции Rust создаст исполняемый бинарный файл.
        let guess: u32 = guess.trim().parse().expect("Пожалуйста, введите число!");
Если у вас есть опыт работы с C или C++, вам могут вспомниться `gcc` или `clang`. После успешной компиляции Rust создаст исполняемый бинарный файл.
        println!("Вы предположили: {guess}");
Если у вас есть опыт работы с C или C++, вам могут вспомниться `gcc` или `clang`. После успешной компиляции Rust создаст исполняемый бинарный файл.
        match guess.cmp(&secret_number) {
            Ordering::Less => println!("Слишком маленькое!"),
            Ordering::Greater => println!("Слишком большое!"),
            Ordering::Equal => println!("Вы победили!"),
        }
    }
}
Как вы можете видеть, мы переместили весь код обработки догадки в цикл. Убедитесь, что отбили строчки от левого края ещё четырьмя пробелами каждую, и снова запустите программу. Программа теперь будет спрашивать догадку бесконечно, и это создало нам новую проблему: игра никогда не закончится!
The user could always interrupt the program by using the keyboard shortcut ctrl-C. But there’s another way to escape this insatiable monster, as mentioned in the parse discussion in “Comparing the Guess to the Secret Number”: If the user enters a non-number answer, the program will crash. We can take advantage of that to allow the user to quit, as shown here:
$ cargo run
   Compiling guessing_game v0.1.0 (file:///projects/guessing_game)
    Finished `dev` profile [unoptimized + debuginfo] target(s) in 0.23s
     Running `target/debug/guessing_game`
Guess the number!
The secret number is: 59
Please input your guess.
45
You guessed: 45
Too small!
Please input your guess.
60
You guessed: 60
Too big!
Please input your guess.
59
You guessed: 59
You win!
Please input your guess.
quit
Если у вас есть опыт работы с C или C++, вам могут вспомниться `gcc` или `clang`. После успешной компиляции Rust создаст исполняемый бинарный файл.
thread 'main' panicked at src/main.rs:28:47:
Please type a number!: ParseIntError { kind: InvalidDigit }
note: run with `RUST_BACKTRACE=1` environment variable to display a backtrace
Ввод слова quit остановит программу, но как вы можете заметить, это произойдёт при любом нечисловом вводе. Такое поведение программы, мягко говоря, неоптимально. Мы хотим, чтобы игра завершалась, когда догадка игрока оказывается правильной.
Завершение игры после правильной догадки
Запрограммируем выход из игры, когда игрок побеждает. Для этого, используем инструкцию break:
Файл: src/main.rs
use std::cmp::Ordering;
use std::io;
Если у вас есть опыт работы с C или C++, вам могут вспомниться `gcc` или `clang`. После успешной компиляции Rust создаст исполняемый бинарный файл.
use rand::Rng;
Если у вас есть опыт работы с C или C++, вам могут вспомниться `gcc` или `clang`. После успешной компиляции Rust создаст исполняемый бинарный файл.
fn main() {
    println!("Угадайте число!");
Если у вас есть опыт работы с C или C++, вам могут вспомниться `gcc` или `clang`. После успешной компиляции Rust создаст исполняемый бинарный файл.
    let secret_number = rand::thread_rng().gen_range(1..=100);
Если у вас есть опыт работы с C или C++, вам могут вспомниться `gcc` или `clang`. После успешной компиляции Rust создаст исполняемый бинарный файл.
    println!("Загаданное число: {secret_number}");
Если у вас есть опыт работы с C или C++, вам могут вспомниться `gcc` или `clang`. После успешной компиляции Rust создаст исполняемый бинарный файл.
    loop {
        println!("Введите свою догадку.");
Если у вас есть опыт работы с C или C++, вам могут вспомниться `gcc` или `clang`. После успешной компиляции Rust создаст исполняемый бинарный файл.
        let mut guess = String::new();
Если у вас есть опыт работы с C или C++, вам могут вспомниться `gcc` или `clang`. После успешной компиляции Rust создаст исполняемый бинарный файл.
        io::stdin()
            .read_line(&mut guess)
            .expect("Не удалось прочесть ввод.");
Если у вас есть опыт работы с C или C++, вам могут вспомниться `gcc` или `clang`. После успешной компиляции Rust создаст исполняемый бинарный файл.
        let guess: u32 = guess.trim().parse().expect("Пожалуйста, введите число!");
Если у вас есть опыт работы с C или C++, вам могут вспомниться `gcc` или `clang`. После успешной компиляции Rust создаст исполняемый бинарный файл.
        println!("Вы предположили: {guess}");
Если у вас есть опыт работы с C или C++, вам могут вспомниться `gcc` или `clang`. После успешной компиляции Rust создаст исполняемый бинарный файл.
        // --код сокращён--
Если у вас есть опыт работы с C или C++, вам могут вспомниться `gcc` или `clang`. После успешной компиляции Rust создаст исполняемый бинарный файл.
        match guess.cmp(&secret_number) {
            Ordering::Less => println!("Слишком маленькое!"),
            Ordering::Greater => println!("Слишком большое!"),
            Ordering::Equal => {
                println!("Вы победили!");
                break;
            }
        }
    }
}
Строка break после You win! заставляет программу покинуть цикл, когда игрок делает правильную догадку. Выход из цикла также означает конец программы, поскольку цикл оказывается последней частью main.
Обработка неправильного ввода
To further refine the game’s behavior, rather than crashing the program when the user inputs a non-number, let’s make the game ignore a non-number so that the user can continue guessing. We can do that by altering the line where guess is converted from a String to a u32, as shown in Listing 2-5.
use std::cmp::Ordering;
use std::io;
Если у вас есть опыт работы с C или C++, вам могут вспомниться `gcc` или `clang`. После успешной компиляции Rust создаст исполняемый бинарный файл.
use rand::Rng;
Если у вас есть опыт работы с C или C++, вам могут вспомниться `gcc` или `clang`. После успешной компиляции Rust создаст исполняемый бинарный файл.
fn main() {
    println!("Угадайте число!");
Если у вас есть опыт работы с C или C++, вам могут вспомниться `gcc` или `clang`. После успешной компиляции Rust создаст исполняемый бинарный файл.
    let secret_number = rand::thread_rng().gen_range(1..=100);
Если у вас есть опыт работы с C или C++, вам могут вспомниться `gcc` или `clang`. После успешной компиляции Rust создаст исполняемый бинарный файл.
    println!("Загаданное число: {secret_number}");
Если у вас есть опыт работы с C или C++, вам могут вспомниться `gcc` или `clang`. После успешной компиляции Rust создаст исполняемый бинарный файл.
    loop {
        println!("Введите свою догадку.");
Если у вас есть опыт работы с C или C++, вам могут вспомниться `gcc` или `clang`. После успешной компиляции Rust создаст исполняемый бинарный файл.
        let mut guess = String::new();
Если у вас есть опыт работы с C или C++, вам могут вспомниться `gcc` или `clang`. После успешной компиляции Rust создаст исполняемый бинарный файл.
        // --код сокращён--
Если у вас есть опыт работы с C или C++, вам могут вспомниться `gcc` или `clang`. После успешной компиляции Rust создаст исполняемый бинарный файл.
        io::stdin()
            .read_line(&mut guess)
            .expect("Не удалось прочесть ввод.");
Если у вас есть опыт работы с C или C++, вам могут вспомниться `gcc` или `clang`. После успешной компиляции Rust создаст исполняемый бинарный файл.
        let guess: u32 = match guess.trim().parse() {
            Ok(num) => num,
            Err(_) => continue,
        };
Если у вас есть опыт работы с C или C++, вам могут вспомниться `gcc` или `clang`. После успешной компиляции Rust создаст исполняемый бинарный файл.
        println!("Вы предположили: {guess}");
Если у вас есть опыт работы с C или C++, вам могут вспомниться `gcc` или `clang`. После успешной компиляции Rust создаст исполняемый бинарный файл.
        // --код сокращён--
Если у вас есть опыт работы с C или C++, вам могут вспомниться `gcc` или `clang`. После успешной компиляции Rust создаст исполняемый бинарный файл.
        match guess.cmp(&secret_number) {
            Ordering::Less => println!("Слишком маленькое!"),
            Ordering::Greater => println!("Слишком большое!"),
            Ordering::Equal => {
                println!("Вы победили!");
                break;
            }
        }
    }
}We switch from an expect call to a match expression to move from crashing on an error to handling the error. Remember that parse returns a Result type and Result is an enum that has the variants Ok and Err. We’re using a match expression here, as we did with the Ordering result of the cmp method.
Если parse может преобразовать строку в число, он вернёт значение Ok, содержащее результат преобразования — число. Этот Ok сопоставится с шаблоном первой ветви, и выражение match просто вернёт значение num, которое до этого создало parse и поместило в значение Ok. Это число будет сохранено в созданной нами переменной guess.
If parse is not able to turn the string into a number, it will return an Err value that contains more information about the error. The Err value does not match the Ok(num) pattern in the first match arm, but it does match the Err(_) pattern in the second arm. The underscore, _, is a catch-all value; in this example, we’re saying we want to match all Err values, no matter what information they have inside them. So, the program will execute the second arm’s code, continue, which tells the program to go to the next iteration of the loop and ask for another guess. So, effectively, the program ignores all errors that parse might encounter!
Теперь вся программа должна работать нужным образом. Попробуем:
$ cargo run
   Compiling guessing_game v0.1.0 (file:///projects/guessing_game)
    Finished `dev` profile [unoptimized + debuginfo] target(s) in 0.13s
     Running `target/debug/guessing_game`
Угадайте число!
Загаданное число: 61
Введите свою догадку.
10
Вы предположили: 10
Слишком маленькое!
Введите свою догадку.
99
Вы предположили: 99
Слишком большое!
Введите свою догадку.
foo
Введите свою догадку.
61
Вы предположили: 61
Вы победили!
Замечательно! Нам нужно внести только ещё одну небольшую последнюю правку. Вспомним, что программа всё ещё печатает загаданное число. Это было полезно для тестирования, но для игры это бессмысленно. Удалим строчку с println!, которая печатает загаданное число. В Листинге 2-6 приведён окончательный код программы.
use std::cmp::Ordering;
use std::io;
Если у вас есть опыт работы с C или C++, вам могут вспомниться `gcc` или `clang`. После успешной компиляции Rust создаст исполняемый бинарный файл.
use rand::Rng;
Если у вас есть опыт работы с C или C++, вам могут вспомниться `gcc` или `clang`. После успешной компиляции Rust создаст исполняемый бинарный файл.
fn main() {
    println!("Угадайте число!");
Если у вас есть опыт работы с C или C++, вам могут вспомниться `gcc` или `clang`. После успешной компиляции Rust создаст исполняемый бинарный файл.
    let secret_number = rand::thread_rng().gen_range(1..=100);
Если у вас есть опыт работы с C или C++, вам могут вспомниться `gcc` или `clang`. После успешной компиляции Rust создаст исполняемый бинарный файл.
    loop {
        println!("Введите свою догадку.");
Если у вас есть опыт работы с C или C++, вам могут вспомниться `gcc` или `clang`. После успешной компиляции Rust создаст исполняемый бинарный файл.
        let mut guess = String::new();
Если у вас есть опыт работы с C или C++, вам могут вспомниться `gcc` или `clang`. После успешной компиляции Rust создаст исполняемый бинарный файл.
        io::stdin()
            .read_line(&mut guess)
            .expect("Не удалось прочесть ввод.");
Если у вас есть опыт работы с C или C++, вам могут вспомниться `gcc` или `clang`. После успешной компиляции Rust создаст исполняемый бинарный файл.
        let guess: u32 = match guess.trim().parse() {
            Ok(num) => num,
            Err(_) => continue,
        };
Если у вас есть опыт работы с C или C++, вам могут вспомниться `gcc` или `clang`. После успешной компиляции Rust создаст исполняемый бинарный файл.
        println!("Вы предположили: {guess}");
Если у вас есть опыт работы с C или C++, вам могут вспомниться `gcc` или `clang`. После успешной компиляции Rust создаст исполняемый бинарный файл.
        match guess.cmp(&secret_number) {
            Ordering::Less => println!("Слишком маленькое!"),
            Ordering::Greater => println!("Слишком большое!"),
            Ordering::Equal => {
                println!("Вы победили!");
                break;
            }
        }
    }
}Игра готова. Хорошая работа, поздравляем!
Подведём итоги
Этот прикладной проект познакомил вас со многими концепциями Rust: let, match, функциями, использованием внешних крейтов и многим другим. В нескольких следующих главах вы изучите эта концепции подробнее. Глава 3 расскажет об общих понятиях программирования, присущих и Rust, таких как переменные, типы данных и функциях, а также покажет, как их использовать. Глава 4 посвящена системе владения — особенности Rust, сильно выделяющей его среди других языков программирования. В Главе 5 обсуждаются структуры и синтаксис метода, а Глава 6 объясняет работу с перечислениями.
Общие понятия программирования
This chapter covers concepts that appear in almost every programming language and how they work in Rust. Many programming languages have much in common at their core. None of the concepts presented in this chapter are unique to Rust, but we’ll discuss them in the context of Rust and explain the conventions around using them.
Говоря конкретно, вы изучите переменные, основные типы, функции, комментарии и управление потоком исполнения. Это — основы: вы встретите их в каждой программе на Rust; они станут для вас фундаментом для дальнейшей работы.
Ключевые слова
The Rust language has a set of keywords that are reserved for use by the language only, much as in other languages. Keep in mind that you cannot use these words as names of variables or functions. Most of the keywords have special meanings, and you’ll be using them to do various tasks in your Rust programs; a few have no current functionality associated with them but have been reserved for functionality that might be added to Rust in the future. You can find the list of the keywords in Appendix A.
Переменные и изменяемость
Переменные и изменяемость
Как упоминалось в разделе “Хранение значений с помощью переменных” , по умолчанию, переменные неизменяемы. Это — одно из средств Rust, побуждающее вас писать код так, чтобы он использовал преимущества безопасности и лёгкого параллелизма, предоставляемые языком. Однако, вы всё же можете делать свои переменные изменяемыми. Давайте рассмотрим, как и почему Rust побуждает вас отдавать предпочтение неизменяемости данных, и почему вам иногда может захотеться отказаться от неё.
Если переменная неизменяема, то однажды присвоив ей значение, вы не сможете его поменять. Чтобы проиллюстрировать это, создадим в директории projects новый проект variables. Выполним для этого команду cargo new variables.
Затем, в вашей новой директории variables, откройте src/main.rs и замените его код тем, что ниже (пока что он не будет компилироваться):
Файл: src/main.rs
fn main() {
    let x = 5;
    println!("Значение x: {x}");
    x = 6;
    println!("Значение x: {x}");
}
Save and run the program using cargo run. You should receive an error message regarding an immutability error, as shown in this output:
$ cargo run
   Compiling variables v0.1.0 (file:///projects/variables)
error[E0384]: cannot assign twice to immutable variable `x`
 --> src/main.rs:4:5
  |
2 |     let x = 5;
  |         - first assignment to `x`
3 |     println!("Значение x: {x}");
4 |     x = 6;
  |     ^^^^^ cannot assign twice to immutable variable
  |
help: consider making this binding mutable
  |
2 |     let mut x = 5;
  |         +++
Если у вас есть опыт работы с C или C++, вам могут вспомниться `gcc` или `clang`. После успешной компиляции Rust создаст исполняемый бинарный файл.
For more information about this error, try `rustc --explain E0384`.
error: could not compile `variables` (bin "variables") due to 1 previous error
Этот пример демонстрирует, как компилятор помогает вам находить ошибки в ваших программах. Ошибки компилятора могут быть вводящими в ступор, но на деле они всего лишь значат, что ваша программа работает не так, как вы от неё, скорее всего, ожидаете. Они не означают, что вы — плохой программист! Опытные программисты на Rust регулярно сталкиваются с ошибками компилятора.
Вы получили сообщение об ошибке (cannot assign twice to immutable variable `x`), поскольку пытаетесь связать второе значение с неизменяемой переменной x.
It’s important that we get compile-time errors when we attempt to change a value that’s designated as immutable, because this very situation can lead to bugs. If one part of our code operates on the assumption that a value will never change and another part of our code changes that value, it’s possible that the first part of the code won’t do what it was designed to do. The cause of this kind of bug can be difficult to track down after the fact, especially when the second piece of code changes the value only sometimes. The Rust compiler guarantees that when you state that a value won’t change, it really won’t change, so you don’t have to keep track of it yourself. Your code is thus easier to reason through.
But mutability can be very useful and can make code more convenient to write. Although variables are immutable by default, you can make them mutable by adding mut in front of the variable name as you did in Chapter 2. Adding mut also conveys intent to future readers of the code by indicating that other parts of the code will be changing this variable’s value.
Например, давайте поменяем src/main.rs вот так:
Файл: src/main.rs
fn main() {
    let mut x = 5;
    println!("Значение x: {x}");
    x = 6;
    println!("Значение x: {x}");
}
Когда мы теперь запустим программу, мы увидим:
$ cargo run
   Compiling variables v0.1.0 (file:///projects/variables)
    Finished `dev` profile [unoptimized + debuginfo] target(s) in 0.30s
     Running `target/debug/variables`
Значение x: 5
Значение x: 6
Мы смогли поменять значение, связанное с x, с 5 на 6, поскольку использовали mut. В конечном счёте, вопрос об использовании изменяемости остаётся за вами и определяется тем, какое решение, по вашему мнению, будет чище.
Declaring Constants
Как и неизменяемые переменные, константы — это привязанные к имени неизменяемые значения. Однако, между константами и неизменяемыми переменными разница есть.
Во-первых, вы не можете использовать mut с константами. Константы не просто неизменяемы по умолчанию — они вообще неизменяемы, всегда. Константы объявляются с помощью ключевого слова const (вместо ключевого слова let), а также они должны быть аннотированы типом. Мы расскажем подробнее о типах и аннотациях типа в следующем разделе — “Типы данных”; так что пока что не задумывайтесь много о деталях. Просто помните, что вы обязаны аннотировать тип констант.
Константы могут быть объявлены в любой области видимости, в том числе и в глобальной, что делает их полезными для объявления значений, которые используются в программе повсеместно.
Последнее отличие констант от неизменяемых переменных состоит в том, что константы могут связываться только с константыми выражениями — то есть такими, которые могут быть вычислены на этапе компиляции.
Вот пример объявление константы:
#![allow(unused)]
fn main() {
const THREE_HOURS_IN_SECONDS: u32 = 60 * 60 * 3;
}
The constant’s name is THREE_HOURS_IN_SECONDS, and its value is set to the result of multiplying 60 (the number of seconds in a minute) by 60 (the number of minutes in an hour) by 3 (the number of hours we want to count in this program). Rust’s naming convention for constants is to use all uppercase with underscores between words. The compiler is able to evaluate a limited set of operations at compile time, which lets us choose to write out this value in a way that’s easier to understand and verify, rather than setting this constant to the value 10,800. See the Rust Reference’s section on constant evaluation for more information on what operations can be used when declaring constants.
Константы существуют в памяти в течение всего времени исполнения программы — в той области видимости, в которой были объявлены. Это свойство делает константы полезными для определения значений в программе, многим частям которой необходимо знать, например, скорость света или о максимальном количестве очков, которые может получить игрок.
Naming hardcoded values used throughout your program as constants is useful in conveying the meaning of that value to future maintainers of the code. It also helps to have only one place in your code that you would need to change if the hardcoded value needed to be updated in the future.
Затенение
Как вы увидели в Главе 2 ,вы можете объявить новую переменную с тем же именем, которое носит уже существующая переменная. Считается, что старая переменная затеняется новой, что означает, что при использовании данного имени компилятор будет искать значение именно в новой переменной. Старая переменная не будет видна до тех пор, пока не закончится область видимости новой. Кроме того, затеняющая переменная сама может быть затенённой. Мы можем затенить переменную, использовав её же имя и повторно использовав его с ключевым словом let; вот так:
Файл: src/main.rs
fn main() {
    let x = 5;
Если у вас есть опыт работы с C или C++, вам могут вспомниться `gcc` или `clang`. После успешной компиляции Rust создаст исполняемый бинарный файл.
    let x = x + 1;
Если у вас есть опыт работы с C или C++, вам могут вспомниться `gcc` или `clang`. После успешной компиляции Rust создаст исполняемый бинарный файл.
    {
        let x = x * 2;
        println!("Значение x во внутренней области видимости: {x}");
    }
Если у вас есть опыт работы с C или C++, вам могут вспомниться `gcc` или `clang`. После успешной компиляции Rust создаст исполняемый бинарный файл.
    println!("Значение x: {x}");
}
This program first binds x to a value of 5. Then, it creates a new variable x by repeating let x =, taking the original value and adding 1 so that the value of x is 6. Then, within an inner scope created with the curly brackets, the third let statement also shadows x and creates a new variable, multiplying the previous value by 2 to give x a value of 12. When that scope is over, the inner shadowing ends and x returns to being 6. When we run this program, it will output the following:
$ cargo run
   Compiling variables v0.1.0 (file:///projects/variables)
    Finished `dev` profile [unoptimized + debuginfo] target(s) in 0.31s
     Running `target/debug/variables`
Значение x во внутренней области видимости: 12
Значение x: 6
Shadowing is different from marking a variable as mut because we’ll get a compile-time error if we accidentally try to reassign to this variable without using the let keyword. By using let, we can perform a few transformations on a value but have the variable be immutable after those transformations have completed.
Другим отличием между mut и затенением является то, что поскольку мы, по сути, создаём новую переменную (поскольку используем ключевое слово let), мы можем поменять тип значения, но использовать то же самое имя для связанной с ним переменной. Например, допустим, наша программа спрашивает пользователя, скольким количеством пробелов пользователь хочет отбить некоторый текст, и просит для этого у пользователя непосредственно нужные несколько знаков пробела. Мы можем сохранить количество введённых пробелов в виде числа вот таким образом:
fn main() {
    let spaces = "   ";
    let spaces = spaces.len();
}
The first spaces variable is a string type, and the second spaces variable is a number type. Shadowing thus spares us from having to come up with different names, such as spaces_str and spaces_num; instead, we can reuse the simpler spaces name. However, if we try to use mut for this, as shown here, we’ll get a compile-time error:
fn main() {
    let mut spaces = "   ";
    spaces = spaces.len();
}
Ошибка сообщает, что мы не можем изменять тип переменной:
$ cargo run
   Compiling variables v0.1.0 (file:///projects/variables)
error[E0308]: mismatched types
 --> src/main.rs:3:14
  |
2 |     let mut spaces = "   ";
  |                      ----- expected due to this value
3 |     spaces = spaces.len();
  |              ^^^^^^^^^^^^ expected `&str`, found `usize`
Если у вас есть опыт работы с C или C++, вам могут вспомниться `gcc` или `clang`. После успешной компиляции Rust создаст исполняемый бинарный файл.
For more information about this error, try `rustc --explain E0308`.
error: could not compile `variables` (bin "variables") due to 1 previous error
Теперь мы знаем, как работают переменные. Давайте теперь подробнее посмотрим на типы данных, которые эти переменные могут хранить.
Типы данных
Типы данных
Every value in Rust is of a certain data type, which tells Rust what kind of data is being specified so that it knows how to work with that data. We’ll look at two data type subsets: scalar and compound.
Не забывайте, что Rust — язык со статической типизацией. Это означает, что типы всех переменных должны быть известны уже на этапе компиляции. Компилятор обычно может самостоятельно вывести тип переменной, основываясь на её значении и том, как она используется. В тех случаях, когда компилятор не может вывести конкретный тип (например, как в том случае, когда мы преобразовывали String к численному типу данных методом parse в разделе “Сравнение догадки с загаданным числом” Главы 2), мы должны явно аннотировать тип; вот так:
#![allow(unused)]
fn main() {
let guess: u32 = "42".parse().expect("Не число!");
}
Если мы не добавим аннотацию типа (: u32) в коде выше, Rust сообщит о соответствующей ошибке, означающей, что компилятору нужно больше информации для автоматического вывода типа:
$ cargo build
   Compiling no_type_annotations v0.1.0 (file:///projects/no_type_annotations)
error[E0284]: type annotations needed
 --> src/main.rs:2:9
  |
2 |     let guess = "42".parse().expect("Не число!");
  |         ^^^^^        ----- type must be known at this point
  |
  = note: cannot satisfy `<_ as FromStr>::Err == _`
help: consider giving `guess` an explicit type
  |
2 |     let guess: /* Type */ = "42".parse().expect("Не число!");
  |              ++++++++++++
Если у вас есть опыт работы с C или C++, вам могут вспомниться `gcc` или `clang`. После успешной компиляции Rust создаст исполняемый бинарный файл.
For more information about this error, try `rustc --explain E0284`.
error: could not compile `no_type_annotations` (bin "no_type_annotations") due to 1 previous error
Для других типов данных аннотации будут соответственно отличаться.
Неделимые типы
Неделимый тип представляет одичночное значение. Rust имеет четыре базовых неделимых типа: целые числа, числа с плавающей точкой, логические значения, а также символы. Они могут вам показаться знакомыми по другим языкам программирования. Посмотрим, как они все работают в Rust.
Целочисленные типы
Целое число — это число без дробной части. Мы уже использовали один целочисленный тип: в Главе 2 нам понадобился тип u32. Это имя типа указывает на то, что он переменные этого типа представляют беззнаковое целое число (знаковое целое число начиналось бы не с u, а с i), занимающее 32 бита памяти. Таблица 3-1 показывает встроенные целочисленные типы Rust. Мы можем использовать любой из них для объявления переменной, хранящей целое число.
Таблица 3-1: Целочисленные типы в Rust
| Длина | Знаковые | Беззнаковые |
|---|---|---|
| 8-битные | i8 | u8 |
| 16-битные | i16 | u16 |
| 32-битные | i32 | u32 |
| 64-битные | i64 | u64 |
| 128-битные | i128 | u128 |
| Architecture-dependent | isize | usize |
Each variant can be either signed or unsigned and has an explicit size. Signed and unsigned refer to whether it’s possible for the number to be negative—in other words, whether the number needs to have a sign with it (signed) or whether it will only ever be positive and can therefore be represented without a sign (unsigned). It’s like writing numbers on paper: When the sign matters, a number is shown with a plus sign or a minus sign; however, when it’s safe to assume the number is positive, it’s shown with no sign. Signed numbers are stored using two’s complement representation.
Each signed variant can store numbers from −(2n − 1) to 2n − 1 − 1 inclusive, where n is the number of bits that variant uses. So, an i8 can store numbers from −(27) to 27 − 1, which equals −128 to 127. Unsigned variants can store numbers from 0 to 2n − 1, so a u8 can store numbers from 0 to 28 − 1, which equals 0 to 255.
Additionally, the isize and usize types depend on the architecture of the computer your program is running on: 64 bits if you’re on a 64-bit architecture and 32 bits if you’re on a 32-bit architecture.
Вы можете записывать литералы целых чисел в любом формате из тех, что перечислены в Таблице 3-2. Стоит отметить, что тип литералов, которые могут быть отнесены к разным типам, может быть определён явно с помощью суффикса типа, например: 57u8. В числовых литералах можно также использовать знак _ как разделитель для удобства чтения: например, запись 1_000 будет эквивалентна записи 1000.
Таблица 3-2: Целочисленные литералы в Rust
| Литералы | Пример |
|---|---|
| Десятичный | 98_222 |
| Шестнадцатеричный | 0xff |
| Восьмеричный | 0o77 |
| Двоичный | 0b1111_0000 |
Байт (только тип u8) | b'A' |
So how do you know which type of integer to use? If you’re unsure, Rust’s defaults are generally good places to start: Integer types default to i32. The primary situation in which you’d use isize or usize is when indexing some sort of collection.
Целочисленное переполнение
Допустим, у вас есть переменная типа u8, которая может принимать значения от 0 до 255. Если вы попытаетесь приписать этой переменной значение за этими пределами (например, 270), произойдёт целочисленное переполнение, которое может привести к двум различным ситуациям. Если вы скомпилировали программу в режиме отладки, Rust включил в неё проверки на целочисленное переполнение, которые вызовут панику, если переполнение произойдёт. В Rust под термином паника понимается завершение программы с ошибкой. Больше о панике мы поговорим в разделе “Неустранимые ошибки с panic!” Главы 9.
Когда вы компилируете программу в релизном режиме (используя флаг --release), Rust не включает проверки на целочисленное переполнение и не вызывает паники в его случае. Вместо этого, Rust выполняет обращение по модулю. Кратко говоря, значения, превышающие максимальное значение типа, “оборачиваются” по модулю до числа, которое будет находиться в пределах типа. В случае типа u8, значение 256 станет 0, значение 257 станет 1, и так далее. Программа не вызовет панику, но в переменной будет сохранено не то значение, которое вы, скорее всего, ожидаете. Полагаться на обращение переполнения по модулю считается ошибкой.
Чтобы явно обработать возможность переполнения, вы можете использовать набор методов базовых числовых типов, предоставляемый стандартной библиотекой:
- Методы
wrapping_*(например,wrapping_add) обратят переполнение по модулю — как в релизном режиме, так и в режиме отладки. - Методы
checked_*вернут значениеNone, если произойдёт переполнение. - Методы
overflowing_*вернут число и логическое значение, сообщающее о том, произошло ли переполнение. - Методы
saturating_*вернут минимальное или максимальное значение типа (в зависимости от того, меньше ли переполнение, чем минимум типа, или переполнение больше, чем максимум).
Типы чисел с плавающей точкой
Rust также имеет два базовых типа чисел с плавающей точкой — чисел с десятичной дробной частью. К этим типам относятся типы f32 и f64, соответственно занимающие в памяти 32 и 64 бита. По умолчанию используется тип f64, поскольку на новых ЦП он сравним по быстродействию с f32, но при этом даёт большую точность. Все типы чисел с плавающей точкой — знаковые.
Вот пример использования чисел с плавающей точкой:
Файл: src/main.rs
fn main() {
    let x = 2.0; // f64
Если у вас есть опыт работы с C или C++, вам могут вспомниться `gcc` или `clang`. После успешной компиляции Rust создаст исполняемый бинарный файл.
    let y: f32 = 3.0; // f32
}
Числа с плавающей точкой реализованы в соответствии со стандартом IEEE-754.
Операции над числами
Rust поддерживает базовые математические операции над числовыми типами: сложение, вычитание, умножение, деление и взятие остатка от деления. Целочисленное деление отбрасывает дробную часть. Код ниже содержит примеры использования операций над числами и инструкции let:
Файл: src/main.rs
fn main() {
    // сложение
    let sum = 5 + 10;
Если у вас есть опыт работы с C или C++, вам могут вспомниться `gcc` или `clang`. После успешной компиляции Rust создаст исполняемый бинарный файл.
    // вычитание
    let difference = 95.5 - 4.3;
Если у вас есть опыт работы с C или C++, вам могут вспомниться `gcc` или `clang`. После успешной компиляции Rust создаст исполняемый бинарный файл.
    // умножение
    let product = 4 * 30;
Если у вас есть опыт работы с C или C++, вам могут вспомниться `gcc` или `clang`. После успешной компиляции Rust создаст исполняемый бинарный файл.
    // деление
    let quotient = 56.7 / 32.2;
    let truncated = -5 / 3; // будет равно -1
Если у вас есть опыт работы с C или C++, вам могут вспомниться `gcc` или `clang`. После успешной компиляции Rust создаст исполняемый бинарный файл.
    // остаток от деления
    let remainder = 43 % 5;
}
В каждой строчке используется математический оператор и вычисляется результат, который привязывается к переменной. Приложение B содержит список всех операторов в Rust.
Логический тип
Как и в других языках программирования, логический тип в Rust представлен двумя возможными значениями: true и false. Логический тип занимает один байт в памяти. Логический тип аннотируется словом bool; например:
Файл: src/main.rs
fn main() {
    let t = true;
Если у вас есть опыт работы с C или C++, вам могут вспомниться `gcc` или `clang`. После успешной компиляции Rust создаст исполняемый бинарный файл.
    let f: bool = false; // с явной аннотацией типа
}
Основным местом, где используются логические значения, являются условные выражения, вроде выражения if. Мы расскажем о том, как раюотают выражения if, в разделе “Управление потоком”.
Тип символа
Тип char — это простейший тип, реализующий символ. Вот несколько примеров объявления значений типа char:
Файл: src/main.rs
fn main() {
    let c = 'z';
    let z: char = 'ℤ'; // с явной аннотацией типа
    let heart_eyed_cat = '😻';
}
Note that we specify char literals with single quotation marks, as opposed to string literals, which use double quotation marks. Rust’s char type is 4 bytes in size and represents a Unicode scalar value, which means it can represent a lot more than just ASCII. Accented letters; Chinese, Japanese, and Korean characters; emojis; and zero-width spaces are all valid char values in Rust. Unicode scalar values range from U+0000 to U+D7FF and U+E000 to U+10FFFF inclusive. However, a “character” isn’t really a concept in Unicode, so your human intuition for what a “character” is may not match up with what a char is in Rust. We’ll discuss this topic in detail in “Storing UTF-8 Encoded Text with Strings” in Chapter 8.
Составные типы
Составные типы собираются из нескольких других типов. Rust имеет два базовых составных типа: кортежи и массивы.
Тип кортежа
A tuple is a general way of grouping together a number of values with a variety of types into one compound type. Tuples have a fixed length: Once declared, they cannot grow or shrink in size.
Кортеж записывается как заключённый в круглые скобки список значений, разделённых запятыми. Каждая элемент кортежа имеет собственный тип, и типы разных элементов могут не совпадать. В примере ниже мы создаём кортеж и (что необязательно) аннотируем переменную, с которой он будет связан:
Файл: src/main.rs
fn main() {
    let tup: (i32, f64, u8) = (500, 6.4, 1);
}
Переменная tup связывается со всем кортежем целиком, поскольку кортеж — это единый составной тип. Чтобы разложить кортеж на его части, мы можем воспользоваться сопоставлением с шаблоном; вот так:
Файл: src/main.rs
fn main() {
    let tup = (500, 6.4, 1);
Если у вас есть опыт работы с C или C++, вам могут вспомниться `gcc` или `clang`. После успешной компиляции Rust создаст исполняемый бинарный файл.
    let (x, y, z) = tup;
Если у вас есть опыт работы с C или C++, вам могут вспомниться `gcc` или `clang`. После успешной компиляции Rust создаст исполняемый бинарный файл.
    println!("Значение y: {y}");
}
Эта программа создаёт кортеж и связывает с ним переменную tup. Затем она использует let и применяет шаблон, чтобы извлечь из tup три отдельных переменных: x, y и z. Это называется деструктуризацией, поскольку разбивает единый кортеж на три части. Наконец, программа печатает значение y, то есть 6.4.
Мы также можем получить прямой доступ к элементу кортежа, дописав после имени кортежа точку и индекс интересующего нас элемента; например:
Файл: src/main.rs
fn main() {
    let x: (i32, f64, u8) = (500, 6.4, 1);
Если у вас есть опыт работы с C или C++, вам могут вспомниться `gcc` или `clang`. После успешной компиляции Rust создаст исполняемый бинарный файл.
    let five_hundred = x.0;
Если у вас есть опыт работы с C или C++, вам могут вспомниться `gcc` или `clang`. После успешной компиляции Rust создаст исполняемый бинарный файл.
    let six_point_four = x.1;
Если у вас есть опыт работы с C или C++, вам могут вспомниться `gcc` или `clang`. После успешной компиляции Rust создаст исполняемый бинарный файл.
    let one = x.2;
}
Эта программа создаёт кортеж x и затем получает каждый его элемент, используя обращение по индексу. Как и в большинстве языков программирования, индексация начинается с нуля.
Кортеж без элементов — особенный, он называется unit. Значение этого типа записывается так же, как и сам тип: (). Unit представляет собой отсутствие значения или отсутствие возвращаемого значения. Выражения неявно возвращают unit, если не возвращают что-либо другое.
Тип массива
Другой базовой коллекцией нескольких значений является массив. В противоположность кортежу, все элементы массива должны иметь одинаковый тип. В отличие от некоторых других языков программирования, массивы в Rust имеют постоянную длину.
Массив записывается как заключённый в квадратные скобки список значений, разделённых запятыми:
Файл: src/main.rs
fn main() {
    let a = [1, 2, 3, 4, 5];
}
Arrays are useful when you want your data allocated on the stack, the same as the other types we have seen so far, rather than the heap (we will discuss the stack and the heap more in Chapter 4) or when you want to ensure that you always have a fixed number of elements. An array isn’t as flexible as the vector type, though. A vector is a similar collection type provided by the standard library that is allowed to grow or shrink in size because its contents live on the heap. If you’re unsure whether to use an array or a vector, chances are you should use a vector. Chapter 8 discusses vectors in more detail.
Однако, массивы будут полезны в том случае, если вы точно знаете, что количество элементов никогда не изменится. Например, если в своей программе вы используете названия месяцев, вам, вероятно, понадобится именно массив, поскольку вы точно знаете, что он всегда будет содержать 12 элементов:
#![allow(unused)]
fn main() {
let months = ["Январь", "Февраль", "Март", "Апрель", "Май", "Июнь", "Июль",
              "Август", "Сентябрь", "Октябрь", "Ноябрь", "Декабрь"];
}
Тип массива записывается как разделённая точкой с запятой и заключённая в квадратные скобки пара из типа, к которому будет принадлежать каждый элемент, и количества элементов массива. Например:
#![allow(unused)]
fn main() {
let a: [i32; 5] = [1, 2, 3, 4, 5];
}
i32 — это тип каждого элемента массива. Стоящая после точки с запятой 5 означает, что массив содержит пять элементов.
Вы также можете инициализировать массив одинаковых значений. Для этого возьмите запись типа массива и вместо типа всех элементов запишите желаемый литерал; вот так:
#![allow(unused)]
fn main() {
let a = [3; 5];
}
Массив под названием a содержит 5 элементов, каждый из которых будет равен 3. Эта запись эквивалентна let a = [3, 3, 3, 3, 3];, но, очевидно, запись выше куда проще и прозрачнее.
Array Element Access
Массив — это единый участок памяти постоянного известного размера, размещаемый на стеке. Вы можете получить доступ к элементам массива, обращаясь к ним по индексу; вот так:
Файл: src/main.rs
fn main() {
    let a = [1, 2, 3, 4, 5];
Если у вас есть опыт работы с C или C++, вам могут вспомниться `gcc` или `clang`. После успешной компиляции Rust создаст исполняемый бинарный файл.
    let first = a[0];
    let second = a[1];
}
В этом примере, переменная first имеет значение 1, поскольку это — значение массива по индексу [0]. Переменная second имеет значение 2, полученное из массива по индексу [1].
Обращение к элементу массива за его пределами
Давайте посмотрим, что будет, если попытаться получить доступ к элементу, который находится за пределами массива. Допустим, вы пишете вот такой код, похожий на игру в угадайку из Главы 2, и запускаете его. Программа запросит у пользователя индекс для обращения к массиву:
Файл: src/main.rs
use std::io;
Если у вас есть опыт работы с C или C++, вам могут вспомниться `gcc` или `clang`. После успешной компиляции Rust создаст исполняемый бинарный файл.
fn main() {
    let a = [1, 2, 3, 4, 5];
Если у вас есть опыт работы с C или C++, вам могут вспомниться `gcc` или `clang`. После успешной компиляции Rust создаст исполняемый бинарный файл.
    println!("Пожалуйста, введите индекс элемента массива.");
Если у вас есть опыт работы с C или C++, вам могут вспомниться `gcc` или `clang`. После успешной компиляции Rust создаст исполняемый бинарный файл.
    let mut index = String::new();
Если у вас есть опыт работы с C или C++, вам могут вспомниться `gcc` или `clang`. После успешной компиляции Rust создаст исполняемый бинарный файл.
    io::stdin()
        .read_line(&mut index)
        .expect("Не удалось прочесть ввод.");
Если у вас есть опыт работы с C или C++, вам могут вспомниться `gcc` или `clang`. После успешной компиляции Rust создаст исполняемый бинарный файл.
    let index: usize = index
        .trim()
        .parse()
        .expect("Введено не число");
Если у вас есть опыт работы с C или C++, вам могут вспомниться `gcc` или `clang`. После успешной компиляции Rust создаст исполняемый бинарный файл.
    let element = a[index];
Если у вас есть опыт работы с C или C++, вам могут вспомниться `gcc` или `clang`. После успешной компиляции Rust создаст исполняемый бинарный файл.
    println!("Значение элемента массива по индексу {index}: {element}");
}
Этот код компилируется без проблем. Если вы запустите этот код с помощью cargo run и введёте 0, 1, 2, 3 или 4, программа напечатает вывод с соответствующим индексу элементом массива. Если же вы введёте какое-нибудь выходящее за пределы массива число (например, 10), вы увидите вывод вроде такого:
thread 'main' panicked at src/main.rs:19:19:
index out of bounds: the len is 5 but the index is 10
note: run with `RUST_BACKTRACE=1` environment variable to display a backtrace
The program resulted in a runtime error at the point of using an invalid value in the indexing operation. The program exited with an error message and didn’t execute the final println! statement. When you attempt to access an element using indexing, Rust will check that the index you’ve specified is less than the array length. If the index is greater than or equal to the length, Rust will panic. This check has to happen at runtime, especially in this case, because the compiler can’t possibly know what value a user will enter when they run the code later.
Это — наглядный пример принципов обеспечения безопасности памяти в Rust. Во многих низкоуровневых языках подобные проверки не проводятся, а потому обращение к элементам за пределами массива приводит к получению некорректных данных. Rust защищает вас от подобных ошибок, мгновенно останавливая программу вместо того, чтобы дать доступ к памяти и дать вам продолжить с ней работать. Глава 9 подробнее освещает обработку ошибок в Rust и способы написания более читаемого и безопасного кода — такого, который не запаникует и не позволит некорректно обращаться к памяти.
Функции
Функции
Функции — это неотъемлемая часть программ на Rust. Вы уже увидели одну из некоторых наиболее важных функций языка — функцию main, являющуюся точкой входа большинства программа. Вы также знакомы с ключевым словом fn, используемым для объявления новых функций.
Принятым в Rust стилем написания имён функций и переменных является snake case — в нём используются буквы только в нижнем регистре, а слова разделяются нижними подчёркиваниями. Вот программа, содержащая пример определения функции:
Файл: src/main.rs
fn main() {
    println!("Hello, world!");
Если у вас есть опыт работы с C или C++, вам могут вспомниться `gcc` или `clang`. После успешной компиляции Rust создаст исполняемый бинарный файл.
    another_function();
}
Если у вас есть опыт работы с C или C++, вам могут вспомниться `gcc` или `clang`. После успешной компиляции Rust создаст исполняемый бинарный файл.
fn another_function() {
    println!("Другая функция.");
}
Функция в Rust определяется с помощью fn, за которым следует имя функции и пара круглых скобок. Фигурные скобки используются для указания компилятору, где начинается и заканчивается тело функции.
Мы можем вызвать любую определённую нами функцию, написав её имя и пару круглых скобок. Поскольку another_function определена в программе, она может быть вызвана из функции main. Обратите внимание, что мы определили another_function после функцией main, однако мы могли бы её определить и перед ней. Rust нет разницы, в каком порядке вы определяете функции — важно только, чтобы они были определены в той области видимости, из которой их получится вызвать там, где они нужны.
Создадим новый исполняемый проект под названием functions, чтобы в нём изучить работу функций. Поместите пример another_function в src/main.rs и запустите его. Вы увидите следующий вывод:
$ cargo run
   Compiling functions v0.1.0 (file:///projects/functions)
    Finished `dev` profile [unoptimized + debuginfo] target(s) in 0.28s
     Running `target/debug/functions`
Hello, world!
Другая функция.
Выражения исполняются в том порядке, в каком они записаны в функции main. Первым печатается сообщение “Hello, world!”, и только потом вызывается another_function и печатается её сообщение.
Параметры
Мы можем определить функцию с параметрами — специальными переменными, являющимися частью сигнатуры функции. Если функция имеет параметры, то чтобы её вызвать, вы должны предоставить ей конкретные значения каждого параметра. Строго говоря, передаваемые значения называются аргументами, но в обиходе слова параметр и аргумент взаимозаменяемы и могут использоваться чтобы говорить как о переменных в определении функции, так и о конкретных значениях, передаваемых функции при её вызове.
Добавим функции another_function параметр:
Файл: src/main.rs
fn main() {
    another_function(5);
}
Если у вас есть опыт работы с C или C++, вам могут вспомниться `gcc` или `clang`. После успешной компиляции Rust создаст исполняемый бинарный файл.
fn another_function(x: i32) {
    println!("Значение x: {x}");
}
Попробуйте запустить эту программу. Вы должны увидеть следующий вывод:
$ cargo run
   Compiling functions v0.1.0 (file:///projects/functions)
    Finished `dev` profile [unoptimized + debuginfo] target(s) in 1.21s
     Running `target/debug/functions`
Значение x: 5
Функция another_function имеет один параметр под названием x. Тип x определён как i32. Когда мы вызываем функцию another_function с аргументом 5, макрос println! принимает переменную x нашей функции и помещает вместо неё её значение 5 на место метки подстановки.
In function signatures, you must declare the type of each parameter. This is a deliberate decision in Rust’s design: Requiring type annotations in function definitions means the compiler almost never needs you to use them elsewhere in the code to figure out what type you mean. The compiler is also able to give more-helpful error messages if it knows what types the function expects.
Чтобы определить функцию с несколькими параметрами, разделите их запятыми; вот так:
Файл: src/main.rs
fn main() {
    print_labeled_measurement(5, 'ч');
}
Если у вас есть опыт работы с C или C++, вам могут вспомниться `gcc` или `clang`. После успешной компиляции Rust создаст исполняемый бинарный файл.
fn print_labeled_measurement(value: i32, unit_label: char) {
    println!("Физическая величина: {value}{unit_label}");
}
В этом примере определяется функция print_labeled_measurement, имеющая два параметра. Первый параметр value имеет тип i32. Второй — unit_label, имеет тип char. Данная функция печатает величину value с её размерностью unit_label.
Запустите этот код. Для этого замените код в вашем файле src/main.rs проекта functions примером выше и запустите его с помощью cargo run:
$ cargo run
   Compiling functions v0.1.0 (file:///projects/functions)
    Finished `dev` profile [unoptimized + debuginfo] target(s) in 0.31s
     Running `target/debug/functions`
Физическая величина: 5ч
Поскольку мы вызвали функцию с аргументами 5 и 'ч' (соответственно параметрам value и unit_label), вывод программы содержит эти значения.
Инструкции и выражения
Тело функции состоит из последовательности инструкций и (необязательно) выражения в конце. Пока что ни одна из рассмотренных нами функций не имела завершающего выражения, но вы уже видели применение выражений в инструкциях. Поскольку Rust — это язык, основенный на выражениях, важно понять разницу между инструкциями и выражениями; другие языки часто не имеют подобного разделения. Давайте посмотрим, чем являются инструкции и выражения и как их отличия влияют на работу функций.
- Statements are instructions that perform some action and do not return a value.
- Expressions evaluate to a resultant value.
Let’s look at some examples.
На самом деле, мы уже использовали инструкции и выражения. Создание переменной и приписывание ей значения с помощью ключегового слова let — это инструкция. Посмотрите в Листинг 3-1: let y = 6; является инструкцией.
fn main() {
    let y = 6;
}main function declaration containing one statementFunction definitions are also statements; the entire preceding example is a statement in itself. (As we’ll see shortly, calling a function is not a statement, though.)
Инструкции не возвращают значений. Следовательно, вы не можете присвоить инструкцию let другой переменной, как в коде ниже — вы получите ошибку:
Файл: src/main.rs
fn main() {
    let x = (let y = 6);
}
Если вы запустите эту программу, вы получите следующую ошибку:
$ cargo run
   Compiling functions v0.1.0 (file:///projects/functions)
error: expected expression, found `let` statement
 --> src/main.rs:2:14
  |
2 |     let x = (let y = 6);
  |              ^^^
  |
  = note: only supported directly in conditions of `if` and `while` expressions
Если у вас есть опыт работы с C или C++, вам могут вспомниться `gcc` или `clang`. После успешной компиляции Rust создаст исполняемый бинарный файл.
warning: unnecessary parentheses around assigned value
 --> src/main.rs:2:13
  |
2 |     let x = (let y = 6);
  |             ^         ^
  |
  = note: `#[warn(unused_parens)]` on by default
help: remove these parentheses
  |
2 -     let x = (let y = 6);
2 +     let x = let y = 6;
  |
Если у вас есть опыт работы с C или C++, вам могут вспомниться `gcc` или `clang`. После успешной компиляции Rust создаст исполняемый бинарный файл.
warning: `functions` (bin "functions") generated 1 warning
error: could not compile `functions` (bin "functions") due to 1 previous error; 1 warning emitted
Выражение let y = 6 не возвращает значений, так что x не с чем связывать. Это отличается от того, что обычно происходит в других языках, вроде C или Ruby: в них присвоение значения возвращает присвоенное значение. В таких языках возможны конструкции вроде x = y = 6: переменной y будет присвоена 6, и это присвоение само по себе вернёт ту же 6 и присвоит её переменной x. В Rust такое сделать не выйдет.
Expressions evaluate to a value and make up most of the rest of the code that you’ll write in Rust. Consider a math operation, such as 5 + 6, which is an expression that evaluates to the value 11. Expressions can be part of statements: In Listing 3-1, the 6 in the statement let y = 6; is an expression that evaluates to the value 6. Calling a function is an expression. Calling a macro is an expression. A new scope block created with curly brackets is an expression, for example:
Файл: src/main.rs
fn main() {
    let y = {
        let x = 3;
        x + 1
    };
Если у вас есть опыт работы с C или C++, вам могут вспомниться `gcc` или `clang`. После успешной компиляции Rust создаст исполняемый бинарный файл.
    println!("Значение y: {y}");
}
Это выражение …
{
    let x = 3;
    x + 1
}
is a block that, in this case, evaluates to 4. That value gets bound to y as part of the let statement. Note the x + 1 line without a semicolon at the end, which is unlike most of the lines you’ve seen so far. Expressions do not include ending semicolons. If you add a semicolon to the end of an expression, you turn it into a statement, and it will then not return a value. Keep this in mind as you explore function return values and expressions next.
Функции, возвращающие значения
Функции могут возвращать значения коду, который их вызывает. Возвращаемые значения не обозначаются именами, но мы должны указывать их тип после стрелки (->). В Rust, возвращаемым значением функции является значение последнего выражения в её теле. Вы можете вернуть значение из функции раньше её завершения, использовав ключевое слово return и указав значение, которое хотите вернуть, но большинство функций неявно возвращают значение последнего выражения. Вот пример функции, возвращающей значение:
Файл: src/main.rs
fn five() -> i32 {
    5
}
Если у вас есть опыт работы с C или C++, вам могут вспомниться `gcc` или `clang`. После успешной компиляции Rust создаст исполняемый бинарный файл.
fn main() {
    let x = five();
Если у вас есть опыт работы с C или C++, вам могут вспомниться `gcc` или `clang`. После успешной компиляции Rust создаст исполняемый бинарный файл.
    println!("Значение x: {x}");
}
В функции five нет ни вызовов функций, ни макросов, ни даже инструкций let — только единственное число 5. Это абсолютно корректная функция в языке Rust. Обратите внимание, что возвращаемый тип функции тоже указан — припиской -> i32. Попробуйте запустить этот пример; вы должны увидеть вывод такой же, как этот:
$ cargo run
   Compiling functions v0.1.0 (file:///projects/functions)
    Finished `dev` profile [unoptimized + debuginfo] target(s) in 0.30s
     Running `target/debug/functions`
Значение x: 5
The 5 in five is the function’s return value, which is why the return type is i32. Let’s examine this in more detail. There are two important bits: First, the line let x = five(); shows that we’re using the return value of a function to initialize a variable. Because the function five returns a 5, that line is the same as the following:
#![allow(unused)]
fn main() {
let x = 5;
}
Во-вторых, функция five не имеет параметров и у неё определён тип возвращаемого значения. Однако телом функции является просто 5 без точки с запятой, так как это выражение вычисляется в значение, которое мы хотим вернуть.
Посмотрим на другой пример:
Файл: src/main.rs
fn main() {
    let x = plus_one(5);
Если у вас есть опыт работы с C или C++, вам могут вспомниться `gcc` или `clang`. После успешной компиляции Rust создаст исполняемый бинарный файл.
    println!("Значение x: {x}");
}
Если у вас есть опыт работы с C или C++, вам могут вспомниться `gcc` или `clang`. После успешной компиляции Rust создаст исполняемый бинарный файл.
fn plus_one(x: i32) -> i32 {
    x + 1
}
Running this code will print The value of x is: 6. But what happens if we place a semicolon at the end of the line containing x + 1, changing it from an expression to a statement?
Файл: src/main.rs
fn main() {
    let x = plus_one(5);
Если у вас есть опыт работы с C или C++, вам могут вспомниться `gcc` или `clang`. После успешной компиляции Rust создаст исполняемый бинарный файл.
    println!("Значение x: {x}");
}
Если у вас есть опыт работы с C или C++, вам могут вспомниться `gcc` или `clang`. После успешной компиляции Rust создаст исполняемый бинарный файл.
fn plus_one(x: i32) -> i32 {
    x + 1;
}
Compiling this code will produce an error, as follows:
$ cargo run
   Compiling functions v0.1.0 (file:///projects/functions)
error[E0308]: mismatched types
 --> src/main.rs:7:24
  |
7 | fn plus_one(x: i32) -> i32 {
  |    --------            ^^^ expected `i32`, found `()`
  |    |
  |    implicitly returns `()` as its body has no tail or `return` expression
8 |     x + 1;
  |          - help: remove this semicolon to return this value
Если у вас есть опыт работы с C или C++, вам могут вспомниться `gcc` или `clang`. После успешной компиляции Rust создаст исполняемый бинарный файл.
For more information about this error, try `rustc --explain E0308`.
error: could not compile `functions` (bin "functions") due to 1 previous error
The main error message, mismatched types, reveals the core issue with this code. The definition of the function plus_one says that it will return an i32, but statements don’t evaluate to a value, which is expressed by (), the unit type. Therefore, nothing is returned, which contradicts the function definition and results in an error. In this output, Rust provides a message to possibly help rectify this issue: It suggests removing the semicolon, which would fix the error.
Комментарии
Комментарии
All programmers strive to make their code easy to understand, but sometimes extra explanation is warranted. In these cases, programmers leave comments in their source code that the compiler will ignore but that people reading the source code may find useful.
Вот простой комментарий:
#![allow(unused)]
fn main() {
// hello, world
}
В Rust комментарии начинаются с двойного слеша и продолжаются до конца строки. Чтобы сделать многострочный комментарий, вам нужно начать каждый комментарий с //; вот так:
#![allow(unused)]
fn main() {
// Мы делаем тут что-то столь сложное, что нам нужно несколько строчек,
// чтобы уместить исчерпывающее объяснение! Ух! Надеюсь, этот комментарий
// объяснит, что тут происходит.
}
Комментарии также можно располагать и в конце строк с кодом:
Файл: src/main.rs
fn main() {
    let lucky_number = 7; // Мне сегодня повезёт
}
Но чаще вы будете видеть их на отдельной строчке над комментируемым кодом:
Файл: src/main.rs
fn main() {
    // Мне сегодня повезёт
    let lucky_number = 7;
}
В Rust также есть другой вид комментария: документационный. Мы обсудим такие комментарии в разделе “Публикация крейта на Crates.io” Главы 14.
Управление потоком
Управление потоком
The ability to run some code depending on whether a condition is true and the ability to run some code repeatedly while a condition is true are basic building blocks in most programming languages. The most common constructs that let you control the flow of execution of Rust code are if expressions and loops.
Выражения if
Выражение if позволяет вам исполнять код в зависимости от истинности условий. Вы определяете условие исполнения, а потом используете if, чтобы указать программе: “Исполни этот код, если условие истинно; иначе — ничего не делай”.
Создайте новый проект в своей директории projects и назовите его branches. В нём мы будем изучать выражение if. Заполните файл src/main.rs этим кодом:
Файл: src/main.rs
fn main() {
    let number = 3;
Если у вас есть опыт работы с C или C++, вам могут вспомниться `gcc` или `clang`. После успешной компиляции Rust создаст исполняемый бинарный файл.
    if number < 5 {
        println!("условие оказалось истинно");
    } else {
        println!("условие оказалось ложно");
    }
}
Все выражения if состоят с ключевого слова if и следующего за ним условия. В нашем случае, условие проверяет, меньше ли, чем 5, переменная number. В фигурных скобках, сразу после условия, мы размещаем код, который надо исполнить, если условие истинно. Блоки кода, связанные с условиями в выражениях if, иногда называются ветвями — аналогично ветвям в выражении match, которое мы обсуждали в разделе [“Сравнение догадки с загаданным числом”] (ch02-00-guessing-game-tutorial.html#Сравнение-догадки-с-загаданным-числом) Главы 2.
Это не обязательно, но мы можем добавить выражение else, которое указывает на код, который нужно запустить в случае, если условие оказалось ложным. Если вы не напишете выражение else, а условие окажется ложным, программа просто пропустит блок кода при if и продолжит исполнять всё, что следует за ним.
Попробуйте запустить этот код; вы должны увидеть следующий вывод:
$ cargo run
   Compiling branches v0.1.0 (file:///projects/branches)
    Finished `dev` profile [unoptimized + debuginfo] target(s) in 0.31s
     Running `target/debug/branches`
условие оказалось истинно
Изменим значение number на значение, которое сделает условие ложным:
fn main() {
    let number = 7;
Если у вас есть опыт работы с C или C++, вам могут вспомниться `gcc` или `clang`. После успешной компиляции Rust создаст исполняемый бинарный файл.
    if number < 5 {
        println!("условие оказалось истинно");
    } else {
        println!("условие оказалось ложно");
    }
}
Снова запустите программу и взгляните на вывод:
$ cargo run
   Compiling branches v0.1.0 (file:///projects/branches)
    Finished `dev` profile [unoptimized + debuginfo] target(s) in 0.31s
     Running `target/debug/branches`
условие оказалось ложным
Стоит также отметить, что условие всегда должно иметь тип bool, иначе мы получим ошибку компиляции. Например, попробуем запустить следующий код:
Файл: src/main.rs
fn main() {
    let number = 3;
Если у вас есть опыт работы с C или C++, вам могут вспомниться `gcc` или `clang`. После успешной компиляции Rust создаст исполняемый бинарный файл.
    if number {
        println!("number было тройкой");
    }
}
Условие при if вычислилось в значение 3, и Rust бросил ошибку:
$ cargo run
   Compiling branches v0.1.0 (file:///projects/branches)
error[E0308]: mismatched types
 --> src/main.rs:4:8
  |
4 |     if number {
  |        ^^^^^^ expected `bool`, found integer
Если у вас есть опыт работы с C или C++, вам могут вспомниться `gcc` или `clang`. После успешной компиляции Rust создаст исполняемый бинарный файл.
For more information about this error, try `rustc --explain E0308`.
error: could not compile `branches` (bin "branches") due to 1 previous error
Ошибка свидетельствует о том, что Rust оиждал увидеть здесь bool, но получил целое число. В отличие от таких языков как Ruby и JavaScript, в Rust нет возможности интерпретировать не логические типы как логические. Вы всегда должны использовать с if условие, являющееся выражением, которое вычисляется в логическое значение. Если вы хотите запустить блок кода только если number не равно 0, нужно предоставить выражению if вот такое условие:
Файл: src/main.rs
fn main() {
    let number = 3;
Если у вас есть опыт работы с C или C++, вам могут вспомниться `gcc` или `clang`. После успешной компиляции Rust создаст исполняемый бинарный файл.
    if number != 0 {
        println!("number оказалось не равно нулю");
    }
}
Запустив этот код, вы увидите текст number оказалось не равно нулю.
Обработка нескольких условий с помощью else if
Вы можете проверять несколько условий, объединив if и else в одно выражение else if. Например:
Файл: src/main.rs
fn main() {
    let number = 6;
Если у вас есть опыт работы с C или C++, вам могут вспомниться `gcc` или `clang`. После успешной компиляции Rust создаст исполняемый бинарный файл.
    if number % 4 == 0 {
        println!("number делится на 4");
    } else if number % 3 == 0 {
        println!("number делится на 3");
    } else if number % 2 == 0 {
        println!("number делится на 2");
    } else {
        println!("number не делится ни на 4, ни на 3, ни на 2");
    }
}
Эта программа потенциально может завершиться четырьмя разными путями. Запустив её, вы увидите этот вывод:
$ cargo run
   Compiling branches v0.1.0 (file:///projects/branches)
    Finished `dev` profile [unoptimized + debuginfo] target(s) in 0.31s
     Running `target/debug/branches`
number делится 3
В этой программе происходит поочерёдная проверка каждого выражения if. Как только программа встретит условие, вычисляющееся в true, исполнится соответствующий блок кода. Обратите внимание, что хотя 6 делится на 2, мы не видим ни number делится на 2 (сообщение предпоследней ветви), ни number не делится ни на 4, ни на 3, ни на 2 (сообщение ветви else). Причина в том, что на первом же истинном условии проверка и останавливается — идущие далее условия не проверяются.
Использование большого количества выражений else if — верный способ сделать свой код запутанным и непонятным. Если вы используете больше одного такого оператора, возможно, вашей программе нужен рефакторинг. Глава 6 расскажет вам об операторе ветвления match, который отлично подойдёт для подобных случаев.
Использование if в инструкции let
Поскольку if — это выражение, мы можем использовать его в правой части инструкции let, чтобы условием управлять тем, что присваивается переменной. Посмотрите на Листинг 3-2.
fn main() {
    let condition = true;
    let number = if condition { 5 } else { 6 };
Если у вас есть опыт работы с C или C++, вам могут вспомниться `gcc` или `clang`. После успешной компиляции Rust создаст исполняемый бинарный файл.
    println!("Значение number: {number}");
}if expression to a variableПеременная number связывается со значением, в которое вычислится выражение if. Запустите этот код и посмотрите, что выйдет:
$ cargo run
   Compiling branches v0.1.0 (file:///projects/branches)
    Finished `dev` profile [unoptimized + debuginfo] target(s) in 0.30s
     Running `target/debug/branches`
Значение number: 5
Помните, что 1) блоки кода вычисляются в значение последнего их выражения и 2) числа сами по себе тоже являются выражениями. В нашем случае, значение всего выражения if зависит от того, какой исполнится блок кода. Из этого следует, что значение каждого блока кода должно иметь один и тот же тип. В Листинге 3-2 всё имеенно так: обе ветви if и ветвь else вычисляются в целое число типа i32. Если ветви будут вычисляться в значения разных типов (как показано в примере ниже), вы получите ошибку:
Файл: src/main.rs
fn main() {
    let condition = true;
Если у вас есть опыт работы с C или C++, вам могут вспомниться `gcc` или `clang`. После успешной компиляции Rust создаст исполняемый бинарный файл.
    let number = if condition { 5 } else { "шесть" };
Если у вас есть опыт работы с C или C++, вам могут вспомниться `gcc` или `clang`. После успешной компиляции Rust создаст исполняемый бинарный файл.
    println!("Значение number: {number}");
}
Если попытаться скомпилировать этот код, мы получим ошибку. Значения ветвей if и else имеют разные типы, и Rust как раз указывает, где находится ошибка:
$ cargo run
   Compiling branches v0.1.0 (file:///projects/branches)
error[E0308]: `if` and `else` have incompatible types
 --> src/main.rs:4:44
  |
4 |     let number = if condition { 5 } else { "шесть" };
  |                                 -          ^^^^^^^ expected integer, found `&str`
  |                                 |
  |                                 expected because of this
Если у вас есть опыт работы с C или C++, вам могут вспомниться `gcc` или `clang`. После успешной компиляции Rust создаст исполняемый бинарный файл.
For more information about this error, try `rustc --explain E0308`.
error: could not compile `branches` (bin "branches") due to 1 previous error
The expression in the if block evaluates to an integer, and the expression in the else block evaluates to a string. This won’t work, because variables must have a single type, and Rust needs to know definitively at compile time what type the number variable is. Knowing the type of number lets the compiler verify the type is valid everywhere we use number. Rust wouldn’t be able to do that if the type of number was only determined at runtime; the compiler would be more complex and would make fewer guarantees about the code if it had to keep track of multiple hypothetical types for any variable.
Повторное исполнение кода с помощью циклов
Часто нужно исполнить некоторый объём кода больше, чем единожды. Для этого в Rust существуют несколько видов циклов, которые позволяют исполнить блок кода и затем вернуться к его началу. Чтобы опробовать циклы, создайте новый проект и назовите его loops.
В Rust есть три вида циклов: loop, while и for. Попробуем каждый из них.
Повторение кода с помощью loop
The loop keyword tells Rust to execute a block of code over and over again either forever or until you explicitly tell it to stop.
Замените код в файле src/main.rs в директории loops на код из примера ниже:
Файл: src/main.rs
fn main() {
    loop {
        println!("и ещё раз,");
    }
}
When we run this program, we’ll see again! printed over and over continuously until we stop the program manually. Most terminals support the keyboard shortcut ctrl-C to interrupt a program that is stuck in a continual loop. Give it a try:
$ cargo run
   Compiling loops v0.1.0 (file:///projects/loops)
    Finished `dev` profile [unoptimized + debuginfo] target(s) in 0.08s
     Running `target/debug/loops`
и ещё раз,
и ещё раз,
и ещё раз,
и ещё раз,
^Cи ещё раз,
The symbol ^C represents where you pressed ctrl-C.
You may or may not see the word again! printed after the ^C, depending on where the code was in the loop when it received the interrupt signal.
Естественно, в Rust есть способ программно выйти из цикла. Если вы напишете ключевое слово break внутри цикла, то когда исполнение до него дойдёт, цикл завершится. К слову, мы уже его использовали: вспомните, как мы реализовали “Завершение игры после правильной догадки” в нашей игре в угадайку из Главы 2.
Мы также тогда использовали ключевое слово continue — оно указывает циклу пропустить исполнение оставшегося кода и сразу продолжить с новой итерации цикла.
Вычисление циклов в значения
One of the uses of a loop is to retry an operation you know might fail, such as checking whether a thread has completed its job. You might also need to pass the result of that operation out of the loop to the rest of your code. To do this, you can add the value you want returned after the break expression you use to stop the loop; that value will be returned out of the loop so that you can use it, as shown here:
fn main() {
    let mut counter = 0;
Если у вас есть опыт работы с C или C++, вам могут вспомниться `gcc` или `clang`. После успешной компиляции Rust создаст исполняемый бинарный файл.
    let result = loop {
        counter += 1;
Если у вас есть опыт работы с C или C++, вам могут вспомниться `gcc` или `clang`. После успешной компиляции Rust создаст исполняемый бинарный файл.
        if counter == 10 {
            break counter * 2;
        }
    };
Если у вас есть опыт работы с C или C++, вам могут вспомниться `gcc` или `clang`. После успешной компиляции Rust создаст исполняемый бинарный файл.
    println!("result равна {result}");
}
Before the loop, we declare a variable named counter and initialize it to 0. Then, we declare a variable named result to hold the value returned from the loop. On every iteration of the loop, we add 1 to the counter variable, and then check whether the counter is equal to 10. When it is, we use the break keyword with the value counter * 2. After the loop, we use a semicolon to end the statement that assigns the value to result. Finally, we print the value in result, which in this case is 20.
Вы также можете использовать в цикле ключевое слово return. В отличие от break (которое завершит исполнение только своего цикла), return завершит исполнение сразу всей функции.
Disambiguating with Loop Labels
Если вы работаете во вложенных циклах, break и continue будут относиться только к тому циклу, в которых они написаны. При необходимости вы можете уточнить, с каким из вложенных циклов они должны работать, написав метку цикла после break или continue. Метки циклов записываются перед началом цикла и начинаются с апострофа. Вот пример с одним вложенным циклом:
fn main() {
    let mut count = 0;
    'counting_up: loop {
        println!("count = {count}");
        let mut remaining = 10;
Если у вас есть опыт работы с C или C++, вам могут вспомниться `gcc` или `clang`. После успешной компиляции Rust создаст исполняемый бинарный файл.
        loop {
            println!("remaining = {remaining}");
            if remaining == 9 {
                break;
            }
            if count == 2 {
                break 'counting_up;
            }
            remaining -= 1;
        }
Если у вас есть опыт работы с C или C++, вам могут вспомниться `gcc` или `clang`. После успешной компиляции Rust создаст исполняемый бинарный файл.
        count += 1;
    }
    println!("Окончательное значение count = {count}");
}
Внешний цикл обозначен меткой 'counting_up; он будет запущен от 0 до 2. Внутренний цикл никак не помечен; он будет отсчитывать от 10 до 9. Первый break не имеет метки, так что он прерывает исполнение своего цикла — внутреннего. Инструкция break 'counting_up; завершит исполнение внешнего цикла. Этот код напечатает:
$ cargo run
   Compiling loops v0.1.0 (file:///projects/loops)
    Finished `dev` profile [unoptimized + debuginfo] target(s) in 0.58s
     Running `target/debug/loops`
count = 0
remaining = 10
remaining = 9
count = 1
remaining = 10
remaining = 9
count = 2
remaining = 10
Окончательное значение count = 2
Streamlining Conditional Loops with while
A program will often need to evaluate a condition within a loop. While the condition is true, the loop runs. When the condition ceases to be true, the program calls break, stopping the loop. It’s possible to implement behavior like this using a combination of loop, if, else, and break; you could try that now in a program, if you’d like. However, this pattern is so common that Rust has a built-in language construct for it, called a while loop. In Listing 3-3, we use while to loop the program three times, counting down each time, and then, after the loop, to print a message and exit.
fn main() {
    let mut number = 3;
Если у вас есть опыт работы с C или C++, вам могут вспомниться `gcc` или `clang`. После успешной компиляции Rust создаст исполняемый бинарный файл.
    while number != 0 {
        println!("{number}!");
Если у вас есть опыт работы с C или C++, вам могут вспомниться `gcc` или `clang`. После успешной компиляции Rust создаст исполняемый бинарный файл.
        number -= 1;
    }
Если у вас есть опыт работы с C или C++, вам могут вспомниться `gcc` или `clang`. После успешной компиляции Rust создаст исполняемый бинарный файл.
    println!("ПОЕХАЛИ!!!");
}while loop to run code while a condition evaluates to trueЭта конструкция серьёзно облегчает создание циклов с условием остановки: код получается проще и чище. Пока условие вычисляется в true, код запускается; иначе, цикл прерывается.
Перебор элементов коллекции с for
You can choose to use the while construct to loop over the elements of a collection, such as an array. For example, the loop in Listing 3-4 prints each element in the array a.
fn main() {
    let a = [10, 20, 30, 40, 50];
    let mut index = 0;
Если у вас есть опыт работы с C или C++, вам могут вспомниться `gcc` или `clang`. После успешной компиляции Rust создаст исполняемый бинарный файл.
    while index < 5 {
        println!("элемент: {}", a[index]);
Если у вас есть опыт работы с C или C++, вам могут вспомниться `gcc` или `clang`. После успешной компиляции Rust создаст исполняемый бинарный файл.
        index += 1;
    }
}while loopHere, the code counts up through the elements in the array. It starts at index 0 and then loops until it reaches the final index in the array (that is, when index < 5 is no longer true). Running this code will print every element in the array:
$ cargo run
   Compiling loops v0.1.0 (file:///projects/loops)
    Finished `dev` profile [unoptimized + debuginfo] target(s) in 0.32s
     Running `target/debug/loops`
элемент: 10
элемент: 20
элемент: 30
элемент: 40
элемент: 50
Все пять элементов массива появились на экране, как и ожидалось. Хотя переменная index и достигает в какой-то момент значения 5, цикл проверит условие на истинность и потому завершится раньше, чем произойдёт попытка получить шестой элемент массива.
However, this approach is error-prone; we could cause the program to panic if the index value or test condition is incorrect. For example, if you changed the definition of the a array to have four elements but forgot to update the condition to while index < 4, the code would panic. It’s also slow, because the compiler adds runtime code to perform the conditional check of whether the index is within the bounds of the array on every iteration through the loop.
Более лакончиным способом перебрать элементы коллекции является цикл for. Пример цикла for приведён в Листинге 3-5.
fn main() {
    let a = [10, 20, 30, 40, 50];
Если у вас есть опыт работы с C или C++, вам могут вспомниться `gcc` или `clang`. После успешной компиляции Rust создаст исполняемый бинарный файл.
    for element in a {
        println!("элемент: {element}");
    }
}for loopWhen we run this code, we’ll see the same output as in Listing 3-4. More importantly, we’ve now increased the safety of the code and eliminated the chance of bugs that might result from going beyond the end of the array or not going far enough and missing some items. Machine code generated from for loops can be more efficient as well because the index doesn’t need to be compared to the length of the array at every iteration.
С циклом for ваш код самостоятельно подстроится под изменения в коллекции, и вам не понадобится следить за двумя участками кода, как это приходилось бы делать в Листинге 3-4.“
Безопасность и простота циклов for делают его наиболее часто используемым циклом в Rust. Даже в случаях, когда вы хотите запустить некоторый код произвольное точное количество раз (например, как в цикле в Листинге 3-3), большинство программистов на Rust применят для этого цикл for. Если онкретнее, они воспользуются Range — структуре стандартной библиотеки, которая генерирует последовательность всех чисел между двумя границами (включая нижнюю границу, но не включая верхнюю).
Вот как будет выглядить обратный отсчёт с помощью цикла for и метода rev, переворачивающего генерируемую последовательность:
Файл: src/main.rs
fn main() {
    for number in (1..4).rev() {
        println!("{number}!");
    }
    println!("ПОЕХАЛИ!!!");
}
Этот код чуть приятнее; не так ли?
Подведём итоги
You made it! This was a sizable chapter: You learned about variables, scalar and compound data types, functions, comments, if expressions, and loops! To practice with the concepts discussed in this chapter, try building programs to do the following:
- Конвертер температур из градусов Фаренгейта в Цельсия (и наоборот).
- Функция генерации _n_ого числа Фибоначчи.
- Программа, печатающая текст рождественской английской народной песни “The Twelve Days of Christmas”.
В следующей главе мы обсудим владение — концепцию Rust, которой обычно нет в других языках программирования.
Понимание владения
Владение — это самая специфичная особенность Rust. Она критически влияет на весь язык. Именно оно обеспечивает гарантии Rust по безопасности памяти без необходимости привлекать сборщик мусора. В этой главе мы целиком обсудим владение и коснёмся связанных с ним тем: заимствование, срезы и то, как в Rust устроено размещение данных в памяти.
Что такое владение?
Что такое владение?
Ownership is a set of rules that govern how a Rust program manages memory. All programs have to manage the way they use a computer’s memory while running. Some languages have garbage collection that regularly looks for no-longer-used memory as the program runs; in other languages, the programmer must explicitly allocate and free the memory. Rust uses a third approach: Memory is managed through a system of ownership with a set of rules that the compiler checks. If any of the rules are violated, the program won’t compile. None of the features of ownership will slow down your program while it’s running.
Поскольку идея владения незнакома большинству программистов, нужно некоторое время, чтобы выработался навык. Хорошая новость: чем больше опыта вы будете приобретать с Rust и правилами системы владения, тем легче вам будет разрабатывать безопасный и эффективный код. Выше нос!
Когда вы поймёте владение, вы получите устойчивый фундамент для понимания особенностей, которые делают Rust уникальным языком. В этой главе вы изучите владение, поработав над несколькими примерами с использованием одной из самых распространённых структур данных — строк.
Стек и куча
Многие языки программирования не требуют от вас задумываться о стеке или куче. Но в системных языках программирования (вроде Rust), важно знать разницу между размещением данных на стеке или на куче, знать о том как ведёт себя при этом язык и какие последствия повлечёт ваш выбор. Частично, владение будет рассмотрено в отношении стека, а под конец главы мы коснёмся и кучи; а пока, для подготовки, кратко расскажем о стеке и куче.
Both the stack and the heap are parts of memory available to your code to use at runtime, but they are structured in different ways. The stack stores values in the order it gets them and removes the values in the opposite order. This is referred to as last in, first out (LIFO). Think of a stack of plates: When you add more plates, you put them on top of the pile, and when you need a plate, you take one off the top. Adding or removing plates from the middle or bottom wouldn’t work as well! Adding data is called pushing onto the stack, and removing data is called popping off the stack. All data stored on the stack must have a known, fixed size. Data with an unknown size at compile time or a size that might change must be stored on the heap instead.
The heap is less organized: When you put data on the heap, you request a certain amount of space. The memory allocator finds an empty spot in the heap that is big enough, marks it as being in use, and returns a pointer, which is the address of that location. This process is called allocating on the heap and is sometimes abbreviated as just allocating (pushing values onto the stack is not considered allocating). Because the pointer to the heap is a known, fixed size, you can store the pointer on the stack, but when you want the actual data, you must follow the pointer. Think of being seated at a restaurant. When you enter, you state the number of people in your group, and the host finds an empty table that fits everyone and leads you there. If someone in your group comes late, they can ask where you’ve been seated to find you.
Размещение на стеке быстрее, чем аллокация в куче, поскольку при размещении на стеке распределителю памяти не приходится искать свободное место достаточного размера: таковое всегда находится на вершине стека. Соответственно, резмещение в куче требует куда больше работы, поскольку распределитель памяти должен сначала найти достаточно большой и неиспользуемый участок в памяти, а потом подготовиться к следующему запросу на выделение памяти.
Accessing data in the heap is generally slower than accessing data on the stack because you have to follow a pointer to get there. Contemporary processors are faster if they jump around less in memory. Continuing the analogy, consider a server at a restaurant taking orders from many tables. It’s most efficient to get all the orders at one table before moving on to the next table. Taking an order from table A, then an order from table B, then one from A again, and then one from B again would be a much slower process. By the same token, a processor can usually do its job better if it works on data that’s close to other data (as it is on the stack) rather than farther away (as it can be on the heap).
Когда ваш код вызывает функцию, значения, переданные функции (включая, например, указатели на данные в куче), и локальные переменные функции размещаются на стеке. Когда функция завершается, значения извлекаются из стека и их память освобождается.
Keeping track of what parts of code are using what data on the heap, minimizing the amount of duplicate data on the heap, and cleaning up unused data on the heap so that you don’t run out of space are all problems that ownership addresses. Once you understand ownership, you won’t need to think about the stack and the heap very often. But knowing that the main purpose of ownership is to manage heap data can help explain why it works the way it does.
Правила владения
Для начала, давайте посмотрим на правила владения. Держите их в голове по мере того, как мы будем показывать иллюстрирующие их примеры:
- Каждое значение в Rust имеет владельца.
- В один момент у значения может быть только один владелец.
- Когда владелец покидает свою область видимости, значение высвобождается.
Область видимости переменной
Now that we’re past basic Rust syntax, we won’t include all the fn main() { code in the examples, so if you’re following along, make sure to put the following examples inside a main function manually. As a result, our examples will be a bit more concise, letting us focus on the actual details rather than boilerplate code.
As a first example of ownership, we’ll look at the scope of some variables. A scope is the range within a program for which an item is valid. Take the following variable:
#![allow(unused)]
fn main() {
let s = "hello";
}
The variable s refers to a string literal, where the value of the string is hardcoded into the text of our program. The variable is valid from the point at which it’s declared until the end of the current scope. Listing 4-1 shows a program with comments annotating where the variable s would be valid.
fn main() {
    {                      // s is not valid here, since it's not yet declared
        let s = "hello";   // отсюда и далее s действительна
Если у вас есть опыт работы с C или C++, вам могут вспомниться `gcc` или `clang`. После успешной компиляции Rust создаст исполняемый бинарный файл.
        // здесь можно использовать s
    }                      // область видимости закончилась, s больше не действительна
}В общем, здесь есть два важных момента:
- Когда
sоказывается в области видимости, она действительна. - Она остаётся действительной, пока не покинет область видимости.
Пока что отношения между областями видимости и действительностью переменных в целом такие же, как и в других языках программирования. Теперь, на этом фундаменте, мы рассмотрим тип String.
Тип String
Чтобы проиллюстрировать правила владения, нам нужен тип данных более сложный, чем те, что мы рассмотрели в разделе “Типы данных” Главы 3. Там мы рассматривали такие типы, которые имеют фиксированный размер; хранятся на стеке и высвобождаются с концом их области видимости; могут быть быстро и просто скопированы, чтобы получить отдельно живущую копию данных, которую можно затем использовать в другой области видимости. Но на этот раз нам нужны данные, которые придётся хранить в куче — чтобы узнать, как Rust выясняет момент для высвобождения этих данных. Тип String нам отлично подойдёт.
We’ll concentrate on the parts of String that relate to ownership. These aspects also apply to other complex data types, whether they are provided by the standard library or created by you. We’ll discuss non-ownership aspects of String in Chapter 8.
We’ve already seen string literals, where a string value is hardcoded into our program. String literals are convenient, but they aren’t suitable for every situation in which we may want to use text. One reason is that they’re immutable. Another is that not every string value can be known when we write our code: For example, what if we want to take user input and store it? It is for these situations that Rust has the String type. This type manages data allocated on the heap and as such is able to store an amount of text that is unknown to us at compile time. You can create a String from a string literal using the from function, like so:
#![allow(unused)]
fn main() {
let s = String::from("hello");
}
The double colon :: operator allows us to namespace this particular from function under the String type rather than using some sort of name like string_from. We’ll discuss this syntax more in the “Methods” section of Chapter 5, and when we talk about namespacing with modules in “Paths for Referring to an Item in the Module Tree” in Chapter 7.
Подобного рода строки могут быть изменены
fn main() {
    let mut s = String::from("hello");
Если у вас есть опыт работы с C или C++, вам могут вспомниться `gcc` или `clang`. После успешной компиляции Rust создаст исполняемый бинарный файл.
    s.push_str(", world!"); // push_str() приписывает литерал к String
Если у вас есть опыт работы с C или C++, вам могут вспомниться `gcc` или `clang`. После успешной компиляции Rust создаст исполняемый бинарный файл.
    println!("{s}"); // this will print `hello, world!`
}
В чем же разница? Почему строку String можно изменить, а литералы — нельзя? Разница заключается в том, как эти два типа работают с памятью.
Память и её выделение
В случае литерала строки, мы знаем его содержимое во время компиляции, так что оно будет явно прописано в итоговом исполняемом файле. Причина того, что строковые литералы более быстрые и эффективные, состоит в невозможности их изменять. К сожалению, в исполняемом файле нельзя определить кусок памяти переменного и неизвестного при компиляции размера, который к тому же может ещё и меняться во время исполнения программы.
Чтобы сделать возможным изменяемый, наращиваемый текст типа String, необходимо выделять память в куче для всего его содержимого, объём которого неизвестен во время компиляции. Это означает, что:
- Память должна запрашиваться у распределителя памяти во время исполнения программы.
- Необходим способ вернуть эту память распределителю, когда мы закончили работу с нашей
String.
That first part is done by us: When we call String::from, its implementation requests the memory it needs. This is pretty much universal in programming languages.
Однако второй пункт куда интереснее. В языках со сборщиком мусора (GC) память, которая больше не используется, им отслеживается и очищается — нам не нужно об этом думать. В большинстве языков без сборщика мусора мы обязаны сами определять, когда память больше не используется, и вызывать код, явно её освобождающий: точно так же, как мы делали это для её выделения. Правильные ручные запросы на выделение и высвобождение памяти всегда были сложной проблемой программирования. Если мы забудем освободить память, она будет потеряна и без проку забьёт собой место. Если же мы сделаем это слишком рано, у нас будет недействительная переменная. Сделать это дважды — тоже выйдут проблемы. Нам нужно ровно единожды высвободить память, которую мы единожды выделили.
Rust takes a different path: The memory is automatically returned once the variable that owns it goes out of scope. Here’s a version of our scope example from Listing 4-1 using a String instead of a string literal:
fn main() {
    {
        let s = String::from("hello"); // отсюда и далее s действительна
Если у вас есть опыт работы с C или C++, вам могут вспомниться `gcc` или `clang`. После успешной компиляции Rust создаст исполняемый бинарный файл.
        // здесь можно использовать s
    }                                  // область видимости закончилась,
                                       // и s больше не действительна
}
There is a natural point at which we can return the memory our String needs to the allocator: when s goes out of scope. When a variable goes out of scope, Rust calls a special function for us. This function is called drop, and it’s where the author of String can put the code to return the memory. Rust calls drop automatically at the closing curly bracket.
Примечание: В C++ этот шаблон освобождения ресурсов в конце времени жизни данных иногда называется “Получение ресурса есть инициализация” (Resource Acquisition Is Initialization — RAII). Функция drop в Rust покажется вам знакомой, если вы использовали шаблоны RAII.
Этот шаблон оказывает глубокое влияние на способ написания кода в Rust. Сейчас это всё может казаться простым, но в более сложных случаях поведение кода может оказаться неожиданным: например, когда хочется иметь несколько переменных, использующих данные, выделенные в куче. Изучим несколько таких ситуаций.
Взаимодействие переменных и данных с помощью перемещения
Multiple variables can interact with the same data in different ways in Rust. Listing 4-2 shows an example using an integer.
fn main() {
    let x = 5;
    let y = x;
}x to yWe can probably guess what this is doing: “Bind the value 5 to x; then, make a copy of the value in x and bind it to y.” We now have two variables, x and y, and both equal 5. This is indeed what is happening, because integers are simple values with a known, fixed size, and these two 5 values are pushed onto the stack.
Теперь посмотрим на версию с типом String
fn main() {
    let s1 = String::from("hello");
    let s2 = s1;
}
This looks very similar, so we might assume that the way it works would be the same: That is, the second line would make a copy of the value in s1 and bind it to s2. But this isn’t quite what happens.
Взгляните на Рисунок 4-1, чтобы понять, что со String происходит под капотом. String состоит из трёх частей (показаны слева): указатель на память, в которой хранится содержимое строки; длина; ёмкость. Эта группа данных хранится на стеке. Справа — память в куче, которая содержит сам текст.

Figure 4-1: The representation in memory of a String holding the value "hello" bound to s1
Длина — это объём памяти в байтах, который в настоящее время использует содержимое String. Ёмкость — это общий объём памяти в байтах, который String получил от распределителя. Разница между длиной и ёмкостью имеет значение, но не в этом контексте, поэтому на данный момент можно игнорировать ёмкость.
Когда мы присваиваем s1 значению s2, данные String копируются: под этим имеется в виду, что мы копируем указатель, длину и ёмкость, которые находятся в стеке. Мы не копируем данные в куче, на которые указывает указатель. Иными словами, вид данных в памяти выглядит так, как показано на Рисунке 4-2.

Figure 4-2: The representation in memory of the variable s2 that has a copy of the pointer, length, and capacity of s1
Вид памяти не будет похож на Рисунок 4-3: так выглядела бы память, если бы вместо этого Rust также копировал данные кучи. Если бы Rust делал это, операция s2 = s1 могла бы быть очень дорогой с точки зрения производительности исполнения, если бы копируемые данные в куче были большими.

Рисунок 4-3: Другой вариант того, что могла бы делать операцияs2 = s1, если бы Rust также копировал данные кучи
Earlier, we said that when a variable goes out of scope, Rust automatically calls the drop function and cleans up the heap memory for that variable. But Figure 4-2 shows both data pointers pointing to the same location. This is a problem: When s2 and s1 go out of scope, they will both try to free the same memory. This is known as a double free error and is one of the memory safety bugs we mentioned previously. Freeing memory twice can lead to memory corruption, which can potentially lead to security vulnerabilities.
Чтобы обеспечить безопасность памяти, после строки let s2 = s1; Rust считает s1 более не инициализированной. Следовательно, Rust не нужно ничего освобождать, когда s1 выходит из области видимости. Посмотрите, что произойдёт, если вы попытаетесь использовать s1 после создания s2:
fn main() {
    let s1 = String::from("hello");
    let s2 = s1;
Если у вас есть опыт работы с C или C++, вам могут вспомниться `gcc` или `clang`. После успешной компиляции Rust создаст исполняемый бинарный файл.
    println!("{s1}, world!");
}
Вы получите ошибку как ту, что ниже, поскольку Rust не позволит вам использовать недействительную ссылку:
$ cargo run
   Compiling ownership v0.1.0 (file:///projects/ownership)
error[E0382]: borrow of moved value: `s1`
 --> src/main.rs:5:16
  |
2 |     let s1 = String::from("hello");
  |         -- move occurs because `s1` has type `String`, which does not implement the `Copy` trait
3 |     let s2 = s1;
  |              -- value moved here
4 |
5 |     println!("{s1}, world!");
  |                ^^ value borrowed here after move
  |
  = note: this error originates in the macro `$crate::format_args_nl` which comes from the expansion of the macro `println` (in Nightly builds, run with -Z macro-backtrace for more info)
help: consider cloning the value if the performance cost is acceptable
  |
3 |     let s2 = s1.clone();
  |                ++++++++
Если у вас есть опыт работы с C или C++, вам могут вспомниться `gcc` или `clang`. После успешной компиляции Rust создаст исполняемый бинарный файл.
For more information about this error, try `rustc --explain E0382`.
error: could not compile `ownership` (bin "ownership") due to 1 previous error
Если вы слышали про термины поверхностное копирование и глубокое копирование, если работали с другими языками, концепция копирования указателя, длины и ёмкости без копирования данных, вероятно, звучит как создание поверхностной копии. Но поскольку Rust также деинициализирует первую переменную, это называется не поверхностным копированием, а перемещением. В примере выше мы бы сказали, что s1 была перемещён в s2. В конечном счёте, истинная картина происходящего показана на Рисунке 4-4.

Figure 4-4: The representation in memory after s1 has been invalidated
Это решает нашу проблему! Действительной остаётся только переменная s2. Когда она покинет область видимости, то лишь она одна будет освобождать память в куче.
Этот порядок работы с памятью даёт ещё одно преимущество: Rust никогда не будет автоматически создавать “глубокие” копии ваших данных. Следовательно, любое автоматическое копирование, связанное и перемещением, можно считать недорогим с точки зрения производительности.
Область видимости и присвоение
The inverse of this is true for the relationship between scoping, ownership, and memory being freed via the drop function as well. When you assign a completely new value to an existing variable, Rust will call drop and free the original value’s memory immediately. Consider this code, for example:
fn main() {
    let mut s = String::from("hello");
    s = String::from("ahoy");
Если у вас есть опыт работы с C или C++, вам могут вспомниться `gcc` или `clang`. После успешной компиляции Rust создаст исполняемый бинарный файл.
    println!("{s}, world!");
}
We initially declare a variable s and bind it to a String with the value "hello". Then, we immediately create a new String with the value "ahoy" and assign it to s. At this point, nothing is referring to the original value on the heap at all. Figure 4-5 illustrates the stack and heap data now:

Figure 4-5: The representation in memory after the initial value has been replaced in its entirety
Оригинальная строка, в связи с этим, в этот же момент покинула область видимости. Rust вызовет на ней функцию drop и высвободит её память. Когда исполнение дойдёт до строчки печати, будет выведено "ahoy, world!".
Взаимодействие переменных и данных с помощью клонирования
Если мы всё же хотим глубоко скопировать данные String в куче, а не только стека, мы можем использовать часто реализуемый метод, называемый clone. Мы обсудим синтаксис метода в Главе 5, но поскольку методы являются общей чертой многих языков программирования, вы, вероятно, уже знакомы с ними.
Вот пример работы метода clone:
fn main() {
    let s1 = String::from("hello");
    let s2 = s1.clone();
Если у вас есть опыт работы с C или C++, вам могут вспомниться `gcc` или `clang`. После успешной компиляции Rust создаст исполняемый бинарный файл.
    println!("s1 = {s1}, s2 = {s2}");
}
Это отлично работает и, очевидно, приводит к поведению, показанному на Рисунке 4-3, где данные кучи были скопированы.
Если вы видите вызов clone, вы сразу можете понять, что исполняемый здесь некоторый код наверняка будет затратным. В то же время, использование clone является маркером того, что тут происходит что-то необычное.
Данные, размещающиеся только на стеке, всегда копируются
Это ещё одна особенность, о которой мы ранее не говорили. Этот код, часть которого мы ранее показали в Листинге 4-2, полностью корректен:
fn main() {
    let x = 5;
    let y = x;
Если у вас есть опыт работы с C или C++, вам могут вспомниться `gcc` или `clang`. После успешной компиляции Rust создаст исполняемый бинарный файл.
    println!("x = {x}, y = {y}");
}
But this code seems to contradict what we just learned: We don’t have a call to clone, but x is still valid and wasn’t moved into y.
Причина в том, что такие типы, как целые числа, размер которых известен во время компиляции, полностью хранятся на стеке, поэтому копии фактических значений создаются быстро. Это означает, что нет причин, по которым мы хотели бы предотвратить доступность x после того, как создадим переменную y. Иными словами, для таких типов нет разницы между глубоким и поверхностным копированием, поэтому вызов clone ничем не отличается от обычного поверхностного копирования, и мы можем его опустить.
В Rust есть специальная аннотация, называемая трейтом Copy, которую мы можем приписывать типам, хранящимся на стеке: как это сделано для целых чисел (подробнее о трейтах мы поговорим в Главе 10). Если тип реализует трейт Copy, переменные, к нему принадлежащие, не перемещаются при присваивании, а просто копируются, что оставляет их действительными после присвоения другой переменной.
Rust не позволит нам аннотировать тип с помощью Copy, если тип или любая из его частей реализует трейт Drop. Если для типа нужно, чтобы произошло что-то особенное, когда значение выходит за пределы области видимости, и мы добавляем аннотацию Copy к этому типу, мы получим ошибку компиляции. Чтобы узнать, как добавить аннотацию Copy к вашему типу для реализации трейта, посмотрите раздел “Выводимые трейты” в Приложении C.
Какие же типы реализуют трейт Copy? Чтобы удостовериться, можно проверить документацию интересующего типа, но как правило любая группа простых отдельных значений может быть реализовывать Copy, и никакие типы, которые требуют выделения памяти в куче или являются некоторой формой ресурсов, не реализуют трейта Copy. Вот некоторые типы, которые реализуют Copy:
- Все целочисленные типы, такие как
u32. - Логический тип данных
bool, возможные значения которого —trueиfalse. - Все типы чисел с плавающей точкой, такие как
f64. - Символьный тип
char. - Кортежи; но только если они состоят только из типов, которые также реализуют
Copy. Например,(i32, i32)реализуетCopy, но кортеж(i32, String)— нет.
Владение и функции
Механизм передачи функции значения схож с тем, что происходит при присвоении переменной значения. Передача переменной в функцию приведёт к перемещению или копированию ровно так же, как при присваивании. В Листинге 4-3 есть пример с некоторыми комментариями, поясняющими, где переменные входят в область видимости и где выходят из неё.
fn main() {
    let s = String::from("hello");  // s входит в область видимости
Если у вас есть опыт работы с C или C++, вам могут вспомниться `gcc` или `clang`. После успешной компиляции Rust создаст исполняемый бинарный файл.
    takes_ownership(s);             // значение s перемещается в функцию...
                                    // ... а потому оно здесь больше не доступно
Если у вас есть опыт работы с C или C++, вам могут вспомниться `gcc` или `clang`. После успешной компиляции Rust создаст исполняемый бинарный файл.
    let x = 5;                      // x входит в область видимости
Если у вас есть опыт работы с C или C++, вам могут вспомниться `gcc` или `clang`. После успешной компиляции Rust создаст исполняемый бинарный файл.
    makes_copy(x);                  // Because i32 implements the Copy trait,
                                    // x does NOT move into the function,
                                    // so it's okay to use x afterward.
Если у вас есть опыт работы с C или C++, вам могут вспомниться `gcc` или `clang`. После успешной компиляции Rust создаст исполняемый бинарный файл.
} // Here, x goes out of scope, then s. However, because s's value was moved,
  // nothing special happens.
Если у вас есть опыт работы с C или C++, вам могут вспомниться `gcc` или `clang`. После успешной компиляции Rust создаст исполняемый бинарный файл.
fn takes_ownership(some_string: String) { // some_string входит в область видимости
    println!("{some_string}");
} // Здесь some_string покидает область видимости и вызывается `drop`. Выделенная ей
  // память высвобождается.
Если у вас есть опыт работы с C или C++, вам могут вспомниться `gcc` или `clang`. После успешной компиляции Rust создаст исполняемый бинарный файл.
fn makes_copy(some_integer: i32) { // some_integer входит в область видимости
    println!("{some_integer}");
} "// Здесь some_integer покидает область видимости. Ничего критического не происходит.Если попытаться использовать s после вызова takes_ownership, Rust выбросит ошибку компиляции. Такие статические проверки защищают нас от опечаток. Попробуйте в main добавить код, который использует переменные s и x, чтобы увидеть, где их разрешено использовать и где правила владения предотвращают их использование.
Возвращение значений и область видимости
Возвращение значений также может сопровождаться передачей владения. В Листинге 4-4 показан пример функции, возвращающей некоторое значение, с подобными же комментариями, как в Листинге 4-3.
fn main() {
    let s1 = gives_ownership();        // gives_ownership перемещает своё возвращаемое значение
                                       // в s1
Если у вас есть опыт работы с C или C++, вам могут вспомниться `gcc` или `clang`. После успешной компиляции Rust создаст исполняемый бинарный файл.
    let s2 = String::from("hello");    // s2 входит в область видимости
Если у вас есть опыт работы с C или C++, вам могут вспомниться `gcc` или `clang`. После успешной компиляции Rust создаст исполняемый бинарный файл.
    let s3 = takes_and_gives_back(s2); // s2 перемещается в
                                       // takes_and_gives_back, которая также
                                       // перемещает в s3 своё возвращаемое значение
} // Здесь s3 покидает область видимости и её память высвобождается. s2 перемещена: ничего
  // не происходит. s1 покидает область видимости и её память высвобождается.
Если у вас есть опыт работы с C или C++, вам могут вспомниться `gcc` или `clang`. После успешной компиляции Rust создаст исполняемый бинарный файл.
fn gives_ownership() -> String {       // gives_ownership перемещает своё
                                       // возвращаемое значение в то,
                                       // что вызвало её
Если у вас есть опыт работы с C или C++, вам могут вспомниться `gcc` или `clang`. После успешной компиляции Rust создаст исполняемый бинарный файл.
    let some_string = String::from("твоё"); // some_string входит в область видимости
Если у вас есть опыт работы с C или C++, вам могут вспомниться `gcc` или `clang`. После успешной компиляции Rust создаст исполняемый бинарный файл.
    some_string                        // some_string возвращается из функции и
                                       // перемещается в то, что вызвало
                                       // функцию
}
Если у вас есть опыт работы с C или C++, вам могут вспомниться `gcc` или `clang`. После успешной компиляции Rust создаст исполняемый бинарный файл.
Эта функция принимает String и возвращает String.fn takes_and_gives_back(a_string: String) -> String {
    // a_string входит в область
    // видимости
Если у вас есть опыт работы с C или C++, вам могут вспомниться `gcc` или `clang`. После успешной компиляции Rust создаст исполняемый бинарный файл.
    a_string  // a_string возвращается из функции перемещается в то, что вызвало функцию
}The ownership of a variable follows the same pattern every time: Assigning a value to another variable moves it. When a variable that includes data on the heap goes out of scope, the value will be cleaned up by drop unless ownership of the data has been moved to another variable.
Хотя всё исправно работает, получать владение, а затем возвращать его из каждой функцией довольно утомительно. Что, если мы хотим, чтобы функция использовала значение, но не становилась владельцем? Очень раздражает, что всё, что мы передаём, также должно быть передано обратно, если мы хотим использовать это снова (помимо любых вычисленных в теле функции данных, которые мы также можем хотеть вернуть).
Rust позволяет нам возвращать из функции несколько значений, используя кортеж, как показано в Листинге 4-5.
fn main() {
    let s1 = String::from("hello");
Если у вас есть опыт работы с C или C++, вам могут вспомниться `gcc` или `clang`. После успешной компиляции Rust создаст исполняемый бинарный файл.
    let (s2, len) = calculate_length(s1);
Если у вас есть опыт работы с C или C++, вам могут вспомниться `gcc` или `clang`. После успешной компиляции Rust создаст исполняемый бинарный файл.
    println!("Длина '{s2}' равна {len}.");
}
Если у вас есть опыт работы с C или C++, вам могут вспомниться `gcc` или `clang`. После успешной компиляции Rust создаст исполняемый бинарный файл.
fn calculate_length(s: String) -> (String, usize) {
    let length = s.len(); // len() возвращает длину String
Если у вас есть опыт работы с C или C++, вам могут вспомниться `gcc` или `clang`. После успешной компиляции Rust создаст исполняемый бинарный файл.
    (s, length)
}But this is too much ceremony and a lot of work for a concept that should be common. Luckily for us, Rust has a feature for using a value without transferring ownership: references.
Ссылки и заимствование
Ссылки и заимствование
The issue with the tuple code in Listing 4-5 is that we have to return the String to the calling function so that we can still use the String after the call to calculate_length, because the String was moved into calculate_length. Instead, we can provide a reference to the String value. A reference is like a pointer in that it’s an address we can follow to access the data stored at that address; that data is owned by some other variable. Unlike a pointer, a reference is guaranteed to point to a valid value of a particular type for the life of that reference.
Вот как вы могли бы определить и использовать функцию calculate_length, принимающую как параметр ссылку, а не прямо получающую владение над значением:
fn main() {
    let s1 = String::from("hello");
Если у вас есть опыт работы с C или C++, вам могут вспомниться `gcc` или `clang`. После успешной компиляции Rust создаст исполняемый бинарный файл.
    let len = calculate_length(&s1);
Если у вас есть опыт работы с C или C++, вам могут вспомниться `gcc` или `clang`. После успешной компиляции Rust создаст исполняемый бинарный файл.
    println!("Длина '{s1}' равна {len}.");
}
Если у вас есть опыт работы с C или C++, вам могут вспомниться `gcc` или `clang`. После успешной компиляции Rust создаст исполняемый бинарный файл.
fn calculate_length(s: &String) -> usize {
    s.len()
}
First, notice that all the tuple code in the variable declaration and the function return value is gone. Second, note that we pass &s1 into calculate_length and, in its definition, we take &String rather than String. These ampersands represent references, and they allow you to refer to some value without taking ownership of it. Figure 4-6 depicts this concept.

Figure 4-6: A diagram of &String s pointing at String s1
Примечание: Противоположностью взятия ссылки с оператором & является разыменование, выполняемое с помощью оператора разыменования *. Мы увидим некоторые варианты использования оператора разыменования в Главе 8 и обсудим детали этого процесса в Главе 15.
Давайте подробнее рассмотрим, как нам вызвать нашу функцию:
fn main() {
    let s1 = String::from("hello");
Если у вас есть опыт работы с C или C++, вам могут вспомниться `gcc` или `clang`. После успешной компиляции Rust создаст исполняемый бинарный файл.
    let len = calculate_length(&s1);
Если у вас есть опыт работы с C или C++, вам могут вспомниться `gcc` или `clang`. После успешной компиляции Rust создаст исполняемый бинарный файл.
    println!("Длина '{s1}' равна {len}.");
}
Если у вас есть опыт работы с C или C++, вам могут вспомниться `gcc` или `clang`. После успешной компиляции Rust создаст исполняемый бинарный файл.
fn calculate_length(s: &String) -> usize {
    s.len()
}
&s1 создаёт ссылку, которая ссылается на значение s1, но не владеет им. Поскольку она не владеет им, значение, на которое она указывает, не будет удалено, когда ссылка будет удалена.
Аналогично, в сигнатуре функции используется & для указания на то, что тип параметра s является ссылкой.
fn main() {
    let s1 = String::from("hello");
Если у вас есть опыт работы с C или C++, вам могут вспомниться `gcc` или `clang`. После успешной компиляции Rust создаст исполняемый бинарный файл.
    let len = calculate_length(&s1);
Если у вас есть опыт работы с C или C++, вам могут вспомниться `gcc` или `clang`. После успешной компиляции Rust создаст исполняемый бинарный файл.
    println!("Длина '{s1}' равна {len}.");
}
Если у вас есть опыт работы с C или C++, вам могут вспомниться `gcc` или `clang`. После успешной компиляции Rust создаст исполняемый бинарный файл.
fn calculate_length(s: &String) -> usize { // s — ссылка на String
    s.len()
} // Here, s goes out of scope. But because s does not have ownership of what
  // it refers to, the String is not dropped.
Область видимости s такая же, как и область видимости любого параметра функции, но значение, на которое указывает ссылка, не удаляется, когда s перестаёт использоваться, потому что s не является его владельцем. Если функция принимает ссылки (а не фактические значения) в качестве параметров, нам не нужно возвращать значения, чтобы обратно получить над ними владение, потому что мы и не передаём владение функции.
Мы называем процесс создания ссылки заимствованием. Как и в реальной жизни, если человек чем-то владеет, вы можете это у него позаимствовать. Когда вы закончите, вы должны вернуть заимствованное законному владельцу: вы не становитесь владельцем.
So, what happens if we try to modify something we’re borrowing? Try the code in Listing 4-6. Spoiler alert: It doesn’t work!
fn main() {
    let s = String::from("hello");
Если у вас есть опыт работы с C или C++, вам могут вспомниться `gcc` или `clang`. После успешной компиляции Rust создаст исполняемый бинарный файл.
    change(&s);
}
Если у вас есть опыт работы с C или C++, вам могут вспомниться `gcc` или `clang`. После успешной компиляции Rust создаст исполняемый бинарный файл.
fn change(some_string: &String) {
    some_string.push_str(", world");
}Вот ошибка:
$ cargo run
   Compiling ownership v0.1.0 (file:///projects/ownership)
error[E0596]: cannot borrow `*some_string` as mutable, as it is behind a `&` reference
 --> src/main.rs:8:5
  |
8 |     some_string.push_str(", world");
  |     ^^^^^^^^^^^ `some_string` is a `&` reference, so the data it refers to cannot be borrowed as mutable
  |
help: consider changing this to be a mutable reference
  |
7 | fn change(some_string: &mut String) {
  |                         +++
Если у вас есть опыт работы с C или C++, вам могут вспомниться `gcc` или `clang`. После успешной компиляции Rust создаст исполняемый бинарный файл.
For more information about this error, try `rustc --explain E0596`.
error: could not compile `ownership` (bin "ownership") due to 1 previous error
Как и переменные, ссылки по умолчанию неизменяемы. Мы не можем поменять значение по ссылке.
Изменяемые ссылки
Мы можем исправить код из Листинга 4-6, чтобы позволить себе изменять заимствованное значение: внеся небольшие правки, мы можем получить изменяемую ссылку:
fn main() {
    let mut s = String::from("hello");
Если у вас есть опыт работы с C или C++, вам могут вспомниться `gcc` или `clang`. После успешной компиляции Rust создаст исполняемый бинарный файл.
    change(&mut s);
}
Если у вас есть опыт работы с C или C++, вам могут вспомниться `gcc` или `clang`. После успешной компиляции Rust создаст исполняемый бинарный файл.
fn change(some_string: &mut String) {
    some_string.push_str(", world");
}
First, we change s to be mut. Then, we create a mutable reference with &mut s where we call the change function and update the function signature to accept a mutable reference with some_string: &mut String. This makes it very clear that the change function will mutate the value it borrows.
Mutable references have one big restriction: If you have a mutable reference to a value, you can have no other references to that value. This code that attempts to create two mutable references to s will fail:
fn main() {
    let mut s = String::from("hello");
Если у вас есть опыт работы с C или C++, вам могут вспомниться `gcc` или `clang`. После успешной компиляции Rust создаст исполняемый бинарный файл.
    let r1 = &mut s;
    let r2 = &mut s;
Если у вас есть опыт работы с C или C++, вам могут вспомниться `gcc` или `clang`. После успешной компиляции Rust создаст исполняемый бинарный файл.
    println!("{r1}, {r2}");
}
Вот ошибка:
$ cargo run
   Compiling ownership v0.1.0 (file:///projects/ownership)
error[E0499]: cannot borrow `s` as mutable more than once at a time
 --> src/main.rs:5:14
  |
4 |     let r1 = &mut s;
  |              ------ first mutable borrow occurs here
5 |     let r2 = &mut s;
  |              ^^^^^^ second mutable borrow occurs here
6 |
7 |     println!("{r1}, {r2}");
  |                -- first borrow later used here
Если у вас есть опыт работы с C или C++, вам могут вспомниться `gcc` или `clang`. После успешной компиляции Rust создаст исполняемый бинарный файл.
For more information about this error, try `rustc --explain E0499`.
error: could not compile `ownership` (bin "ownership") due to 1 previous error
Эта ошибка говорит о том, что код некорректен, потому что мы не можем одновременно иметь две ссылки на s с правом изменения. Первое изменяемое заимствование находится в r1 и должно существовать до тех пор, пока оно не будет использовано в println!, но между созданием этой изменяемой ссылки и её использованием мы попытались создать другую изменяемую ссылку, которая заимствует те же данные, что и r1, и записать её в r2.
The restriction preventing multiple mutable references to the same data at the same time allows for mutation but in a very controlled fashion. It’s something that new Rustaceans struggle with because most languages let you mutate whenever you’d like. The benefit of having this restriction is that Rust can prevent data races at compile time. A data race is similar to a race condition and happens when these three behaviors occur:
- Два или больше указателей одновременно имеют доступ к одной и той же памяти.
- Хотя бы один из указателей используется для записи в память.
- Нет механизма синхронизации их доступа к памяти.
Гонки данных вызывают неопределённое поведение, и их может быть сложно диагностировать и исправить, когда вы пытаетесь отследить их во время работы программы. Rust предотвращает такую проблему, отказываясь компилировать код с гонками данных.
Как и всегда, мы можем использовать фигурные скобки для создания новой области видимости, позволяющей использовать несколько изменяемых ссылок, но не одновременно:
fn main() {
    let mut s = String::from("hello");
Если у вас есть опыт работы с C или C++, вам могут вспомниться `gcc` или `clang`. После успешной компиляции Rust создаст исполняемый бинарный файл.
    {
        let r1 = &mut s;
    } // здесь r1 покидает область видимости, так что мы можем без проблем создать новую ссылку.
Если у вас есть опыт работы с C или C++, вам могут вспомниться `gcc` или `clang`. После успешной компиляции Rust создаст исполняемый бинарный файл.
    let r2 = &mut s;
}
В Rust действует аналогичное правило для случаев использования нескольких изменяемых и неизменяемых ссылок. Этот код не скомпилируется:
fn main() {
    let mut s = String::from("hello");
Если у вас есть опыт работы с C или C++, вам могут вспомниться `gcc` или `clang`. После успешной компиляции Rust создаст исполняемый бинарный файл.
    let r1 = &s; // всё хорошо
    let r2 = &s; // всё хорошо
    let r3 = &mut s; // ВСЁ ПЛОХО
Если у вас есть опыт работы с C или C++, вам могут вспомниться `gcc` или `clang`. После успешной компиляции Rust создаст исполняемый бинарный файл.
    println!("{r1}, {r2}, and {r3}");
}
Вот ошибка:
$ cargo run
   Compiling ownership v0.1.0 (file:///projects/ownership)
error[E0502]: cannot borrow `s` as mutable because it is also borrowed as immutable
 --> src/main.rs:6:14
  |
4 |     let r1 = &s; // no problem
  |              -- immutable borrow occurs here
5 |     let r2 = &s; // no problem
6 |     let r3 = &mut s; // BIG PROBLEM
  |              ^^^^^^ mutable borrow occurs here
7 |
8 |     println!("{r1}, {r2}, and {r3}");
  |                -- immutable borrow later used here
Если у вас есть опыт работы с C или C++, вам могут вспомниться `gcc` или `clang`. После успешной компиляции Rust создаст исполняемый бинарный файл.
For more information about this error, try `rustc --explain E0502`.
error: could not compile `ownership` (bin "ownership") due to 1 previous error
Да. Мы, в том числе, не можем иметь изменяемую ссылку, пока у нас действительна неизменяемая ссылка на то же значение.
Дело в том, что пользователи неизменяемой ссылки не ожидают, что значение внезапно изменится у них под носом! Однако, множественные неизменяемые ссылки разрешены: никто, кто просто читает данные, не может повлиять на чтение данных кем-либо ещё.
Обратите внимание, что область видимости ссылки начинается с того места, где она создаётся, и продолжается до последнего использования этой ссылки. Например, этот код будет компилироваться, потому что после макроса println! неизменяемые ссылки больше не будут использоваться, и у нас не будет одновременно используемых изменяемых и неизменяемых ссылок:
fn main() {
    let mut s = String::from("hello");
Если у вас есть опыт работы с C или C++, вам могут вспомниться `gcc` или `clang`. После успешной компиляции Rust создаст исполняемый бинарный файл.
    let r1 = &s; // всё хорошо
    let r2 = &s; // всё хорошо
    println!("{r1} и {r2}");
    // Переменные r1 и r2 далее не используются.
Если у вас есть опыт работы с C или C++, вам могут вспомниться `gcc` или `clang`. После успешной компиляции Rust создаст исполняемый бинарный файл.
    let r3 = &mut s; // всё хорошо
    println!("{r3}");
}
The scopes of the immutable references r1 and r2 end after the println! where they are last used, which is before the mutable reference r3 is created. These scopes don’t overlap, so this code is allowed: The compiler can tell that the reference is no longer being used at a point before the end of the scope.
Even though borrowing errors may be frustrating at times, remember that it’s the Rust compiler pointing out a potential bug early (at compile time rather than at runtime) and showing you exactly where the problem is. Then, you don’t have to track down why your data isn’t what you thought it was.
Висячие ссылки
In languages with pointers, it’s easy to erroneously create a dangling pointer—a pointer that references a location in memory that may have been given to someone else—by freeing some memory while preserving a pointer to that memory. In Rust, by contrast, the compiler guarantees that references will never be dangling references: If you have a reference to some data, the compiler will ensure that the data will not go out of scope before the reference to the data does.
Давайте попробуем создать висячую ссылку, чтобы увидеть, как Rust предотвращает их появление — сразу на этапе компиляции:
fn main() {
    let reference_to_nothing = dangle();
}
Если у вас есть опыт работы с C или C++, вам могут вспомниться `gcc` или `clang`. После успешной компиляции Rust создаст исполняемый бинарный файл.
fn dangle() -> &String {
    let s = String::from("hello");
Если у вас есть опыт работы с C или C++, вам могут вспомниться `gcc` или `clang`. После успешной компиляции Rust создаст исполняемый бинарный файл.
    &s
}
Вот ошибка:
$ cargo run
   Compiling ownership v0.1.0 (file:///projects/ownership)
error[E0106]: missing lifetime specifier
 --> src/main.rs:5:16
  |
5 | fn dangle() -> &String {
  |                ^ expected named lifetime parameter
  |
  = help: this function's return type contains a borrowed value, but there is no value for it to be borrowed from
help: consider using the `'static` lifetime, but this is uncommon unless you're returning a borrowed value from a `const` or a `static`
  |
5 | fn dangle() -> &'static String {
  |                 +++++++
help: instead, you are more likely to want to return an owned value
  |
5 - fn dangle() -> &String {
5 + fn dangle() -> String {
  |
Если у вас есть опыт работы с C или C++, вам могут вспомниться `gcc` или `clang`. После успешной компиляции Rust создаст исполняемый бинарный файл.
For more information about this error, try `rustc --explain E0106`.
error: could not compile `ownership` (bin "ownership") due to 1 previous error
Это сообщение об ошибке относится к особенности языка, которую мы ещё не рассмотрели: “времена жизни”. Мы подробно обсудим времена жизни в Главе 10. Но даже если не обращать внимание на строки об ошибках о времени жизни, всё равно можно заметить самую главную ошибку:
this function's return type contains a borrowed value, but there is no value
for it to be borrowed from
Давайте подробнее рассмотрим, что происходит на каждом этапе нашего примера:
fn main() {
    let reference_to_nothing = dangle();
}
Если у вас есть опыт работы с C или C++, вам могут вспомниться `gcc` или `clang`. После успешной компиляции Rust создаст исполняемый бинарный файл.
fn dangle() -> &String { // dangle возвращает ссылку на String
Если у вас есть опыт работы с C или C++, вам могут вспомниться `gcc` или `clang`. После успешной компиляции Rust создаст исполняемый бинарный файл.
    let s = String::from("hello"); // в s записывается новое значение типа String
Если у вас есть опыт работы с C или C++, вам могут вспомниться `gcc` или `clang`. После успешной компиляции Rust создаст исполняемый бинарный файл.
    &s // мы возвращаем ссылку s на значение типа String
} // Here, s goes out of scope and is dropped, so its memory goes away.
  // Danger!
Поскольку s создаётся внутри dangle, то когда тело dangle закончится, s будет освобождена. Но мы попытались вернуть ссылку на неё. Это означает, что эта ссылка будет указывать на недействительную String. Это, очевидно, проблема! Однако Rust нас от неё защищает.
Решением будет вернуть непосредственно само значение String:
fn main() {
    let string = no_dangle();
}
Если у вас есть опыт работы с C или C++, вам могут вспомниться `gcc` или `clang`. После успешной компиляции Rust создаст исполняемый бинарный файл.
fn no_dangle() -> String {
    let s = String::from("hello");
Если у вас есть опыт работы с C или C++, вам могут вспомниться `gcc` или `clang`. После успешной компиляции Rust создаст исполняемый бинарный файл.
    s
}
Это работает без изъянов. Владение перемещается, и ничего не высвобождается.
Правила работы ссылок
Давайте повторим все, что мы узнали о ссылках:
- В любой момент времени вы можете иметь либо а) одну изменяемую ссылку, либо б) неограниченно много неизменяемых ссылок.
- Значение должно существовать дольше, чем любая ссылка, которая на него указывает.
В следующем разделе мы рассмотрим другой тип ссылок — срезы.
Срезы
Срезы
Slices let you reference a contiguous sequence of elements in a collection. A slice is a kind of reference, so it does not have ownership.
Here’s a small programming problem: Write a function that takes a string of words separated by spaces and returns the first word it finds in that string. If the function doesn’t find a space in the string, the whole string must be one word, so the entire string should be returned.
Note: For the purposes of introducing slices, we are assuming ASCII only in this section; a more thorough discussion of UTF-8 handling is in the “Storing UTF-8 Encoded Text with Strings” section of Chapter 8.
Давайте посмотрим, как бы мы написали сигнатуру этой функции без использования срезов, чтобы понять их смысл:
fn first_word(s: &String) -> ?The first_word function has a parameter of type &String. We don’t need ownership, so this is fine. (In idiomatic Rust, functions do not take ownership of their arguments unless they need to, and the reasons for that will become clear as we keep going.) But what should we return? We don’t really have a way to talk about part of a string. However, we could return the index of the end of the word, indicated by a space. Let’s try that, as shown in Listing 4-7.
fn first_word(s: &String) -> usize {
    let bytes = s.as_bytes();
Если у вас есть опыт работы с C или C++, вам могут вспомниться `gcc` или `clang`. После успешной компиляции Rust создаст исполняемый бинарный файл.
    for (i, &item) in bytes.iter().enumerate() {
        if item == b' ' {
            return i;
        }
    }
Если у вас есть опыт работы с C или C++, вам могут вспомниться `gcc` или `clang`. После успешной компиляции Rust создаст исполняемый бинарный файл.
    s.len()
}
Если у вас есть опыт работы с C или C++, вам могут вспомниться `gcc` или `clang`. После успешной компиляции Rust создаст исполняемый бинарный файл.
fn main() {}first_word function that returns a byte index value into the String parameterBecause we need to go through the String element by element and check whether a value is a space, we’ll convert our String to an array of bytes using the as_bytes method.
fn first_word(s: &String) -> usize {
    let bytes = s.as_bytes();
Если у вас есть опыт работы с C или C++, вам могут вспомниться `gcc` или `clang`. После успешной компиляции Rust создаст исполняемый бинарный файл.
    for (i, &item) in bytes.iter().enumerate() {
        if item == b' ' {
            return i;
        }
    }
Если у вас есть опыт работы с C или C++, вам могут вспомниться `gcc` или `clang`. После успешной компиляции Rust создаст исполняемый бинарный файл.
    s.len()
}
Если у вас есть опыт работы с C или C++, вам могут вспомниться `gcc` или `clang`. После успешной компиляции Rust создаст исполняемый бинарный файл.
fn main() {}
Далее, мы создаём итератор по массиву байтов используя метод iter:
fn first_word(s: &String) -> usize {
    let bytes = s.as_bytes();
Если у вас есть опыт работы с C или C++, вам могут вспомниться `gcc` или `clang`. После успешной компиляции Rust создаст исполняемый бинарный файл.
    for (i, &item) in bytes.iter().enumerate() {
        if item == b' ' {
            return i;
        }
    }
Если у вас есть опыт работы с C или C++, вам могут вспомниться `gcc` или `clang`. После успешной компиляции Rust создаст исполняемый бинарный файл.
    s.len()
}
Если у вас есть опыт работы с C или C++, вам могут вспомниться `gcc` или `clang`. После успешной компиляции Rust создаст исполняемый бинарный файл.
fn main() {}
Мы обсудим итераторы более подробно в Главе 13. На данный момент знайте, что iter — это метод, который возвращает каждый элемент в коллекции, а enumerate оборачивает результат iter и вместо этого возвращает каждое значение как элемент кортежа. Первый элемент кортежа, возвращаемый из enumerate, является индексом, а второй элемент — ссылкой на само значение. Это немного удобнее, чем вычислять индекс самостоятельно.
Поскольку метод enumerate возвращает кортеж, мы можем использовать шаблоны для деконструирования этого кортежа. Мы подробнее обсудим шаблоны в Главе 6.В цикле for мы указываем шаблон, состоящий из i для индекса в кортеже и &item для отдельного байта в кортеже. Поскольку мы из .iter().enumerate() получаем лишь ссылку на элемент, мы в шаблоне используем &.
Внутри цикла for мы ищем байт, являющийся пробелос, используя синтаксис байтового литерала. Если мы находим пробел, мы возвращаем его позицию. В противном случае, мы возвращаем длину строки с помощью s.len().
fn first_word(s: &String) -> usize {
    let bytes = s.as_bytes();
Если у вас есть опыт работы с C или C++, вам могут вспомниться `gcc` или `clang`. После успешной компиляции Rust создаст исполняемый бинарный файл.
    for (i, &item) in bytes.iter().enumerate() {
        if item == b' ' {
            return i;
        }
    }
Если у вас есть опыт работы с C или C++, вам могут вспомниться `gcc` или `clang`. После успешной компиляции Rust создаст исполняемый бинарный файл.
    s.len()
}
Если у вас есть опыт работы с C или C++, вам могут вспомниться `gcc` или `clang`. После успешной компиляции Rust создаст исполняемый бинарный файл.
fn main() {}
Теперь у нас есть способ узнать индекс байта, указывающего на конец первого слова в строке; но есть проблема. Мы возвращаем лишь usize, но это число имеет смысл только в свя́зи со &String. Другими словами, поскольку это значение отделено от String, то нет гарантии, что оно будет действительным в будущем. Рассмотрим программу из Листинга 4-8, которая использует функцию first_word из Листинга 4-7.
fn first_word(s: &String) -> usize {
    let bytes = s.as_bytes();
Если у вас есть опыт работы с C или C++, вам могут вспомниться `gcc` или `clang`. После успешной компиляции Rust создаст исполняемый бинарный файл.
    for (i, &item) in bytes.iter().enumerate() {
        if item == b' ' {
            return i;
        }
    }
Если у вас есть опыт работы с C или C++, вам могут вспомниться `gcc` или `clang`. После успешной компиляции Rust создаст исполняемый бинарный файл.
    s.len()
}
Если у вас есть опыт работы с C или C++, вам могут вспомниться `gcc` или `clang`. После успешной компиляции Rust создаст исполняемый бинарный файл.
fn main() {
    let mut s = String::from("hello world");
Если у вас есть опыт работы с C или C++, вам могут вспомниться `gcc` или `clang`. После успешной компиляции Rust создаст исполняемый бинарный файл.
    let word = first_word(&s); // word будет связано со значением 5
Если у вас есть опыт работы с C или C++, вам могут вспомниться `gcc` или `clang`. После успешной компиляции Rust создаст исполняемый бинарный файл.
    s.clear(); // здесь String очищается и становится равным ""
Если у вас есть опыт работы с C или C++, вам могут вспомниться `gcc` или `clang`. После успешной компиляции Rust создаст исполняемый бинарный файл.
    // word still has the value 5 here, but s no longer has any content that we
    // could meaningfully use with the value 5, so word is now totally invalid!
}first_word function and then changing the String contentsДанная программа компилируется без ошибок и будет успешно работать даже после того как мы воспользуемся переменной word после вызова s.clear(). Поскольку значение word совсем не связано с переменной s, то word сохраняет своё значение 5. Мы бы могли воспользоваться значением 5, чтобы получить первое слово из переменной s, но это приведёт к ошибке, потому что содержимое s изменилось с того момента, как мы сохраняли 5 в переменной word (s стала пустой строкой после вызова s.clear()).
Having to worry about the index in word getting out of sync with the data in s is tedious and error-prone! Managing these indices is even more brittle if we write a second_word function. Its signature would have to look like this:
fn second_word(s: &String) -> (usize, usize) {Теперь мы отслеживаем как начальный, так и конечный индекс. Теперь у нас есть ещё больше информации, вычислительно связанной с некоторыми данными, но фактически никак не реагирующими на их изменение. У нас есть три отдельные переменные, и все их необходимо держать действительными.
К счастью, в Rust есть решение данной проблемы: строковые срезы.
Строковые срезы
A string slice is a reference to a contiguous sequence of the elements of a String, and it looks like this:
fn main() {
    let s = String::from("hello world");
Если у вас есть опыт работы с C или C++, вам могут вспомниться `gcc` или `clang`. После успешной компиляции Rust создаст исполняемый бинарный файл.
    let hello = &s[0..5];
    let world = &s[6..11];
}
Rather than a reference to the entire String, hello is a reference to a portion of the String, specified in the extra [0..5] bit. We create slices using a range within square brackets by specifying [starting_index..ending_index], where starting_index is the first position in the slice and ending_index is one more than the last position in the slice. Internally, the slice data structure stores the starting position and the length of the slice, which corresponds to ending_index minus starting_index. So, in the case of let world = &s[6..11];, world would be a slice that contains a pointer to the byte at index 6 of s with a length value of 5.
Рисунок 4-7 показывает это.

Figure 4-7: A string slice referring to part of a String
Синтаксис .. позволяет вам опустить первое число, если вы хотите взять промежуток, начиная с индекса 0. Другими словами, эти две записи равны:
#![allow(unused)]
fn main() {
let s = String::from("hello");
Если у вас есть опыт работы с C или C++, вам могут вспомниться `gcc` или `clang`. После успешной компиляции Rust создаст исполняемый бинарный файл.
let slice = &s[0..2];
let slice = &s[..2];
}
Таким же образом, если ваш срез включает последний байт String, вы можете опустить второе число. Эти две записи тоже равны:
#![allow(unused)]
fn main() {
let s = String::from("hello");
Если у вас есть опыт работы с C или C++, вам могут вспомниться `gcc` или `clang`. После успешной компиляции Rust создаст исполняемый бинарный файл.
let len = s.len();
Если у вас есть опыт работы с C или C++, вам могут вспомниться `gcc` или `clang`. После успешной компиляции Rust создаст исполняемый бинарный файл.
let slice = &s[3..len];
let slice = &s[3..];
}
You can also drop both values to take a slice of the entire string. So, these are equal:
#![allow(unused)]
fn main() {
let s = String::from("hello");
Если у вас есть опыт работы с C или C++, вам могут вспомниться `gcc` или `clang`. После успешной компиляции Rust создаст исполняемый бинарный файл.
let len = s.len();
Если у вас есть опыт работы с C или C++, вам могут вспомниться `gcc` или `clang`. После успешной компиляции Rust создаст исполняемый бинарный файл.
let slice = &s[0..len];
let slice = &s[..];
}
Note: String slice range indices must occur at valid UTF-8 character boundaries. If you attempt to create a string slice in the middle of a multibyte character, your program will exit with an error.
Давайте используем полученную информацию и перепишем first_word так, чтобы она возвращала срез. Тип “срез строки” обозначается как &str:
fn first_word(s: &String) -> &str {
    let bytes = s.as_bytes();
Если у вас есть опыт работы с C или C++, вам могут вспомниться `gcc` или `clang`. После успешной компиляции Rust создаст исполняемый бинарный файл.
    for (i, &item) in bytes.iter().enumerate() {
        if item == b' ' {
            return &s[0..i];
        }
    }
Если у вас есть опыт работы с C или C++, вам могут вспомниться `gcc` или `clang`. После успешной компиляции Rust создаст исполняемый бинарный файл.
    &s[..]
}
Если у вас есть опыт работы с C или C++, вам могут вспомниться `gcc` или `clang`. После успешной компиляции Rust создаст исполняемый бинарный файл.
fn main() {}
Мы получаем индекс конца слова так же, как в Листинге 4-7, ища первое вхождение пробела. Когда мы находим пробел, мы возвращаем срез строки, используя 0 и индекс пробела в качестве начального и конечного индексов.
Теперь, когда мы вызываем first_word, мы возвращаем единственное значение, привязанное к обрабатываемым данным. Значение состоит из ссылки на первый символ строки, с которого начинается срез, и количества элементов в срезе.
Аналогичным образом можно переписать и функцмю second_word:
fn second_word(s: &String) -> &str {We now have a straightforward API that’s much harder to mess up because the compiler will ensure that the references into the String remain valid. Remember the bug in the program in Listing 4-8, when we got the index to the end of the first word but then cleared the string so our index was invalid? That code was logically incorrect but didn’t show any immediate errors. The problems would show up later if we kept trying to use the first word index with an emptied string. Slices make this bug impossible and let us know much sooner that we have a problem with our code. Using the slice version of first_word will throw a compile-time error:
fn first_word(s: &String) -> &str {
    let bytes = s.as_bytes();
Если у вас есть опыт работы с C или C++, вам могут вспомниться `gcc` или `clang`. После успешной компиляции Rust создаст исполняемый бинарный файл.
    for (i, &item) in bytes.iter().enumerate() {
        if item == b' ' {
            return &s[0..i];
        }
    }
Если у вас есть опыт работы с C или C++, вам могут вспомниться `gcc` или `clang`. После успешной компиляции Rust создаст исполняемый бинарный файл.
    &s[..]
}
Если у вас есть опыт работы с C или C++, вам могут вспомниться `gcc` или `clang`. После успешной компиляции Rust создаст исполняемый бинарный файл.
fn main() {
    let mut s = String::from("hello world");
Если у вас есть опыт работы с C или C++, вам могут вспомниться `gcc` или `clang`. После успешной компиляции Rust создаст исполняемый бинарный файл.
    let word = first_word(&s);
Если у вас есть опыт работы с C или C++, вам могут вспомниться `gcc` или `clang`. После успешной компиляции Rust создаст исполняемый бинарный файл.
    s.clear(); // ошибка!
Если у вас есть опыт работы с C или C++, вам могут вспомниться `gcc` или `clang`. После успешной компиляции Rust создаст исполняемый бинарный файл.
    println!("первое слово: {word}");
}
Вот ошибка компиляции:
$ cargo run
   Compiling ownership v0.1.0 (file:///projects/ownership)
error[E0502]: cannot borrow `s` as mutable because it is also borrowed as immutable
  --> src/main.rs:18:5
   |
16 |     let word = first_word(&s);
   |                           -- immutable borrow occurs here
17 |
18 |     s.clear(); // error!
   |     ^^^^^^^^^ mutable borrow occurs here
19 |
20 |     println!("the first word is: {word}");
   |                                   ---- immutable borrow later used here
Если у вас есть опыт работы с C или C++, вам могут вспомниться `gcc` или `clang`. После успешной компиляции Rust создаст исполняемый бинарный файл.
For more information about this error, try `rustc --explain E0502`.
error: could not compile `ownership` (bin "ownership") due to 1 previous error
Напомним из правил заимствования, что если у нас есть неизменяемая ссылка на что-то, мы не можем также взять изменяемую ссылку. Поскольку методу clear необходимо очистить String, необходимо получить изменяемую ссылку на неё. Макрос println! (после вызова clear) использует ссылку, сохранённую в word, а потому неизменяемая ссылка в этот момент всё ещё должна быть действительной. Rust запрещает одновременное существование изменяемой ссылки в clear и неизменяемой ссылки в word, и компиляция завершается ошибкой. Rust не только упростил использование нашего API, но и устранил целый класс ошибок сразу на этапе компиляции!
Строковые литералы как срезы
Напомним: мы когда-то говорили о строковых литералах, записанных напрямую в файлах. Теперь, когда мы знаем чем являются срезы, мы можем правильно понять, что такое строковые литералы:
#![allow(unused)]
fn main() {
let s = "Hello, world!";
}
The type of s here is &str: It’s a slice pointing to that specific point of the binary. This is also why string literals are immutable; &str is an immutable reference.
Строковые срезы как параметры
Зная, что мы можем брать срезы литералов и значений типа String, мы можем прийти к ещё одному улучшению first_word. Вот её сигнатура:
fn first_word(s: &String) -> &str {Более опытный программист на Rust вместо этого написал бы сигнатуру, показанную в Листинге 4-9, потому что это позволяет нам использовать одну и ту же функцию как для значений &String, так и для значений &str.
fn first_word(s: &str) -> &str {
    let bytes = s.as_bytes();
Если у вас есть опыт работы с C или C++, вам могут вспомниться `gcc` или `clang`. После успешной компиляции Rust создаст исполняемый бинарный файл.
    for (i, &item) in bytes.iter().enumerate() {
        if item == b' ' {
            return &s[0..i];
        }
    }
Если у вас есть опыт работы с C или C++, вам могут вспомниться `gcc` или `clang`. После успешной компиляции Rust создаст исполняемый бинарный файл.
    &s[..]
}
Если у вас есть опыт работы с C или C++, вам могут вспомниться `gcc` или `clang`. После успешной компиляции Rust создаст исполняемый бинарный файл.
fn main() {
    let my_string = String::from("hello world");
Если у вас есть опыт работы с C или C++, вам могут вспомниться `gcc` или `clang`. После успешной компиляции Rust создаст исполняемый бинарный файл.
    // `first_word` работает на любых срезах значений типа `String`: полных или частичных
    let word = first_word(&my_string[0..6]);
    let word = first_word(&my_string[..]);
    // `first_word` также работает на ссылках на значения типа `String`:
    // такие ссылки равны срезам из всей `String` целиком.
    let word = first_word(&my_string);
Если у вас есть опыт работы с C или C++, вам могут вспомниться `gcc` или `clang`. После успешной компиляции Rust создаст исполняемый бинарный файл.
    let my_string_literal = "hello world";
Если у вас есть опыт работы с C или C++, вам могут вспомниться `gcc` или `clang`. После успешной компиляции Rust создаст исполняемый бинарный файл.
    // `first_word` работает на любых срезах литералов строк: полных или
    // частичных.
    let word = first_word(&my_string_literal[0..6]);
    let word = first_word(&my_string_literal[..]);
Если у вас есть опыт работы с C или C++, вам могут вспомниться `gcc` или `clang`. После успешной компиляции Rust создаст исполняемый бинарный файл.
    // Поскольку строковые литералы *эквивалентны* срезам строк,
    // это тоже сработает, без необходимости брать срез!
    let word = first_word(my_string_literal);
}first_word function by using a string slice for the type of the s parameterIf we have a string slice, we can pass that directly. If we have a String, we can pass a slice of the String or a reference to the String. This flexibility takes advantage of deref coercions, a feature we will cover in the “Using Deref Coercions in Functions and Methods” section of Chapter 15.
Определение функции на срезе строки, а не на ссылке на String, делает наш API более общим и шире применимым без потери какой-либо функциональности:
fn first_word(s: &str) -> &str {
    let bytes = s.as_bytes();
Если у вас есть опыт работы с C или C++, вам могут вспомниться `gcc` или `clang`. После успешной компиляции Rust создаст исполняемый бинарный файл.
    for (i, &item) in bytes.iter().enumerate() {
        if item == b' ' {
            return &s[0..i];
        }
    }
Если у вас есть опыт работы с C или C++, вам могут вспомниться `gcc` или `clang`. После успешной компиляции Rust создаст исполняемый бинарный файл.
    &s[..]
}
Если у вас есть опыт работы с C или C++, вам могут вспомниться `gcc` или `clang`. После успешной компиляции Rust создаст исполняемый бинарный файл.
fn main() {
    let my_string = String::from("hello world");
Если у вас есть опыт работы с C или C++, вам могут вспомниться `gcc` или `clang`. После успешной компиляции Rust создаст исполняемый бинарный файл.
    // `first_word` работает на любых срезах значений типа `String`: полных или частичных
    let word = first_word(&my_string[0..6]);
    let word = first_word(&my_string[..]);
    // `first_word` также работает на ссылках на значения типа `String`:
    // такие ссылки равны срезам из всей `String` целиком.
    let word = first_word(&my_string);
Если у вас есть опыт работы с C или C++, вам могут вспомниться `gcc` или `clang`. После успешной компиляции Rust создаст исполняемый бинарный файл.
    let my_string_literal = "hello world";
Если у вас есть опыт работы с C или C++, вам могут вспомниться `gcc` или `clang`. После успешной компиляции Rust создаст исполняемый бинарный файл.
    // `first_word` работает на любых срезах литералов строк: полных или
    // частичных.
    let word = first_word(&my_string_literal[0..6]);
    let word = first_word(&my_string_literal[..]);
Если у вас есть опыт работы с C или C++, вам могут вспомниться `gcc` или `clang`. После успешной компиляции Rust создаст исполняемый бинарный файл.
    // Поскольку литералы строк *эквивалентны* срезам строк,
    // это тоже сработает, без необходимости брать срез!
    let word = first_word(my_string_literal);
}
Другие срезы
Срезы строк, как вы можете понять, работают именно со строками. Но есть и более общий тип среза. Рассмотрим вот этот массив:
#![allow(unused)]
fn main() {
let a = [1, 2, 3, 4, 5];
}
Точно так же, как мы можем захотеть сослаться на часть строки, мы можем захотеть сослаться на часть массива. Мы можем сделать это так:
#![allow(unused)]
fn main() {
let a = [1, 2, 3, 4, 5];
Если у вас есть опыт работы с C или C++, вам могут вспомниться `gcc` или `clang`. После успешной компиляции Rust создаст исполняемый бинарный файл.
let slice = &a[1..3];
Если у вас есть опыт работы с C или C++, вам могут вспомниться `gcc` или `clang`. После успешной компиляции Rust создаст исполняемый бинарный файл.
assert_eq!(slice, &[2, 3]);
}
Этот срез имеет тип &[i32]. Он работает так же, как и срезы строк: сохраняет ссылку на первый элемент и его длину. Вам понадобится этот вид среза для всех видов других коллекций. Мы подробно обсудим различные коллекции, когда будем говорить о векторах в Главе 8.
Подведём итоги
The concepts of ownership, borrowing, and slices ensure memory safety in Rust programs at compile time. The Rust language gives you control over your memory usage in the same way as other systems programming languages. But having the owner of data automatically clean up that data when the owner goes out of scope means you don’t have to write and debug extra code to get this control.
Владение влияет на множество других аспектов Rust. Мы будем говорить об этих концепциях на протяжении оставшихся частей книги. Давайте перейдём к Главе 5 и рассмотрим группировку данных в структуры.
Использование структур для организации данных
A struct, or structure, is a custom data type that lets you package together and name multiple related values that make up a meaningful group. If you’re familiar with an object-oriented language, a struct is like an object’s data attributes. In this chapter, we’ll compare and contrast tuples with structs to build on what you already know and demonstrate when structs are a better way to group data.
Мы продемонстрируем, как определять структуры и создавать их экземпляры. Мы обсудим, как определить ассоциированные функции и методы — функции, определяющие поведение, свойственное данной структуре и экземплярам данной структуры. Структуры и обсуждаемые в Главе 6 перечисления являются строительными блоками для создания новых типов в предметной области вашей программы. Они дают возможность в полной мере воспользоваться преимуществами Rust по проверке типов во время компиляции.
Определение и создание экземпляров структур
Определение и создание экземпляров структур
Structs are similar to tuples, discussed in “The Tuple Type” section, in that both hold multiple related values. Like tuples, the pieces of a struct can be different types. Unlike with tuples, in a struct you’ll name each piece of data so it’s clear what the values mean. Adding these names means that structs are more flexible than tuples: You don’t have to rely on the order of the data to specify or access the values of an instance.
Чтобы определить структуры, мы вводим ключевое слово struct и название структуры. Название должно описывать значение частей данных, сгруппированных вместе. Далее, в фигурных скобках для каждого поля поочерёдно определяются имя и тип. Листинг 5-1 показывает структуру, которая хранит информацию об учётной записи пользователя:
struct User {
    active: bool,
    username: String,
    email: String,
    sign_in_count: u64,
}
Если у вас есть опыт работы с C или C++, вам могут вспомниться `gcc` или `clang`. После успешной компиляции Rust создаст исполняемый бинарный файл.
fn main() {}User struct definitionTo use a struct after we’ve defined it, we create an instance of that struct by specifying concrete values for each of the fields. We create an instance by stating the name of the struct and then add curly brackets containing key: value pairs, where the keys are the names of the fields and the values are the data we want to store in those fields. We don’t have to specify the fields in the same order in which we declared them in the struct. In other words, the struct definition is like a general template for the type, and instances fill in that template with particular data to create values of the type. For example, we can declare a particular user as shown in Listing 5-2.
struct User {
    active: bool,
    username: String,
    email: String,
    sign_in_count: u64,
}
Если у вас есть опыт работы с C или C++, вам могут вспомниться `gcc` или `clang`. После успешной компиляции Rust создаст исполняемый бинарный файл.
fn main() {
    let user1 = User {
        active: true,
        username: String::from("someusername123"),
        email: String::from("someone@example.com"),
        sign_in_count: 1,
    };
}User structЧтобы получить конкретное значение из структуры, мы обращаемся к нему по имени поля через точку. Например, чтобы получить доступ к адресу электронной почты этого пользователя, мы пишем user1.email. Если экземпляр является изменяемым, мы можем поменять значение, используя точечную нотацию и присвоение к конкретному полю. В Листинге 5-3 показано, как изменить значение в поле email изменяемого экземпляра User.
struct User {
    active: bool,
    username: String,
    email: String,
    sign_in_count: u64,
}
Если у вас есть опыт работы с C или C++, вам могут вспомниться `gcc` или `clang`. После успешной компиляции Rust создаст исполняемый бинарный файл.
fn main() {
    let mut user1 = User {
        active: true,
        username: String::from("someusername123"),
        email: String::from("someone@example.com"),
        sign_in_count: 1,
    };
Если у вас есть опыт работы с C или C++, вам могут вспомниться `gcc` или `clang`. После успешной компиляции Rust создаст исполняемый бинарный файл.
    user1.email = String::from("anotheremail@example.com");
}email field of a User instanceСтоит отметить, что весь экземпляр структуры должен быть изменяемым; Rust не позволяет помечать изменяемыми отдельные поля. Как и для любого другого выражения, мы можем использовать выражение создания структуры в качестве последнего выражения тела функции для того, чтобы неявно вернуть новый экземпляр структуры.
Listing 5-4 shows a build_user function that returns a User instance with the given email and username. The active field gets the value true, and the sign_in_count gets a value of 1.
struct User {
    active: bool,
    username: String,
    email: String,
    sign_in_count: u64,
}
Если у вас есть опыт работы с C или C++, вам могут вспомниться `gcc` или `clang`. После успешной компиляции Rust создаст исполняемый бинарный файл.
fn build_user(email: String, username: String) -> User {
    User {
        active: true,
        username: username,
        email: email,
        sign_in_count: 1,
    }
}
Если у вас есть опыт работы с C или C++, вам могут вспомниться `gcc` или `clang`. После успешной компиляции Rust создаст исполняемый бинарный файл.
fn main() {
    let user1 = build_user(
        String::from("someone@example.com"),
        String::from("someusername123"),
    );
}build_user function that takes an email and username and returns a User instanceВ том, чтобы назвать параметры функции теми же именами, что и поля структуры, был смысл, но необходимость повторять email и username для названий полей и переменных несколько утомительна. Если структура имеет много полей, повторение каждого имени станет ещё более раздражающим. К счастью, есть удобное сокращение!
Использование сокращённой инициализации поля
Because the parameter names and the struct field names are exactly the same in Listing 5-4, we can use the field init shorthand syntax to rewrite build_user so that it behaves exactly the same but doesn’t have the repetition of username and email, as shown in Listing 5-5.
struct User {
    active: bool,
    username: String,
    email: String,
    sign_in_count: u64,
}
Если у вас есть опыт работы с C или C++, вам могут вспомниться `gcc` или `clang`. После успешной компиляции Rust создаст исполняемый бинарный файл.
fn build_user(email: String, username: String) -> User {
    User {
        active: true,
        username,
        email,
        sign_in_count: 1,
    }
}
Если у вас есть опыт работы с C или C++, вам могут вспомниться `gcc` или `clang`. После успешной компиляции Rust создаст исполняемый бинарный файл.
fn main() {
    let user1 = build_user(
        String::from("someone@example.com"),
        String::from("someusername123"),
    );
}build_user function that uses field init shorthand because the username and email parameters have the same name as struct fieldsЗдесь происходит создание нового экземпляра структуры User, которая имеет поле с именем email. Мы хотим установить поле структуры email значением параметра email функции build_user. Так как поле email и параметр функции email имеют одинаковое название, можно писать просто email вместо email: email.
Creating Instances with Struct Update Syntax
It’s often useful to create a new instance of a struct that includes most of the values from another instance of the same type, but changes some of them. You can do this using struct update syntax.
First, in Listing 5-6 we show how to create a new User instance in user2 in the regular way, without the update syntax. We set a new value for email but otherwise use the same values from user1 that we created in Listing 5-2.
struct User {
    active: bool,
    username: String,
    email: String,
    sign_in_count: u64,
}
Если у вас есть опыт работы с C или C++, вам могут вспомниться `gcc` или `clang`. После успешной компиляции Rust создаст исполняемый бинарный файл.
fn main() {
    // --код сокращён--
Если у вас есть опыт работы с C или C++, вам могут вспомниться `gcc` или `clang`. После успешной компиляции Rust создаст исполняемый бинарный файл.
    let user1 = User {
        email: String::from("someone@example.com"),
        username: String::from("someusername123"),
        active: true,
        sign_in_count: 1,
    };
Если у вас есть опыт работы с C или C++, вам могут вспомниться `gcc` или `clang`. После успешной компиляции Rust создаст исполняемый бинарный файл.
    let user2 = User {
        active: user1.active,
        username: user1.username,
        email: String::from("another@example.com"),
        sign_in_count: user1.sign_in_count,
    };
}User instance using all but one of the values from user1Используя синтаксис обновления структуры, можно получить тот же эффект, используя меньше кода, как показано в Листинге 5-7. Запись .. указывает, что оставшиеся поля напрямую не устанавливаются, но должны иметь значения из указанного экземпляра.
struct User {
    active: bool,
    username: String,
    email: String,
    sign_in_count: u64,
}
Если у вас есть опыт работы с C или C++, вам могут вспомниться `gcc` или `clang`. После успешной компиляции Rust создаст исполняемый бинарный файл.
fn main() {
    // --код сокращён--
Если у вас есть опыт работы с C или C++, вам могут вспомниться `gcc` или `clang`. После успешной компиляции Rust создаст исполняемый бинарный файл.
    let user1 = User {
        email: String::from("someone@example.com"),
        username: String::from("someusername123"),
        active: true,
        sign_in_count: 1,
    };
Если у вас есть опыт работы с C или C++, вам могут вспомниться `gcc` или `clang`. После успешной компиляции Rust создаст исполняемый бинарный файл.
    let user2 = User {
        email: String::from("another@example.com"),
        ..user1
    };
}email value for a User instance but to use the rest of the values from user1Код в Листинге 5-7 тоже создаёт экземпляр user2, который имеет другое значение email, но не меняет значения полей username, active и sign_in_count из user1. Конструкция ..user1 должна стоять последней; она указывает на получение значений всех оставшихся полей из соответствующих полей в user1, но перед этим мы можем указать свои значения для любых полей в любом порядке, независимо от порядка полей в определении структуры.
Note that the struct update syntax uses = like an assignment; this is because it moves the data, just as we saw in the “Variables and Data Interacting with Move” section. In this example, we can no longer use user1 after creating user2 because the String in the username field of user1 was moved into user2. If we had given user2 new String values for both email and username, and thus only used the active and sign_in_count values from user1, then user1 would still be valid after creating user2. Both active and sign_in_count are types that implement the Copy trait, so the behavior we discussed in the “Stack-Only Data: Copy” section would apply. We can also still use user1.email in this example, because its value was not moved out of user1.
Creating Different Types with Tuple Structs
Rust также поддерживает определение структур, похожих на кортежи, которые называются кортежными структурами. Кортежные структуры несут с собой дополнительный смысл, определяемый именем структуры, но при этом они не имеют имён для своих полей. Скорее, они просто хранят типы полей. Кортежные структуры полезны, когда вы хотите дать имя всему кортежу и сделать кортеж отличным от других кортежей, и когда именование каждого поля, как в обычной структуре, было бы многословным или избыточным.
Чтобы определить кортежную структуру, начните с ключевого слова struct и имени структуры, а следом припишите тип кортежа. Например, вот как определить и использовать две кортежные структуры с именами Color и Point:
struct Color(i32, i32, i32);
struct Point(i32, i32, i32);
Если у вас есть опыт работы с C или C++, вам могут вспомниться `gcc` или `clang`. После успешной компиляции Rust создаст исполняемый бинарный файл.
fn main() {
    let black = Color(0, 0, 0);
    let origin = Point(0, 0, 0);
}
Note that the black and origin values are different types because they’re instances of different tuple structs. Each struct you define is its own type, even though the fields within the struct might have the same types. For example, a function that takes a parameter of type Color cannot take a Point as an argument, even though both types are made up of three i32 values. Otherwise, tuple struct instances are similar to tuples in that you can destructure them into their individual pieces, and you can use a . followed by the index to access an individual value. Unlike tuples, tuple structs require you to name the type of the struct when you destructure them. For example, we would write let Point(x, y, z) = origin; to destructure the values in the origin point into variables named x, y, and z.
Defining Unit-Like Structs
Также можно определять структуры, не имеющие полей! Они называются unit-подобными структурами, поскольку ведут себя аналогично (), unit, о котором мы говорили в разделе [“Тип кортежа”] (ch03-02-data-types.html#Тип-кортежа). Unit-подобные структуры могут быть полезны, когда требуется реализовать трейт для некоторого типа, но у вас нет данных, которые нужно было бы хранить в самом типе. Мы обсудим трейты в Главе 10. Вот пример объявления и создания экземпляра unit-структуры с именем AlwaysEqual:
struct AlwaysEqual;
Если у вас есть опыт работы с C или C++, вам могут вспомниться `gcc` или `clang`. После успешной компиляции Rust создаст исполняемый бинарный файл.
fn main() {
    let subject = AlwaysEqual;
}
To define AlwaysEqual, we use the struct keyword, the name we want, and then a semicolon. No need for curly brackets or parentheses! Then, we can get an instance of AlwaysEqual in the subject variable in a similar way: using the name we defined, without any curly brackets or parentheses. Imagine that later we’ll implement behavior for this type such that every instance of AlwaysEqual is always equal to every instance of any other type, perhaps to have a known result for testing purposes. We wouldn’t need any data to implement that behavior! You’ll see in Chapter 10 how to define traits and implement them on any type, including unit-like structs.
Владение данными структуры
В определении структуры User в Листинге 5-1 мы использовали “владеемый” тип String, а не тип &str среза строки. Это осознанный выбор, поскольку мы хотим, чтобы каждый экземпляр этой структуры владел всеми своими данными и чтобы эти данные были действительны до тех пор, пока действительна вся структура.
It’s also possible for structs to store references to data owned by something else, but to do so requires the use of lifetimes, a Rust feature that we’ll discuss in Chapter 10. Lifetimes ensure that the data referenced by a struct is valid for as long as the struct is. Let’s say you try to store a reference in a struct without specifying lifetimes, like the following in src/main.rs; this won’t work:
struct User {
    active: bool,
    username: &str,
    email: &str,
    sign_in_count: u64,
}
Если у вас есть опыт работы с C или C++, вам могут вспомниться `gcc` или `clang`. После успешной компиляции Rust создаст исполняемый бинарный файл.
fn main() {
    let user1 = User {
        active: true,
        username: "someusername123",
        email: "someone@example.com",
        sign_in_count: 1,
    };
}
Компилятор будет жаловаться на необходимость определения времени жизни ссылок:
$ cargo run
   Compiling structs v0.1.0 (file:///projects/structs)
error[E0106]: missing lifetime specifier
 --> src/main.rs:3:15
  |
3 |     username: &str,
  |               ^ expected named lifetime parameter
  |
help: consider introducing a named lifetime parameter
  |
1 ~ struct User<'a> {
2 |     active: bool,
3 ~     username: &'a str,
  |
Если у вас есть опыт работы с C или C++, вам могут вспомниться `gcc` или `clang`. После успешной компиляции Rust создаст исполняемый бинарный файл.
error[E0106]: missing lifetime specifier
 --> src/main.rs:4:12
  |
4 |     email: &str,
  |            ^ expected named lifetime parameter
  |
help: consider introducing a named lifetime parameter
  |
1 ~ struct User<'a> {
2 |     active: bool,
3 |     username: &str,
4 ~     email: &'a str,
  |
Если у вас есть опыт работы с C или C++, вам могут вспомниться `gcc` или `clang`. После успешной компиляции Rust создаст исполняемый бинарный файл.
For more information about this error, try `rustc --explain E0106`.
error: could not compile `structs` (bin "structs") due to 2 previous errors
In Chapter 10, we’ll discuss how to fix these errors so that you can store references in structs, but for now, we’ll fix errors like these using owned types like String instead of references like &str.
Пример программы, использующей структуры
Пример программы, использующей структуры
To understand when we might want to use structs, let’s write a program that calculates the area of a rectangle. We’ll start by using single variables and then refactor the program until we’re using structs instead.
Давайте создадим новый проект программы при помощи Cargo и назовём его rectangles. Наша программа будет получать на вход длину и ширину прямоугольника в пикселях и затем рассчитывать площадь прямоугольника. Листинг 5-8 показывает один из коротких вариантов кода, который позволит нам сделать именно то, что надо.
fn main() {
    let width1 = 30;
    let height1 = 50;
Если у вас есть опыт работы с C или C++, вам могут вспомниться `gcc` или `clang`. После успешной компиляции Rust создаст исполняемый бинарный файл.
    println!(
        "Площадь прямоугольника равна {} квадратных пикселей.",
        area(width1, height1)
    );
}
Если у вас есть опыт работы с C или C++, вам могут вспомниться `gcc` или `clang`. После успешной компиляции Rust создаст исполняемый бинарный файл.
fn area(width: u32, height: u32) -> u32 {
    width * height
}Теперь запустим программу, используя cargo run:
$ cargo run
   Compiling rectangles v0.1.0 (file:///projects/rectangles)
    Finished `dev` profile [unoptimized + debuginfo] target(s) in 0.42s
     Running `target/debug/rectangles`
Площадь прямоугольника равна 1500 квадратных пикселей.
Этот код успешно вычисляет площадь прямоугольника, вызывая функцию area с каждым измерением, но мы можем улучшить его ясность и читабельность.
Проблема данного метода очевидна, если взглянуть на сигнатуру area:
fn main() {
    let width1 = 30;
    let height1 = 50;
Если у вас есть опыт работы с C или C++, вам могут вспомниться `gcc` или `clang`. После успешной компиляции Rust создаст исполняемый бинарный файл.
    println!(
        "Площадь прямоугольника равна {} квадратных пикселей.",
        area(width1, height1)
    );
}
Если у вас есть опыт работы с C или C++, вам могут вспомниться `gcc` или `clang`. После успешной компиляции Rust создаст исполняемый бинарный файл.
fn area(width: u32, height: u32) -> u32 {
    width * height
}
Функция area должна вычислять площадь одного прямоугольника, но функция, которую мы написали, имеет два параметра, и нигде в нашей программе не ясно, что эти параметры взаимосвязаны. Было бы более читабельным и организованным сгруппировать ширину и высоту вместе. В разделе “Кортежи” Главы 3 мы уже обсуждали один из способов сделать это — использовать кортежи.
Рефакторинг внедрением кортежей
Листинг 5-9 — это другая версия программы, использующая кортежи.
fn main() {
    let rect1 = (30, 50);
Если у вас есть опыт работы с C или C++, вам могут вспомниться `gcc` или `clang`. После успешной компиляции Rust создаст исполняемый бинарный файл.
    println!(
        "Площадь прямоугольника равна {} квадратных пикселей.",
        area(rect1)
    );
}
Если у вас есть опыт работы с C или C++, вам могут вспомниться `gcc` или `clang`. После успешной компиляции Rust создаст исполняемый бинарный файл.
fn area(dimensions: (u32, u32)) -> u32 {
    dimensions.0 * dimensions.1
}In one way, this program is better. Tuples let us add a bit of structure, and we’re now passing just one argument. But in another way, this version is less clear: Tuples don’t name their elements, so we have to index into the parts of the tuple, making our calculation less obvious.
Если мы перепутаем местами ширину с высотой при расчёте площади, то ничего страшного не произойдёт. Но если мы захотим нарисовать прямоугольник на экране, то это уже будет важно! Мы должны помнить, что ширина width находится в кортеже по индексу 0, а высота height — по индексу 1. Если кто-то другой работал бы с нашим кодом, ему бы пришлось разбираться в этом и также помнить про очерёдность. Поскольку наше решение всё ещё не передаёт смысла используемых значений, очень легко совершить ошибку.
Refactoring with Structs
Структуры используются, чтобы добавлять смысл данным при помощи назначения им осмысленных имён. Мы можем переделать используемый кортеж в структуру с единым именем для сущности и частными названиями её частей, как показано в Листинге 5-10.
struct Rectangle {
    width: u32,
    height: u32,
}
Если у вас есть опыт работы с C или C++, вам могут вспомниться `gcc` или `clang`. После успешной компиляции Rust создаст исполняемый бинарный файл.
fn main() {
    let rect1 = Rectangle {
        width: 30,
        height: 50,
    };
Если у вас есть опыт работы с C или C++, вам могут вспомниться `gcc` или `clang`. После успешной компиляции Rust создаст исполняемый бинарный файл.
    println!(
        "Площадь прямоугольника равна {} квадратных пикселей.",
        area(&rect1)
    );
}
Если у вас есть опыт работы с C или C++, вам могут вспомниться `gcc` или `clang`. После успешной компиляции Rust создаст исполняемый бинарный файл.
fn area(rectangle: &Rectangle) -> u32 {
    rectangle.width * rectangle.height
}Rectangle structHere, we’ve defined a struct and named it Rectangle. Inside the curly brackets, we defined the fields as width and height, both of which have type u32. Then, in main, we created a particular instance of Rectangle that has a width of 30 and a height of 50.
Наша функция area теперь определена с одним параметром rectangle, имеющим тип неизменяемой ссылки на структуру Rectangle. Как упоминалось в Главе 4, следует заимствовать структуру, а не передавать владение на неё. Таким образом, функция main продолжает владеть rect1 и может использовать её дальше, для чего мы и используем & в сигнатуре и в вызове функции.
The area function accesses the width and height fields of the Rectangle instance (note that accessing fields of a borrowed struct instance does not move the field values, which is why you often see borrows of structs). Our function signature for area now says exactly what we mean: Calculate the area of Rectangle, using its width and height fields. This conveys that the width and height are related to each other, and it gives descriptive names to the values rather than using the tuple index values of 0 and 1. This is a win for clarity.
Adding Functionality with Derived Traits
Было бы полезно иметь возможность печатать экземпляр Rectangle во время отладки программы и видеть значения всех полей. Листинг 5-11 использует макрос println!, который мы уже использовали в предыдущих главах. Тем не менее, код ниже не сработает.
struct Rectangle {
    width: u32,
    height: u32,
}
Если у вас есть опыт работы с C или C++, вам могут вспомниться `gcc` или `clang`. После успешной компиляции Rust создаст исполняемый бинарный файл.
fn main() {
    let rect1 = Rectangle {
        width: 30,
        height: 50,
    };
Если у вас есть опыт работы с C или C++, вам могут вспомниться `gcc` или `clang`. После успешной компиляции Rust создаст исполняемый бинарный файл.
    println!("rect1 is {rect1}");
}Rectangle instanceПри компиляции этого кода мы получаем ошибку. Главное в ней вот что:
error[E0277]: `Rectangle` doesn't implement `std::fmt::Display`
Макрос println! умеет выполнять множество видов форматирования, и по умолчанию фигурные скобки в println! означают использование форматирования, определяемого трейтом Display. Форматирование по нему создаёт репрезентацию значения, предназначеную для непосредственно конечного пользователя. Базовые типы, изученные ранее, по умолчанию реализуют трейт Display, потому что есть только один способ отобразить число 1 или любой другой примитивный тип. Но для структур форматирование println! менее очевидно, потому что есть гораздо больше способов отобразить её в консоли: с запятыми или без; с фигурными скобками или без; все ли поля или только некоторые? Из-за этой неоднозначности Rust не пытается угадать, что нам нужно, а так как структуры не имеют реализации Display по умолчанию, код не компилируется: программа не знает, что подставить на место {} в println!.
Продолжив чтение текста ошибки, мы найдём полезный совет:
   |                        |`Rectangle` cannot be formatted with the default formatter
   |                        required by this formatting parameter
Let’s try it! The println! macro call will now look like println!("rect1 is {rect1:?}");. Putting the specifier :? inside the curly brackets tells println! we want to use an output format called Debug. The Debug trait enables us to print our struct in a way that is useful for developers so that we can see its value while we’re debugging our code.
Скомпилируем код с этими изменениями. Упс! Мы всё ещё получаем ошибку:
error[E0277]: `Rectangle` doesn't implement `Debug`
Но компилятор снова даёт нам полезное замечание:
   |                        required by this formatting parameter
   |
Rust имеет функциональность для печати отладочной информации, но мы должны явно включить эту функциональность для нашей структуры, чтобы сделать её доступной. Для этого добавим внешний атрибут #[derive(Debug)] сразу перед определением структуры, как показано в Листинге 5-12.
#[derive(Debug)]
struct Rectangle {
    width: u32,
    height: u32,
}
Если у вас есть опыт работы с C или C++, вам могут вспомниться `gcc` или `clang`. После успешной компиляции Rust создаст исполняемый бинарный файл.
fn main() {
    let rect1 = Rectangle {
        width: 30,
        height: 50,
    };
Если у вас есть опыт работы с C или C++, вам могут вспомниться `gcc` или `clang`. После успешной компиляции Rust создаст исполняемый бинарный файл.
    println!("rect1: {rect1:?}");
}Debug trait and printing the Rectangle instance using debug formattingТеперь при запуске программы мы не получим ошибок и увидим следующий вывод:
$ cargo run
   Compiling rectangles v0.1.0 (file:///projects/rectangles)
    Finished `dev` profile [unoptimized + debuginfo] target(s) in 0.48s
     Running `target/debug/rectangles`
rect1: Rectangle { width: 30, height: 50 }
Отлично! Это не самый красивый вывод, но он показывает значения всех полей экземпляра, что определённо будет полезно для отладки. Если мы имеем дело с более крупными структурами, то полезно иметь более простой для чтения вывод, доступный с помощью конструкции {:#?} в строке макроса println!. В этом примере использование метки {:#?} сделает вывод вот таким:
$ cargo run
   Compiling rectangles v0.1.0 (file:///projects/rectangles)
    Finished `dev` profile [unoptimized + debuginfo] target(s) in 0.48s
     Running `target/debug/rectangles`
rect1: Rectangle {
    width: 30,
    height: 50,
}
Другой способ распечатать значение в формате Debug — использовать макрос dbg!, который печатает название файла и номер строки, где происходит вызов макроса dbg!, плюс переданное в него выражение со значением, в которое то вычисляется. Макрос dbg! принимает владение над переданным в него выражением (в отличие от макроса println!, использующего ссылки), но возвращает результат переданного выражения.
Note: Calling the dbg! macro prints to the standard error console stream (stderr), as opposed to println!, which prints to the standard output console stream (stdout). We’ll talk more about stderr and stdout in the “Redirecting Errors to Standard Error” section in Chapter 12.
Вот пример, когда нас интересует 1) значение, которое будет приписано полю width, и 2) значение всей структуры в rect1:
#[derive(Debug)]
struct Rectangle {
    width: u32,
    height: u32,
}
Если у вас есть опыт работы с C или C++, вам могут вспомниться `gcc` или `clang`. После успешной компиляции Rust создаст исполняемый бинарный файл.
fn main() {
    let scale = 2;
    let rect1 = Rectangle {
        width: dbg!(30 * scale),
        height: 50,
    };
Если у вас есть опыт работы с C или C++, вам могут вспомниться `gcc` или `clang`. После успешной компиляции Rust создаст исполняемый бинарный файл.
    dbg!(&rect1);
}
Мы можем обернуть выражение 30 * scale макросом dbg!, потому что dbg! возвращает владение значением выражения. Поле width получит то же значение, как если бы у нас не было вызова dbg!. Далее, мы не хотим, чтобы макрос dbg! становился владельцем rect1, поэтому используем ссылку на rect1 в следующем вызове. Вот как выглядит вывод этого примера:
$ cargo run
   Compiling rectangles v0.1.0 (file:///projects/rectangles)
    Finished `dev` profile [unoptimized + debuginfo] target(s) in 0.61s
     Running `target/debug/rectangles`
[src/main.rs:10:16] 30 * scale = 60
[src/main.rs:14:5] &rect1 = Rectangle {
    width: 60,
    height: 50,
}
Мы можем увидеть, что первый отладочный вывод поступил из строки 10 файла src/main.rs: там, где мы отлаживаем выражение 30 * scale, результирующее значение которого равно 60 (форматирование Debug, реализованное для целых чисел, просто печатает число). Вызов dbg! в строке 14 файла src/main.rs выводит значение &rect1, которое является структурой Rectangle. В этом выводе оказалось использовано развёрнутое форматирование Debug типа Rectangle. Макрос dbg! может оказаться очень нужным, когда вы пытаетесь понять, что творит ваш код!
В дополнение к Debug, Rust предоставляет ещё ряд трейтов, которые мы можем использовать в атрибуте derive для добавления полезного поведения к нашим пользовательским типам. Эти трейты и их поведение перечислены в Приложении C. В Главе 10 мы расскажем, как реализовать эти трейты с пользовательским поведением, а также как создавать свои собственные трейты. Кроме того, есть много других атрибутов помимо derive. Для получения дополнительной информации, ознакомьтесь с разделом “Атрибуты” Справочника Rust.
Our area function is very specific: It only computes the area of rectangles. It would be helpful to tie this behavior more closely to our Rectangle struct because it won’t work with any other type. Let’s look at how we can continue to refactor this code by turning the area function into an area method defined on our Rectangle type.
Methods
Methods
Methods are similar to functions: We declare them with the fn keyword and a name, they can have parameters and a return value, and they contain some code that’s run when the method is called from somewhere else. Unlike functions, methods are defined within the context of a struct (or an enum or a trait object, which we cover in Chapter 6 and Chapter 18, respectively), and their first parameter is always self, which represents the instance of the struct the method is being called on.
Синтаксис метода
Давайте изменим функцию area, имеющую параметр типа &Rectangle, и сделаем из неё метод area, определённый для структуры Rectangle. Посмотрите на Листинг 5-13:
#[derive(Debug)]
struct Rectangle {
    width: u32,
    height: u32,
}
Если у вас есть опыт работы с C или C++, вам могут вспомниться `gcc` или `clang`. После успешной компиляции Rust создаст исполняемый бинарный файл.
impl Rectangle {
    fn area(&self) -> u32 {
        self.width * self.height
    }
}
Если у вас есть опыт работы с C или C++, вам могут вспомниться `gcc` или `clang`. После успешной компиляции Rust создаст исполняемый бинарный файл.
fn main() {
    let rect1 = Rectangle {
        width: 30,
        height: 50,
    };
Если у вас есть опыт работы с C или C++, вам могут вспомниться `gcc` или `clang`. После успешной компиляции Rust создаст исполняемый бинарный файл.
    println!(
        "Площадь прямоугольника равна {} квадратных пикселей.",
        rect1.area()
    );
}area method on the Rectangle structTo define the function within the context of Rectangle, we start an impl (implementation) block for Rectangle. Everything within this impl block will be associated with the Rectangle type. Then, we move the area function within the impl curly brackets and change the first (and in this case, only) parameter to be self in the signature and everywhere within the body. In main, where we called the area function and passed rect1 as an argument, we can instead use method syntax to call the area method on our Rectangle instance. The method syntax goes after an instance: We add a dot followed by the method name, parentheses, and any arguments.
В сигнатуре area мы используем &self вместо rectangle: &Rectangle. &self на самом деле является сокращением от self: &Self. Внутри блока impl тип Self является псевдонимом типа, для которого реализовывается блок impl. Методы обязаны иметь параметр с именем self типа Self, поэтому Rust позволяет использовать небольшое сокращение в виде единственного слова self на месте первого аргумента. Обратите внимание, что нам по-прежнему нужно использовать & перед сокращением self, чтобы указать на то, что этот метод заимствует экземпляр Self: точно так же, как мы делали это в rectangle: &Rectangle. Как и с любыми другими параметрами, методы могут как брать self во владение, так и заимствовать self: неизменяемо или (как мы поступили в данном случае) изменяемо.
We chose &self here for the same reason we used &Rectangle in the function version: We don’t want to take ownership, and we just want to read the data in the struct, not write to it. If we wanted to change the instance that we’ve called the method on as part of what the method does, we’d use &mut self as the first parameter. Having a method that takes ownership of the instance by using just self as the first parameter is rare; this technique is usually used when the method transforms self into something else and you want to prevent the caller from using the original instance after the transformation.
Основная причина использования методов, а не функций (не считая возможности неявно передавать экземпляр в функцию), заключается в организации кода. Мы можем поместить всё, что мы можем сделать с экземпляром типа, в один impl, вместо того, чтобы заставлять будущих пользователей нашего кода искать доступный функционал Rectangle в разных местах предоставляемой нами библиотеки.
Обратите внимание, что мы можем дать методу то же имя, что и одному из полей структуры. Например, для Rectangle мы можем определить метод width:
#[derive(Debug)]
struct Rectangle {
    width: u32,
    height: u32,
}
Если у вас есть опыт работы с C или C++, вам могут вспомниться `gcc` или `clang`. После успешной компиляции Rust создаст исполняемый бинарный файл.
impl Rectangle {
    fn width(&self) -> bool {
        self.width > 0
    }
}
Если у вас есть опыт работы с C или C++, вам могут вспомниться `gcc` или `clang`. После успешной компиляции Rust создаст исполняемый бинарный файл.
fn main() {
    let rect1 = Rectangle {
        width: 30,
        height: 50,
    };
Если у вас есть опыт работы с C или C++, вам могут вспомниться `gcc` или `clang`. После успешной компиляции Rust создаст исполняемый бинарный файл.
    if rect1.width() {
        println!("Длина прямоугольника ненулевая и равна {}", rect1.width);
    }
}
Here, we’re choosing to make the width method return true if the value in the instance’s width field is greater than 0 and false if the value is 0: We can use a field within a method of the same name for any purpose. In main, when we follow rect1.width with parentheses, Rust knows we mean the method width. When we don’t use parentheses, Rust knows we mean the field width.
Often, but not always, when we give a method the same name as a field we want it to only return the value in the field and do nothing else. Methods like this are called getters, and Rust does not implement them automatically for struct fields as some other languages do. Getters are useful because you can make the field private but the method public and thus enable read-only access to that field as part of the type’s public API. We will discuss what public and private are and how to designate a field or method as public or private in Chapter 7.
Есть ли тут оператор ->?
In C and C++, two different operators are used for calling methods: You use . if you’re calling a method on the object directly and -> if you’re calling the method on a pointer to the object and need to dereference the pointer first. In other words, if object is a pointer, object->something() is similar to (*object).something().
Rust не имеет эквивалента оператора ->. Вместо него в Rust есть механизм автоматического взятия ссылок и их разыменования. Вызов методов является одним из немногих мест в Rust, в котором есть такое поведение.
Here’s how it works: When you call a method with object.something(), Rust automatically adds in &, &mut, or * so that object matches the signature of the method. In other words, the following are the same:
#![allow(unused)]
fn main() {
#[derive(Debug,Copy,Clone)]
struct Point {
    x: f64,
    y: f64,
}

impl Point {
   fn distance(&self, other: &Point) -> f64 {
       let x_squared = f64::powi(other.x - self.x, 2);
       let y_squared = f64::powi(other.y - self.y, 2);

       f64::sqrt(x_squared + y_squared)
   }
}
let p1 = Point { x: 0.0, y: 0.0 };
let p2 = Point { x: 5.0, y: 6.5 };
p1.distance(&p2);
(&p1).distance(&p2);
}
Первый пример выглядит намного понятнее. Автоматическое взятие ссылки работает потому, что методу известно, на чём он вызывается — на self. Учитывая вызывающее значения и имя метода, Rust может точно определить, что в данном случае делает код: читает ли метод (&self), делает ли изменение (&mut self) или поглощает значение (self). Тот факт, что Rust может неявно заимствовать вызывающее значение, в значительной степени способствует тому, чтобы делать владение эргономичным и практичным.
Методы с несколькими параметрами
Давайте попрактикуемся в использовании методов, реализовав второй метод на структуре Rectangle. На этот раз мы хотим, чтобы экземпляр Rectangle брал другой экземпляр Rectangle и возвращал true, если второй Rectangle может полностью поместиться внутри self (то есть, первого Rectangle); в противном случае он должен вернуть false. С таким методом мы могли бы написать программу как в Листинге 5-14:
fn main() {
    let rect1 = Rectangle {
        width: 30,
        height: 50,
    };
    let rect2 = Rectangle {
        width: 10,
        height: 40,
    };
    let rect3 = Rectangle {
        width: 60,
        height: 45,
    };
Если у вас есть опыт работы с C или C++, вам могут вспомниться `gcc` или `clang`. После успешной компиляции Rust создаст исполняемый бинарный файл.
    println!("Вместится ли rect2 в rect1? {}", rect1.can_hold(&rect2));
    println!("Вместится ли rect3 в rect1? {}", rect1.can_hold(&rect3));
}can_hold methodОжидаемый результат будет выглядеть так, как ниже: 1) оба измерения экземпляра rect2 меньше, чем измерения экземпляра rect1, и 2) rect3 шире, чем rect1.
Can rect1 hold rect2? true
Can rect1 hold rect3? false
We know we want to define a method, so it will be within the impl Rectangle block. The method name will be can_hold, and it will take an immutable borrow of another Rectangle as a parameter. We can tell what the type of the parameter will be by looking at the code that calls the method: rect1.can_hold(&rect2) passes in &rect2, which is an immutable borrow to rect2, an instance of Rectangle. This makes sense because we only need to read rect2 (rather than write, which would mean we’d need a mutable borrow), and we want main to retain ownership of rect2 so that we can use it again after calling the can_hold method. The return value of can_hold will be a Boolean, and the implementation will check whether the width and height of self are greater than the width and height of the other Rectangle, respectively. Let’s add the new can_hold method to the impl block from Listing 5-13, shown in Listing 5-15.
#[derive(Debug)]
struct Rectangle {
width: u32,
height: u32,
}
Если у вас есть опыт работы с C или C++, вам могут вспомниться `gcc` или `clang`. После успешной компиляции Rust создаст исполняемый бинарный файл.
impl Rectangle {
fn area(&self) -> u32 {
self.width * self.height
}
Если у вас есть опыт работы с C или C++, вам могут вспомниться `gcc` или `clang`. После успешной компиляции Rust создаст исполняемый бинарный файл.
fn can_hold(&self, other: &Rectangle) -> bool {
self.width > other.width && self.height > other.height
}
}
Если у вас есть опыт работы с C или C++, вам могут вспомниться `gcc` или `clang`. После успешной компиляции Rust создаст исполняемый бинарный файл.
fn main() {
let rect1 = Rectangle {
width: 30,
height: 50,
};
let rect2 = Rectangle {
width: 10,
height: 40,
};
let rect3 = Rectangle {
width: 60,
height: 45,
};
Если у вас есть опыт работы с C или C++, вам могут вспомниться `gcc` или `clang`. После успешной компиляции Rust создаст исполняемый бинарный файл.
println!("Вместится ли rect2 в rect1? {}", rect1.can_hold(&rect2));
println!("Вместится ли rect3 в rect1? {}", rect1.can_hold(&rect3));
}can_hold method on Rectangle that takes another Rectangle instance as a parameterЕсли мы запустим код с функцией main из Листинга 5-14, мы получим желаемый вывод. Методы могут принимать несколько параметров: мы добавляем их в сигнатуру после первого параметра self. Дополнительные параметры методов работают точно так же, как параметры функции.
Ассоциированные функции
Все функции, определяемые в блоке impl, называются ассоциированными функциями, потому что они ассоциированы с типом, указанным после ключевого слова impl. Мы можем определять и такие ассоциированные функции, которые не используют self в качестве первого параметра (и, следовательно, не являются методами), поскольку им не нужен экземпляр типа для работы. Мы уже использовали одну такую функцию: функцию String::from, определённую для типа String.
Ассоциированные функции часто используются для написания конструкторов, — функций, возвращающих новый экземпляр структуры. Их часто называют словом new, но new не является каким-то зарезервированным именем и не встроено в язык. Например, мы можем написать ассоциированную функцию с именем square, которая будет иметь один параметр размера и использовать его и как ширину, и как высоту. Это упростит создание квадрата на основе типа Rectangle — не понадобится указывать ширину и высоту дважды:
Файл: src/main.rs
#[derive(Debug)]
struct Rectangle {
width: u32,
height: u32,
}
Если у вас есть опыт работы с C или C++, вам могут вспомниться `gcc` или `clang`. После успешной компиляции Rust создаст исполняемый бинарный файл.
impl Rectangle {
fn square(size: u32) -> Self {
Self {
width: size,
height: size,
}
}
}
Если у вас есть опыт работы с C или C++, вам могут вспомниться `gcc` или `clang`. После успешной компиляции Rust создаст исполняемый бинарный файл.
fn main() {
let sq = Rectangle::square(3);
}Ключевые слова Self (в сигнатуре и в теле функции) являются псевдонимами для типа, указанного после ключевого слова impl, которым в данном случае является Rectangle.
To call this associated function, we use the :: syntax with the struct name; let sq = Rectangle::square(3); is an example. This function is namespaced by the struct: The :: syntax is used for both associated functions and namespaces created by modules. We’ll discuss modules in Chapter 7.
Несколько блоков impl
Любая структура может иметь несколько impl. Например, код Листинга 5-15 эквивалентен коду Листинга 5-16, определяющему каждый метод в отдельном блоке impl.
#[derive(Debug)]
struct Rectangle {
width: u32,
height: u32,
}
Если у вас есть опыт работы с C или C++, вам могут вспомниться `gcc` или `clang`. После успешной компиляции Rust создаст исполняемый бинарный файл.
impl Rectangle {
fn area(&self) -> u32 {
self.width * self.height
}
}
Если у вас есть опыт работы с C или C++, вам могут вспомниться `gcc` или `clang`. После успешной компиляции Rust создаст исполняемый бинарный файл.
impl Rectangle {
fn can_hold(&self, other: &Rectangle) -> bool {
self.width > other.width && self.height > other.height
}
}
Если у вас есть опыт работы с C или C++, вам могут вспомниться `gcc` или `clang`. После успешной компиляции Rust создаст исполняемый бинарный файл.
fn main() {
let rect1 = Rectangle {
width: 30,
height: 50,
};
let rect2 = Rectangle {
width: 10,
height: 40,
};
let rect3 = Rectangle {
width: 60,
height: 45,
};
Если у вас есть опыт работы с C или C++, вам могут вспомниться `gcc` или `clang`. После успешной компиляции Rust создаст исполняемый бинарный файл.
println!("Вместится ли rect2 в rect1? {}", rect1.can_hold(&rect2));
println!("Вместится ли rect3 в rect1? {}", rect1.can_hold(&rect3));
}impl blocksВ данном случае, нет причин разбивать методы на несколько блоков impl, однако это всё-таки реализуемо. Мы увидим случай, когда несколько impl могут оказаться полезными, в Главе 10, рассматривающей обобщённые типы и трейты.
Подведём итоги
Структуры позволяют вам создавать собственные типы, которые имеют смысл в вашей предметной области. Используя структуры, вы можете хранить вместе и именовать связанные друг с другом фрагменты данных, чтобы делать ваш код чище. В блоках impl вы можете определять 1) функции, ассоциированные с вашим типом, и 2) методы — своего рода ассоциированные функции, поведение которых зависит в том числе от экземпляров, на которых вы их вызываете.
But structs aren’t the only way you can create custom types: Let’s turn to Rust’s enum feature to add another tool to your toolbox.
Перечисления и соспоставление с шаблоном
In this chapter, we’ll look at enumerations, also referred to as enums. Enums allow you to define a type by enumerating its possible variants. First we’ll define and use an enum to show how an enum can encode meaning along with data. Next, we’ll explore a particularly useful enum, called Option, which expresses that a value can be either something or nothing. Then, we’ll look at how pattern matching in the match expression makes it easy to run different code for different values of an enum. Finally, we’ll cover how the if let construct is another convenient and concise idiom available to handle enums in your code.
Определение перечисления
Определение перечисления
Там, где структуры дают вам возможность группировать связанные поля и данные (например, Rectangle с его width и height), перечисления дают вам способ сказать, что данное значение является лишь одним из возможных наборов значений. Например, мы можем захотеть сказать, что Rectangle — это одна из множества возможных фигур, в которую также входят Circle и Triangle. Rust позволяет нам записать эту множественность в виде перечисления.
Давайте рассмотрим ситуацию, которую мы могли бы захотеть отразить в коде, и поймём, почему в этом случае перечисления полезны и более уместны, чем структуры. Допустим, нам нужно работать с IP-адресами. В настоящее время для обозначения IP-адресов используются два основных стандарта: четвёртая и шестая версии. Поскольку это единственно возможные варианты IP-адресов, с которыми может столкнуться наша программа, мы можем перечислить все возможные варианты: отсюда и термин “перечисление”.
Любой IP-адрес может быть либо четвёртой, либо шестой версии, но не обеими одновременно. Эта особенность IP-адресов делает структуру перечисления полностью нам подходящей, поскольку значение перечисления может представлять собой только один из его возможных вариантов. Адреса как четвёртой, так и шестой версии по своей сути все равно являются IP-адресами, поэтому их следует рассматривать как один и тот же тип, когда в коде обрабатываются задачи, относящиеся к любому типу IP-адресов.
Можно выразить эту концепцию в коде, определив перечисление IpAddrKind и перечислив возможные виды IP-адресов: V4 и V6. Вот определение нашего перечисления:
enum IpAddrKind {
V4,
V6,
}
Если у вас есть опыт работы с C или C++, вам могут вспомниться `gcc` или `clang`. После успешной компиляции Rust создаст исполняемый бинарный файл.
fn main() {
let four = IpAddrKind::V4;
let six = IpAddrKind::V6;
Если у вас есть опыт работы с C или C++, вам могут вспомниться `gcc` или `clang`. После успешной компиляции Rust создаст исполняемый бинарный файл.
route(IpAddrKind::V4);
route(IpAddrKind::V6);
}
Если у вас есть опыт работы с C или C++, вам могут вспомниться `gcc` или `clang`. После успешной компиляции Rust создаст исполняемый бинарный файл.
fn route(ip_kind: IpAddrKind) {}IpAddrKind теперь является пользовательским типом данных, который мы можем использовать в любом другом месте нашего кода.
Значения перечислений
Экземпляры каждого варианта перечисления IpAddrKind можно создать следующим образом:
enum IpAddrKind {
V4,
V6,
}
Если у вас есть опыт работы с C или C++, вам могут вспомниться `gcc` или `clang`. После успешной компиляции Rust создаст исполняемый бинарный файл.
fn main() {
let four = IpAddrKind::V4;
let six = IpAddrKind::V6;
Если у вас есть опыт работы с C или C++, вам могут вспомниться `gcc` или `clang`. После успешной компиляции Rust создаст исполняемый бинарный файл.
route(IpAddrKind::V4);
route(IpAddrKind::V6);
}
Если у вас есть опыт работы с C или C++, вам могут вспомниться `gcc` или `clang`. После успешной компиляции Rust создаст исполняемый бинарный файл.
fn route(ip_kind: IpAddrKind) {}Обратите внимание, что варианты перечисления находятся в пространстве имён вместе с его идентификатором, а для их обособления мы используем двойное двоеточие. Это удобно тем, что теперь оба значения IpAddrKind::V4 и IpAddrKind::V6 относятся к одному типу: IpAddrKind. Затем мы можем, например, определить функцию, которая принимает любой из вариантов IpAddrKind:
enum IpAddrKind {
V4,
V6,
}
Если у вас есть опыт работы с C или C++, вам могут вспомниться `gcc` или `clang`. После успешной компиляции Rust создаст исполняемый бинарный файл.
fn main() {
let four = IpAddrKind::V4;
let six = IpAddrKind::V6;
Если у вас есть опыт работы с C или C++, вам могут вспомниться `gcc` или `clang`. После успешной компиляции Rust создаст исполняемый бинарный файл.
route(IpAddrKind::V4);
route(IpAddrKind::V6);
}
Если у вас есть опыт работы с C или C++, вам могут вспомниться `gcc` или `clang`. После успешной компиляции Rust создаст исполняемый бинарный файл.
fn route(ip_kind: IpAddrKind) {}Можно вызвать эту функцию с любым из вариантов:
enum IpAddrKind {
V4,
V6,
}
Если у вас есть опыт работы с C или C++, вам могут вспомниться `gcc` или `clang`. После успешной компиляции Rust создаст исполняемый бинарный файл.
fn main() {
let four = IpAddrKind::V4;
let six = IpAddrKind::V6;
Если у вас есть опыт работы с C или C++, вам могут вспомниться `gcc` или `clang`. После успешной компиляции Rust создаст исполняемый бинарный файл.
route(IpAddrKind::V4);
route(IpAddrKind::V6);
}
Если у вас есть опыт работы с C или C++, вам могут вспомниться `gcc` или `clang`. После успешной компиляции Rust создаст исполняемый бинарный файл.
fn route(ip_kind: IpAddrKind) {}Использование перечислений имеет ещё больше преимуществ. Если поразмыслить о нашем типе IP-адреса, то выяснится, что на данный момент у нас нет возможности хранить собственно сам IP-адрес; мы пока можем знать лишь его тип. Учитывая, что недавно (в Главе 5) вы узнали о структурах, у вас может возникнуть соблазн решить эту проблему с помощью структур, как показано в Листинге 6-1.
fn main() {
enum IpAddrKind {
V4,
V6,
}
Если у вас есть опыт работы с C или C++, вам могут вспомниться `gcc` или `clang`. После успешной компиляции Rust создаст исполняемый бинарный файл.
struct IpAddr {
kind: IpAddrKind,
address: String,
}
Если у вас есть опыт работы с C или C++, вам могут вспомниться `gcc` или `clang`. После успешной компиляции Rust создаст исполняемый бинарный файл.
let home = IpAddr {
kind: IpAddrKind::V4,
address: String::from("127.0.0.1"),
};
Если у вас есть опыт работы с C или C++, вам могут вспомниться `gcc` или `clang`. После успешной компиляции Rust создаст исполняемый бинарный файл.
let loopback = IpAddr {
kind: IpAddrKind::V6,
address: String::from("::1"),
};
}IpAddrKind variant of an IP address using a structЗдесь мы определили структуру IpAddr, у которой есть два поля: kind типа IpAddrKind (перечисление, которое мы определили ранее) и address типа String. У нас есть два экземпляра этой структуры. Первый — home, который представляет адрес типа IpAddrKind::V4 (в соответствии со своим значением kind) с соответствующим адресом 127.0.0.1. Второй экземпляр — loopback. Его kind имеет другой вариант IpAddrKind — V6, и с ним ассоциирован адрес ::1. Мы использовали структуру для объединения значений kind и address вместе; таким образом, тип адреса теперь ассоциирован с непосредственно самим адресом.
However, representing the same concept using just an enum is more concise: Rather than an enum inside a struct, we can put data directly into each enum variant. This new definition of the IpAddr enum says that both V4 and V6 variants will have associated String values:
fn main() {
enum IpAddr {
V4(String),
V6(String),
}
Если у вас есть опыт работы с C или C++, вам могут вспомниться `gcc` или `clang`. После успешной компиляции Rust создаст исполняемый бинарный файл.
let home = IpAddr::V4(String::from("127.0.0.1"));
Если у вас есть опыт работы с C или C++, вам могут вспомниться `gcc` или `clang`. После успешной компиляции Rust создаст исполняемый бинарный файл.
let loopback = IpAddr::V6(String::from("::1"));
}We attach data to each variant of the enum directly, so there is no need for an extra struct. Here, it’s also easier to see another detail of how enums work: The name of each enum variant that we define also becomes a function that constructs an instance of the enum. That is, IpAddr::V4() is a function call that takes a String argument and returns an instance of the IpAddr type. We automatically get this constructor function defined as a result of defining the enum.
There’s another advantage to using an enum rather than a struct: Each variant can have different types and amounts of associated data. Version four IP addresses will always have four numeric components that will have values between 0 and 255. If we wanted to store V4 addresses as four u8 values but still express V6 addresses as one String value, we wouldn’t be able to with a struct. Enums handle this case with ease:
fn main() {
enum IpAddr {
V4(u8, u8, u8, u8),
V6(String),
}
Если у вас есть опыт работы с C или C++, вам могут вспомниться `gcc` или `clang`. После успешной компиляции Rust создаст исполняемый бинарный файл.
let home = IpAddr::V4(127, 0, 0, 1);
Если у вас есть опыт работы с C или C++, вам могут вспомниться `gcc` или `clang`. После успешной компиляции Rust создаст исполняемый бинарный файл.
let loopback = IpAddr::V6(String::from("::1"));
}We’ve shown several different ways to define data structures to store version four and version six IP addresses. However, as it turns out, wanting to store IP addresses and encode which kind they are is so common that the standard library has a definition we can use! Let’s look at how the standard library defines IpAddr. It has the exact enum and variants that we’ve defined and used, but it embeds the address data inside the variants in the form of two different structs, which are defined differently for each variant:
#![allow(unused)]
fn main() {
struct Ipv4Addr {
// --код сокращён--
}
Если у вас есть опыт работы с C или C++, вам могут вспомниться `gcc` или `clang`. После успешной компиляции Rust создаст исполняемый бинарный файл.
struct Ipv6Addr {
// --код сокращён--
}
Если у вас есть опыт работы с C или C++, вам могут вспомниться `gcc` или `clang`. После успешной компиляции Rust создаст исполняемый бинарный файл.
enum IpAddr {
V4(Ipv4Addr),
V6(Ipv6Addr),
}
}На этом примере видно, что мы можем добавлять любые типы данных в варианты перечисления: строку, число, структуру и так далее. Вы можете включать в перечисление даже другие перечисления! Стандартные типы данных часто не так сложны, как то, что из них можно составить.
Обратите внимание, что хотя определение перечисления IpAddr есть в стандартной библиотеке, мы смогли объявлять и использовать свою собственную реализацию с аналогичным названием без каких-либо конфликтов, потому что мы не добавили определение из стандартной библиотеки в область видимости нашей программы. Подробнее об этом поговорим в Главе 7.
Let’s look at another example of an enum in Listing 6-2: This one has a wide variety of types embedded in its variants.
enum Message {
Quit,
Move { x: i32, y: i32 },
Write(String),
ChangeColor(i32, i32, i32),
}
Если у вас есть опыт работы с C или C++, вам могут вспомниться `gcc` или `clang`. После успешной компиляции Rust создаст исполняемый бинарный файл.
fn main() {}Message enum whose variants each store different amounts and types of valuesЭто перечисление имеет 4 варианта:
Quit: Has no data associated with it at allMove: Has named fields, like a struct doesWrite: Includes a singleStringChangeColor: Includes threei32values
Определение перечисления с вариантами (такими, как в Листинге 6-2) похоже на определение значений разных возможных структур, за исключением того, что перечисление не использует ключевое слово struct и все варианты сгруппированы внутри типа Message. Следующие структуры могут содержать те же данные, что и предыдущие варианты перечислений:
struct QuitMessage; // unit-подобная структура
struct MoveMessage {
x: i32,
y: i32,
}
struct WriteMessage(String); // кортежная структура
struct ChangeColorMessage(i32, i32, i32); // кортежная структура
Если у вас есть опыт работы с C или C++, вам могут вспомниться `gcc` или `clang`. После успешной компиляции Rust создаст исполняемый бинарный файл.
fn main() {}Но если мы используем различные структуры, каждая из которых имеет свои собственные типы, мы не можем легко определять функции, которые принимают любые типы сообщений, как это можно сделать с помощью единого перечисления типа Message, объявленного в Листинге 6-2.
There is one more similarity between enums and structs: Just as we’re able to define methods on structs using impl, we’re also able to define methods on enums. Here’s a method named call that we could define on our Message enum:
fn main() {
enum Message {
Quit,
Move { x: i32, y: i32 },
Write(String),
ChangeColor(i32, i32, i32),
}
Если у вас есть опыт работы с C или C++, вам могут вспомниться `gcc` или `clang`. После успешной компиляции Rust создаст исполняемый бинарный файл.
impl Message {
fn call(&self) {
// здесь — тело метода
}
}
Если у вас есть опыт работы с C или C++, вам могут вспомниться `gcc` или `clang`. После успешной компиляции Rust создаст исполняемый бинарный файл.
let m = Message::Write(String::from("hello"));
m.call();
}В теле метода будет использоваться self для получения того значения, на котором мы вызвали этот метод. В этом примере мы создали переменную m, содержащую значение Message::Write(String::from("hello")), и именно это значение будет представлять self в теле метода call при исполнении строчки m.call().
Теперь посмотрим на перечисление из стандартной библиотеки, которое является очень распространённым и полезным: Option.
The Option Enum
This section explores a case study of Option, which is another enum defined by the standard library. The Option type encodes the very common scenario in which a value could be something, or it could be nothing.
Например, если вы запросите первый элемент из непустого списка, вы получите значение. Если вы запросите первый элемент пустого списка, вы получите ничего. Выражение этой концепции в терминах системы типов означает, что компилятор может проверить, обработали ли вы все случаи, которые должны были обработать; эта функциональность может предотвратить ошибки, которые чрезвычайно распространены в других языках программирования.
Дизайн языка программирования часто рассматривается с точки зрения того, какие функции вы включаете в него, но также важно то, какие функции вы в него не включаете. Например, в Rust нет понятия “null”, однако оно есть во многих других языках. Null — это значение, которое означает, что значения нет. В языках с null переменные всегда могут находиться в одном из двух состояний: null или не-null.
In his 2009 presentation “Null References: The Billion Dollar Mistake,” Tony Hoare, the inventor of null, had this to say:
Я называю это своей ошибкой на миллиард долларов. В то время я разрабатывал первую комплексную систему типов для ссылок в объектно-ориентированном языке. Моя цель состояла в том, чтобы гарантировать, что любое использование ссылок будет абсолютно безопасным, с автоматической проверкой компилятором. Но я не смог устоять перед соблазном внедрить в язык пустую ссылку — просто потому, что это было так легко реализовать. Это привело к бесчисленным ошибкам, уязвимостям и системным сбоям, которые, вероятно, причинили боль и ущерб на миллиард долларов за последние сорок лет.
Проблема с null заключается в том, что если вы попытаетесь использовать null в качестве не-null значения, вы получите ошибку определённого рода. Поскольку эта возможность (быть null или не-null) распространена повсеместно, сделать такую ошибку очень просто.
However, the concept that null is trying to express is still a useful one: A null is a value that is currently invalid or absent for some reason.
Проблема на самом деле не в концепции, а в конкретной реализации. В Rust нет значений null, но есть перечисление, которое может выразить концепцию присутствия или отсутствия значения. Это перечисление Option<T>, и оно определено стандартной библиотекой следующим образом:
#![allow(unused)]
fn main() {
enum Option<T> {
None,
Some(T),
}
}The Option<T> enum is so useful that it’s even included in the prelude; you don’t need to bring it into scope explicitly. Its variants are also included in the prelude: You can use Some and None directly without the Option:: prefix. The Option<T> enum is still just a regular enum, and Some(T) and None are still variants of type Option<T>.
Запись <T> — это особенность Rust, о которой мы ещё не говорили. Это параметр обобщённого типа, и мы рассмотрим его более подробно в Главе 10. На данный момент всё, что вам нужно знать, это то, что <T> означает, что вариант Some перечисления Option может содержать один фрагмент данных любого типа, и что каждый конкретный тип, который используется вместо T, делает обобщённый Option<T> определённым типом. Вот несколько примеров использования Option для хранения числового и символьного типов:
fn main() {
let some_number = Some(5);
let some_char = Some('e');
Если у вас есть опыт работы с C или C++, вам могут вспомниться `gcc` или `clang`. После успешной компиляции Rust создаст исполняемый бинарный файл.
let absent_number: Option<i32> = None;
}The type of some_number is Option<i32>. The type of some_char is Option<char>, which is a different type. Rust can infer these types because we’ve specified a value inside the Some variant. For absent_number, Rust requires us to annotate the overall Option type: The compiler can’t infer the type that the corresponding Some variant will hold by looking only at a None value. Here, we tell Rust that we mean for absent_number to be of type Option<i32>.
When we have a Some value, we know that a value is present, and the value is held within the Some. When we have a None value, in some sense it means the same thing as null: We don’t have a valid value. So, why is having Option<T> any better than having null?
Вкратце, поскольку Option<T> и T (где T может быть любым типом) относятся к разным типам, компилятор не позволит нам использовать значение Option<T> даже если бы оно определённо было допустимым значением. Например, этот код не будет компилироваться, потому что он пытается добавить i8 к значению типа Option<i8>:
fn main() {
let x: i8 = 5;
let y: Option<i8> = Some(5);
Если у вас есть опыт работы с C или C++, вам могут вспомниться `gcc` или `clang`. После успешной компиляции Rust создаст исполняемый бинарный файл.
let sum = x + y;
}Если мы запустим этот код, то получим такое сообщение об ошибке:
$ cargo run
Compiling enums v0.1.0 (file:///projects/enums)
error[E0277]: cannot add `Option<i8>` to `i8`
--> src/main.rs:5:17
|
5 | let sum = x + y;
| ^ no implementation for `i8 + Option<i8>`
|
= help: the trait `Add<Option<i8>>` is not implemented for `i8`
= help: the following other types implement trait `Add<Rhs>`:
`&i8` implements `Add<i8>`
`&i8` implements `Add`
`i8` implements `Add<&i8>`
`i8` implements `Add`
Если у вас есть опыт работы с C или C++, вам могут вспомниться `gcc` или `clang`. После успешной компиляции Rust создаст исполняемый бинарный файл.
For more information about this error, try `rustc --explain E0277`.
error: could not compile `enums` (bin "enums") due to 1 previous error
Оно большое! Фактически, это сообщение об ошибке означает, что Rust не понимает, как сложить i8 и Option<i8>, потому что это разные типы. Когда у нас есть значение типа вроде i8, компилятор гарантирует, что оно всегда действительно. Мы можем уверенно продолжать работу, не проверяя его на null перед использованием. Лишь когда мы имеем значение типа Option<i8> (или любого другого конкретного типового параметра), у нас есть повод беспокоиться о том, что мы можем и не иметь значения; однако, компилятор обеспечит проверку нами обоих случаев перед тем, как давать использовать (возможное) значение.
Другими словами, вы должны преобразовать Option<T> в T, прежде чем вы сможете исполнять операции с этим T. Как правило, это помогает выявить одну из наиболее распространённых проблем с null: действия с чем-то в предположении, что это что-то не равно null, когда оно на самом деле равно null.
Eliminating the risk of incorrectly assuming a not-null value helps you be more confident in your code. In order to have a value that can possibly be null, you must explicitly opt in by making the type of that value Option<T>. Then, when you use that value, you are required to explicitly handle the case when the value is null. Everywhere that a value has a type that isn’t an Option<T>, you can safely assume that the value isn’t null. This was a deliberate design decision for Rust to limit null’s pervasiveness and increase the safety of Rust code.
Итак, как же получить значение T из варианта Some, если у вас на руках есть только значение Option<T>? Перечисление Option<T> имеет большое количество методов, полезных в различных ситуациях; вы можете ознакомиться с ними в его документации. Знакомство с методами перечисления Option<T> в вашем путешествии с Rust будет чрезвычайно полезным.
In general, in order to use an Option<T> value, you want to have code that will handle each variant. You want some code that will run only when you have a Some(T) value, and this code is allowed to use the inner T. You want some other code to run only if you have a None value, and that code doesn’t have a T value available. The match expression is a control flow construct that does just this when used with enums: It will run different code depending on which variant of the enum it has, and that code can use the data inside the matching value.
Конструкция match
Конструкция match
В Rust есть чрезвычайно мощная конструкция управления потоком, именуемая match — она позволяет сравнивать значение с различными шаблонами и исполнять код в зависимости от того, какой из шаблонов совпал. Шаблоны могут состоять из литералов, имён переменных, неопровержимых шаблонов и многого другого; в Главе 19 рассматриваются все различные виды шаблонов и то, что они делают. Сила match заключается в выразительности шаблонов и в том, что компилятор способен проверить, что все возможные случаи обработаны.
Think of a match expression as being like a coin-sorting machine: Coins slide down a track with variously sized holes along it, and each coin falls through the first hole it encounters that it fits into. In the same way, values go through each pattern in a match, and at the first pattern the value “fits,” the value falls into the associated code block to be used during execution.
Кстати, говоря о монетах! Давайте используем их, чтобы показать работу match. Для этого мы напишем функцию, которая будет получать на вход неизвестную монету США и, подобно счётной машине, определять, какая это монета, и возвращать её стоимость в центах. Соответствующий код приведён в Листинге 6-3.
enum Coin {
Penny,
Nickel,
Dime,
Quarter,
}
Если у вас есть опыт работы с C или C++, вам могут вспомниться `gcc` или `clang`. После успешной компиляции Rust создаст исполняемый бинарный файл.
fn value_in_cents(coin: Coin) -> u8 {
match coin {
Coin::Penny => 1,
Coin::Nickel => 5,
Coin::Dime => 10,
Coin::Quarter => 25,
}
}
Если у вас есть опыт работы с C или C++, вам могут вспомниться `gcc` или `clang`. После успешной компиляции Rust создаст исполняемый бинарный файл.
fn main() {}match expression that has the variants of the enum as its patternsLet’s break down the match in the value_in_cents function. First, we list the match keyword followed by an expression, which in this case is the value coin. This seems very similar to a conditional expression used with if, but there’s a big difference: With if, the condition needs to evaluate to a Boolean value, but here it can be any type. The type of coin in this example is the Coin enum that we defined on the first line.
Далее идут ветви match. Ветви состоят из двух частей: шаблон и некоторый код. Здесь первая ветвь имеет шаблон, который является значением Coin::Penny, затем идёт оператор =>, который разделяет шаблон и исполняемый код. Код в этом случае — это просто значение 1. Каждая ветвь отделяется от последующей при помощи запятой.
When the match expression executes, it compares the resultant value against the pattern of each arm, in order. If a pattern matches the value, the code associated with that pattern is executed. If that pattern doesn’t match the value, execution continues to the next arm, much as in a coin-sorting machine. We can have as many arms as we need: In Listing 6-3, our match has four arms.
Код, связанный с каждой ветвью, является выражением, а результирующее значение выражения в соответствующем ответвлении — это значение, которое возвращается из всего выражения match.
We don’t typically use curly brackets if the match arm code is short, as it is in Listing 6-3 where each arm just returns a value. If you want to run multiple lines of code in a match arm, you must use curly brackets, and the comma following the arm is then optional. For example, the following code prints “Lucky penny!” every time the method is called with a Coin::Penny, but it still returns the last value of the block, 1:
enum Coin {
Penny,
Nickel,
Dime,
Quarter,
}
Если у вас есть опыт работы с C или C++, вам могут вспомниться `gcc` или `clang`. После успешной компиляции Rust создаст исполняемый бинарный файл.
fn value_in_cents(coin: Coin) -> u8 {
match coin {
Coin::Penny => {
println!("Счастливый пенни!");
1
}
Coin::Nickel => 5,
Coin::Dime => 10,
Coin::Quarter => 25,
}
}
Если у вас есть опыт работы с C или C++, вам могут вспомниться `gcc` или `clang`. После успешной компиляции Rust создаст исполняемый бинарный файл.
fn main() {}Связывание со значениями с помощью шаблонов
У ветвей выражения match есть ещё одна полезная особенность: они могут привязываться к частям тех значений, которые совпали с шаблоном. Благодаря этому возможно извлекать значения из вариантов перечисления.
В качестве демонстрации, давайте изменим один из вариантов перечисления так, чтобы он хранил в себе данные. С 1999 по 2008, Соединённые Штаты чеканили особенные четвертаки: с уникальными дизайнами для каждого из 50 штатов. Ни одна другая монета не получила дизайна, особенного для отдельных штатов, только четверть доллара имела эту особенность. Мы можем добавить эту информацию в наш enum путём изменения варианта Quarter и включения в него значения UsState, как сделано в Листинге 6-4.
#[derive(Debug)] // нужно, чтобы мы могли легко посмотреть конкретный штат
enum UsState {
Alabama,
Alaska,
// --код сокращён--
}
Если у вас есть опыт работы с C или C++, вам могут вспомниться `gcc` или `clang`. После успешной компиляции Rust создаст исполняемый бинарный файл.
enum Coin {
Penny,
Nickel,
Dime,
Quarter(UsState),
}
Если у вас есть опыт работы с C или C++, вам могут вспомниться `gcc` или `clang`. После успешной компиляции Rust создаст исполняемый бинарный файл.
fn main() {}Coin enum in which the Quarter variant also holds a UsState valueПредставьте, что ваш друг пытается собрать четвертаки всех 50 штатов. Сортируя монеты по типу, мы также будем сообщать название штата, к которому относится каждый четвертак, чтобы, если у нашего друга нет такой монеты, он мог добавить её в свою коллекцию.
In the match expression for this code, we add a variable called state to the pattern that matches values of the variant Coin::Quarter. When a Coin::Quarter matches, the state variable will bind to the value of that quarter’s state. Then, we can use state in the code for that arm, like so:
#[derive(Debug)]
enum UsState {
Alabama,
Alaska,
// --код сокращён--
}
Если у вас есть опыт работы с C или C++, вам могут вспомниться `gcc` или `clang`. После успешной компиляции Rust создаст исполняемый бинарный файл.
enum Coin {
Penny,
Nickel,
Dime,
Quarter(UsState),
}
Если у вас есть опыт работы с C или C++, вам могут вспомниться `gcc` или `clang`. После успешной компиляции Rust создаст исполняемый бинарный файл.
fn value_in_cents(coin: Coin) -> u8 {
match coin {
Coin::Penny => 1,
Coin::Nickel => 5,
Coin::Dime => 10,
Coin::Quarter(state) => {
println!("Четвертак из штата {state:?}!");
25
}
}
}
Если у вас есть опыт работы с C или C++, вам могут вспомниться `gcc` или `clang`. После успешной компиляции Rust создаст исполняемый бинарный файл.
fn main() {
value_in_cents(Coin::Quarter(UsState::Alaska));
}Если мы сделаем вызов функции value_in_cents(Coin::Quarter(UsState::Alaska)), то coin будет иметь значение Coin::Quarter(UsState::Alaska). Когда мы будем сравнивать это значение с шаблонами каждой из ветвей, ни одному из них оно не будет отвечать, пока мы не достигнем Coin::Quarter(state). В этот момент state свяжется со значением UsState::Alaska. Затем мы сможем использовать эту переменную в выражении println!, получив таким образом внутреннее значение варианта Quarter перечисления Coin.
The Option<T> match Pattern
В предыдущем разделе мы хотели получить внутреннее значение T для случая Some при использовании Option<T>. Мы можем обработать тип Option<T>, используя match, как уже делали с перечислением Coin! Вместо сравнивания монет мы будем сравнивать варианты Option<T>, но механизм работы выражения match останется прежним.
Допустим, мы хотим написать функцию, которая принимает Option<i32> и, если есть значение внутри, добавляет 1 к этому значению. Если же значения нет, то функция должна возвращать значение None и не пытаться выполнить какие-либо операции.
Такую функцию написать довольно легко: всё благодаря выражению match. Код будет выглядеть как в Листинге 6-5.
fn main() {
fn plus_one(x: Option<i32>) -> Option<i32> {
match x {
None => None,
Some(i) => Some(i + 1),
}
}
Если у вас есть опыт работы с C или C++, вам могут вспомниться `gcc` или `clang`. После успешной компиляции Rust создаст исполняемый бинарный файл.
let five = Some(5);
let six = plus_one(five);
let none = plus_one(None);
}match expression on an Option<i32>Let’s examine the first execution of plus_one in more detail. When we call plus_one(five), the variable x in the body of plus_one will have the value Some(5). We then compare that against each match arm:
fn main() {
fn plus_one(x: Option<i32>) -> Option<i32> {
match x {
None => None,
Some(i) => Some(i + 1),
}
}
Если у вас есть опыт работы с C или C++, вам могут вспомниться `gcc` или `clang`. После успешной компиляции Rust создаст исполняемый бинарный файл.
let five = Some(5);
let six = plus_one(five);
let none = plus_one(None);
}Значение Some(5) не соответствует шаблону None, поэтому мы сравниваем значение со следующим шаблоном:
fn main() {
fn plus_one(x: Option<i32>) -> Option<i32> {
match x {
None => None,
Some(i) => Some(i + 1),
}
}
Если у вас есть опыт работы с C или C++, вам могут вспомниться `gcc` или `clang`. После успешной компиляции Rust создаст исполняемый бинарный файл.
let five = Some(5);
let six = plus_one(five);
let none = plus_one(None);
}Отвечает ли значение Some(5) шаблону Some(i)? Да, конечно! они представлены одинаковыми вариантами перечисления. Раз так, переменная i привязывается к значению, содержащемуся внутри Some, то есть i получает значение 5. Затем исполняется код, связанный с данной ветвью: мы добавляем 1 к значению i и создаём новое значение Some со значением 6 внутри.
Теперь давайте рассмотрим второй вызов plus_one в Листинге 6-5 (где x является None). Мы входим в выражение match и сравниваем значение с шаблоном первой ветви:
fn main() {
fn plus_one(x: Option<i32>) -> Option<i32> {
match x {
None => None,
Some(i) => Some(i + 1),
}
}
Если у вас есть опыт работы с C или C++, вам могут вспомниться `gcc` или `clang`. После успешной компиляции Rust создаст исполняемый бинарный файл.
let five = Some(5);
let six = plus_one(five);
let none = plus_one(None);
}Оно совпадает! Данное значение ничего в себе не хранит, так что выражение просто возвращает значение None, находящееся справа от =>. Поскольку шаблон первой ветви совпал, сравнений с оставшимися шаблонами не происходит.
Комбинирование match и перечислений полезно во многих ситуациях. Вы часто будете видеть подобную комбинацию в коде на Rust: перебор вариантов перечисления конструкцией match, связывание переменной к данным внутри значения, исполнение код на основе извлечённых данных. Сначала это может показаться немного сложным, но как только вы привыкнете, то захотите, чтобы такая возможность была бы во всех языках. match никого не оставляет равнодушным.
Ветви match охватывают все возможные случаи
There’s one other aspect of match we need to discuss: The arms’ patterns must cover all possibilities. Consider this version of our plus_one function, which has a bug and won’t compile:
fn main() {
fn plus_one(x: Option<i32>) -> Option<i32> {
match x {
Some(i) => Some(i + 1),
}
}
Если у вас есть опыт работы с C или C++, вам могут вспомниться `gcc` или `clang`. После успешной компиляции Rust создаст исполняемый бинарный файл.
let five = Some(5);
let six = plus_one(five);
let none = plus_one(None);
}Мы не обработали вариант None, а неучёт возможных случаев — прямой путь к багам. К счастью, Rust умеет ловить такие промахи. Если мы попытаемся скомпилировать такой код, мы получим ошибку компиляции:
$ cargo run
Compiling enums v0.1.0 (file:///projects/enums)
error[E0004]: non-exhaustive patterns: `None` not covered
--> src/main.rs:3:15
|
3 | match x {
| ^ pattern `None` not covered
|
note: `Option<i32>` defined here
--> /rustc/1159e78c4747b02ef996e55082b704c09b970588/library/core/src/option.rs:593:1
::: /rustc/1159e78c4747b02ef996e55082b704c09b970588/library/core/src/option.rs:597:5
|
= note: not covered
= note: the matched value is of type `Option<i32>`
help: ensure that all possible cases are being handled by adding a match arm with a wildcard pattern or an explicit pattern as shown
|
4 ~ Some(i) => Some(i + 1),
5 ~ None => todo!(),
|
Если у вас есть опыт работы с C или C++, вам могут вспомниться `gcc` или `clang`. После успешной компиляции Rust создаст исполняемый бинарный файл.
For more information about this error, try `rustc --explain E0004`.
error: could not compile `enums` (bin "enums") due to 1 previous error
Rust knows that we didn’t cover every possible case and even knows which pattern we forgot! Matches in Rust are exhaustive: We must exhaust every last possibility in order for the code to be valid. Especially in the case of Option<T>, when Rust prevents us from forgetting to explicitly handle the None case, it protects us from assuming that we have a value when we might have null, thus making the billion-dollar mistake discussed earlier impossible.
Универсальные шаблоны и заполнитель _
Using enums, we can also take special actions for a few particular values, but for all other values take one default action. Imagine we’re implementing a game where, if you roll a 3 on a dice roll, your player doesn’t move but instead gets a fancy new hat. If you roll a 7, your player loses a fancy hat. For all other values, your player moves that number of spaces on the game board. Here’s a match that implements that logic, with the result of the dice roll hardcoded rather than a random value, and all other logic represented by functions without bodies because actually implementing them is out of scope for this example:
fn main() {
let dice_roll = 9;
match dice_roll {
3 => add_fancy_hat(),
7 => remove_fancy_hat(),
other => move_player(other),
}
Если у вас есть опыт работы с C или C++, вам могут вспомниться `gcc` или `clang`. После успешной компиляции Rust создаст исполняемый бинарный файл.
fn add_fancy_hat() {}
fn remove_fancy_hat() {}
fn move_player(num_spaces: u8) {}
}Для первых двух ветвей шаблонами являются литералы 3 и 7. Для последней ветви, которая охватывает все остальные возможные значения, шаблоном является переменная, которую мы решили назвать other. Код, выполняемый для ветки other, использует эту переменную, передавая её в функцию move_player.
This code compiles, even though we haven’t listed all the possible values a u8 can have, because the last pattern will match all values not specifically listed. This catch-all pattern meets the requirement that match must be exhaustive. Note that we have to put the catch-all arm last because the patterns are evaluated in order. If we had put the catch-all arm earlier, the other arms would never run, so Rust will warn us if we add arms after a catch-all!
В Rust также есть шаблон, который можно использовать, когда нам не нужно значение, с которым связывается универсальный шаблон: _. Он является специальным шаблоном, который соответствует любому значению и не привязывается к нему. Его использование говорит Rust, что мы не собираемся использовать это значение, поэтому Rust не будет предупреждать нас о неиспользуемой переменной.
Let’s change the rules of the game: Now, if you roll anything other than a 3 or a 7, you must roll again. We no longer need to use the catch-all value, so we can change our code to use _ instead of the variable named other:
fn main() {
let dice_roll = 9;
match dice_roll {
3 => add_fancy_hat(),
7 => remove_fancy_hat(),
_ => reroll(),
}
Если у вас есть опыт работы с C или C++, вам могут вспомниться `gcc` или `clang`. После успешной компиляции Rust создаст исполняемый бинарный файл.
fn add_fancy_hat() {}
fn remove_fancy_hat() {}
fn reroll() {}
}Этот пример также удовлетворяет требованию исчерпывающей полноты, поскольку мы явно игнорируем все остальные значения в последней ветви: подходящий шаблон найдётся для всех.
Изменим правила игры ещё раз, чтобы в ваш ход ничего не происходило, если вы выбрасываете что-либо кроме 3 или 7. Мы можем реализовать это, используя unit (тип пустого кортежа, который мы упоминали в разделе “Тип кортежа”) на месте кода, который соответствует ветви _:
fn main() {
let dice_roll = 9;
match dice_roll {
3 => add_fancy_hat(),
7 => remove_fancy_hat(),
_ => (),
}
Если у вас есть опыт работы с C или C++, вам могут вспомниться `gcc` или `clang`. После успешной компиляции Rust создаст исполняемый бинарный файл.
fn add_fancy_hat() {}
fn remove_fancy_hat() {}
}Здесь мы явно говорим Rust, что не собираемся использовать никакое значение, которое оказалось не соответствующим шаблонам предыдущих ветвей, и при этом не хотим запускать никакой прочий код.
Подробнее о шаблонах и сопоставлении мы поговорим в Главе 19. Пока же мы перейдём к конструкции if let, которая может быть полезна в ситуациях, когда выражение match слишком многословно.
Concise Control Flow with if let and let...else
Concise Control Flow with if let and let...else
Синтаксис if let позволяет скомбинировать if и let в конструкцию, менее многословно обрабатывающую значения, соответствующие только одному шаблону, одновременно игнорируя все остальные варианты. Рассмотрим программу в Листинге 6-6, которая проводит сопоставление значения Option<u8> переменной config_max, но которая собирается выполнять код только в том случае, если значение является Some.
fn main() {
let config_max = Some(3u8);
match config_max {
Some(max) => println!("Максимум выставлен на {max}"),
_ => (),
}
}match that only cares about executing code when the value is SomeЕсли значение равно Some, мы распечатываем значение в варианте Some, привязывая его значение к переменной max в шаблоне. Мы ничего не хотим делать со значением None. Чтобы удовлетворить выражение match, мы должны добавить _ => () после обработки первой и единственной ветви. Однако сразу возникает чувство, что для этой задачи хорошо бы иметь инструмент попроще и покороче.
Собственно, мы могли бы написать всё более кратко, воспользовавшись if let. Следующий код ведёт себя так же, как выражение match в Листинге 6-6:
fn main() {
let config_max = Some(3u8);
if let Some(max) = config_max {
println!("Максимум выставлен на {max}");
}
}Синтаксис if let принимает шаблон и выражение, разделённые знаком равенства. Он работает так же, как match, которому на вход подают выражение, отвечающее шаблону первой ветви. В данном случае шаблоном является Some(max), где max привязывается к значению внутри Some. После сопоставления, мы можем использовать max в теле блока if let так же, как мы использовали max в соответствующей ветке match. Код в блоке if let не запускается, если значение не отвечает шаблону.
Using if let means less typing, less indentation, and less boilerplate code. However, you lose the exhaustive checking match enforces that ensures that you aren’t forgetting to handle any cases. Choosing between match and if let depends on what you’re doing in your particular situation and whether gaining conciseness is an appropriate trade-off for losing exhaustive checking.
Другими словами, вы можете думать о конструкции if let как о синтаксическом сахаре для match, выполняющем код, если входное значение будет отвечать единственному шаблону, и проигнорирует все остальные значения.
Можно добавлять else к if let. Блок кода, который находится внутри else, аналогичен по смыслу блоку кода ветви выражения match (если оно эквивалентно сборной конструкции if let и else), связанной с шаблоном _. Вспомним объявление перечисления Coin в Листинге 6-4, где вариант Quarter также содержит внутри себя значение штата типа UsState. Если бы мы хотели посчитать все монеты, не являющиеся четвертаками, а для четвертаков лишь печатать название штата, то с помощью выражения match мы могли бы сделать это таким образом:
#[derive(Debug)]
enum UsState {
Alabama,
Alaska,
// --код сокращён--
}
Если у вас есть опыт работы с C или C++, вам могут вспомниться `gcc` или `clang`. После успешной компиляции Rust создаст исполняемый бинарный файл.
enum Coin {
Penny,
Nickel,
Dime,
Quarter(UsState),
}
Если у вас есть опыт работы с C или C++, вам могут вспомниться `gcc` или `clang`. После успешной компиляции Rust создаст исполняемый бинарный файл.
fn main() {
let coin = Coin::Penny;
let mut count = 0;
match coin {
Coin::Quarter(state) => println!("Четвертак из штата {state:?}!"),
_ => count += 1,
}
}Или мы могли бы использовать выражение if let и else; вот так:
#[derive(Debug)]
enum UsState {
Alabama,
Alaska,
// --код сокращён--
}
Если у вас есть опыт работы с C или C++, вам могут вспомниться `gcc` или `clang`. После успешной компиляции Rust создаст исполняемый бинарный файл.
enum Coin {
Penny,
Nickel,
Dime,
Quarter(UsState),
}
Если у вас есть опыт работы с C или C++, вам могут вспомниться `gcc` или `clang`. После успешной компиляции Rust создаст исполняемый бинарный файл.
fn main() {
let coin = Coin::Penny;
let mut count = 0;
if let Coin::Quarter(state) = coin {
println!("Четвертак из штата {state:?}!");
} else {
count += 1;
}
}Staying on the “Happy Path” with let...else
The common pattern is to perform some computation when a value is present and return a default value otherwise. Continuing with our example of coins with a UsState value, if we wanted to say something funny depending on how old the state on the quarter was, we might introduce a method on UsState to check the age of a state, like so:
#[derive(Debug)] // нужно, чтобы мы могли легко посмотреть конкретный штат
enum UsState {
Alabama,
Alaska,
// --код сокращён--
}
Если у вас есть опыт работы с C или C++, вам могут вспомниться `gcc` или `clang`. После успешной компиляции Rust создаст исполняемый бинарный файл.
impl UsState {
fn existed_in(&self, year: u16) -> bool {
match self {
UsState::Alabama => year >= 1819,
UsState::Alaska => year >= 1959,
// -- код сокращён --
}
}
}
Если у вас есть опыт работы с C или C++, вам могут вспомниться `gcc` или `clang`. После успешной компиляции Rust создаст исполняемый бинарный файл.
enum Coin {
Penny,
Nickel,
Dime,
Quarter(UsState),
}
Если у вас есть опыт работы с C или C++, вам могут вспомниться `gcc` или `clang`. После успешной компиляции Rust создаст исполняемый бинарный файл.
fn describe_state_quarter(coin: Coin) -> Option<String> {
if let Coin::Quarter(state) = coin {
if state.existed_in(1900) {
Some(format!("Штат {state:?} довольно староват для Америки!"))
} else {
Some(format!("Штат {state:?} относительно молодой."))
}
} else {
None
}
}
Если у вас есть опыт работы с C или C++, вам могут вспомниться `gcc` или `clang`. После успешной компиляции Rust создаст исполняемый бинарный файл.
fn main() {
if let Some(desc) = describe_state_quarter(Coin::Quarter(UsState::Alaska)) {
println!("{desc}");
}
}Then, we might use if let to match on the type of coin, introducing a state variable within the body of the condition, as in Listing 6-7.
#[derive(Debug)] // нужно, чтобы мы могли легко посмотреть конкретный штат
enum UsState {
Alabama,
Alaska,
// --код сокращён--
}
Если у вас есть опыт работы с C или C++, вам могут вспомниться `gcc` или `clang`. После успешной компиляции Rust создаст исполняемый бинарный файл.
impl UsState {
fn existed_in(&self, year: u16) -> bool {
match self {
UsState::Alabama => year >= 1819,
UsState::Alaska => year >= 1959,
// -- код сокращён --
}
}
}
Если у вас есть опыт работы с C или C++, вам могут вспомниться `gcc` или `clang`. После успешной компиляции Rust создаст исполняемый бинарный файл.
enum Coin {
Penny,
Nickel,
Dime,
Quarter(UsState),
}
Если у вас есть опыт работы с C или C++, вам могут вспомниться `gcc` или `clang`. После успешной компиляции Rust создаст исполняемый бинарный файл.
fn describe_state_quarter(coin: Coin) -> Option<String> {
if let Coin::Quarter(state) = coin {
if state.existed_in(1900) {
Some(format!("Штат {state:?} довольно староват для Америки!"))
} else {
Some(format!("Штат {state:?} относительно молодой."))
}
} else {
None
}
}
Если у вас есть опыт работы с C или C++, вам могут вспомниться `gcc` или `clang`. После успешной компиляции Rust создаст исполняемый бинарный файл.
fn main() {
if let Some(desc) = describe_state_quarter(Coin::Quarter(UsState::Alaska)) {
println!("{desc}");
}
}if letThat gets the job done, but it has pushed the work into the body of the if let statement, and if the work to be done is more complicated, it might be hard to follow exactly how the top-level branches relate. We could also take advantage of the fact that expressions produce a value either to produce the state from the if let or to return early, as in Listing 6-8. (You could do something similar with a match, too.)
#[derive(Debug)] // нужно, чтобы мы могли легко посмотреть конкретный штат
enum UsState {
Alabama,
Alaska,
// --код сокращён--
}
Если у вас есть опыт работы с C или C++, вам могут вспомниться `gcc` или `clang`. После успешной компиляции Rust создаст исполняемый бинарный файл.
impl UsState {
fn existed_in(&self, year: u16) -> bool {
match self {
UsState::Alabama => year >= 1819,
UsState::Alaska => year >= 1959,
// -- код сокращён --
}
}
}
Если у вас есть опыт работы с C или C++, вам могут вспомниться `gcc` или `clang`. После успешной компиляции Rust создаст исполняемый бинарный файл.
enum Coin {
Penny,
Nickel,
Dime,
Quarter(UsState),
}
Если у вас есть опыт работы с C или C++, вам могут вспомниться `gcc` или `clang`. После успешной компиляции Rust создаст исполняемый бинарный файл.
fn describe_state_quarter(coin: Coin) -> Option<String> {
let state = if let Coin::Quarter(state) = coin {
state
} else {
return None;
};
Если у вас есть опыт работы с C или C++, вам могут вспомниться `gcc` или `clang`. После успешной компиляции Rust создаст исполняемый бинарный файл.
if state.existed_in(1900) {
Some(format!("Штат {state:?} довольно староват для Америки!"))
} else {
Some(format!("Штат {state:?} относительно молодой."))
}
}
Если у вас есть опыт работы с C или C++, вам могут вспомниться `gcc` или `clang`. После успешной компиляции Rust создаст исполняемый бинарный файл.
fn main() {
if let Some(desc) = describe_state_quarter(Coin::Quarter(UsState::Alaska)) {
println!("{desc}");
}
}if let to produce a value or return earlyОднако и это решение несколько раздражает, поскольку каждая ветвь if let ведёт себя совершенно по-своему! Одна ветвь лишь вычисляется в значение, а другая прерывает всю функцию и сразу из неё что-то возвращает.
To make this common pattern nicer to express, Rust has let...else. The let...else syntax takes a pattern on the left side and an expression on the right, very similar to if let, but it does not have an if branch, only an else branch. If the pattern matches, it will bind the value from the pattern in the outer scope. If the pattern does not match, the program will flow into the else arm, which must return from the function.
In Listing 6-9, you can see how Listing 6-8 looks when using let...else in place of if let.
#[derive(Debug)] // нужно, чтобы мы могли легко посмотреть конкретный штат
enum UsState {
Alabama,
Alaska,
// --код сокращён--
}
Если у вас есть опыт работы с C или C++, вам могут вспомниться `gcc` или `clang`. После успешной компиляции Rust создаст исполняемый бинарный файл.
impl UsState {
fn existed_in(&self, year: u16) -> bool {
match self {
UsState::Alabama => year >= 1819,
UsState::Alaska => year >= 1959,
// -- код сокращён --
}
}
}
Если у вас есть опыт работы с C или C++, вам могут вспомниться `gcc` или `clang`. После успешной компиляции Rust создаст исполняемый бинарный файл.
enum Coin {
Penny,
Nickel,
Dime,
Quarter(UsState),
}
Если у вас есть опыт работы с C или C++, вам могут вспомниться `gcc` или `clang`. После успешной компиляции Rust создаст исполняемый бинарный файл.
fn describe_state_quarter(coin: Coin) -> Option<String> {
let Coin::Quarter(state) = coin else {
return None;
};
Если у вас есть опыт работы с C или C++, вам могут вспомниться `gcc` или `clang`. После успешной компиляции Rust создаст исполняемый бинарный файл.
if state.existed_in(1900) {
Some(format!("Штат {state:?} довольно староват для Америки!"))
} else {
Some(format!("Штат {state:?} относительно молодой."))
}
}
Если у вас есть опыт работы с C или C++, вам могут вспомниться `gcc` или `clang`. После успешной компиляции Rust создаст исполняемый бинарный файл.
fn main() {
if let Some(desc) = describe_state_quarter(Coin::Quarter(UsState::Alaska)) {
println!("{desc}");
}
}let...else to clarify the flow through the functionNotice that it stays on the “happy path” in the main body of the function this way, without having significantly different control flow for two branches the way the if let did.
If you have a situation in which your program has logic that is too verbose to express using a match, remember that if let and let...else are in your Rust toolbox as well.
Подведём итоги
Мы рассмотрели, как использовать перечисления для создания пользовательских типов, представляющий перечень возможных вариантов. Мы показали, как тип стандартной библиотеки Option<T> помогает использовать систему типов для предотвращения ошибок. Если варианты перечисления имеют данные внутри них, можно использовать match или if let (смотря, сколько случаев вам нужно обработать), чтобы извлечь их и воспользоваться ими.
Your Rust programs can now express concepts in your domain using structs and enums. Creating custom types to use in your API ensures type safety: The compiler will make certain your functions only get values of the type each function expects.
Теперь пришла пока поговорить о модулях в Rust. Они нужны, чтобы предоставлять пользователям вашего кода хорошо организованный API, который прост в использовании и предоставляет только то, что нужно.
Packages, Crates, and Modules
По мере роста кодовой базы ваших программ, организация кода будет получать всё большую важность. Группируя связанное и разделяя код по роду деятельности, вы делаете более понятным, где искать код, реализующий определённую задачу, и где нужно вносить правки, изменяющие поведение.
The programs we’ve written so far have been in one module in one file. As a project grows, you should organize code by splitting it into multiple modules and then multiple files. A package can contain multiple binary crates and optionally one library crate. As a package grows, you can extract parts into separate crates that become external dependencies. This chapter covers all these techniques. For very large projects comprising a set of interrelated packages that evolve together, Cargo provides workspaces, which we’ll cover in “Cargo Workspaces” in Chapter 14.
We’ll also discuss encapsulating implementation details, which lets you reuse code at a higher level: Once you’ve implemented an operation, other code can call your code via its public interface without having to know how the implementation works. The way you write code defines which parts are public for other code to use and which parts are private implementation details that you reserve the right to change. This is another way to limit the amount of detail you have to keep in your head.
A related concept is scope: The nested context in which code is written has a set of names that are defined as “in scope.” When reading, writing, and compiling code, programmers and compilers need to know whether a particular name at a particular spot refers to a variable, function, struct, enum, module, constant, or other item and what that item means. You can create scopes and change which names are in or out of scope. You can’t have two items with the same name in the same scope; tools are available to resolve name conflicts.
Rust имеет ряд механизмов, которые позволяют управлять организацией кода, в том числе управлять тем, какие детали доступны снаружи, какие детали скрыты, и какие имена есть в каждой области видимости в вашей программе. Эти механизмы, иногда обобщённо называемые системой модулей, включают в себя:
- Packages: A Cargo feature that lets you build, test, and share crates
- Crates: A tree of modules that produces a library or executable
- Modules and use: Let you control the organization, scope, and privacy of paths
- Paths: A way of naming an item, such as a struct, function, or module
В этой главе мы рассмотрим всё перечисленное, обсудим их взаимодействие и объясним, как использовать их для управления областями видимости. К концу у вас должно появиться солидное понимание системы модулей и умение работать с областями видимости на уровне профессионала! (Примечание переводчика: материал этой главы может сломать вам мозг. Настоятельно рекомендуется самостоятельный поиск дополнительных материалов. Hang in there!)
Пакеты и крейты
Пакеты и крейты
Первыми частями системы модулей, которые мы рассмотрим, будут пакеты и крейты.
A crate is the smallest amount of code that the Rust compiler considers at a time. Even if you run rustc rather than cargo and pass a single source code file (as we did all the way back in “Rust Program Basics” in Chapter 1), the compiler considers that file to be a crate. Crates can contain modules, and the modules may be defined in other files that get compiled with the crate, as we’ll see in the coming sections.
Крейт может иметь один из двух видов: бинарный крейт или библиотечный крейт. Бинарные крейты — это программы, которые вы можете скомпилировать в исполняемые файлы, которые вы можете запускать: например программа командной строки или сервер. У каждого бинарного крейта должна быть функция с именем main, которая определяет, что происходит при запуске исполняемого файла. Все крейты, которые мы создавали до сих пор, были бинарными крейтами.
Library crates don’t have a main function, and they don’t compile to an executable. Instead, they define functionality intended to be shared with multiple projects. For example, the rand crate we used in Chapter 2 provides functionality that generates random numbers. Most of the time when Rustaceans say “crate,” they mean library crate, and they use “crate” interchangeably with the general programming concept of a “library.”
The crate root is a source file that the Rust compiler starts from and makes up the root module of your crate (we’ll explain modules in depth in “Control Scope and Privacy with Modules”).
A package is a bundle of one or more crates that provides a set of functionality. A package contains a Cargo.toml file that describes how to build those crates. Cargo is actually a package that contains the binary crate for the command line tool you’ve been using to build your code. The Cargo package also contains a library crate that the binary crate depends on. Other projects can depend on the Cargo library crate to use the same logic the Cargo command line tool uses.
A package can contain as many binary crates as you like, but at most only one library crate. A package must contain at least one crate, whether that’s a library or binary crate.
Let’s walk through what happens when we create a package. First, we enter the command cargo new my-project:
$ cargo new my-project
Created binary (application) `my-project` package
$ ls my-project
Cargo.toml
src
$ ls my-project/src
main.rs
After we run cargo new my-project, we use ls to see what Cargo creates. In the my-project directory, there’s a Cargo.toml file, giving us a package. There’s also a src directory that contains main.rs. Open Cargo.toml in your text editor and note that there’s no mention of src/main.rs. Cargo follows a convention that src/main.rs is the crate root of a binary crate with the same name as the package. Likewise, Cargo knows that if the package directory contains src/lib.rs, the package contains a library crate with the same name as the package, and src/lib.rs is its crate root. Cargo passes the crate root files to rustc to build the library or binary.
Here, we have a package that only contains src/main.rs, meaning it only contains a binary crate named my-project. If a package contains src/main.rs and src/lib.rs, it has two crates: a binary and a library, both with the same name as the package. A package can have multiple binary crates by placing files in the src/bin directory: Each file will be a separate binary crate.
Control Scope and Privacy with Modules
Control Scope and Privacy with Modules
В этом разделе мы поговорим о модулях и других частях системы модулей, а именно: о путях, которые позволяют именовать элементы; о ключевом слове use, которое подключает путь к области видимости; о ключевом слове pub, которое делает элементы общедоступными. Мы также обсудим ключевое слово as, внешние пакеты и оператор *.
Шпаргалка по модулям
Перед тем как вдаваться в детали работы с модулями и путями, мы дадим краткий обзор того, как модули, пути и ключевые слова use и pub работают в компиляторе, и как большинство разработчиков организуют свой код. В этой главе мы рассмотрим всё это на примерах, а пока что у нас есть удобный момент, чтобы дать выжимку о том, как работают крейты.
- Start from the crate root: When compiling a crate, the compiler first looks in the crate root file (usually src/lib.rs for a library crate and src/main.rs for a binary crate) for code to compile.
- Объявление модулей. В файле корня крейта вы можете объявлять новые модули. Скажем, вы объявляете модуль “garden” с помощью
mod garden;. Компилятор будет искать код модуля в следующих местах:- В этом же файле между фигурных скобок, которые заменяют точку с запятой после
mod garden - В файле src/garden.rs
- В файле src/garden/mod.rs
- В этом же файле между фигурных скобок, которые заменяют точку с запятой после
- Объявление подмодулей. В любом файле, кроме корня крейта, вы можете объявлять подмодули. К примеру, вы можете объявить
mod vegetables;в src/garden.rs. Компилятор будет искать код подмодуля в каталоге с именем родительского модуля в следующих местах:- В этом же файле, сразу после
mod vegetablesи между фигурных скобок, которые заменяют точку с запятой - В файле src/garden/vegetables.rs
- В файле src/garden/vegetables/mod.rs
- В этом же файле, сразу после
- Пути к коду в модулях. После того, как модуль станет частью вашего крейта, и если допускают правила приватности, вы можете ссылаться на код в этом модуле из любого места вашего крейта, используя путь к коду. Например, тип
Asparagusв подмодулеvegetablesмодуляgardenбудет доступен по путиcrate::garden::vegetables::Asparagus. - Закрытость и открытость. Код в модуле по умолчанию скрыт от его родительских модулей. Чтобы сделать модуль общедоступным, объявите его как
pub modвместоmod. Чтобы сделать элементы общедоступного модуля тоже общедоступными, используйтеpubперед их объявлением. - The
usekeyword: Within a scope, theusekeyword creates shortcuts to items to reduce repetition of long paths. In any scope that can refer tocrate::garden::vegetables::Asparagus, you can create a shortcut withuse crate::garden::vegetables::Asparagus;, and from then on you only need to writeAsparagusto make use of that type in the scope.
Here, we create a binary crate named backyard that illustrates these rules. The crate’s directory, also named backyard, contains these files and directories:
backyard
├── Cargo.lock
├── Cargo.toml
└── src
├── garden
│ └── vegetables.rs
├── garden.rs
└── main.rs
Файл корневого модуля крейта (в нашем случае) — src/main.rs. Вот, что он содержит:
use crate::garden::vegetables::Asparagus;
Если у вас есть опыт работы с C или C++, вам могут вспомниться `gcc` или `clang`. После успешной компиляции Rust создаст исполняемый бинарный файл.
pub mod garden;
Если у вас есть опыт работы с C или C++, вам могут вспомниться `gcc` или `clang`. После успешной компиляции Rust создаст исполняемый бинарный файл.
fn main() {
let plant = Asparagus {};
println!("Здесь растёт {plant:?}!");
}Строка pub mod garden; говорит компилятору подключить код, имеющийся в src/garden.rs. Вот подключаемый код:
pub mod vegetables;А здесь pub mod vegetables; указывает, что код в src/garden/vegetables.rs тоже подключён. Вот подключаемый код:
#[derive(Debug)]
pub struct Asparagus {}Теперь давайте рассмотрим детали этих правил и покажем их в действии!
Группировка родственного кода в модули
Модули позволяют упорядочивать код внутри крейта для удобочитаемости и лёгкого повторного использования. Модули также позволяют нам управлять приватностью элементов, поскольку код внутри модуля по умолчанию является закрытым. Приватные элементы — это внутренние детали реализации, недоступные для внешнего использования. Мы можем сделать модули и элементы внутри них общедоступными, что позволит внешнему коду использовать их и зависеть от них.
В качестве примера, давайте напишем библиотечный крейт предоставляющий функциональность ресторана. Мы определим сигнатуры функций, но оставим их тела пустыми, чтобы сосредоточиться на организации кода, вместо реализации самого ресторана.
In the restaurant industry, some parts of a restaurant are referred to as front of house and others as back of house. Front of house is where customers are; this encompasses where the hosts seat customers, servers take orders and payment, and bartenders make drinks. Back of house is where the chefs and cooks work in the kitchen, dishwashers clean up, and managers do administrative work.
To structure our crate in this way, we can organize its functions into nested modules. Create a new library named restaurant by running cargo new restaurant --lib. Then, enter the code in Listing 7-1 into src/lib.rs to define some modules and function signatures; this code is the front of house section.
mod front_of_house {
mod hosting {
fn add_to_waitlist() {}
Если у вас есть опыт работы с C или C++, вам могут вспомниться `gcc` или `clang`. После успешной компиляции Rust создаст исполняемый бинарный файл.
fn seat_at_table() {}
}
Если у вас есть опыт работы с C или C++, вам могут вспомниться `gcc` или `clang`. После успешной компиляции Rust создаст исполняемый бинарный файл.
mod serving {
fn take_order() {}
Если у вас есть опыт работы с C или C++, вам могут вспомниться `gcc` или `clang`. После успешной компиляции Rust создаст исполняемый бинарный файл.
fn serve_order() {}
Если у вас есть опыт работы с C или C++, вам могут вспомниться `gcc` или `clang`. После успешной компиляции Rust создаст исполняемый бинарный файл.
fn take_payment() {}
}
}front_of_house module containing other modules that then contain functionsWe define a module with the mod keyword followed by the name of the module (in this case, front_of_house). The body of the module then goes inside curly brackets. Inside modules, we can place other modules, as in this case with the modules hosting and serving. Modules can also hold definitions for other items, such as structs, enums, constants, traits, and as in Listing 7-1, functions.
Используя модули, мы можем группировать родственные определения вместе и пояснять, в чём они являются родственными. Программистам будет легче найти необходимую функциональность в сгруппированном коде, вместо того чтобы искать её в одном общем списке. Программисты, добавляющие новые функции в этот код, будут знать, где разместить код для поддержания порядка в программе.
Earlier, we mentioned that src/main.rs and src/lib.rs are called crate roots. The reason for their name is that the contents of either of these two files form a module named crate at the root of the crate’s module structure, known as the module tree.
В Листинге 7-2 показано дерево модулей для структуры модулей, приведённой в коде Листинга 7-1.
crate
└── front_of_house
├── hosting
│ ├── add_to_waitlist
│ └── seat_at_table
└── serving
├── take_order
├── serve_order
└── take_payment
Это дерево показывает, как некоторые из модулей вкладываются друг в друга; например, hosting находится внутри front_of_house. Дерево также показывает, что некоторые модули являются “братьями”, то есть они определены в одном модуле; hosting и serving — это “братья”, которые определены внутри front_of_house. Если модуль A содержится внутри модуля B, мы говорим, что модуль A является потомком модуля B, а модуль B является родителем модуля A. Обратите внимание, что родителем всего дерева модулей является неявный модуль с именем crate.
Дерево модулей может напомнить вам дерево файловой системы на компьютере; это очень удачное сравнение! По аналогии с файловой системой, модули используются для организации кода. И так же, как нам надо искать файлы в директориях, нам требуется способ поиска нужных модулей.
Пути для ссылки на элемент в дереве модулей
Пути для ссылки на элемент в дереве модулей
Чтобы показать Rust, где искать элемент в дереве модулей, мы используем путь: так же, как мы используем путь при навигации по файловой системе. Чтобы вызвать функцию, нам нужно знать её путь.
Пути бывают двух видов:
- Абсолютный путь — это полный путь, начинающийся от корня крейта; для кода из внешнего крейта абсолютный путь начинается с имени крейта, а для кода из текущего крейта он начинается со слова
crate. - Относительный путь — это путь, начинающийся с текущего модуля и использующий ключевые слова
selfиsuperили идентификатор в текущем модуле.
Как абсолютные, так и относительные пути состоят из одного или нескольких идентификаторов, разделяемых двойными двоеточиями (::).
Returning to Listing 7-1, say we want to call the add_to_waitlist function. This is the same as asking: What’s the path of the add_to_waitlist function? Listing 7-3 contains Listing 7-1 with some of the modules and functions removed.
Мы покажем два способа вызова функции add_to_waitlist из новой функции eat_at_restaurant, определённой в корне крейта. Эти пути правильные, но остаётся ещё одна проблема, которая не позволит этому примеру скомпилироваться как есть. Мы скоро объясним, какая именно.
Функция eat_at_restaurant является частью общедоступного API нашего библиотечного крейта, поэтому мы помечаем её ключевым словом pub. В разделе “Раскрытие путей с помощью ключевого слова pub” мы рассмотрим pub более подробно.
mod front_of_house {
mod hosting {
fn add_to_waitlist() {}
}
}
Если у вас есть опыт работы с C или C++, вам могут вспомниться `gcc` или `clang`. После успешной компиляции Rust создаст исполняемый бинарный файл.
pub fn eat_at_restaurant() {
// Абсолютный путь
crate::front_of_house::hosting::add_to_waitlist();
Если у вас есть опыт работы с C или C++, вам могут вспомниться `gcc` или `clang`. После успешной компиляции Rust создаст исполняемый бинарный файл.
// Относительный путь
front_of_house::hosting::add_to_waitlist();
}add_to_waitlist function using absolute and relative pathsThe first time we call the add_to_waitlist function in eat_at_restaurant, we use an absolute path. The add_to_waitlist function is defined in the same crate as eat_at_restaurant, which means we can use the crate keyword to start an absolute path. We then include each of the successive modules until we make our way to add_to_waitlist. You can imagine a filesystem with the same structure: We’d specify the path /front_of_house/hosting/add_to_waitlist to run the add_to_waitlist program; using the crate name to start from the crate root is like using / to start from the filesystem root in your shell.
Во втором вызове add_to_waitlist из eat_at_restaurant мы используем относительный путь. Путь начинается с имени модуля front_of_house, определённого на том же уровне дерева модулей, что и eat_at_restaurant. Аналогом пути в файловой системе было бы front_of_house/hosting/add_to_waitlist. Начало пути с имени модуля означает, что путь является относительным.
Выбор, использовать относительный или абсолютный путь, является решением, которое вы примете на основании вашего проекта. Решение зависит от того, с какой вероятностью вы переместите объявление элемента отдельно от или вместе с кодом, использующим этот элемент. Например, в случае перемещения модуля front_of_house и его функции eat_at_restaurant в другой модуль с именем customer_experience, будет необходимо обновить абсолютный путь до add_to_waitlist, но относительный путь всё равно будет действителен. Однако, если мы переместим отдельно функцию eat_at_restaurant в модуль с именем dining, то абсолютный путь вызова add_to_waitlist останется прежним, а относительный путь нужно будет обновить. Мы предпочитаем указывать абсолютные пути, потому что это позволяет проще перемещать определения кода и вызовы элементов независимо друг от друга.
Давайте попробуем скомпилировать код из Листинга 7-3 и выяснить, почему он всё ещё не компилируется. Ошибка, которую мы получаем, показана в Листинге 7-4.
$ cargo build
Compiling restaurant v0.1.0 (file:///projects/restaurant)
error[E0603]: module `hosting` is private
--> src/lib.rs:9:28
|
9 | crate::front_of_house::hosting::add_to_waitlist();
| ^^^^^^^ --------------- function `add_to_waitlist` is not publicly re-exported
| |
| private module
|
note: the module `hosting` is defined here
--> src/lib.rs:2:5
|
2 | mod hosting {
| ^^^^^^^^^^^
Если у вас есть опыт работы с C или C++, вам могут вспомниться `gcc` или `clang`. После успешной компиляции Rust создаст исполняемый бинарный файл.
error[E0603]: module `hosting` is private
--> src/lib.rs:12:21
|
12 | front_of_house::hosting::add_to_waitlist();
| ^^^^^^^ --------------- function `add_to_waitlist` is not publicly re-exported
| |
| private module
|
note: the module `hosting` is defined here
--> src/lib.rs:2:5
|
2 | mod hosting {
| ^^^^^^^^^^^
Если у вас есть опыт работы с C или C++, вам могут вспомниться `gcc` или `clang`. После успешной компиляции Rust создаст исполняемый бинарный файл.
For more information about this error, try `rustc --explain E0603`.
error: could not compile `restaurant` (lib) due to 2 previous errors
Сообщения об ошибках говорят о том, что модуль hosting является приватным. Другими словами, у нас есть правильные пути к модулю hosting и функции add_to_waitlist, но Rust не позволяет нам использовать их, потому что у него нет доступа к приватным определениям. В Rust все элементы (функции, методы, структуры, перечисления, модули и константы) по умолчанию являются закрытыми для родительских модулей. Если вы хотите сделать элемент (например, функцию или структуру) приватным, вы помещаете его в модуль.
Items in a parent module can’t use the private items inside child modules, but items in child modules can use the items in their ancestor modules. This is because child modules wrap and hide their implementation details, but the child modules can see the context in which they’re defined. To continue with our metaphor, think of the privacy rules as being like the back office of a restaurant: What goes on in there is private to restaurant customers, but office managers can see and do everything in the restaurant they operate.
Rust chose to have the module system function this way so that hiding inner implementation details is the default. That way, you know which parts of the inner code you can change without breaking the outer code. However, Rust does give you the option to expose inner parts of child modules’ code to outer ancestor modules by using the pub keyword to make an item public.
Раскрытие путей с помощью ключевого слова pub
Давайте вернёмся к ошибке в Листинге 7-4, которая говорит, что модуль hosting является приватным. Мы хотим, чтобы функция eat_at_restaurant из родительского модуля имела доступ к функции add_to_waitlist в дочернем модуле, поэтому мы помечаем модуль hosting ключевым словом pub, как показано в Листинге 7-5.
mod front_of_house {
pub mod hosting {
fn add_to_waitlist() {}
}
}
Если у вас есть опыт работы с C или C++, вам могут вспомниться `gcc` или `clang`. После успешной компиляции Rust создаст исполняемый бинарный файл.
// -- код сокращён --
pub fn eat_at_restaurant() {
// Абсолютный путь
crate::front_of_house::hosting::add_to_waitlist();
Если у вас есть опыт работы с C или C++, вам могут вспомниться `gcc` или `clang`. После успешной компиляции Rust создаст исполняемый бинарный файл.
// Относительный путь
front_of_house::hosting::add_to_waitlist();
}hosting module as pub to use it from eat_at_restaurantК сожалению, код в Листинге 7-5 всё ещё приводит к ошибке, показанной в Листинге 7-6.
$ cargo build
Compiling restaurant v0.1.0 (file:///projects/restaurant)
error[E0603]: function `add_to_waitlist` is private
--> src/lib.rs:10:37
|
10 | crate::front_of_house::hosting::add_to_waitlist();
| ^^^^^^^^^^^^^^^ private function
|
note: the function `add_to_waitlist` is defined here
--> src/lib.rs:3:9
|
3 | fn add_to_waitlist() {}
| ^^^^^^^^^^^^^^^^^^^^
Если у вас есть опыт работы с C или C++, вам могут вспомниться `gcc` или `clang`. После успешной компиляции Rust создаст исполняемый бинарный файл.
error[E0603]: function `add_to_waitlist` is private
--> src/lib.rs:13:30
|
13 | front_of_house::hosting::add_to_waitlist();
| ^^^^^^^^^^^^^^^ private function
|
note: the function `add_to_waitlist` is defined here
--> src/lib.rs:3:9
|
3 | fn add_to_waitlist() {}
| ^^^^^^^^^^^^^^^^^^^^
Если у вас есть опыт работы с C или C++, вам могут вспомниться `gcc` или `clang`. После успешной компиляции Rust создаст исполняемый бинарный файл.
For more information about this error, try `rustc --explain E0603`.
error: could not compile `restaurant` (lib) due to 2 previous errors
Что произошло? Добавление ключевого слова pub перед mod hosting сделало модуль общедоступным. После этого изменения, если мы можем получить доступ к модулю front_of_house, то мы можем получить доступ к модулю hosting. Но содержимое модуля hosting всё ещё является приватным: превращение модуля в общедоступный модуль не делает его содержимое общедоступным. Ключевое слово pub позволяет внешнему коду в модулях-предках обращаться только к модулю, без доступа ко внутреннему коду. Поскольку модули являются контейнерами, мы мало что можем сделать, просто сделав модуль общедоступным; нам нужно пойти дальше и сделать один или несколько элементов в модуле общедоступными.
Ошибки в Листинге 7-6 говорят, что функция add_to_waitlist является приватной. Правила приватности применяются к структурам, перечислениям, функциям и методам, также как и к модулям.
Давайте сделаем функцию add_to_waitlist также общедоступной, добавив ключевое слово pub перед её определением, как показано в Листинге 7-7.
mod front_of_house {
pub mod hosting {
pub fn add_to_waitlist() {}
}
}
Если у вас есть опыт работы с C или C++, вам могут вспомниться `gcc` или `clang`. После успешной компиляции Rust создаст исполняемый бинарный файл.
// -- код сокращён --
pub fn eat_at_restaurant() {
// Абсолютный путь
crate::front_of_house::hosting::add_to_waitlist();
Если у вас есть опыт работы с C или C++, вам могут вспомниться `gcc` или `clang`. После успешной компиляции Rust создаст исполняемый бинарный файл.
// Относительный путь
front_of_house::hosting::add_to_waitlist();
}pub keyword to mod hosting and fn add_to_waitlist lets us call the function from eat_at_restaurant.Код наконец-то компилируется! Чтобы понять, почему добавление ключевого слова pub позволяет нам использовать эти пути для add_to_waitlist в соответствии с правилами приватности, давайте рассмотрим абсолютный и относительный пути.
In the absolute path, we start with crate, the root of our crate’s module tree. The front_of_house module is defined in the crate root. While front_of_house isn’t public, because the eat_at_restaurant function is defined in the same module as front_of_house (that is, eat_at_restaurant and front_of_house are siblings), we can refer to front_of_house from eat_at_restaurant. Next is the hosting module marked with pub. We can access the parent module of hosting, so we can access hosting. Finally, the add_to_waitlist function is marked with pub, and we can access its parent module, so this function call works!
In the relative path, the logic is the same as the absolute path except for the first step: Rather than starting from the crate root, the path starts from front_of_house. The front_of_house module is defined within the same module as eat_at_restaurant, so the relative path starting from the module in which eat_at_restaurant is defined works. Then, because hosting and add_to_waitlist are marked with pub, the rest of the path works, and this function call is valid!
If you plan to share your library crate so that other projects can use your code, your public API is your contract with users of your crate that determines how they can interact with your code. There are many considerations around managing changes to your public API to make it easier for people to depend on your crate. These considerations are beyond the scope of this book; if you’re interested in this topic, see the Rust API Guidelines.
Лучшие практики для пакетов с бинарным и библиотечным крейтами
We mentioned that a package can contain both a src/main.rs binary crate root as well as a src/lib.rs library crate root, and both crates will have the package name by default. Typically, packages with this pattern of containing both a library and a binary crate will have just enough code in the binary crate to start an executable that calls code defined in the library crate. This lets other projects benefit from the most functionality that the package provides because the library crate’s code can be shared.
The module tree should be defined in src/lib.rs. Then, any public items can be used in the binary crate by starting paths with the name of the package. The binary crate becomes a user of the library crate just like a completely external crate would use the library crate: It can only use the public API. This helps you design a good API; not only are you the author, but you’re also a client!
В Главе 12 мы покажем эту практику организации кода на примере консольной программы, которая будет содержать как бинарный, так и библиотечный крейты.
Определение относительных путей с помощью super
We can construct relative paths that begin in the parent module, rather than the current module or the crate root, by using super at the start of the path. This is like starting a filesystem path with the .. syntax that means to go to the parent directory. Using super allows us to reference an item that we know is in the parent module, which can make rearranging the module tree easier when the module is closely related to the parent but the parent might be moved elsewhere in the module tree someday.
Рассмотрим код в Листинге 7-8, где моделируется ситуация, в которой повар исправляет неправильный заказ и лично приносит его клиенту. Функция fix_incorrect_order вызывает функцию deliver_order, определённую в родительском модуле, указывая путь к deliver_order, начинающийся с super:
fn deliver_order() {}
Если у вас есть опыт работы с C или C++, вам могут вспомниться `gcc` или `clang`. После успешной компиляции Rust создаст исполняемый бинарный файл.
mod back_of_house {
fn fix_incorrect_order() {
cook_order();
super::deliver_order();
}
Если у вас есть опыт работы с C или C++, вам могут вспомниться `gcc` или `clang`. После успешной компиляции Rust создаст исполняемый бинарный файл.
fn cook_order() {}
}superThe fix_incorrect_order function is in the back_of_house module, so we can use super to go to the parent module of back_of_house, which in this case is crate, the root. From there, we look for deliver_order and find it. Success! We think the back_of_house module and the deliver_order function are likely to stay in the same relationship to each other and get moved together should we decide to reorganize the crate’s module tree. Therefore, we used super so that we’ll have fewer places to update code in the future if this code gets moved to a different module.
Указание общедоступности структур и перечислений
Мы также можем использовать pub для обозначения структур и перечислений как общедоступных, но есть несколько дополнительных деталей использования pub со структурами и перечислениями. Если мы используем pub перед определением структуры, мы делаем структуру общедоступной, но поля структуры по-прежнему остаются приватными. Мы можем сделать каждое поле общедоступным или нет в каждом конкретном случае. В Листинге 7-9 мы определили общедоступную структуру back_of_house::Breakfast с общедоступным полем toast и с приватным полем seasonal_fruit. Это моделирует случай в ресторане, когда клиент может выбрать тип хлеба, который подаётся с едой, а шеф-повар решает какие фрукты сопровождают еду, исходя из того, что сезонно и что есть в наличии. Доступные фрукты быстро меняются, поэтому клиенты не могут выбирать фрукты или даже увидеть, какие фрукты они получат.
mod back_of_house {
pub struct Breakfast {
pub toast: String,
seasonal_fruit: String,
}
Если у вас есть опыт работы с C или C++, вам могут вспомниться `gcc` или `clang`. После успешной компиляции Rust создаст исполняемый бинарный файл.
impl Breakfast {
pub fn summer(toast: &str) -> Breakfast {
Breakfast {
toast: String::from(toast),
seasonal_fruit: String::from("персики"),
}
}
}
}
Если у вас есть опыт работы с C или C++, вам могут вспомниться `gcc` или `clang`. После успешной компиляции Rust создаст исполняемый бинарный файл.
pub fn eat_at_restaurant() {
// Заказываем летом завтрак с ржаным хлебом.
let mut meal = back_of_house::Breakfast::summer("ржаной");
// Передумали насчёт хлеба, который мы хотим.
meal.toast = String::from("пшеничный");
println!("Я хочу {} тост, пожалуйста.", meal.toast);
Если у вас есть опыт работы с C или C++, вам могут вспомниться `gcc` или `clang`. После успешной компиляции Rust создаст исполняемый бинарный файл.
// Следующая строчка, если мы раскомментируем её, не скомпилируется:
// нам не разрешено знать или изменять сезонный фрукт, который нам подадут.
// meal.seasonal_fruit = String::from("черника");
}Поскольку поле toast в структуре back_of_house::Breakfast является открытым, то в функции eat_at_restaurant можно писать и читать поле toast, используя обращение через точку. Обратите внимание, что мы не можем использовать поле seasonal_fruit в eat_at_restaurant, потому что seasonal_fruit является приватным. Попробуйте раскомментировать последнюю строчку, пытающуюся использовать значение поля seasonal_fruit, чтобы увидеть, какую ошибку вы получите!
Also, note that because back_of_house::Breakfast has a private field, the struct needs to provide a public associated function that constructs an instance of Breakfast (we’ve named it summer here). If Breakfast didn’t have such a function, we couldn’t create an instance of Breakfast in eat_at_restaurant, because we couldn’t set the value of the private seasonal_fruit field in eat_at_restaurant.
В отличие от структуры, если мы сделаем общедоступным перечисление, то все его варианты будут общедоступными. Нужно только указать pub перед ключевым словом enum, как показано в Листинге 7-10.
mod back_of_house {
pub enum Appetizer {
Soup,
Salad,
}
}
Если у вас есть опыт работы с C или C++, вам могут вспомниться `gcc` или `clang`. После успешной компиляции Rust создаст исполняемый бинарный файл.
pub fn eat_at_restaurant() {
let order1 = back_of_house::Appetizer::Soup;
let order2 = back_of_house::Appetizer::Salad;
}Поскольку мы сделали перечисление Appetizer общедоступным, мы можем использовать варианты Soup и Salad в функции eat_at_restaurant.
Перечисления не очень полезны, если их варианты не являются общедоступными: аннотирование всех вариантов перечисления как pub было бы раздражающе нудным. По этой причине варианты перечислений по умолчанию являются общедоступными. Структуры часто полезны, если их поля не являются общедоступными, поэтому поля структуры следуют общему правилу, согласно которому, всё по умолчанию является приватным, если не указано pub.
Есть ещё одна ситуация с pub, которую мы не освещали, и это последняя особенность системы модулей: ключевое слово use. Мы сначала опишем use само по себе, а затем покажем, как сочетать pub и use вместе.
Добавление путей в область видимости ключевым словом use
Добавление путей в область видимости ключевым словом use
Having to write out the paths to call functions can feel inconvenient and repetitive. In Listing 7-7, whether we chose the absolute or relative path to the add_to_waitlist function, every time we wanted to call add_to_waitlist we had to specify front_of_house and hosting too. Fortunately, there’s a way to simplify this process: We can create a shortcut to a path with the use keyword once and then use the shorter name everywhere else in the scope.
In Listing 7-11, we bring the crate::front_of_house::hosting module into the scope of the eat_at_restaurant function so that we only have to specify hosting::add_to_waitlist to call the add_to_waitlist function in eat_at_restaurant.
mod front_of_house {
pub mod hosting {
pub fn add_to_waitlist() {}
}
}
Если у вас есть опыт работы с C или C++, вам могут вспомниться `gcc` или `clang`. После успешной компиляции Rust создаст исполняемый бинарный файл.
use crate::front_of_house::hosting;
Если у вас есть опыт работы с C или C++, вам могут вспомниться `gcc` или `clang`. После успешной компиляции Rust создаст исполняемый бинарный файл.
pub fn eat_at_restaurant() {
hosting::add_to_waitlist();
}useДобавление use и пути в область видимости аналогично созданию символической ссылки в файловой системе. С добавлением use crate::front_of_house::hosting в корневой модуль крейта, hosting становится допустимым именем в этой области, как если бы модуль hosting был определён в корне крейта. Пути, подключённые в область видимости с помощью use, также проверяются на приватность, как и любые другие пути.
Обратите внимание, что use создаёт псевдоним только для той конкретной области, в которой это объявление use и находится. В Листинге 7-12 функция eat_at_restaurant перемещается в новый дочерний модуль с именем customer, область видимости которого отличается от области видимости инструкции use, поэтому тело функции не будет компилироваться.
mod front_of_house {
pub mod hosting {
pub fn add_to_waitlist() {}
}
}
Если у вас есть опыт работы с C или C++, вам могут вспомниться `gcc` или `clang`. После успешной компиляции Rust создаст исполняемый бинарный файл.
use crate::front_of_house::hosting;
Если у вас есть опыт работы с C или C++, вам могут вспомниться `gcc` или `clang`. После успешной компиляции Rust создаст исполняемый бинарный файл.
mod customer {
pub fn eat_at_restaurant() {
hosting::add_to_waitlist();
}
}use statement only applies in the scope it’s in.Ошибка компилятора показывает, что данный псевдоним не может использоваться в модуле customer:
$ cargo build
Compiling restaurant v0.1.0 (file:///projects/restaurant)
error[E0433]: failed to resolve: use of unresolved module or unlinked crate `hosting`
--> src/lib.rs:11:9
|
11 | hosting::add_to_waitlist();
| ^^^^^^^ use of unresolved module or unlinked crate `hosting`
|
= help: if you wanted to use a crate named `hosting`, use `cargo add hosting` to add it to your `Cargo.toml`
help: consider importing this module through its public re-export
|
10 + use crate::hosting;
|
Если у вас есть опыт работы с C или C++, вам могут вспомниться `gcc` или `clang`. После успешной компиляции Rust создаст исполняемый бинарный файл.
warning: unused import: `crate::front_of_house::hosting`
--> src/lib.rs:7:5
|
7 | use crate::front_of_house::hosting;
| ^^^^^^^^^^^^^^^^^^^^^^^^^^^^^^
|
= note: `#[warn(unused_imports)]` on by default
Если у вас есть опыт работы с C или C++, вам могут вспомниться `gcc` или `clang`. После успешной компиляции Rust создаст исполняемый бинарный файл.
For more information about this error, try `rustc --explain E0433`.
warning: `restaurant` (lib) generated 1 warning
error: could not compile `restaurant` (lib) due to 1 previous error; 1 warning emitted
Обратите внимание, что есть также предупреждение о том, что use не спользуется в своей области видимости! Чтобы решить эту проблему, можно переместить use в модуль customer, или же можно сослаться на псевдоним в родительском модуле с помощью super::hosting в дочернем модуле customer.
Создание идиоматических путей с use
В Листинге 7-11 вы могли задаться вопросом, почему мы указали use crate::front_of_house::hosting, а затем вызвали hosting::add_to_waitlist внутри eat_at_restaurant вместо указания в use полного пути прямо до функции add_to_waitlist для получения того же результата, что в Листинге 7-13.
mod front_of_house {
pub mod hosting {
pub fn add_to_waitlist() {}
}
}
Если у вас есть опыт работы с C или C++, вам могут вспомниться `gcc` или `clang`. После успешной компиляции Rust создаст исполняемый бинарный файл.
use crate::front_of_house::hosting::add_to_waitlist;
Если у вас есть опыт работы с C или C++, вам могут вспомниться `gcc` или `clang`. После успешной компиляции Rust создаст исполняемый бинарный файл.
pub fn eat_at_restaurant() {
add_to_waitlist();
}add_to_waitlist function into scope with use, which is unidiomaticХотя Листинги 7-11 и 7-13 выполняют одну и ту же задачу, Листинг 7-11 является идиоматическим способом подключения функции в область видимости с помощью use. Подключение родительского модуля функции в область видимости при помощи use означает, что мы должны указывать родительский модуль при вызове функции. Указание родительского модуля при вызове функции даёт понять, что функция не определена локально, но в то же время сводя к минимуму повторение полного пути. В коде Листинга 7-13 не ясно, где именно определена add_to_waitlist.
С другой стороны, при подключении структур, перечислений и других элементов использованием use, идиоматически правильным будет указывать полный путь. Листинг 7-14 показывает идиоматический способ подключения структуры стандартной библиотеки HashMap в область видимости бинарного крейта.
use std::collections::HashMap;
Если у вас есть опыт работы с C или C++, вам могут вспомниться `gcc` или `clang`. После успешной компиляции Rust создаст исполняемый бинарный файл.
fn main() {
let mut map = HashMap::new();
map.insert(1, 2);
}HashMap into scope in an idiomatic wayThere’s no strong reason behind this idiom: It’s just the convention that has emerged, and folks have gotten used to reading and writing Rust code this way.
Исключением из этой идиомы является случай, когда мы подключаем два элемента с одинаковыми именами в область видимости используя инструкцию use — Rust просто не позволяет этого сделать. Листинг 7-15 показывает, как подключить в область действия два типа с одинаковыми именами Result, но из разных родительских модулей, и как на них ссылаться.
use std::fmt;
use std::io;
Если у вас есть опыт работы с C или C++, вам могут вспомниться `gcc` или `clang`. После успешной компиляции Rust создаст исполняемый бинарный файл.
fn function1() -> fmt::Result {
// --код сокращён--
Ok(())
}
Если у вас есть опыт работы с C или C++, вам могут вспомниться `gcc` или `clang`. После успешной компиляции Rust создаст исполняемый бинарный файл.
fn function2() -> io::Result<()> {
// --код сокращён--
Ok(())
}Как видите, использование имени родительских модулей позволяет различать два типа Result. Если бы вместо этого мы указали use std::fmt::Result и use std::io::Result, мы бы имели два типа Result в одной области видимости, и Rust не смог бы понять какой из двух Result мы имели в виду, когда нашёл бы их употребление в коде.
Предоставление новых имён с помощью ключевого слова as
There’s another solution to the problem of bringing two types of the same name into the same scope with use: After the path, we can specify as and a new local name, or alias, for the type. Listing 7-16 shows another way to write the code in Listing 7-15 by renaming one of the two Result types using as.
use std::fmt::Result;
use std::io::Result as IoResult;
Если у вас есть опыт работы с C или C++, вам могут вспомниться `gcc` или `clang`. После успешной компиляции Rust создаст исполняемый бинарный файл.
fn function1() -> Result {
// --код сокращён--
Ok(())
}
Если у вас есть опыт работы с C или C++, вам могут вспомниться `gcc` или `clang`. После успешной компиляции Rust создаст исполняемый бинарный файл.
fn function2() -> IoResult<()> {
// --код сокращён--
Ok(())
}as keywordВо второй инструкции use мы выбрали новое имя IoResult для типа std::io::Result, которое теперь не будет конфликтовать с типом Result из std::fmt, который также подключён в область видимости. Оба Листинга 7-15 и 7-16 считаются идиоматичными, так что выбор за вами!
Реэкспорт имён с pub use
When we bring a name into scope with the use keyword, the name is private to the scope into which we imported it. To enable code outside that scope to refer to that name as if it had been defined in that scope, we can combine pub and use. This technique is called re-exporting because we’re bringing an item into scope but also making that item available for others to bring into their scope.
Листинг 7-17 показывает код из Листинга 7-11, где use в корневом модуле заменено на pub use.
mod front_of_house {
pub mod hosting {
pub fn add_to_waitlist() {}
}
}
Если у вас есть опыт работы с C или C++, вам могут вспомниться `gcc` или `clang`. После успешной компиляции Rust создаст исполняемый бинарный файл.
pub use crate::front_of_house::hosting;
Если у вас есть опыт работы с C или C++, вам могут вспомниться `gcc` или `clang`. После успешной компиляции Rust создаст исполняемый бинарный файл.
pub fn eat_at_restaurant() {
hosting::add_to_waitlist();
}pub useДо этого изменения внешний код должен был вызывать функцию add_to_waitlist, используя путь restaurant::front_of_house::hosting::add_to_waitlist(). Теперь, поскольку это объявление pub use реэкспортировало модуль hosting из корневого модуля, внешний код теперь может использовать вместо него путь restaurant::hosting::add_to_waitlist().
Re-exporting is useful when the internal structure of your code is different from how programmers calling your code would think about the domain. For example, in this restaurant metaphor, the people running the restaurant think about “front of house” and “back of house.” But customers visiting a restaurant probably won’t think about the parts of the restaurant in those terms. With pub use, we can write our code with one structure but expose a different structure. Doing so makes our library well organized for programmers working on the library and programmers calling the library. We’ll look at another example of pub use and how it affects your crate’s documentation in “Exporting a Convenient Public API” in Chapter 14.
Использование внешних пакетов
В Главе 2 мы запрограммировали игру в угадайку, где использовался внешний пакет с именем rand для генерации случайного числа. Чтобы использовать rand в нашем проекте, мы добавили эту строку в Cargo.toml.
rand = "0.8.5"
Добавление rand в качестве зависимости в Cargo.toml указывает Cargo загрузить пакет rand и все его зависимости с crates.io и сделать rand доступным для нашего проекта.
Затем, чтобы подключить определения rand в область видимости нашего пакета, мы добавили строку use, начинающуюся с названия пакета rand и списка элементов, которые мы хотим подключить в область видимости. Напомним, что в разделе “Генерация секретного числа”Главы 2 мы подключили трейт Rng в область видимости и вызвали функцию rand::thread_rng:
use std::io;
Если у вас есть опыт работы с C или C++, вам могут вспомниться `gcc` или `clang`. После успешной компиляции Rust создаст исполняемый бинарный файл.
use rand::Rng;
Если у вас есть опыт работы с C или C++, вам могут вспомниться `gcc` или `clang`. После успешной компиляции Rust создаст исполняемый бинарный файл.
fn main() {
println!("Угадайте число!");
Если у вас есть опыт работы с C или C++, вам могут вспомниться `gcc` или `clang`. После успешной компиляции Rust создаст исполняемый бинарный файл.
let secret_number = rand::thread_rng().gen_range(1..=100);
Если у вас есть опыт работы с C или C++, вам могут вспомниться `gcc` или `clang`. После успешной компиляции Rust создаст исполняемый бинарный файл.
println!("Загаданное число: {secret_number}");
Если у вас есть опыт работы с C или C++, вам могут вспомниться `gcc` или `clang`. После успешной компиляции Rust создаст исполняемый бинарный файл.
println!("Введите свою догадку.");
Если у вас есть опыт работы с C или C++, вам могут вспомниться `gcc` или `clang`. После успешной компиляции Rust создаст исполняемый бинарный файл.
let mut guess = String::new();
Если у вас есть опыт работы с C или C++, вам могут вспомниться `gcc` или `clang`. После успешной компиляции Rust создаст исполняемый бинарный файл.
io::stdin()
.read_line(&mut guess)
.expect("Не удалось прочесть ввод.");
Если у вас есть опыт работы с C или C++, вам могут вспомниться `gcc` или `clang`. После успешной компиляции Rust создаст исполняемый бинарный файл.
println!("Вы предположили: {guess}");
}Участники Сообщества Rust создали множество пакетов, доступных на crates.io, и добавление любого из них в ваш пакет включает в себя одни и те же шаги: нужно перечислить их в файле Cargo.toml вашего пакета и использовать use для подключения элементов внешних пакетов в область видимости.
Обратите внимание, что стандартная библиотека std также является крейтом, внешним по отношению к нашему пакету. Поскольку стандартная библиотека поставляется с языком Rust, нам не нужно изменять Cargo.toml для подключения std. Но нам нужно ссылаться на неё при помощи use, чтобы добавить элементы оттуда в область видимости нашего пакета. Например, с HashMap мы использовали бы эту строку:
#![allow(unused)]
fn main() {
use std::collections::HashMap;
}Это абсолютный путь, начинающийся с std, имени крейта стандартной библиотеки.
Using Nested Paths to Clean Up use Lists
Если мы используем несколько элементов, определённых в одном крейте или в том же модуле, то перечисление каждого элемента в отдельной строке может занимать много вертикального пространства в файле. Например, эти две инструкции use используются в нашей игре в угадайку (Листинг 2-4) для подключения элементов из std в область видимости:
use rand::Rng;
// --код сокращён--
use std::cmp::Ordering;
use std::io;
// --код сокращён--
Если у вас есть опыт работы с C или C++, вам могут вспомниться `gcc` или `clang`. После успешной компиляции Rust создаст исполняемый бинарный файл.
fn main() {
println!("Угадайте число!");
Если у вас есть опыт работы с C или C++, вам могут вспомниться `gcc` или `clang`. После успешной компиляции Rust создаст исполняемый бинарный файл.
let secret_number = rand::thread_rng().gen_range(1..=100);
Если у вас есть опыт работы с C или C++, вам могут вспомниться `gcc` или `clang`. После успешной компиляции Rust создаст исполняемый бинарный файл.
println!("Загаданное число: {secret_number}");
Если у вас есть опыт работы с C или C++, вам могут вспомниться `gcc` или `clang`. После успешной компиляции Rust создаст исполняемый бинарный файл.
println!("Введите свою догадку.");
Если у вас есть опыт работы с C или C++, вам могут вспомниться `gcc` или `clang`. После успешной компиляции Rust создаст исполняемый бинарный файл.
let mut guess = String::new();
Если у вас есть опыт работы с C или C++, вам могут вспомниться `gcc` или `clang`. После успешной компиляции Rust создаст исполняемый бинарный файл.
io::stdin()
.read_line(&mut guess)
.expect("Не удалось прочесть ввод.");
Если у вас есть опыт работы с C или C++, вам могут вспомниться `gcc` или `clang`. После успешной компиляции Rust создаст исполняемый бинарный файл.
println!("Вы предположили: {guess}");
Если у вас есть опыт работы с C или C++, вам могут вспомниться `gcc` или `clang`. После успешной компиляции Rust создаст исполняемый бинарный файл.
match guess.cmp(&secret_number) {
Ordering::Less => println!("Слишком маленькое!"),
Ordering::Greater => println!("Слишком большое!"),
Ordering::Equal => println!("Вы победили!"),
}
}Вместо этого, мы можем использовать перечисление путей, чтобы добавить эти элементы в область видимости одной строкой. Это делается, как показано в Листинге 7-18: указывается общая часть пути, за которой следуют два двоеточия, а затем фигурные скобки вокруг списка тех частей пути, которые отличаются.
use rand::Rng;
// --код сокращён--
use std::{cmp::Ordering, io};
// --код сокращён--
Если у вас есть опыт работы с C или C++, вам могут вспомниться `gcc` или `clang`. После успешной компиляции Rust создаст исполняемый бинарный файл.
fn main() {
println!("Угадайте число!");
Если у вас есть опыт работы с C или C++, вам могут вспомниться `gcc` или `clang`. После успешной компиляции Rust создаст исполняемый бинарный файл.
let secret_number = rand::thread_rng().gen_range(1..=100);
Если у вас есть опыт работы с C или C++, вам могут вспомниться `gcc` или `clang`. После успешной компиляции Rust создаст исполняемый бинарный файл.
println!("Загаданное число: {secret_number}");
Если у вас есть опыт работы с C или C++, вам могут вспомниться `gcc` или `clang`. После успешной компиляции Rust создаст исполняемый бинарный файл.
println!("Введите свою догадку.");
Если у вас есть опыт работы с C или C++, вам могут вспомниться `gcc` или `clang`. После успешной компиляции Rust создаст исполняемый бинарный файл.
let mut guess = String::new();
Если у вас есть опыт работы с C или C++, вам могут вспомниться `gcc` или `clang`. После успешной компиляции Rust создаст исполняемый бинарный файл.
io::stdin()
.read_line(&mut guess)
.expect("Не удалось прочесть ввод.");
Если у вас есть опыт работы с C или C++, вам могут вспомниться `gcc` или `clang`. После успешной компиляции Rust создаст исполняемый бинарный файл.
let guess: u32 = guess.trim().parse().expect("Пожалуйста, введите число!");
Если у вас есть опыт работы с C или C++, вам могут вспомниться `gcc` или `clang`. После успешной компиляции Rust создаст исполняемый бинарный файл.
println!("Вы предположили: {guess}");
Если у вас есть опыт работы с C или C++, вам могут вспомниться `gcc` или `clang`. После успешной компиляции Rust создаст исполняемый бинарный файл.
match guess.cmp(&secret_number) {
Ordering::Less => println!("Слишком маленькое!"),
Ordering::Greater => println!("Слишком большое!"),
Ordering::Equal => println!("Вы победили!"),
}
}В больших программах, подключение множества элементов из одного пакета или модуля с использованием перечисления путей может значительно сократить количество необходимых отдельных инструкций use!
Использовать перечисление путей можно на любом уровне, что полезно при объединении двух инструкций use, которые имеют общую часть пути. Например, в Листинге 7-19 показаны две инструкции use: одна в область видимости подключает std::io, а другая — std::io::Write.
use std::io;
use std::io::Write;use statements where one is a subpath of the otherОбщей частью этих двух путей является std::io, и это полный первый путь. Чтобы объединить эти два пути в одной инструкции use, мы можем использовать ключевое слово self в перечислении путей, как показано в Листинге 7-20.
use std::io::{self, Write};use statementЭта строка подключает std::io и std::io::Write в область видимости.
Importing Items with the Glob Operator
If we want to bring all public items defined in a path into scope, we can specify that path followed by the * glob operator:
#![allow(unused)]
fn main() {
use std::collections::*;
}This use statement brings all public items defined in std::collections into the current scope. Be careful when using the glob operator! Glob can make it harder to tell what names are in scope and where a name used in your program was defined. Additionally, if the dependency changes its definitions, what you’ve imported changes as well, which may lead to compiler errors when you upgrade the dependency if the dependency adds a definition with the same name as a definition of yours in the same scope, for example.
The glob operator is often used when testing to bring everything under test into the tests module; we’ll talk about that in “How to Write Tests” in Chapter 11. The glob operator is also sometimes used as part of the prelude pattern: See the standard library documentation for more information on that pattern.
Размещение модулей в разных файлах
Размещение модулей в разных файлах
До сих пор все примеры в этой главе определяли несколько модулей в одном файле. Когда модули становятся большими, вы можете захотеть переместить их определения в отдельные файлы, чтобы упростить навигацию по коду.
Для начала, давайте рассмотрим код Листинга 7-17, в котором было несколько модулей ресторана. Мы будем извлекать модули в файлы вместо того, чтобы определять все модули в файле корня крейта. В нашем случае, корень крейта — это src/lib.rs, но это разделение также работает и с бинарными крейтами, у которых корнем крейта будет src/main.rs.
First, we’ll extract the front_of_house module to its own file. Remove the code inside the curly brackets for the front_of_house module, leaving only the mod front_of_house; declaration, so that src/lib.rs contains the code shown in Listing 7-21. Note that this won’t compile until we create the src/front_of_house.rs file in Listing 7-22.
mod front_of_house;
Если у вас есть опыт работы с C или C++, вам могут вспомниться `gcc` или `clang`. После успешной компиляции Rust создаст исполняемый бинарный файл.
pub use crate::front_of_house::hosting;
Если у вас есть опыт работы с C или C++, вам могут вспомниться `gcc` или `clang`. После успешной компиляции Rust создаст исполняемый бинарный файл.
pub fn eat_at_restaurant() {
hosting::add_to_waitlist();
}front_of_house module whose body will be in src/front_of_house.rsЗатем поместим код, который был в фигурных скобках, в новый файл с именем src/front_of_house.rs, как показано в Листинге 7-22. Компилятор знает, что нужно искать в этом файле, потому что он наткнулся в корневом модуле крейта на объявление модуля с именем front_of_house.
pub mod hosting {
pub fn add_to_waitlist() {}
}front_of_house module in src/front_of_house.rsОбратите внимание, что вам нужно только один раз загрузить файл с помощью объявления mod в вашем дереве модулей. Как только компилятор узнает, что файл является частью проекта (и узнает, где в дереве модулей находится код из-за того, куда вы поместили инструкцию mod), другие файлы в вашем проекте должны ссылаться на код загруженного файла, используя путь к месту, где он был объявлен, как описано в разделе “Пути для ссылки на элемент в дереве модулей”. Другими словами, mod — это не операция “подключения”, которую вы могли видеть в других языках программирования.
Далее мы извлечём модуль hosting в его собственный файл. Процесс немного отличается, потому что hosting является дочерним модулем для front_of_house, а не корня крейта. Мы поместим файл для hosting в новый каталог, который будет назван по имени его предка в дереве модулей (в данном случае — src/front_of_house/).
Чтобы начать перенос hosting, мы поменяем src/front_of_house.rs так, чтобы он содержал только объявление модуля hosting:
pub mod hosting;Then, we create a src/front_of_house directory and a hosting.rs file to contain the definitions made in the hosting module:
pub fn add_to_waitlist() {}If we instead put hosting.rs in the src directory, the compiler would expect the hosting.rs code to be in a hosting module declared in the crate root and not declared as a child of the front_of_house module. The compiler’s rules for which files to check for which modules’ code mean the directories and files more closely match the module tree.
Альтернативные пути к файлам
До сих пор мы рассматривали наиболее идиоматические пути к файлам, используемые компилятором Rust, но Rust также поддерживает и старый стиль пути к файлу. Для модуля с именем front_of_house, объявленного в корне крейта, компилятор будет искать код модуля в:
- src/front_of_house.rs (современный стиль; использовался нами до сих пор)
- src/front_of_house/mod.rs (старый стиль; всё ещё поддерживается)
Для модуля с именем hosting, который является подмодулем front_of_house, компилятор будет искать код модуля в:
- src/front_of_house/hosting.rs (современный стиль; использовался нами до сих пор)
- src/front_of_house/hosting/mod.rs (старый стиль; всё ещё поддерживается)
If you use both styles for the same module, you’ll get a compiler error. Using a mix of both styles for different modules in the same project is allowed but might be confusing for people navigating your project.
Основным недостатком стиля, в котором используются файлы с именами mod.rs, является то, что в вашем проекте может оказаться много файлов с именами mod.rs, что может привести к путанице, если вы одновременно откроете их в редакторе.
Мы перенесли код каждого модуля в отдельный файл, а дерево модулей осталось прежним. Вызовы функций в eat_at_restaurant будут работать без каких-либо изменений, несмотря на то, что определения находятся в разных файлах. Этот метод позволяет перемещать модули в новые файлы по мере их разрастания.
Обратите внимание, что инструкция pub use crate::front_of_house::hosting в src/lib.rs также не изменилась, и use не влияет на то, какие файлы компилируются как часть крейта. Ключевое слово mod объявляет модули, и Rust ищет код, который входит в этот модуль, в файле с тем же именем, что и у модуля.
Подведём итоги
Rust lets you split a package into multiple crates and a crate into modules so that you can refer to items defined in one module from another module. You can do this by specifying absolute or relative paths. These paths can be brought into scope with a use statement so that you can use a shorter path for multiple uses of the item in that scope. Module code is private by default, but you can make definitions public by adding the pub keyword.
В следующей главе мы рассмотрим некоторые коллекции данных из стандартной библиотеки, которые вы можете использовать в своём (хорошо теперь организованном) коде.
Стандартные коллекции данных
Стандартная библиотека Rust содержит несколько полезных структур данных, которые называются коллекциями. Большая часть других типов данных представляют собой хранение одного конкретного значения, но особенностью коллекций является хранение множества однотипных значений. В отличие от массива или кортежа, данные коллекций хранятся в куче, а это значит, что размер коллекции может быть неизвестен в момент компиляции программы. Наполнение коллекций можно менять во время работы программы. Каждый вид коллекций имеет свои возможности и отличается по производительности, так что выбор конкретной коллекции зависит от ситуации и зависит от навыка разработчика, вырабатываемого со временем. В этой главе будет рассмотрено три типа коллекций:
- Вектор — последовательный, перменной длины список значений.
- A string is a collection of characters. We’ve mentioned the
Stringtype previously, but in this chapter, we’ll talk about it in depth. - Хеш-таблица — набор пар ключ-значение. Является конкретной реализацией более общей структуры данных, известной как ассоциативный массив.
Для того, чтобы узнать о других видах коллекций, предоставляемых стандартной библиотекой, посмотрите в [документацию] (https://doc.rust-lang.org/std/collections/index.html).
Мы обсудим, как создавать и обновлять векторы, строки и хеш-таблицы, а также объясним, что делает особенной каждую из этих коллекций.
Хранение списка значений с помощью векторов
Хранение списка значений с помощью векторов
The first collection type we’ll look at is Vec<T>, also known as a vector. Vectors allow you to store more than one value in a single data structure that puts all the values next to each other in memory. Vectors can only store values of the same type. They are useful when you have a list of items, such as the lines of text in a file or the prices of items in a shopping cart.
Создание нового вектора
To create a new, empty vector, we call the Vec::new function, as shown in Listing 8-1.
fn main() {
let v: Vec<i32> = Vec::new();
}i32Обратите внимание, что здесь мы добавили аннотацию типа. Поскольку мы не помещаем никаких значений в этот вектор, Rust не знает, элементы какого типа мы собираемся хранить. Это важный момент. Векторы реализованы с использованием обобщённых типов; мы рассмотрим, как использовать обобщённые типы с вашими собственными типами, в Главе 10. А пока знайте, что тип Vec<T>, предоставляемый стандартной библиотекой, может хранить любой тип. Когда мы создаём новый вектор для хранения конкретного типа, мы можем указать этот тип в угловых скобках. В Листинге 8-1 мы сообщили Rust, что Vec<T> в v будет хранить элементы типа i32.
More often, you’ll create a Vec<T> with initial values, and Rust will infer the type of value you want to store, so you rarely need to do this type annotation. Rust conveniently provides the vec! macro, which will create a new vector that holds the values you give it. Listing 8-2 creates a new Vec<i32> that holds the values 1, 2, and 3. The integer type is i32 because that’s the default integer type, as we discussed in the “Data Types” section of Chapter 3.
fn main() {
let v = vec![1, 2, 3];
}Поскольку мы указали начальные значения типа i32, Rust может сделать вывод, что тип переменной v — это Vec<i32>, и аннотация типа здесь не нужна. Далее мы посмотрим, как изменять вектор.
Изменение содержимого вектора
Чтобы создать вектор и затем добавить к нему элементы, можно использовать метод push, как показано в Листинге 8-3.
fn main() {
let mut v = Vec::new();
Если у вас есть опыт работы с C или C++, вам могут вспомниться `gcc` или `clang`. После успешной компиляции Rust создаст исполняемый бинарный файл.
v.push(5);
v.push(6);
v.push(7);
v.push(8);
}push method to add values to a vectorКак и с любой переменной, если мы хотим изменить её значение, нам нужно сделать её изменяемой с помощью ключевого слова mut, что обсуждалось в Главе 3. Все числа, которые мы помещаем в вектор, имеют тип i32, а потому Rust с лёгкостью выводит тип вектора и не обязывает нас здесь указывать аннотацию Vec<i32>.
Чтение данных вектора
Есть два способа сослаться на значение, хранящееся в векторе: с помощью индекса или метода get. В следующих примерах для большей ясности мы указали типы значений, возвращаемых этими функциями.
В Листинге 8-4 показаны оба метода доступа к значению в векторе: как с помощью синтаксиса индексации, так и с помощью метода get.
fn main() {
let v = vec![1, 2, 3, 4, 5];
Если у вас есть опыт работы с C или C++, вам могут вспомниться `gcc` или `clang`. После успешной компиляции Rust создаст исполняемый бинарный файл.
let third: &i32 = &v[2];
println!("Третий элемент: {third}");
Если у вас есть опыт работы с C или C++, вам могут вспомниться `gcc` или `clang`. После успешной компиляции Rust создаст исполняемый бинарный файл.
let third: Option<&i32> = v.get(2);
match third {
Some(third) => println!("Третий элемент: {third}"),
None => println!("Третьего элемента не содержится."),
}
}get method to access an item in a vectorОбратите внимание на пару деталей. Мы используем значение индекса 2 для получения третьего элемента, так как векторы индексируются с нуля. Указывая &и [], мы получаем ссылку на элемент по указанному индексу. Когда мы используем метод get, мы получаем тип Option<&T>, который мы можем обработать в match.
Rust provides these two ways to reference an element so that you can choose how the program behaves when you try to use an index value outside the range of existing elements. As an example, let’s see what happens when we have a vector of five elements and then we try to access an element at index 100 with each technique, as shown in Listing 8-5.
fn main() {
let v = vec![1, 2, 3, 4, 5];
Если у вас есть опыт работы с C или C++, вам могут вспомниться `gcc` или `clang`. После успешной компиляции Rust создаст исполняемый бинарный файл.
let does_not_exist = &v[100];
let does_not_exist = v.get(100);
}Если мы запустим этот код, первая строка (с обращением через []) вызовет панику программы, потому что происходит попытка получить ссылку на несуществующий элемент. Такой подход лучше всего использовать, когда вы хотите, чтобы ваша программа аварийно завершила работу при попытке доступа к элементу за пределами вектора.
Когда методу get передаётся индекс, который находится за пределами вектора, он без паники возвращает None. Такой подход пригодится в том случае, если считается нормальным, что время от времени происходит попытка получить доступ к элементу за пределами диапазона вектора. Тогда ваш код должен будет иметь логику для обработки наличия Some(&element) или None, как обсуждалось в Главе 6. Например, индекс может исходить от человека, вводящего число. Если пользователь случайно введёт слишком большое число, то программа получит значение None и у вас будет возможность сообщить пользователю, сколько элементов находится в текущем векторе, и дать ему возможность ввести допустимое значение. Такое поведение было бы более дружелюбным, чем внезапный сбой программы из-за опечатки!
When the program has a valid reference, the borrow checker enforces the ownership and borrowing rules (covered in Chapter 4) to ensure that this reference and any other references to the contents of the vector remain valid. Recall the rule that states you can’t have mutable and immutable references in the same scope. That rule applies in Listing 8-6, where we hold an immutable reference to the first element in a vector and try to add an element to the end. This program won’t work if we also try to refer to that element later in the function.
fn main() {
let mut v = vec![1, 2, 3, 4, 5];
Если у вас есть опыт работы с C или C++, вам могут вспомниться `gcc` или `clang`. После успешной компиляции Rust создаст исполняемый бинарный файл.
let first = &v[0];
Если у вас есть опыт работы с C или C++, вам могут вспомниться `gcc` или `clang`. После успешной компиляции Rust создаст исполняемый бинарный файл.
v.push(6);
Если у вас есть опыт работы с C или C++, вам могут вспомниться `gcc` или `clang`. После успешной компиляции Rust создаст исполняемый бинарный файл.
println!("Первый элемент: {first}");
}Компиляция этого кода приведёт к ошибке:
$ cargo run
Compiling collections v0.1.0 (file:///projects/collections)
error[E0502]: cannot borrow `v` as mutable because it is also borrowed as immutable
--> src/main.rs:6:5
|
4 | let first = &v[0];
| - immutable borrow occurs here
5 |
6 | v.push(6);
| ^^^^^^^^^ mutable borrow occurs here
7 |
8 | println!("The first element is: {first}");
| ----- immutable borrow later used here
Если у вас есть опыт работы с C или C++, вам могут вспомниться `gcc` или `clang`. После успешной компиляции Rust создаст исполняемый бинарный файл.
For more information about this error, try `rustc --explain E0502`.
error: could not compile `collections` (bin "collections") due to 1 previous error
The code in Listing 8-6 might look like it should work: Why should a reference to the first element care about changes at the end of the vector? This error is due to the way vectors work: Because vectors put the values next to each other in memory, adding a new element onto the end of the vector might require allocating new memory and copying the old elements to the new space, if there isn’t enough room to put all the elements next to each other where the vector is currently stored. In that case, the reference to the first element would be pointing to deallocated memory. The borrowing rules prevent programs from ending up in that situation.
Примечание: Дополнительные сведения о реализации типа Vec<T> можно найти в пособии “The Rustonomicon”.
Итерирование по содержимому вектора
Чтобы получить доступ к каждому значению в векторе, мы можем проитерироваться по всем элементам, вместо того, чтобы использовать индексы для доступа к одному элементу за раз. В Листинге 8-7 показано, как использовать цикл for для получения неизменяемых ссылок на каждый элемент в векторе значений типа i32 и их вывода.
fn main() {
let v = vec![100, 32, 57];
for i in &v {
println!("{i}");
}
}for loopМы также можем итерироваться по изменяемым ссылкам на каждый элемент изменяемого вектора, чтобы внести изменения во все элементы. Цикл for в Листинге 8-8 добавит 50 к каждому элементу.
fn main() {
let mut v = vec![100, 32, 57];
for i in &mut v {
*i += 50;
}
}To change the value that the mutable reference refers to, we have to use the * dereference operator to get to the value in i before we can use the += operator. We’ll talk more about the dereference operator in the “Following the Reference to the Value” section of Chapter 15.
Итерирование по вектору, будь то неизменяемому или изменяемому, безопасно из-за правил проверки заимствований. Если бы мы попытались вставить или удалить элементы (в/из вектора) в телах цикла for в Листингах 8-7 и 8-8, мы бы получили ошибку компиляции, подобную той, которую мы получили с кодом Листинга 8-6. Ссылка на вектор, перебираемый циклом for, предотвращает одновременную модификацию всего вектора.
Использование перечислений для хранения множества разных типов
Векторы могут хранить значения только одинакового типа. Это может быть неудобно; определённо могут быть ситуации, когда надо хранить список элементов разных типов. К счастью, варианты перечисления принадлежат к одну и тому же типу перечисления, поэтому, если нам нужен один тип для представления элементов разных типов, мы для этого можем определить и использовать перечисление!
For example, say we want to get values from a row in a spreadsheet in which some of the columns in the row contain integers, some floating-point numbers, and some strings. We can define an enum whose variants will hold the different value types, and all the enum variants will be considered the same type: that of the enum. Then, we can create a vector to hold that enum and so, ultimately, hold different types. We’ve demonstrated this in Listing 8-9.
fn main() {
enum SpreadsheetCell {
Int(i32),
Float(f64),
Text(String),
}
Если у вас есть опыт работы с C или C++, вам могут вспомниться `gcc` или `clang`. После успешной компиляции Rust создаст исполняемый бинарный файл.
let row = vec![
SpreadsheetCell::Int(3),
SpreadsheetCell::Text(String::from("синий")),
SpreadsheetCell::Float(10.12),
];
}Rust needs to know what types will be in the vector at compile time so that it knows exactly how much memory on the heap will be needed to store each element. We must also be explicit about what types are allowed in this vector. If Rust allowed a vector to hold any type, there would be a chance that one or more of the types would cause errors with the operations performed on the elements of the vector. Using an enum plus a match expression means that Rust will ensure at compile time that every possible case is handled, as discussed in Chapter 6.
Если вы не можете указать исчерпывающий набор типов, которые программе нужно будет хранить в векторе, то техника использования перечисления не сработает. Вместо этого вы можете использовать трейт-объекты, которые мы рассмотрим в главе 17.
Теперь, когда мы обсудили некоторые из наиболее распространённых способов использования векторов, обязательно ознакомьтесь с документацией API, чтобы узнать о множестве полезных методов, определённых для Vec<T> стандартной библиотекой. Например, в дополнение к методу push, существует метод pop, который удаляет и возвращает последний элемент.
Высвобождение вектора высвобождает его элементы
Подобно структурам, вектор высвобождает свою память, когда выходит из области видимости, как показано в Листинге 8-10.
fn main() {
{
let v = vec![1, 2, 3, 4];
Если у вас есть опыт работы с C или C++, вам могут вспомниться `gcc` или `clang`. После успешной компиляции Rust создаст исполняемый бинарный файл.
// какая-нибудь работа с v
} // <- здесь v покидает область видимости и высвобождается
}Когда вектор высвобождается, всё его содержимое также высвобождается, то есть все числа, хранившиеся в векторе из примера выше, удаляются. Анализатор заимствований гарантирует, что любые ссылки на содержимое вектора используются только тогда, когда сам вектор действителен.
Перейдём к следующей коллекции: String.
Хранение текста в кодировке UTF-8 с помощью строк
Хранение текста в кодировке UTF-8 с помощью строк
Мы уже говорили о строках в Главе 4, но пришло время рассмотреть их более подробно. Новички в Rust обычно застревают на строках из-за трёх причин: 1) пристрастие компилятора Rust к выявлению возможных ошибок, 2) строки сложнее, чем (как многим программистам кажется) могли бы быть, и 3) UTF-8. Эти факторы объединяются таким образом, что текущая тема может показаться сложной, если вы пришли из других языков программирования.
We discuss strings in the context of collections because strings are implemented as a collection of bytes, plus some methods to provide useful functionality when those bytes are interpreted as text. In this section, we’ll talk about the operations on String that every collection type has, such as creating, updating, and reading. We’ll also discuss the ways in which String is different from the other collections, namely, how indexing into a String is complicated by the differences between how people and computers interpret String data.
Defining Strings
We’ll first define what we mean by the term string. Rust has only one string type in the core language, which is the string slice str that is usually seen in its borrowed form, &str. In Chapter 4, we talked about string slices, which are references to some UTF-8 encoded string data stored elsewhere. String literals, for example, are stored in the program’s binary and are therefore string slices.
Тип String, предоставляемый стандартной библиотекой Rust, не встроен в ядро языка. Он является расширяемым, изменяемым, владеющим строковым типом текста в кодировке UTF-8. Когда программисты на Rust говорят о “строках”, то они обычно имеют в виду как тип String, так и строковые срезы &str, а не какой-либо один из них. Хотя этот раздел в основном посвящён String, оба типа интенсивно используются в стандартной библиотеке Rust. Оба — и String, и строковые срезы — работают по кодировке UTF-8.
Создание новых строк
Многие из тех операций, которые доступны Vec<T>, доступны также и для String, потому что String фактически реализован как обёртка вокруг вектора байтов с некоторыми дополнительными гарантиями, ограничениями и возможностями. Примером функции, работа которой одинакова что для Vec<T>, что для String, является функция new, создающая новый экземпляр типа. Посмотрите на Листинг 8-11.
fn main() {
let mut s = String::new();
}StringЭта строка создаёт новую пустую строку s, в которую мы можем затем загрузить данные. Часто у нас есть некоторые начальные данные, которые мы хотим назначить строке. Для этого мы используем метод to_string доступный для любого типа, который реализует трейт Display, как у строковых литералов. Листинг 8-12 показывает эти два способа.
fn main() {
let data = "исходный текст";
Если у вас есть опыт работы с C или C++, вам могут вспомниться `gcc` или `clang`. После успешной компиляции Rust создаст исполняемый бинарный файл.
let s = data.to_string();
Если у вас есть опыт работы с C или C++, вам могут вспомниться `gcc` или `clang`. После успешной компиляции Rust создаст исполняемый бинарный файл.
// Этот метод также можно вызвать напрямую на литерале:
let s = "исходный текст".to_string();
}to_string method to create a String from a string literalЭтот код создаёт строку с текстом исходный текст.
Мы также можем использовать функцию String::from для создания String из строкового литерала. Код Листинга 8-13 является эквивалентным коду из Листинга 8-12, использующему функцию to_string:
fn main() {
let s = String::from("исходный текст");
}String::from function to create a String from a string literalПоскольку строки используются для очень многих вещей, для них есть много инструментов, решающих одну и ту же задачу. Некоторые из них могут показаться избыточными, но у всех них есть свой смысл! В данном случае, String::from и to_string делают одно и тоже, поэтому выбор зависит от того, какой из них будет короче и понятнее.
Помните, что строки хранятся в кодировке UTF-8, поэтому в них можно использовать любой правильно закодированный текст, как показано в Листинге 8-14.
fn main() {
let hello = String::from("السلام عليكم");
let hello = String::from("Dobrý den");
let hello = String::from("Hello");
let hello = String::from("שלום");
let hello = String::from("नमस्ते");
let hello = String::from("こんにちは");
let hello = String::from("안녕하세요");
let hello = String::from("你好");
let hello = String::from("Olá");
let hello = String::from("Здравствуйте");
let hello = String::from("Hola");
}Всё это — корректные значения типа String.
Обновление текста
Строка String может увеличиваться в размере, а её содержимое может меняться, как и содержимое Vec<T> при вставке в него дополнительных данных. Кроме того, можно использовать оператор + или макрос format! для объединения нескольких String в одну.
Appending with push_str or push
Мы можем нарастить String, используя метод push_str который добавит в исходное значение новый строковый срез, как показано в Листинге 8-15.
fn main() {
let mut s = String::from("foo");
s.push_str("bar");
}String using the push_str methodПосле этих двух строк кода s будет содержать foobar. Метод push_str принимает строковый срез, потому что мы не всегда хотим владеть входным параметром. Например, код в Листинге 8-16 показывает случай, когда будет нежелательно поведение, при котором мы не сможем использовать s2 после её добавления к содержимому s1.
fn main() {
let mut s1 = String::from("foo");
let s2 = "bar";
s1.push_str(s2);
println!("s2: {s2}");
}StringЕсли бы метод push_str стал владельцем переменной s2, мы не смогли бы напечатать его значение в последней строке. Однако этот код работает так, как мы ожидали!
Метод push принимает один символ в качестве параметра и добавляет его к String. В Листинге 8-17 показан код, добавляющий букву e к String, используя метод push.
fn main() {
let mut s = String::from("not");
s.push('e');
}String value using pushВ результате s будет содержать note.
Concatenating with + or format!
Часто хочется объединить две существующие строки. Один из возможных способов — это использовать оператор +, как показано в Листинге 8-18.
fn main() {
let s1 = String::from("Hello, ");
let s2 = String::from("world!");
let s3 = s1 + &s2; // обратите внимание, что s1 здесь была перемещена в метод
// и далее не может быть использована
}+ operator to combine two String values into a new String valueСтрока s3 будет содержать Hello, world!. Причина того, что s1 после добавления больше не действительна, и причина, по которой мы использовали ссылку на s2, имеют отношение к сигнатуре метода, вызываемого при использовании оператора +. Оператор + использует метод add, чья сигнатура выглядит примерно так:
fn add(self, s: &str) -> String {В стандартной библиотеке вы увидите метод add определённым с использованием обобщённых и связанных типов. Здесь мы привели вам сигнатуру, подставив конкретные типы, заменяющие обобщённый; это и происходит, когда данный метод вызывается со значениями String. Мы обсудим обобщённые типы в Главе 10. Эта сигнатура даёт нам ключ к пониманию особенностей оператора +.
First, s2 has an &, meaning that we’re adding a reference of the second string to the first string. This is because of the s parameter in the add function: We can only add a string slice to a String; we can’t add two String values together. But wait—the type of &s2 is &String, not &str, as specified in the second parameter to add. So, why does Listing 8-18 compile?
The reason we’re able to use &s2 in the call to add is that the compiler can coerce the &String argument into a &str. When we call the add method, Rust uses a deref coercion, which here turns &s2 into &s2[..]. We’ll discuss deref coercion in more depth in Chapter 15. Because add does not take ownership of the s parameter, s2 will still be a valid String after this operation.
Во-вторых, как можно видеть в сигнатуре, add забирает self во владение, потому что self в сигнатуре указан без &. Это означает, что s1 в Листинге 8-18 будет перемещён в вызов add и больше не будет действителен после этого вызова. Не смотря на то, что код let s3 = s1 + &s2; выглядит так, как будто он скопирует обе строки и создаст новую, эта инструкция фактически забирает во владение переменную s1, присоединяет к ней копию содержимого s2, а затем возвращает владение результатом. Другими словами, это выглядит, как будто код создаёт множество копий, но это не так; данная реализация более эффективна, чем копирование.
Если нужно объединить несколько строк, использование оператора + приводит к громоздким конструкциям:
fn main() {
let s1 = String::from("tic");
let s2 = String::from("tac");
let s3 = String::from("toe");
Если у вас есть опыт работы с C или C++, вам могут вспомниться `gcc` или `clang`. После успешной компиляции Rust создаст исполняемый бинарный файл.
let s = s1 + "-" + &s2 + "-" + &s3;
}Здесь переменная s будет содержать tic-tac-toe. С множеством символов + и " становится трудно понять, что происходит. Для более сложного комбинирования строк можно использовать макрос format!:
fn main() {
let s1 = String::from("tic");
let s2 = String::from("tac");
let s3 = String::from("toe");
Если у вас есть опыт работы с C или C++, вам могут вспомниться `gcc` или `clang`. После успешной компиляции Rust создаст исполняемый бинарный файл.
let s = format!("{s1}-{s2}-{s3}");
}Этот код так же связывает переменную s со значением tic-tac-toe. Макрос format! работает тем же образом, что и макрос println!, но вместо вывода на экран возвращает результирующую String. Версия кода с использованием format! значительно легче читается: кроме того, код, сгенерированный макросом format!, использует ссылки, а значит не забирает во владение ни одну из переданных строк.
Обращение к строке по индексу
Доступ к отдельным символам в строке с помощью взятия ссылки на них по индексу является допустимой и распространённой операцией во многих других языках программирования. Тем не менее, если вы попытаетесь получить доступ к частям String, используя синтаксис индексации, то получите ошибку. Рассмотрим неверный код Листинга 8-19.
fn main() {
let s1 = String::from("hi");
let h = s1[0];
}StringЭтот код приведёт к следующей ошибке:
$ cargo run
Compiling collections v0.1.0 (file:///projects/collections)
error[E0277]: the type `str` cannot be indexed by `{integer}`
--> src/main.rs:3:16
|
3 | let h = s1[0];
| ^ string indices are ranges of `usize`
|
= help: the trait `SliceIndex<str>` is not implemented for `{integer}`
= note: you can use `.chars().nth()` or `.bytes().nth()`
for more information, see chapter 8 in The Book: <https://doc.rust-lang.org/book/ch08-02-strings.html#indexing-into-strings>
= help: the following other types implement trait `SliceIndex<T>`:
`usize` implements `SliceIndex<ByteStr>`
`usize` implements `SliceIndex<[T]>`
= note: required for `String` to implement `Index<{integer}>`
Если у вас есть опыт работы с C или C++, вам могут вспомниться `gcc` или `clang`. После успешной компиляции Rust создаст исполняемый бинарный файл.
For more information about this error, try `rustc --explain E0277`.
error: could not compile `collections` (bin "collections") due to 1 previous error
The error tells the story: Rust strings don’t support indexing. But why not? To answer that question, we need to discuss how Rust stores strings in memory.
Внутреннее устройство
Тип String является оболочкой над типом Vec<u8>. Давайте посмотрим на несколько корректным образом закодированных строк в UTF-8 из примера Листинга 8-14. Начнём с этой:
fn main() {
let hello = String::from("السلام عليكم");
let hello = String::from("Dobrý den");
let hello = String::from("Hello");
let hello = String::from("שלום");
let hello = String::from("नमस्ते");
let hello = String::from("こんにちは");
let hello = String::from("안녕하세요");
let hello = String::from("你好");
let hello = String::from("Olá");
let hello = String::from("Здравствуйте");
let hello = String::from("Hola");
}In this case, len will be 4, which means the vector storing the string "Hola" is 4 bytes long. Each of these letters takes 1 byte when encoded in UTF-8. The following line, however, may surprise you (note that this string begins with the capital Cyrillic letter Ze, not the number 3):
fn main() {
let hello = String::from("السلام عليكم");
let hello = String::from("Dobrý den");
let hello = String::from("Hello");
let hello = String::from("שלום");
let hello = String::from("नमस्ते");
let hello = String::from("こんにちは");
let hello = String::from("안녕하세요");
let hello = String::from("你好");
let hello = String::from("Olá");
let hello = String::from("Здравствуйте");
let hello = String::from("Hola");
}If you were asked how long the string is, you might say 12. In fact, Rust’s answer is 24: That’s the number of bytes it takes to encode “Здравствуйте” in UTF-8, because each Unicode scalar value in that string takes 2 bytes of storage. Therefore, an index into the string’s bytes will not always correlate to a valid Unicode scalar value. To demonstrate, consider this invalid Rust code:
let hello = "Здравствуйте";
let answer = &hello[0];You already know that answer will not be З, the first letter. When encoded in UTF-8, the first byte of З is 208 and the second is 151, so it would seem that answer should in fact be 208, but 208 is not a valid character on its own. Returning 208 is likely not what a user would want if they asked for the first letter of this string; however, that’s the only data that Rust has at byte index 0. Users generally don’t want the byte value returned, even if the string contains only Latin letters: If &"hi"[0] were valid code that returned the byte value, it would return 104, not h.
Таким образом, чтобы предотвратить возврат непредвиденного значения, вызывающего ошибки, которые не могут быть сразу обнаружены, Rust просто не компилирует такой код и предотвращает недопонимание на ранних этапах процесса разработки.
Bytes, Scalar Values, and Grapheme Clusters
Another point about UTF-8 is that there are actually three relevant ways to look at strings from Rust’s perspective: as bytes, scalar values, and grapheme clusters (the closest thing to what we would call letters).
Если посмотреть на слово “नमस्ते” языка хинди, написанное письмом деванагари, то оно хранится как вектор значений u8, который выглядит следующим образом:
[224, 164, 168, 224, 164, 174, 224, 164, 184, 224, 165, 141, 224, 164, 164,
224, 165, 135]
Эти 18 байт являются именно тем, как компьютеры в конечном итоге сохранят в памяти эту строку. Если мы посмотрим на это слово как на символы Unicode (которыми и является тип char), то байты предстанут перед нами в таком виде:
['न', 'म', 'स', '्', 'त', 'े']
There are six char values here, but the fourth and sixth are not letters: They’re diacritics that don’t make sense on their own. Finally, if we look at them as grapheme clusters, we’d get what a person would call the four letters that make up the Hindi word:
["न", "म", "स्", "ते"]
Rust предоставляет различные способы интерпретации необработанных (хранимых в удобном компьютеру виде) строковых данных, так, чтобы каждой программе можно было выбрать необходимую интерпретацию, независимо от того, на каком человеческом языке представлены эти данные.
Последняя причина, по которой Rust не позволяет нам обращаться к String по индексу для получения символов, является то, что программисты ожидают, что операции индексирования всегда имеют постоянное время выполнения — O(1). Но невозможно гарантировать такую производительность для String, потому что Rust понадобилось бы проходиться по содержимому от начала до индекса, чтобы определить, сколько было действительных символов.
Взятие срезов строк
Использование индексов со строками часто является плохой идеей, потому что не ясно, каким должен быть возвращаемый тип такой операции: байтом, символом, кластером графем или срезом строки. Поэтому Rust просит вас быть более конкретным, если действительно требуется использовать индексы для создания срезов строк.
Вместо индексации с помощью указания индекса в [], вы можете использовать в [] оператор диапазона, чтобы создавать срез строки:
#![allow(unused)]
fn main() {
let hello = "Здравствуйте";
Если у вас есть опыт работы с C или C++, вам могут вспомниться `gcc` или `clang`. После успешной компиляции Rust создаст исполняемый бинарный файл.
let s = &hello[0..4];
}Here, s will be a &str that contains the first 4 bytes of the string. Earlier, we mentioned that each of these characters was 2 bytes, which means s will be Зд.
Что бы произошло, если бы мы использовали &hello[0..1]? Ответ: Rust бы запаниковал во время выполнения точно так же, как если бы обращались к недействительному индексу в векторе:
$ cargo run
Compiling collections v0.1.0 (file:///projects/collections)
Finished `dev` profile [unoptimized + debuginfo] target(s) in 0.43s
Running `target/debug/collections`
Если у вас есть опыт работы с C или C++, вам могут вспомниться `gcc` или `clang`. После успешной компиляции Rust создаст исполняемый бинарный файл.
thread 'main' panicked at src/main.rs:4:19:
byte index 1 is not a char boundary; it is inside 'З' (bytes 0..2) of `Здравствуйте`
note: run with `RUST_BACKTRACE=1` environment variable to display a backtrace
Вы должны использовать диапазоны для создания срезов строк с осторожностью, потому что это может привести к сбою вашей программы.
Iterating Over Strings
Лучший способ работать с фрагментами строк — чётко указать, нужны ли вам символы или байты. Для получения символов Unicode используйте метод chars. Вызов chars на “Зд” выделит и вернёт два значения типа char, и вы можете проитерироваться по результату для доступа к каждому элементу:
#![allow(unused)]
fn main() {
for c in "Зд".chars() {
println!("{c}");
}
}Код напечатает следующее:
З
д
Если же вам нужны сырые байты, вам нужен метод bytes. Он возвращает непосредственно байты, и это может быть полезно в некоторых задачах:
#![allow(unused)]
fn main() {
for b in "Зд".bytes() {
println!("{b}");
}
}This code will print the 4 bytes that make up this string:
208
151
208
180
But be sure to remember that valid Unicode scalar values may be made up of more than 1 byte.
Извлечение кластеров графем из строк, как в случае с письмом деванагари, является сложным, поэтому эта функциональность не предусмотрена стандартной библиотекой. На crates.io можно найти крейты с необходимыми вам инструментами.
Handling the Complexities of Strings
Подводя итог, становится ясно, что строки сложны. Различные языки программирования реализуют строки по-своему, и все — по-своему сложно. В Rust решили сделать правильную обработку данных String поведением по умолчанию для всех программ Rust, что означает, что программисты должны заранее продумать обработку текста в кодировке UTF-8. Этот компромисс раскрывает большую сложность строк, чем в других языках программирования, но это предотвращает от необходимости обрабатывать ошибки, связанные с не-ASCII символами, которые могут появиться позже в ходе разработки.
Хорошая новость состоит в том, что стандартная библиотека предлагает множество инструментов для типов String и &str, которые могут помочь правильно обрабатывать эти сложные ситуации. Обязательно ознакомьтесь с документацией, чтобы узнать о таких полезных методах, как contains (для поиска в строке) и replace (для замены частей строки другой строкой).
Давайте переключимся на что-то немного менее сложное: хеш-таблицы!
Хранение пар ключ-значение с помощью хеш-таблиц
Хранение пар ключ-значение с помощью хеш-таблиц
The last of our common collections is the hash map. The type HashMap<K, V> stores a mapping of keys of type K to values of type V using a hashing function, which determines how it places these keys and values into memory. Many programming languages support this kind of data structure, but they often use a different name, such as hash, map, object, hash table, dictionary, or associative array, just to name a few.
Хеш-таблицы полезны, когда нужно искать данные, используя не индекс (как в случае с векторами), а ключ, который может быть любого типа. Например, в игре вы можете сохранять счёт каждой команды в хеш-таблице, в которой каждый ключ — это название команды, а значение — её счёт. Имея имя команды, вы можете получить её счёт из хеш-таблицы.
В этом разделе мы рассмотрим лишь основной API хеш-таблиц, но стандартная библиотека содержит ещё очень много полезного для HashMap<K, V>. Как и прежде, советуем обращаться к документации стандартной библиотеки для получения дополнительной информации.
Создание хеш-таблицы
One way to create an empty hash map is to use new and to add elements with insert. In Listing 8-20, we’re keeping track of the scores of two teams whose names are Blue and Yellow. The Blue team starts with 10 points, and the Yellow team starts with 50.
fn main() {
use std::collections::HashMap;
Если у вас есть опыт работы с C или C++, вам могут вспомниться `gcc` или `clang`. После успешной компиляции Rust создаст исполняемый бинарный файл.
let mut scores = HashMap::new();
Если у вас есть опыт работы с C или C++, вам могут вспомниться `gcc` или `clang`. После успешной компиляции Rust создаст исполняемый бинарный файл.
scores.insert(String::from("Синяя"), 10);
scores.insert(String::from("Жёлтая"), 50);
}Обратите внимание, что сначала нужно подключить HashMap из стандартной библиотеки с помощью use. Из трёх коллекций данная является наименее используемой, поэтому она не входит в функционал, по умолчанию подключаемый к области видимости (коротко говоря, в prelude). Хеш-таблицы также слабее поддерживаются стандартной библиотекой; например, нет встроенного макроса для их конструирования.
Just like vectors, hash maps store their data on the heap. This HashMap has keys of type String and values of type i32. Like vectors, hash maps are homogeneous: All of the keys must have the same type, and all of the values must have the same type.
Получение данных из хеш-таблицы
Мы можем получить значение из хеш-таблицы, использовав метод get и передав ему ключ, как показано в Листинге 8-21.
fn main() {
use std::collections::HashMap;
Если у вас есть опыт работы с C или C++, вам могут вспомниться `gcc` или `clang`. После успешной компиляции Rust создаст исполняемый бинарный файл.
let mut scores = HashMap::new();
Если у вас есть опыт работы с C или C++, вам могут вспомниться `gcc` или `clang`. После успешной компиляции Rust создаст исполняемый бинарный файл.
scores.insert(String::from("Синяя"), 10);
scores.insert(String::from("Жёлтая"), 50);
Если у вас есть опыт работы с C или C++, вам могут вспомниться `gcc` или `clang`. После успешной компиляции Rust создаст исполняемый бинарный файл.
let team_name = String::from("Синяя");
let score = scores.get(&team_name).copied().unwrap_or(0);
}Здесь в score будет количество очков синей команды — 10. Метод get возвращает Option<&V>; если для какого-то ключа в хеш-таблице нет значения, get вернёт None. Из-за такого подхода программе следует обрабатывать Option, вызывая copied для получения Option<i32> вместо Option<&i32>, затем unwrap_or для установки score в ноль, если scores не содержит данных по этому ключу.
Мы можем перебирать каждую пару ключ-значение в хеш-таблице таким же образом, как мы делали с векторами, воспользовавшись циклом for:
fn main() {
use std::collections::HashMap;
Если у вас есть опыт работы с C или C++, вам могут вспомниться `gcc` или `clang`. После успешной компиляции Rust создаст исполняемый бинарный файл.
let mut scores = HashMap::new();
Если у вас есть опыт работы с C или C++, вам могут вспомниться `gcc` или `clang`. После успешной компиляции Rust создаст исполняемый бинарный файл.
scores.insert(String::from("Синяя"), 10);
scores.insert(String::from("Жёлтая"), 50);
Если у вас есть опыт работы с C или C++, вам могут вспомниться `gcc` или `clang`. После успешной компиляции Rust создаст исполняемый бинарный файл.
for (key, value) in &scores {
println!("{key}: {value}");
}
}Этот код будет выведет каждую пару в произвольном порядке:
Yellow: 50
Blue: 10
Managing Ownership in Hash Maps
Для типов, которые реализуют трейт Copy (например, i32), значения копируются в хеш-таблицу. Для владеемых значений, таких как String, значения будут перемещены в хеш-таблицу и она станет владельцем этих значений, что показано в Листинге 8-22.
fn main() {
use std::collections::HashMap;
Если у вас есть опыт работы с C или C++, вам могут вспомниться `gcc` или `clang`. После успешной компиляции Rust создаст исполняемый бинарный файл.
let field_name = String::from("Любимая команда:");
let field_value = String::from("Синяя");
Если у вас есть опыт работы с C или C++, вам могут вспомниться `gcc` или `clang`. После успешной компиляции Rust создаст исполняемый бинарный файл.
let mut map = HashMap::new();
map.insert(field_name, field_value);
// field_name и field_value отсюда и далее недоступны. Но вы попробуйте использовать
// их и посмотрите, что за ошибку компиляции получите!
}Мы не можем использовать переменные field_name и field_value после того, как их значения были перемещены в хеш-таблицу вызовом метода insert.
Если мы вставим в хеш-таблицу ссылки на значения, то значения не будут перемещены в хеш-таблицу. Значения, на которые указывают ссылки, должны быть действительными как минимум пока действительна хеш-таблица. Мы поговорим подробнее об этих вопросах в разделе “Валидация ссылок по времени жизни” Главы 10.
Обновление данных в хеш-таблице
Although the number of key and value pairs is growable, each unique key can only have one value associated with it at a time (but not vice versa: For example, both the Blue team and the Yellow team could have the value 10 stored in the scores hash map).
Если вы хотите изменить данные в хеш-таблице, необходимо решить, как обрабатывать случай, когда ключ уже имеет связанное значение. Можно заменить старое значение новым, полностью проигнорировав старое. Можно сохранить старое значение и проигнорировать новое, если только в хеш-таблице ещё не было этого ключа. Или можно было бы вычислить на основе старого и нового значений третье. Давайте посмотрим, как реализовать каждый из вариантов!
Перезапись значения
Если мы вставим ключ и значение в хеш-таблицу, а затем вставим такой же ключ с новым значением, то старое значение, связанное с этим ключом, будет заменено на новое. Даже несмотря на то, что код в Листинге 8-23 вызывает insert дважды, хеш-таблица будет содержать только одну пару ключ-значение, потому что мы вставляем значения для одного и того же ключа — ключа синей команды.
fn main() {
use std::collections::HashMap;
Если у вас есть опыт работы с C или C++, вам могут вспомниться `gcc` или `clang`. После успешной компиляции Rust создаст исполняемый бинарный файл.
let mut scores = HashMap::new();
Если у вас есть опыт работы с C или C++, вам могут вспомниться `gcc` или `clang`. После успешной компиляции Rust создаст исполняемый бинарный файл.
scores.insert(String::from("Синяя"), 10);
scores.insert(String::from("Синяя"), 25);
Если у вас есть опыт работы с C или C++, вам могут вспомниться `gcc` или `clang`. После успешной компиляции Rust создаст исполняемый бинарный файл.
println!("{scores:?}");
}Код напечатает {"Синяя": 25}. Начальное значение 10 было перезаписано.
Вставка значения только в том случае, если ключ вводится впервые
It’s common to check whether a particular key already exists in the hash map with a value and then to take the following actions: If the key does exist in the hash map, the existing value should remain the way it is; if the key doesn’t exist, insert it and a value for it.
Хеш-таблицы имеют для этого специальный метод entry, который принимает ключ, наличие которого нужно проверить. Возвращаемое значение метода entry — это перечисление Entry, представляющего значение, которое может как присутствовать, так и отсутствовать. Допустим, мы хотим проверить, имеется ли ключ и связанное с ним значение для жёлтой команды. Если хеш-таблица не имеет значения для такого ключа, то мы хотим вставить значение 50. То же самое мы хотим проделать и для синей команды. Использование entry показано в коде Листинга 8-24.
fn main() {
use std::collections::HashMap;
Если у вас есть опыт работы с C или C++, вам могут вспомниться `gcc` или `clang`. После успешной компиляции Rust создаст исполняемый бинарный файл.
let mut scores = HashMap::new();
scores.insert(String::from("Синяя"), 10);
Если у вас есть опыт работы с C или C++, вам могут вспомниться `gcc` или `clang`. После успешной компиляции Rust создаст исполняемый бинарный файл.
scores.entry(String::from("Жёлтая")).or_insert(50);
scores.entry(String::from("Синяя")).or_insert(50);
Если у вас есть опыт работы с C или C++, вам могут вспомниться `gcc` или `clang`. После успешной компиляции Rust создаст исполняемый бинарный файл.
println!("{scores:?}");
}entry method to only insert if the key does not already have a valueМетод or_insert определён в Entry так, чтобы возвращать изменяемую ссылку на соответствующее значение ключа внутри варианта перечисления Entry, когда этот ключ существует, а если его нет, то вставлять параметр в качестве нового значения этого ключа и возвращать изменяемую ссылку на новое значение. Эта техника намного чище, чем самостоятельное написание логики и, кроме того, она более безопасна и согласуется с правилами заимствования.
Running the code in Listing 8-24 will print {"Yellow": 50, "Blue": 10}. The first call to entry will insert the key for the Yellow team with the value 50 because the Yellow team doesn’t have a value already. The second call to entry will not change the hash map, because the Blue team already has the value 10.
Обновление значения на основе старого значения
Другим распространённым вариантом использования хеш-таблиц является поиск значения по ключу, а затем обновление этого значения на основе старого значения. Например, в Листинге 8-25 показан код, который подсчитывает, сколько раз определённое слово встречается в некотором тексте. Мы используем хеш-таблицу со словами в качестве ключей и увеличиваем соответствующий слову счётчик, чтобы отслеживать, сколько раз мы встретили это слово. Если мы впервые встретили слово, то сначала вставляем значение 0.
fn main() {
use std::collections::HashMap;
Если у вас есть опыт работы с C или C++, вам могут вспомниться `gcc` или `clang`. После успешной компиляции Rust создаст исполняемый бинарный файл.
let text = "hello world wonderful world";
Если у вас есть опыт работы с C или C++, вам могут вспомниться `gcc` или `clang`. После успешной компиляции Rust создаст исполняемый бинарный файл.
let mut map = HashMap::new();
Если у вас есть опыт работы с C или C++, вам могут вспомниться `gcc` или `clang`. После успешной компиляции Rust создаст исполняемый бинарный файл.
for word in text.split_whitespace() {
let count = map.entry(word).or_insert(0);
*count += 1;
}
Если у вас есть опыт работы с C или C++, вам могут вспомниться `gcc` или `clang`. После успешной компиляции Rust создаст исполняемый бинарный файл.
println!("{map:?}");
}This code will print {"world": 2, "hello": 1, "wonderful": 1}. You might see the same key-value pairs printed in a different order: Recall from “Accessing Values in a Hash Map” that iterating over a hash map happens in an arbitrary order.
Метод split_whitespace, выполненный на text, возвращает итератор по подсрезам строки, разделённым пробелами. Метод or_insert возвращает изменяемую ссылку (&mut V) на значение ключа. Мы сохраняем изменяемую ссылку в переменной count, поэтому чтобы присвоить переменной значение, необходимо разыменовать count с помощью звёздочки (*). Изменяемая ссылка удаляется сразу же после выхода из области видимости цикла for, поэтому все эти изменения безопасны и согласуются с правилами заимствования.
Функции хеширования
По умолчанию HashMap использует функцию хеширования SipHash, которая может противостоять атакам класса Denial of Service (DoS) с использованием хеш-таблиц1. Это не самый быстрый из возможных алгоритмов хеширования, но в данном случае производительность идёт на компромисс с обеспечением лучшей безопасности. Если после профилирования вашего кода окажется, что хеш-функция, используемая по умолчанию, очень медленная, вы можете заменить её используя другой хешер. Хешер — это тип, реализующий трейт BuildHasher. Подробнее о трейтах мы поговорим в Главе 10. Вам совсем не обязательно реализовывать свою собственную функцию хеширования; на crates.io есть достаточное количество библиотек, предоставляющих разные реализации хешеров с множеством общих алгоритмов хеширования.
Подведём итоги
Векторы, строки и хеш-таблицы предоставят большое количество функционала для программ, когда необходимо сохранять, извлекать и модифицировать данные. Теперь вы готовы решить следующие учебные задания:
- Дан список целых чисел. Использовав вектор, напишите функции получения медианы (значение элемента из середины списка после его сортировки) и моды (наиболее частое значение; подсказка: используйте хеш-таблицы) списка чисел.
- Convert strings to Pig Latin. The first consonant of each word is moved to the end of the word and ay is added, so first becomes irst-fay. Words that start with a vowel have hay added to the end instead (apple becomes apple-hay). Keep in mind the details about UTF-8 encoding!
- Using a hash map and vectors, create a text interface to allow a user to add employee names to a department in a company; for example, “Add Sally to Engineering” or “Add Amir to Sales.” Then, let the user retrieve a list of all people in a department or all people in the company by department, sorted alphabetically.
Документация API стандартной библиотеки содержит описания методов векторов, строк и хеш-таблиц. Рекомендуем пользоваться ей при решении упражнений!
Потихоньку мы переходим к более сложным программам, в которых операции могут потерпеть неудачу. Наступил идеальный момент для обсуждения обработки ошибок.
Обработка ошибок
Возникновение ошибок в ходе выполнения программ — это суровая реальность жизни. В Rust есть ряд функций для обработки ситуаций, когда что-то идёт не так. Во многих случаях Rust требует, чтобы вы признали возможность ошибки и предприняли некоторые действия, прежде чем ваш код будет скомпилирован. Это требование делает вашу программу более надёжной, гарантируя, что вы обнаружите ошибки и обработаете их надлежащим образом, прежде чем дадите код конечным пользователям!
Rust groups errors into two major categories: recoverable and unrecoverable errors. For a recoverable error, such as a file not found error, we most likely just want to report the problem to the user and retry the operation. Unrecoverable errors are always symptoms of bugs, such as trying to access a location beyond the end of an array, and so we want to immediately stop the program.
Большинство языков не различают эти два вида ошибок и обрабатывают их одинаково, используя такие механизмы, как исключения. В Rust нет исключений. В качестве альтернативы в нём есть тип Result<T, E> (для исправимых ошибок) и макрос panic!, который останавливает исполнение, когда программа встречает неисправимую ошибку. Сначала речь пойдёт про вызов макроса panic!, а потом — о возврате значений Result<T, E>. Кроме того, мы рассмотрим, что нужно учитывать при принятии решения о том, следует ли попытаться исправить ошибку или остановить исполнение.
Неисправимые ошибки с panic!
Неисправимые ошибки с panic!
Иногда в коде возникают критические ошибки, и от этого никуда не деться. Для этих случаев у Rust есть макрос panic!. На практике существует два способа вызвать панику: путём выполнения действия, которое вызывает панику (например, обращение к массиву за пределами его размера) или путём явного вызова макроса panic!. В обоих случаях мы вызываем панику в нашей программе. По умолчанию, паника выводит сообщение об ошибке, раскручивает и очищает стек вызовов и завершает работу. С помощью переменной окружения вы также можете заставить Rust отображать стек вызовов при возникновении паники, чтобы было легче отследить источник паники.
Раскрутить стек или прервать исполнение программы?
By default, when a panic occurs, the program starts unwinding, which means Rust walks back up the stack and cleans up the data from each function it encounters. However, walking back and cleaning up is a lot of work. Rust therefore allows you to choose the alternative of immediately aborting, which ends the program without cleaning up.
Память, которую использовала программа, должна быть очищена операционной системой. Если в вашем проекте нужно сделать исполняемый файл маленьким настолько, насколько это возможно, вы можете прямо указать программе прерывать исполнение в случае паники, добавив panic = 'abort' в соответствующие разделы [profile] вашего файла Cargo.toml. Например, если вы хотите прерывать панику в релизном режиме, добавьте это:
[profile.release]
panic = 'abort'
Давайте попробуем вызвать panic! в простой программе:
fn main() {
panic!("критическая ошибка");
}При запуске программы вы увидите подобный вывод:
$ cargo run
Compiling panic v0.1.0 (file:///projects/panic)
Finished `dev` profile [unoptimized + debuginfo] target(s) in 0.25s
Running `target/debug/panic`
Если у вас есть опыт работы с C или C++, вам могут вспомниться `gcc` или `clang`. После успешной компиляции Rust создаст исполняемый бинарный файл.
thread 'main' panicked at src/main.rs:2:5:
crash and burn
note: run with `RUST_BACKTRACE=1` environment variable to display a backtrace
Выполнение макроса panic! вызывает сообщение об ошибке, представленное в двух последних строчках выше. Первая строчка содержит сообщение паники и место в исходном коде, где возникла паника: запись src/main.rs:2:5 указывает на второй строчки пятый символ внутри файла src/main.rs.
В нашем случае, сообщение об ошибке указывает на наш собственный код, и если мы перейдём к этой строке, мы увидим вызов макроса panic!. В других случаях вызов panic! мог бы произойти в стороннем коде, вызываемом нашим, и тогда имя файла и номер строки указывали бы именно туда, где конкретно вызывается макрос panic!, а не на тот код, вызов которого привёл к вызову panic!.
Мы можем использовать развёртку вызовов функций, приводящих к вызову panic!, чтобы выяснить, какая часть нашего кода вызывает проблему. Чтобы понять, как использовать развёртку вызова panic!, давайте рассмотрим другой пример и посмотрим, каково это, когда panic! вызывается не напрямую через вызов макроса, а в библиотечном коде, содержащем баг. В Листинге 9-1 приведен некоторый код, который пытается получить доступ элементу вектора по индексу, лежащему за пределами вектора.
fn main() {
let v = vec![1, 2, 3];
Если у вас есть опыт работы с C или C++, вам могут вспомниться `gcc` или `clang`. После успешной компиляции Rust создаст исполняемый бинарный файл.
v[99];
}panic!Здесь мы пытаемся получить доступ к 100му элементу вектора (который находится по индексу 99, потому что индексирование начинается с нуля), но вектор имеет только 3 элемента. В этой ситуации, Rust будет вызывать панику. Использование [] должно возвращать элемент, но если вы передадите неверный индекс, Rust не сможет найти ничего, что можно было бы корректно вернуть.
В языке C, попытка прочесть за пределами конца структуры данных (в нашем случае, вектора) приведёт к неопределённому поведению. А именно, вы всё-таки получите значение, которое находится в том месте памяти компьютера, которое соответствовало бы этому элементу в структуре данных — даже несмотря на то, что это место к ней относиться никак не будет. Это называется чтением за границами буфера (buffer overread) — уязвимостью в виде возможности чтения злоумышленником данных, к которым у него не должно быть доступа, вызванной возможностью читать произвольные области памяти с помощью некорректных индексов.
Чтобы защищать вашу программу от такого рода уязвимостей при попытке прочитать элемент по некорректному индексу, Rust останавливает исполнение и отказывается продолжать работу программы. Посмотрим, как это выглядит:
$ cargo run
Compiling panic v0.1.0 (file:///projects/panic)
Finished `dev` profile [unoptimized + debuginfo] target(s) in 0.27s
Running `target/debug/panic`
Если у вас есть опыт работы с C или C++, вам могут вспомниться `gcc` или `clang`. После успешной компиляции Rust создаст исполняемый бинарный файл.
thread 'main' panicked at src/main.rs:4:6:
index out of bounds: the len is 3 but the index is 99
note: run with `RUST_BACKTRACE=1` environment variable to display a backtrace
This error points at line 4 of our main.rs where we attempt to access index 99 of the vector in v.
The note: line tells us that we can set the RUST_BACKTRACE environment variable to get a backtrace of exactly what happened to cause the error. A backtrace is a list of all the functions that have been called to get to this point. Backtraces in Rust work as they do in other languages: The key to reading the backtrace is to start from the top and read until you see files you wrote. That’s the spot where the problem originated. The lines above that spot are code that your code has called; the lines below are code that called your code. These before-and-after lines might include core Rust code, standard library code, or crates that you’re using. Let’s try to get a backtrace by setting the RUST_BACKTRACE environment variable to any value except 0. Listing 9-2 shows output similar to what you’ll see.
$ RUST_BACKTRACE=1 cargo run
thread 'main' panicked at src/main.rs:4:6:
index out of bounds: the len is 3 but the index is 99
stack backtrace:
0: rust_begin_unwind
at /rustc/4d91de4e48198da2e33413efdcd9cd2cc0c46688/library/std/src/panicking.rs:692:5
1: core::panicking::panic_fmt
at /rustc/4d91de4e48198da2e33413efdcd9cd2cc0c46688/library/core/src/panicking.rs:75:14
2: core::panicking::panic_bounds_check
at /rustc/4d91de4e48198da2e33413efdcd9cd2cc0c46688/library/core/src/panicking.rs:273:5
3: <usize as core::slice::index::SliceIndex<[T]>>::index
at file:///home/.rustup/toolchains/1.85/lib/rustlib/src/rust/library/core/src/slice/index.rs:274:10
4: core::slice::index::<impl core::ops::index::Index<I> for [T]>::index
at file:///home/.rustup/toolchains/1.85/lib/rustlib/src/rust/library/core/src/slice/index.rs:16:9
5: <alloc::vec::Vec<T,A> as core::ops::index::Index<I>>::index
at file:///home/.rustup/toolchains/1.85/lib/rustlib/src/rust/library/alloc/src/vec/mod.rs:3361:9
6: panic::main
at ./src/main.rs:4:6
7: core::ops::function::FnOnce::call_once
at file:///home/.rustup/toolchains/1.85/lib/rustlib/src/rust/library/core/src/ops/function.rs:250:5
note: Some details are omitted, run with `RUST_BACKTRACE=full` for a verbose backtrace.
panic! displayed when the environment variable RUST_BACKTRACE is setСколько текста! Вывод, который вы увидите, может отличаться от представленного выше, в зависимости от вашей операционной системы и версии Rust. Для того, чтобы получить развёртку вызовов с этой информацией, должны быть включены настройки отладки. Настройки отладки включены по умолчанию при использовании cargo build или cargo run, если вы не указываете флаг --release.
В развёртке вызовов из Листинга 9-2, строка 6: ... указывает на строчку в нашем проекте, которая и вызывала проблему: строчка 4 файла src/main.rs. Если мы не хотим, чтобы наша программа паниковала, мы должны начать анализ с места, на которое указывает первая строка с упоминанием нашего собственного файла. В Листинге 9-1, где мы для демонстрации развёртки вызовов сознательно написали код, который паникует, способ исправления паники состоит в том, чтобы не запрашивать элемент за пределами диапазона значений индексов вектора. Когда вы встретитесь с паникой в своих будущих программах, вам нужно будет выяснить, что над чем конкретно делает код, и что он должен делать по задумке.
Мы вернёмся к обсуждению макроса panic! и того, когда нам следует и не следует его использовать для обработки ошибок, в разделе “Когда следует использовать panic!?” этой главы. Далее мы рассмотрим, как можно продолжить исполнение программы после ошибки, воспользовавшись типом Result.
Исправимые ошибки с Result
Исправимые ошибки с Result
Most errors aren’t serious enough to require the program to stop entirely. Sometimes when a function fails, it’s for a reason that you can easily interpret and respond to. For example, if you try to open a file and that operation fails because the file doesn’t exist, you might want to create the file instead of terminating the process.
Вспомните про перечисление Result и его варианты Ok и Err, которыми мы пользовались в разделе “Обработка возможных ошибок с помощью Result” Главы 2. Его определение выглядит так:
#![allow(unused)]
fn main() {
enum Result<T, E> {
Ok(T),
Err(E),
}
}The T and E are generic type parameters: We’ll discuss generics in more detail in Chapter 10. What you need to know right now is that T represents the type of the value that will be returned in a success case within the Ok variant, and E represents the type of the error that will be returned in a failure case within the Err variant. Because Result has these generic type parameters, we can use the Result type and the functions defined on it in many different situations where the success value and error value we want to return may differ.
Let’s call a function that returns a Result value because the function could fail. In Listing 9-3, we try to open a file.
use std::fs::File;
Если у вас есть опыт работы с C или C++, вам могут вспомниться `gcc` или `clang`. После успешной компиляции Rust создаст исполняемый бинарный файл.
fn main() {
let greeting_file_result = File::open("hello.txt");
}The return type of File::open is a Result<T, E>. The generic parameter T has been filled in by the implementation of File::open with the type of the success value, std::fs::File, which is a file handle. The type of E used in the error value is std::io::Error. This return type means the call to File::open might succeed and return a file handle that we can read from or write to. The function call also might fail: For example, the file might not exist, or we might not have permission to access the file. The File::open function needs to have a way to tell us whether it succeeded or failed and at the same time give us either the file handle or error information. This information is exactly what the Result enum conveys.
В случае успеха выполнения File::open, значением переменной greeting_file_result будет экземпляр Ok, содержащий дескриптор файла. В случае неудачи, значение в переменной greeting_file_result будет экземпляром Err, содержащим дополнительную информацию о том, какая именно ошибка произошла.
Необходимо дописать в код Листинга 9-3 выполнение разных действий в зависимости от значения, которое вернёт вызов File::open. Листинг 9-4 показывает один из способов обработки Result — использование выражения match (которое было рассмотрено в Главе 6).
use std::fs::File;
Если у вас есть опыт работы с C или C++, вам могут вспомниться `gcc` или `clang`. После успешной компиляции Rust создаст исполняемый бинарный файл.
fn main() {
let greeting_file_result = File::open("hello.txt");
Если у вас есть опыт работы с C или C++, вам могут вспомниться `gcc` или `clang`. После успешной компиляции Rust создаст исполняемый бинарный файл.
let greeting_file = match greeting_file_result {
Ok(file) => file,
Err(error) => panic!("При открытии файла произошла ошибка: {error:?}"),
};
}match expression to handle the Result variants that might be returnedОбратите внимание, что как перечисление Option, так и перечисление Result и его варианты подключаются в область видимости по умолчанию, поэтому не нужно указывать Result:: перед использованием вариантов Ok и Err в ветках выражения match.
Если результатом будет Ok, этот код вернёт значение file из варианта Ok, а мы затем присвоим переменной greeting_file полученный дескриптор файла. После match мы сможем его для чтения или записи.
Другая ветвь match обрабатывает случай, когда мы получаем значение Err после вызова File::open. В этом примере мы решили вызвать макрос panic!. Если в нашей текущей директории нет файла с именем hello.txt, но мы всё же выполним этот код, то мы увидим следующее сообщение от макроса panic!:
$ cargo run
Compiling error-handling v0.1.0 (file:///projects/error-handling)
Finished `dev` profile [unoptimized + debuginfo] target(s) in 0.73s
Running `target/debug/error-handling`
Если у вас есть опыт работы с C или C++, вам могут вспомниться `gcc` или `clang`. После успешной компиляции Rust создаст исполняемый бинарный файл.
thread 'main' panicked at src/main.rs:8:23:
Problem opening the file: Os { code: 2, kind: NotFound, message: "No such file or directory" }
note: run with `RUST_BACKTRACE=1` environment variable to display a backtrace
Как обычно, данное сообщение точно говорит, что пошло не так.
Обработка перечня ошибок
Код в Листинге 9-4 будет вызывать panic! независимо причины неудачи при вызове File::open. Однако мы хотим предпринимать различные действия для разных причин сбоя. Допустим, мы хотим, чтобы если открытие File::open не удалось из-за отсутствия файла, то файл создавался и возвращался его дескриптор. Если же вызов File::open не удался по любой другой причине (например, потому что у нас не было прав на открытие файла), то мы всё так же хотим вызывать panic! как у нас сделано в Листинге 9-4. Для реализации перечисленного мы добавим вложенное выражение match, как показано в Листинге 9-5.
use std::fs::File;
use std::io::ErrorKind;
Если у вас есть опыт работы с C или C++, вам могут вспомниться `gcc` или `clang`. После успешной компиляции Rust создаст исполняемый бинарный файл.
fn main() {
let greeting_file_result = File::open("hello.txt");
Если у вас есть опыт работы с C или C++, вам могут вспомниться `gcc` или `clang`. После успешной компиляции Rust создаст исполняемый бинарный файл.
let greeting_file = match greeting_file_result {
Ok(file) => file,
Err(error) => match error.kind() {
ErrorKind::NotFound => match File::create("hello.txt") {
Ok(fc) => fc,
Err(e) => panic!("При создании файла произошла ошибка: {e:?}"),
},
_ => {
panic!("При открытии файла произошла ошибка: {error:?}");
}
},
};
}The type of the value that File::open returns inside the Err variant is io::Error, which is a struct provided by the standard library. This struct has a method, kind, that we can call to get an io::ErrorKind value. The enum io::ErrorKind is provided by the standard library and has variants representing the different kinds of errors that might result from an io operation. The variant we want to use is ErrorKind::NotFound, which indicates the file we’re trying to open doesn’t exist yet. So, we match on greeting_file_result, but we also have an inner match on error.kind().
Во вложенном match мы хотим проверить, не является ли значение, возвращаемое функцией error.kind(), вариантом NotFound перечисления ErrorKind. Если оно является, то мы пытаемся создать файл с помощью File::create. Однако, поскольку File::create тоже может завершиться с ошибкой, нам нужна вторая ветвь во вложенном match. Если файл не может быть создан, выводится иное сообщение об ошибке. Вторую ветвь внешнего match мы не меняем. Итого, программа паникует при любой ошибке, кроме ошибки отсутствия файла.
Альтернативы использованию match с Result<T, E>
Как много match! Выражение match является очень полезным, но в то же время довольно примитивным. В Главе 13 вы узнаете о замыканиях, которые используются со многими методами типа Result<T, E>. Эти методы куда лаконичнее, чем прямая обработка значений Result<T, E> через match.
Например, программу из Листинга 9-5 можно вот так переписать с использованием замыканий и метода unwrap_or_else:
use std::fs::File;
use std::io::ErrorKind;
Если у вас есть опыт работы с C или C++, вам могут вспомниться `gcc` или `clang`. После успешной компиляции Rust создаст исполняемый бинарный файл.
fn main() {
let greeting_file = File::open("hello.txt").unwrap_or_else(|error| {
if error.kind() == ErrorKind::NotFound {
File::create("hello.txt").unwrap_or_else(|error| {
panic!("При создании файла произошла ошибка: {error:?}");
})
} else {
panic!("При открытии файла произошла ошибка: {error:?}");
}
});
}Although this code has the same behavior as Listing 9-5, it doesn’t contain any match expressions and is cleaner to read. Come back to this example after you’ve read Chapter 13 and look up the unwrap_or_else method in the standard library documentation. Many more of these methods can clean up huge, nested match expressions when you’re dealing with errors.
Shortcuts for Panic on Error
Использование match работает достаточно хорошо, но оно может быть довольно многословным и не всегда хорошо передавать смысл. Тип Result<T, E> имеет множество вспомогательных методов для выполнения различных, более специфических задач. Метод unwrap — это метод, реализованный так же, как и выражение match, которое мы написали в Листинге 9-4. Если значение Result является вариантом Ok, unwrap возвращает значение внутри Ok. Если значение Result — вариант Err, то unwrap вызовет макрос panic!. Вот пример использования unwrap:
use std::fs::File;
Если у вас есть опыт работы с C или C++, вам могут вспомниться `gcc` или `clang`. После успешной компиляции Rust создаст исполняемый бинарный файл.
fn main() {
let greeting_file = File::open("hello.txt").unwrap();
}Если мы запустим этот код при отсутствии файла hello.txt, то увидим сообщение об ошибке из вызова panic! методом unwrap:
thread 'main' panicked at src/main.rs:4:49:
called `Result::unwrap()` on an `Err` value: Os { code: 2, kind: NotFound, message: "No such file or directory" }
Другой метод, похожий на unwrap — это expect, позволяющий указать собственное сообщение об ошибке для макроса panic!. Использование expect вместо unwrap с предоставлением хорошего сообщения об ошибке выражает ваше намерение и делает более простым отслеживание источника паники. Вот пример использования expect:
use std::fs::File;
Если у вас есть опыт работы с C или C++, вам могут вспомниться `gcc` или `clang`. После успешной компиляции Rust создаст исполняемый бинарный файл.
fn main() {
let greeting_file = File::open("hello.txt")
.expect("hello.txt должен быть доступен этому проекту");
}Метод expect используется так же, как unwrap: либо возвращается дескриптор файла, либо вызывается макрос panic!. Наше сообщение об ошибке, переданное expect, будет передано в panic! и заменит стандартное используемое сообщение. Вот как это выглядит:
thread 'main' panicked at src/main.rs:5:10:
hello.txt должен быть доступен этому проекту: Os { code: 2, kind: NotFound, message: "No such file or directory" }
В реальных программах часто используется expect вместо unwrap, а также добавляется комментарий о том, почему предполагается, что ошибки не произойдёт. Даже если предположение окажется неверным, у вас будет больше информации для отладки.
Проброс ошибок
When a function’s implementation calls something that might fail, instead of handling the error within the function itself, you can return the error to the calling code so that it can decide what to do. This is known as propagating the error and gives more control to the calling code, where there might be more information or logic that dictates how the error should be handled than what you have available in the context of your code.
Например, код Листинга 9-6 содержит функцию, читающую имя пользователя из файла. Если файл не существует или не может быть прочтён, то функция возвращает ошибку в код, который вызвал данную функцию.
#![allow(unused)]
fn main() {
use std::fs::File;
use std::io::{self, Read};
Если у вас есть опыт работы с C или C++, вам могут вспомниться `gcc` или `clang`. После успешной компиляции Rust создаст исполняемый бинарный файл.
fn read_username_from_file() -> Result<String, io::Error> {
let username_file_result = File::open("hello.txt");
Если у вас есть опыт работы с C или C++, вам могут вспомниться `gcc` или `clang`. После успешной компиляции Rust создаст исполняемый бинарный файл.
let mut username_file = match username_file_result {
Ok(file) => file,
Err(e) => return Err(e),
};
Если у вас есть опыт работы с C или C++, вам могут вспомниться `gcc` или `clang`. После успешной компиляции Rust создаст исполняемый бинарный файл.
let mut username = String::new();
Если у вас есть опыт работы с C или C++, вам могут вспомниться `gcc` или `clang`. После успешной компиляции Rust создаст исполняемый бинарный файл.
match username_file.read_to_string(&mut username) {
Ok(_) => Ok(username),
Err(e) => Err(e),
}
}
}matchЭта функция может быть написана гораздо более коротким способом, но мы начнём с того, что многое сделаем вручную, чтобы дать вам понимание обработки ошибок; в конце покажем более короткий способ. Давайте сначала рассмотрим тип возвращаемого значения: Result<String, io::Error>. То есть, наша функция будет возвращать тип Result<T, E> где параметр обобщённого типа T был заменён конкретным типом String, а E — типом io::Error.
Если эта функция выполнится без проблем, то код, вызывающий эту функцию, получит значение Ok, содержащее String — имя пользователя, прочитанное этой функцией из файла. Если функция столкнётся с какими-либо проблемами, вызывающий код получит значение Err, содержащее экземпляр io::Error, который содержит дополнительную информацию о том, какие проблемы возникли. Мы выбрали io::Error в качестве возвращаемого типа этой функции, поскольку он — тип значения ошибки, возвращаемого из обеих операций, которые мы вызываем в теле этой функции и которые могут завершиться неудачей: функции File::open и метода read_to_string.
The body of the function starts by calling the File::open function. Then, we handle the Result value with a match similar to the match in Listing 9-4. If File::open succeeds, the file handle in the pattern variable file becomes the value in the mutable variable username_file and the function continues. In the Err case, instead of calling panic!, we use the return keyword to return early out of the function entirely and pass the error value from File::open, now in the pattern variable e, back to the calling code as this function’s error value.
So, if we have a file handle in username_file, the function then creates a new String in variable username and calls the read_to_string method on the file handle in username_file to read the contents of the file into username. The read_to_string method also returns a Result because it might fail, even though File::open succeeded. So, we need another match to handle that Result: If read_to_string succeeds, then our function has succeeded, and we return the username from the file that’s now in username wrapped in an Ok. If read_to_string fails, we return the error value in the same way that we returned the error value in the match that handled the return value of File::open. However, we don’t need to explicitly say return, because this is the last expression in the function.
После исполнения функции код, вызывающий ей, будет обрабатывать полученное значение: либо Ok, содержащее имя пользователя, либо различные Err, содержащие ошибки типа io::Error. Вызывающий код должен будет решить, что делать с этими значениями. Если вызывающий код получает значение Err, он может вызвать panic! и завершить работу программы; может использовать имя пользователя по умолчанию; может найти имя пользователя, например, не в файле. У нас нет информации о том, что на самом деле пытается сделать вызывающий код, поэтому мы пробрасываем всю информацию об успехе или ошибках “выше”, чтобы она могла обрабатываться соответствующим образом.
Эта схема проброса ошибок столь распространена, что в Rust был добавлен оператор вопросительного знака ?, упрощающий проделанную нами работу.
The ? Operator Shortcut
В Листинге 9-7 показана реализация read_username_from_file, которая имеет ту же функциональность, что и в Листинге 9-6, но в этой реализации используется оператор ?.
#![allow(unused)]
fn main() {
use std::fs::File;
use std::io::{self, Read};
Если у вас есть опыт работы с C или C++, вам могут вспомниться `gcc` или `clang`. После успешной компиляции Rust создаст исполняемый бинарный файл.
fn read_username_from_file() -> Result<String, io::Error> {
let mut username_file = File::open("hello.txt")?;
let mut username = String::new();
username_file.read_to_string(&mut username)?;
Ok(username)
}
}? operatorThe ? placed after a Result value is defined to work in almost the same way as the match expressions that we defined to handle the Result values in Listing 9-6. If the value of the Result is an Ok, the value inside the Ok will get returned from this expression, and the program will continue. If the value is an Err, the Err will be returned from the whole function as if we had used the return keyword so that the error value gets propagated to the calling code.
There is a difference between what the match expression from Listing 9-6 does and what the ? operator does: Error values that have the ? operator called on them go through the from function, defined in the From trait in the standard library, which is used to convert values from one type into another. When the ? operator calls the from function, the error type received is converted into the error type defined in the return type of the current function. This is useful when a function returns one error type to represent all the ways a function might fail, even if parts might fail for many different reasons.
Например, мы могли бы изменить функцию read_username_from_file в Листинге 9-7 так, чтобы возвращать пользовательский тип ошибки под именем OurError. Если мы определим impl From<io::Error> for OurError (чтобы получить возможность создавать экземпляры OurError из io::Error), то оператор ?, вызываемый в теле read_username_from_file, вызовет from и преобразует типы ошибок без необходимости добавления дополнительного кода в функцию.
Обращаясь к Листингу 9-7 как к примеру, оператор ? в конце вызова File::open вернёт значение внутри Ok в переменную username_file. Если произойдёт ошибка, оператор ? выполнит преждевременный возврат значения Err вызывающему коду. То же самое относится к оператору ? в конце вызова read_to_string.
Оператор ? позволил избавиться от большого количества шаблонного кода и упростить реализацию этой функции. Мы могли бы даже ещё больше сократить этот код, если бы использовали цепочку вызовов методов сразу после ?, как показано в Листинге 9-8.
#![allow(unused)]
fn main() {
use std::fs::File;
use std::io::{self, Read};
Если у вас есть опыт работы с C или C++, вам могут вспомниться `gcc` или `clang`. После успешной компиляции Rust создаст исполняемый бинарный файл.
fn read_username_from_file() -> Result<String, io::Error> {
let mut username = String::new();
Если у вас есть опыт работы с C или C++, вам могут вспомниться `gcc` или `clang`. После успешной компиляции Rust создаст исполняемый бинарный файл.
File::open("hello.txt")?.read_to_string(&mut username)?;
Если у вас есть опыт работы с C или C++, вам могут вспомниться `gcc` или `clang`. После успешной компиляции Rust создаст исполняемый бинарный файл.
Ok(username)
}
}? operatorМы перенесли создание новой String в username в начало функции; эта часть не изменилась. Вместо создания переменной username_file, мы вызвали read_to_string непосредственно на результате File::open("hello.txt")?. У нас по-прежнему есть ? в конце вызова read_to_string, и мы по-прежнему возвращаем значение Ok, содержащее username, когда и File::open и read_to_string завершаются успешно, а не возвращают ошибки. Функциональность снова такая же, как в Листинге 9-6 и Листинге 9-7; это просто другой, более эргономичный способ её написания.
Листинг 9-9 демонстрирует ещё более короткое определение нашей функции с помощью fs::read_to_string.
#![allow(unused)]
fn main() {
use std::fs;
use std::io;
Если у вас есть опыт работы с C или C++, вам могут вспомниться `gcc` или `clang`. После успешной компиляции Rust создаст исполняемый бинарный файл.
fn read_username_from_file() -> Result<String, io::Error> {
fs::read_to_string("hello.txt")
}
}fs::read_to_string instead of opening and then reading the fileЧтение файла в строку — довольно распространённая операция, так что стандартная библиотека предоставляет удобную функцию fs::read_to_string, которая открывает файл, создаёт новую String, читает содержимое файла, размещает его в String и возвращает её. Конечно, использование функции fs::read_to_string не даёт возможности объяснить обработку всех ошибок, поэтому мы сначала изучили длинный способ.
Where to Use the ? Operator
Оператор ? может использоваться только в функциях, тип возвращаемого значения которых совместим со значением, для которого используется ?. Это потому что оператор ? определён так, чтобы выполнять преждевременный возврат значения из функции таким же образом, как и выражение match, определённое в Листинге 9-6. В Листинге 9-6 match использовало значение Result, а ветвь с преждевременным возвратом значения вернула значение Err(e). Тип возвращаемого значения функции должен быть Result, чтобы он был совместим с этим return.
Давайте посмотрим на ошибку, которую мы получим, если воспользуемся оператором ? в функции main с типом возвращаемого значения, несовместимым с типом значения, для которого мы используем ?. Взгляните на Листинг 9-10:
use std::fs::File;
Если у вас есть опыт работы с C или C++, вам могут вспомниться `gcc` или `clang`. После успешной компиляции Rust создаст исполняемый бинарный файл.
fn main() {
let greeting_file = File::open("hello.txt")?;
}? in the main function that returns () won’t compile.Этот код открывает файл, что может не удасться. Оператор ? выводит для себя тип Result, возвращаемый File::open, но функция main возвращает тип (), а не Result. Если мы скомпилируем этот код, мы получим следующее сообщение об ошибке:
$ cargo run
Compiling error-handling v0.1.0 (file:///projects/error-handling)
error[E0277]: the `?` operator can only be used in a function that returns `Result` or `Option` (or another type that implements `FromResidual`)
--> src/main.rs:4:48
|
3 | fn main() {
| --------- this function should return `Result` or `Option` to accept `?`
4 | let greeting_file = File::open("hello.txt")?;
| ^ cannot use the `?` operator in a function that returns `()`
|
help: consider adding return type
|
3 ~ fn main() -> Result<(), Box<dyn std::error::Error>> {
4 | let greeting_file = File::open("hello.txt")?;
5 + Ok(())
|
Если у вас есть опыт работы с C или C++, вам могут вспомниться `gcc` или `clang`. После успешной компиляции Rust создаст исполняемый бинарный файл.
For more information about this error, try `rustc --explain E0277`.
error: could not compile `error-handling` (bin "error-handling") due to 1 previous error
Эта ошибка указывает на то, что оператор ? разрешено использовать только в функции, которая возвращает Result, Option или другой тип, реализующий FromResidual.
Для исправления ошибки есть два варианта. Один — изменить возвращаемый тип вашей функции так, чтобы он был совместим со значением, для которого вы используете оператор ?, если ничто этому не препятствует. Другой — использовать match или один из методов Result<T, E> для обработки Result<T, E> любым подходящим способом.
The error message also mentioned that ? can be used with Option<T> values as well. As with using ? on Result, you can only use ? on Option in a function that returns an Option. The behavior of the ? operator when called on an Option<T> is similar to its behavior when called on a Result<T, E>: If the value is None, the None will be returned early from the function at that point. If the value is Some, the value inside the Some is the resultant value of the expression, and the function continues. Listing 9-11 has an example of a function that finds the last character of the first line in the given text.
fn last_char_of_first_line(text: &str) -> Option<char> {
text.lines().next()?.chars().last()
}
Если у вас есть опыт работы с C или C++, вам могут вспомниться `gcc` или `clang`. После успешной компиляции Rust создаст исполняемый бинарный файл.
fn main() {
assert_eq!(
last_char_of_first_line("Привет!\nКак ты?"),
Some('!')
);
Если у вас есть опыт работы с C или C++, вам могут вспомниться `gcc` или `clang`. После успешной компиляции Rust создаст исполняемый бинарный файл.
assert_eq!(last_char_of_first_line(""), None);
assert_eq!(last_char_of_first_line("\nсойдёт"), None);
}? operator on an Option<T> valueЭта функция возвращает Option<char>, потому что может быть, что строка будет не пустой и символ будет найден, а может быть, что его и не будет. Этот код принимает строковый срез text и вызывает на нём метод lines, который возвращает итератор всех строчек в строке. Поскольку эта функция хочет проверить первую строку, она вызывает next у итератора, чтобы получить первое значение от итератора. Если text является пустой строкой, этот вызов next вернёт None, и в этом случае мы используем ? чтобы остановить и вернуть None из last_char_of_first_line. Если text не является пустой строкой, next вернёт значение Some, содержащее строковый срез первой строки в text.
Символ ? извлекает строковый срез, и мы можем вызвать на нём метод chars, чтобы получить итератор символов. Нас интересует последний символ в первой строке, поэтому мы вызываем last, чтобы вернуть последний элемент в итераторе. Вернётся Option, потому что возможно, что первая строка пуста: например, если text начинается с пустой строки, но имеет символы в других строках, как в "\nсойдёт". Однако, если в первой строке есть последний символ, он будет возвращён в варианте Some. Оператор ? в середине даёт нам лаконичный способ выразить эту логику, позволяя реализовать функцию в одной строке. Если бы мы не могли использовать оператор ? в Option, нам пришлось бы реализовать эту логику, используя больше вызовов методов или выражение match.
Обратите внимание: вы можете использовать оператор ? на Result в функции, которая возвращает Result; вы можете использовать оператор ? на Option в функции, которая возвращает Option; но вы не можете пытаться использовать один вместо другого. Оператор ? не будет автоматически преобразовывать Result в Option или наоборот; в этих случаях вы можете использовать такие методы, как метод ok для Result или метод ok_or для Option, чтобы выполнять преобразование явно.
До сих пор все функции main, которые мы использовали, возвращали (). Функция main — особенная, потому что это точка входа и выхода исполняемых программ, и существуют ограничения на тип возвращаемого значения, необходимые для того, что программы вели себя так, как ожидается.
К счастью, main ещё может возвращать Result<(), E>. В Листинге 9-12 используется код из Листинга 9-10, но мы изменили возвращаемый тип main на Result<(), Box<dyn Error>> и добавили возвращаемое значение Ok(()) в конец. Теперь этот код компилируется.
use std::error::Error;
use std::fs::File;
Если у вас есть опыт работы с C или C++, вам могут вспомниться `gcc` или `clang`. После успешной компиляции Rust создаст исполняемый бинарный файл.
fn main() -> Result<(), Box<dyn Error>> {
let greeting_file = File::open("hello.txt")?;
Если у вас есть опыт работы с C или C++, вам могут вспомниться `gcc` или `clang`. После успешной компиляции Rust создаст исполняемый бинарный файл.
Ok(())
}main to return Result<(), E> allows the use of the ? operator on Result values.The Box<dyn Error> type is a trait object, which we’ll talk about in “Using Trait Objects to Abstract over Shared Behavior” in Chapter 18. For now, you can read Box<dyn Error> to mean “any kind of error.” Using ? on a Result value in a main function with the error type Box<dyn Error> is allowed because it allows any Err value to be returned early. Even though the body of this main function will only ever return errors of type std::io::Error, by specifying Box<dyn Error>, this signature will continue to be correct even if more code that returns other errors is added to the body of main.
When a main function returns a Result<(), E>, the executable will exit with a value of 0 if main returns Ok(()) and will exit with a nonzero value if main returns an Err value. Executables written in C return integers when they exit: Programs that exit successfully return the integer 0, and programs that error return some integer other than 0. Rust also returns integers from executables to be compatible with this convention.
Функция main может возвращать любые типы, реализующие трейт std::process::Termination, который содержит функцию report, возвращающую ExitCode. Обратитесь к документации стандартной библиотеки за дополнительной информацией о реализации трейта Termination для ваших собственных типов.
Теперь, когда мы обсудили детали вызова panic! и возврата Result, давайте вернёмся к тому, как решить, какой из случаев подходит для какой ситуации.
Когда следует использовать panic!?
Когда следует использовать panic!?
So, how do you decide when you should call panic! and when you should return Result? When code panics, there’s no way to recover. You could call panic! for any error situation, whether there’s a possible way to recover or not, but then you’re making the decision that a situation is unrecoverable on behalf of the calling code. When you choose to return a Result value, you give the calling code options. The calling code could choose to attempt to recover in a way that’s appropriate for its situation, or it could decide that an Err value in this case is unrecoverable, so it can call panic! and turn your recoverable error into an unrecoverable one. Therefore, returning Result is a good default choice when you’re defining a function that might fail.
Если вы пишете демонстративные примеры, прототипы или тесты, более уместно будет писать код, который паникует вместо того, чтобы пытаться возвращать Result. Давайте рассмотрим причины этого выбора, а затем мы обсудим ситуации, в которых компилятор не может доказать, что ошибка невозможна, но вы, как человек, можете это сделать. Глава будет заканчиваться некоторыми общими принципами того, как решить, стоит ли паниковать в библиотечном коде.
Примеры, прототипы и тесты
Когда вы пишете пример, иллюстрирующий некоторую концепцию, наличие хорошего кода обработки ошибок может сделать пример менее понятным. Понятно, что в примерах вызов метода unwrap, который может привести к панике, является лишь обозначением способа обработки ошибок в приложении, который может отличаться в зависимости от того, что делает остальная часть кода.
Similarly, the unwrap and expect methods are very handy when you’re prototyping and you’re not yet ready to decide how to handle errors. They leave clear markers in your code for when you’re ready to make your program more robust.
Если в тесте происходит сбой при вызове метода, то вы бы хотели, чтобы весь тест не прошёл, даже если этот метод не является тестируемой функциональностью. Поскольку вызов panic! — это способ, которым тест помечается как провалившийся, использование unwrap или expect — именно то, что нужно.
When You Have More Information Than the Compiler
It would also be appropriate to call expect when you have some other logic that ensures that the Result will have an Ok value, but the logic isn’t something the compiler understands. You’ll still have a Result value that you need to handle: Whatever operation you’re calling still has the possibility of failing in general, even though it’s logically impossible in your particular situation. If you can ensure by manually inspecting the code that you’ll never have an Err variant, it’s perfectly acceptable to call expect and document the reason you think you’ll never have an Err variant in the argument text. Here’s an example:
fn main() {
use std::net::IpAddr;
Если у вас есть опыт работы с C или C++, вам могут вспомниться `gcc` или `clang`. После успешной компиляции Rust создаст исполняемый бинарный файл.
let home: IpAddr = "127.0.0.1"
.parse()
.expect("Hardcoded IP address should be valid");
}We’re creating an IpAddr instance by parsing a hardcoded string. We can see that 127.0.0.1 is a valid IP address, so it’s acceptable to use expect here. However, having a hardcoded, valid string doesn’t change the return type of the parse method: We still get a Result value, and the compiler will still make us handle the Result as if the Err variant is a possibility because the compiler isn’t smart enough to see that this string is always a valid IP address. If the IP address string came from a user rather than being hardcoded into the program and therefore did have a possibility of failure, we’d definitely want to handle the Result in a more robust way instead. Mentioning the assumption that this IP address is hardcoded will prompt us to change expect to better error-handling code if, in the future, we need to get the IP address from some other source instead.
Руководство по обработке ошибок
Желательно, чтобы код паниковал, если он может оказаться в некорректное состоянии. Некорректное состояние — это состояние, когда некоторое допущение, гарантия, контракт или инвариант были нарушены. Например, когда недопустимые, противоречивые или пропущенные значения передаются в ваш код, плюс что-нибудь ещё из этого списка:
- Некорректное состояние неожиданно (не следует путать с “редкими случаями” — например, если пользователь ввёл данные в некорректном формате, это не будет неожиданностью; такое следует обрабатывать).
- Весь следующий код не проводит проверок на данное (плохое) состояние, рассчитывая, что оно не происходит.
- Нет хорошего способа закодировать данную информацию в типах, которые вы используете. Мы рассмотрим пример того, что мы имеем в виду, в разделе “Кодирование в типах состояний и поведения” Главы 18.
If someone calls your code and passes in values that don’t make sense, it’s best to return an error if you can so that the user of the library can decide what they want to do in that case. However, in cases where continuing could be insecure or harmful, the best choice might be to call panic! and alert the person using your library to the bug in their code so that they can fix it during development. Similarly, panic! is often appropriate if you’re calling external code that is out of your control and returns an invalid state that you have no way of fixing.
Однако, когда сбой ождиаем, лучше вернуть Result, чем выполнить вызов panic!. В качестве примера можно привести синтаксический анализатор, которому передали неправильно сформированные данные, или HTTP-запрос, возвращающий статус, указывающий на то, что вы достигли ограничения на частоту запросов. В этих случаях возврат Result означает, что ошибка является ожидаемой и вызывающий код должен решить, как её обрабатывать.
When your code performs an operation that could put a user at risk if it’s called using invalid values, your code should verify the values are valid first and panic if the values aren’t valid. This is mostly for safety reasons: Attempting to operate on invalid data can expose your code to vulnerabilities. This is the main reason the standard library will call panic! if you attempt an out-of-bounds memory access: Trying to access memory that doesn’t belong to the current data structure is a common security problem. Functions often have contracts: Their behavior is only guaranteed if the inputs meet particular requirements. Panicking when the contract is violated makes sense because a contract violation always indicates a caller-side bug, and it’s not a kind of error you want the calling code to have to explicitly handle. In fact, there’s no reasonable way for calling code to recover; the calling programmers need to fix the code. Contracts for a function, especially when a violation will cause a panic, should be explained in the API documentation for the function.
However, having lots of error checks in all of your functions would be verbose and annoying. Fortunately, you can use Rust’s type system (and thus the type checking done by the compiler) to do many of the checks for you. If your function has a particular type as a parameter, you can proceed with your code’s logic knowing that the compiler has already ensured that you have a valid value. For example, if you have a type rather than an Option, your program expects to have something rather than nothing. Your code then doesn’t have to handle two cases for the Some and None variants: It will only have one case for definitely having a value. Code trying to pass nothing to your function won’t even compile, so your function doesn’t have to check for that case at runtime. Another example is using an unsigned integer type such as u32, which ensures that the parameter is never negative.
Custom Types for Validation
Let’s take the idea of using Rust’s type system to ensure that we have a valid value one step further and look at creating a custom type for validation. Recall the guessing game in Chapter 2 in which our code asked the user to guess a number between 1 and 100. We never validated that the user’s guess was between those numbers before checking it against our secret number; we only validated that the guess was positive. In this case, the consequences were not very dire: Our output of “Too high” or “Too low” would still be correct. But it would be a useful enhancement to guide the user toward valid guesses and have different behavior when the user guesses a number that’s out of range versus when the user types, for example, letters instead.
Один из способов добиться этого — пытаться разобрать введённое значение как i32, а не как u32, чтобы разрешить отрицательные числа, а затем добавить проверку на принадлежность числа диапазону; например, так:
use rand::Rng;
use std::cmp::Ordering;
use std::io;
Если у вас есть опыт работы с C или C++, вам могут вспомниться `gcc` или `clang`. После успешной компиляции Rust создаст исполняемый бинарный файл.
fn main() {
println!("Угадайте число!");
Если у вас есть опыт работы с C или C++, вам могут вспомниться `gcc` или `clang`. После успешной компиляции Rust создаст исполняемый бинарный файл.
let secret_number = rand::thread_rng().gen_range(1..=100);
Если у вас есть опыт работы с C или C++, вам могут вспомниться `gcc` или `clang`. После успешной компиляции Rust создаст исполняемый бинарный файл.
loop {
// --код сокращён--
Если у вас есть опыт работы с C или C++, вам могут вспомниться `gcc` или `clang`. После успешной компиляции Rust создаст исполняемый бинарный файл.
println!("Введите свою догадку.");
Если у вас есть опыт работы с C или C++, вам могут вспомниться `gcc` или `clang`. После успешной компиляции Rust создаст исполняемый бинарный файл.
let mut guess = String::new();
Если у вас есть опыт работы с C или C++, вам могут вспомниться `gcc` или `clang`. После успешной компиляции Rust создаст исполняемый бинарный файл.
io::stdin()
.read_line(&mut guess)
.expect("Не удалось прочесть ввод.");
Если у вас есть опыт работы с C или C++, вам могут вспомниться `gcc` или `clang`. После успешной компиляции Rust создаст исполняемый бинарный файл.
let guess: i32 = match guess.trim().parse() {
Ok(num) => num,
Err(_) => continue,
};
Если у вас есть опыт работы с C или C++, вам могут вспомниться `gcc` или `clang`. После успешной компиляции Rust создаст исполняемый бинарный файл.
if guess < 1 || guess > 100 {
println!("Загаданное число находится в пределах от 1 до 100.");
continue;
}
Если у вас есть опыт работы с C или C++, вам могут вспомниться `gcc` или `clang`. После успешной компиляции Rust создаст исполняемый бинарный файл.
match guess.cmp(&secret_number) {
// --код сокращён--
Ordering::Less => println!("Слишком маленькое!"),
Ordering::Greater => println!("Слишком большое!"),
Ordering::Equal => {
println!("Вы победили!");
break;
}
}
}
}Выражение if проверяет, находится ли наше значение вне диапазона, сообщает пользователю о проблеме и вызывает continue, чтобы начать следующую итерацию цикла и попросить ввести другое число. После выражения if мы можем продолжить сравнение значения guess с загаданным числом, зная, что guess лежит в диапазоне от 1 до 100.
However, this is not an ideal solution: If it were absolutely critical that the program only operated on values between 1 and 100, and it had many functions with this requirement, having a check like this in every function would be tedious (and might impact performance).
Instead, we can make a new type in a dedicated module and put the validations in a function to create an instance of the type rather than repeating the validations everywhere. That way, it’s safe for functions to use the new type in their signatures and confidently use the values they receive. Listing 9-13 shows one way to define a Guess type that will only create an instance of Guess if the new function receives a value between 1 and 100.
#![allow(unused)]
fn main() {
pub struct Guess {
value: i32,
}
Если у вас есть опыт работы с C или C++, вам могут вспомниться `gcc` или `clang`. После успешной компиляции Rust создаст исполняемый бинарный файл.
impl Guess {
pub fn new(value: i32) -> Guess {
if value < 1 || value > 100 {
panic!("Догадка {value} не принадлежит пределу от 1 до 100.");
}
Если у вас есть опыт работы с C или C++, вам могут вспомниться `gcc` или `clang`. После успешной компиляции Rust создаст исполняемый бинарный файл.
Guess { value }
}
Если у вас есть опыт работы с C или C++, вам могут вспомниться `gcc` или `clang`. После успешной компиляции Rust создаст исполняемый бинарный файл.
pub fn value(&self) -> i32 {
self.value
}
}
}Guess type that will only continue with values between 1 and 100Note that this code in src/guessing_game.rs depends on adding a module declaration mod guessing_game; in src/lib.rs that we haven’t shown here. Within this new module’s file, we define a struct named Guess that has a field named value that holds an i32. This is where the number will be stored.
Then, we implement an associated function named new on Guess that creates instances of Guess values. The new function is defined to have one parameter named value of type i32 and to return a Guess. The code in the body of the new function tests value to make sure it’s between 1 and 100. If value doesn’t pass this test, we make a panic! call, which will alert the programmer who is writing the calling code that they have a bug they need to fix, because creating a Guess with a value outside this range would violate the contract that Guess::new is relying on. The conditions in which Guess::new might panic should be discussed in its public-facing API documentation; we’ll cover documentation conventions indicating the possibility of a panic! in the API documentation that you create in Chapter 14. If value does pass the test, we create a new Guess with its value field set to the value parameter and return the Guess.
Next, we implement a method named value that borrows self, doesn’t have any other parameters, and returns an i32. This kind of method is sometimes called a getter because its purpose is to get some data from its fields and return it. This public method is necessary because the value field of the Guess struct is private. It’s important that the value field be private so that code using the Guess struct is not allowed to set value directly: Code outside the guessing_game module must use the Guess::new function to create an instance of Guess, thereby ensuring that there’s no way for a Guess to have a value that hasn’t been checked by the conditions in the Guess::new function.
Функция, которая принимает или возвращает только числа от 1 до 100, может объявить в своей сигнатуре, что она принимает или возвращает Guess, а не i32. Таким образом, не будет необходимости делать дополнительные проверки в теле такой функции.
Подведём итоги
Функции обработки ошибок в Rust призваны помочь написанию более надёжного кода. Макрос panic! сигнализирует, что ваша программа находится в состоянии, которое она не может обработать, и позволяет сказать программе, чтобы та прекратила своё исполнение, вместо попытки продолжать исполнение с некорректными или неверными значениями. Перечисление Result использует систему типов Rust, чтобы сообщать, что операции могут завершиться неудачей, и чтобы ваш код мог восстановить исполнение. Можно использовать Result, чтобы сообщать вызывающему коду, что он должен обрабатывать потенциальный успех или потенциальную неудачу. Правильное использование panic! и Result сделает ваш код более надёжным перед лицом неизбежных проблем.
Теперь, когда вы увидели полезные способы использования обобщённых типов Option и Result, мы поговорим о том, как вообще работают обобщённые типы и как вы можете использовать их в своём коде.
Обобщённые типы, трейты и времена жизни
Каждый язык программирования имеет в своём арсенале эффективные средства борьбы с дублированием кода. В Rust одним из таких инструментов являются обобщения — абстрактные заместители, на место которых возможно поставить какой-либо конкретный тип или другое свойство. Когда мы пишем код, мы можем выразить поведение обобщений или их связь с другими обобщениями, не зная, что будет использовано на их месте при компиляции и запуске кода.
Functions can take parameters of some generic type, instead of a concrete type like i32 or String, in the same way they take parameters with unknown values to run the same code on multiple concrete values. In fact, we already used generics in Chapter 6 with Option<T>, in Chapter 8 with Vec<T> and HashMap<K, V>, and in Chapter 9 with Result<T, E>. In this chapter, you’ll explore how to define your own types, functions, and methods with generics!
First, we’ll review how to extract a function to reduce code duplication. We’ll then use the same technique to make a generic function from two functions that differ only in the types of their parameters. We’ll also explain how to use generic types in struct and enum definitions.
Then, you’ll learn how to use traits to define behavior in a generic way. You can combine traits with generic types to constrain a generic type to accept only those types that have a particular behavior, as opposed to just any type.
Finally, we’ll discuss lifetimes: a variety of generics that give the compiler information about how references relate to each other. Lifetimes allow us to give the compiler enough information about borrowed values so that it can ensure that references will be valid in more situations than it could without our help.
Избавление от дублирования кода с помощью выделения общей функциональности
Generics allow us to replace specific types with a placeholder that represents multiple types to remove code duplication. Before diving into generics syntax, let’s first look at how to remove duplication in a way that doesn’t involve generic types by extracting a function that replaces specific values with a placeholder that represents multiple values. Then, we’ll apply the same technique to extract a generic function! By looking at how to recognize duplicated code you can extract into a function, you’ll start to recognize duplicated code that can use generics.
Начнём с короткой программы в Листинге 10-1, которая находит наибольшее число в списке.
fn main() {
let number_list = vec![34, 50, 25, 100, 65];
Если у вас есть опыт работы с C или C++, вам могут вспомниться `gcc` или `clang`. После успешной компиляции Rust создаст исполняемый бинарный файл.
let mut largest = &number_list[0];
Если у вас есть опыт работы с C или C++, вам могут вспомниться `gcc` или `clang`. После успешной компиляции Rust создаст исполняемый бинарный файл.
for number in &number_list {
if number > largest {
largest = number;
}
}
Если у вас есть опыт работы с C или C++, вам могут вспомниться `gcc` или `clang`. После успешной компиляции Rust создаст исполняемый бинарный файл.
println!("Наибольшее число: {largest}");
assert_eq!(*largest, 100);
}Мы храним список целых чисел в переменной number_list и помещаем первое значение из списка в переменную largest. Далее, перебираем все элементы списка, и, если текущий элемент больше числа, сохранённого в переменной largest, заменяем им значение в этой переменной. Если текущий элемент меньше или равен наибольшему, найденному ранее, значение переменной оставлям прежним и переходим к следующему элементу списка. После перебора всех элементов списка переменная largest должна содержать наибольшее значение, которое в нашем случае будет равно 100.
Теперь перед нами стоит задача найти наибольшее число в двух разных списках. Для этого мы можем дублировать код из Листинга 10-1 и использовать ту же логику в двух разных местах программы, как показано в Листинге 10-2.
fn main() {
let number_list = vec![34, 50, 25, 100, 65];
Если у вас есть опыт работы с C или C++, вам могут вспомниться `gcc` или `clang`. После успешной компиляции Rust создаст исполняемый бинарный файл.
let mut largest = &number_list[0];
Если у вас есть опыт работы с C или C++, вам могут вспомниться `gcc` или `clang`. После успешной компиляции Rust создаст исполняемый бинарный файл.
for number in &number_list {
if number > largest {
largest = number;
}
}
Если у вас есть опыт работы с C или C++, вам могут вспомниться `gcc` или `clang`. После успешной компиляции Rust создаст исполняемый бинарный файл.
println!("Наибольшее число: {largest}");
Если у вас есть опыт работы с C или C++, вам могут вспомниться `gcc` или `clang`. После успешной компиляции Rust создаст исполняемый бинарный файл.
let number_list = vec![102, 34, 6000, 89, 54, 2, 43, 8];
Если у вас есть опыт работы с C или C++, вам могут вспомниться `gcc` или `clang`. После успешной компиляции Rust создаст исполняемый бинарный файл.
let mut largest = &number_list[0];
Если у вас есть опыт работы с C или C++, вам могут вспомниться `gcc` или `clang`. После успешной компиляции Rust создаст исполняемый бинарный файл.
for number in &number_list {
if number > largest {
largest = number;
}
}
Если у вас есть опыт работы с C или C++, вам могут вспомниться `gcc` или `clang`. После успешной компиляции Rust создаст исполняемый бинарный файл.
println!("Наибольшее число: {largest}");
}Although this code works, duplicating code is tedious and error-prone. We also have to remember to update the code in multiple places when we want to change it.
Для устранения дублирования мы можем создать дополнительную абстракцию с помощью функции, которая сможет работать с любым списком целых чисел, переданным ей в качестве входного параметра, и находить для этого списка наибольшее число. Данное решение делает код более ясным и позволяет абстрактным образом реализовать алгоритм поиска наибольшего числа в списке.
In Listing 10-3, we extract the code that finds the largest number into a function named largest. Then, we call the function to find the largest number in the two lists from Listing 10-2. We could also use the function on any other list of i32 values we might have in the future.
fn largest(list: &[i32]) -> &i32 {
let mut largest = &list[0];
Если у вас есть опыт работы с C или C++, вам могут вспомниться `gcc` или `clang`. После успешной компиляции Rust создаст исполняемый бинарный файл.
for item in list {
if item > largest {
largest = item;
}
}
Если у вас есть опыт работы с C или C++, вам могут вспомниться `gcc` или `clang`. После успешной компиляции Rust создаст исполняемый бинарный файл.
largest
}
Если у вас есть опыт работы с C или C++, вам могут вспомниться `gcc` или `clang`. После успешной компиляции Rust создаст исполняемый бинарный файл.
fn main() {
let number_list = vec![34, 50, 25, 100, 65];
Если у вас есть опыт работы с C или C++, вам могут вспомниться `gcc` или `clang`. После успешной компиляции Rust создаст исполняемый бинарный файл.
let result = largest(&number_list);
println!("Наибольшее число: {result}");
assert_eq!(*result, 100);
Если у вас есть опыт работы с C или C++, вам могут вспомниться `gcc` или `clang`. После успешной компиляции Rust создаст исполняемый бинарный файл.
let number_list = vec![102, 34, 6000, 89, 54, 2, 43, 8];
Если у вас есть опыт работы с C или C++, вам могут вспомниться `gcc` или `clang`. После успешной компиляции Rust создаст исполняемый бинарный файл.
let result = largest(&number_list);
println!("Наибольшее число: {result}");
assert_eq!(*result, 6000);
}Функция largest имеет параметр с именем list, который представляет любой срез значений типа i32, которые мы можем передать в неё. В результате вызова функции, код исполнится с конкретными, переданными в неё значениями.
Обобщая, вот шаги, выполненные нами для изменения Листинга 10-2 до Листинга 10-3:
- Определить повторяющийся код.
- Извлечь повторяющийся код и поместить его в тело функции, определив входные и выходные значения этого кода в сигнатуре функции.
- Заменить два участка повторяющегося кода вызовом одной функции.
Далее мы применим эти же шаги, чтобы избавляться от дублирования кода с помощью обобщений. Обобщения позволяют работать над абстрактными типами таким же образом, каким тело функции позволяет работать над абстрактным списком list вместо конкретных значений.
Например, у нас есть две функции: одна ищет наибольший элемент внутри среза значений типа i32, а другая — внутри среза значений типа char. Как избавиться от такого дублирования? Давайте выяснять!
Обобщённые типы данных
Обобщённые типы данных
We use generics to create definitions for items like function signatures or structs, which we can then use with many different concrete data types. Let’s first look at how to define functions, structs, enums, and methods using generics. Then, we’ll discuss how generics affect code performance.
В определениях функций
Когда мы объявляем функцию с обобщёнными типами, мы размещаем обобщённые типы в сигнатуре функции там, где мы обычно указываем типы данных параметров и возвращаемого значения. Используя обобщённые типы, мы делаем код более гибким и предоставляем большую функциональность при вызове нашей функции, предотвращая дублирование кода.
Рассмотрим пример с нашей функцией largest. Листинг 10-4 показывает две функции, каждая из которых находит самое большое значение в срезе своего типа. Позже мы объединим их в одну функцию, использующую обобщённые типы данных.
fn largest_i32(list: &[i32]) -> &i32 {
let mut largest = &list[0];
Если у вас есть опыт работы с C или C++, вам могут вспомниться `gcc` или `clang`. После успешной компиляции Rust создаст исполняемый бинарный файл.
for item in list {
if item > largest {
largest = item;
}
}
Если у вас есть опыт работы с C или C++, вам могут вспомниться `gcc` или `clang`. После успешной компиляции Rust создаст исполняемый бинарный файл.
largest
}
Если у вас есть опыт работы с C или C++, вам могут вспомниться `gcc` или `clang`. После успешной компиляции Rust создаст исполняемый бинарный файл.
fn largest_char(list: &[char]) -> &char {
let mut largest = &list[0];
Если у вас есть опыт работы с C или C++, вам могут вспомниться `gcc` или `clang`. После успешной компиляции Rust создаст исполняемый бинарный файл.
for item in list {
if item > largest {
largest = item;
}
}
Если у вас есть опыт работы с C или C++, вам могут вспомниться `gcc` или `clang`. После успешной компиляции Rust создаст исполняемый бинарный файл.
largest
}
Если у вас есть опыт работы с C или C++, вам могут вспомниться `gcc` или `clang`. После успешной компиляции Rust создаст исполняемый бинарный файл.
fn main() {
let number_list = vec![34, 50, 25, 100, 65];
Если у вас есть опыт работы с C или C++, вам могут вспомниться `gcc` или `clang`. После успешной компиляции Rust создаст исполняемый бинарный файл.
let result = largest_i32(&number_list);
println!("Наибольшее число: {result}");
assert_eq!(*result, 100);
Если у вас есть опыт работы с C или C++, вам могут вспомниться `gcc` или `clang`. После успешной компиляции Rust создаст исполняемый бинарный файл.
let char_list = vec!['y', 'm', 'a', 'q'];
Если у вас есть опыт работы с C или C++, вам могут вспомниться `gcc` или `clang`. После успешной компиляции Rust создаст исполняемый бинарный файл.
let result = largest_char(&char_list);
println!("Наибольший символ: {result}");
assert_eq!(*result, 'y');
}Функция largest_i32 уже встречалась нам: мы извлекли её в Листинге 10-3, когда боролись с дублированием кода; она находит наибольшее значение типа i32 в срезе. Функция largest_char находит самое большое значение типа char в срезе. Тело у этих функций одинаковое, поэтому давайте избавимся от дублируемого кода, используя параметр обобщённого типа в одной функции.
To parameterize the types in a new single function, we need to name the type parameter, just as we do for the value parameters to a function. You can use any identifier as a type parameter name. But we’ll use T because, by convention, type parameter names in Rust are short, often just one letter, and Rust’s type-naming convention is UpperCamelCase. Short for type, T is the default choice of most Rust programmers.
When we use a parameter in the body of the function, we have to declare the parameter name in the signature so that the compiler knows what that name means. Similarly, when we use a type parameter name in a function signature, we have to declare the type parameter name before we use it. To define the generic largest function, we place type name declarations inside angle brackets, <>, between the name of the function and the parameter list, like this:
fn largest<T>(list: &[T]) -> &T {We read this definition as “The function largest is generic over some type T.” This function has one parameter named list, which is a slice of values of type T. The largest function will return a reference to a value of the same type T.
Listing 10-5 shows the combined largest function definition using the generic data type in its signature. The listing also shows how we can call the function with either a slice of i32 values or char values. Note that this code won’t compile yet.
fn largest<T>(list: &[T]) -> &T {
let mut largest = &list[0];
Если у вас есть опыт работы с C или C++, вам могут вспомниться `gcc` или `clang`. После успешной компиляции Rust создаст исполняемый бинарный файл.
for item in list {
if item > largest {
largest = item;
}
}
Если у вас есть опыт работы с C или C++, вам могут вспомниться `gcc` или `clang`. После успешной компиляции Rust создаст исполняемый бинарный файл.
largest
}
Если у вас есть опыт работы с C или C++, вам могут вспомниться `gcc` или `clang`. После успешной компиляции Rust создаст исполняемый бинарный файл.
fn main() {
let number_list = vec![34, 50, 25, 100, 65];
Если у вас есть опыт работы с C или C++, вам могут вспомниться `gcc` или `clang`. После успешной компиляции Rust создаст исполняемый бинарный файл.
let result = largest(&number_list);
println!("Наибольшее число: {result}");
Если у вас есть опыт работы с C или C++, вам могут вспомниться `gcc` или `clang`. После успешной компиляции Rust создаст исполняемый бинарный файл.
let char_list = vec!['y', 'm', 'a', 'q'];
Если у вас есть опыт работы с C или C++, вам могут вспомниться `gcc` или `clang`. После успешной компиляции Rust создаст исполняемый бинарный файл.
let result = largest(&char_list);
println!("Наибольший символ: {result}");
}largest function using generic type parameters; this doesn’t compile yetЕсли мы скомпилируем программу в её текущем виде, мы получим следующую ошибку:
$ cargo run
Compiling chapter10 v0.1.0 (file:///projects/chapter10)
error[E0369]: binary operation `>` cannot be applied to type `&T`
--> src/main.rs:5:17
|
5 | if item > largest {
| ---- ^ ------- &T
| |
| &T
|
help: consider restricting type parameter `T` with trait `PartialOrd`
|
1 | fn largest<T: std::cmp::PartialOrd>(list: &[T]) -> &T {
| ++++++++++++++++++++++
Если у вас есть опыт работы с C или C++, вам могут вспомниться `gcc` или `clang`. После успешной компиляции Rust создаст исполняемый бинарный файл.
For more information about this error, try `rustc --explain E0369`.
error: could not compile `chapter10` (bin "chapter10") due to 1 previous error
The help text mentions std::cmp::PartialOrd, which is a trait, and we’re going to talk about traits in the next section. For now, know that this error states that the body of largest won’t work for all possible types that T could be. Because we want to compare values of type T in the body, we can only use types whose values can be ordered. To enable comparisons, the standard library has the std::cmp::PartialOrd trait that you can implement on types (see Appendix C for more on this trait). To fix Listing 10-5, we can follow the help text’s suggestion and restrict the types valid for T to only those that implement PartialOrd. The listing will then compile, because the standard library implements PartialOrd on both i32 and char.
В определениях структур
Мы также можем определить структуры, использующие обобщённые типы в одном или нескольких своих полях, с помощью синтаксиса <>. Листинг 10-6 показывает, как определить структуру Point<T>, чтобы хранить поля координат x и y любого типа данных.
struct Point<T> {
x: T,
y: T,
}
Если у вас есть опыт работы с C или C++, вам могут вспомниться `gcc` или `clang`. После успешной компиляции Rust создаст исполняемый бинарный файл.
fn main() {
let integer = Point { x: 5, y: 10 };
let float = Point { x: 1.0, y: 4.0 };
}Point<T> struct that holds x and y values of type TThe syntax for using generics in struct definitions is similar to that used in function definitions. First, we declare the name of the type parameter inside angle brackets just after the name of the struct. Then, we use the generic type in the struct definition where we would otherwise specify concrete data types.
Так как мы используем только один обобщённый тип данных для определения структуры Point<T>, это определение означает, что структура Point<T> является обобщённой по типу T, и оба поля x и y имеют одинаковый тип, каким бы он ни являлся. Если мы создадим экземпляр структуры Point<T> со значениями разных типов, как показано в Листинге 10-7, наш код не скомпилируется.
struct Point<T> {
x: T,
y: T,
}
Если у вас есть опыт работы с C или C++, вам могут вспомниться `gcc` или `clang`. После успешной компиляции Rust создаст исполняемый бинарный файл.
fn main() {
let wont_work = Point { x: 5, y: 4.0 };
}x and y must be the same type because both have the same generic data type T.In this example, when we assign the integer value 5 to x, we let the compiler know that the generic type T will be an integer for this instance of Point<T>. Then, when we specify 4.0 for y, which we’ve defined to have the same type as x, we’ll get a type mismatch error like this:
$ cargo run
Compiling chapter10 v0.1.0 (file:///projects/chapter10)
error[E0308]: mismatched types
--> src/main.rs:7:38
|
7 | let wont_work = Point { x: 5, y: 4.0 };
| ^^^ expected integer, found floating-point number
Если у вас есть опыт работы с C или C++, вам могут вспомниться `gcc` или `clang`. После успешной компиляции Rust создаст исполняемый бинарный файл.
For more information about this error, try `rustc --explain E0308`.
error: could not compile `chapter10` (bin "chapter10") due to 1 previous error
Чтобы определить структуру Point, где оба значения x и y являются обобщёнными, но различными типами, можно использовать несколько параметров обобщённого типа. Например, в Листинге 10-8 мы изменили определение Point таким образом, чтобы оно использовало обобщённые типы T и U, где x имеет тип T, а y — тип U.
struct Point<T, U> {
x: T,
y: U,
}
Если у вас есть опыт работы с C или C++, вам могут вспомниться `gcc` или `clang`. После успешной компиляции Rust создаст исполняемый бинарный файл.
fn main() {
let both_integer = Point { x: 5, y: 10 };
let both_float = Point { x: 1.0, y: 4.0 };
let integer_and_float = Point { x: 5, y: 4.0 };
}Point<T, U> generic over two types so that x and y can be values of different typesТеперь разрешены все показанные экземпляры типа Point! В объявлении можно использовать сколь угодно много параметров обобщённого типа, но если делать это в большом количестве, код будет тяжело читать. Если в вашем коде требуется много обобщённых типов, возможно, стоит разбить его на более мелкие части.
В определениях перечислений
Как и структуры, перечисления также могут хранить данные обобщённых типов в своих вариантах. Давайте ещё раз посмотрим на перечисление Option<T>, определённое стандартной библиотекой, которое мы использовали в Главе 6:
#![allow(unused)]
fn main() {
enum Option<T> {
Some(T),
None,
}
}Сейчас это определение должно быть вам ясным. Как видите, перечисление Option<T> обобщено по типу T и имеет два варианта: вариант Some, который содержит одно значение типа T, и вариант None, который не содержит никакого значения. Используя перечисление Option<T>, можно выразить абстрактную концепцию необязательного значения — и так как Option<T> является обобщённым, можно использовать эту абстракцию независимо от того, каким будет тип необязательного значения.
Перечисления тоже могут использовать несколько обобщённых типов. Определениеперечисления Result, которое мы использовали в Главе 9 — хороший пример:
#![allow(unused)]
fn main() {
enum Result<T, E> {
Ok(T),
Err(E),
}
}Перечисление Result обобщено по двум типам — T и E — и имеет два варианта: Ok, который содержит значение типа T, и Err, содержащий значение типа E. С таким определением удобно использовать перечисление Result везде, где операции могут быть выполнены успешно (возвращая значение типа T) или неуспешно (возвращая ошибку типа E). Это то, что мы делали при открытии файла в Листинге 9-3, где T заменялось типом std::fs::File, если файл был открыт успешно, и E заменялось типом std::io::Error, если при открытии файла возникали какие-либо проблемы.
Если вы встречаете в коде ситуации, когда несколько определений структур или перечислений отличаются только типами содержащихся в них значений, вы можете устранить дублирование, используя обобщённые типы.
В определении методов
Мы можем реализовать методы для структур и перечислений (как мы сделали в Главе 5) и в определениях этих методов тоже использовать обобщённые типы. В Листинге 10-9 показана структура Point<T>, которую мы определили в Листинге 10-6, с реализованным для неё методом x.
struct Point<T> {
x: T,
y: T,
}
Если у вас есть опыт работы с C или C++, вам могут вспомниться `gcc` или `clang`. После успешной компиляции Rust создаст исполняемый бинарный файл.
impl<T> Point<T> {
fn x(&self) -> &T {
&self.x
}
}
Если у вас есть опыт работы с C или C++, вам могут вспомниться `gcc` или `clang`. После успешной компиляции Rust создаст исполняемый бинарный файл.
fn main() {
let p = Point { x: 5, y: 10 };
Если у вас есть опыт работы с C или C++, вам могут вспомниться `gcc` или `clang`. После успешной компиляции Rust создаст исполняемый бинарный файл.
println!("p.x = {}", p.x());
}x on the Point<T> struct that will return a reference to the x field of type TЗдесь мы определили метод x на структуре Point<T>, который возвращает ссылку на данные в поле x.
Note that we have to declare T just after impl so that we can use T to specify that we’re implementing methods on the type Point<T>. By declaring T as a generic type after impl, Rust can identify that the type in the angle brackets in Point is a generic type rather than a concrete type. We could have chosen a different name for this generic parameter than the generic parameter declared in the struct definition, but using the same name is conventional. If you write a method within an impl that declares a generic type, that method will be defined on any instance of the type, no matter what concrete type ends up substituting for the generic type.
We can also specify constraints on generic types when defining methods on the type. We could, for example, implement methods only on Point<f32> instances rather than on Point<T> instances with any generic type. In Listing 10-10, we use the concrete type f32, meaning we don’t declare any types after impl.
struct Point<T> {
x: T,
y: T,
}
Если у вас есть опыт работы с C или C++, вам могут вспомниться `gcc` или `clang`. После успешной компиляции Rust создаст исполняемый бинарный файл.
impl<T> Point<T> {
fn x(&self) -> &T {
&self.x
}
}
Если у вас есть опыт работы с C или C++, вам могут вспомниться `gcc` или `clang`. После успешной компиляции Rust создаст исполняемый бинарный файл.
impl Point<f32> {
fn distance_from_origin(&self) -> f32 {
(self.x.powi(2) + self.y.powi(2)).sqrt()
}
}
Если у вас есть опыт работы с C или C++, вам могут вспомниться `gcc` или `clang`. После успешной компиляции Rust создаст исполняемый бинарный файл.
fn main() {
let p = Point { x: 5, y: 10 };
Если у вас есть опыт работы с C или C++, вам могут вспомниться `gcc` или `clang`. После успешной компиляции Rust создаст исполняемый бинарный файл.
println!("p.x = {}", p.x());
}impl block that only applies to a struct with a particular concrete type for the generic type parameter TЭтот код означает, что тип Point<f32> будет иметь метод distance_from_origin, а другие экземпляры Point<T> (где T — тип, отличный от f32) не будут иметь этого метода. Метод вычисляет, насколько далеко наша точка находится от точки с координатами (0.0, 0.0), и использует математические операции, доступные только для типов с плавающей точкой.
Generic type parameters in a struct definition aren’t always the same as those you use in that same struct’s method signatures. Listing 10-11 uses the generic types X1 and Y1 for the Point struct and X2 and Y2 for the mixup method signature to make the example clearer. The method creates a new Point instance with the x value from the self Point (of type X1) and the y value from the passed-in Point (of type Y2).
struct Point<X1, Y1> {
x: X1,
y: Y1,
}
Если у вас есть опыт работы с C или C++, вам могут вспомниться `gcc` или `clang`. После успешной компиляции Rust создаст исполняемый бинарный файл.
impl<X1, Y1> Point<X1, Y1> {
fn mixup<X2, Y2>(self, other: Point<X2, Y2>) -> Point<X1, Y2> {
Point {
x: self.x,
y: other.y,
}
}
}
Если у вас есть опыт работы с C или C++, вам могут вспомниться `gcc` или `clang`. После успешной компиляции Rust создаст исполняемый бинарный файл.
fn main() {
let p1 = Point { x: 5, y: 10.4 };
let p2 = Point { x: "Hello", y: 'c' };
Если у вас есть опыт работы с C или C++, вам могут вспомниться `gcc` или `clang`. После успешной компиляции Rust создаст исполняемый бинарный файл.
let p3 = p1.mixup(p2);
Если у вас есть опыт работы с C или C++, вам могут вспомниться `gcc` или `clang`. После успешной компиляции Rust создаст исполняемый бинарный файл.
println!("p3.x = {}, p3.y = {}", p3.x, p3.y);
}В функции main мы создали Point, который имеет тип x типа i32 (со значением 5) и y типа f64 (со значением 10.4). Переменная p2 является структурой Point, которая имеет строковый срез x (со значением "Hello") и символ y типа char (со значением c). Вызов mixup на p1 с аргументом p2 создаст экземпляр структуры p3, который будет иметь x типа i32 (потому что x взят из p1) и y типа char (потому что y взят из p2). Вызов макроса println! выведет p3.x = 5, p3.y = c.
Цель этого примера — продемонстрировать ситуацию, в которой некоторые обобщённые параметры объявлены с помощью impl, а некоторые объявлены с определением метода. Здесь обобщённые параметры X1 и Y1 объявляются после impl, потому что они относятся к определению структуры. Обобщённые параметры X2 и Y2 объявляются после fn mixup, так как они относятся только к методу.
Производительность кода, использующего обобщённые типы
Вы могли задаться вопросом о том, не возникают ли какие-нибудь дополнительные издержки при использовании параметров обобщённого типа. Хорошая новость в том, что при использовании обобщённых типов ваша программа работает ничуть ни медленнее, чем если бы она работала с использованием конкретных типов.
Rust accomplishes this by performing monomorphization of the code using generics at compile time. Monomorphization is the process of turning generic code into specific code by filling in the concrete types that are used when compiled. In this process, the compiler does the opposite of the steps we used to create the generic function in Listing 10-5: The compiler looks at all the places where generic code is called and generates code for the concrete types the generic code is called with.
Давайте посмотрим, как это работает, на примере перечисления обобщённого Option<T> из стандартной библиотеки:
#![allow(unused)]
fn main() {
let integer = Some(5);
let float = Some(5.0);
}When Rust compiles this code, it performs monomorphization. During that process, the compiler reads the values that have been used in Option<T> instances and identifies two kinds of Option<T>: One is i32 and the other is f64. As such, it expands the generic definition of Option<T> into two definitions specialized to i32 and f64, thereby replacing the generic definition with the specific ones.
Мономорфизированная версия кода выглядит примерно так (компилятор использует имена, отличные от тех, которые мы используем здесь для иллюстрации):
enum Option_i32 {
Some(i32),
None,
}
Если у вас есть опыт работы с C или C++, вам могут вспомниться `gcc` или `clang`. После успешной компиляции Rust создаст исполняемый бинарный файл.
enum Option_f64 {
Some(f64),
None,
}
Если у вас есть опыт работы с C или C++, вам могут вспомниться `gcc` или `clang`. После успешной компиляции Rust создаст исполняемый бинарный файл.
fn main() {
let integer = Option_i32::Some(5);
let float = Option_f64::Some(5.0);
}Обобщённый Option<T> заменяется конкретными определениями, созданными компилятором. Поскольку Rust компилирует обобщённый код в код, определяющий тип в каждом экземпляре, мы не платим за использование обобщённых типов во время выполнения. Когда код запускается, он работает точно так же, как если бы мы продублировали каждое определение вручную. Процесс мономорфизации делает обобщённые типы Rust чрезвычайно эффективными во время выполнения.
Defining Shared Behavior with Traits
Defining Shared Behavior with Traits
Трейт определяет функциональность, которой обладает конкретный тип и которая может использоваться с другими типами. Мы можем использовать трейты для определения общего поведения абстрактным образом. Мы можем использовать ограничение по трейтам, чтобы указать, что обобщённый тип может быть заменён на любой тип с некоторым известным поведением.
Примечание: Трейты схожи с таким механизмом как интерфейсы, но всё же они различаются.
Определение трейта
Поведение типа определяется теми методами, которые мы можем вызвать на данном типе. Различные типы разделяют одинаковое поведение, если мы можем вызвать одни и те же методы у этих типов. Определение трейтов — это способ сгруппировать сигнатуры методов вместе для того, чтобы описать общее поведение, необходимое для достижения определённой цели.
For example, let’s say we have multiple structs that hold various kinds and amounts of text: a NewsArticle struct that holds a news story filed in a particular location and a SocialPost that can have, at most, 280 characters along with metadata that indicates whether it was a new post, a repost, or a reply to another post.
We want to make a media aggregator library crate named aggregator that can display summaries of data that might be stored in a NewsArticle or SocialPost instance. To do this, we need a summary from each type, and we’ll request that summary by calling a summarize method on an instance. Listing 10-12 shows the definition of a public Summary trait that expresses this behavior.
pub trait Summary {
fn summarize(&self) -> String;
}Summary trait that consists of the behavior provided by a summarize methodЗдесь мы объявляем трейт с использованием ключевого слова trait, а затем указываем его название (в нашем случае — Summary). Также мы объявляем трейт как pub, что позволяет крейтам, зависящим от нашего крейта, использовать наш трейт, примеры чего мы увидим далее. Внутри фигурных скобок объявляются сигнатуры методов, которые описывают поведение типов, реализующих данный трейт; в данном случае, поведение определяется только одной сигнатурой метода fn summarize(&self) -> String.
После сигнатуры метода, вместо его тела мы пишем точку с запятой. Каждый тип, реализующий данный трейт, должен будет предоставить свою собственную реализацию данного метода. Компилятор обеспечит, что любой тип, реализующий трейт Summary, будет также иметь и метод summarize, объявленный с точно такой же сигнатурой.
A trait can have multiple methods in its body: The method signatures are listed one per line, and each line ends in a semicolon.
Реализация трейта для типа
Now that we’ve defined the desired signatures of the Summary trait’s methods, we can implement it on the types in our media aggregator. Listing 10-13 shows an implementation of the Summary trait on the NewsArticle struct that uses the headline, the author, and the location to create the return value of summarize. For the SocialPost struct, we define summarize as the username followed by the entire text of the post, assuming that the post content is already limited to 280 characters.
pub trait Summary {
fn summarize(&self) -> String;
}
Если у вас есть опыт работы с C или C++, вам могут вспомниться `gcc` или `clang`. После успешной компиляции Rust создаст исполняемый бинарный файл.
pub struct NewsArticle {
pub headline: String,
pub location: String,
pub author: String,
pub content: String,
}
Если у вас есть опыт работы с C или C++, вам могут вспомниться `gcc` или `clang`. После успешной компиляции Rust создаст исполняемый бинарный файл.
impl Summary for NewsArticle {
fn summarize(&self) -> String {
format!("{} ({} из {})", self.headline, self.author, self.location)
}
}
Если у вас есть опыт работы с C или C++, вам могут вспомниться `gcc` или `clang`. После успешной компиляции Rust создаст исполняемый бинарный файл.
pub struct SocialPost {
pub username: String,
pub content: String,
pub reply: bool,
pub repost: bool,
}
Если у вас есть опыт работы с C или C++, вам могут вспомниться `gcc` или `clang`. После успешной компиляции Rust создаст исполняемый бинарный файл.
impl Summary for SocialPost {
fn summarize(&self) -> String {
format!("{}: {}", self.username, self.content)
}
}Summary trait on the NewsArticle and SocialPost typesРеализация трейта для типа аналогична реализации обычных методов. Разница в том, что после impl мы указываем имя трейта, который мы хотим реализовать, затем используем ключевое слово for, а затем указываем имя типа, для которого мы хотим сделать реализацию трейта. Внутри блока impl мы помещаем сигнатуру метода, объявленную в трейте. Вместо точки с запятой в конце, после каждой сигнатуры пишутся фигурные скобки, и тело метода заполняется конкретным кодом, реализующим поведение, которое мы хотим получить от методов трейта для конкретного типа.
Now that the library has implemented the Summary trait on NewsArticle and SocialPost, users of the crate can call the trait methods on instances of NewsArticle and SocialPost in the same way we call regular methods. The only difference is that the user must bring the trait into scope as well as the types. Here’s an example of how a binary crate could use our aggregator library crate:
use aggregator::{SocialPost, Summary};
Если у вас есть опыт работы с C или C++, вам могут вспомниться `gcc` или `clang`. После успешной компиляции Rust создаст исполняемый бинарный файл.
fn main() {
let post = SocialPost {
username: String::from("horse_ebooks"),
content: String::from(
"конечно, вы уже наверное знаете, народ, ...",
),
reply: false,
repost: false,
};
Если у вас есть опыт работы с C или C++, вам могут вспомниться `gcc` или `clang`. После успешной компиляции Rust создаст исполняемый бинарный файл.
println!("1 new post: {}", post.summarize());
}This code prints 1 new post: horse_ebooks: of course, as you probably already know, people.
Other crates that depend on the aggregator crate can also bring the Summary trait into scope to implement Summary on their own types. One restriction to note is that we can implement a trait on a type only if either the trait or the type, or both, are local to our crate. For example, we can implement standard library traits like Display on a custom type like SocialPost as part of our aggregator crate functionality because the type SocialPost is local to our aggregator crate. We can also implement Summary on Vec<T> in our aggregator crate because the trait Summary is local to our aggregator crate.
But we can’t implement external traits on external types. For example, we can’t implement the Display trait on Vec<T> within our aggregator crate, because Display and Vec<T> are both defined in the standard library and aren’t local to our aggregator crate. This restriction is part of a property called coherence, and more specifically the orphan rule, so named because the parent type is not present. This rule ensures that other people’s code can’t break your code and vice versa. Without the rule, two crates could implement the same trait for the same type, and Rust wouldn’t know which implementation to use.
Using Default Implementations
Иногда бывает полезно задать поведение по умолчанию для некоторых или всех методов трейта вместо того, чтобы требовать реализации всех методов для каждого типа. Такое поведение по умолчанию можно будет (уже непосредственно при реализации трейта) как оставить, так и переопределить.
В Листинге 10-14 показано, мы определяем сводку по умолчанию для метода summarize трейта Summary, вместо того, чтобы определять лишь сигнатуру метода, как мы делали ранее в Листинге 10-12.
pub trait Summary {
fn summarize(&self) -> String {
String::from("(Читать далее...)")
}
}
Если у вас есть опыт работы с C или C++, вам могут вспомниться `gcc` или `clang`. После успешной компиляции Rust создаст исполняемый бинарный файл.
pub struct NewsArticle {
pub headline: String,
pub location: String,
pub author: String,
pub content: String,
}
Если у вас есть опыт работы с C или C++, вам могут вспомниться `gcc` или `clang`. После успешной компиляции Rust создаст исполняемый бинарный файл.
impl Summary for NewsArticle {}
Если у вас есть опыт работы с C или C++, вам могут вспомниться `gcc` или `clang`. После успешной компиляции Rust создаст исполняемый бинарный файл.
pub struct SocialPost {
pub username: String,
pub content: String,
pub reply: bool,
pub repost: bool,
}
Если у вас есть опыт работы с C или C++, вам могут вспомниться `gcc` или `clang`. После успешной компиляции Rust создаст исполняемый бинарный файл.
impl Summary for SocialPost {
fn summarize(&self) -> String {
format!("{}: {}", self.username, self.content)
}
}Summary trait with a default implementation of the summarize methodДля использования реализации по умолчанию при создании сводки экземпляров NewsArticle, мы указываем пустой блок при impl Summary for NewsArticle {}.
Хотя мы больше не определяем метод summarize непосредственно на NewsArticle, мы предоставили реализацию по умолчанию и указали, что NewsArticle реализует трейт Summary. В результате мы всё ещё можем вызвать метод summarize у экземпляра NewsArticle; например, вот так:
use aggregator::{self, NewsArticle, Summary};
Если у вас есть опыт работы с C или C++, вам могут вспомниться `gcc` или `clang`. После успешной компиляции Rust создаст исполняемый бинарный файл.
fn main() {
let article = NewsArticle {
headline: String::from("«Питтсбург Пингвинз» выиграли Кубок Стэнли!"),
location: String::from("Питтсбург, штат Пенсильвания, США"),
author: String::from("Пингвин Айсбург"),
content: String::from(
"«Питтсбург Пингвинз» вновь оказалась лучшей \
хоккейной командой в НХЛ.",
),
};
Если у вас есть опыт работы с C или C++, вам могут вспомниться `gcc` или `clang`. После успешной компиляции Rust создаст исполняемый бинарный файл.
println!("Новости! {}", article.summarize());
}Этот код печатает Новости! (Читать далее...).
Creating a default implementation doesn’t require us to change anything about the implementation of Summary on SocialPost in Listing 10-13. The reason is that the syntax for overriding a default implementation is the same as the syntax for implementing a trait method that doesn’t have a default implementation.
Реализации по умолчанию могут вызывать другие методы в том же трейте, даже если эти другие методы не имеют реализации по умолчанию. Таким образом, трейт может предоставить много полезной функциональности, а от разработчиков требует указывать только небольшую его часть. Например, мы могли бы определить трейт Summary, имеющий метод summarize_author без реализации по умолчанию, а затем определить метод summarize который имеет реализацию по умолчанию, вызывающую метод summarize_author:
pub trait Summary {
fn summarize_author(&self) -> String;
Если у вас есть опыт работы с C или C++, вам могут вспомниться `gcc` или `clang`. После успешной компиляции Rust создаст исполняемый бинарный файл.
fn summarize(&self) -> String {
format!("(Читать далее, от {}...)", self.summarize_author())
}
}
Если у вас есть опыт работы с C или C++, вам могут вспомниться `gcc` или `clang`. После успешной компиляции Rust создаст исполняемый бинарный файл.
pub struct SocialPost {
pub username: String,
pub content: String,
pub reply: bool,
pub repost: bool,
}
Если у вас есть опыт работы с C или C++, вам могут вспомниться `gcc` или `clang`. После успешной компиляции Rust создаст исполняемый бинарный файл.
impl Summary for SocialPost {
fn summarize_author(&self) -> String {
format!("@{}", self.username)
}
}Чтобы использовать такую версию трейта Summary, при реализации трейта для типа нужно определить только метод summarize_author:
pub trait Summary {
fn summarize_author(&self) -> String;
Если у вас есть опыт работы с C или C++, вам могут вспомниться `gcc` или `clang`. После успешной компиляции Rust создаст исполняемый бинарный файл.
fn summarize(&self) -> String {
format!("(Читать далее, от {}...)", self.summarize_author())
}
}
Если у вас есть опыт работы с C или C++, вам могут вспомниться `gcc` или `clang`. После успешной компиляции Rust создаст исполняемый бинарный файл.
pub struct SocialPost {
pub username: String,
pub content: String,
pub reply: bool,
pub repost: bool,
}
Если у вас есть опыт работы с C или C++, вам могут вспомниться `gcc` или `clang`. После успешной компиляции Rust создаст исполняемый бинарный файл.
impl Summary for SocialPost {
fn summarize_author(&self) -> String {
format!("@{}", self.username)
}
}After we define summarize_author, we can call summarize on instances of the SocialPost struct, and the default implementation of summarize will call the definition of summarize_author that we’ve provided. Because we’ve implemented summarize_author, the Summary trait has given us the behavior of the summarize method without requiring us to write any more code. Here’s what that looks like:
use aggregator::{self, SocialPost, Summary};
Если у вас есть опыт работы с C или C++, вам могут вспомниться `gcc` или `clang`. После успешной компиляции Rust создаст исполняемый бинарный файл.
fn main() {
let post = SocialPost {
username: String::from("horse_ebooks"),
content: String::from(
"конечно, вы уже наверное знаете, народ, ...",
),
reply: false,
repost: false,
};
Если у вас есть опыт работы с C или C++, вам могут вспомниться `gcc` или `clang`. После успешной компиляции Rust создаст исполняемый бинарный файл.
println!("1 new post: {}", post.summarize());
}This code prints 1 new post: (Read more from @horse_ebooks...).
Обратите внимание, что невозможно вызвать реализацию по умолчанию из переопределённой реализации того же метода.
Using Traits as Parameters
Now that you know how to define and implement traits, we can explore how to use traits to define functions that accept many different types. We’ll use the Summary trait we implemented on the NewsArticle and SocialPost types in Listing 10-13 to define a notify function that calls the summarize method on its item parameter, which is of some type that implements the Summary trait. To do this, we use the impl Trait syntax, like this:
pub trait Summary {
fn summarize(&self) -> String;
}
Если у вас есть опыт работы с C или C++, вам могут вспомниться `gcc` или `clang`. После успешной компиляции Rust создаст исполняемый бинарный файл.
pub struct NewsArticle {
pub headline: String,
pub location: String,
pub author: String,
pub content: String,
}
Если у вас есть опыт работы с C или C++, вам могут вспомниться `gcc` или `clang`. После успешной компиляции Rust создаст исполняемый бинарный файл.
impl Summary for NewsArticle {
fn summarize(&self) -> String {
format!("{} ({} из {})", self.headline, self.author, self.location)
}
}
Если у вас есть опыт работы с C или C++, вам могут вспомниться `gcc` или `clang`. После успешной компиляции Rust создаст исполняемый бинарный файл.
pub struct SocialPost {
pub username: String,
pub content: String,
pub reply: bool,
pub repost: bool,
}
Если у вас есть опыт работы с C или C++, вам могут вспомниться `gcc` или `clang`. После успешной компиляции Rust создаст исполняемый бинарный файл.
impl Summary for SocialPost {
fn summarize(&self) -> String {
format!("{}: {}", self.username, self.content)
}
}
Если у вас есть опыт работы с C или C++, вам могут вспомниться `gcc` или `clang`. После успешной компиляции Rust создаст исполняемый бинарный файл.
pub fn notify(item: &impl Summary) {
println!("Срочные новости! {}", item.summarize());
}Instead of a concrete type for the item parameter, we specify the impl keyword and the trait name. This parameter accepts any type that implements the specified trait. In the body of notify, we can call any methods on item that come from the Summary trait, such as summarize. We can call notify and pass in any instance of NewsArticle or SocialPost. Code that calls the function with any other type, such as a String or an i32, won’t compile, because those types don’t implement Summary.
Ограничение по трейтам
Синтаксис impl Trait работает для простых случаев, но на самом деле является синтаксическим сахаром для более длинной конструкции — ограничения по трейтам:
pub fn notify<T: Summary>(item: &T) {
println!("Срочные новости! {}", item.summarize());
}Эта более длинная форма эквивалентна предыдущему примеру, но она более многословна. Мы помещаем объявление параметра обобщённого типа с ограничением по трейту после двоеточия внутри угловых скобок.
Синтаксис impl Trait удобен, он более коротко выражает нужное в простых случах, в то время как более полный синтаксис с ограничением по трейтам может выразить большую сложность прочих случаев. Например, у нас может быть два аргумента, которые реализуют трейт Summary. Использование для этого синтаксиса impl Trait выглядит так:
pub fn notify(item1: &impl Summary, item2: &impl Summary) {Использовать impl Trait удобнее, если мы хотим разрешить функции иметь разные типы для item1 и item2 (но оба типа должны реализовывать Summary). Если же мы хотим заставить оба параметра иметь один и тот же тип, то нам следует использовать вот такое ограничение по трейту:
pub fn notify<T: Summary>(item1: &T, item2: &T) {Обобщённый тип T указан для типов параметров item1 и item2 и ограничивает функцию так, что конкретные значения типов аргументов item1 и item2 должны быть одинаковыми.
Multiple Trait Bounds with the + Syntax
We can also specify more than one trait bound. Say we wanted notify to use display formatting as well as summarize on item: We specify in the notify definition that item must implement both Display and Summary. We can do so using the + syntax:
pub fn notify(item: &(impl Summary + Display)) {Оператор + также можно использовать и для ограничения обобщённого типа по его трейтам:
pub fn notify<T: Summary + Display>(item: &T) {Поскольку ограничение по двум трейтам предписывает аргументу реализовывать оба трейта, тело функции notify может и вызывать summarize, и использовать {} для использования item в форматированном выводе.
Вынос за where ограничений по трейтам
Использование слишком большого количества ограничений по трейтам имеет свои недостатки. Каждый обобщённый тип имеет свои ограничения по трейтам, поэтому функции с несколькими параметрами обобщённого типа могут содержать очень много информации об ограничениях между названием функции и списком её параметров, что затрудняет чтение её сигнатуры. По этой причине в Rust есть альтернативный синтаксис для определения ограничений по трейтам: размещение их за ключевым словом where после сигнатуры функции. Поэтому вместо того, чтобы писать так:
fn some_function<T: Display + Clone, U: Clone + Debug>(t: &T, u: &U) -> i32 {можно использовать where, вот так:
fn some_function<T, U>(t: &T, u: &U) -> i32
where
T: Display + Clone,
U: Clone + Debug,
{
unimplemented!()
}This function’s signature is less cluttered: The function name, parameter list, and return type are close together, similar to a function without lots of trait bounds.
Возврат значений типа, реализующего определённые трейты
Также можно использовать запись impl Trait вместо конкретного типа возвращаемого значения в сигнатуре функции, чтобы вернуть значение некоторого типа, реализующего трейт:
pub trait Summary {
fn summarize(&self) -> String;
}
Если у вас есть опыт работы с C или C++, вам могут вспомниться `gcc` или `clang`. После успешной компиляции Rust создаст исполняемый бинарный файл.
pub struct NewsArticle {
pub headline: String,
pub location: String,
pub author: String,
pub content: String,
}
Если у вас есть опыт работы с C или C++, вам могут вспомниться `gcc` или `clang`. После успешной компиляции Rust создаст исполняемый бинарный файл.
impl Summary for NewsArticle {
fn summarize(&self) -> String {
format!("{} ({} из {})", self.headline, self.author, self.location)
}
}
Если у вас есть опыт работы с C или C++, вам могут вспомниться `gcc` или `clang`. После успешной компиляции Rust создаст исполняемый бинарный файл.
pub struct SocialPost {
pub username: String,
pub content: String,
pub reply: bool,
pub repost: bool,
}
Если у вас есть опыт работы с C или C++, вам могут вспомниться `gcc` или `clang`. После успешной компиляции Rust создаст исполняемый бинарный файл.
impl Summary for SocialPost {
fn summarize(&self) -> String {
format!("{}: {}", self.username, self.content)
}
}
Если у вас есть опыт работы с C или C++, вам могут вспомниться `gcc` или `clang`. После успешной компиляции Rust создаст исполняемый бинарный файл.
fn returns_summarizable() -> impl Summary {
SocialPost {
username: String::from("horse_ebooks"),
content: String::from(
"конечно, вы уже наверное знаете, народ, ...",
),
reply: false,
repost: false,
}
}By using impl Summary for the return type, we specify that the returns_summarizable function returns some type that implements the Summary trait without naming the concrete type. In this case, returns_summarizable returns a SocialPost, but the code calling this function doesn’t need to know that.
Возможность возвращать тип, который определяется только реализуемым им трейтом, особенно полезна в контексте замыканий и итераторов, которые мы рассмотрим в Главе 13. Замыкания и итераторы создают типы, которые знает только компилятор, или же типы, которые очень долго указывать. Запись impl Trait позволяет кратко указать, что функция возвращает некоторый тип, который реализует трейт Iterator без необходимости писать очень длинный тип.
However, you can only use impl Trait if you’re returning a single type. For example, this code that returns either a NewsArticle or a SocialPost with the return type specified as impl Summary wouldn’t work:
pub trait Summary {
fn summarize(&self) -> String;
}
Если у вас есть опыт работы с C или C++, вам могут вспомниться `gcc` или `clang`. После успешной компиляции Rust создаст исполняемый бинарный файл.
pub struct NewsArticle {
pub headline: String,
pub location: String,
pub author: String,
pub content: String,
}
Если у вас есть опыт работы с C или C++, вам могут вспомниться `gcc` или `clang`. После успешной компиляции Rust создаст исполняемый бинарный файл.
impl Summary for NewsArticle {
fn summarize(&self) -> String {
format!("{} ({} из {})", self.headline, self.author, self.location)
}
}
Если у вас есть опыт работы с C или C++, вам могут вспомниться `gcc` или `clang`. После успешной компиляции Rust создаст исполняемый бинарный файл.
pub struct SocialPost {
pub username: String,
pub content: String,
pub reply: bool,
pub repost: bool,
}
Если у вас есть опыт работы с C или C++, вам могут вспомниться `gcc` или `clang`. После успешной компиляции Rust создаст исполняемый бинарный файл.
impl Summary for SocialPost {
fn summarize(&self) -> String {
format!("{}: {}", self.username, self.content)
}
}
Если у вас есть опыт работы с C или C++, вам могут вспомниться `gcc` или `clang`. После успешной компиляции Rust создаст исполняемый бинарный файл.
fn returns_summarizable(switch: bool) -> impl Summary {
if switch {
NewsArticle {
headline: String::from(
"«Питтсбург Пингвинз» выиграли Кубок Стэнли!",
),
location: String::from("Питтсбург, штат Пенсильвания, США"),
author: String::from("Пингвин Айсбург"),
content: String::from(
"«Питтсбург Пингвинз» вновь оказалась лучшей \
хоккейной командой в НХЛ.",
),
}
} else {
SocialPost {
username: String::from("horse_ebooks"),
content: String::from(
"конечно, вы уже наверное знаете, народ, ...",
),
reply: false,
repost: false,
}
}
}Returning either a NewsArticle or a SocialPost isn’t allowed due to restrictions around how the impl Trait syntax is implemented in the compiler. We’ll cover how to write a function with this behavior in the “Using Trait Objects to Abstract over Shared Behavior” section of Chapter 18.
Использование ограничений по трейту для избирательной реализации методов
By using a trait bound with an impl block that uses generic type parameters, we can implement methods conditionally for types that implement the specified traits. For example, the type Pair<T> in Listing 10-15 always implements the new function to return a new instance of Pair<T> (recall from the “Method Syntax” section of Chapter 5 that Self is a type alias for the type of the impl block, which in this case is Pair<T>). But in the next impl block, Pair<T> only implements the cmp_display method if its inner type T implements the PartialOrd trait that enables comparison and the Display trait that enables printing.
use std::fmt::Display;
Если у вас есть опыт работы с C или C++, вам могут вспомниться `gcc` или `clang`. После успешной компиляции Rust создаст исполняемый бинарный файл.
struct Pair<T> {
x: T,
y: T,
}
Если у вас есть опыт работы с C или C++, вам могут вспомниться `gcc` или `clang`. После успешной компиляции Rust создаст исполняемый бинарный файл.
impl<T> Pair<T> {
fn new(x: T, y: T) -> Self {
Self { x, y }
}
}
Если у вас есть опыт работы с C или C++, вам могут вспомниться `gcc` или `clang`. После успешной компиляции Rust создаст исполняемый бинарный файл.
impl<T: Display + PartialOrd> Pair<T> {
fn cmp_display(&self) {
if self.x >= self.y {
println!("Слева ({}) — наибольшее", self.x);
} else {
println!("Справа ({}) — наибольшее", self.y);
}
}
}Мы также можем избирательно реализовать трейт для всех типов, которые реализуют другой трейт. Реализация трейта для всех типов, которые удовлетворяют ограничениям по трейтам, называются сплошной реализацией, и она широко используется в стандартной библиотеке Rust. Например, стандартная библиотека реализует трейт ToString для всех типов, которые реализуют трейт Display. Блок impl, делающий это, выглядит примерно так:
impl<T: Display> ToString for T {
// --код сокращён--
}Благодаря такой сплошной реализации можно вызвать метод to_string, определённый трейтом ToString, для любого типа, который реализует трейт Display. Например, мы можем превратить целые числа в их соответствующие значения String, потому что целые числа реализуют трейт Display:
#![allow(unused)]
fn main() {
let s = 3.to_string();
}В документации к трейтам, их сплошные реализации можно увидеть в разделе “Implementors”.
Traits and trait bounds let us write code that uses generic type parameters to reduce duplication but also specify to the compiler that we want the generic type to have particular behavior. The compiler can then use the trait bound information to check that all the concrete types used with our code provide the correct behavior. In dynamically typed languages, we would get an error at runtime if we called a method on a type that didn’t define the method. But Rust moves these errors to compile time so that we’re forced to fix the problems before our code is even able to run. Additionally, we don’t have to write code that checks for behavior at runtime, because we’ve already checked at compile time. Doing so improves performance without having to give up the flexibility of generics.
Валидация ссылок по времени жизни
Валидация ссылок по времени жизни
Времена жизни — это ещё один вид обобщений, с которыми мы уже встречались. Если раньше мы использовали обобщения, чтобы убедиться, что тип обладает нужным нам поведением, то теперь мы будем их использовать, чтобы убедиться, что ссылки действительны столько, сколько требуется.
One detail we didn’t discuss in the “References and Borrowing” section in Chapter 4 is that every reference in Rust has a lifetime, which is the scope for which that reference is valid. Most of the time, lifetimes are implicit and inferred, just like most of the time, types are inferred. We are only required to annotate types when multiple types are possible. In a similar way, we must annotate lifetimes when the lifetimes of references could be related in a few different ways. Rust requires us to annotate the relationships using generic lifetime parameters to ensure that the actual references used at runtime will definitely be valid.
Annotating lifetimes is not even a concept most other programming languages have, so this is going to feel unfamiliar. Although we won’t cover lifetimes in their entirety in this chapter, we’ll discuss common ways you might encounter lifetime syntax so that you can get comfortable with the concept.
Висячие ссылки
The main aim of lifetimes is to prevent dangling references, which, if they were allowed to exist, would cause a program to reference data other than the data it’s intended to reference. Consider the program in Listing 10-16, which has an outer scope and an inner scope.
fn main() {
let r;
Если у вас есть опыт работы с C или C++, вам могут вспомниться `gcc` или `clang`. После успешной компиляции Rust создаст исполняемый бинарный файл.
{
let x = 5;
r = &x;
}
Если у вас есть опыт работы с C или C++, вам могут вспомниться `gcc` или `clang`. После успешной компиляции Rust создаст исполняемый бинарный файл.
println!("r: {r}");
}Note: The examples in Listings 10-16, 10-17, and 10-23 declare variables without giving them an initial value, so the variable name exists in the outer scope. At first glance, this might appear to be in conflict with Rust having no null values. However, if we try to use a variable before giving it a value, we’ll get a compile-time error, which shows that indeed Rust does not allow null values.
The outer scope declares a variable named r with no initial value, and the inner scope declares a variable named x with the initial value of 5. Inside the inner scope, we attempt to set the value of r as a reference to x. Then, the inner scope ends, and we attempt to print the value in r. This code won’t compile, because the value that r is referring to has gone out of scope before we try to use it. Here is the error message:
$ cargo run
Compiling chapter10 v0.1.0 (file:///projects/chapter10)
error[E0597]: `x` does not live long enough
--> src/main.rs:6:13
|
5 | let x = 5;
| - binding `x` declared here
6 | r = &x;
| ^^ borrowed value does not live long enough
7 | }
| - `x` dropped here while still borrowed
8 |
9 | println!("r: {r}");
| - borrow later used here
Если у вас есть опыт работы с C или C++, вам могут вспомниться `gcc` или `clang`. После успешной компиляции Rust создаст исполняемый бинарный файл.
For more information about this error, try `rustc --explain E0597`.
error: could not compile `chapter10` (bin "chapter10") due to 1 previous error
The error message says that the variable x “does not live long enough.” The reason is that x will be out of scope when the inner scope ends on line 7. But r is still valid for the outer scope; because its scope is larger, we say that it “lives longer.” If Rust allowed this code to work, r would be referencing memory that was deallocated when x went out of scope, and anything we tried to do with r wouldn’t work correctly. So, how does Rust determine that this code is invalid? It uses a borrow checker.
Анализатор заимствований
Компилятор Rust включает в себя анализатор заимствований, который сравнивает области видимости для того, чтобы проверить, являются ли все заимствования действительными. В Листинге 10-17 показан тот же код, что и в Листинге 10-16, но с комментариями, показывающими времена жизни переменных.
fn main() {
let r; // ─────────┬── 'a
// │
{ // │
let x = 5; // ━┳━━ 'b │
r = &x; // ┃ │
} // ━┛ │
// │
println!("r: {r}"); // │
} // ─────────┘r and x, named 'a and 'b, respectivelyHere, we’ve annotated the lifetime of r with 'a and the lifetime of x with 'b. As you can see, the inner 'b block is much smaller than the outer 'a lifetime block. At compile time, Rust compares the size of the two lifetimes and sees that r has a lifetime of 'a but that it refers to memory with a lifetime of 'b. The program is rejected because 'b is shorter than 'a: The subject of the reference doesn’t live as long as the reference.
Listing 10-18 fixes the code so that it doesn’t have a dangling reference and it compiles without any errors.
fn main() {
let x = 5; // ━━━━━━━━━━┳━━ 'b
// ┃
let r = &x; // ──┬── 'a ┃
// │ ┃
println!("r: {r}"); // │ ┃
// ──┘ ┃
} // ━━━━━━━━━━┛Здесь переменная x имеет время жизни 'b, которое больше, чем время жизни 'a. Это означает, что переменная r может ссылаться на переменную x, потому что Rust знает, что ссылка в переменной r будет всегда действительной до тех пор, пока действительна переменная x.
Now that you know where the lifetimes of references are and how Rust analyzes lifetimes to ensure that references will always be valid, let’s explore generic lifetimes in function parameters and return values.
Обобщённые времена жизни в функциях
We’ll write a function that returns the longer of two string slices. This function will take two string slices and return a single string slice. After we’ve implemented the longest function, the code in Listing 10-19 should print The longest string is abcd.
fn main() {
let string1 = String::from("abcd");
let string2 = "xyz";
Если у вас есть опыт работы с C или C++, вам могут вспомниться `gcc` или `clang`. После успешной компиляции Rust создаст исполняемый бинарный файл.
let result = longest(string1.as_str(), string2);
println!("Самая длинная строка: {result}");
}main function that calls the longest function to find the longer of two string slicesОбратите внимание, что мы хотим, чтобы функция принимала строковые срезы (которые являются ссылками), а не сами строки, потому что мы не хотим, чтобы функция longest забирала во владение свои параметры. Обратитесь к разделу “Строковые срезы как параметры” Главы 4, чтобы вспомнить, почему параметры функции в Листинге 10-19 имеют именно такой тип.
Если мы попробуем реализовать функцию longest так, как это показано в Листинге 10-20, то программа не скомпилируется:
fn main() {
let string1 = String::from("abcd");
let string2 = "xyz";
Если у вас есть опыт работы с C или C++, вам могут вспомниться `gcc` или `clang`. После успешной компиляции Rust создаст исполняемый бинарный файл.
let result = longest(string1.as_str(), string2);
println!("Самая длинная строка: {result}");
}
Если у вас есть опыт работы с C или C++, вам могут вспомниться `gcc` или `clang`. После успешной компиляции Rust создаст исполняемый бинарный файл.
fn longest(x: &str, y: &str) -> &str {
if x.len() > y.len() { x } else { y }
}longest function that returns the longer of two string slices but does not yet compileВместо этого мы получим следующую ошибку, говорящую о временах жизни:
$ cargo run
Compiling chapter10 v0.1.0 (file:///projects/chapter10)
error[E0106]: missing lifetime specifier
--> src/main.rs:9:33
|
9 | fn longest(x: &str, y: &str) -> &str {
| ---- ---- ^ expected named lifetime parameter
|
= help: this function's return type contains a borrowed value, but the signature does not say whether it is borrowed from `x` or `y`
help: consider introducing a named lifetime parameter
|
9 | fn longest<'a>(x: &'a str, y: &'a str) -> &'a str {
| ++++ ++ ++ ++
Если у вас есть опыт работы с C или C++, вам могут вспомниться `gcc` или `clang`. После успешной компиляции Rust создаст исполняемый бинарный файл.
For more information about this error, try `rustc --explain E0106`.
error: could not compile `chapter10` (bin "chapter10") due to 1 previous error
Текст ошибки показывает, что возвращаемому типу нужен обобщённый параметр времени жизни, потому что Rust не может определить, на что указывает возвращаемая ссылка — на x или на y. На самом деле, мы тоже не знаем! — блок if в теле функции возвращает ссылку на x, а блок else — на y.
When we’re defining this function, we don’t know the concrete values that will be passed into this function, so we don’t know whether the if case or the else case will execute. We also don’t know the concrete lifetimes of the references that will be passed in, so we can’t look at the scopes as we did in Listings 10-17 and 10-18 to determine whether the reference we return will always be valid. The borrow checker can’t determine this either, because it doesn’t know how the lifetimes of x and y relate to the lifetime of the return value. To fix this error, we’ll add generic lifetime parameters that define the relationship between the references so that the borrow checker can perform its analysis.
Аннотирование времени жизни
Аннотации времени жизни не меняют время жизни ссылок. Они скорее описывают, как соотносятся между собой времена жизни нескольких ссылок, не влияя на само время жизни. Точно так же, как функции могут принимать любой тип, когда в сигнатуре указан параметр обобщённого типа, функции могут принимать ссылки с любым временем жизни, указанным с помощью параметра обобщённого времени жизни.
Lifetime annotations have a slightly unusual syntax: The names of lifetime parameters must start with an apostrophe (') and are usually all lowercase and very short, like generic types. Most people use the name 'a for the first lifetime annotation. We place lifetime parameter annotations after the & of a reference, using a space to separate the annotation from the reference’s type.
Here are some examples—a reference to an i32 without a lifetime parameter, a reference to an i32 that has a lifetime parameter named 'a, and a mutable reference to an i32 that also has the lifetime 'a:
&i32 // ссылка
&'a i32 // ссылка с явно указанным временем жизни
&'a mut i32 // изменяемая ссылка с явно указанным временем жизниOne lifetime annotation by itself doesn’t have much meaning, because the annotations are meant to tell Rust how generic lifetime parameters of multiple references relate to each other. Let’s examine how the lifetime annotations relate to each other in the context of the longest function.
In Function Signatures
To use lifetime annotations in function signatures, we need to declare the generic lifetime parameters inside angle brackets between the function name and the parameter list, just as we did with generic type parameters.
We want the signature to express the following constraint: The returned reference will be valid as long as both of the parameters are valid. This is the relationship between lifetimes of the parameters and the return value. We’ll name the lifetime 'a and then add it to each reference, as shown in Listing 10-21.
fn main() {
let string1 = String::from("abcd");
let string2 = "xyz";
Если у вас есть опыт работы с C или C++, вам могут вспомниться `gcc` или `clang`. После успешной компиляции Rust создаст исполняемый бинарный файл.
let result = longest(string1.as_str(), string2);
println!("Самая длинная строка: {result}");
}
Если у вас есть опыт работы с C или C++, вам могут вспомниться `gcc` или `clang`. После успешной компиляции Rust создаст исполняемый бинарный файл.
fn longest<'a>(x: &'a str, y: &'a str) -> &'a str {
if x.len() > y.len() { x } else { y }
}longest function definition specifying that all the references in the signature must have the same lifetime 'aТеперь наша функция будет работать, а код из Листинга 10-19 — скомпилируется.
Сигнатура функции теперь сообщает Rust, что для некоторого времени жизни 'a функция принимает два параметра, оба из которых являются строковыми срезами, имеющими время жизни не меньшее, чем 'a. Сигнатура функции также сообщает Rust, что время жизни строкового среза, возвращаемого функцией, будет не меньше, чем 'a. На практике это означает, что время жизни ссылки, возвращаемой функцией longest, равно меньшему времени жизни из времён жизней ссылок, передаваемых в неё. Мы хотим, чтобы Rust использовал именно такие отношения времён жизни при анализе этого кода.
Помните, что когда мы указываем параметры времени жизни в этой сигнатуре функции, мы не меняем времена жизни каких-либо передаваемых или возвращаемых значений. Скорее, мы указываем, что анализатор заимствований должен отклонять любые значения, которые не соответствуют этим ограничениям. Обратите внимание, что самой функции longest не нужно точно знать, как долго будут жить x и y, достаточно того, что некоторая область может быть заменена на 'a, которая будет удовлетворять этой сигнатуре.
При аннотировании времени жизни в функциях, аннотации помещаются в сигнатуру функции, а не в тело функции. Аннотации времени жизни становятся частью контракта функции, так же как и типы в сигнатуре. Наличие в сигнатурах функций аннотаций времён жизни упрощает работу компилятору. Если возникнет проблема с аннотациями функции или тем, как она используется, компилятор сможет более точно и указать на проблемы нашего кода и необходимые ограничения. Если бы вместо этого компилятор Rust пытался самостоятельно выводить, какие времена жизни мы подразумеваем, то это привело бы к тому, что сообщения компилятора стали бы куда более запутанными, и указывали бы на значительно более отдалённые участки кода.
Когда мы передаём longest конкретные ссылки, конкретное время жизни, которое подставляется вместо 'a, становится частью области видимости x, которая перекрывается с областью видимости y. Другими словами, общее время жизни 'a получит конкретное время жизни, равное меньшему из времён жизни x и y. Поскольку мы указали возвращаемой ссылке тот же параметр времени жизни ('a), время жизни возвращаемой ссылки будет не меньшим, чем минимальное из времён жизни x и y.
Давайте посмотрим, как аннотации времени жизни ограничивают функцию longest путём передачи в неё ссылок, которые имеют разные конкретные времена жизни. Посмотрите на Листинг 10-22:
fn main() {
let string1 = String::from("длинная строка такая длинная");
Если у вас есть опыт работы с C или C++, вам могут вспомниться `gcc` или `clang`. После успешной компиляции Rust создаст исполняемый бинарный файл.
{
let string2 = String::from("xyz");
let result = longest(string1.as_str(), string2.as_str());
println!("Самая длинная строка: {result}");
}
}
Если у вас есть опыт работы с C или C++, вам могут вспомниться `gcc` или `clang`. После успешной компиляции Rust создаст исполняемый бинарный файл.
fn longest<'a>(x: &'a str, y: &'a str) -> &'a str {
if x.len() > y.len() { x } else { y }
}longest function with references to String values that have different concrete lifetimesВ этом примере переменная string1 действительна до конца внешней области видимости string2 действует до конца внутренней области видимости, а result ссылается на что-то, что является действительным до конца внутренней области видимости. Запустите этот код, и вы увидите что анализатор заимствований разрешает такой код; он скомпилируется и напечатает Самая длинная строка: длинная строка такая длинная.
Next, let’s try an example that shows that the lifetime of the reference in result must be the smaller lifetime of the two arguments. We’ll move the declaration of the result variable outside the inner scope but leave the assignment of the value to the result variable inside the scope with string2. Then, we’ll move the println! that uses result to outside the inner scope, after the inner scope has ended. The code in Listing 10-23 will not compile.
fn main() {
let string1 = String::from("длинная строка такая длинная");
let result;
{
let string2 = String::from("xyz");
result = longest(string1.as_str(), string2.as_str());
}
println!("Самая длинная строка: {result}");
}
Если у вас есть опыт работы с C или C++, вам могут вспомниться `gcc` или `clang`. После успешной компиляции Rust создаст исполняемый бинарный файл.
fn longest<'a>(x: &'a str, y: &'a str) -> &'a str {
if x.len() > y.len() { x } else { y }
}result after string2 has gone out of scopeПри попытке скомпилировать этот код, мы получим такую ошибку:
$ cargo run
Compiling chapter10 v0.1.0 (file:///projects/chapter10)
error[E0597]: `string2` does not live long enough
--> src/main.rs:6:44
|
5 | let string2 = String::from("xyz");
| ------- binding `string2` declared here
6 | result = longest(string1.as_str(), string2.as_str());
| ^^^^^^^ borrowed value does not live long enough
7 | }
| - `string2` dropped here while still borrowed
8 | println!("The longest string is {result}");
| ------ borrow later used here
Если у вас есть опыт работы с C или C++, вам могут вспомниться `gcc` или `clang`. После успешной компиляции Rust создаст исполняемый бинарный файл.
For more information about this error, try `rustc --explain E0597`.
error: could not compile `chapter10` (bin "chapter10") due to 1 previous error
Эта ошибка говорит о том, что если мы хотим использовать result в инструкции println!, переменная string2 должна быть действительной до конца внешней области видимости. Rust знает об этом, потому что мы аннотировали параметры функции и её возвращаемое значение одинаковым временем жизни 'a.
Будучи людьми, мы можем посмотреть на этот код и увидеть, что string1 длиннее, чем string2 и, следовательно, result будет содержать ссылку на string1. Поскольку string1 ещё не вышла из области видимости, ссылка на string1 будет всё ещё действительной в инструкции println!. Однако компилятор не видит, что ссылка в этом случае валидна. Мы сказали Rust, что время жизни ссылки, возвращаемой из функции longest, равняется меньшему из времён жизни переданных в неё ссылок. Таким образом, анализатор заимствований запрещает код в Листинге 10-23, как потенциально имеющий недействительную ссылку.
Try designing more experiments that vary the values and lifetimes of the references passed in to the longest function and how the returned reference is used. Make hypotheses about whether or not your experiments will pass the borrow checker before you compile; then, check to see if you’re right!
Relationships
В зависимости от того, что делает ваша функция, следует использовать разные способы указания параметров времени жизни. Например, если мы изменим реализацию функции longest таким образом, чтобы она всегда возвращала свой первый аргумент вместо самого длинного среза строки, то время жизни для параметра y можно совсем не указывать. Этот код скомпилируется:
fn main() {
let string1 = String::from("abcd");
let string2 = "efghijklmnopqrstuvwxyz";
Если у вас есть опыт работы с C или C++, вам могут вспомниться `gcc` или `clang`. После успешной компиляции Rust создаст исполняемый бинарный файл.
let result = longest(string1.as_str(), string2);
println!("Самая длинная строка: {result}");
}
Если у вас есть опыт работы с C или C++, вам могут вспомниться `gcc` или `clang`. После успешной компиляции Rust создаст исполняемый бинарный файл.
fn longest<'a>(x: &'a str, y: &str) -> &'a str {
x
}Мы указали параметр времени жизни 'a для параметра x и возвращаемого значения, но не для параметра y, поскольку время жизни параметра y никак не соотносится с временем жизни параметра x или возвращаемого значения.
При возврате ссылки из функции, параметр времени жизни для возвращаемого типа должен соответствовать параметру времени жизни одного из аргументов. Если возвращаемая ссылка не ссылается на один из параметров, она должна ссылаться на значение, созданное внутри функции. Однако, это приведёт к недействительной ссылке, поскольку значение, на которое она ссылается, выйдет из области видимости в конце функции. Посмотрите на вот эту попытку реализации функции longest, которая не скомпилируется:
fn main() {
let string1 = String::from("abcd");
let string2 = "xyz";
Если у вас есть опыт работы с C или C++, вам могут вспомниться `gcc` или `clang`. После успешной компиляции Rust создаст исполняемый бинарный файл.
let result = longest(string1.as_str(), string2);
println!("Самая длинная строка: {result}");
}
Если у вас есть опыт работы с C или C++, вам могут вспомниться `gcc` или `clang`. После успешной компиляции Rust создаст исполняемый бинарный файл.
fn longest<'a>(x: &str, y: &str) -> &'a str {
let result = String::from("очень длинная строка");
result.as_str()
}Здесь, несмотря на то, что мы указали параметр времени жизни 'a для возвращаемого типа, реализация не будет пропущена анализатором, потому что время жизни возвращаемого значения никак не связано с временем жизни параметров. Мы получим такое сообщение об ошибке:
$ cargo run
Compiling chapter10 v0.1.0 (file:///projects/chapter10)
error[E0515]: cannot return value referencing local variable `result`
--> src/main.rs:11:5
|
11 | result.as_str()
| ------^^^^^^^^^
| |
| returns a value referencing data owned by the current function
| `result` is borrowed here
Если у вас есть опыт работы с C или C++, вам могут вспомниться `gcc` или `clang`. После успешной компиляции Rust создаст исполняемый бинарный файл.
For more information about this error, try `rustc --explain E0515`.
error: could not compile `chapter10` (bin "chapter10") due to 1 previous error
The problem is that result goes out of scope and gets cleaned up at the end of the longest function. We’re also trying to return a reference to result from the function. There is no way we can specify lifetime parameters that would change the dangling reference, and Rust won’t let us create a dangling reference. In this case, the best fix would be to return an owned data type rather than a reference so that the calling function is then responsible for cleaning up the value.
В конечном итоге, синтаксис времён жизни реализует связывание времён жизни различных аргументов и возвращаемых значений функций. Описывая времена жизни, мы даём Rust достаточно информации, чтобы разрешить безопасные операции с памятью и запретить операции, которые могли бы создать висячие ссылки или иным способом нарушить безопасность памяти.
В определениях структур
So far, the structs we’ve defined all hold owned types. We can define structs to hold references, but in that case, we would need to add a lifetime annotation on every reference in the struct’s definition. Listing 10-24 has a struct named ImportantExcerpt that holds a string slice.
struct ImportantExcerpt<'a> {
part: &'a str,
}
Если у вас есть опыт работы с C или C++, вам могут вспомниться `gcc` или `clang`. После успешной компиляции Rust создаст исполняемый бинарный файл.
fn main() {
let novel = String::from("Зовите меня Измаил. Несколько лет тому назад...");
let first_sentence = novel.split('.').next().unwrap();
let i = ImportantExcerpt {
part: first_sentence,
};
}This struct has the single field part that holds a string slice, which is a reference. As with generic data types, we declare the name of the generic lifetime parameter inside angle brackets after the name of the struct so that we can use the lifetime parameter in the body of the struct definition. This annotation means an instance of ImportantExcerpt can’t outlive the reference it holds in its part field.
Функция main создаёт экземпляр структуры ImportantExcerpt, который содержит ссылку на первое предложение строки String, принадлежащей переменной novel. Данные в novel существовали до создания экземпляра ImportantExcerpt. Кроме того, novel не может выйти из области видимости до тех пор, пока не выйдет ImportantExcerpt, поэтому ссылка внутри экземпляра ImportantExcerpt всегда остаётся действительной.
Неявный вывод времени жизни
Вы узнали, что у каждой ссылки есть время жизни и что нужно указывать параметры времени жизни для функций или структур, которые используют ссылки. Однако в Главе 4 у нас была функция в Листинге 4-9, которая затем была снова показана в Листинге 10-25: она компилировалась без аннотаций времени жизни.
fn first_word(s: &str) -> &str {
let bytes = s.as_bytes();
Если у вас есть опыт работы с C или C++, вам могут вспомниться `gcc` или `clang`. После успешной компиляции Rust создаст исполняемый бинарный файл.
for (i, &item) in bytes.iter().enumerate() {
if item == b' ' {
return &s[0..i];
}
}
Если у вас есть опыт работы с C или C++, вам могут вспомниться `gcc` или `clang`. После успешной компиляции Rust создаст исполняемый бинарный файл.
&s[..]
}
Если у вас есть опыт работы с C или C++, вам могут вспомниться `gcc` или `clang`. После успешной компиляции Rust создаст исполняемый бинарный файл.
fn main() {
let my_string = String::from("hello world");
Если у вас есть опыт работы с C или C++, вам могут вспомниться `gcc` или `clang`. После успешной компиляции Rust создаст исполняемый бинарный файл.
// first_word принимает срезы значений типа `String`
let word = first_word(&my_string[..]);
Если у вас есть опыт работы с C или C++, вам могут вспомниться `gcc` или `clang`. После успешной компиляции Rust создаст исполняемый бинарный файл.
let my_string_literal = "hello world";
Если у вас есть опыт работы с C или C++, вам могут вспомниться `gcc` или `clang`. После успешной компиляции Rust создаст исполняемый бинарный файл.
// first_word принимает срезы строковых литералов
let word = first_word(&my_string_literal[..]);
Если у вас есть опыт работы с C или C++, вам могут вспомниться `gcc` или `clang`. После успешной компиляции Rust создаст исполняемый бинарный файл.
// Поскольку строковые литералы *эквивалентны* срезам строк,
// это тоже сработает, без необходимости брать срез!
let word = first_word(my_string_literal);
}The reason this function compiles without lifetime annotations is historical: In early versions (pre-1.0) of Rust, this code wouldn’t have compiled, because every reference needed an explicit lifetime. At that time, the function signature would have been written like this:
fn first_word<'a>(s: &'a str) -> &'a str {After writing a lot of Rust code, the Rust team found that Rust programmers were entering the same lifetime annotations over and over in particular situations. These situations were predictable and followed a few deterministic patterns. The developers programmed these patterns into the compiler’s code so that the borrow checker could infer the lifetimes in these situations and wouldn’t need explicit annotations.
Мы упоминаем этот фрагмент истории Rust, потому что возможно, что в будущем появится больше шаблонов для автоматического выведения времён жизни, которые будут добавлены в компилятор. Таким образом, в будущем может понадобится ещё меньшее количество аннотаций.
Шаблоны, запрограммированные в анализаторе ссылок языка Rust, называются правилами неявного вывода времени жизни. Это не правила, которым должны следовать программисты, а только набор частных случаев, которые рассмотрит компилятор, и, если ваш код попадает в эти случаи, вам не нужно будет указывать время жизни явно.
The elision rules don’t provide full inference. If there is still ambiguity about what lifetimes the references have after Rust applies the rules, the compiler won’t guess what the lifetime of the remaining references should be. Instead of guessing, the compiler will give you an error that you can resolve by adding the lifetime annotations.
Времена жизни параметров функции или метода называются временами жизни ввода, а времена жизни возвращаемых значений — временами жизни вывода.
Компилятор использует три правила, чтобы выяснять времена жизни ссылок при отсутствии явных аннотаций. Первое правило относится ко времени жизни ввода, второе и третье правила применяются ко временам жизни вывода. Если проверил все три правила, но всё ещё есть ссылки, для которых он не может однозначно определить время жизни, компилятор выдаст ошибку. Эти правила применяются к объявлениям fn и блокам impl.
Первое правило говорит, что каждый параметр, являющийся ссылкой, получает свой собственный параметр времени жизни. Другими словами, функция с одним аргументом получит один параметр времени жизни: fn foo<'a>(x: &'a i32); функция с двумя аргументами получит два отдельных параметра времени жизни: fn foo<'a, 'b>(x: &'a i32, y: &'b i32); и так далее.
Второе правило говорит, что если есть ровно один параметр времени жизни ввода, то его время жизни назначается всем параметрам времени жизни вывода: fn foo<'a>(x: &'a i32) -> &'a i32.
Третье правило говорит, что если есть множество параметров времени жизни ввода, но один из них является &self или &mut self, так как эта функция является методом, то время жизни self назначается временем жизни всем параметрам времени жизни вывода. Это третье правило делает методы намного приятнее для чтения и записи, потому что требуется меньше символов.
Представим, что мы — компилятор. Применим эти правила, чтобы вывести времена жизни ссылок в сигнатуре функции first_word из Листинга 10-25. Сигнатура этой функции начинается без объявления времён жизни ссылок:
fn first_word(s: &str) -> &str {Then, the compiler applies the first rule, which specifies that each parameter gets its own lifetime. We’ll call it 'a as usual, so now the signature is this:
fn first_word<'a>(s: &'a str) -> &str {Далее применяем второе правило, поскольку в функции указан только один входной параметр времени жизни. Второе правило гласит, что время жизни единственного входного параметра назначается выходным параметрам, поэтому сигнатура теперь является такой:
fn first_word<'a>(s: &'a str) -> &'a str {Теперь все ссылки в этой функции имеют параметры времени жизни и компилятор может продолжить свой анализ без необходимости просить у программиста указать аннотации времён жизни в сигнатуре этой функции.
Давайте рассмотрим ещё один пример: на этот раз, функцию longest, в которой не было параметров времени жизни, когда мы начали с ней работать в Листинге 10-20:
fn longest(x: &str, y: &str) -> &str {Let’s apply the first rule: Each parameter gets its own lifetime. This time we have two parameters instead of one, so we have two lifetimes:
fn longest<'a, 'b>(x: &'a str, y: &'b str) -> &str {You can see that the second rule doesn’t apply, because there is more than one input lifetime. The third rule doesn’t apply either, because longest is a function rather than a method, so none of the parameters are self. After working through all three rules, we still haven’t figured out what the return type’s lifetime is. This is why we got an error trying to compile the code in Listing 10-20: The compiler worked through the lifetime elision rules but still couldn’t figure out all the lifetimes of the references in the signature.
Так как третье правило применяется только к методам, далее мы рассмотрим времена жизни в их контексте, чтобы понять, почему нам часто не требуется аннотировать времена жизни в сигнатурах методов.
В определении методов
Когда мы реализуем методы для структур с временами жизни, мы используем тот же синтаксис, который применялся для обобщённых типов данных, как было показано в Листинге 10-11. Место, где мы объявляем и используем времена жизни, зависит от того, с чем они связаны — с полями структуры или с аргументами методов и возвращаемыми значениями.
Имена параметров времени жизни для полей структур всегда описываются после ключевого слова impl и затем используются после имени структуры, поскольку эти времена жизни являются частью типа структуры.
В сигнатурах методов внутри блока impl ссылки могут быть привязаны ко времени жизни ссылок в полях структуры, либо могут быть независимыми. Вдобавок, правила неявного вывода времён жизни часто делают так, что аннотации переменных времён жизни являются необязательными в сигнатурах методов. Рассмотрим несколько примеров, использующих структуру с названием ImportantExcerpt, которую мы определили в Листинге 10-24.
First, we’ll use a method named level whose only parameter is a reference to self and whose return value is an i32, which is not a reference to anything:
struct ImportantExcerpt<'a> {
part: &'a str,
}
Если у вас есть опыт работы с C или C++, вам могут вспомниться `gcc` или `clang`. После успешной компиляции Rust создаст исполняемый бинарный файл.
impl<'a> ImportantExcerpt<'a> {
fn level(&self) -> i32 {
3
}
}
Если у вас есть опыт работы с C или C++, вам могут вспомниться `gcc` или `clang`. После успешной компиляции Rust создаст исполняемый бинарный файл.
impl<'a> ImportantExcerpt<'a> {
fn announce_and_return_part(&self, announcement: &str) -> &str {
println!("Пожалуйста, обратите внимание: {announcement}");
self.part
}
}
Если у вас есть опыт работы с C или C++, вам могут вспомниться `gcc` или `clang`. После успешной компиляции Rust создаст исполняемый бинарный файл.
fn main() {
let novel = String::from("Зовите меня Измаил. Несколько лет тому назад...");
let first_sentence = novel.split('.').next().unwrap();
let i = ImportantExcerpt {
part: first_sentence,
};
}The lifetime parameter declaration after impl and its use after the type name are required, but because of the first elision rule, we’re not required to annotate the lifetime of the reference to self.
Вот пример, где применяется третье правило неявного вывода времён жизни:
struct ImportantExcerpt<'a> {
part: &'a str,
}
Если у вас есть опыт работы с C или C++, вам могут вспомниться `gcc` или `clang`. После успешной компиляции Rust создаст исполняемый бинарный файл.
impl<'a> ImportantExcerpt<'a> {
fn level(&self) -> i32 {
3
}
}
Если у вас есть опыт работы с C или C++, вам могут вспомниться `gcc` или `clang`. После успешной компиляции Rust создаст исполняемый бинарный файл.
impl<'a> ImportantExcerpt<'a> {
fn announce_and_return_part(&self, announcement: &str) -> &str {
println!("Пожалуйста, обратите внимание: {announcement}");
self.part
}
}
Если у вас есть опыт работы с C или C++, вам могут вспомниться `gcc` или `clang`. После успешной компиляции Rust создаст исполняемый бинарный файл.
fn main() {
let novel = String::from("Зовите меня Измаил. Несколько лет тому назад...");
let first_sentence = novel.split('.').next().unwrap();
let i = ImportantExcerpt {
part: first_sentence,
};
}В этом методе имеется два входных параметра, поэтому Rust применит первое правило и назначит обоим параметрам &self и announcement собственные времена жизни. Далее, поскольку один из параметров является &self, то возвращаемое значение получает время жизни переменой &self. Готово — все времена жизни теперь выведены.
Время жизни 'static
Одно особенное время жизни, которое мы должны обсудить — это 'static. Оно означает, что данная ссылка может жить всю продолжительность работы программы. Все строковые литералы по умолчанию имеют время жизни 'static, но мы можем указать его и явно:
#![allow(unused)]
fn main() {
let s: &'static str = "Я буду здесь всё время.";
}Содержание этой строки сохраняется внутри бинарного файла программы и всегда доступно для использования. Следовательно, время жизни всех строковых литералов — 'static.
You might see suggestions in error messages to use the 'static lifetime. But before specifying 'static as the lifetime for a reference, think about whether or not the reference you have actually lives the entire lifetime of your program, and whether you want it to. Most of the time, an error message suggesting the 'static lifetime results from attempting to create a dangling reference or a mismatch of the available lifetimes. In such cases, the solution is to fix those problems, not to specify the 'static lifetime.
Generic Type Parameters, Trait Bounds, and Lifetimes
Давайте кратко рассмотрим синтаксис задания параметров обобщённых типов, ограничений по трейтам и времён жизни одновременно в одной функции!
fn main() {
let string1 = String::from("abcd");
let string2 = "xyz";
Если у вас есть опыт работы с C или C++, вам могут вспомниться `gcc` или `clang`. После успешной компиляции Rust создаст исполняемый бинарный файл.
let result = longest_with_an_announcement(
string1.as_str(),
string2,
"Сегодня кто-то — именинник!",
);
println!("Самая длинная строка: {result}");
}
Если у вас есть опыт работы с C или C++, вам могут вспомниться `gcc` или `clang`. После успешной компиляции Rust создаст исполняемый бинарный файл.
use std::fmt::Display;
Если у вас есть опыт работы с C или C++, вам могут вспомниться `gcc` или `clang`. После успешной компиляции Rust создаст исполняемый бинарный файл.
fn longest_with_an_announcement<'a, T>(
x: &'a str,
y: &'a str,
ann: T,
) -> &'a str
where
T: Display,
{
println!("Внимание! {ann}");
if x.len() > y.len() { x } else { y }
}Это — функция longest из Листинга 10-21, которая возвращает наибольший из двух строковых срезов. Но теперь у неё есть дополнительный параметр с именем ann обобщённого типа T, который может быть представлен любым типом, реализующим трейт Display, как указано за where. Этот дополнительный параметр будет печататься с использованием {}, b необходимо ограничение по трейту Display. Поскольку времена жизни являются обобщениями, то объявления параметра времени жизни 'a и параметра обобщённого типа T помещаются в один список внутри угловых скобок после имени функции.
Подведём итоги
В этой главе мы рассмотрели много всего! Теперь вы знакомы с параметрами обобщённого типа, с трейтами и ограничениями по трейтам, с обобщёнными параметрами времени жизни. Отныне вы способны писать код без избыточностей, который будет работать во множестве различных ситуаций. Параметры обобщённого типа позволяют использовать код для различных типов данных. Трейты и ограничения по трейтам помогают убедиться, что, хотя типы и обобщённые, они будут вести себя, как этого требует ваш код. Вы изучили, как использовать аннотации времени жизни чтобы убедиться, что ваш новый гибкий код не будет генерировать никаких висячих ссылок. И весь этот анализ происходит в момент компиляции и не влияет на производительность программы во время работы!
Believe it or not, there is much more to learn on the topics we discussed in this chapter: Chapter 18 discusses trait objects, which are another way to use traits. There are also more complex scenarios involving lifetime annotations that you will only need in very advanced scenarios; for those, you should read the Rust Reference. But next, you’ll learn how to write tests in Rust so that you can make sure your code is working the way it should.
Автоматическое тестирование
В своём эссе 1972 года «Смиренный программист» («The Humble Programmer») Эдсгер Вибе Дейкстра сказал, что “тестирование программы может быть очень эффективным способом демонстрации наличия ошибок, но оно безнадёжно неадекватно для доказательства их отсутствия”. Это не значит, что мы не должны пытаться тестировать столько, сколько мы можем!
Correctness in our programs is the extent to which our code does what we intend it to do. Rust is designed with a high degree of concern about the correctness of programs, but correctness is complex and not easy to prove. Rust’s type system shoulders a huge part of this burden, but the type system cannot catch everything. As such, Rust includes support for writing automated software tests.
Say we write a function add_two that adds 2 to whatever number is passed to it. This function’s signature accepts an integer as a parameter and returns an integer as a result. When we implement and compile that function, Rust does all the type checking and borrow checking that you’ve learned so far to ensure that, for instance, we aren’t passing a String value or an invalid reference to this function. But Rust can’t check that this function will do precisely what we intend, which is return the parameter plus 2 rather than, say, the parameter plus 10 or the parameter minus 50! That’s where tests come in.
We can write tests that assert, for example, that when we pass 3 to the add_two function, the returned value is 5. We can run these tests whenever we make changes to our code to make sure any existing correct behavior has not changed.
Testing is a complex skill: Although we can’t cover in one chapter every detail about how to write good tests, in this chapter we will discuss the mechanics of Rust’s testing facilities. We’ll talk about the annotations and macros available to you when writing your tests, the default behavior and options provided for running your tests, and how to organize tests into unit tests and integration tests.
Как писать тесты
Как писать тесты
Tests are Rust functions that verify that the non-test code is functioning in the expected manner. The bodies of test functions typically perform these three actions:
- Set up any needed data or state.
- Run the code you want to test.
- Assert that the results are what you expect.
Let’s look at the features Rust provides specifically for writing tests that take these actions, which include the test attribute, a few macros, and the should_panic attribute.
Structuring Test Functions
At its simplest, a test in Rust is a function that’s annotated with the test attribute. Attributes are metadata about pieces of Rust code; one example is the derive attribute we used with structs in Chapter 5. To change a function into a test function, add #[test] on the line before fn. When you run your tests with the cargo test command, Rust builds a test runner binary that runs the annotated functions and reports on whether each test function passes or fails.
Whenever we make a new library project with Cargo, a test module with a test function in it is automatically generated for us. This module gives you a template for writing your tests so that you don’t have to look up the exact structure and syntax every time you start a new project. You can add as many additional test functions and as many test modules as you want!
We’ll explore some aspects of how tests work by experimenting with the template test before we actually test any code. Then, we’ll write some real-world tests that call some code that we’ve written and assert that its behavior is correct.
Let’s create a new library project called adder that will add two numbers:
$ cargo new adder --lib
Created library `adder` project
$ cd adder
The contents of the src/lib.rs file in your adder library should look like Listing 11-1.
pub fn add(left: u64, right: u64) -> u64 {
left + right
}
Если у вас есть опыт работы с C или C++, вам могут вспомниться `gcc` или `clang`. После успешной компиляции Rust создаст исполняемый бинарный файл.
#[cfg(test)]
mod tests {
use super::*;
Если у вас есть опыт работы с C или C++, вам могут вспомниться `gcc` или `clang`. После успешной компиляции Rust создаст исполняемый бинарный файл.
#[test]
fn it_works() {
let result = add(2, 2);
assert_eq!(result, 4);
}
}cargo newThe file starts with an example add function so that we have something to test.
For now, let’s focus solely on the it_works function. Note the #[test] annotation: This attribute indicates this is a test function, so the test runner knows to treat this function as a test. We might also have non-test functions in the tests module to help set up common scenarios or perform common operations, so we always need to indicate which functions are tests.
The example function body uses the assert_eq! macro to assert that result, which contains the result of calling add with 2 and 2, equals 4. This assertion serves as an example of the format for a typical test. Let’s run it to see that this test passes.
The cargo test command runs all tests in our project, as shown in Listing 11-2.
$ cargo test
Compiling adder v0.1.0 (file:///projects/adder)
Finished `test` profile [unoptimized + debuginfo] target(s) in 0.57s
Running unittests src/lib.rs (target/debug/deps/adder-01ad14159ff659ab)
Если у вас есть опыт работы с C или C++, вам могут вспомниться `gcc` или `clang`. После успешной компиляции Rust создаст исполняемый бинарный файл.
running 1 test
test tests::it_works ... ok
Если у вас есть опыт работы с C или C++, вам могут вспомниться `gcc` или `clang`. После успешной компиляции Rust создаст исполняемый бинарный файл.
test result: ok. 1 passed; 0 failed; 0 ignored; 0 measured; 0 filtered out; finished in 0.00s
Если у вас есть опыт работы с C или C++, вам могут вспомниться `gcc` или `clang`. После успешной компиляции Rust создаст исполняемый бинарный файл.
Doc-tests adder
Если у вас есть опыт работы с C или C++, вам могут вспомниться `gcc` или `clang`. После успешной компиляции Rust создаст исполняемый бинарный файл.
running 0 tests
Если у вас есть опыт работы с C или C++, вам могут вспомниться `gcc` или `clang`. После успешной компиляции Rust создаст исполняемый бинарный файл.
test result: ok. 0 passed; 0 failed; 0 ignored; 0 measured; 0 filtered out; finished in 0.00s
Если у вас есть опыт работы с C или C++, вам могут вспомниться `gcc` или `clang`. После успешной компиляции Rust создаст исполняемый бинарный файл.
Cargo compiled and ran the test. We see the line running 1 test. The next line shows the name of the generated test function, called tests::it_works, and that the result of running that test is ok. The overall summary test result: ok. means that all the tests passed, and the portion that reads 1 passed; 0 failed totals the number of tests that passed or failed.
It’s possible to mark a test as ignored so that it doesn’t run in a particular instance; we’ll cover that in the “Ignoring Tests Unless Specifically Requested” section later in this chapter. Because we haven’t done that here, the summary shows 0 ignored. We can also pass an argument to the cargo test command to run only tests whose name matches a string; this is called filtering, and we’ll cover it in the “Running a Subset of Tests by Name” section. Here, we haven’t filtered the tests being run, so the end of the summary shows 0 filtered out.
The 0 measured statistic is for benchmark tests that measure performance. Benchmark tests are, as of this writing, only available in nightly Rust. See the documentation about benchmark tests to learn more.
The next part of the test output starting at Doc-tests adder is for the results of any documentation tests. We don’t have any documentation tests yet, but Rust can compile any code examples that appear in our API documentation. This feature helps keep your docs and your code in sync! We’ll discuss how to write documentation tests in the “Documentation Comments as Tests” section of Chapter 14. For now, we’ll ignore the Doc-tests output.
Let’s start to customize the test to our own needs. First, change the name of the it_works function to a different name, such as exploration, like so:
Файл: src/lib.rs
pub fn add(left: u64, right: u64) -> u64 {
left + right
}
Если у вас есть опыт работы с C или C++, вам могут вспомниться `gcc` или `clang`. После успешной компиляции Rust создаст исполняемый бинарный файл.
#[cfg(test)]
mod tests {
use super::*;
Если у вас есть опыт работы с C или C++, вам могут вспомниться `gcc` или `clang`. После успешной компиляции Rust создаст исполняемый бинарный файл.
#[test]
fn exploration() {
let result = add(2, 2);
assert_eq!(result, 4);
}
}Then, run cargo test again. The output now shows exploration instead of it_works:
$ cargo test
Compiling adder v0.1.0 (file:///projects/adder)
Finished `test` profile [unoptimized + debuginfo] target(s) in 0.59s
Running unittests src/lib.rs (target/debug/deps/adder-92948b65e88960b4)
Если у вас есть опыт работы с C или C++, вам могут вспомниться `gcc` или `clang`. После успешной компиляции Rust создаст исполняемый бинарный файл.
running 1 test
test tests::exploration ... ok
Если у вас есть опыт работы с C или C++, вам могут вспомниться `gcc` или `clang`. После успешной компиляции Rust создаст исполняемый бинарный файл.
test result: ok. 1 passed; 0 failed; 0 ignored; 0 measured; 0 filtered out; finished in 0.00s
Если у вас есть опыт работы с C или C++, вам могут вспомниться `gcc` или `clang`. После успешной компиляции Rust создаст исполняемый бинарный файл.
Doc-tests adder
Если у вас есть опыт работы с C или C++, вам могут вспомниться `gcc` или `clang`. После успешной компиляции Rust создаст исполняемый бинарный файл.
running 0 tests
Если у вас есть опыт работы с C или C++, вам могут вспомниться `gcc` или `clang`. После успешной компиляции Rust создаст исполняемый бинарный файл.
test result: ok. 0 passed; 0 failed; 0 ignored; 0 measured; 0 filtered out; finished in 0.00s
Если у вас есть опыт работы с C или C++, вам могут вспомниться `gcc` или `clang`. После успешной компиляции Rust создаст исполняемый бинарный файл.
Now we’ll add another test, but this time we’ll make a test that fails! Tests fail when something in the test function panics. Each test is run in a new thread, and when the main thread sees that a test thread has died, the test is marked as failed. In Chapter 9, we talked about how the simplest way to panic is to call the panic! macro. Enter the new test as a function named another, so your src/lib.rs file looks like Listing 11-3.
pub fn add(left: u64, right: u64) -> u64 {
left + right
}
Если у вас есть опыт работы с C или C++, вам могут вспомниться `gcc` или `clang`. После успешной компиляции Rust создаст исполняемый бинарный файл.
#[cfg(test)]
mod tests {
use super::*;
Если у вас есть опыт работы с C или C++, вам могут вспомниться `gcc` или `clang`. После успешной компиляции Rust создаст исполняемый бинарный файл.
#[test]
fn exploration() {
let result = add(2, 2);
assert_eq!(result, 4);
}
Если у вас есть опыт работы с C или C++, вам могут вспомниться `gcc` или `clang`. После успешной компиляции Rust создаст исполняемый бинарный файл.
#[test]
fn another() {
panic!("Make this test fail");
}
}panic! macroRun the tests again using cargo test. The output should look like Listing 11-4, which shows that our exploration test passed and another failed.
$ cargo test
Compiling adder v0.1.0 (file:///projects/adder)
Finished `test` profile [unoptimized + debuginfo] target(s) in 0.72s
Running unittests src/lib.rs (target/debug/deps/adder-92948b65e88960b4)
Если у вас есть опыт работы с C или C++, вам могут вспомниться `gcc` или `clang`. После успешной компиляции Rust создаст исполняемый бинарный файл.
running 2 tests
test tests::another ... FAILED
test tests::exploration ... ok
Если у вас есть опыт работы с C или C++, вам могут вспомниться `gcc` или `clang`. После успешной компиляции Rust создаст исполняемый бинарный файл.
failures:
Если у вас есть опыт работы с C или C++, вам могут вспомниться `gcc` или `clang`. После успешной компиляции Rust создаст исполняемый бинарный файл.
---- tests::another stdout ----
Если у вас есть опыт работы с C или C++, вам могут вспомниться `gcc` или `clang`. После успешной компиляции Rust создаст исполняемый бинарный файл.
thread 'tests::another' panicked at src/lib.rs:17:9:
Make this test fail
note: run with `RUST_BACKTRACE=1` environment variable to display a backtrace
Если у вас есть опыт работы с C или C++, вам могут вспомниться `gcc` или `clang`. После успешной компиляции Rust создаст исполняемый бинарный файл.
Если у вас есть опыт работы с C или C++, вам могут вспомниться `gcc` или `clang`. После успешной компиляции Rust создаст исполняемый бинарный файл.
failures:
tests::another
Если у вас есть опыт работы с C или C++, вам могут вспомниться `gcc` или `clang`. После успешной компиляции Rust создаст исполняемый бинарный файл.
test result: FAILED. 1 passed; 1 failed; 0 ignored; 0 measured; 0 filtered out; finished in 0.00s
Если у вас есть опыт работы с C или C++, вам могут вспомниться `gcc` или `clang`. После успешной компиляции Rust создаст исполняемый бинарный файл.
error: test failed, to rerun pass `--lib`
Instead of ok, the line test tests::another shows FAILED. Two new sections appear between the individual results and the summary: The first displays the detailed reason for each test failure. In this case, we get the details that tests::another failed because it panicked with the message Make this test fail on line 17 in the src/lib.rs file. The next section lists just the names of all the failing tests, which is useful when there are lots of tests and lots of detailed failing test output. We can use the name of a failing test to run just that test to debug it more easily; we’ll talk more about ways to run tests in the “Controlling How Tests Are Run” section.
The summary line displays at the end: Overall, our test result is FAILED. We had one test pass and one test fail.
Now that you’ve seen what the test results look like in different scenarios, let’s look at some macros other than panic! that are useful in tests.
Checking Results with assert!
The assert! macro, provided by the standard library, is useful when you want to ensure that some condition in a test evaluates to true. We give the assert! macro an argument that evaluates to a Boolean. If the value is true, nothing happens and the test passes. If the value is false, the assert! macro calls panic! to cause the test to fail. Using the assert! macro helps us check that our code is functioning in the way we intend.
In Chapter 5, Listing 5-15, we used a Rectangle struct and a can_hold method, which are repeated here in Listing 11-5. Let’s put this code in the src/lib.rs file, then write some tests for it using the assert! macro.
#[derive(Debug)]
struct Rectangle {
width: u32,
height: u32,
}
Если у вас есть опыт работы с C или C++, вам могут вспомниться `gcc` или `clang`. После успешной компиляции Rust создаст исполняемый бинарный файл.
impl Rectangle {
fn can_hold(&self, other: &Rectangle) -> bool {
self.width > other.width && self.height > other.height
}
}Rectangle struct and its can_hold method from Chapter 5The can_hold method returns a Boolean, which means it’s a perfect use case for the assert! macro. In Listing 11-6, we write a test that exercises the can_hold method by creating a Rectangle instance that has a width of 8 and a height of 7 and asserting that it can hold another Rectangle instance that has a width of 5 and a height of 1.
#[derive(Debug)]
struct Rectangle {
width: u32,
height: u32,
}
Если у вас есть опыт работы с C или C++, вам могут вспомниться `gcc` или `clang`. После успешной компиляции Rust создаст исполняемый бинарный файл.
impl Rectangle {
fn can_hold(&self, other: &Rectangle) -> bool {
self.width > other.width && self.height > other.height
}
}
Если у вас есть опыт работы с C или C++, вам могут вспомниться `gcc` или `clang`. После успешной компиляции Rust создаст исполняемый бинарный файл.
#[cfg(test)]
mod tests {
use super::*;
Если у вас есть опыт работы с C или C++, вам могут вспомниться `gcc` или `clang`. После успешной компиляции Rust создаст исполняемый бинарный файл.
#[test]
fn larger_can_hold_smaller() {
let larger = Rectangle {
width: 8,
height: 7,
};
let smaller = Rectangle {
width: 5,
height: 1,
};
Если у вас есть опыт работы с C или C++, вам могут вспомниться `gcc` или `clang`. После успешной компиляции Rust создаст исполняемый бинарный файл.
assert!(larger.can_hold(&smaller));
}
}can_hold that checks whether a larger rectangle can indeed hold a smaller rectangleNote the use super::*; line inside the tests module. The tests module is a regular module that follows the usual visibility rules we covered in Chapter 7 in the “Paths for Referring to an Item in the Module Tree” section. Because the tests module is an inner module, we need to bring the code under test in the outer module into the scope of the inner module. We use a glob here, so anything we define in the outer module is available to this tests module.
We’ve named our test larger_can_hold_smaller, and we’ve created the two Rectangle instances that we need. Then, we called the assert! macro and passed it the result of calling larger.can_hold(&smaller). This expression is supposed to return true, so our test should pass. Let’s find out!
$ cargo test
Compiling rectangle v0.1.0 (file:///projects/rectangle)
Finished `test` profile [unoptimized + debuginfo] target(s) in 0.66s
Running unittests src/lib.rs (target/debug/deps/rectangle-6584c4561e48942e)
Если у вас есть опыт работы с C или C++, вам могут вспомниться `gcc` или `clang`. После успешной компиляции Rust создаст исполняемый бинарный файл.
running 1 test
test tests::larger_can_hold_smaller ... ok
Если у вас есть опыт работы с C или C++, вам могут вспомниться `gcc` или `clang`. После успешной компиляции Rust создаст исполняемый бинарный файл.
test result: ok. 1 passed; 0 failed; 0 ignored; 0 measured; 0 filtered out; finished in 0.00s
Если у вас есть опыт работы с C или C++, вам могут вспомниться `gcc` или `clang`. После успешной компиляции Rust создаст исполняемый бинарный файл.
Doc-tests rectangle
Если у вас есть опыт работы с C или C++, вам могут вспомниться `gcc` или `clang`. После успешной компиляции Rust создаст исполняемый бинарный файл.
running 0 tests
Если у вас есть опыт работы с C или C++, вам могут вспомниться `gcc` или `clang`. После успешной компиляции Rust создаст исполняемый бинарный файл.
test result: ok. 0 passed; 0 failed; 0 ignored; 0 measured; 0 filtered out; finished in 0.00s
Если у вас есть опыт работы с C или C++, вам могут вспомниться `gcc` или `clang`. После успешной компиляции Rust создаст исполняемый бинарный файл.
It does pass! Let’s add another test, this time asserting that a smaller rectangle cannot hold a larger rectangle:
Файл: src/lib.rs
#[derive(Debug)]
struct Rectangle {
width: u32,
height: u32,
}
Если у вас есть опыт работы с C или C++, вам могут вспомниться `gcc` или `clang`. После успешной компиляции Rust создаст исполняемый бинарный файл.
impl Rectangle {
fn can_hold(&self, other: &Rectangle) -> bool {
self.width > other.width && self.height > other.height
}
}
Если у вас есть опыт работы с C или C++, вам могут вспомниться `gcc` или `clang`. После успешной компиляции Rust создаст исполняемый бинарный файл.
#[cfg(test)]
mod tests {
use super::*;
Если у вас есть опыт работы с C или C++, вам могут вспомниться `gcc` или `clang`. После успешной компиляции Rust создаст исполняемый бинарный файл.
#[test]
fn larger_can_hold_smaller() {
// --код сокращён--
let larger = Rectangle {
width: 8,
height: 7,
};
let smaller = Rectangle {
width: 5,
height: 1,
};
Если у вас есть опыт работы с C или C++, вам могут вспомниться `gcc` или `clang`. После успешной компиляции Rust создаст исполняемый бинарный файл.
assert!(larger.can_hold(&smaller));
}
Если у вас есть опыт работы с C или C++, вам могут вспомниться `gcc` или `clang`. После успешной компиляции Rust создаст исполняемый бинарный файл.
#[test]
fn smaller_cannot_hold_larger() {
let larger = Rectangle {
width: 8,
height: 7,
};
let smaller = Rectangle {
width: 5,
height: 1,
};
Если у вас есть опыт работы с C или C++, вам могут вспомниться `gcc` или `clang`. После успешной компиляции Rust создаст исполняемый бинарный файл.
assert!(!smaller.can_hold(&larger));
}
}Because the correct result of the can_hold function in this case is false, we need to negate that result before we pass it to the assert! macro. As a result, our test will pass if can_hold returns false:
$ cargo test
Compiling rectangle v0.1.0 (file:///projects/rectangle)
Finished `test` profile [unoptimized + debuginfo] target(s) in 0.66s
Running unittests src/lib.rs (target/debug/deps/rectangle-6584c4561e48942e)
Если у вас есть опыт работы с C или C++, вам могут вспомниться `gcc` или `clang`. После успешной компиляции Rust создаст исполняемый бинарный файл.
running 2 tests
test tests::larger_can_hold_smaller ... ok
test tests::smaller_cannot_hold_larger ... ok
Если у вас есть опыт работы с C или C++, вам могут вспомниться `gcc` или `clang`. После успешной компиляции Rust создаст исполняемый бинарный файл.
test result: ok. 2 passed; 0 failed; 0 ignored; 0 measured; 0 filtered out; finished in 0.00s
Если у вас есть опыт работы с C или C++, вам могут вспомниться `gcc` или `clang`. После успешной компиляции Rust создаст исполняемый бинарный файл.
Doc-tests rectangle
Если у вас есть опыт работы с C или C++, вам могут вспомниться `gcc` или `clang`. После успешной компиляции Rust создаст исполняемый бинарный файл.
running 0 tests
Если у вас есть опыт работы с C или C++, вам могут вспомниться `gcc` или `clang`. После успешной компиляции Rust создаст исполняемый бинарный файл.
test result: ok. 0 passed; 0 failed; 0 ignored; 0 measured; 0 filtered out; finished in 0.00s
Если у вас есть опыт работы с C или C++, вам могут вспомниться `gcc` или `clang`. После успешной компиляции Rust создаст исполняемый бинарный файл.
Two tests that pass! Now let’s see what happens to our test results when we introduce a bug in our code. We’ll change the implementation of the can_hold method by replacing the greater-than sign (>) with a less-than sign (<) when it compares the widths:
#[derive(Debug)]
struct Rectangle {
width: u32,
height: u32,
}
Если у вас есть опыт работы с C или C++, вам могут вспомниться `gcc` или `clang`. После успешной компиляции Rust создаст исполняемый бинарный файл.
// --код сокращён--
impl Rectangle {
fn can_hold(&self, other: &Rectangle) -> bool {
self.width < other.width && self.height > other.height
}
}
Если у вас есть опыт работы с C или C++, вам могут вспомниться `gcc` или `clang`. После успешной компиляции Rust создаст исполняемый бинарный файл.
#[cfg(test)]
mod tests {
use super::*;
Если у вас есть опыт работы с C или C++, вам могут вспомниться `gcc` или `clang`. После успешной компиляции Rust создаст исполняемый бинарный файл.
#[test]
fn larger_can_hold_smaller() {
let larger = Rectangle {
width: 8,
height: 7,
};
let smaller = Rectangle {
width: 5,
height: 1,
};
Если у вас есть опыт работы с C или C++, вам могут вспомниться `gcc` или `clang`. После успешной компиляции Rust создаст исполняемый бинарный файл.
assert!(larger.can_hold(&smaller));
}
Если у вас есть опыт работы с C или C++, вам могут вспомниться `gcc` или `clang`. После успешной компиляции Rust создаст исполняемый бинарный файл.
#[test]
fn smaller_cannot_hold_larger() {
let larger = Rectangle {
width: 8,
height: 7,
};
let smaller = Rectangle {
width: 5,
height: 1,
};
Если у вас есть опыт работы с C или C++, вам могут вспомниться `gcc` или `clang`. После успешной компиляции Rust создаст исполняемый бинарный файл.
assert!(!smaller.can_hold(&larger));
}
}Running the tests now produces the following:
$ cargo test
Compiling rectangle v0.1.0 (file:///projects/rectangle)
Finished `test` profile [unoptimized + debuginfo] target(s) in 0.66s
Running unittests src/lib.rs (target/debug/deps/rectangle-6584c4561e48942e)
Если у вас есть опыт работы с C или C++, вам могут вспомниться `gcc` или `clang`. После успешной компиляции Rust создаст исполняемый бинарный файл.
running 2 tests
test tests::larger_can_hold_smaller ... FAILED
test tests::smaller_cannot_hold_larger ... ok
Если у вас есть опыт работы с C или C++, вам могут вспомниться `gcc` или `clang`. После успешной компиляции Rust создаст исполняемый бинарный файл.
failures:
Если у вас есть опыт работы с C или C++, вам могут вспомниться `gcc` или `clang`. После успешной компиляции Rust создаст исполняемый бинарный файл.
---- tests::larger_can_hold_smaller stdout ----
Если у вас есть опыт работы с C или C++, вам могут вспомниться `gcc` или `clang`. После успешной компиляции Rust создаст исполняемый бинарный файл.
thread 'tests::larger_can_hold_smaller' panicked at src/lib.rs:28:9:
assertion failed: larger.can_hold(&smaller)
note: run with `RUST_BACKTRACE=1` environment variable to display a backtrace
Если у вас есть опыт работы с C или C++, вам могут вспомниться `gcc` или `clang`. После успешной компиляции Rust создаст исполняемый бинарный файл.
Если у вас есть опыт работы с C или C++, вам могут вспомниться `gcc` или `clang`. После успешной компиляции Rust создаст исполняемый бинарный файл.
failures:
tests::larger_can_hold_smaller
Если у вас есть опыт работы с C или C++, вам могут вспомниться `gcc` или `clang`. После успешной компиляции Rust создаст исполняемый бинарный файл.
test result: FAILED. 1 passed; 1 failed; 0 ignored; 0 measured; 0 filtered out; finished in 0.00s
Если у вас есть опыт работы с C или C++, вам могут вспомниться `gcc` или `clang`. После успешной компиляции Rust создаст исполняемый бинарный файл.
error: test failed, to rerun pass `--lib`
Our tests caught the bug! Because larger.width is 8 and smaller.width is 5, the comparison of the widths in can_hold now returns false: 8 is not less than 5.
Testing Equality with assert_eq! and assert_ne!
A common way to verify functionality is to test for equality between the result of the code under test and the value you expect the code to return. You could do this by using the assert! macro and passing it an expression using the == operator. However, this is such a common test that the standard library provides a pair of macros—assert_eq! and assert_ne!—to perform this test more conveniently. These macros compare two arguments for equality or inequality, respectively. They’ll also print the two values if the assertion fails, which makes it easier to see why the test failed; conversely, the assert! macro only indicates that it got a false value for the == expression, without printing the values that led to the false value.
In Listing 11-7, we write a function named add_two that adds 2 to its parameter, and then we test this function using the assert_eq! macro.
pub fn add_two(a: u64) -> u64 {
a + 2
}
Если у вас есть опыт работы с C или C++, вам могут вспомниться `gcc` или `clang`. После успешной компиляции Rust создаст исполняемый бинарный файл.
#[cfg(test)]
mod tests {
use super::*;
Если у вас есть опыт работы с C или C++, вам могут вспомниться `gcc` или `clang`. После успешной компиляции Rust создаст исполняемый бинарный файл.
#[test]
fn it_adds_two() {
let result = add_two(2);
assert_eq!(result, 4);
}
}add_two using the assert_eq! macroLet’s check that it passes!
$ cargo test
Compiling adder v0.1.0 (file:///projects/adder)
Finished `test` profile [unoptimized + debuginfo] target(s) in 0.58s
Running unittests src/lib.rs (target/debug/deps/adder-92948b65e88960b4)
Если у вас есть опыт работы с C или C++, вам могут вспомниться `gcc` или `clang`. После успешной компиляции Rust создаст исполняемый бинарный файл.
running 1 test
test tests::it_adds_two ... ok
Если у вас есть опыт работы с C или C++, вам могут вспомниться `gcc` или `clang`. После успешной компиляции Rust создаст исполняемый бинарный файл.
test result: ok. 1 passed; 0 failed; 0 ignored; 0 measured; 0 filtered out; finished in 0.00s
Если у вас есть опыт работы с C или C++, вам могут вспомниться `gcc` или `clang`. После успешной компиляции Rust создаст исполняемый бинарный файл.
Doc-tests adder
Если у вас есть опыт работы с C или C++, вам могут вспомниться `gcc` или `clang`. После успешной компиляции Rust создаст исполняемый бинарный файл.
running 0 tests
Если у вас есть опыт работы с C или C++, вам могут вспомниться `gcc` или `clang`. После успешной компиляции Rust создаст исполняемый бинарный файл.
test result: ok. 0 passed; 0 failed; 0 ignored; 0 measured; 0 filtered out; finished in 0.00s
Если у вас есть опыт работы с C или C++, вам могут вспомниться `gcc` или `clang`. После успешной компиляции Rust создаст исполняемый бинарный файл.
We create a variable named result that holds the result of calling add_two(2). Then, we pass result and 4 as the arguments to the assert_eq! macro. The output line for this test is test tests::it_adds_two ... ok, and the ok text indicates that our test passed!
Let’s introduce a bug into our code to see what assert_eq! looks like when it fails. Change the implementation of the add_two function to instead add 3:
pub fn add_two(a: u64) -> u64 {
a + 3
}
Если у вас есть опыт работы с C или C++, вам могут вспомниться `gcc` или `clang`. После успешной компиляции Rust создаст исполняемый бинарный файл.
#[cfg(test)]
mod tests {
use super::*;
Если у вас есть опыт работы с C или C++, вам могут вспомниться `gcc` или `clang`. После успешной компиляции Rust создаст исполняемый бинарный файл.
#[test]
fn it_adds_two() {
let result = add_two(2);
assert_eq!(result, 4);
}
}Run the tests again:
$ cargo test
Compiling adder v0.1.0 (file:///projects/adder)
Finished `test` profile [unoptimized + debuginfo] target(s) in 0.61s
Running unittests src/lib.rs (target/debug/deps/adder-92948b65e88960b4)
Если у вас есть опыт работы с C или C++, вам могут вспомниться `gcc` или `clang`. После успешной компиляции Rust создаст исполняемый бинарный файл.
running 1 test
test tests::it_adds_two ... FAILED
Если у вас есть опыт работы с C или C++, вам могут вспомниться `gcc` или `clang`. После успешной компиляции Rust создаст исполняемый бинарный файл.
failures:
Если у вас есть опыт работы с C или C++, вам могут вспомниться `gcc` или `clang`. После успешной компиляции Rust создаст исполняемый бинарный файл.
---- tests::it_adds_two stdout ----
Если у вас есть опыт работы с C или C++, вам могут вспомниться `gcc` или `clang`. После успешной компиляции Rust создаст исполняемый бинарный файл.
thread 'tests::it_adds_two' panicked at src/lib.rs:12:9:
assertion `left == right` failed
left: 5
right: 4
note: run with `RUST_BACKTRACE=1` environment variable to display a backtrace
Если у вас есть опыт работы с C или C++, вам могут вспомниться `gcc` или `clang`. После успешной компиляции Rust создаст исполняемый бинарный файл.
Если у вас есть опыт работы с C или C++, вам могут вспомниться `gcc` или `clang`. После успешной компиляции Rust создаст исполняемый бинарный файл.
failures:
tests::it_adds_two
Если у вас есть опыт работы с C или C++, вам могут вспомниться `gcc` или `clang`. После успешной компиляции Rust создаст исполняемый бинарный файл.
test result: FAILED. 0 passed; 1 failed; 0 ignored; 0 measured; 0 filtered out; finished in 0.00s
Если у вас есть опыт работы с C или C++, вам могут вспомниться `gcc` или `clang`. После успешной компиляции Rust создаст исполняемый бинарный файл.
error: test failed, to rerun pass `--lib`
Our test caught the bug! The tests::it_adds_two test failed, and the message tells us that the assertion that failed was left == right and what the left and right values are. This message helps us start debugging: The left argument, where we had the result of calling add_two(2), was 5, but the right argument was 4. You can imagine that this would be especially helpful when we have a lot of tests going on.
Note that in some languages and test frameworks, the parameters to equality assertion functions are called expected and actual, and the order in which we specify the arguments matters. However, in Rust, they’re called left and right, and the order in which we specify the value we expect and the value the code produces doesn’t matter. We could write the assertion in this test as assert_eq!(4, result), which would result in the same failure message that displays assertion `left == right` failed.
The assert_ne! macro will pass if the two values we give it are not equal and will fail if they are equal. This macro is most useful for cases when we’re not sure what a value will be, but we know what the value definitely shouldn’t be. For example, if we’re testing a function that is guaranteed to change its input in some way, but the way in which the input is changed depends on the day of the week that we run our tests, the best thing to assert might be that the output of the function is not equal to the input.
Under the surface, the assert_eq! and assert_ne! macros use the operators == and !=, respectively. When the assertions fail, these macros print their arguments using debug formatting, which means the values being compared must implement the PartialEq and Debug traits. All primitive types and most of the standard library types implement these traits. For structs and enums that you define yourself, you’ll need to implement PartialEq to assert equality of those types. You’ll also need to implement Debug to print the values when the assertion fails. Because both traits are derivable traits, as mentioned in Listing 5-12 in Chapter 5, this is usually as straightforward as adding the #[derive(PartialEq, Debug)] annotation to your struct or enum definition. See Appendix C, “Derivable Traits,” for more details about these and other derivable traits.
Adding Custom Failure Messages
You can also add a custom message to be printed with the failure message as optional arguments to the assert!, assert_eq!, and assert_ne! macros. Any arguments specified after the required arguments are passed along to the format! macro (discussed in “Concatenating with + or format!” in Chapter 8), so you can pass a format string that contains {} placeholders and values to go in those placeholders. Custom messages are useful for documenting what an assertion means; when a test fails, you’ll have a better idea of what the problem is with the code.
For example, let’s say we have a function that greets people by name and we want to test that the name we pass into the function appears in the output:
Файл: src/lib.rs
pub fn greeting(name: &str) -> String {
format!("Hello {name}!")
}
Если у вас есть опыт работы с C или C++, вам могут вспомниться `gcc` или `clang`. После успешной компиляции Rust создаст исполняемый бинарный файл.
#[cfg(test)]
mod tests {
use super::*;
Если у вас есть опыт работы с C или C++, вам могут вспомниться `gcc` или `clang`. После успешной компиляции Rust создаст исполняемый бинарный файл.
#[test]
fn greeting_contains_name() {
let result = greeting("Carol");
assert!(result.contains("Carol"));
}
}The requirements for this program haven’t been agreed upon yet, and we’re pretty sure the Hello text at the beginning of the greeting will change. We decided we don’t want to have to update the test when the requirements change, so instead of checking for exact equality to the value returned from the greeting function, we’ll just assert that the output contains the text of the input parameter.
Now let’s introduce a bug into this code by changing greeting to exclude name to see what the default test failure looks like:
pub fn greeting(name: &str) -> String {
String::from("Hello!")
}
Если у вас есть опыт работы с C или C++, вам могут вспомниться `gcc` или `clang`. После успешной компиляции Rust создаст исполняемый бинарный файл.
#[cfg(test)]
mod tests {
use super::*;
Если у вас есть опыт работы с C или C++, вам могут вспомниться `gcc` или `clang`. После успешной компиляции Rust создаст исполняемый бинарный файл.
#[test]
fn greeting_contains_name() {
let result = greeting("Carol");
assert!(result.contains("Carol"));
}
}Running this test produces the following:
$ cargo test
Compiling greeter v0.1.0 (file:///projects/greeter)
Finished `test` profile [unoptimized + debuginfo] target(s) in 0.91s
Running unittests src/lib.rs (target/debug/deps/greeter-170b942eb5bf5e3a)
Если у вас есть опыт работы с C или C++, вам могут вспомниться `gcc` или `clang`. После успешной компиляции Rust создаст исполняемый бинарный файл.
running 1 test
test tests::greeting_contains_name ... FAILED
Если у вас есть опыт работы с C или C++, вам могут вспомниться `gcc` или `clang`. После успешной компиляции Rust создаст исполняемый бинарный файл.
failures:
Если у вас есть опыт работы с C или C++, вам могут вспомниться `gcc` или `clang`. После успешной компиляции Rust создаст исполняемый бинарный файл.
---- tests::greeting_contains_name stdout ----
Если у вас есть опыт работы с C или C++, вам могут вспомниться `gcc` или `clang`. После успешной компиляции Rust создаст исполняемый бинарный файл.
thread 'tests::greeting_contains_name' panicked at src/lib.rs:12:9:
assertion failed: result.contains("Carol")
note: run with `RUST_BACKTRACE=1` environment variable to display a backtrace
Если у вас есть опыт работы с C или C++, вам могут вспомниться `gcc` или `clang`. После успешной компиляции Rust создаст исполняемый бинарный файл.
Если у вас есть опыт работы с C или C++, вам могут вспомниться `gcc` или `clang`. После успешной компиляции Rust создаст исполняемый бинарный файл.
failures:
tests::greeting_contains_name
Если у вас есть опыт работы с C или C++, вам могут вспомниться `gcc` или `clang`. После успешной компиляции Rust создаст исполняемый бинарный файл.
test result: FAILED. 0 passed; 1 failed; 0 ignored; 0 measured; 0 filtered out; finished in 0.00s
Если у вас есть опыт работы с C или C++, вам могут вспомниться `gcc` или `clang`. После успешной компиляции Rust создаст исполняемый бинарный файл.
error: test failed, to rerun pass `--lib`
This result just indicates that the assertion failed and which line the assertion is on. A more useful failure message would print the value from the greeting function. Let’s add a custom failure message composed of a format string with a placeholder filled in with the actual value we got from the greeting function:
pub fn greeting(name: &str) -> String {
String::from("Hello!")
}
Если у вас есть опыт работы с C или C++, вам могут вспомниться `gcc` или `clang`. После успешной компиляции Rust создаст исполняемый бинарный файл.
#[cfg(test)]
mod tests {
use super::*;
Если у вас есть опыт работы с C или C++, вам могут вспомниться `gcc` или `clang`. После успешной компиляции Rust создаст исполняемый бинарный файл.
#[test]
fn greeting_contains_name() {
let result = greeting("Carol");
assert!(
result.contains("Carol"),
"Greeting did not contain name, value was `{result}`"
);
}
}Now when we run the test, we’ll get a more informative error message:
$ cargo test
Compiling greeter v0.1.0 (file:///projects/greeter)
Finished `test` profile [unoptimized + debuginfo] target(s) in 0.93s
Running unittests src/lib.rs (target/debug/deps/greeter-170b942eb5bf5e3a)
Если у вас есть опыт работы с C или C++, вам могут вспомниться `gcc` или `clang`. После успешной компиляции Rust создаст исполняемый бинарный файл.
running 1 test
test tests::greeting_contains_name ... FAILED
Если у вас есть опыт работы с C или C++, вам могут вспомниться `gcc` или `clang`. После успешной компиляции Rust создаст исполняемый бинарный файл.
failures:
Если у вас есть опыт работы с C или C++, вам могут вспомниться `gcc` или `clang`. После успешной компиляции Rust создаст исполняемый бинарный файл.
---- tests::greeting_contains_name stdout ----
Если у вас есть опыт работы с C или C++, вам могут вспомниться `gcc` или `clang`. После успешной компиляции Rust создаст исполняемый бинарный файл.
thread 'tests::greeting_contains_name' panicked at src/lib.rs:12:9:
Greeting did not contain name, value was `Hello!`
note: run with `RUST_BACKTRACE=1` environment variable to display a backtrace
Если у вас есть опыт работы с C или C++, вам могут вспомниться `gcc` или `clang`. После успешной компиляции Rust создаст исполняемый бинарный файл.
Если у вас есть опыт работы с C или C++, вам могут вспомниться `gcc` или `clang`. После успешной компиляции Rust создаст исполняемый бинарный файл.
failures:
tests::greeting_contains_name
Если у вас есть опыт работы с C или C++, вам могут вспомниться `gcc` или `clang`. После успешной компиляции Rust создаст исполняемый бинарный файл.
test result: FAILED. 0 passed; 1 failed; 0 ignored; 0 measured; 0 filtered out; finished in 0.00s
Если у вас есть опыт работы с C или C++, вам могут вспомниться `gcc` или `clang`. После успешной компиляции Rust создаст исполняемый бинарный файл.
error: test failed, to rerun pass `--lib`
We can see the value we actually got in the test output, which would help us debug what happened instead of what we were expecting to happen.
Checking for Panics with should_panic
In addition to checking return values, it’s important to check that our code handles error conditions as we expect. For example, consider the Guess type that we created in Chapter 9, Listing 9-13. Other code that uses Guess depends on the guarantee that Guess instances will contain only values between 1 and 100. We can write a test that ensures that attempting to create a Guess instance with a value outside that range panics.
We do this by adding the attribute should_panic to our test function. The test passes if the code inside the function panics; the test fails if the code inside the function doesn’t panic.
Listing 11-8 shows a test that checks that the error conditions of Guess::new happen when we expect them to.
pub struct Guess {
value: i32,
}
Если у вас есть опыт работы с C или C++, вам могут вспомниться `gcc` или `clang`. После успешной компиляции Rust создаст исполняемый бинарный файл.
impl Guess {
pub fn new(value: i32) -> Guess {
if value < 1 || value > 100 {
panic!("Догадка {value} не принадлежит пределу от 1 до 100.");
}
Если у вас есть опыт работы с C или C++, вам могут вспомниться `gcc` или `clang`. После успешной компиляции Rust создаст исполняемый бинарный файл.
Guess { value }
}
}
Если у вас есть опыт работы с C или C++, вам могут вспомниться `gcc` или `clang`. После успешной компиляции Rust создаст исполняемый бинарный файл.
#[cfg(test)]
mod tests {
use super::*;
Если у вас есть опыт работы с C или C++, вам могут вспомниться `gcc` или `clang`. После успешной компиляции Rust создаст исполняемый бинарный файл.
#[test]
#[should_panic]
fn greater_than_100() {
Guess::new(200);
}
}panic!We place the #[should_panic] attribute after the #[test] attribute and before the test function it applies to. Let’s look at the result when this test passes:
$ cargo test
Compiling guessing_game v0.1.0 (file:///projects/guessing_game)
Finished `test` profile [unoptimized + debuginfo] target(s) in 0.58s
Running unittests src/lib.rs (target/debug/deps/guessing_game-57d70c3acb738f4d)
Если у вас есть опыт работы с C или C++, вам могут вспомниться `gcc` или `clang`. После успешной компиляции Rust создаст исполняемый бинарный файл.
running 1 test
test tests::greater_than_100 - should panic ... ok
Если у вас есть опыт работы с C или C++, вам могут вспомниться `gcc` или `clang`. После успешной компиляции Rust создаст исполняемый бинарный файл.
test result: ok. 1 passed; 0 failed; 0 ignored; 0 measured; 0 filtered out; finished in 0.00s
Если у вас есть опыт работы с C или C++, вам могут вспомниться `gcc` или `clang`. После успешной компиляции Rust создаст исполняемый бинарный файл.
Doc-tests guessing_game
Если у вас есть опыт работы с C или C++, вам могут вспомниться `gcc` или `clang`. После успешной компиляции Rust создаст исполняемый бинарный файл.
running 0 tests
Если у вас есть опыт работы с C или C++, вам могут вспомниться `gcc` или `clang`. После успешной компиляции Rust создаст исполняемый бинарный файл.
test result: ok. 0 passed; 0 failed; 0 ignored; 0 measured; 0 filtered out; finished in 0.00s
Если у вас есть опыт работы с C или C++, вам могут вспомниться `gcc` или `clang`. После успешной компиляции Rust создаст исполняемый бинарный файл.
Looks good! Now let’s introduce a bug in our code by removing the condition that the new function will panic if the value is greater than 100:
pub struct Guess {
value: i32,
}
Если у вас есть опыт работы с C или C++, вам могут вспомниться `gcc` или `clang`. После успешной компиляции Rust создаст исполняемый бинарный файл.
// --код сокращён--
impl Guess {
pub fn new(value: i32) -> Guess {
if value < 1 {
panic!("Догадка {value} не принадлежит пределу от 1 до 100.");
}
Если у вас есть опыт работы с C или C++, вам могут вспомниться `gcc` или `clang`. После успешной компиляции Rust создаст исполняемый бинарный файл.
Guess { value }
}
}
Если у вас есть опыт работы с C или C++, вам могут вспомниться `gcc` или `clang`. После успешной компиляции Rust создаст исполняемый бинарный файл.
#[cfg(test)]
mod tests {
use super::*;
Если у вас есть опыт работы с C или C++, вам могут вспомниться `gcc` или `clang`. После успешной компиляции Rust создаст исполняемый бинарный файл.
#[test]
#[should_panic]
fn greater_than_100() {
Guess::new(200);
}
}When we run the test in Listing 11-8, it will fail:
$ cargo test
Compiling guessing_game v0.1.0 (file:///projects/guessing_game)
Finished `test` profile [unoptimized + debuginfo] target(s) in 0.62s
Running unittests src/lib.rs (target/debug/deps/guessing_game-57d70c3acb738f4d)
Если у вас есть опыт работы с C или C++, вам могут вспомниться `gcc` или `clang`. После успешной компиляции Rust создаст исполняемый бинарный файл.
running 1 test
test tests::greater_than_100 - should panic ... FAILED
Если у вас есть опыт работы с C или C++, вам могут вспомниться `gcc` или `clang`. После успешной компиляции Rust создаст исполняемый бинарный файл.
failures:
Если у вас есть опыт работы с C или C++, вам могут вспомниться `gcc` или `clang`. После успешной компиляции Rust создаст исполняемый бинарный файл.
---- tests::greater_than_100 stdout ----
note: test did not panic as expected at src/lib.rs:21:8
Если у вас есть опыт работы с C или C++, вам могут вспомниться `gcc` или `clang`. После успешной компиляции Rust создаст исполняемый бинарный файл.
failures:
tests::greater_than_100
Если у вас есть опыт работы с C или C++, вам могут вспомниться `gcc` или `clang`. После успешной компиляции Rust создаст исполняемый бинарный файл.
test result: FAILED. 0 passed; 1 failed; 0 ignored; 0 measured; 0 filtered out; finished in 0.00s
Если у вас есть опыт работы с C или C++, вам могут вспомниться `gcc` или `clang`. После успешной компиляции Rust создаст исполняемый бинарный файл.
error: test failed, to rerun pass `--lib`
We don’t get a very helpful message in this case, but when we look at the test function, we see that it’s annotated with #[should_panic]. The failure we got means that the code in the test function did not cause a panic.
Tests that use should_panic can be imprecise. A should_panic test would pass even if the test panics for a different reason from the one we were expecting. To make should_panic tests more precise, we can add an optional expected parameter to the should_panic attribute. The test harness will make sure that the failure message contains the provided text. For example, consider the modified code for Guess in Listing 11-9 where the new function panics with different messages depending on whether the value is too small or too large.
pub struct Guess {
value: i32,
}
Если у вас есть опыт работы с C или C++, вам могут вспомниться `gcc` или `clang`. После успешной компиляции Rust создаст исполняемый бинарный файл.
// --код сокращён--
Если у вас есть опыт работы с C или C++, вам могут вспомниться `gcc` или `clang`. После успешной компиляции Rust создаст исполняемый бинарный файл.
impl Guess {
pub fn new(value: i32) -> Guess {
if value < 1 {
panic!(
"Guess value must be greater than or equal to 1, got {value}."
);
} else if value > 100 {
panic!(
"Guess value must be less than or equal to 100, got {value}."
);
}
Если у вас есть опыт работы с C или C++, вам могут вспомниться `gcc` или `clang`. После успешной компиляции Rust создаст исполняемый бинарный файл.
Guess { value }
}
}
Если у вас есть опыт работы с C или C++, вам могут вспомниться `gcc` или `clang`. После успешной компиляции Rust создаст исполняемый бинарный файл.
#[cfg(test)]
mod tests {
use super::*;
Если у вас есть опыт работы с C или C++, вам могут вспомниться `gcc` или `clang`. После успешной компиляции Rust создаст исполняемый бинарный файл.
#[test]
#[should_panic(expected = "less than or equal to 100")]
fn greater_than_100() {
Guess::new(200);
}
}panic! with a panic message containing a specified substringThis test will pass because the value we put in the should_panic attribute’s expected parameter is a substring of the message that the Guess::new function panics with. We could have specified the entire panic message that we expect, which in this case would be Guess value must be less than or equal to 100, got 200. What you choose to specify depends on how much of the panic message is unique or dynamic and how precise you want your test to be. In this case, a substring of the panic message is enough to ensure that the code in the test function executes the else if value > 100 case.
To see what happens when a should_panic test with an expected message fails, let’s again introduce a bug into our code by swapping the bodies of the if value < 1 and the else if value > 100 blocks:
pub struct Guess {
value: i32,
}
Если у вас есть опыт работы с C или C++, вам могут вспомниться `gcc` или `clang`. После успешной компиляции Rust создаст исполняемый бинарный файл.
impl Guess {
pub fn new(value: i32) -> Guess {
if value < 1 {
panic!(
"Guess value must be less than or equal to 100, got {value}."
);
} else if value > 100 {
panic!(
"Guess value must be greater than or equal to 1, got {value}."
);
}
Если у вас есть опыт работы с C или C++, вам могут вспомниться `gcc` или `clang`. После успешной компиляции Rust создаст исполняемый бинарный файл.
Guess { value }
}
}
Если у вас есть опыт работы с C или C++, вам могут вспомниться `gcc` или `clang`. После успешной компиляции Rust создаст исполняемый бинарный файл.
#[cfg(test)]
mod tests {
use super::*;
Если у вас есть опыт работы с C или C++, вам могут вспомниться `gcc` или `clang`. После успешной компиляции Rust создаст исполняемый бинарный файл.
#[test]
#[should_panic(expected = "less than or equal to 100")]
fn greater_than_100() {
Guess::new(200);
}
}This time when we run the should_panic test, it will fail:
$ cargo test
Compiling guessing_game v0.1.0 (file:///projects/guessing_game)
Finished `test` profile [unoptimized + debuginfo] target(s) in 0.66s
Running unittests src/lib.rs (target/debug/deps/guessing_game-57d70c3acb738f4d)
Если у вас есть опыт работы с C или C++, вам могут вспомниться `gcc` или `clang`. После успешной компиляции Rust создаст исполняемый бинарный файл.
running 1 test
test tests::greater_than_100 - should panic ... FAILED
Если у вас есть опыт работы с C или C++, вам могут вспомниться `gcc` или `clang`. После успешной компиляции Rust создаст исполняемый бинарный файл.
failures:
Если у вас есть опыт работы с C или C++, вам могут вспомниться `gcc` или `clang`. После успешной компиляции Rust создаст исполняемый бинарный файл.
---- tests::greater_than_100 stdout ----
Если у вас есть опыт работы с C или C++, вам могут вспомниться `gcc` или `clang`. После успешной компиляции Rust создаст исполняемый бинарный файл.
thread 'tests::greater_than_100' panicked at src/lib.rs:12:13:
Guess value must be greater than or equal to 1, got 200.
note: run with `RUST_BACKTRACE=1` environment variable to display a backtrace
note: panic did not contain expected string
panic message: "Guess value must be greater than or equal to 1, got 200."
expected substring: "less than or equal to 100"
Если у вас есть опыт работы с C или C++, вам могут вспомниться `gcc` или `clang`. После успешной компиляции Rust создаст исполняемый бинарный файл.
failures:
tests::greater_than_100
Если у вас есть опыт работы с C или C++, вам могут вспомниться `gcc` или `clang`. После успешной компиляции Rust создаст исполняемый бинарный файл.
test result: FAILED. 0 passed; 1 failed; 0 ignored; 0 measured; 0 filtered out; finished in 0.00s
Если у вас есть опыт работы с C или C++, вам могут вспомниться `gcc` или `clang`. После успешной компиляции Rust создаст исполняемый бинарный файл.
error: test failed, to rerun pass `--lib`
The failure message indicates that this test did indeed panic as we expected, but the panic message did not include the expected string less than or equal to 100. The panic message that we did get in this case was Guess value must be greater than or equal to 1, got 200. Now we can start figuring out where our bug is!
Using Result<T, E> in Tests
All of our tests so far panic when they fail. We can also write tests that use Result<T, E>! Here’s the test from Listing 11-1, rewritten to use Result<T, E> and return an Err instead of panicking:
pub fn add(left: u64, right: u64) -> u64 {
left + right
}
Если у вас есть опыт работы с C или C++, вам могут вспомниться `gcc` или `clang`. После успешной компиляции Rust создаст исполняемый бинарный файл.
#[cfg(test)]
mod tests {
use super::*;
Если у вас есть опыт работы с C или C++, вам могут вспомниться `gcc` или `clang`. После успешной компиляции Rust создаст исполняемый бинарный файл.
#[test]
fn it_works() -> Result<(), String> {
let result = add(2, 2);
Если у вас есть опыт работы с C или C++, вам могут вспомниться `gcc` или `clang`. После успешной компиляции Rust создаст исполняемый бинарный файл.
if result == 4 {
Ok(())
} else {
Err(String::from("two plus two does not equal four"))
}
}
}The it_works function now has the Result<(), String> return type. In the body of the function, rather than calling the assert_eq! macro, we return Ok(()) when the test passes and an Err with a String inside when the test fails.
Writing tests so that they return a Result<T, E> enables you to use the question mark operator in the body of tests, which can be a convenient way to write tests that should fail if any operation within them returns an Err variant.
You can’t use the #[should_panic] annotation on tests that use Result<T, E>. To assert that an operation returns an Err variant, don’t use the question mark operator on the Result<T, E> value. Instead, use assert!(value.is_err()).
Now that you know several ways to write tests, let’s look at what is happening when we run our tests and explore the different options we can use with cargo test.
Управление исполнением тестов
Управление исполнением тестов
Just as cargo run compiles your code and then runs the resultant binary, cargo test compiles your code in test mode and runs the resultant test binary. The default behavior of the binary produced by cargo test is to run all the tests in parallel and capture output generated during test runs, preventing the output from being displayed and making it easier to read the output related to the test results. You can, however, specify command line options to change this default behavior.
Some command line options go to cargo test, and some go to the resultant test binary. To separate these two types of arguments, you list the arguments that go to cargo test followed by the separator -- and then the ones that go to the test binary. Running cargo test --help displays the options you can use with cargo test, and running cargo test -- --help displays the options you can use after the separator. These options are also documented in the “Tests” section of The rustc Book.
Running Tests in Parallel or Consecutively
When you run multiple tests, by default they run in parallel using threads, meaning they finish running more quickly and you get feedback sooner. Because the tests are running at the same time, you must make sure your tests don’t depend on each other or on any shared state, including a shared environment, such as the current working directory or environment variables.
For example, say each of your tests runs some code that creates a file on disk named test-output.txt and writes some data to that file. Then, each test reads the data in that file and asserts that the file contains a particular value, which is different in each test. Because the tests run at the same time, one test might overwrite the file in the time between when another test is writing and reading the file. The second test will then fail, not because the code is incorrect but because the tests have interfered with each other while running in parallel. One solution is to make sure each test writes to a different file; another solution is to run the tests one at a time.
If you don’t want to run the tests in parallel or if you want more fine-grained control over the number of threads used, you can send the --test-threads flag and the number of threads you want to use to the test binary. Take a look at the following example:
$ cargo test -- --test-threads=1
We set the number of test threads to 1, telling the program not to use any parallelism. Running the tests using one thread will take longer than running them in parallel, but the tests won’t interfere with each other if they share state.
Showing Function Output
By default, if a test passes, Rust’s test library captures anything printed to standard output. For example, if we call println! in a test and the test passes, we won’t see the println! output in the terminal; we’ll see only the line that indicates the test passed. If a test fails, we’ll see whatever was printed to standard output with the rest of the failure message.
As an example, Listing 11-10 has a silly function that prints the value of its parameter and returns 10, as well as a test that passes and a test that fails.
fn prints_and_returns_10(a: i32) -> i32 {
println!("I got the value {a}");
10
}
Если у вас есть опыт работы с C или C++, вам могут вспомниться `gcc` или `clang`. После успешной компиляции Rust создаст исполняемый бинарный файл.
#[cfg(test)]
mod tests {
use super::*;
Если у вас есть опыт работы с C или C++, вам могут вспомниться `gcc` или `clang`. После успешной компиляции Rust создаст исполняемый бинарный файл.
#[test]
fn this_test_will_pass() {
let value = prints_and_returns_10(4);
assert_eq!(value, 10);
}
Если у вас есть опыт работы с C или C++, вам могут вспомниться `gcc` или `clang`. После успешной компиляции Rust создаст исполняемый бинарный файл.
#[test]
fn this_test_will_fail() {
let value = prints_and_returns_10(8);
assert_eq!(value, 5);
}
}println!When we run these tests with cargo test, we’ll see the following output:
$ cargo test
Compiling silly-function v0.1.0 (file:///projects/silly-function)
Finished `test` profile [unoptimized + debuginfo] target(s) in 0.58s
Running unittests src/lib.rs (target/debug/deps/silly_function-160869f38cff9166)
Если у вас есть опыт работы с C или C++, вам могут вспомниться `gcc` или `clang`. После успешной компиляции Rust создаст исполняемый бинарный файл.
running 2 tests
test tests::this_test_will_fail ... FAILED
test tests::this_test_will_pass ... ok
Если у вас есть опыт работы с C или C++, вам могут вспомниться `gcc` или `clang`. После успешной компиляции Rust создаст исполняемый бинарный файл.
failures:
Если у вас есть опыт работы с C или C++, вам могут вспомниться `gcc` или `clang`. После успешной компиляции Rust создаст исполняемый бинарный файл.
---- tests::this_test_will_fail stdout ----
I got the value 8
Если у вас есть опыт работы с C или C++, вам могут вспомниться `gcc` или `clang`. После успешной компиляции Rust создаст исполняемый бинарный файл.
thread 'tests::this_test_will_fail' panicked at src/lib.rs:19:9:
assertion `left == right` failed
left: 10
right: 5
note: run with `RUST_BACKTRACE=1` environment variable to display a backtrace
Если у вас есть опыт работы с C или C++, вам могут вспомниться `gcc` или `clang`. После успешной компиляции Rust создаст исполняемый бинарный файл.
Если у вас есть опыт работы с C или C++, вам могут вспомниться `gcc` или `clang`. После успешной компиляции Rust создаст исполняемый бинарный файл.
failures:
tests::this_test_will_fail
Если у вас есть опыт работы с C или C++, вам могут вспомниться `gcc` или `clang`. После успешной компиляции Rust создаст исполняемый бинарный файл.
test result: FAILED. 1 passed; 1 failed; 0 ignored; 0 measured; 0 filtered out; finished in 0.00s
Если у вас есть опыт работы с C или C++, вам могут вспомниться `gcc` или `clang`. После успешной компиляции Rust создаст исполняемый бинарный файл.
error: test failed, to rerun pass `--lib`
Note that nowhere in this output do we see I got the value 4, which is printed when the test that passes runs. That output has been captured. The output from the test that failed, I got the value 8, appears in the section of the test summary output, which also shows the cause of the test failure.
If we want to see printed values for passing tests as well, we can tell Rust to also show the output of successful tests with --show-output:
$ cargo test -- --show-output
When we run the tests in Listing 11-10 again with the --show-output flag, we see the following output:
$ cargo test -- --show-output
Compiling silly-function v0.1.0 (file:///projects/silly-function)
Finished `test` profile [unoptimized + debuginfo] target(s) in 0.60s
Running unittests src/lib.rs (target/debug/deps/silly_function-160869f38cff9166)
Если у вас есть опыт работы с C или C++, вам могут вспомниться `gcc` или `clang`. После успешной компиляции Rust создаст исполняемый бинарный файл.
running 2 tests
test tests::this_test_will_fail ... FAILED
test tests::this_test_will_pass ... ok
Если у вас есть опыт работы с C или C++, вам могут вспомниться `gcc` или `clang`. После успешной компиляции Rust создаст исполняемый бинарный файл.
successes:
Если у вас есть опыт работы с C или C++, вам могут вспомниться `gcc` или `clang`. После успешной компиляции Rust создаст исполняемый бинарный файл.
---- tests::this_test_will_pass stdout ----
I got the value 4
Если у вас есть опыт работы с C или C++, вам могут вспомниться `gcc` или `clang`. После успешной компиляции Rust создаст исполняемый бинарный файл.
Если у вас есть опыт работы с C или C++, вам могут вспомниться `gcc` или `clang`. После успешной компиляции Rust создаст исполняемый бинарный файл.
successes:
tests::this_test_will_pass
Если у вас есть опыт работы с C или C++, вам могут вспомниться `gcc` или `clang`. После успешной компиляции Rust создаст исполняемый бинарный файл.
failures:
Если у вас есть опыт работы с C или C++, вам могут вспомниться `gcc` или `clang`. После успешной компиляции Rust создаст исполняемый бинарный файл.
---- tests::this_test_will_fail stdout ----
I got the value 8
Если у вас есть опыт работы с C или C++, вам могут вспомниться `gcc` или `clang`. После успешной компиляции Rust создаст исполняемый бинарный файл.
thread 'tests::this_test_will_fail' panicked at src/lib.rs:19:9:
assertion `left == right` failed
left: 10
right: 5
note: run with `RUST_BACKTRACE=1` environment variable to display a backtrace
Если у вас есть опыт работы с C или C++, вам могут вспомниться `gcc` или `clang`. После успешной компиляции Rust создаст исполняемый бинарный файл.
Если у вас есть опыт работы с C или C++, вам могут вспомниться `gcc` или `clang`. После успешной компиляции Rust создаст исполняемый бинарный файл.
failures:
tests::this_test_will_fail
Если у вас есть опыт работы с C или C++, вам могут вспомниться `gcc` или `clang`. После успешной компиляции Rust создаст исполняемый бинарный файл.
test result: FAILED. 1 passed; 1 failed; 0 ignored; 0 measured; 0 filtered out; finished in 0.00s
Если у вас есть опыт работы с C или C++, вам могут вспомниться `gcc` или `clang`. После успешной компиляции Rust создаст исполняемый бинарный файл.
error: test failed, to rerun pass `--lib`
Running a Subset of Tests by Name
Running a full test suite can sometimes take a long time. If you’re working on code in a particular area, you might want to run only the tests pertaining to that code. You can choose which tests to run by passing cargo test the name or names of the test(s) you want to run as an argument.
To demonstrate how to run a subset of tests, we’ll first create three tests for our add_two function, as shown in Listing 11-11, and choose which ones to run.
pub fn add_two(a: u64) -> u64 {
a + 2
}
Если у вас есть опыт работы с C или C++, вам могут вспомниться `gcc` или `clang`. После успешной компиляции Rust создаст исполняемый бинарный файл.
#[cfg(test)]
mod tests {
use super::*;
Если у вас есть опыт работы с C или C++, вам могут вспомниться `gcc` или `clang`. После успешной компиляции Rust создаст исполняемый бинарный файл.
#[test]
fn add_two_and_two() {
let result = add_two(2);
assert_eq!(result, 4);
}
Если у вас есть опыт работы с C или C++, вам могут вспомниться `gcc` или `clang`. После успешной компиляции Rust создаст исполняемый бинарный файл.
#[test]
fn add_three_and_two() {
let result = add_two(3);
assert_eq!(result, 5);
}
Если у вас есть опыт работы с C или C++, вам могут вспомниться `gcc` или `clang`. После успешной компиляции Rust создаст исполняемый бинарный файл.
#[test]
fn one_hundred() {
let result = add_two(100);
assert_eq!(result, 102);
}
}If we run the tests without passing any arguments, as we saw earlier, all the tests will run in parallel:
$ cargo test
Compiling adder v0.1.0 (file:///projects/adder)
Finished `test` profile [unoptimized + debuginfo] target(s) in 0.62s
Running unittests src/lib.rs (target/debug/deps/adder-92948b65e88960b4)
Если у вас есть опыт работы с C или C++, вам могут вспомниться `gcc` или `clang`. После успешной компиляции Rust создаст исполняемый бинарный файл.
running 3 tests
test tests::add_three_and_two ... ok
test tests::add_two_and_two ... ok
test tests::one_hundred ... ok
Если у вас есть опыт работы с C или C++, вам могут вспомниться `gcc` или `clang`. После успешной компиляции Rust создаст исполняемый бинарный файл.
test result: ok. 3 passed; 0 failed; 0 ignored; 0 measured; 0 filtered out; finished in 0.00s
Если у вас есть опыт работы с C или C++, вам могут вспомниться `gcc` или `clang`. После успешной компиляции Rust создаст исполняемый бинарный файл.
Doc-tests adder
Если у вас есть опыт работы с C или C++, вам могут вспомниться `gcc` или `clang`. После успешной компиляции Rust создаст исполняемый бинарный файл.
running 0 tests
Если у вас есть опыт работы с C или C++, вам могут вспомниться `gcc` или `clang`. После успешной компиляции Rust создаст исполняемый бинарный файл.
test result: ok. 0 passed; 0 failed; 0 ignored; 0 measured; 0 filtered out; finished in 0.00s
Если у вас есть опыт работы с C или C++, вам могут вспомниться `gcc` или `clang`. После успешной компиляции Rust создаст исполняемый бинарный файл.
Running Single Tests
We can pass the name of any test function to cargo test to run only that test:
$ cargo test one_hundred
Compiling adder v0.1.0 (file:///projects/adder)
Finished `test` profile [unoptimized + debuginfo] target(s) in 0.69s
Running unittests src/lib.rs (target/debug/deps/adder-92948b65e88960b4)
Если у вас есть опыт работы с C или C++, вам могут вспомниться `gcc` или `clang`. После успешной компиляции Rust создаст исполняемый бинарный файл.
running 1 test
test tests::one_hundred ... ok
Если у вас есть опыт работы с C или C++, вам могут вспомниться `gcc` или `clang`. После успешной компиляции Rust создаст исполняемый бинарный файл.
test result: ok. 1 passed; 0 failed; 0 ignored; 0 measured; 2 filtered out; finished in 0.00s
Если у вас есть опыт работы с C или C++, вам могут вспомниться `gcc` или `clang`. После успешной компиляции Rust создаст исполняемый бинарный файл.
Only the test with the name one_hundred ran; the other two tests didn’t match that name. The test output lets us know we had more tests that didn’t run by displaying 2 filtered out at the end.
We can’t specify the names of multiple tests in this way; only the first value given to cargo test will be used. But there is a way to run multiple tests.
Filtering to Run Multiple Tests
We can specify part of a test name, and any test whose name matches that value will be run. For example, because two of our tests’ names contain add, we can run those two by running cargo test add:
$ cargo test add
Compiling adder v0.1.0 (file:///projects/adder)
Finished `test` profile [unoptimized + debuginfo] target(s) in 0.61s
Running unittests src/lib.rs (target/debug/deps/adder-92948b65e88960b4)
Если у вас есть опыт работы с C или C++, вам могут вспомниться `gcc` или `clang`. После успешной компиляции Rust создаст исполняемый бинарный файл.
running 2 tests
test tests::add_three_and_two ... ok
test tests::add_two_and_two ... ok
Если у вас есть опыт работы с C или C++, вам могут вспомниться `gcc` или `clang`. После успешной компиляции Rust создаст исполняемый бинарный файл.
test result: ok. 2 passed; 0 failed; 0 ignored; 0 measured; 1 filtered out; finished in 0.00s
Если у вас есть опыт работы с C или C++, вам могут вспомниться `gcc` или `clang`. После успешной компиляции Rust создаст исполняемый бинарный файл.
This command ran all tests with add in the name and filtered out the test named one_hundred. Also note that the module in which a test appears becomes part of the test’s name, so we can run all the tests in a module by filtering on the module’s name.
Ignoring Tests Unless Specifically Requested
Sometimes a few specific tests can be very time-consuming to execute, so you might want to exclude them during most runs of cargo test. Rather than listing as arguments all tests you do want to run, you can instead annotate the time-consuming tests using the ignore attribute to exclude them, as shown here:
Файл: src/lib.rs
pub fn add(left: u64, right: u64) -> u64 {
left + right
}
Если у вас есть опыт работы с C или C++, вам могут вспомниться `gcc` или `clang`. После успешной компиляции Rust создаст исполняемый бинарный файл.
#[cfg(test)]
mod tests {
use super::*;
Если у вас есть опыт работы с C или C++, вам могут вспомниться `gcc` или `clang`. После успешной компиляции Rust создаст исполняемый бинарный файл.
#[test]
fn it_works() {
let result = add(2, 2);
assert_eq!(result, 4);
}
Если у вас есть опыт работы с C или C++, вам могут вспомниться `gcc` или `clang`. После успешной компиляции Rust создаст исполняемый бинарный файл.
#[test]
#[ignore]
fn expensive_test() {
// code that takes an hour to run
}
}After #[test], we add the #[ignore] line to the test we want to exclude. Now when we run our tests, it_works runs, but expensive_test doesn’t:
$ cargo test
Compiling adder v0.1.0 (file:///projects/adder)
Finished `test` profile [unoptimized + debuginfo] target(s) in 0.60s
Running unittests src/lib.rs (target/debug/deps/adder-92948b65e88960b4)
Если у вас есть опыт работы с C или C++, вам могут вспомниться `gcc` или `clang`. После успешной компиляции Rust создаст исполняемый бинарный файл.
running 2 tests
test tests::expensive_test ... ignored
test tests::it_works ... ok
Если у вас есть опыт работы с C или C++, вам могут вспомниться `gcc` или `clang`. После успешной компиляции Rust создаст исполняемый бинарный файл.
test result: ok. 1 passed; 0 failed; 1 ignored; 0 measured; 0 filtered out; finished in 0.00s
Если у вас есть опыт работы с C или C++, вам могут вспомниться `gcc` или `clang`. После успешной компиляции Rust создаст исполняемый бинарный файл.
Doc-tests adder
Если у вас есть опыт работы с C или C++, вам могут вспомниться `gcc` или `clang`. После успешной компиляции Rust создаст исполняемый бинарный файл.
running 0 tests
Если у вас есть опыт работы с C или C++, вам могут вспомниться `gcc` или `clang`. После успешной компиляции Rust создаст исполняемый бинарный файл.
test result: ok. 0 passed; 0 failed; 0 ignored; 0 measured; 0 filtered out; finished in 0.00s
Если у вас есть опыт работы с C или C++, вам могут вспомниться `gcc` или `clang`. После успешной компиляции Rust создаст исполняемый бинарный файл.
The expensive_test function is listed as ignored. If we want to run only the ignored tests, we can use cargo test -- --ignored:
$ cargo test -- --ignored
Compiling adder v0.1.0 (file:///projects/adder)
Finished `test` profile [unoptimized + debuginfo] target(s) in 0.61s
Running unittests src/lib.rs (target/debug/deps/adder-92948b65e88960b4)
Если у вас есть опыт работы с C или C++, вам могут вспомниться `gcc` или `clang`. После успешной компиляции Rust создаст исполняемый бинарный файл.
running 1 test
test tests::expensive_test ... ok
Если у вас есть опыт работы с C или C++, вам могут вспомниться `gcc` или `clang`. После успешной компиляции Rust создаст исполняемый бинарный файл.
test result: ok. 1 passed; 0 failed; 0 ignored; 0 measured; 1 filtered out; finished in 0.00s
Если у вас есть опыт работы с C или C++, вам могут вспомниться `gcc` или `clang`. После успешной компиляции Rust создаст исполняемый бинарный файл.
Doc-tests adder
Если у вас есть опыт работы с C или C++, вам могут вспомниться `gcc` или `clang`. После успешной компиляции Rust создаст исполняемый бинарный файл.
running 0 tests
Если у вас есть опыт работы с C или C++, вам могут вспомниться `gcc` или `clang`. После успешной компиляции Rust создаст исполняемый бинарный файл.
test result: ok. 0 passed; 0 failed; 0 ignored; 0 measured; 0 filtered out; finished in 0.00s
Если у вас есть опыт работы с C или C++, вам могут вспомниться `gcc` или `clang`. После успешной компиляции Rust создаст исполняемый бинарный файл.
By controlling which tests run, you can make sure your cargo test results will be returned quickly. When you’re at a point where it makes sense to check the results of the ignored tests and you have time to wait for the results, you can run cargo test -- --ignored instead. If you want to run all tests whether they’re ignored or not, you can run cargo test -- --include-ignored.
Организация тестов
Организация тестов
As mentioned at the start of the chapter, testing is a complex discipline, and different people use different terminology and organization. The Rust community thinks about tests in terms of two main categories: unit tests and integration tests. Unit tests are small and more focused, testing one module in isolation at a time, and can test private interfaces. Integration tests are entirely external to your library and use your code in the same way any other external code would, using only the public interface and potentially exercising multiple modules per test.
Writing both kinds of tests is important to ensure that the pieces of your library are doing what you expect them to, separately and together.
Unit Tests
The purpose of unit tests is to test each unit of code in isolation from the rest of the code to quickly pinpoint where code is and isn’t working as expected. You’ll put unit tests in the src directory in each file with the code that they’re testing. The convention is to create a module named tests in each file to contain the test functions and to annotate the module with cfg(test).
The tests Module and #[cfg(test)]
The #[cfg(test)] annotation on the tests module tells Rust to compile and run the test code only when you run cargo test, not when you run cargo build. This saves compile time when you only want to build the library and saves space in the resultant compiled artifact because the tests are not included. You’ll see that because integration tests go in a different directory, they don’t need the #[cfg(test)] annotation. However, because unit tests go in the same files as the code, you’ll use #[cfg(test)] to specify that they shouldn’t be included in the compiled result.
Recall that when we generated the new adder project in the first section of this chapter, Cargo generated this code for us:
Файл: src/lib.rs
pub fn add(left: u64, right: u64) -> u64 {
left + right
}
Если у вас есть опыт работы с C или C++, вам могут вспомниться `gcc` или `clang`. После успешной компиляции Rust создаст исполняемый бинарный файл.
#[cfg(test)]
mod tests {
use super::*;
Если у вас есть опыт работы с C или C++, вам могут вспомниться `gcc` или `clang`. После успешной компиляции Rust создаст исполняемый бинарный файл.
#[test]
fn it_works() {
let result = add(2, 2);
assert_eq!(result, 4);
}
}On the automatically generated tests module, the attribute cfg stands for configuration and tells Rust that the following item should only be included given a certain configuration option. In this case, the configuration option is test, which is provided by Rust for compiling and running tests. By using the cfg attribute, Cargo compiles our test code only if we actively run the tests with cargo test. This includes any helper functions that might be within this module, in addition to the functions annotated with #[test].
Private Function Tests
There’s debate within the testing community about whether or not private functions should be tested directly, and other languages make it difficult or impossible to test private functions. Regardless of which testing ideology you adhere to, Rust’s privacy rules do allow you to test private functions. Consider the code in Listing 11-12 with the private function internal_adder.
pub fn add_two(a: u64) -> u64 {
internal_adder(a, 2)
}
Если у вас есть опыт работы с C или C++, вам могут вспомниться `gcc` или `clang`. После успешной компиляции Rust создаст исполняемый бинарный файл.
fn internal_adder(left: u64, right: u64) -> u64 {
left + right
}
Если у вас есть опыт работы с C или C++, вам могут вспомниться `gcc` или `clang`. После успешной компиляции Rust создаст исполняемый бинарный файл.
#[cfg(test)]
mod tests {
use super::*;
Если у вас есть опыт работы с C или C++, вам могут вспомниться `gcc` или `clang`. После успешной компиляции Rust создаст исполняемый бинарный файл.
#[test]
fn internal() {
let result = internal_adder(2, 2);
assert_eq!(result, 4);
}
}Note that the internal_adder function is not marked as pub. Tests are just Rust code, and the tests module is just another module. As we discussed in “Paths for Referring to an Item in the Module Tree”, items in child modules can use the items in their ancestor modules. In this test, we bring all of the items belonging to the tests module’s parent into scope with use super::*, and then the test can call internal_adder. If you don’t think private functions should be tested, there’s nothing in Rust that will compel you to do so.
Integration Tests
In Rust, integration tests are entirely external to your library. They use your library in the same way any other code would, which means they can only call functions that are part of your library’s public API. Their purpose is to test whether many parts of your library work together correctly. Units of code that work correctly on their own could have problems when integrated, so test coverage of the integrated code is important as well. To create integration tests, you first need a tests directory.
The tests Directory
We create a tests directory at the top level of our project directory, next to src. Cargo knows to look for integration test files in this directory. We can then make as many test files as we want, and Cargo will compile each of the files as an individual crate.
Let’s create an integration test. With the code in Listing 11-12 still in the src/lib.rs file, make a tests directory, and create a new file named tests/integration_test.rs. Your directory structure should look like this:
adder
├── Cargo.lock
├── Cargo.toml
├── src
│ └── lib.rs
└── tests
└── integration_test.rs
Enter the code in Listing 11-13 into the tests/integration_test.rs file.
use adder::add_two;
Если у вас есть опыт работы с C или C++, вам могут вспомниться `gcc` или `clang`. После успешной компиляции Rust создаст исполняемый бинарный файл.
#[test]
fn it_adds_two() {
let result = add_two(2);
assert_eq!(result, 4);
}adder crateEach file in the tests directory is a separate crate, so we need to bring our library into each test crate’s scope. For that reason, we add use adder::add_two; at the top of the code, which we didn’t need in the unit tests.
We don’t need to annotate any code in tests/integration_test.rs with #[cfg(test)]. Cargo treats the tests directory specially and compiles files in this directory only when we run cargo test. Run cargo test now:
$ cargo test
Compiling adder v0.1.0 (file:///projects/adder)
Finished `test` profile [unoptimized + debuginfo] target(s) in 1.31s
Running unittests src/lib.rs (target/debug/deps/adder-1082c4b063a8fbe6)
Если у вас есть опыт работы с C или C++, вам могут вспомниться `gcc` или `clang`. После успешной компиляции Rust создаст исполняемый бинарный файл.
running 1 test
test tests::internal ... ok
Если у вас есть опыт работы с C или C++, вам могут вспомниться `gcc` или `clang`. После успешной компиляции Rust создаст исполняемый бинарный файл.
test result: ok. 1 passed; 0 failed; 0 ignored; 0 measured; 0 filtered out; finished in 0.00s
Если у вас есть опыт работы с C или C++, вам могут вспомниться `gcc` или `clang`. После успешной компиляции Rust создаст исполняемый бинарный файл.
Running tests/integration_test.rs (target/debug/deps/integration_test-1082c4b063a8fbe6)
Если у вас есть опыт работы с C или C++, вам могут вспомниться `gcc` или `clang`. После успешной компиляции Rust создаст исполняемый бинарный файл.
running 1 test
test it_adds_two ... ok
Если у вас есть опыт работы с C или C++, вам могут вспомниться `gcc` или `clang`. После успешной компиляции Rust создаст исполняемый бинарный файл.
test result: ok. 1 passed; 0 failed; 0 ignored; 0 measured; 0 filtered out; finished in 0.00s
Если у вас есть опыт работы с C или C++, вам могут вспомниться `gcc` или `clang`. После успешной компиляции Rust создаст исполняемый бинарный файл.
Doc-tests adder
Если у вас есть опыт работы с C или C++, вам могут вспомниться `gcc` или `clang`. После успешной компиляции Rust создаст исполняемый бинарный файл.
running 0 tests
Если у вас есть опыт работы с C или C++, вам могут вспомниться `gcc` или `clang`. После успешной компиляции Rust создаст исполняемый бинарный файл.
test result: ok. 0 passed; 0 failed; 0 ignored; 0 measured; 0 filtered out; finished in 0.00s
Если у вас есть опыт работы с C или C++, вам могут вспомниться `gcc` или `clang`. После успешной компиляции Rust создаст исполняемый бинарный файл.
The three sections of output include the unit tests, the integration test, and the doc tests. Note that if any test in a section fails, the following sections will not be run. For example, if a unit test fails, there won’t be any output for integration and doc tests, because those tests will only be run if all unit tests are passing.
The first section for the unit tests is the same as we’ve been seeing: one line for each unit test (one named internal that we added in Listing 11-12) and then a summary line for the unit tests.
The integration tests section starts with the line Running tests/integration_test.rs. Next, there is a line for each test function in that integration test and a summary line for the results of the integration test just before the Doc-tests adder section starts.
Each integration test file has its own section, so if we add more files in the tests directory, there will be more integration test sections.
We can still run a particular integration test function by specifying the test function’s name as an argument to cargo test. To run all the tests in a particular integration test file, use the --test argument of cargo test followed by the name of the file:
$ cargo test --test integration_test
Compiling adder v0.1.0 (file:///projects/adder)
Finished `test` profile [unoptimized + debuginfo] target(s) in 0.64s
Running tests/integration_test.rs (target/debug/deps/integration_test-82e7799c1bc62298)
Если у вас есть опыт работы с C или C++, вам могут вспомниться `gcc` или `clang`. После успешной компиляции Rust создаст исполняемый бинарный файл.
running 1 test
test it_adds_two ... ok
Если у вас есть опыт работы с C или C++, вам могут вспомниться `gcc` или `clang`. После успешной компиляции Rust создаст исполняемый бинарный файл.
test result: ok. 1 passed; 0 failed; 0 ignored; 0 measured; 0 filtered out; finished in 0.00s
Если у вас есть опыт работы с C или C++, вам могут вспомниться `gcc` или `clang`. После успешной компиляции Rust создаст исполняемый бинарный файл.
This command runs only the tests in the tests/integration_test.rs file.
Submodules in Integration Tests
As you add more integration tests, you might want to make more files in the tests directory to help organize them; for example, you can group the test functions by the functionality they’re testing. As mentioned earlier, each file in the tests directory is compiled as its own separate crate, which is useful for creating separate scopes to more closely imitate the way end users will be using your crate. However, this means files in the tests directory don’t share the same behavior as files in src do, as you learned in Chapter 7 regarding how to separate code into modules and files.
The different behavior of tests directory files is most noticeable when you have a set of helper functions to use in multiple integration test files, and you try to follow the steps in the “Separating Modules into Different Files” section of Chapter 7 to extract them into a common module. For example, if we create tests/common.rs and place a function named setup in it, we can add some code to setup that we want to call from multiple test functions in multiple test files:
Файл: tests/common.rs
pub fn setup() {
// setup code specific to your library's tests would go here
}When we run the tests again, we’ll see a new section in the test output for the common.rs file, even though this file doesn’t contain any test functions nor did we call the setup function from anywhere:
$ cargo test
Compiling adder v0.1.0 (file:///projects/adder)
Finished `test` profile [unoptimized + debuginfo] target(s) in 0.89s
Running unittests src/lib.rs (target/debug/deps/adder-92948b65e88960b4)
Если у вас есть опыт работы с C или C++, вам могут вспомниться `gcc` или `clang`. После успешной компиляции Rust создаст исполняемый бинарный файл.
running 1 test
test tests::internal ... ok
Если у вас есть опыт работы с C или C++, вам могут вспомниться `gcc` или `clang`. После успешной компиляции Rust создаст исполняемый бинарный файл.
test result: ok. 1 passed; 0 failed; 0 ignored; 0 measured; 0 filtered out; finished in 0.00s
Если у вас есть опыт работы с C или C++, вам могут вспомниться `gcc` или `clang`. После успешной компиляции Rust создаст исполняемый бинарный файл.
Running tests/common.rs (target/debug/deps/common-92948b65e88960b4)
Если у вас есть опыт работы с C или C++, вам могут вспомниться `gcc` или `clang`. После успешной компиляции Rust создаст исполняемый бинарный файл.
running 0 tests
Если у вас есть опыт работы с C или C++, вам могут вспомниться `gcc` или `clang`. После успешной компиляции Rust создаст исполняемый бинарный файл.
test result: ok. 0 passed; 0 failed; 0 ignored; 0 measured; 0 filtered out; finished in 0.00s
Если у вас есть опыт работы с C или C++, вам могут вспомниться `gcc` или `clang`. После успешной компиляции Rust создаст исполняемый бинарный файл.
Running tests/integration_test.rs (target/debug/deps/integration_test-92948b65e88960b4)
Если у вас есть опыт работы с C или C++, вам могут вспомниться `gcc` или `clang`. После успешной компиляции Rust создаст исполняемый бинарный файл.
running 1 test
test it_adds_two ... ok
Если у вас есть опыт работы с C или C++, вам могут вспомниться `gcc` или `clang`. После успешной компиляции Rust создаст исполняемый бинарный файл.
test result: ok. 1 passed; 0 failed; 0 ignored; 0 measured; 0 filtered out; finished in 0.00s
Если у вас есть опыт работы с C или C++, вам могут вспомниться `gcc` или `clang`. После успешной компиляции Rust создаст исполняемый бинарный файл.
Doc-tests adder
Если у вас есть опыт работы с C или C++, вам могут вспомниться `gcc` или `clang`. После успешной компиляции Rust создаст исполняемый бинарный файл.
running 0 tests
Если у вас есть опыт работы с C или C++, вам могут вспомниться `gcc` или `clang`. После успешной компиляции Rust создаст исполняемый бинарный файл.
test result: ok. 0 passed; 0 failed; 0 ignored; 0 measured; 0 filtered out; finished in 0.00s
Если у вас есть опыт работы с C или C++, вам могут вспомниться `gcc` или `clang`. После успешной компиляции Rust создаст исполняемый бинарный файл.
Having common appear in the test results with running 0 tests displayed for it is not what we wanted. We just wanted to share some code with the other integration test files. To avoid having common appear in the test output, instead of creating tests/common.rs, we’ll create tests/common/mod.rs. The project directory now looks like this:
├── Cargo.lock
├── Cargo.toml
├── src
│ └── lib.rs
└── tests
├── common
│ └── mod.rs
└── integration_test.rs
This is the older naming convention that Rust also understands that we mentioned in “Alternate File Paths” in Chapter 7. Naming the file this way tells Rust not to treat the common module as an integration test file. When we move the setup function code into tests/common/mod.rs and delete the tests/common.rs file, the section in the test output will no longer appear. Files in subdirectories of the tests directory don’t get compiled as separate crates or have sections in the test output.
After we’ve created tests/common/mod.rs, we can use it from any of the integration test files as a module. Here’s an example of calling the setup function from the it_adds_two test in tests/integration_test.rs:
Файл: tests/integration_test.rs
use adder::add_two;
Если у вас есть опыт работы с C или C++, вам могут вспомниться `gcc` или `clang`. После успешной компиляции Rust создаст исполняемый бинарный файл.
mod common;
Если у вас есть опыт работы с C или C++, вам могут вспомниться `gcc` или `clang`. После успешной компиляции Rust создаст исполняемый бинарный файл.
#[test]
fn it_adds_two() {
common::setup();
Если у вас есть опыт работы с C или C++, вам могут вспомниться `gcc` или `clang`. После успешной компиляции Rust создаст исполняемый бинарный файл.
let result = add_two(2);
assert_eq!(result, 4);
}Note that the mod common; declaration is the same as the module declaration we demonstrated in Listing 7-21. Then, in the test function, we can call the common::setup() function.
Integration Tests for Binary Crates
If our project is a binary crate that only contains a src/main.rs file and doesn’t have a src/lib.rs file, we can’t create integration tests in the tests directory and bring functions defined in the src/main.rs file into scope with a use statement. Only library crates expose functions that other crates can use; binary crates are meant to be run on their own.
This is one of the reasons Rust projects that provide a binary have a straightforward src/main.rs file that calls logic that lives in the src/lib.rs file. Using that structure, integration tests can test the library crate with use to make the important functionality available. If the important functionality works, the small amount of code in the src/main.rs file will work as well, and that small amount of code doesn’t need to be tested.
Подведём итоги
Rust’s testing features provide a way to specify how code should function to ensure that it continues to work as you expect, even as you make changes. Unit tests exercise different parts of a library separately and can test private implementation details. Integration tests check that many parts of the library work together correctly, and they use the library’s public API to test the code in the same way external code will use it. Even though Rust’s type system and ownership rules help prevent some kinds of bugs, tests are still important to reduce logic bugs having to do with how your code is expected to behave.
Let’s combine the knowledge you learned in this chapter and in previous chapters to work on a project!
Проект с вводом-выводом: разрабатываем приложение командной строки
This chapter is a recap of the many skills you’ve learned so far and an exploration of a few more standard library features. We’ll build a command line tool that interacts with file and command line input/output to practice some of the Rust concepts you now have under your belt.
Rust’s speed, safety, single binary output, and cross-platform support make it an ideal language for creating command line tools, so for our project, we’ll make our own version of the classic command line search tool grep (globally search a regular expression and print). In the simplest use case, grep searches a specified file for a specified string. To do so, grep takes as its arguments a file path and a string. Then, it reads the file, finds lines in that file that contain the string argument, and prints those lines.
Along the way, we’ll show how to make our command line tool use the terminal features that many other command line tools use. We’ll read the value of an environment variable to allow the user to configure the behavior of our tool. We’ll also print error messages to the standard error console stream (stderr) instead of standard output (stdout) so that, for example, the user can redirect successful output to a file while still seeing error messages onscreen.
One Rust community member, Andrew Gallant, has already created a fully featured, very fast version of grep, called ripgrep. By comparison, our version will be fairly simple, but this chapter will give you some of the background knowledge you need to understand a real-world project such as ripgrep.
Our grep project will combine a number of concepts you’ve learned so far:
- Organizing code (Chapter 7)
- Using vectors and strings (Chapter 8)
- Handling errors (Chapter 9)
- Using traits and lifetimes where appropriate (Chapter 10)
- Writing tests (Chapter 11)
We’ll also briefly introduce closures, iterators, and trait objects, which Chapter 13 and Chapter 18 will cover in detail.
Обработка аргументов командной строки
Обработка аргументов командной строки
Let’s create a new project with, as always, cargo new. We’ll call our project minigrep to distinguish it from the grep tool that you might already have on your system:
$ cargo new minigrep
Created binary (application) `minigrep` project
$ cd minigrep
The first task is to make minigrep accept its two command line arguments: the file path and a string to search for. That is, we want to be able to run our program with cargo run, two hyphens to indicate the following arguments are for our program rather than for cargo, a string to search for, and a path to a file to search in, like so:
$ cargo run -- searchstring example-filename.txt
Right now, the program generated by cargo new cannot process arguments we give it. Some existing libraries on crates.io can help with writing a program that accepts command line arguments, but because you’re just learning this concept, let’s implement this capability ourselves.
Reading the Argument Values
To enable minigrep to read the values of command line arguments we pass to it, we’ll need the std::env::args function provided in Rust’s standard library. This function returns an iterator of the command line arguments passed to minigrep. We’ll cover iterators fully in Chapter 13. For now, you only need to know two details about iterators: Iterators produce a series of values, and we can call the collect method on an iterator to turn it into a collection, such as a vector, which contains all the elements the iterator produces.
The code in Listing 12-1 allows your minigrep program to read any command line arguments passed to it and then collect the values into a vector.
use std::env;
Если у вас есть опыт работы с C или C++, вам могут вспомниться `gcc` или `clang`. После успешной компиляции Rust создаст исполняемый бинарный файл.
fn main() {
let args: Vec<String> = env::args().collect();
dbg!(args);
}First, we bring the std::env module into scope with a use statement so that we can use its args function. Notice that the std::env::args function is nested in two levels of modules. As we discussed in Chapter 7, in cases where the desired function is nested in more than one module, we’ve chosen to bring the parent module into scope rather than the function. By doing so, we can easily use other functions from std::env. It’s also less ambiguous than adding use std::env::args and then calling the function with just args, because args might easily be mistaken for a function that’s defined in the current module.
The args Function and Invalid Unicode
Note that std::env::args will panic if any argument contains invalid Unicode. If your program needs to accept arguments containing invalid Unicode, use std::env::args_os instead. That function returns an iterator that produces OsString values instead of String values. We’ve chosen to use std::env::args here for simplicity because OsString values differ per platform and are more complex to work with than String values.
On the first line of main, we call env::args, and we immediately use collect to turn the iterator into a vector containing all the values produced by the iterator. We can use the collect function to create many kinds of collections, so we explicitly annotate the type of args to specify that we want a vector of strings. Although you very rarely need to annotate types in Rust, collect is one function you do often need to annotate because Rust isn’t able to infer the kind of collection you want.
Finally, we print the vector using the debug macro. Let’s try running the code first with no arguments and then with two arguments:
$ cargo run
Compiling minigrep v0.1.0 (file:///projects/minigrep)
Finished `dev` profile [unoptimized + debuginfo] target(s) in 0.61s
Running `target/debug/minigrep`
[src/main.rs:5:5] args = [
"target/debug/minigrep",
]
$ cargo run -- needle haystack
Compiling minigrep v0.1.0 (file:///projects/minigrep)
Finished `dev` profile [unoptimized + debuginfo] target(s) in 1.57s
Running `target/debug/minigrep needle haystack`
[src/main.rs:5:5] args = [
"target/debug/minigrep",
"needle",
"haystack",
]
Notice that the first value in the vector is "target/debug/minigrep", which is the name of our binary. This matches the behavior of the arguments list in C, letting programs use the name by which they were invoked in their execution. It’s often convenient to have access to the program name in case you want to print it in messages or change the behavior of the program based on what command line alias was used to invoke the program. But for the purposes of this chapter, we’ll ignore it and save only the two arguments we need.
Saving the Argument Values in Variables
The program is currently able to access the values specified as command line arguments. Now we need to save the values of the two arguments in variables so that we can use the values throughout the rest of the program. We do that in Listing 12-2.
use std::env;
Если у вас есть опыт работы с C или C++, вам могут вспомниться `gcc` или `clang`. После успешной компиляции Rust создаст исполняемый бинарный файл.
fn main() {
let args: Vec<String> = env::args().collect();
Если у вас есть опыт работы с C или C++, вам могут вспомниться `gcc` или `clang`. После успешной компиляции Rust создаст исполняемый бинарный файл.
let query = &args[1];
let file_path = &args[2];
Если у вас есть опыт работы с C или C++, вам могут вспомниться `gcc` или `clang`. После успешной компиляции Rust создаст исполняемый бинарный файл.
println!("Searching for {query}");
println!("In file {file_path}");
}As we saw when we printed the vector, the program’s name takes up the first value in the vector at args[0], so we’re starting arguments at index 1. The first argument minigrep takes is the string we’re searching for, so we put a reference to the first argument in the variable query. The second argument will be the file path, so we put a reference to the second argument in the variable file_path.
We temporarily print the values of these variables to prove that the code is working as we intend. Let’s run this program again with the arguments test and sample.txt:
$ cargo run -- test sample.txt
Compiling minigrep v0.1.0 (file:///projects/minigrep)
Finished `dev` profile [unoptimized + debuginfo] target(s) in 0.0s
Running `target/debug/minigrep test sample.txt`
Searching for test
In file sample.txt
Great, the program is working! The values of the arguments we need are being saved into the right variables. Later we’ll add some error handling to deal with certain potential erroneous situations, such as when the user provides no arguments; for now, we’ll ignore that situation and work on adding file-reading capabilities instead.
Чтение файла
Чтение файла
Now we’ll add functionality to read the file specified in the file_path argument. First, we need a sample file to test it with: We’ll use a file with a small amount of text over multiple lines with some repeated words. Listing 12-3 has an Emily Dickinson poem that will work well! Create a file called poem.txt at the root level of your project, and enter the poem “I’m Nobody! Who are you?”
I'm nobody! Who are you?
Are you nobody, too?
Then there's a pair of us - don't tell!
They'd banish us, you know.
Если у вас есть опыт работы с C или C++, вам могут вспомниться `gcc` или `clang`. После успешной компиляции Rust создаст исполняемый бинарный файл.
How dreary to be somebody!
How public, like a frog
To tell your name the livelong day
To an admiring bog!
With the text in place, edit src/main.rs and add code to read the file, as shown in Listing 12-4.
use std::env;
use std::fs;
Если у вас есть опыт работы с C или C++, вам могут вспомниться `gcc` или `clang`. После успешной компиляции Rust создаст исполняемый бинарный файл.
fn main() {
// --код сокращён--
let args: Vec<String> = env::args().collect();
Если у вас есть опыт работы с C или C++, вам могут вспомниться `gcc` или `clang`. После успешной компиляции Rust создаст исполняемый бинарный файл.
let query = &args[1];
let file_path = &args[2];
Если у вас есть опыт работы с C или C++, вам могут вспомниться `gcc` или `clang`. После успешной компиляции Rust создаст исполняемый бинарный файл.
println!("Searching for {query}");
println!("In file {file_path}");
Если у вас есть опыт работы с C или C++, вам могут вспомниться `gcc` или `clang`. После успешной компиляции Rust создаст исполняемый бинарный файл.
let contents = fs::read_to_string(file_path)
.expect("Should have been able to read the file");
Если у вас есть опыт работы с C или C++, вам могут вспомниться `gcc` или `clang`. После успешной компиляции Rust создаст исполняемый бинарный файл.
println!("With text:\n{contents}");
}First, we bring in a relevant part of the standard library with a use statement: We need std::fs to handle files.
In main, the new statement fs::read_to_string takes the file_path, opens that file, and returns a value of type std::io::Result<String> that contains the file’s contents.
After that, we again add a temporary println! statement that prints the value of contents after the file is read so that we can check that the program is working so far.
Let’s run this code with any string as the first command line argument (because we haven’t implemented the searching part yet) and the poem.txt file as the second argument:
$ cargo run -- the poem.txt
Compiling minigrep v0.1.0 (file:///projects/minigrep)
Finished `dev` profile [unoptimized + debuginfo] target(s) in 0.0s
Running `target/debug/minigrep the poem.txt`
Searching for the
In file poem.txt
With text:
I'm nobody! Who are you?
Are you nobody, too?
Then there's a pair of us - don't tell!
They'd banish us, you know.
Если у вас есть опыт работы с C или C++, вам могут вспомниться `gcc` или `clang`. После успешной компиляции Rust создаст исполняемый бинарный файл.
How dreary to be somebody!
How public, like a frog
To tell your name the livelong day
To an admiring bog!
Если у вас есть опыт работы с C или C++, вам могут вспомниться `gcc` или `clang`. После успешной компиляции Rust создаст исполняемый бинарный файл.
Great! The code read and then printed the contents of the file. But the code has a few flaws. At the moment, the main function has multiple responsibilities: Generally, functions are clearer and easier to maintain if each function is responsible for only one idea. The other problem is that we’re not handling errors as well as we could. The program is still small, so these flaws aren’t a big problem, but as the program grows, it will be harder to fix them cleanly. It’s a good practice to begin refactoring early on when developing a program because it’s much easier to refactor smaller amounts of code. We’ll do that next.
Рефакторинг: развитие модульности и обработки ошибок
Рефакторинг: развитие модульности и обработки ошибок
To improve our program, we’ll fix four problems that have to do with the program’s structure and how it’s handling potential errors. First, our main function now performs two tasks: It parses arguments and reads files. As our program grows, the number of separate tasks the main function handles will increase. As a function gains responsibilities, it becomes more difficult to reason about, harder to test, and harder to change without breaking one of its parts. It’s best to separate functionality so that each function is responsible for one task.
This issue also ties into the second problem: Although query and file_path are configuration variables to our program, variables like contents are used to perform the program’s logic. The longer main becomes, the more variables we’ll need to bring into scope; the more variables we have in scope, the harder it will be to keep track of the purpose of each. It’s best to group the configuration variables into one structure to make their purpose clear.
The third problem is that we’ve used expect to print an error message when reading the file fails, but the error message just prints Should have been able to read the file. Reading a file can fail in a number of ways: For example, the file could be missing, or we might not have permission to open it. Right now, regardless of the situation, we’d print the same error message for everything, which wouldn’t give the user any information!
Fourth, we use expect to handle an error, and if the user runs our program without specifying enough arguments, they’ll get an index out of bounds error from Rust that doesn’t clearly explain the problem. It would be best if all the error-handling code were in one place so that future maintainers had only one place to consult the code if the error-handling logic needed to change. Having all the error-handling code in one place will also ensure that we’re printing messages that will be meaningful to our end users.
Let’s address these four problems by refactoring our project.
Separating Concerns in Binary Projects
The organizational problem of allocating responsibility for multiple tasks to the main function is common to many binary projects. As a result, many Rust programmers find it useful to split up the separate concerns of a binary program when the main function starts getting large. This process has the following steps:
- Split your program into a main.rs file and a lib.rs file and move your program’s logic to lib.rs.
- As long as your command line parsing logic is small, it can remain in the
mainfunction. - When the command line parsing logic starts getting complicated, extract it from the
mainfunction into other functions or types.
The responsibilities that remain in the main function after this process should be limited to the following:
- Calling the command line parsing logic with the argument values
- Setting up any other configuration
- Calling a
runfunction in lib.rs - Handling the error if
runreturns an error
This pattern is about separating concerns: main.rs handles running the program and lib.rs handles all the logic of the task at hand. Because you can’t test the main function directly, this structure lets you test all of your program’s logic by moving it out of the main function. The code that remains in the main function will be small enough to verify its correctness by reading it. Let’s rework our program by following this process.
Extracting the Argument Parser
We’ll extract the functionality for parsing arguments into a function that main will call. Listing 12-5 shows the new start of the main function that calls a new function parse_config, which we’ll define in src/main.rs.
use std::env;
use std::fs;
Если у вас есть опыт работы с C или C++, вам могут вспомниться `gcc` или `clang`. После успешной компиляции Rust создаст исполняемый бинарный файл.
fn main() {
let args: Vec<String> = env::args().collect();
Если у вас есть опыт работы с C или C++, вам могут вспомниться `gcc` или `clang`. После успешной компиляции Rust создаст исполняемый бинарный файл.
let (query, file_path) = parse_config(&args);
Если у вас есть опыт работы с C или C++, вам могут вспомниться `gcc` или `clang`. После успешной компиляции Rust создаст исполняемый бинарный файл.
// --код сокращён--
Если у вас есть опыт работы с C или C++, вам могут вспомниться `gcc` или `clang`. После успешной компиляции Rust создаст исполняемый бинарный файл.
println!("Searching for {query}");
println!("In file {file_path}");
Если у вас есть опыт работы с C или C++, вам могут вспомниться `gcc` или `clang`. После успешной компиляции Rust создаст исполняемый бинарный файл.
let contents = fs::read_to_string(file_path)
.expect("Should have been able to read the file");
Если у вас есть опыт работы с C или C++, вам могут вспомниться `gcc` или `clang`. После успешной компиляции Rust создаст исполняемый бинарный файл.
println!("With text:\n{contents}");
}
Если у вас есть опыт работы с C или C++, вам могут вспомниться `gcc` или `clang`. После успешной компиляции Rust создаст исполняемый бинарный файл.
fn parse_config(args: &[String]) -> (&str, &str) {
let query = &args[1];
let file_path = &args[2];
Если у вас есть опыт работы с C или C++, вам могут вспомниться `gcc` или `clang`. После успешной компиляции Rust создаст исполняемый бинарный файл.
(query, file_path)
}parse_config function from mainWe’re still collecting the command line arguments into a vector, but instead of assigning the argument value at index 1 to the variable query and the argument value at index 2 to the variable file_path within the main function, we pass the whole vector to the parse_config function. The parse_config function then holds the logic that determines which argument goes in which variable and passes the values back to main. We still create the query and file_path variables in main, but main no longer has the responsibility of determining how the command line arguments and variables correspond.
This rework may seem like overkill for our small program, but we’re refactoring in small, incremental steps. After making this change, run the program again to verify that the argument parsing still works. It’s good to check your progress often, to help identify the cause of problems when they occur.
Grouping Configuration Values
We can take another small step to improve the parse_config function further. At the moment, we’re returning a tuple, but then we immediately break that tuple into individual parts again. This is a sign that perhaps we don’t have the right abstraction yet.
Another indicator that shows there’s room for improvement is the config part of parse_config, which implies that the two values we return are related and are both part of one configuration value. We’re not currently conveying this meaning in the structure of the data other than by grouping the two values into a tuple; we’ll instead put the two values into one struct and give each of the struct fields a meaningful name. Doing so will make it easier for future maintainers of this code to understand how the different values relate to each other and what their purpose is.
Listing 12-6 shows the improvements to the parse_config function.
use std::env;
use std::fs;
Если у вас есть опыт работы с C или C++, вам могут вспомниться `gcc` или `clang`. После успешной компиляции Rust создаст исполняемый бинарный файл.
fn main() {
let args: Vec<String> = env::args().collect();
Если у вас есть опыт работы с C или C++, вам могут вспомниться `gcc` или `clang`. После успешной компиляции Rust создаст исполняемый бинарный файл.
let config = parse_config(&args);
Если у вас есть опыт работы с C или C++, вам могут вспомниться `gcc` или `clang`. После успешной компиляции Rust создаст исполняемый бинарный файл.
println!("Searching for {}", config.query);
println!("In file {}", config.file_path);
Если у вас есть опыт работы с C или C++, вам могут вспомниться `gcc` или `clang`. После успешной компиляции Rust создаст исполняемый бинарный файл.
let contents = fs::read_to_string(config.file_path)
.expect("Should have been able to read the file");
Если у вас есть опыт работы с C или C++, вам могут вспомниться `gcc` или `clang`. После успешной компиляции Rust создаст исполняемый бинарный файл.
// --код сокращён--
Если у вас есть опыт работы с C или C++, вам могут вспомниться `gcc` или `clang`. После успешной компиляции Rust создаст исполняемый бинарный файл.
println!("With text:\n{contents}");
}
Если у вас есть опыт работы с C или C++, вам могут вспомниться `gcc` или `clang`. После успешной компиляции Rust создаст исполняемый бинарный файл.
struct Config {
query: String,
file_path: String,
}
Если у вас есть опыт работы с C или C++, вам могут вспомниться `gcc` или `clang`. После успешной компиляции Rust создаст исполняемый бинарный файл.
fn parse_config(args: &[String]) -> Config {
let query = args[1].clone();
let file_path = args[2].clone();
Если у вас есть опыт работы с C или C++, вам могут вспомниться `gcc` или `clang`. После успешной компиляции Rust создаст исполняемый бинарный файл.
Config { query, file_path }
}parse_config to return an instance of a Config structWe’ve added a struct named Config defined to have fields named query and file_path. The signature of parse_config now indicates that it returns a Config value. In the body of parse_config, where we used to return string slices that reference String values in args, we now define Config to contain owned String values. The args variable in main is the owner of the argument values and is only letting the parse_config function borrow them, which means we’d violate Rust’s borrowing rules if Config tried to take ownership of the values in args.
There are a number of ways we could manage the String data; the easiest, though somewhat inefficient, route is to call the clone method on the values. This will make a full copy of the data for the Config instance to own, which takes more time and memory than storing a reference to the string data. However, cloning the data also makes our code very straightforward because we don’t have to manage the lifetimes of the references; in this circumstance, giving up a little performance to gain simplicity is a worthwhile trade-off.
The Trade-Offs of Using clone
There’s a tendency among many Rustaceans to avoid using clone to fix ownership problems because of its runtime cost. In Chapter 13, you’ll learn how to use more efficient methods in this type of situation. But for now, it’s okay to copy a few strings to continue making progress because you’ll make these copies only once and your file path and query string are very small. It’s better to have a working program that’s a bit inefficient than to try to hyperoptimize code on your first pass. As you become more experienced with Rust, it’ll be easier to start with the most efficient solution, but for now, it’s perfectly acceptable to call clone.
We’ve updated main so that it places the instance of Config returned by parse_config into a variable named config, and we updated the code that previously used the separate query and file_path variables so that it now uses the fields on the Config struct instead.
Now our code more clearly conveys that query and file_path are related and that their purpose is to configure how the program will work. Any code that uses these values knows to find them in the config instance in the fields named for their purpose.
Creating a Constructor for Config
So far, we’ve extracted the logic responsible for parsing the command line arguments from main and placed it in the parse_config function. Doing so helped us see that the query and file_path values were related, and that relationship should be conveyed in our code. We then added a Config struct to name the related purpose of query and file_path and to be able to return the values’ names as struct field names from the parse_config function.
So, now that the purpose of the parse_config function is to create a Config instance, we can change parse_config from a plain function to a function named new that is associated with the Config struct. Making this change will make the code more idiomatic. We can create instances of types in the standard library, such as String, by calling String::new. Similarly, by changing parse_config into a new function associated with Config, we’ll be able to create instances of Config by calling Config::new. Listing 12-7 shows the changes we need to make.
use std::env;
use std::fs;
Если у вас есть опыт работы с C или C++, вам могут вспомниться `gcc` или `clang`. После успешной компиляции Rust создаст исполняемый бинарный файл.
fn main() {
let args: Vec<String> = env::args().collect();
Если у вас есть опыт работы с C или C++, вам могут вспомниться `gcc` или `clang`. После успешной компиляции Rust создаст исполняемый бинарный файл.
let config = Config::new(&args);
Если у вас есть опыт работы с C или C++, вам могут вспомниться `gcc` или `clang`. После успешной компиляции Rust создаст исполняемый бинарный файл.
println!("Searching for {}", config.query);
println!("In file {}", config.file_path);
Если у вас есть опыт работы с C или C++, вам могут вспомниться `gcc` или `clang`. После успешной компиляции Rust создаст исполняемый бинарный файл.
let contents = fs::read_to_string(config.file_path)
.expect("Should have been able to read the file");
Если у вас есть опыт работы с C или C++, вам могут вспомниться `gcc` или `clang`. После успешной компиляции Rust создаст исполняемый бинарный файл.
println!("With text:\n{contents}");
Если у вас есть опыт работы с C или C++, вам могут вспомниться `gcc` или `clang`. После успешной компиляции Rust создаст исполняемый бинарный файл.
// --код сокращён--
}
Если у вас есть опыт работы с C или C++, вам могут вспомниться `gcc` или `clang`. После успешной компиляции Rust создаст исполняемый бинарный файл.
// --код сокращён--
Если у вас есть опыт работы с C или C++, вам могут вспомниться `gcc` или `clang`. После успешной компиляции Rust создаст исполняемый бинарный файл.
struct Config {
query: String,
file_path: String,
}
Если у вас есть опыт работы с C или C++, вам могут вспомниться `gcc` или `clang`. После успешной компиляции Rust создаст исполняемый бинарный файл.
impl Config {
fn new(args: &[String]) -> Config {
let query = args[1].clone();
let file_path = args[2].clone();
Если у вас есть опыт работы с C или C++, вам могут вспомниться `gcc` или `clang`. После успешной компиляции Rust создаст исполняемый бинарный файл.
Config { query, file_path }
}
}parse_config into Config::newWe’ve updated main where we were calling parse_config to instead call Config::new. We’ve changed the name of parse_config to new and moved it within an impl block, which associates the new function with Config. Try compiling this code again to make sure it works.
Fixing the Error Handling
Now we’ll work on fixing our error handling. Recall that attempting to access the values in the args vector at index 1 or index 2 will cause the program to panic if the vector contains fewer than three items. Try running the program without any arguments; it will look like this:
$ cargo run
Compiling minigrep v0.1.0 (file:///projects/minigrep)
Finished `dev` profile [unoptimized + debuginfo] target(s) in 0.0s
Running `target/debug/minigrep`
Если у вас есть опыт работы с C или C++, вам могут вспомниться `gcc` или `clang`. После успешной компиляции Rust создаст исполняемый бинарный файл.
thread 'main' panicked at src/main.rs:27:21:
index out of bounds: the len is 1 but the index is 1
note: run with `RUST_BACKTRACE=1` environment variable to display a backtrace
The line index out of bounds: the len is 1 but the index is 1 is an error message intended for programmers. It won’t help our end users understand what they should do instead. Let’s fix that now.
Improving the Error Message
In Listing 12-8, we add a check in the new function that will verify that the slice is long enough before accessing index 1 and index 2. If the slice isn’t long enough, the program panics and displays a better error message.
use std::env;
use std::fs;
Если у вас есть опыт работы с C или C++, вам могут вспомниться `gcc` или `clang`. После успешной компиляции Rust создаст исполняемый бинарный файл.
fn main() {
let args: Vec<String> = env::args().collect();
Если у вас есть опыт работы с C или C++, вам могут вспомниться `gcc` или `clang`. После успешной компиляции Rust создаст исполняемый бинарный файл.
let config = Config::new(&args);
Если у вас есть опыт работы с C или C++, вам могут вспомниться `gcc` или `clang`. После успешной компиляции Rust создаст исполняемый бинарный файл.
println!("Searching for {}", config.query);
println!("In file {}", config.file_path);
Если у вас есть опыт работы с C или C++, вам могут вспомниться `gcc` или `clang`. После успешной компиляции Rust создаст исполняемый бинарный файл.
let contents = fs::read_to_string(config.file_path)
.expect("Should have been able to read the file");
Если у вас есть опыт работы с C или C++, вам могут вспомниться `gcc` или `clang`. После успешной компиляции Rust создаст исполняемый бинарный файл.
println!("With text:\n{contents}");
}
Если у вас есть опыт работы с C или C++, вам могут вспомниться `gcc` или `clang`. После успешной компиляции Rust создаст исполняемый бинарный файл.
struct Config {
query: String,
file_path: String,
}
Если у вас есть опыт работы с C или C++, вам могут вспомниться `gcc` или `clang`. После успешной компиляции Rust создаст исполняемый бинарный файл.
impl Config {
// --код сокращён--
fn new(args: &[String]) -> Config {
if args.len() < 3 {
panic!("not enough arguments");
}
// --код сокращён--
Если у вас есть опыт работы с C или C++, вам могут вспомниться `gcc` или `clang`. После успешной компиляции Rust создаст исполняемый бинарный файл.
let query = args[1].clone();
let file_path = args[2].clone();
Если у вас есть опыт работы с C или C++, вам могут вспомниться `gcc` или `clang`. После успешной компиляции Rust создаст исполняемый бинарный файл.
Config { query, file_path }
}
}This code is similar to the Guess::new function we wrote in Listing 9-13, where we called panic! when the value argument was out of the range of valid values. Instead of checking for a range of values here, we’re checking that the length of args is at least 3 and the rest of the function can operate under the assumption that this condition has been met. If args has fewer than three items, this condition will be true, and we call the panic! macro to end the program immediately.
With these extra few lines of code in new, let’s run the program without any arguments again to see what the error looks like now:
$ cargo run
Compiling minigrep v0.1.0 (file:///projects/minigrep)
Finished `dev` profile [unoptimized + debuginfo] target(s) in 0.0s
Running `target/debug/minigrep`
Если у вас есть опыт работы с C или C++, вам могут вспомниться `gcc` или `clang`. После успешной компиляции Rust создаст исполняемый бинарный файл.
thread 'main' panicked at src/main.rs:26:13:
not enough arguments
note: run with `RUST_BACKTRACE=1` environment variable to display a backtrace
This output is better: We now have a reasonable error message. However, we also have extraneous information we don’t want to give to our users. Perhaps the technique we used in Listing 9-13 isn’t the best one to use here: A call to panic! is more appropriate for a programming problem than a usage problem, as discussed in Chapter 9. Instead, we’ll use the other technique you learned about in Chapter 9—returning a Result that indicates either success or an error.
Returning a Result Instead of Calling panic!
We can instead return a Result value that will contain a Config instance in the successful case and will describe the problem in the error case. We’re also going to change the function name from new to build because many programmers expect new functions to never fail. When Config::build is communicating to main, we can use the Result type to signal there was a problem. Then, we can change main to convert an Err variant into a more practical error for our users without the surrounding text about thread 'main' and RUST_BACKTRACE that a call to panic! causes.
Listing 12-9 shows the changes we need to make to the return value of the function we’re now calling Config::build and the body of the function needed to return a Result. Note that this won’t compile until we update main as well, which we’ll do in the next listing.
use std::env;
use std::fs;
Если у вас есть опыт работы с C или C++, вам могут вспомниться `gcc` или `clang`. После успешной компиляции Rust создаст исполняемый бинарный файл.
fn main() {
let args: Vec<String> = env::args().collect();
Если у вас есть опыт работы с C или C++, вам могут вспомниться `gcc` или `clang`. После успешной компиляции Rust создаст исполняемый бинарный файл.
let config = Config::new(&args);
Если у вас есть опыт работы с C или C++, вам могут вспомниться `gcc` или `clang`. После успешной компиляции Rust создаст исполняемый бинарный файл.
println!("Searching for {}", config.query);
println!("In file {}", config.file_path);
Если у вас есть опыт работы с C или C++, вам могут вспомниться `gcc` или `clang`. После успешной компиляции Rust создаст исполняемый бинарный файл.
let contents = fs::read_to_string(config.file_path)
.expect("Should have been able to read the file");
Если у вас есть опыт работы с C или C++, вам могут вспомниться `gcc` или `clang`. После успешной компиляции Rust создаст исполняемый бинарный файл.
println!("With text:\n{contents}");
}
Если у вас есть опыт работы с C или C++, вам могут вспомниться `gcc` или `clang`. После успешной компиляции Rust создаст исполняемый бинарный файл.
struct Config {
query: String,
file_path: String,
}
Если у вас есть опыт работы с C или C++, вам могут вспомниться `gcc` или `clang`. После успешной компиляции Rust создаст исполняемый бинарный файл.
impl Config {
fn build(args: &[String]) -> Result<Config, &'static str> {
if args.len() < 3 {
return Err("not enough arguments");
}
Если у вас есть опыт работы с C или C++, вам могут вспомниться `gcc` или `clang`. После успешной компиляции Rust создаст исполняемый бинарный файл.
let query = args[1].clone();
let file_path = args[2].clone();
Если у вас есть опыт работы с C или C++, вам могут вспомниться `gcc` или `clang`. После успешной компиляции Rust создаст исполняемый бинарный файл.
Ok(Config { query, file_path })
}
}Result from Config::buildOur build function returns a Result with a Config instance in the success case and a string literal in the error case. Our error values will always be string literals that have the 'static lifetime.
We’ve made two changes in the body of the function: Instead of calling panic! when the user doesn’t pass enough arguments, we now return an Err value, and we’ve wrapped the Config return value in an Ok. These changes make the function conform to its new type signature.
Returning an Err value from Config::build allows the main function to handle the Result value returned from the build function and exit the process more cleanly in the error case.
Calling Config::build and Handling Errors
To handle the error case and print a user-friendly message, we need to update main to handle the Result being returned by Config::build, as shown in Listing 12-10. We’ll also take the responsibility of exiting the command line tool with a nonzero error code away from panic! and instead implement it by hand. A nonzero exit status is a convention to signal to the process that called our program that the program exited with an error state.
use std::env;
use std::fs;
use std::process;
Если у вас есть опыт работы с C или C++, вам могут вспомниться `gcc` или `clang`. После успешной компиляции Rust создаст исполняемый бинарный файл.
fn main() {
let args: Vec<String> = env::args().collect();
Если у вас есть опыт работы с C или C++, вам могут вспомниться `gcc` или `clang`. После успешной компиляции Rust создаст исполняемый бинарный файл.
let config = Config::build(&args).unwrap_or_else(|err| {
println!("Problem parsing arguments: {err}");
process::exit(1);
});
Если у вас есть опыт работы с C или C++, вам могут вспомниться `gcc` или `clang`. После успешной компиляции Rust создаст исполняемый бинарный файл.
// --код сокращён--
Если у вас есть опыт работы с C или C++, вам могут вспомниться `gcc` или `clang`. После успешной компиляции Rust создаст исполняемый бинарный файл.
println!("Searching for {}", config.query);
println!("In file {}", config.file_path);
Если у вас есть опыт работы с C или C++, вам могут вспомниться `gcc` или `clang`. После успешной компиляции Rust создаст исполняемый бинарный файл.
let contents = fs::read_to_string(config.file_path)
.expect("Should have been able to read the file");
Если у вас есть опыт работы с C или C++, вам могут вспомниться `gcc` или `clang`. После успешной компиляции Rust создаст исполняемый бинарный файл.
println!("With text:\n{contents}");
}
Если у вас есть опыт работы с C или C++, вам могут вспомниться `gcc` или `clang`. После успешной компиляции Rust создаст исполняемый бинарный файл.
struct Config {
query: String,
file_path: String,
}
Если у вас есть опыт работы с C или C++, вам могут вспомниться `gcc` или `clang`. После успешной компиляции Rust создаст исполняемый бинарный файл.
impl Config {
fn build(args: &[String]) -> Result<Config, &'static str> {
if args.len() < 3 {
return Err("not enough arguments");
}
Если у вас есть опыт работы с C или C++, вам могут вспомниться `gcc` или `clang`. После успешной компиляции Rust создаст исполняемый бинарный файл.
let query = args[1].clone();
let file_path = args[2].clone();
Если у вас есть опыт работы с C или C++, вам могут вспомниться `gcc` или `clang`. После успешной компиляции Rust создаст исполняемый бинарный файл.
Ok(Config { query, file_path })
}
}Config failsIn this listing, we’ve used a method we haven’t covered in detail yet: unwrap_or_else, which is defined on Result<T, E> by the standard library. Using unwrap_or_else allows us to define some custom, non-panic! error handling. If the Result is an Ok value, this method’s behavior is similar to unwrap: It returns the inner value that Ok is wrapping. However, if the value is an Err value, this method calls the code in the closure, which is an anonymous function we define and pass as an argument to unwrap_or_else. We’ll cover closures in more detail in Chapter 13. For now, you just need to know that unwrap_or_else will pass the inner value of the Err, which in this case is the static string "not enough arguments" that we added in Listing 12-9, to our closure in the argument err that appears between the vertical pipes. The code in the closure can then use the err value when it runs.
We’ve added a new use line to bring process from the standard library into scope. The code in the closure that will be run in the error case is only two lines: We print the err value and then call process::exit. The process::exit function will stop the program immediately and return the number that was passed as the exit status code. This is similar to the panic!-based handling we used in Listing 12-8, but we no longer get all the extra output. Let’s try it:
$ cargo run
Compiling minigrep v0.1.0 (file:///projects/minigrep)
Finished `dev` profile [unoptimized + debuginfo] target(s) in 0.48s
Running `target/debug/minigrep`
Problem parsing arguments: not enough arguments
Great! This output is much friendlier for our users.
Extracting Logic from main
Now that we’ve finished refactoring the configuration parsing, let’s turn to the program’s logic. As we stated in “Separating Concerns in Binary Projects”, we’ll extract a function named run that will hold all the logic currently in the main function that isn’t involved with setting up configuration or handling errors. When we’re done, the main function will be concise and easy to verify by inspection, and we’ll be able to write tests for all the other logic.
Listing 12-11 shows the small, incremental improvement of extracting a run function.
use std::env;
use std::fs;
use std::process;
Если у вас есть опыт работы с C или C++, вам могут вспомниться `gcc` или `clang`. После успешной компиляции Rust создаст исполняемый бинарный файл.
fn main() {
// --код сокращён--
Если у вас есть опыт работы с C или C++, вам могут вспомниться `gcc` или `clang`. После успешной компиляции Rust создаст исполняемый бинарный файл.
let args: Vec<String> = env::args().collect();
Если у вас есть опыт работы с C или C++, вам могут вспомниться `gcc` или `clang`. После успешной компиляции Rust создаст исполняемый бинарный файл.
let config = Config::build(&args).unwrap_or_else(|err| {
println!("Problem parsing arguments: {err}");
process::exit(1);
});
Если у вас есть опыт работы с C или C++, вам могут вспомниться `gcc` или `clang`. После успешной компиляции Rust создаст исполняемый бинарный файл.
println!("Searching for {}", config.query);
println!("In file {}", config.file_path);
Если у вас есть опыт работы с C или C++, вам могут вспомниться `gcc` или `clang`. После успешной компиляции Rust создаст исполняемый бинарный файл.
run(config);
}
Если у вас есть опыт работы с C или C++, вам могут вспомниться `gcc` или `clang`. После успешной компиляции Rust создаст исполняемый бинарный файл.
fn run(config: Config) {
let contents = fs::read_to_string(config.file_path)
.expect("Should have been able to read the file");
Если у вас есть опыт работы с C или C++, вам могут вспомниться `gcc` или `clang`. После успешной компиляции Rust создаст исполняемый бинарный файл.
println!("With text:\n{contents}");
}
Если у вас есть опыт работы с C или C++, вам могут вспомниться `gcc` или `clang`. После успешной компиляции Rust создаст исполняемый бинарный файл.
// --код сокращён--
Если у вас есть опыт работы с C или C++, вам могут вспомниться `gcc` или `clang`. После успешной компиляции Rust создаст исполняемый бинарный файл.
struct Config {
query: String,
file_path: String,
}
Если у вас есть опыт работы с C или C++, вам могут вспомниться `gcc` или `clang`. После успешной компиляции Rust создаст исполняемый бинарный файл.
impl Config {
fn build(args: &[String]) -> Result<Config, &'static str> {
if args.len() < 3 {
return Err("not enough arguments");
}
Если у вас есть опыт работы с C или C++, вам могут вспомниться `gcc` или `clang`. После успешной компиляции Rust создаст исполняемый бинарный файл.
let query = args[1].clone();
let file_path = args[2].clone();
Если у вас есть опыт работы с C или C++, вам могут вспомниться `gcc` или `clang`. После успешной компиляции Rust создаст исполняемый бинарный файл.
Ok(Config { query, file_path })
}
}run function containing the rest of the program logicThe run function now contains all the remaining logic from main, starting from reading the file. The run function takes the Config instance as an argument.
Returning Errors from run
With the remaining program logic separated into the run function, we can improve the error handling, as we did with Config::build in Listing 12-9. Instead of allowing the program to panic by calling expect, the run function will return a Result<T, E> when something goes wrong. This will let us further consolidate the logic around handling errors into main in a user-friendly way. Listing 12-12 shows the changes we need to make to the signature and body of run.
use std::env;
use std::fs;
use std::process;
use std::error::Error;
Если у вас есть опыт работы с C или C++, вам могут вспомниться `gcc` или `clang`. После успешной компиляции Rust создаст исполняемый бинарный файл.
// --код сокращён--
Если у вас есть опыт работы с C или C++, вам могут вспомниться `gcc` или `clang`. После успешной компиляции Rust создаст исполняемый бинарный файл.
Если у вас есть опыт работы с C или C++, вам могут вспомниться `gcc` или `clang`. После успешной компиляции Rust создаст исполняемый бинарный файл.
fn main() {
let args: Vec<String> = env::args().collect();
Если у вас есть опыт работы с C или C++, вам могут вспомниться `gcc` или `clang`. После успешной компиляции Rust создаст исполняемый бинарный файл.
let config = Config::build(&args).unwrap_or_else(|err| {
println!("Problem parsing arguments: {err}");
process::exit(1);
});
Если у вас есть опыт работы с C или C++, вам могут вспомниться `gcc` или `clang`. После успешной компиляции Rust создаст исполняемый бинарный файл.
println!("Searching for {}", config.query);
println!("In file {}", config.file_path);
Если у вас есть опыт работы с C или C++, вам могут вспомниться `gcc` или `clang`. После успешной компиляции Rust создаст исполняемый бинарный файл.
run(config);
}
Если у вас есть опыт работы с C или C++, вам могут вспомниться `gcc` или `clang`. После успешной компиляции Rust создаст исполняемый бинарный файл.
fn run(config: Config) -> Result<(), Box<dyn Error>> {
let contents = fs::read_to_string(config.file_path)?;
Если у вас есть опыт работы с C или C++, вам могут вспомниться `gcc` или `clang`. После успешной компиляции Rust создаст исполняемый бинарный файл.
println!("With text:\n{contents}");
Если у вас есть опыт работы с C или C++, вам могут вспомниться `gcc` или `clang`. После успешной компиляции Rust создаст исполняемый бинарный файл.
Ok(())
}
Если у вас есть опыт работы с C или C++, вам могут вспомниться `gcc` или `clang`. После успешной компиляции Rust создаст исполняемый бинарный файл.
struct Config {
query: String,
file_path: String,
}
Если у вас есть опыт работы с C или C++, вам могут вспомниться `gcc` или `clang`. После успешной компиляции Rust создаст исполняемый бинарный файл.
impl Config {
fn build(args: &[String]) -> Result<Config, &'static str> {
if args.len() < 3 {
return Err("not enough arguments");
}
Если у вас есть опыт работы с C или C++, вам могут вспомниться `gcc` или `clang`. После успешной компиляции Rust создаст исполняемый бинарный файл.
let query = args[1].clone();
let file_path = args[2].clone();
Если у вас есть опыт работы с C или C++, вам могут вспомниться `gcc` или `clang`. После успешной компиляции Rust создаст исполняемый бинарный файл.
Ok(Config { query, file_path })
}
}run function to return ResultWe’ve made three significant changes here. First, we changed the return type of the run function to Result<(), Box<dyn Error>>. This function previously returned the unit type, (), and we keep that as the value returned in the Ok case.
For the error type, we used the trait object Box<dyn Error> (and we brought std::error::Error into scope with a use statement at the top). We’ll cover trait objects in Chapter 18. For now, just know that Box<dyn Error> means the function will return a type that implements the Error trait, but we don’t have to specify what particular type the return value will be. This gives us flexibility to return error values that may be of different types in different error cases. The dyn keyword is short for dynamic.
Second, we’ve removed the call to expect in favor of the ? operator, as we talked about in Chapter 9. Rather than panic! on an error, ? will return the error value from the current function for the caller to handle.
Third, the run function now returns an Ok value in the success case. We’ve declared the run function’s success type as () in the signature, which means we need to wrap the unit type value in the Ok value. This Ok(()) syntax might look a bit strange at first. But using () like this is the idiomatic way to indicate that we’re calling run for its side effects only; it doesn’t return a value we need.
When you run this code, it will compile but will display a warning:
$ cargo run -- the poem.txt
Compiling minigrep v0.1.0 (file:///projects/minigrep)
warning: unused `Result` that must be used
--> src/main.rs:19:5
|
19 | run(config);
| ^^^^^^^^^^^
|
= note: this `Result` may be an `Err` variant, which should be handled
= note: `#[warn(unused_must_use)]` on by default
help: use `let _ = ...` to ignore the resulting value
|
19 | let _ = run(config);
| +++++++
Если у вас есть опыт работы с C или C++, вам могут вспомниться `gcc` или `clang`. После успешной компиляции Rust создаст исполняемый бинарный файл.
warning: `minigrep` (bin "minigrep") generated 1 warning
Finished `dev` profile [unoptimized + debuginfo] target(s) in 0.71s
Running `target/debug/minigrep the poem.txt`
Searching for the
In file poem.txt
With text:
I'm nobody! Who are you?
Are you nobody, too?
Then there's a pair of us - don't tell!
They'd banish us, you know.
Если у вас есть опыт работы с C или C++, вам могут вспомниться `gcc` или `clang`. После успешной компиляции Rust создаст исполняемый бинарный файл.
How dreary to be somebody!
How public, like a frog
To tell your name the livelong day
To an admiring bog!
Если у вас есть опыт работы с C или C++, вам могут вспомниться `gcc` или `clang`. После успешной компиляции Rust создаст исполняемый бинарный файл.
Rust tells us that our code ignored the Result value and the Result value might indicate that an error occurred. But we’re not checking to see whether or not there was an error, and the compiler reminds us that we probably meant to have some error-handling code here! Let’s rectify that problem now.
Handling Errors Returned from run in main
We’ll check for errors and handle them using a technique similar to one we used with Config::build in Listing 12-10, but with a slight difference:
Файл: src/main.rs
use std::env;
use std::error::Error;
use std::fs;
use std::process;
Если у вас есть опыт работы с C или C++, вам могут вспомниться `gcc` или `clang`. После успешной компиляции Rust создаст исполняемый бинарный файл.
fn main() {
// --код сокращён--
Если у вас есть опыт работы с C или C++, вам могут вспомниться `gcc` или `clang`. После успешной компиляции Rust создаст исполняемый бинарный файл.
let args: Vec<String> = env::args().collect();
Если у вас есть опыт работы с C или C++, вам могут вспомниться `gcc` или `clang`. После успешной компиляции Rust создаст исполняемый бинарный файл.
let config = Config::build(&args).unwrap_or_else(|err| {
println!("Problem parsing arguments: {err}");
process::exit(1);
});
Если у вас есть опыт работы с C или C++, вам могут вспомниться `gcc` или `clang`. После успешной компиляции Rust создаст исполняемый бинарный файл.
println!("Searching for {}", config.query);
println!("In file {}", config.file_path);
Если у вас есть опыт работы с C или C++, вам могут вспомниться `gcc` или `clang`. После успешной компиляции Rust создаст исполняемый бинарный файл.
if let Err(e) = run(config) {
println!("Application error: {e}");
process::exit(1);
}
}
Если у вас есть опыт работы с C или C++, вам могут вспомниться `gcc` или `clang`. После успешной компиляции Rust создаст исполняемый бинарный файл.
fn run(config: Config) -> Result<(), Box<dyn Error>> {
let contents = fs::read_to_string(config.file_path)?;
Если у вас есть опыт работы с C или C++, вам могут вспомниться `gcc` или `clang`. После успешной компиляции Rust создаст исполняемый бинарный файл.
println!("With text:\n{contents}");
Если у вас есть опыт работы с C или C++, вам могут вспомниться `gcc` или `clang`. После успешной компиляции Rust создаст исполняемый бинарный файл.
Ok(())
}
Если у вас есть опыт работы с C или C++, вам могут вспомниться `gcc` или `clang`. После успешной компиляции Rust создаст исполняемый бинарный файл.
struct Config {
query: String,
file_path: String,
}
Если у вас есть опыт работы с C или C++, вам могут вспомниться `gcc` или `clang`. После успешной компиляции Rust создаст исполняемый бинарный файл.
impl Config {
fn build(args: &[String]) -> Result<Config, &'static str> {
if args.len() < 3 {
return Err("not enough arguments");
}
Если у вас есть опыт работы с C или C++, вам могут вспомниться `gcc` или `clang`. После успешной компиляции Rust создаст исполняемый бинарный файл.
let query = args[1].clone();
let file_path = args[2].clone();
Если у вас есть опыт работы с C или C++, вам могут вспомниться `gcc` или `clang`. После успешной компиляции Rust создаст исполняемый бинарный файл.
Ok(Config { query, file_path })
}
}We use if let rather than unwrap_or_else to check whether run returns an Err value and to call process::exit(1) if it does. The run function doesn’t return a value that we want to unwrap in the same way that Config::build returns the Config instance. Because run returns () in the success case, we only care about detecting an error, so we don’t need unwrap_or_else to return the unwrapped value, which would only be ().
The bodies of the if let and the unwrap_or_else functions are the same in both cases: We print the error and exit.
Splitting Code into a Library Crate
Our minigrep project is looking good so far! Now we’ll split the src/main.rs file and put some code into the src/lib.rs file. That way, we can test the code and have a src/main.rs file with fewer responsibilities.
Let’s define the code responsible for searching text in src/lib.rs rather than in src/main.rs, which will let us (or anyone else using our minigrep library) call the searching function from more contexts than our minigrep binary.
First, let’s define the search function signature in src/lib.rs as shown in Listing 12-13, with a body that calls the unimplemented! macro. We’ll explain the signature in more detail when we fill in the implementation.
pub fn search<'a>(query: &str, contents: &'a str) -> Vec<&'a str> {
unimplemented!();
}search function in src/lib.rsWe’ve used the pub keyword on the function definition to designate search as part of our library crate’s public API. We now have a library crate that we can use from our binary crate and that we can test!
Now we need to bring the code defined in src/lib.rs into the scope of the binary crate in src/main.rs and call it, as shown in Listing 12-14.
use std::env;
use std::error::Error;
use std::fs;
use std::process;
Если у вас есть опыт работы с C или C++, вам могут вспомниться `gcc` или `clang`. После успешной компиляции Rust создаст исполняемый бинарный файл.
// --код сокращён--
use minigrep::search;
Если у вас есть опыт работы с C или C++, вам могут вспомниться `gcc` или `clang`. После успешной компиляции Rust создаст исполняемый бинарный файл.
fn main() {
// --код сокращён--
let args: Vec<String> = env::args().collect();
Если у вас есть опыт работы с C или C++, вам могут вспомниться `gcc` или `clang`. После успешной компиляции Rust создаст исполняемый бинарный файл.
let config = Config::build(&args).unwrap_or_else(|err| {
println!("Problem parsing arguments: {err}");
process::exit(1);
});
Если у вас есть опыт работы с C или C++, вам могут вспомниться `gcc` или `clang`. После успешной компиляции Rust создаст исполняемый бинарный файл.
if let Err(e) = run(config) {
println!("Application error: {e}");
process::exit(1);
}
}
Если у вас есть опыт работы с C или C++, вам могут вспомниться `gcc` или `clang`. После успешной компиляции Rust создаст исполняемый бинарный файл.
// --код сокращён--
Если у вас есть опыт работы с C или C++, вам могут вспомниться `gcc` или `clang`. После успешной компиляции Rust создаст исполняемый бинарный файл.
Если у вас есть опыт работы с C или C++, вам могут вспомниться `gcc` или `clang`. После успешной компиляции Rust создаст исполняемый бинарный файл.
struct Config {
query: String,
file_path: String,
}
Если у вас есть опыт работы с C или C++, вам могут вспомниться `gcc` или `clang`. После успешной компиляции Rust создаст исполняемый бинарный файл.
impl Config {
fn build(args: &[String]) -> Result<Config, &'static str> {
if args.len() < 3 {
return Err("not enough arguments");
}
Если у вас есть опыт работы с C или C++, вам могут вспомниться `gcc` или `clang`. После успешной компиляции Rust создаст исполняемый бинарный файл.
let query = args[1].clone();
let file_path = args[2].clone();
Если у вас есть опыт работы с C или C++, вам могут вспомниться `gcc` или `clang`. После успешной компиляции Rust создаст исполняемый бинарный файл.
Ok(Config { query, file_path })
}
}
Если у вас есть опыт работы с C или C++, вам могут вспомниться `gcc` или `clang`. После успешной компиляции Rust создаст исполняемый бинарный файл.
fn run(config: Config) -> Result<(), Box<dyn Error>> {
let contents = fs::read_to_string(config.file_path)?;
Если у вас есть опыт работы с C или C++, вам могут вспомниться `gcc` или `clang`. После успешной компиляции Rust создаст исполняемый бинарный файл.
for line in search(&config.query, &contents) {
println!("{line}");
}
Если у вас есть опыт работы с C или C++, вам могут вспомниться `gcc` или `clang`. После успешной компиляции Rust создаст исполняемый бинарный файл.
Ok(())
}minigrep library crate’s search function in src/main.rsWe add a use minigrep::search line to bring the search function from the library crate into the binary crate’s scope. Then, in the run function, rather than printing out the contents of the file, we call the search function and pass the config.query value and contents as arguments. Then, run will use a for loop to print each line returned from search that matched the query. This is also a good time to remove the println! calls in the main function that displayed the query and the file path so that our program only prints the search results (if no errors occur).
Note that the search function will be collecting all the results into a vector it returns before any printing happens. This implementation could be slow to display results when searching large files, because results aren’t printed as they’re found; we’ll discuss a possible way to fix this using iterators in Chapter 13.
Whew! That was a lot of work, but we’ve set ourselves up for success in the future. Now it’s much easier to handle errors, and we’ve made the code more modular. Almost all of our work will be done in src/lib.rs from here on out.
Let’s take advantage of this newfound modularity by doing something that would have been difficult with the old code but is easy with the new code: We’ll write some tests!
Adding Functionality with Test Driven Development
Adding Functionality with Test-Driven Development
Now that we have the search logic in src/lib.rs separate from the main function, it’s much easier to write tests for the core functionality of our code. We can call functions directly with various arguments and check return values without having to call our binary from the command line.
In this section, we’ll add the searching logic to the minigrep program using the test-driven development (TDD) process with the following steps:
- Write a test that fails and run it to make sure it fails for the reason you expect.
- Write or modify just enough code to make the new test pass.
- Refactor the code you just added or changed and make sure the tests continue to pass.
- Repeat from step 1!
Though it’s just one of many ways to write software, TDD can help drive code design. Writing the test before you write the code that makes the test pass helps maintain high test coverage throughout the process.
We’ll test-drive the implementation of the functionality that will actually do the searching for the query string in the file contents and produce a list of lines that match the query. We’ll add this functionality in a function called search.
Writing a Failing Test
In src/lib.rs, we’ll add a tests module with a test function, as we did in Chapter 11. The test function specifies the behavior we want the search function to have: It will take a query and the text to search, and it will return only the lines from the text that contain the query. Listing 12-15 shows this test.
pub fn search<'a>(query: &str, contents: &'a str) -> Vec<&'a str> {
unimplemented!();
}
Если у вас есть опыт работы с C или C++, вам могут вспомниться `gcc` или `clang`. После успешной компиляции Rust создаст исполняемый бинарный файл.
// --код сокращён--
Если у вас есть опыт работы с C или C++, вам могут вспомниться `gcc` или `clang`. После успешной компиляции Rust создаст исполняемый бинарный файл.
#[cfg(test)]
mod tests {
use super::*;
Если у вас есть опыт работы с C или C++, вам могут вспомниться `gcc` или `clang`. После успешной компиляции Rust создаст исполняемый бинарный файл.
#[test]
fn one_result() {
let query = "duct";
let contents = "\
Rust:
safe, fast, productive.
Pick three.";
Если у вас есть опыт работы с C или C++, вам могут вспомниться `gcc` или `clang`. После успешной компиляции Rust создаст исполняемый бинарный файл.
assert_eq!(vec!["safe, fast, productive."], search(query, contents));
}
}search function for the functionality we wish we hadThis test searches for the string "duct". The text we’re searching is three lines, only one of which contains "duct" (note that the backslash after the opening double quote tells Rust not to put a newline character at the beginning of the contents of this string literal). We assert that the value returned from the search function contains only the line we expect.
If we run this test, it will currently fail because the unimplemented! macro panics with the message “not implemented”. In accordance with TDD principles, we’ll take a small step of adding just enough code to get the test to not panic when calling the function by defining the search function to always return an empty vector, as shown in Listing 12-16. Then, the test should compile and fail because an empty vector doesn’t match a vector containing the line "safe, fast, productive.".
pub fn search<'a>(query: &str, contents: &'a str) -> Vec<&'a str> {
vec![]
}
Если у вас есть опыт работы с C или C++, вам могут вспомниться `gcc` или `clang`. После успешной компиляции Rust создаст исполняемый бинарный файл.
#[cfg(test)]
mod tests {
use super::*;
Если у вас есть опыт работы с C или C++, вам могут вспомниться `gcc` или `clang`. После успешной компиляции Rust создаст исполняемый бинарный файл.
#[test]
fn one_result() {
let query = "duct";
let contents = "\
Rust:
safe, fast, productive.
Pick three.";
Если у вас есть опыт работы с C или C++, вам могут вспомниться `gcc` или `clang`. После успешной компиляции Rust создаст исполняемый бинарный файл.
assert_eq!(vec!["safe, fast, productive."], search(query, contents));
}
}search function so that calling it won’t panicNow let’s discuss why we need to define an explicit lifetime 'a in the signature of search and use that lifetime with the contents argument and the return value. Recall in Chapter 10 that the lifetime parameters specify which argument lifetime is connected to the lifetime of the return value. In this case, we indicate that the returned vector should contain string slices that reference slices of the argument contents (rather than the argument query).
In other words, we tell Rust that the data returned by the search function will live as long as the data passed into the search function in the contents argument. This is important! The data referenced by a slice needs to be valid for the reference to be valid; if the compiler assumes we’re making string slices of query rather than contents, it will do its safety checking incorrectly.
If we forget the lifetime annotations and try to compile this function, we’ll get this error:
$ cargo build
Compiling minigrep v0.1.0 (file:///projects/minigrep)
error[E0106]: missing lifetime specifier
--> src/lib.rs:1:51
|
1 | pub fn search(query: &str, contents: &str) -> Vec<&str> {
| ---- ---- ^ expected named lifetime parameter
|
= help: this function's return type contains a borrowed value, but the signature does not say whether it is borrowed from `query` or `contents`
help: consider introducing a named lifetime parameter
|
1 | pub fn search<'a>(query: &'a str, contents: &'a str) -> Vec<&'a str> {
| ++++ ++ ++ ++
Если у вас есть опыт работы с C или C++, вам могут вспомниться `gcc` или `clang`. После успешной компиляции Rust создаст исполняемый бинарный файл.
For more information about this error, try `rustc --explain E0106`.
error: could not compile `minigrep` (lib) due to 1 previous error
Rust can’t know which of the two parameters we need for the output, so we need to tell it explicitly. Note that the help text suggests specifying the same lifetime parameter for all the parameters and the output type, which is incorrect! Because contents is the parameter that contains all of our text and we want to return the parts of that text that match, we know contents is the only parameter that should be connected to the return value using the lifetime syntax.
Other programming languages don’t require you to connect arguments to return values in the signature, but this practice will get easier over time. You might want to compare this example with the examples in the “Validating References with Lifetimes” section in Chapter 10.
Writing Code to Pass the Test
Currently, our test is failing because we always return an empty vector. To fix that and implement search, our program needs to follow these steps:
- Iterate through each line of the contents.
- Check whether the line contains our query string.
- If it does, add it to the list of values we’re returning.
- If it doesn’t, do nothing.
- Return the list of results that match.
Let’s work through each step, starting with iterating through lines.
Iterating Through Lines with the lines Method
Rust has a helpful method to handle line-by-line iteration of strings, conveniently named lines, that works as shown in Listing 12-17. Note that this won’t compile yet.
pub fn search<'a>(query: &str, contents: &'a str) -> Vec<&'a str> {
for line in contents.lines() {
// do something with line
}
}
Если у вас есть опыт работы с C или C++, вам могут вспомниться `gcc` или `clang`. После успешной компиляции Rust создаст исполняемый бинарный файл.
#[cfg(test)]
mod tests {
use super::*;
Если у вас есть опыт работы с C или C++, вам могут вспомниться `gcc` или `clang`. После успешной компиляции Rust создаст исполняемый бинарный файл.
#[test]
fn one_result() {
let query = "duct";
let contents = "\
Rust:
safe, fast, productive.
Pick three.";
Если у вас есть опыт работы с C или C++, вам могут вспомниться `gcc` или `clang`. После успешной компиляции Rust создаст исполняемый бинарный файл.
assert_eq!(vec!["safe, fast, productive."], search(query, contents));
}
}contentsThe lines method returns an iterator. We’ll talk about iterators in depth in Chapter 13. But recall that you saw this way of using an iterator in Listing 3-5, where we used a for loop with an iterator to run some code on each item in a collection.
Searching Each Line for the Query
Next, we’ll check whether the current line contains our query string. Fortunately, strings have a helpful method named contains that does this for us! Add a call to the contains method in the search function, as shown in Listing 12-18. Note that this still won’t compile yet.
pub fn search<'a>(query: &str, contents: &'a str) -> Vec<&'a str> {
for line in contents.lines() {
if line.contains(query) {
// do something with line
}
}
}
Если у вас есть опыт работы с C или C++, вам могут вспомниться `gcc` или `clang`. После успешной компиляции Rust создаст исполняемый бинарный файл.
#[cfg(test)]
mod tests {
use super::*;
Если у вас есть опыт работы с C или C++, вам могут вспомниться `gcc` или `clang`. После успешной компиляции Rust создаст исполняемый бинарный файл.
#[test]
fn one_result() {
let query = "duct";
let contents = "\
Rust:
safe, fast, productive.
Pick three.";
Если у вас есть опыт работы с C или C++, вам могут вспомниться `gcc` или `clang`. После успешной компиляции Rust создаст исполняемый бинарный файл.
assert_eq!(vec!["safe, fast, productive."], search(query, contents));
}
}queryAt the moment, we’re building up functionality. To get the code to compile, we need to return a value from the body as we indicated we would in the function signature.
Storing Matching Lines
To finish this function, we need a way to store the matching lines that we want to return. For that, we can make a mutable vector before the for loop and call the push method to store a line in the vector. After the for loop, we return the vector, as shown in Listing 12-19.
pub fn search<'a>(query: &str, contents: &'a str) -> Vec<&'a str> {
let mut results = Vec::new();
Если у вас есть опыт работы с C или C++, вам могут вспомниться `gcc` или `clang`. После успешной компиляции Rust создаст исполняемый бинарный файл.
for line in contents.lines() {
if line.contains(query) {
results.push(line);
}
}
Если у вас есть опыт работы с C или C++, вам могут вспомниться `gcc` или `clang`. После успешной компиляции Rust создаст исполняемый бинарный файл.
results
}
Если у вас есть опыт работы с C или C++, вам могут вспомниться `gcc` или `clang`. После успешной компиляции Rust создаст исполняемый бинарный файл.
#[cfg(test)]
mod tests {
use super::*;
Если у вас есть опыт работы с C или C++, вам могут вспомниться `gcc` или `clang`. После успешной компиляции Rust создаст исполняемый бинарный файл.
#[test]
fn one_result() {
let query = "duct";
let contents = "\
Rust:
safe, fast, productive.
Pick three.";
Если у вас есть опыт работы с C или C++, вам могут вспомниться `gcc` или `clang`. После успешной компиляции Rust создаст исполняемый бинарный файл.
assert_eq!(vec!["safe, fast, productive."], search(query, contents));
}
}Now the search function should return only the lines that contain query, and our test should pass. Let’s run the test:
$ cargo test
Compiling minigrep v0.1.0 (file:///projects/minigrep)
Finished `test` profile [unoptimized + debuginfo] target(s) in 1.22s
Running unittests src/lib.rs (target/debug/deps/minigrep-9cd200e5fac0fc94)
Если у вас есть опыт работы с C или C++, вам могут вспомниться `gcc` или `clang`. После успешной компиляции Rust создаст исполняемый бинарный файл.
running 1 test
test tests::one_result ... ok
Если у вас есть опыт работы с C или C++, вам могут вспомниться `gcc` или `clang`. После успешной компиляции Rust создаст исполняемый бинарный файл.
test result: ok. 1 passed; 0 failed; 0 ignored; 0 measured; 0 filtered out; finished in 0.00s
Если у вас есть опыт работы с C или C++, вам могут вспомниться `gcc` или `clang`. После успешной компиляции Rust создаст исполняемый бинарный файл.
Running unittests src/main.rs (target/debug/deps/minigrep-9cd200e5fac0fc94)
Если у вас есть опыт работы с C или C++, вам могут вспомниться `gcc` или `clang`. После успешной компиляции Rust создаст исполняемый бинарный файл.
running 0 tests
Если у вас есть опыт работы с C или C++, вам могут вспомниться `gcc` или `clang`. После успешной компиляции Rust создаст исполняемый бинарный файл.
test result: ok. 0 passed; 0 failed; 0 ignored; 0 measured; 0 filtered out; finished in 0.00s
Если у вас есть опыт работы с C или C++, вам могут вспомниться `gcc` или `clang`. После успешной компиляции Rust создаст исполняемый бинарный файл.
Doc-tests minigrep
Если у вас есть опыт работы с C или C++, вам могут вспомниться `gcc` или `clang`. После успешной компиляции Rust создаст исполняемый бинарный файл.
running 0 tests
Если у вас есть опыт работы с C или C++, вам могут вспомниться `gcc` или `clang`. После успешной компиляции Rust создаст исполняемый бинарный файл.
test result: ok. 0 passed; 0 failed; 0 ignored; 0 measured; 0 filtered out; finished in 0.00s
Если у вас есть опыт работы с C или C++, вам могут вспомниться `gcc` или `clang`. После успешной компиляции Rust создаст исполняемый бинарный файл.
Our test passed, so we know it works!
At this point, we could consider opportunities for refactoring the implementation of the search function while keeping the tests passing to maintain the same functionality. The code in the search function isn’t too bad, but it doesn’t take advantage of some useful features of iterators. We’ll return to this example in Chapter 13, where we’ll explore iterators in detail, and look at how to improve it.
Now the entire program should work! Let’s try it out, first with a word that should return exactly one line from the Emily Dickinson poem: frog.
$ cargo run -- frog poem.txt
Compiling minigrep v0.1.0 (file:///projects/minigrep)
Finished `dev` profile [unoptimized + debuginfo] target(s) in 0.38s
Running `target/debug/minigrep frog poem.txt`
How public, like a frog
Cool! Now let’s try a word that will match multiple lines, like body:
$ cargo run -- body poem.txt
Compiling minigrep v0.1.0 (file:///projects/minigrep)
Finished `dev` profile [unoptimized + debuginfo] target(s) in 0.0s
Running `target/debug/minigrep body poem.txt`
I'm nobody! Who are you?
Are you nobody, too?
How dreary to be somebody!
And finally, let’s make sure that we don’t get any lines when we search for a word that isn’t anywhere in the poem, such as monomorphization:
$ cargo run -- monomorphization poem.txt
Compiling minigrep v0.1.0 (file:///projects/minigrep)
Finished `dev` profile [unoptimized + debuginfo] target(s) in 0.0s
Running `target/debug/minigrep monomorphization poem.txt`
Excellent! We’ve built our own mini version of a classic tool and learned a lot about how to structure applications. We’ve also learned a bit about file input and output, lifetimes, testing, and command line parsing.
To round out this project, we’ll briefly demonstrate how to work with environment variables and how to print to standard error, both of which are useful when you’re writing command line programs.
Работа с переменными окружения
Работа с переменными окружения
We’ll improve the minigrep binary by adding an extra feature: an option for case-insensitive searching that the user can turn on via an environment variable. We could make this feature a command line option and require that users enter it each time they want it to apply, but by instead making it an environment variable, we allow our users to set the environment variable once and have all their searches be case insensitive in that terminal session.
Writing a Failing Test for Case-Insensitive Search
We first add a new search_case_insensitive function to the minigrep library that will be called when the environment variable has a value. We’ll continue to follow the TDD process, so the first step is again to write a failing test. We’ll add a new test for the new search_case_insensitive function and rename our old test from one_result to case_sensitive to clarify the differences between the two tests, as shown in Listing 12-20.
pub fn search<'a>(query: &str, contents: &'a str) -> Vec<&'a str> {
let mut results = Vec::new();
Если у вас есть опыт работы с C или C++, вам могут вспомниться `gcc` или `clang`. После успешной компиляции Rust создаст исполняемый бинарный файл.
for line in contents.lines() {
if line.contains(query) {
results.push(line);
}
}
Если у вас есть опыт работы с C или C++, вам могут вспомниться `gcc` или `clang`. После успешной компиляции Rust создаст исполняемый бинарный файл.
results
}
Если у вас есть опыт работы с C или C++, вам могут вспомниться `gcc` или `clang`. После успешной компиляции Rust создаст исполняемый бинарный файл.
#[cfg(test)]
mod tests {
use super::*;
Если у вас есть опыт работы с C или C++, вам могут вспомниться `gcc` или `clang`. После успешной компиляции Rust создаст исполняемый бинарный файл.
#[test]
fn case_sensitive() {
let query = "duct";
let contents = "\
Rust:
safe, fast, productive.
Pick three.
Duct tape.";
Если у вас есть опыт работы с C или C++, вам могут вспомниться `gcc` или `clang`. После успешной компиляции Rust создаст исполняемый бинарный файл.
assert_eq!(vec!["safe, fast, productive."], search(query, contents));
}
Если у вас есть опыт работы с C или C++, вам могут вспомниться `gcc` или `clang`. После успешной компиляции Rust создаст исполняемый бинарный файл.
#[test]
fn case_insensitive() {
let query = "rUsT";
let contents = "\
Rust:
safe, fast, productive.
Pick three.
Trust me.";
Если у вас есть опыт работы с C или C++, вам могут вспомниться `gcc` или `clang`. После успешной компиляции Rust создаст исполняемый бинарный файл.
assert_eq!(
vec!["Rust:", "Trust me."],
search_case_insensitive(query, contents)
);
}
}Note that we’ve edited the old test’s contents too. We’ve added a new line with the text "Duct tape." using a capital D that shouldn’t match the query "duct" when we’re searching in a case-sensitive manner. Changing the old test in this way helps ensure that we don’t accidentally break the case-sensitive search functionality that we’ve already implemented. This test should pass now and should continue to pass as we work on the case-insensitive search.
The new test for the case-insensitive search uses "rUsT" as its query. In the search_case_insensitive function we’re about to add, the query "rUsT" should match the line containing "Rust:" with a capital R and match the line "Trust me." even though both have different casing from the query. This is our failing test, and it will fail to compile because we haven’t yet defined the search_case_insensitive function. Feel free to add a skeleton implementation that always returns an empty vector, similar to the way we did for the search function in Listing 12-16 to see the test compile and fail.
Implementing the search_case_insensitive Function
The search_case_insensitive function, shown in Listing 12-21, will be almost the same as the search function. The only difference is that we’ll lowercase the query and each line so that whatever the case of the input arguments, they’ll be the same case when we check whether the line contains the query.
pub fn search<'a>(query: &str, contents: &'a str) -> Vec<&'a str> {
let mut results = Vec::new();
Если у вас есть опыт работы с C или C++, вам могут вспомниться `gcc` или `clang`. После успешной компиляции Rust создаст исполняемый бинарный файл.
for line in contents.lines() {
if line.contains(query) {
results.push(line);
}
}
Если у вас есть опыт работы с C или C++, вам могут вспомниться `gcc` или `clang`. После успешной компиляции Rust создаст исполняемый бинарный файл.
results
}
Если у вас есть опыт работы с C или C++, вам могут вспомниться `gcc` или `clang`. После успешной компиляции Rust создаст исполняемый бинарный файл.
pub fn search_case_insensitive<'a>(
query: &str,
contents: &'a str,
) -> Vec<&'a str> {
let query = query.to_lowercase();
let mut results = Vec::new();
Если у вас есть опыт работы с C или C++, вам могут вспомниться `gcc` или `clang`. После успешной компиляции Rust создаст исполняемый бинарный файл.
for line in contents.lines() {
if line.to_lowercase().contains(&query) {
results.push(line);
}
}
Если у вас есть опыт работы с C или C++, вам могут вспомниться `gcc` или `clang`. После успешной компиляции Rust создаст исполняемый бинарный файл.
results
}
Если у вас есть опыт работы с C или C++, вам могут вспомниться `gcc` или `clang`. После успешной компиляции Rust создаст исполняемый бинарный файл.
#[cfg(test)]
mod tests {
use super::*;
Если у вас есть опыт работы с C или C++, вам могут вспомниться `gcc` или `clang`. После успешной компиляции Rust создаст исполняемый бинарный файл.
#[test]
fn case_sensitive() {
let query = "duct";
let contents = "\
Rust:
safe, fast, productive.
Pick three.
Duct tape.";
Если у вас есть опыт работы с C или C++, вам могут вспомниться `gcc` или `clang`. После успешной компиляции Rust создаст исполняемый бинарный файл.
assert_eq!(vec!["safe, fast, productive."], search(query, contents));
}
Если у вас есть опыт работы с C или C++, вам могут вспомниться `gcc` или `clang`. После успешной компиляции Rust создаст исполняемый бинарный файл.
#[test]
fn case_insensitive() {
let query = "rUsT";
let contents = "\
Rust:
safe, fast, productive.
Pick three.
Trust me.";
Если у вас есть опыт работы с C или C++, вам могут вспомниться `gcc` или `clang`. После успешной компиляции Rust создаст исполняемый бинарный файл.
assert_eq!(
vec!["Rust:", "Trust me."],
search_case_insensitive(query, contents)
);
}
}search_case_insensitive function to lowercase the query and the line before comparing themFirst, we lowercase the query string and store it in a new variable with the same name, shadowing the original query. Calling to_lowercase on the query is necessary so that no matter whether the user’s query is "rust", "RUST", "Rust", or "rUsT", we’ll treat the query as if it were "rust" and be insensitive to the case. While to_lowercase will handle basic Unicode, it won’t be 100 percent accurate. If we were writing a real application, we’d want to do a bit more work here, but this section is about environment variables, not Unicode, so we’ll leave it at that here.
Note that query is now a String rather than a string slice because calling to_lowercase creates new data rather than referencing existing data. Say the query is "rUsT", as an example: That string slice doesn’t contain a lowercase u or t for us to use, so we have to allocate a new String containing "rust". When we pass query as an argument to the contains method now, we need to add an ampersand because the signature of contains is defined to take a string slice.
Next, we add a call to to_lowercase on each line to lowercase all characters. Now that we’ve converted line and query to lowercase, we’ll find matches no matter what the case of the query is.
Let’s see if this implementation passes the tests:
$ cargo test
Compiling minigrep v0.1.0 (file:///projects/minigrep)
Finished `test` profile [unoptimized + debuginfo] target(s) in 1.33s
Running unittests src/lib.rs (target/debug/deps/minigrep-9cd200e5fac0fc94)
Если у вас есть опыт работы с C или C++, вам могут вспомниться `gcc` или `clang`. После успешной компиляции Rust создаст исполняемый бинарный файл.
running 2 tests
test tests::case_insensitive ... ok
test tests::case_sensitive ... ok
Если у вас есть опыт работы с C или C++, вам могут вспомниться `gcc` или `clang`. После успешной компиляции Rust создаст исполняемый бинарный файл.
test result: ok. 2 passed; 0 failed; 0 ignored; 0 measured; 0 filtered out; finished in 0.00s
Если у вас есть опыт работы с C или C++, вам могут вспомниться `gcc` или `clang`. После успешной компиляции Rust создаст исполняемый бинарный файл.
Running unittests src/main.rs (target/debug/deps/minigrep-9cd200e5fac0fc94)
Если у вас есть опыт работы с C или C++, вам могут вспомниться `gcc` или `clang`. После успешной компиляции Rust создаст исполняемый бинарный файл.
running 0 tests
Если у вас есть опыт работы с C или C++, вам могут вспомниться `gcc` или `clang`. После успешной компиляции Rust создаст исполняемый бинарный файл.
test result: ok. 0 passed; 0 failed; 0 ignored; 0 measured; 0 filtered out; finished in 0.00s
Если у вас есть опыт работы с C или C++, вам могут вспомниться `gcc` или `clang`. После успешной компиляции Rust создаст исполняемый бинарный файл.
Doc-tests minigrep
Если у вас есть опыт работы с C или C++, вам могут вспомниться `gcc` или `clang`. После успешной компиляции Rust создаст исполняемый бинарный файл.
running 0 tests
Если у вас есть опыт работы с C или C++, вам могут вспомниться `gcc` или `clang`. После успешной компиляции Rust создаст исполняемый бинарный файл.
test result: ok. 0 passed; 0 failed; 0 ignored; 0 measured; 0 filtered out; finished in 0.00s
Если у вас есть опыт работы с C или C++, вам могут вспомниться `gcc` или `clang`. После успешной компиляции Rust создаст исполняемый бинарный файл.
Great! They passed. Now let’s call the new search_case_insensitive function from the run function. First, we’ll add a configuration option to the Config struct to switch between case-sensitive and case-insensitive search. Adding this field will cause compiler errors because we aren’t initializing this field anywhere yet:
Файл: src/main.rs
use std::env;
use std::error::Error;
use std::fs;
use std::process;
Если у вас есть опыт работы с C или C++, вам могут вспомниться `gcc` или `clang`. После успешной компиляции Rust создаст исполняемый бинарный файл.
use minigrep::{search, search_case_insensitive};
Если у вас есть опыт работы с C или C++, вам могут вспомниться `gcc` или `clang`. После успешной компиляции Rust создаст исполняемый бинарный файл.
// --код сокращён--
Если у вас есть опыт работы с C или C++, вам могут вспомниться `gcc` или `clang`. После успешной компиляции Rust создаст исполняемый бинарный файл.
Если у вас есть опыт работы с C или C++, вам могут вспомниться `gcc` или `clang`. После успешной компиляции Rust создаст исполняемый бинарный файл.
fn main() {
let args: Vec<String> = env::args().collect();
Если у вас есть опыт работы с C или C++, вам могут вспомниться `gcc` или `clang`. После успешной компиляции Rust создаст исполняемый бинарный файл.
let config = Config::build(&args).unwrap_or_else(|err| {
println!("Problem parsing arguments: {err}");
process::exit(1);
});
Если у вас есть опыт работы с C или C++, вам могут вспомниться `gcc` или `clang`. После успешной компиляции Rust создаст исполняемый бинарный файл.
if let Err(e) = run(config) {
println!("Application error: {e}");
process::exit(1);
}
}
Если у вас есть опыт работы с C или C++, вам могут вспомниться `gcc` или `clang`. После успешной компиляции Rust создаст исполняемый бинарный файл.
pub struct Config {
pub query: String,
pub file_path: String,
pub ignore_case: bool,
}
Если у вас есть опыт работы с C или C++, вам могут вспомниться `gcc` или `clang`. После успешной компиляции Rust создаст исполняемый бинарный файл.
impl Config {
fn build(args: &[String]) -> Result<Config, &'static str> {
if args.len() < 3 {
return Err("not enough arguments");
}
Если у вас есть опыт работы с C или C++, вам могут вспомниться `gcc` или `clang`. После успешной компиляции Rust создаст исполняемый бинарный файл.
let query = args[1].clone();
let file_path = args[2].clone();
Если у вас есть опыт работы с C или C++, вам могут вспомниться `gcc` или `clang`. После успешной компиляции Rust создаст исполняемый бинарный файл.
Ok(Config { query, file_path })
}
}
Если у вас есть опыт работы с C или C++, вам могут вспомниться `gcc` или `clang`. После успешной компиляции Rust создаст исполняемый бинарный файл.
fn run(config: Config) -> Result<(), Box<dyn Error>> {
let contents = fs::read_to_string(config.file_path)?;
Если у вас есть опыт работы с C или C++, вам могут вспомниться `gcc` или `clang`. После успешной компиляции Rust создаст исполняемый бинарный файл.
let results = if config.ignore_case {
search_case_insensitive(&config.query, &contents)
} else {
search(&config.query, &contents)
};
Если у вас есть опыт работы с C или C++, вам могут вспомниться `gcc` или `clang`. После успешной компиляции Rust создаст исполняемый бинарный файл.
for line in results {
println!("{line}");
}
Если у вас есть опыт работы с C или C++, вам могут вспомниться `gcc` или `clang`. После успешной компиляции Rust создаст исполняемый бинарный файл.
Ok(())
}We added the ignore_case field that holds a Boolean. Next, we need the run function to check the ignore_case field’s value and use that to decide whether to call the search function or the search_case_insensitive function, as shown in Listing 12-22. This still won’t compile yet.
use std::env;
use std::error::Error;
use std::fs;
use std::process;
Если у вас есть опыт работы с C или C++, вам могут вспомниться `gcc` или `clang`. После успешной компиляции Rust создаст исполняемый бинарный файл.
use minigrep::{search, search_case_insensitive};
Если у вас есть опыт работы с C или C++, вам могут вспомниться `gcc` или `clang`. После успешной компиляции Rust создаст исполняемый бинарный файл.
// --код сокращён--
Если у вас есть опыт работы с C или C++, вам могут вспомниться `gcc` или `clang`. После успешной компиляции Rust создаст исполняемый бинарный файл.
Если у вас есть опыт работы с C или C++, вам могут вспомниться `gcc` или `clang`. После успешной компиляции Rust создаст исполняемый бинарный файл.
fn main() {
let args: Vec<String> = env::args().collect();
Если у вас есть опыт работы с C или C++, вам могут вспомниться `gcc` или `clang`. После успешной компиляции Rust создаст исполняемый бинарный файл.
let config = Config::build(&args).unwrap_or_else(|err| {
println!("Problem parsing arguments: {err}");
process::exit(1);
});
Если у вас есть опыт работы с C или C++, вам могут вспомниться `gcc` или `clang`. После успешной компиляции Rust создаст исполняемый бинарный файл.
if let Err(e) = run(config) {
println!("Application error: {e}");
process::exit(1);
}
}
Если у вас есть опыт работы с C или C++, вам могут вспомниться `gcc` или `clang`. После успешной компиляции Rust создаст исполняемый бинарный файл.
pub struct Config {
pub query: String,
pub file_path: String,
pub ignore_case: bool,
}
Если у вас есть опыт работы с C или C++, вам могут вспомниться `gcc` или `clang`. После успешной компиляции Rust создаст исполняемый бинарный файл.
impl Config {
fn build(args: &[String]) -> Result<Config, &'static str> {
if args.len() < 3 {
return Err("not enough arguments");
}
Если у вас есть опыт работы с C или C++, вам могут вспомниться `gcc` или `clang`. После успешной компиляции Rust создаст исполняемый бинарный файл.
let query = args[1].clone();
let file_path = args[2].clone();
Если у вас есть опыт работы с C или C++, вам могут вспомниться `gcc` или `clang`. После успешной компиляции Rust создаст исполняемый бинарный файл.
Ok(Config { query, file_path })
}
}
Если у вас есть опыт работы с C или C++, вам могут вспомниться `gcc` или `clang`. После успешной компиляции Rust создаст исполняемый бинарный файл.
fn run(config: Config) -> Result<(), Box<dyn Error>> {
let contents = fs::read_to_string(config.file_path)?;
Если у вас есть опыт работы с C или C++, вам могут вспомниться `gcc` или `clang`. После успешной компиляции Rust создаст исполняемый бинарный файл.
let results = if config.ignore_case {
search_case_insensitive(&config.query, &contents)
} else {
search(&config.query, &contents)
};
Если у вас есть опыт работы с C или C++, вам могут вспомниться `gcc` или `clang`. После успешной компиляции Rust создаст исполняемый бинарный файл.
for line in results {
println!("{line}");
}
Если у вас есть опыт работы с C или C++, вам могут вспомниться `gcc` или `clang`. После успешной компиляции Rust создаст исполняемый бинарный файл.
Ok(())
}search or search_case_insensitive based on the value in config.ignore_caseFinally, we need to check for the environment variable. The functions for working with environment variables are in the env module in the standard library, which is already in scope at the top of src/main.rs. We’ll use the var function from the env module to check to see if any value has been set for an environment variable named IGNORE_CASE, as shown in Listing 12-23.
use std::env;
use std::error::Error;
use std::fs;
use std::process;
Если у вас есть опыт работы с C или C++, вам могут вспомниться `gcc` или `clang`. После успешной компиляции Rust создаст исполняемый бинарный файл.
use minigrep::{search, search_case_insensitive};
Если у вас есть опыт работы с C или C++, вам могут вспомниться `gcc` или `clang`. После успешной компиляции Rust создаст исполняемый бинарный файл.
fn main() {
let args: Vec<String> = env::args().collect();
Если у вас есть опыт работы с C или C++, вам могут вспомниться `gcc` или `clang`. После успешной компиляции Rust создаст исполняемый бинарный файл.
let config = Config::build(&args).unwrap_or_else(|err| {
println!("Problem parsing arguments: {err}");
process::exit(1);
});
Если у вас есть опыт работы с C или C++, вам могут вспомниться `gcc` или `clang`. После успешной компиляции Rust создаст исполняемый бинарный файл.
if let Err(e) = run(config) {
println!("Application error: {e}");
process::exit(1);
}
}
Если у вас есть опыт работы с C или C++, вам могут вспомниться `gcc` или `clang`. После успешной компиляции Rust создаст исполняемый бинарный файл.
pub struct Config {
pub query: String,
pub file_path: String,
pub ignore_case: bool,
}
Если у вас есть опыт работы с C или C++, вам могут вспомниться `gcc` или `clang`. После успешной компиляции Rust создаст исполняемый бинарный файл.
impl Config {
fn build(args: &[String]) -> Result<Config, &'static str> {
if args.len() < 3 {
return Err("not enough arguments");
}
Если у вас есть опыт работы с C или C++, вам могут вспомниться `gcc` или `clang`. После успешной компиляции Rust создаст исполняемый бинарный файл.
let query = args[1].clone();
let file_path = args[2].clone();
Если у вас есть опыт работы с C или C++, вам могут вспомниться `gcc` или `clang`. После успешной компиляции Rust создаст исполняемый бинарный файл.
let ignore_case = env::var("IGNORE_CASE").is_ok();
Если у вас есть опыт работы с C или C++, вам могут вспомниться `gcc` или `clang`. После успешной компиляции Rust создаст исполняемый бинарный файл.
Ok(Config {
query,
file_path,
ignore_case,
})
}
}
Если у вас есть опыт работы с C или C++, вам могут вспомниться `gcc` или `clang`. После успешной компиляции Rust создаст исполняемый бинарный файл.
fn run(config: Config) -> Result<(), Box<dyn Error>> {
let contents = fs::read_to_string(config.file_path)?;
Если у вас есть опыт работы с C или C++, вам могут вспомниться `gcc` или `clang`. После успешной компиляции Rust создаст исполняемый бинарный файл.
let results = if config.ignore_case {
search_case_insensitive(&config.query, &contents)
} else {
search(&config.query, &contents)
};
Если у вас есть опыт работы с C или C++, вам могут вспомниться `gcc` или `clang`. После успешной компиляции Rust создаст исполняемый бинарный файл.
for line in results {
println!("{line}");
}
Если у вас есть опыт работы с C или C++, вам могут вспомниться `gcc` или `clang`. После успешной компиляции Rust создаст исполняемый бинарный файл.
Ok(())
}IGNORE_CASEHere, we create a new variable, ignore_case. To set its value, we call the env::var function and pass it the name of the IGNORE_CASE environment variable. The env::var function returns a Result that will be the successful Ok variant that contains the value of the environment variable if the environment variable is set to any value. It will return the Err variant if the environment variable is not set.
We’re using the is_ok method on the Result to check whether the environment variable is set, which means the program should do a case-insensitive search. If the IGNORE_CASE environment variable isn’t set to anything, is_ok will return false and the program will perform a case-sensitive search. We don’t care about the value of the environment variable, just whether it’s set or unset, so we’re checking is_ok rather than using unwrap, expect, or any of the other methods we’ve seen on Result.
We pass the value in the ignore_case variable to the Config instance so that the run function can read that value and decide whether to call search_case_insensitive or search, as we implemented in Listing 12-22.
Let’s give it a try! First, we’ll run our program without the environment variable set and with the query to, which should match any line that contains the word to in all lowercase:
$ cargo run -- to poem.txt
Compiling minigrep v0.1.0 (file:///projects/minigrep)
Finished `dev` profile [unoptimized + debuginfo] target(s) in 0.0s
Running `target/debug/minigrep to poem.txt`
Are you nobody, too?
How dreary to be somebody!
Looks like that still works! Now let’s run the program with IGNORE_CASE set to 1 but with the same query to:
$ IGNORE_CASE=1 cargo run -- to poem.txt
If you’re using PowerShell, you will need to set the environment variable and run the program as separate commands:
PS> $Env:IGNORE_CASE=1; cargo run -- to poem.txt
This will make IGNORE_CASE persist for the remainder of your shell session. It can be unset with the Remove-Item cmdlet:
PS> Remove-Item Env:IGNORE_CASE
We should get lines that contain to that might have uppercase letters:
Are you nobody, too?
How dreary to be somebody!
To tell your name the livelong day
To an admiring bog!
Excellent, we also got lines containing To! Our minigrep program can now do case-insensitive searching controlled by an environment variable. Now you know how to manage options set using either command line arguments or environment variables.
Some programs allow arguments and environment variables for the same configuration. In those cases, the programs decide that one or the other takes precedence. For another exercise on your own, try controlling case sensitivity through either a command line argument or an environment variable. Decide whether the command line argument or the environment variable should take precedence if the program is run with one set to case sensitive and one set to ignore case.
The std::env module contains many more useful features for dealing with environment variables: Check out its documentation to see what is available.
Redirecting Errors to Standard Error
Redirecting Errors to Standard Error
At the moment, we’re writing all of our output to the terminal using the println! macro. In most terminals, there are two kinds of output: standard output (stdout) for general information and standard error (stderr) for error messages. This distinction enables users to choose to direct the successful output of a program to a file but still print error messages to the screen.
The println! macro is only capable of printing to standard output, so we have to use something else to print to standard error.
Checking Where Errors Are Written
First, let’s observe how the content printed by minigrep is currently being written to standard output, including any error messages we want to write to standard error instead. We’ll do that by redirecting the standard output stream to a file while intentionally causing an error. We won’t redirect the standard error stream, so any content sent to standard error will continue to display on the screen.
Command line programs are expected to send error messages to the standard error stream so that we can still see error messages on the screen even if we redirect the standard output stream to a file. Our program is not currently well behaved: We’re about to see that it saves the error message output to a file instead!
To demonstrate this behavior, we’ll run the program with > and the file path, output.txt, that we want to redirect the standard output stream to. We won’t pass any arguments, which should cause an error:
$ cargo run > output.txt
The > syntax tells the shell to write the contents of standard output to output.txt instead of the screen. We didn’t see the error message we were expecting printed to the screen, so that means it must have ended up in the file. This is what output.txt contains:
Problem parsing arguments: not enough arguments
Yup, our error message is being printed to standard output. It’s much more useful for error messages like this to be printed to standard error so that only data from a successful run ends up in the file. We’ll change that.
Printing Errors to Standard Error
We’ll use the code in Listing 12-24 to change how error messages are printed. Because of the refactoring we did earlier in this chapter, all the code that prints error messages is in one function, main. The standard library provides the eprintln! macro that prints to the standard error stream, so let’s change the two places we were calling println! to print errors to use eprintln! instead.
use std::env;
use std::error::Error;
use std::fs;
use std::process;
Если у вас есть опыт работы с C или C++, вам могут вспомниться `gcc` или `clang`. После успешной компиляции Rust создаст исполняемый бинарный файл.
use minigrep::{search, search_case_insensitive};
Если у вас есть опыт работы с C или C++, вам могут вспомниться `gcc` или `clang`. После успешной компиляции Rust создаст исполняемый бинарный файл.
fn main() {
let args: Vec<String> = env::args().collect();
Если у вас есть опыт работы с C или C++, вам могут вспомниться `gcc` или `clang`. После успешной компиляции Rust создаст исполняемый бинарный файл.
let config = Config::build(&args).unwrap_or_else(|err| {
eprintln!("Problem parsing arguments: {err}");
process::exit(1);
});
Если у вас есть опыт работы с C или C++, вам могут вспомниться `gcc` или `clang`. После успешной компиляции Rust создаст исполняемый бинарный файл.
if let Err(e) = run(config) {
eprintln!("Application error: {e}");
process::exit(1);
}
}
Если у вас есть опыт работы с C или C++, вам могут вспомниться `gcc` или `clang`. После успешной компиляции Rust создаст исполняемый бинарный файл.
pub struct Config {
pub query: String,
pub file_path: String,
pub ignore_case: bool,
}
Если у вас есть опыт работы с C или C++, вам могут вспомниться `gcc` или `clang`. После успешной компиляции Rust создаст исполняемый бинарный файл.
impl Config {
fn build(args: &[String]) -> Result<Config, &'static str> {
if args.len() < 3 {
return Err("not enough arguments");
}
Если у вас есть опыт работы с C или C++, вам могут вспомниться `gcc` или `clang`. После успешной компиляции Rust создаст исполняемый бинарный файл.
let query = args[1].clone();
let file_path = args[2].clone();
Если у вас есть опыт работы с C или C++, вам могут вспомниться `gcc` или `clang`. После успешной компиляции Rust создаст исполняемый бинарный файл.
let ignore_case = env::var("IGNORE_CASE").is_ok();
Если у вас есть опыт работы с C или C++, вам могут вспомниться `gcc` или `clang`. После успешной компиляции Rust создаст исполняемый бинарный файл.
Ok(Config {
query,
file_path,
ignore_case,
})
}
}
Если у вас есть опыт работы с C или C++, вам могут вспомниться `gcc` или `clang`. После успешной компиляции Rust создаст исполняемый бинарный файл.
fn run(config: Config) -> Result<(), Box<dyn Error>> {
let contents = fs::read_to_string(config.file_path)?;
Если у вас есть опыт работы с C или C++, вам могут вспомниться `gcc` или `clang`. После успешной компиляции Rust создаст исполняемый бинарный файл.
let results = if config.ignore_case {
search_case_insensitive(&config.query, &contents)
} else {
search(&config.query, &contents)
};
Если у вас есть опыт работы с C или C++, вам могут вспомниться `gcc` или `clang`. После успешной компиляции Rust создаст исполняемый бинарный файл.
for line in results {
println!("{line}");
}
Если у вас есть опыт работы с C или C++, вам могут вспомниться `gcc` или `clang`. После успешной компиляции Rust создаст исполняемый бинарный файл.
Ok(())
}eprintln!Let’s now run the program again in the same way, without any arguments and redirecting standard output with >:
$ cargo run > output.txt
Problem parsing arguments: not enough arguments
Now we see the error onscreen and output.txt contains nothing, which is the behavior we expect of command line programs.
Let’s run the program again with arguments that don’t cause an error but still redirect standard output to a file, like so:
$ cargo run -- to poem.txt > output.txt
We won’t see any output to the terminal, and output.txt will contain our results:
Файл: output.txt
Are you nobody, too?
How dreary to be somebody!
This demonstrates that we’re now using standard output for successful output and standard error for error output as appropriate.
Подведём итоги
This chapter recapped some of the major concepts you’ve learned so far and covered how to perform common I/O operations in Rust. By using command line arguments, files, environment variables, and the eprintln! macro for printing errors, you’re now prepared to write command line applications. Combined with the concepts in previous chapters, your code will be well organized, store data effectively in the appropriate data structures, handle errors nicely, and be well tested.
Next, we’ll explore some Rust features that were influenced by functional languages: closures and iterators.
Функциональные особенности: итераторы и замыкания
Rust’s design has taken inspiration from many existing languages and techniques, and one significant influence is functional programming. Programming in a functional style often includes using functions as values by passing them in arguments, returning them from other functions, assigning them to variables for later execution, and so forth.
In this chapter, we won’t debate the issue of what functional programming is or isn’t but will instead discuss some features of Rust that are similar to features in many languages often referred to as functional.
More specifically, we’ll cover:
- Closures, a function-like construct you can store in a variable
- Iterators, a way of processing a series of elements
- How to use closures and iterators to improve the I/O project in Chapter 12
- The performance of closures and iterators (spoiler alert: They’re faster than you might think!)
We’ve already covered some other Rust features, such as pattern matching and enums, that are also influenced by the functional style. Because mastering closures and iterators is an important part of writing fast, idiomatic, Rust code, we’ll devote this entire chapter to them.
Closures
Closures
Rust’s closures are anonymous functions you can save in a variable or pass as arguments to other functions. You can create the closure in one place and then call the closure elsewhere to evaluate it in a different context. Unlike functions, closures can capture values from the scope in which they’re defined. We’ll demonstrate how these closure features allow for code reuse and behavior customization.
Capturing the Environment
We’ll first examine how we can use closures to capture values from the environment they’re defined in for later use. Here’s the scenario: Every so often, our T-shirt company gives away an exclusive, limited-edition shirt to someone on our mailing list as a promotion. People on the mailing list can optionally add their favorite color to their profile. If the person chosen for a free shirt has their favorite color set, they get that color shirt. If the person hasn’t specified a favorite color, they get whatever color the company currently has the most of.
There are many ways to implement this. For this example, we’re going to use an enum called ShirtColor that has the variants Red and Blue (limiting the number of colors available for simplicity). We represent the company’s inventory with an Inventory struct that has a field named shirts that contains a Vec<ShirtColor> representing the shirt colors currently in stock. The method giveaway defined on Inventory gets the optional shirt color preference of the free-shirt winner, and it returns the shirt color the person will get. This setup is shown in Listing 13-1.
#[derive(Debug, PartialEq, Copy, Clone)]
enum ShirtColor {
Red,
Blue,
}
Если у вас есть опыт работы с C или C++, вам могут вспомниться `gcc` или `clang`. После успешной компиляции Rust создаст исполняемый бинарный файл.
struct Inventory {
shirts: Vec<ShirtColor>,
}
Если у вас есть опыт работы с C или C++, вам могут вспомниться `gcc` или `clang`. После успешной компиляции Rust создаст исполняемый бинарный файл.
impl Inventory {
fn giveaway(&self, user_preference: Option<ShirtColor>) -> ShirtColor {
user_preference.unwrap_or_else(|| self.most_stocked())
}
Если у вас есть опыт работы с C или C++, вам могут вспомниться `gcc` или `clang`. После успешной компиляции Rust создаст исполняемый бинарный файл.
fn most_stocked(&self) -> ShirtColor {
let mut num_red = 0;
let mut num_blue = 0;
Если у вас есть опыт работы с C или C++, вам могут вспомниться `gcc` или `clang`. После успешной компиляции Rust создаст исполняемый бинарный файл.
for color in &self.shirts {
match color {
ShirtColor::Red => num_red += 1,
ShirtColor::Blue => num_blue += 1,
}
}
if num_red > num_blue {
ShirtColor::Red
} else {
ShirtColor::Blue
}
}
}
Если у вас есть опыт работы с C или C++, вам могут вспомниться `gcc` или `clang`. После успешной компиляции Rust создаст исполняемый бинарный файл.
fn main() {
let store = Inventory {
shirts: vec![ShirtColor::Blue, ShirtColor::Red, ShirtColor::Blue],
};
Если у вас есть опыт работы с C или C++, вам могут вспомниться `gcc` или `clang`. После успешной компиляции Rust создаст исполняемый бинарный файл.
let user_pref1 = Some(ShirtColor::Red);
let giveaway1 = store.giveaway(user_pref1);
println!(
"The user with preference {:?} gets {:?}",
user_pref1, giveaway1
);
Если у вас есть опыт работы с C или C++, вам могут вспомниться `gcc` или `clang`. После успешной компиляции Rust создаст исполняемый бинарный файл.
let user_pref2 = None;
let giveaway2 = store.giveaway(user_pref2);
println!(
"The user with preference {:?} gets {:?}",
user_pref2, giveaway2
);
}The store defined in main has two blue shirts and one red shirt remaining to distribute for this limited-edition promotion. We call the giveaway method for a user with a preference for a red shirt and a user without any preference.
Again, this code could be implemented in many ways, and here, to focus on closures, we’ve stuck to concepts you’ve already learned, except for the body of the giveaway method that uses a closure. In the giveaway method, we get the user preference as a parameter of type Option<ShirtColor> and call the unwrap_or_else method on user_preference. The unwrap_or_else method on Option<T> is defined by the standard library. It takes one argument: a closure without any arguments that returns a value T (the same type stored in the Some variant of the Option<T>, in this case ShirtColor). If the Option<T> is the Some variant, unwrap_or_else returns the value from within the Some. If the Option<T> is the None variant, unwrap_or_else calls the closure and returns the value returned by the closure.
We specify the closure expression || self.most_stocked() as the argument to unwrap_or_else. This is a closure that takes no parameters itself (if the closure had parameters, they would appear between the two vertical pipes). The body of the closure calls self.most_stocked(). We’re defining the closure here, and the implementation of unwrap_or_else will evaluate the closure later if the result is needed.
Running this code prints the following:
$ cargo run
Compiling shirt-company v0.1.0 (file:///projects/shirt-company)
Finished `dev` profile [unoptimized + debuginfo] target(s) in 0.27s
Running `target/debug/shirt-company`
The user with preference Some(Red) gets Red
The user with preference None gets Blue
One interesting aspect here is that we’ve passed a closure that calls self.most_stocked() on the current Inventory instance. The standard library didn’t need to know anything about the Inventory or ShirtColor types we defined, or the logic we want to use in this scenario. The closure captures an immutable reference to the self Inventory instance and passes it with the code we specify to the unwrap_or_else method. Functions, on the other hand, are not able to capture their environment in this way.
Inferring and Annotating Closure Types
There are more differences between functions and closures. Closures don’t usually require you to annotate the types of the parameters or the return value like fn functions do. Type annotations are required on functions because the types are part of an explicit interface exposed to your users. Defining this interface rigidly is important for ensuring that everyone agrees on what types of values a function uses and returns. Closures, on the other hand, aren’t used in an exposed interface like this: They’re stored in variables, and they’re used without naming them and exposing them to users of our library.
Closures are typically short and relevant only within a narrow context rather than in any arbitrary scenario. Within these limited contexts, the compiler can infer the types of the parameters and the return type, similar to how it’s able to infer the types of most variables (there are rare cases where the compiler needs closure type annotations too).
As with variables, we can add type annotations if we want to increase explicitness and clarity at the cost of being more verbose than is strictly necessary. Annotating the types for a closure would look like the definition shown in Listing 13-2. In this example, we’re defining a closure and storing it in a variable rather than defining the closure in the spot we pass it as an argument, as we did in Listing 13-1.
use std::thread;
use std::time::Duration;
Если у вас есть опыт работы с C или C++, вам могут вспомниться `gcc` или `clang`. После успешной компиляции Rust создаст исполняемый бинарный файл.
fn generate_workout(intensity: u32, random_number: u32) {
let expensive_closure = |num: u32| -> u32 {
println!("calculating slowly...");
thread::sleep(Duration::from_secs(2));
num
};
Если у вас есть опыт работы с C или C++, вам могут вспомниться `gcc` или `clang`. После успешной компиляции Rust создаст исполняемый бинарный файл.
if intensity < 25 {
println!("Today, do {} pushups!", expensive_closure(intensity));
println!("Next, do {} situps!", expensive_closure(intensity));
} else {
if random_number == 3 {
println!("Take a break today! Remember to stay hydrated!");
} else {
println!(
"Today, run for {} minutes!",
expensive_closure(intensity)
);
}
}
}
Если у вас есть опыт работы с C или C++, вам могут вспомниться `gcc` или `clang`. После успешной компиляции Rust создаст исполняемый бинарный файл.
fn main() {
let simulated_user_specified_value = 10;
let simulated_random_number = 7;
Если у вас есть опыт работы с C или C++, вам могут вспомниться `gcc` или `clang`. После успешной компиляции Rust создаст исполняемый бинарный файл.
generate_workout(simulated_user_specified_value, simulated_random_number);
}With type annotations added, the syntax of closures looks more similar to the syntax of functions. Here, we define a function that adds 1 to its parameter and a closure that has the same behavior, for comparison. We’ve added some spaces to line up the relevant parts. This illustrates how closure syntax is similar to function syntax except for the use of pipes and the amount of syntax that is optional:
fn add_one_v1 (x: u32) -> u32 { x + 1 }
let add_one_v2 = |x: u32| -> u32 { x + 1 };
let add_one_v3 = |x| { x + 1 };
let add_one_v4 = |x| x + 1 ;The first line shows a function definition and the second line shows a fully annotated closure definition. In the third line, we remove the type annotations from the closure definition. In the fourth line, we remove the brackets, which are optional because the closure body has only one expression. These are all valid definitions that will produce the same behavior when they’re called. The add_one_v3 and add_one_v4 lines require the closures to be evaluated to be able to compile because the types will be inferred from their usage. This is similar to let v = Vec::new(); needing either type annotations or values of some type to be inserted into the Vec for Rust to be able to infer the type.
For closure definitions, the compiler will infer one concrete type for each of their parameters and for their return value. For instance, Listing 13-3 shows the definition of a short closure that just returns the value it receives as a parameter. This closure isn’t very useful except for the purposes of this example. Note that we haven’t added any type annotations to the definition. Because there are no type annotations, we can call the closure with any type, which we’ve done here with String the first time. If we then try to call example_closure with an integer, we’ll get an error.
fn main() {
let example_closure = |x| x;
Если у вас есть опыт работы с C или C++, вам могут вспомниться `gcc` или `clang`. После успешной компиляции Rust создаст исполняемый бинарный файл.
let s = example_closure(String::from("hello"));
let n = example_closure(5);
}The compiler gives us this error:
$ cargo run
Compiling closure-example v0.1.0 (file:///projects/closure-example)
error[E0308]: mismatched types
--> src/main.rs:5:29
|
5 | let n = example_closure(5);
| --------------- ^ expected `String`, found integer
| |
| arguments to this function are incorrect
|
note: expected because the closure was earlier called with an argument of type `String`
--> src/main.rs:4:29
|
4 | let s = example_closure(String::from("hello"));
| --------------- ^^^^^^^^^^^^^^^^^^^^^ expected because this argument is of type `String`
| |
| in this closure call
note: closure parameter defined here
--> src/main.rs:2:28
|
2 | let example_closure = |x| x;
| ^
help: try using a conversion method
|
5 | let n = example_closure(5.to_string());
| ++++++++++++
Если у вас есть опыт работы с C или C++, вам могут вспомниться `gcc` или `clang`. После успешной компиляции Rust создаст исполняемый бинарный файл.
For more information about this error, try `rustc --explain E0308`.
error: could not compile `closure-example` (bin "closure-example") due to 1 previous error
The first time we call example_closure with the String value, the compiler infers the type of x and the return type of the closure to be String. Those types are then locked into the closure in example_closure, and we get a type error when we next try to use a different type with the same closure.
Capturing References or Moving Ownership
Closures can capture values from their environment in three ways, which directly map to the three ways a function can take a parameter: borrowing immutably, borrowing mutably, and taking ownership. The closure will decide which of these to use based on what the body of the function does with the captured values.
In Listing 13-4, we define a closure that captures an immutable reference to the vector named list because it only needs an immutable reference to print the value.
fn main() {
let list = vec![1, 2, 3];
println!("Before defining closure: {list:?}");
Если у вас есть опыт работы с C или C++, вам могут вспомниться `gcc` или `clang`. После успешной компиляции Rust создаст исполняемый бинарный файл.
let only_borrows = || println!("From closure: {list:?}");
Если у вас есть опыт работы с C или C++, вам могут вспомниться `gcc` или `clang`. После успешной компиляции Rust создаст исполняемый бинарный файл.
println!("Before calling closure: {list:?}");
only_borrows();
println!("After calling closure: {list:?}");
}This example also illustrates that a variable can bind to a closure definition, and we can later call the closure by using the variable name and parentheses as if the variable name were a function name.
Because we can have multiple immutable references to list at the same time, list is still accessible from the code before the closure definition, after the closure definition but before the closure is called, and after the closure is called. This code compiles, runs, and prints:
$ cargo run
Compiling closure-example v0.1.0 (file:///projects/closure-example)
Finished `dev` profile [unoptimized + debuginfo] target(s) in 0.43s
Running `target/debug/closure-example`
Before defining closure: [1, 2, 3]
Before calling closure: [1, 2, 3]
From closure: [1, 2, 3]
After calling closure: [1, 2, 3]
Next, in Listing 13-5, we change the closure body so that it adds an element to the list vector. The closure now captures a mutable reference.
fn main() {
let mut list = vec![1, 2, 3];
println!("Before defining closure: {list:?}");
Если у вас есть опыт работы с C или C++, вам могут вспомниться `gcc` или `clang`. После успешной компиляции Rust создаст исполняемый бинарный файл.
let mut borrows_mutably = || list.push(7);
Если у вас есть опыт работы с C или C++, вам могут вспомниться `gcc` или `clang`. После успешной компиляции Rust создаст исполняемый бинарный файл.
borrows_mutably();
println!("After calling closure: {list:?}");
}This code compiles, runs, and prints:
$ cargo run
Compiling closure-example v0.1.0 (file:///projects/closure-example)
Finished `dev` profile [unoptimized + debuginfo] target(s) in 0.43s
Running `target/debug/closure-example`
Before defining closure: [1, 2, 3]
After calling closure: [1, 2, 3, 7]
Note that there’s no longer a println! between the definition and the call of the borrows_mutably closure: When borrows_mutably is defined, it captures a mutable reference to list. We don’t use the closure again after the closure is called, so the mutable borrow ends. Between the closure definition and the closure call, an immutable borrow to print isn’t allowed, because no other borrows are allowed when there’s a mutable borrow. Try adding a println! there to see what error message you get!
If you want to force the closure to take ownership of the values it uses in the environment even though the body of the closure doesn’t strictly need ownership, you can use the move keyword before the parameter list.
This technique is mostly useful when passing a closure to a new thread to move the data so that it’s owned by the new thread. We’ll discuss threads and why you would want to use them in detail in Chapter 16 when we talk about concurrency, but for now, let’s briefly explore spawning a new thread using a closure that needs the move keyword. Listing 13-6 shows Listing 13-4 modified to print the vector in a new thread rather than in the main thread.
use std::thread;
Если у вас есть опыт работы с C или C++, вам могут вспомниться `gcc` или `clang`. После успешной компиляции Rust создаст исполняемый бинарный файл.
fn main() {
let list = vec![1, 2, 3];
println!("Before defining closure: {list:?}");
Если у вас есть опыт работы с C или C++, вам могут вспомниться `gcc` или `clang`. После успешной компиляции Rust создаст исполняемый бинарный файл.
thread::spawn(move || println!("From thread: {list:?}"))
.join()
.unwrap();
}move to force the closure for the thread to take ownership of listWe spawn a new thread, giving the thread a closure to run as an argument. The closure body prints out the list. In Listing 13-4, the closure only captured list using an immutable reference because that’s the least amount of access to list needed to print it. In this example, even though the closure body still only needs an immutable reference, we need to specify that list should be moved into the closure by putting the move keyword at the beginning of the closure definition. If the main thread performed more operations before calling join on the new thread, the new thread might finish before the rest of the main thread finishes, or the main thread might finish first. If the main thread maintained ownership of list but ended before the new thread and drops list, the immutable reference in the thread would be invalid. Therefore, the compiler requires that list be moved into the closure given to the new thread so that the reference will be valid. Try removing the move keyword or using list in the main thread after the closure is defined to see what compiler errors you get!
Moving Captured Values Out of Closures
Once a closure has captured a reference or captured ownership of a value from the environment where the closure is defined (thus affecting what, if anything, is moved into the closure), the code in the body of the closure defines what happens to the references or values when the closure is evaluated later (thus affecting what, if anything, is moved out of the closure).
A closure body can do any of the following: Move a captured value out of the closure, mutate the captured value, neither move nor mutate the value, or capture nothing from the environment to begin with.
The way a closure captures and handles values from the environment affects which traits the closure implements, and traits are how functions and structs can specify what kinds of closures they can use. Closures will automatically implement one, two, or all three of these Fn traits, in an additive fashion, depending on how the closure’s body handles the values:
FnOnceapplies to closures that can be called once. All closures implement at least this trait because all closures can be called. A closure that moves captured values out of its body will only implementFnOnceand none of the otherFntraits because it can only be called once.FnMutapplies to closures that don’t move captured values out of their body but might mutate the captured values. These closures can be called more than once.Fnapplies to closures that don’t move captured values out of their body and don’t mutate captured values, as well as closures that capture nothing from their environment. These closures can be called more than once without mutating their environment, which is important in cases such as calling a closure multiple times concurrently.
Let’s look at the definition of the unwrap_or_else method on Option<T> that we used in Listing 13-1:
impl<T> Option<T> {
pub fn unwrap_or_else<F>(self, f: F) -> T
where
F: FnOnce() -> T
{
match self {
Some(x) => x,
None => f(),
}
}
}Recall that T is the generic type representing the type of the value in the Some variant of an Option. That type T is also the return type of the unwrap_or_else function: Code that calls unwrap_or_else on an Option<String>, for example, will get a String.
Next, notice that the unwrap_or_else function has the additional generic type parameter F. The F type is the type of the parameter named f, which is the closure we provide when calling unwrap_or_else.
The trait bound specified on the generic type F is FnOnce() -> T, which means F must be able to be called once, take no arguments, and return a T. Using FnOnce in the trait bound expresses the constraint that unwrap_or_else will not call f more than once. In the body of unwrap_or_else, we can see that if the Option is Some, f won’t be called. If the Option is None, f will be called once. Because all closures implement FnOnce, unwrap_or_else accepts all three kinds of closures and is as flexible as it can be.
Note: If what we want to do doesn’t require capturing a value from the environment, we can use the name of a function rather than a closure where we need something that implements one of the Fn traits. For example, on an Option<Vec<T>> value, we could call unwrap_or_else(Vec::new) to get a new, empty vector if the value is None. The compiler automatically implements whichever of the Fn traits is applicable for a function definition.
Now let’s look at the standard library method sort_by_key, defined on slices, to see how that differs from unwrap_or_else and why sort_by_key uses FnMut instead of FnOnce for the trait bound. The closure gets one argument in the form of a reference to the current item in the slice being considered, and it returns a value of type K that can be ordered. This function is useful when you want to sort a slice by a particular attribute of each item. In Listing 13-7, we have a list of Rectangle instances, and we use sort_by_key to order them by their width attribute from low to high.
#[derive(Debug)]
struct Rectangle {
width: u32,
height: u32,
}
Если у вас есть опыт работы с C или C++, вам могут вспомниться `gcc` или `clang`. После успешной компиляции Rust создаст исполняемый бинарный файл.
fn main() {
let mut list = [
Rectangle { width: 10, height: 1 },
Rectangle { width: 3, height: 5 },
Rectangle { width: 7, height: 12 },
];
Если у вас есть опыт работы с C или C++, вам могут вспомниться `gcc` или `clang`. После успешной компиляции Rust создаст исполняемый бинарный файл.
list.sort_by_key(|r| r.width);
println!("{list:#?}");
}sort_by_key to order rectangles by widthThis code prints:
$ cargo run
Compiling rectangles v0.1.0 (file:///projects/rectangles)
Finished `dev` profile [unoptimized + debuginfo] target(s) in 0.41s
Running `target/debug/rectangles`
[
Rectangle {
width: 3,
height: 5,
},
Rectangle {
width: 7,
height: 12,
},
Rectangle {
width: 10,
height: 1,
},
]
The reason sort_by_key is defined to take an FnMut closure is that it calls the closure multiple times: once for each item in the slice. The closure |r| r.width doesn’t capture, mutate, or move anything out from its environment, so it meets the trait bound requirements.
In contrast, Listing 13-8 shows an example of a closure that implements just the FnOnce trait, because it moves a value out of the environment. The compiler won’t let us use this closure with sort_by_key.
#[derive(Debug)]
struct Rectangle {
width: u32,
height: u32,
}
Если у вас есть опыт работы с C или C++, вам могут вспомниться `gcc` или `clang`. После успешной компиляции Rust создаст исполняемый бинарный файл.
fn main() {
let mut list = [
Rectangle { width: 10, height: 1 },
Rectangle { width: 3, height: 5 },
Rectangle { width: 7, height: 12 },
];
Если у вас есть опыт работы с C или C++, вам могут вспомниться `gcc` или `clang`. После успешной компиляции Rust создаст исполняемый бинарный файл.
let mut sort_operations = vec![];
let value = String::from("closure called");
Если у вас есть опыт работы с C или C++, вам могут вспомниться `gcc` или `clang`. После успешной компиляции Rust создаст исполняемый бинарный файл.
list.sort_by_key(|r| {
sort_operations.push(value);
r.width
});
println!("{list:#?}");
}FnOnce closure with sort_by_keyThis is a contrived, convoluted way (that doesn’t work) to try to count the number of times sort_by_key calls the closure when sorting list. This code attempts to do this counting by pushing value—a String from the closure’s environment—into the sort_operations vector. The closure captures value and then moves value out of the closure by transferring ownership of value to the sort_operations vector. This closure can be called once; trying to call it a second time wouldn’t work, because value would no longer be in the environment to be pushed into sort_operations again! Therefore, this closure only implements FnOnce. When we try to compile this code, we get this error that value can’t be moved out of the closure because the closure must implement FnMut:
$ cargo run
Compiling rectangles v0.1.0 (file:///projects/rectangles)
error[E0507]: cannot move out of `value`, a captured variable in an `FnMut` closure
--> src/main.rs:18:30
|
15 | let value = String::from("closure called");
| ----- ------------------------------ move occurs because `value` has type `String`, which does not implement the `Copy` trait
| |
| captured outer variable
16 |
17 | list.sort_by_key(|r| {
| --- captured by this `FnMut` closure
18 | sort_operations.push(value);
| ^^^^^ `value` is moved here
|
help: consider cloning the value if the performance cost is acceptable
|
18 | sort_operations.push(value.clone());
| ++++++++
Если у вас есть опыт работы с C или C++, вам могут вспомниться `gcc` или `clang`. После успешной компиляции Rust создаст исполняемый бинарный файл.
For more information about this error, try `rustc --explain E0507`.
error: could not compile `rectangles` (bin "rectangles") due to 1 previous error
The error points to the line in the closure body that moves value out of the environment. To fix this, we need to change the closure body so that it doesn’t move values out of the environment. Keeping a counter in the environment and incrementing its value in the closure body is a more straightforward way to count the number of times the closure is called. The closure in Listing 13-9 works with sort_by_key because it is only capturing a mutable reference to the num_sort_operations counter and can therefore be called more than once.
#[derive(Debug)]
struct Rectangle {
width: u32,
height: u32,
}
Если у вас есть опыт работы с C или C++, вам могут вспомниться `gcc` или `clang`. После успешной компиляции Rust создаст исполняемый бинарный файл.
fn main() {
let mut list = [
Rectangle { width: 10, height: 1 },
Rectangle { width: 3, height: 5 },
Rectangle { width: 7, height: 12 },
];
Если у вас есть опыт работы с C или C++, вам могут вспомниться `gcc` или `clang`. После успешной компиляции Rust создаст исполняемый бинарный файл.
let mut num_sort_operations = 0;
list.sort_by_key(|r| {
num_sort_operations += 1;
r.width
});
println!("{list:#?}, sorted in {num_sort_operations} operations");
}FnMut closure with sort_by_key is allowed.The Fn traits are important when defining or using functions or types that make use of closures. In the next section, we’ll discuss iterators. Many iterator methods take closure arguments, so keep these closure details in mind as we continue!
Обработка последовательностей элементов с помощью итераторов
Обработка последовательностей элементов с помощью итераторов
The iterator pattern allows you to perform some task on a sequence of items in turn. An iterator is responsible for the logic of iterating over each item and determining when the sequence has finished. When you use iterators, you don’t have to reimplement that logic yourself.
In Rust, iterators are lazy, meaning they have no effect until you call methods that consume the iterator to use it up. For example, the code in Listing 13-10 creates an iterator over the items in the vector v1 by calling the iter method defined on Vec<T>. This code by itself doesn’t do anything useful.
fn main() {
let v1 = vec![1, 2, 3];
Если у вас есть опыт работы с C или C++, вам могут вспомниться `gcc` или `clang`. После успешной компиляции Rust создаст исполняемый бинарный файл.
let v1_iter = v1.iter();
}The iterator is stored in the v1_iter variable. Once we’ve created an iterator, we can use it in a variety of ways. In Listing 3-5, we iterated over an array using a for loop to execute some code on each of its items. Under the hood, this implicitly created and then consumed an iterator, but we glossed over how exactly that works until now.
In the example in Listing 13-11, we separate the creation of the iterator from the use of the iterator in the for loop. When the for loop is called using the iterator in v1_iter, each element in the iterator is used in one iteration of the loop, which prints out each value.
fn main() {
let v1 = vec![1, 2, 3];
Если у вас есть опыт работы с C или C++, вам могут вспомниться `gcc` или `clang`. После успешной компиляции Rust создаст исполняемый бинарный файл.
let v1_iter = v1.iter();
Если у вас есть опыт работы с C или C++, вам могут вспомниться `gcc` или `clang`. После успешной компиляции Rust создаст исполняемый бинарный файл.
for val in v1_iter {
println!("Got: {val}");
}
}for loopIn languages that don’t have iterators provided by their standard libraries, you would likely write this same functionality by starting a variable at index 0, using that variable to index into the vector to get a value, and incrementing the variable value in a loop until it reached the total number of items in the vector.
Iterators handle all of that logic for you, cutting down on repetitive code you could potentially mess up. Iterators give you more flexibility to use the same logic with many different kinds of sequences, not just data structures you can index into, like vectors. Let’s examine how iterators do that.
The Iterator Trait and the next Method
All iterators implement a trait named Iterator that is defined in the standard library. The definition of the trait looks like this:
#![allow(unused)]
fn main() {
pub trait Iterator {
type Item;
Если у вас есть опыт работы с C или C++, вам могут вспомниться `gcc` или `clang`. После успешной компиляции Rust создаст исполняемый бинарный файл.
fn next(&mut self) -> Option<Self::Item>;
Если у вас есть опыт работы с C или C++, вам могут вспомниться `gcc` или `clang`. После успешной компиляции Rust создаст исполняемый бинарный файл.
// methods with default implementations elided
}
}Notice that this definition uses some new syntax: type Item and Self::Item, which are defining an associated type with this trait. We’ll talk about associated types in depth in Chapter 20. For now, all you need to know is that this code says implementing the Iterator trait requires that you also define an Item type, and this Item type is used in the return type of the next method. In other words, the Item type will be the type returned from the iterator.
The Iterator trait only requires implementors to define one method: the next method, which returns one item of the iterator at a time, wrapped in Some, and, when iteration is over, returns None.
We can call the next method on iterators directly; Listing 13-12 demonstrates what values are returned from repeated calls to next on the iterator created from the vector.
#[cfg(test)]
mod tests {
#[test]
fn iterator_demonstration() {
let v1 = vec![1, 2, 3];
Если у вас есть опыт работы с C или C++, вам могут вспомниться `gcc` или `clang`. После успешной компиляции Rust создаст исполняемый бинарный файл.
let mut v1_iter = v1.iter();
Если у вас есть опыт работы с C или C++, вам могут вспомниться `gcc` или `clang`. После успешной компиляции Rust создаст исполняемый бинарный файл.
assert_eq!(v1_iter.next(), Some(&1));
assert_eq!(v1_iter.next(), Some(&2));
assert_eq!(v1_iter.next(), Some(&3));
assert_eq!(v1_iter.next(), None);
}
}next method on an iteratorNote that we needed to make v1_iter mutable: Calling the next method on an iterator changes internal state that the iterator uses to keep track of where it is in the sequence. In other words, this code consumes, or uses up, the iterator. Each call to next eats up an item from the iterator. We didn’t need to make v1_iter mutable when we used a for loop, because the loop took ownership of v1_iter and made it mutable behind the scenes.
Also note that the values we get from the calls to next are immutable references to the values in the vector. The iter method produces an iterator over immutable references. If we want to create an iterator that takes ownership of v1 and returns owned values, we can call into_iter instead of iter. Similarly, if we want to iterate over mutable references, we can call iter_mut instead of iter.
Methods That Consume the Iterator
The Iterator trait has a number of different methods with default implementations provided by the standard library; you can find out about these methods by looking in the standard library API documentation for the Iterator trait. Some of these methods call the next method in their definition, which is why you’re required to implement the next method when implementing the Iterator trait.
Methods that call next are called consuming adapters because calling them uses up the iterator. One example is the sum method, which takes ownership of the iterator and iterates through the items by repeatedly calling next, thus consuming the iterator. As it iterates through, it adds each item to a running total and returns the total when iteration is complete. Listing 13-13 has a test illustrating a use of the sum method.
#[cfg(test)]
mod tests {
#[test]
fn iterator_sum() {
let v1 = vec![1, 2, 3];
Если у вас есть опыт работы с C или C++, вам могут вспомниться `gcc` или `clang`. После успешной компиляции Rust создаст исполняемый бинарный файл.
let v1_iter = v1.iter();
Если у вас есть опыт работы с C или C++, вам могут вспомниться `gcc` или `clang`. После успешной компиляции Rust создаст исполняемый бинарный файл.
let total: i32 = v1_iter.sum();
Если у вас есть опыт работы с C или C++, вам могут вспомниться `gcc` или `clang`. После успешной компиляции Rust создаст исполняемый бинарный файл.
assert_eq!(total, 6);
}
}sum method to get the total of all items in the iteratorWe aren’t allowed to use v1_iter after the call to sum, because sum takes ownership of the iterator we call it on.
Methods That Produce Other Iterators
Iterator adapters are methods defined on the Iterator trait that don’t consume the iterator. Instead, they produce different iterators by changing some aspect of the original iterator.
Listing 13-14 shows an example of calling the iterator adapter method map, which takes a closure to call on each item as the items are iterated through. The map method returns a new iterator that produces the modified items. The closure here creates a new iterator in which each item from the vector will be incremented by 1.
fn main() {
let v1: Vec<i32> = vec![1, 2, 3];
Если у вас есть опыт работы с C или C++, вам могут вспомниться `gcc` или `clang`. После успешной компиляции Rust создаст исполняемый бинарный файл.
v1.iter().map(|x| x + 1);
}map to create a new iteratorHowever, this code produces a warning:
$ cargo run
Compiling iterators v0.1.0 (file:///projects/iterators)
warning: unused `Map` that must be used
--> src/main.rs:4:5
|
4 | v1.iter().map(|x| x + 1);
| ^^^^^^^^^^^^^^^^^^^^^^^^
|
= note: iterators are lazy and do nothing unless consumed
= note: `#[warn(unused_must_use)]` on by default
help: use `let _ = ...` to ignore the resulting value
|
4 | let _ = v1.iter().map(|x| x + 1);
| +++++++
Если у вас есть опыт работы с C или C++, вам могут вспомниться `gcc` или `clang`. После успешной компиляции Rust создаст исполняемый бинарный файл.
warning: `iterators` (bin "iterators") generated 1 warning
Finished `dev` profile [unoptimized + debuginfo] target(s) in 0.47s
Running `target/debug/iterators`
The code in Listing 13-14 doesn’t do anything; the closure we’ve specified never gets called. The warning reminds us why: Iterator adapters are lazy, and we need to consume the iterator here.
To fix this warning and consume the iterator, we’ll use the collect method, which we used with env::args in Listing 12-1. This method consumes the iterator and collects the resultant values into a collection data type.
In Listing 13-15, we collect the results of iterating over the iterator that’s returned from the call to map into a vector. This vector will end up containing each item from the original vector, incremented by 1.
fn main() {
let v1: Vec<i32> = vec![1, 2, 3];
Если у вас есть опыт работы с C или C++, вам могут вспомниться `gcc` или `clang`. После успешной компиляции Rust создаст исполняемый бинарный файл.
let v2: Vec<_> = v1.iter().map(|x| x + 1).collect();
Если у вас есть опыт работы с C или C++, вам могут вспомниться `gcc` или `clang`. После успешной компиляции Rust создаст исполняемый бинарный файл.
assert_eq!(v2, vec![2, 3, 4]);
}map method to create a new iterator, and then calling the collect method to consume the new iterator and create a vectorBecause map takes a closure, we can specify any operation we want to perform on each item. This is a great example of how closures let you customize some behavior while reusing the iteration behavior that the Iterator trait provides.
You can chain multiple calls to iterator adapters to perform complex actions in a readable way. But because all iterators are lazy, you have to call one of the consuming adapter methods to get results from calls to iterator adapters.
Closures That Capture Their Environment
Many iterator adapters take closures as arguments, and commonly the closures we’ll specify as arguments to iterator adapters will be closures that capture their environment.
For this example, we’ll use the filter method that takes a closure. The closure gets an item from the iterator and returns a bool. If the closure returns true, the value will be included in the iteration produced by filter. If the closure returns false, the value won’t be included.
In Listing 13-16, we use filter with a closure that captures the shoe_size variable from its environment to iterate over a collection of Shoe struct instances. It will return only shoes that are the specified size.
#[derive(PartialEq, Debug)]
struct Shoe {
size: u32,
style: String,
}
Если у вас есть опыт работы с C или C++, вам могут вспомниться `gcc` или `clang`. После успешной компиляции Rust создаст исполняемый бинарный файл.
fn shoes_in_size(shoes: Vec<Shoe>, shoe_size: u32) -> Vec<Shoe> {
shoes.into_iter().filter(|s| s.size == shoe_size).collect()
}
Если у вас есть опыт работы с C или C++, вам могут вспомниться `gcc` или `clang`. После успешной компиляции Rust создаст исполняемый бинарный файл.
#[cfg(test)]
mod tests {
use super::*;
Если у вас есть опыт работы с C или C++, вам могут вспомниться `gcc` или `clang`. После успешной компиляции Rust создаст исполняемый бинарный файл.
#[test]
fn filters_by_size() {
let shoes = vec![
Shoe {
size: 10,
style: String::from("sneaker"),
},
Shoe {
size: 13,
style: String::from("sandal"),
},
Shoe {
size: 10,
style: String::from("boot"),
},
];
Если у вас есть опыт работы с C или C++, вам могут вспомниться `gcc` или `clang`. После успешной компиляции Rust создаст исполняемый бинарный файл.
let in_my_size = shoes_in_size(shoes, 10);
Если у вас есть опыт работы с C или C++, вам могут вспомниться `gcc` или `clang`. После успешной компиляции Rust создаст исполняемый бинарный файл.
assert_eq!(
in_my_size,
vec![
Shoe {
size: 10,
style: String::from("sneaker")
},
Shoe {
size: 10,
style: String::from("boot")
},
]
);
}
}filter method with a closure that captures shoe_sizeThe shoes_in_size function takes ownership of a vector of shoes and a shoe size as parameters. It returns a vector containing only shoes of the specified size.
In the body of shoes_in_size, we call into_iter to create an iterator that takes ownership of the vector. Then, we call filter to adapt that iterator into a new iterator that only contains elements for which the closure returns true.
The closure captures the shoe_size parameter from the environment and compares the value with each shoe’s size, keeping only shoes of the size specified. Finally, calling collect gathers the values returned by the adapted iterator into a vector that’s returned by the function.
The test shows that when we call shoes_in_size, we get back only shoes that have the same size as the value we specified.
Улучшаем наш проект с вводом-выводом
Улучшаем наш проект с вводом-выводом
With this new knowledge about iterators, we can improve the I/O project in Chapter 12 by using iterators to make places in the code clearer and more concise. Let’s look at how iterators can improve our implementation of the Config::build function and the search function.
Removing a clone Using an Iterator
In Listing 12-6, we added code that took a slice of String values and created an instance of the Config struct by indexing into the slice and cloning the values, allowing the Config struct to own those values. In Listing 13-17, we’ve reproduced the implementation of the Config::build function as it was in Listing 12-23.
use std::env;
use std::error::Error;
use std::fs;
use std::process;
Если у вас есть опыт работы с C или C++, вам могут вспомниться `gcc` или `clang`. После успешной компиляции Rust создаст исполняемый бинарный файл.
use minigrep::{search, search_case_insensitive};
Если у вас есть опыт работы с C или C++, вам могут вспомниться `gcc` или `clang`. После успешной компиляции Rust создаст исполняемый бинарный файл.
fn main() {
let args: Vec<String> = env::args().collect();
Если у вас есть опыт работы с C или C++, вам могут вспомниться `gcc` или `clang`. После успешной компиляции Rust создаст исполняемый бинарный файл.
let config = Config::build(&args).unwrap_or_else(|err| {
println!("Problem parsing arguments: {err}");
process::exit(1);
});
Если у вас есть опыт работы с C или C++, вам могут вспомниться `gcc` или `clang`. После успешной компиляции Rust создаст исполняемый бинарный файл.
if let Err(e) = run(config) {
println!("Application error: {e}");
process::exit(1);
}
}
Если у вас есть опыт работы с C или C++, вам могут вспомниться `gcc` или `clang`. После успешной компиляции Rust создаст исполняемый бинарный файл.
pub struct Config {
pub query: String,
pub file_path: String,
pub ignore_case: bool,
}
Если у вас есть опыт работы с C или C++, вам могут вспомниться `gcc` или `clang`. После успешной компиляции Rust создаст исполняемый бинарный файл.
impl Config {
fn build(args: &[String]) -> Result<Config, &'static str> {
if args.len() < 3 {
return Err("not enough arguments");
}
Если у вас есть опыт работы с C или C++, вам могут вспомниться `gcc` или `clang`. После успешной компиляции Rust создаст исполняемый бинарный файл.
let query = args[1].clone();
let file_path = args[2].clone();
Если у вас есть опыт работы с C или C++, вам могут вспомниться `gcc` или `clang`. После успешной компиляции Rust создаст исполняемый бинарный файл.
let ignore_case = env::var("IGNORE_CASE").is_ok();
Если у вас есть опыт работы с C или C++, вам могут вспомниться `gcc` или `clang`. После успешной компиляции Rust создаст исполняемый бинарный файл.
Ok(Config {
query,
file_path,
ignore_case,
})
}
}
Если у вас есть опыт работы с C или C++, вам могут вспомниться `gcc` или `clang`. После успешной компиляции Rust создаст исполняемый бинарный файл.
fn run(config: Config) -> Result<(), Box<dyn Error>> {
let contents = fs::read_to_string(config.file_path)?;
Если у вас есть опыт работы с C или C++, вам могут вспомниться `gcc` или `clang`. После успешной компиляции Rust создаст исполняемый бинарный файл.
let results = if config.ignore_case {
search_case_insensitive(&config.query, &contents)
} else {
search(&config.query, &contents)
};
Если у вас есть опыт работы с C или C++, вам могут вспомниться `gcc` или `clang`. После успешной компиляции Rust создаст исполняемый бинарный файл.
for line in results {
println!("{line}");
}
Если у вас есть опыт работы с C или C++, вам могут вспомниться `gcc` или `clang`. После успешной компиляции Rust создаст исполняемый бинарный файл.
Ok(())
}Config::build function from Listing 12-23At the time, we said not to worry about the inefficient clone calls because we would remove them in the future. Well, that time is now!
We needed clone here because we have a slice with String elements in the parameter args, but the build function doesn’t own args. To return ownership of a Config instance, we had to clone the values from the query and file_path fields of Config so that the Config instance can own its values.
With our new knowledge about iterators, we can change the build function to take ownership of an iterator as its argument instead of borrowing a slice. We’ll use the iterator functionality instead of the code that checks the length of the slice and indexes into specific locations. This will clarify what the Config::build function is doing because the iterator will access the values.
Once Config::build takes ownership of the iterator and stops using indexing operations that borrow, we can move the String values from the iterator into Config rather than calling clone and making a new allocation.
Using the Returned Iterator Directly
Open your I/O project’s src/main.rs file, which should look like this:
Файл: src/main.rs
use std::env;
use std::error::Error;
use std::fs;
use std::process;
Если у вас есть опыт работы с C или C++, вам могут вспомниться `gcc` или `clang`. После успешной компиляции Rust создаст исполняемый бинарный файл.
use minigrep::{search, search_case_insensitive};
Если у вас есть опыт работы с C или C++, вам могут вспомниться `gcc` или `clang`. После успешной компиляции Rust создаст исполняемый бинарный файл.
fn main() {
let args: Vec<String> = env::args().collect();
Если у вас есть опыт работы с C или C++, вам могут вспомниться `gcc` или `clang`. После успешной компиляции Rust создаст исполняемый бинарный файл.
let config = Config::build(&args).unwrap_or_else(|err| {
eprintln!("Problem parsing arguments: {err}");
process::exit(1);
});
Если у вас есть опыт работы с C или C++, вам могут вспомниться `gcc` или `clang`. После успешной компиляции Rust создаст исполняемый бинарный файл.
// --код сокращён--
Если у вас есть опыт работы с C или C++, вам могут вспомниться `gcc` или `clang`. После успешной компиляции Rust создаст исполняемый бинарный файл.
if let Err(e) = run(config) {
eprintln!("Application error: {e}");
process::exit(1);
}
}
Если у вас есть опыт работы с C или C++, вам могут вспомниться `gcc` или `clang`. После успешной компиляции Rust создаст исполняемый бинарный файл.
pub struct Config {
pub query: String,
pub file_path: String,
pub ignore_case: bool,
}
Если у вас есть опыт работы с C или C++, вам могут вспомниться `gcc` или `clang`. После успешной компиляции Rust создаст исполняемый бинарный файл.
impl Config {
fn build(args: &[String]) -> Result<Config, &'static str> {
if args.len() < 3 {
return Err("not enough arguments");
}
Если у вас есть опыт работы с C или C++, вам могут вспомниться `gcc` или `clang`. После успешной компиляции Rust создаст исполняемый бинарный файл.
let query = args[1].clone();
let file_path = args[2].clone();
Если у вас есть опыт работы с C или C++, вам могут вспомниться `gcc` или `clang`. После успешной компиляции Rust создаст исполняемый бинарный файл.
let ignore_case = env::var("IGNORE_CASE").is_ok();
Если у вас есть опыт работы с C или C++, вам могут вспомниться `gcc` или `clang`. После успешной компиляции Rust создаст исполняемый бинарный файл.
Ok(Config {
query,
file_path,
ignore_case,
})
}
}
Если у вас есть опыт работы с C или C++, вам могут вспомниться `gcc` или `clang`. После успешной компиляции Rust создаст исполняемый бинарный файл.
fn run(config: Config) -> Result<(), Box<dyn Error>> {
let contents = fs::read_to_string(config.file_path)?;
Если у вас есть опыт работы с C или C++, вам могут вспомниться `gcc` или `clang`. После успешной компиляции Rust создаст исполняемый бинарный файл.
let results = if config.ignore_case {
search_case_insensitive(&config.query, &contents)
} else {
search(&config.query, &contents)
};
Если у вас есть опыт работы с C или C++, вам могут вспомниться `gcc` или `clang`. После успешной компиляции Rust создаст исполняемый бинарный файл.
for line in results {
println!("{line}");
}
Если у вас есть опыт работы с C или C++, вам могут вспомниться `gcc` или `clang`. После успешной компиляции Rust создаст исполняемый бинарный файл.
Ok(())
}We’ll first change the start of the main function that we had in Listing 12-24 to the code in Listing 13-18, which this time uses an iterator. This won’t compile until we update Config::build as well.
use std::env;
use std::error::Error;
use std::fs;
use std::process;
Если у вас есть опыт работы с C или C++, вам могут вспомниться `gcc` или `clang`. После успешной компиляции Rust создаст исполняемый бинарный файл.
use minigrep::{search, search_case_insensitive};
Если у вас есть опыт работы с C или C++, вам могут вспомниться `gcc` или `clang`. После успешной компиляции Rust создаст исполняемый бинарный файл.
fn main() {
let config = Config::build(env::args()).unwrap_or_else(|err| {
eprintln!("Problem parsing arguments: {err}");
process::exit(1);
});
Если у вас есть опыт работы с C или C++, вам могут вспомниться `gcc` или `clang`. После успешной компиляции Rust создаст исполняемый бинарный файл.
// --код сокращён--
Если у вас есть опыт работы с C или C++, вам могут вспомниться `gcc` или `clang`. После успешной компиляции Rust создаст исполняемый бинарный файл.
if let Err(e) = run(config) {
eprintln!("Application error: {e}");
process::exit(1);
}
}
Если у вас есть опыт работы с C или C++, вам могут вспомниться `gcc` или `clang`. После успешной компиляции Rust создаст исполняемый бинарный файл.
pub struct Config {
pub query: String,
pub file_path: String,
pub ignore_case: bool,
}
Если у вас есть опыт работы с C или C++, вам могут вспомниться `gcc` или `clang`. После успешной компиляции Rust создаст исполняемый бинарный файл.
impl Config {
fn build(args: &[String]) -> Result<Config, &'static str> {
if args.len() < 3 {
return Err("not enough arguments");
}
Если у вас есть опыт работы с C или C++, вам могут вспомниться `gcc` или `clang`. После успешной компиляции Rust создаст исполняемый бинарный файл.
let query = args[1].clone();
let file_path = args[2].clone();
Если у вас есть опыт работы с C или C++, вам могут вспомниться `gcc` или `clang`. После успешной компиляции Rust создаст исполняемый бинарный файл.
let ignore_case = env::var("IGNORE_CASE").is_ok();
Если у вас есть опыт работы с C или C++, вам могут вспомниться `gcc` или `clang`. После успешной компиляции Rust создаст исполняемый бинарный файл.
Ok(Config {
query,
file_path,
ignore_case,
})
}
}
Если у вас есть опыт работы с C или C++, вам могут вспомниться `gcc` или `clang`. После успешной компиляции Rust создаст исполняемый бинарный файл.
fn run(config: Config) -> Result<(), Box<dyn Error>> {
let contents = fs::read_to_string(config.file_path)?;
Если у вас есть опыт работы с C или C++, вам могут вспомниться `gcc` или `clang`. После успешной компиляции Rust создаст исполняемый бинарный файл.
let results = if config.ignore_case {
search_case_insensitive(&config.query, &contents)
} else {
search(&config.query, &contents)
};
Если у вас есть опыт работы с C или C++, вам могут вспомниться `gcc` или `clang`. После успешной компиляции Rust создаст исполняемый бинарный файл.
for line in results {
println!("{line}");
}
Если у вас есть опыт работы с C или C++, вам могут вспомниться `gcc` или `clang`. После успешной компиляции Rust создаст исполняемый бинарный файл.
Ok(())
}env::args to Config::buildThe env::args function returns an iterator! Rather than collecting the iterator values into a vector and then passing a slice to Config::build, now we’re passing ownership of the iterator returned from env::args to Config::build directly.
Next, we need to update the definition of Config::build. Let’s change the signature of Config::build to look like Listing 13-19. This still won’t compile, because we need to update the function body.
use std::env;
use std::error::Error;
use std::fs;
use std::process;
Если у вас есть опыт работы с C или C++, вам могут вспомниться `gcc` или `clang`. После успешной компиляции Rust создаст исполняемый бинарный файл.
use minigrep::{search, search_case_insensitive};
Если у вас есть опыт работы с C или C++, вам могут вспомниться `gcc` или `clang`. После успешной компиляции Rust создаст исполняемый бинарный файл.
fn main() {
let config = Config::build(env::args()).unwrap_or_else(|err| {
eprintln!("Problem parsing arguments: {err}");
process::exit(1);
});
Если у вас есть опыт работы с C или C++, вам могут вспомниться `gcc` или `clang`. После успешной компиляции Rust создаст исполняемый бинарный файл.
if let Err(e) = run(config) {
eprintln!("Application error: {e}");
process::exit(1);
}
}
Если у вас есть опыт работы с C или C++, вам могут вспомниться `gcc` или `clang`. После успешной компиляции Rust создаст исполняемый бинарный файл.
pub struct Config {
pub query: String,
pub file_path: String,
pub ignore_case: bool,
}
Если у вас есть опыт работы с C или C++, вам могут вспомниться `gcc` или `clang`. После успешной компиляции Rust создаст исполняемый бинарный файл.
impl Config {
fn build(
mut args: impl Iterator<Item = String>,
) -> Result<Config, &'static str> {
// --код сокращён--
if args.len() < 3 {
return Err("not enough arguments");
}
Если у вас есть опыт работы с C или C++, вам могут вспомниться `gcc` или `clang`. После успешной компиляции Rust создаст исполняемый бинарный файл.
let query = args[1].clone();
let file_path = args[2].clone();
Если у вас есть опыт работы с C или C++, вам могут вспомниться `gcc` или `clang`. После успешной компиляции Rust создаст исполняемый бинарный файл.
let ignore_case = env::var("IGNORE_CASE").is_ok();
Если у вас есть опыт работы с C или C++, вам могут вспомниться `gcc` или `clang`. После успешной компиляции Rust создаст исполняемый бинарный файл.
Ok(Config {
query,
file_path,
ignore_case,
})
}
}
Если у вас есть опыт работы с C или C++, вам могут вспомниться `gcc` или `clang`. После успешной компиляции Rust создаст исполняемый бинарный файл.
fn run(config: Config) -> Result<(), Box<dyn Error>> {
let contents = fs::read_to_string(config.file_path)?;
Если у вас есть опыт работы с C или C++, вам могут вспомниться `gcc` или `clang`. После успешной компиляции Rust создаст исполняемый бинарный файл.
let results = if config.ignore_case {
search_case_insensitive(&config.query, &contents)
} else {
search(&config.query, &contents)
};
Если у вас есть опыт работы с C или C++, вам могут вспомниться `gcc` или `clang`. После успешной компиляции Rust создаст исполняемый бинарный файл.
for line in results {
println!("{line}");
}
Если у вас есть опыт работы с C или C++, вам могут вспомниться `gcc` или `clang`. После успешной компиляции Rust создаст исполняемый бинарный файл.
Ok(())
}Config::build to expect an iteratorThe standard library documentation for the env::args function shows that the type of the iterator it returns is std::env::Args, and that type implements the Iterator trait and returns String values.
We’ve updated the signature of the Config::build function so that the parameter args has a generic type with the trait bounds impl Iterator<Item = String> instead of &[String]. This usage of the impl Trait syntax we discussed in the “Using Traits as Parameters” section of Chapter 10 means that args can be any type that implements the Iterator trait and returns String items.
Because we’re taking ownership of args and we’ll be mutating args by iterating over it, we can add the mut keyword into the specification of the args parameter to make it mutable.
Using Iterator Trait Methods
Next, we’ll fix the body of Config::build. Because args implements the Iterator trait, we know we can call the next method on it! Listing 13-20 updates the code from Listing 12-23 to use the next method.
use std::env;
use std::error::Error;
use std::fs;
use std::process;
Если у вас есть опыт работы с C или C++, вам могут вспомниться `gcc` или `clang`. После успешной компиляции Rust создаст исполняемый бинарный файл.
use minigrep::{search, search_case_insensitive};
Если у вас есть опыт работы с C или C++, вам могут вспомниться `gcc` или `clang`. После успешной компиляции Rust создаст исполняемый бинарный файл.
fn main() {
let config = Config::build(env::args()).unwrap_or_else(|err| {
eprintln!("Problem parsing arguments: {err}");
process::exit(1);
});
Если у вас есть опыт работы с C или C++, вам могут вспомниться `gcc` или `clang`. После успешной компиляции Rust создаст исполняемый бинарный файл.
if let Err(e) = run(config) {
eprintln!("Application error: {e}");
process::exit(1);
}
}
Если у вас есть опыт работы с C или C++, вам могут вспомниться `gcc` или `clang`. После успешной компиляции Rust создаст исполняемый бинарный файл.
pub struct Config {
pub query: String,
pub file_path: String,
pub ignore_case: bool,
}
Если у вас есть опыт работы с C или C++, вам могут вспомниться `gcc` или `clang`. После успешной компиляции Rust создаст исполняемый бинарный файл.
impl Config {
fn build(
mut args: impl Iterator<Item = String>,
) -> Result<Config, &'static str> {
args.next();
Если у вас есть опыт работы с C или C++, вам могут вспомниться `gcc` или `clang`. После успешной компиляции Rust создаст исполняемый бинарный файл.
let query = match args.next() {
Some(arg) => arg,
None => return Err("Didn't get a query string"),
};
Если у вас есть опыт работы с C или C++, вам могут вспомниться `gcc` или `clang`. После успешной компиляции Rust создаст исполняемый бинарный файл.
let file_path = match args.next() {
Some(arg) => arg,
None => return Err("Didn't get a file path"),
};
Если у вас есть опыт работы с C или C++, вам могут вспомниться `gcc` или `clang`. После успешной компиляции Rust создаст исполняемый бинарный файл.
let ignore_case = env::var("IGNORE_CASE").is_ok();
Если у вас есть опыт работы с C или C++, вам могут вспомниться `gcc` или `clang`. После успешной компиляции Rust создаст исполняемый бинарный файл.
Ok(Config {
query,
file_path,
ignore_case,
})
}
}
Если у вас есть опыт работы с C или C++, вам могут вспомниться `gcc` или `clang`. После успешной компиляции Rust создаст исполняемый бинарный файл.
fn run(config: Config) -> Result<(), Box<dyn Error>> {
let contents = fs::read_to_string(config.file_path)?;
Если у вас есть опыт работы с C или C++, вам могут вспомниться `gcc` или `clang`. После успешной компиляции Rust создаст исполняемый бинарный файл.
let results = if config.ignore_case {
search_case_insensitive(&config.query, &contents)
} else {
search(&config.query, &contents)
};
Если у вас есть опыт работы с C или C++, вам могут вспомниться `gcc` или `clang`. После успешной компиляции Rust создаст исполняемый бинарный файл.
for line in results {
println!("{line}");
}
Если у вас есть опыт работы с C или C++, вам могут вспомниться `gcc` или `clang`. После успешной компиляции Rust создаст исполняемый бинарный файл.
Ok(())
}Config::build to use iterator methodsRemember that the first value in the return value of env::args is the name of the program. We want to ignore that and get to the next value, so first we call next and do nothing with the return value. Then, we call next to get the value we want to put in the query field of Config. If next returns Some, we use a match to extract the value. If it returns None, it means not enough arguments were given, and we return early with an Err value. We do the same thing for the file_path value.
Clarifying Code with Iterator Adapters
We can also take advantage of iterators in the search function in our I/O project, which is reproduced here in Listing 13-21 as it was in Listing 12-19.
pub fn search<'a>(query: &str, contents: &'a str) -> Vec<&'a str> {
let mut results = Vec::new();
Если у вас есть опыт работы с C или C++, вам могут вспомниться `gcc` или `clang`. После успешной компиляции Rust создаст исполняемый бинарный файл.
for line in contents.lines() {
if line.contains(query) {
results.push(line);
}
}
Если у вас есть опыт работы с C или C++, вам могут вспомниться `gcc` или `clang`. После успешной компиляции Rust создаст исполняемый бинарный файл.
results
}
Если у вас есть опыт работы с C или C++, вам могут вспомниться `gcc` или `clang`. После успешной компиляции Rust создаст исполняемый бинарный файл.
#[cfg(test)]
mod tests {
use super::*;
Если у вас есть опыт работы с C или C++, вам могут вспомниться `gcc` или `clang`. После успешной компиляции Rust создаст исполняемый бинарный файл.
#[test]
fn one_result() {
let query = "duct";
let contents = "\
Rust:
safe, fast, productive.
Pick three.";
Если у вас есть опыт работы с C или C++, вам могут вспомниться `gcc` или `clang`. После успешной компиляции Rust создаст исполняемый бинарный файл.
assert_eq!(vec!["safe, fast, productive."], search(query, contents));
}
}search function from Listing 12-19We can write this code in a more concise way using iterator adapter methods. Doing so also lets us avoid having a mutable intermediate results vector. The functional programming style prefers to minimize the amount of mutable state to make code clearer. Removing the mutable state might enable a future enhancement to make searching happen in parallel because we wouldn’t have to manage concurrent access to the results vector. Listing 13-22 shows this change.
pub fn search<'a>(query: &str, contents: &'a str) -> Vec<&'a str> {
contents
.lines()
.filter(|line| line.contains(query))
.collect()
}
Если у вас есть опыт работы с C или C++, вам могут вспомниться `gcc` или `clang`. После успешной компиляции Rust создаст исполняемый бинарный файл.
pub fn search_case_insensitive<'a>(
query: &str,
contents: &'a str,
) -> Vec<&'a str> {
let query = query.to_lowercase();
let mut results = Vec::new();
Если у вас есть опыт работы с C или C++, вам могут вспомниться `gcc` или `clang`. После успешной компиляции Rust создаст исполняемый бинарный файл.
for line in contents.lines() {
if line.to_lowercase().contains(&query) {
results.push(line);
}
}
Если у вас есть опыт работы с C или C++, вам могут вспомниться `gcc` или `clang`. После успешной компиляции Rust создаст исполняемый бинарный файл.
results
}
Если у вас есть опыт работы с C или C++, вам могут вспомниться `gcc` или `clang`. После успешной компиляции Rust создаст исполняемый бинарный файл.
#[cfg(test)]
mod tests {
use super::*;
Если у вас есть опыт работы с C или C++, вам могут вспомниться `gcc` или `clang`. После успешной компиляции Rust создаст исполняемый бинарный файл.
#[test]
fn case_sensitive() {
let query = "duct";
let contents = "\
Rust:
safe, fast, productive.
Pick three.
Duct tape.";
Если у вас есть опыт работы с C или C++, вам могут вспомниться `gcc` или `clang`. После успешной компиляции Rust создаст исполняемый бинарный файл.
assert_eq!(vec!["safe, fast, productive."], search(query, contents));
}
Если у вас есть опыт работы с C или C++, вам могут вспомниться `gcc` или `clang`. После успешной компиляции Rust создаст исполняемый бинарный файл.
#[test]
fn case_insensitive() {
let query = "rUsT";
let contents = "\
Rust:
safe, fast, productive.
Pick three.
Trust me.";
Если у вас есть опыт работы с C или C++, вам могут вспомниться `gcc` или `clang`. После успешной компиляции Rust создаст исполняемый бинарный файл.
assert_eq!(
vec!["Rust:", "Trust me."],
search_case_insensitive(query, contents)
);
}
}search functionRecall that the purpose of the search function is to return all lines in contents that contain the query. Similar to the filter example in Listing 13-16, this code uses the filter adapter to keep only the lines for which line.contains(query) returns true. We then collect the matching lines into another vector with collect. Much simpler! Feel free to make the same change to use iterator methods in the search_case_insensitive function as well.
For a further improvement, return an iterator from the search function by removing the call to collect and changing the return type to impl Iterator<Item = &'a str> so that the function becomes an iterator adapter. Note that you’ll also need to update the tests! Search through a large file using your minigrep tool before and after making this change to observe the difference in behavior. Before this change, the program won’t print any results until it has collected all of the results, but after the change, the results will be printed as each matching line is found because the for loop in the run function is able to take advantage of the laziness of the iterator.
Choosing Between Loops and Iterators
The next logical question is which style you should choose in your own code and why: the original implementation in Listing 13-21 or the version using iterators in Listing 13-22 (assuming we’re collecting all the results before returning them rather than returning the iterator). Most Rust programmers prefer to use the iterator style. It’s a bit tougher to get the hang of at first, but once you get a feel for the various iterator adapters and what they do, iterators can be easier to understand. Instead of fiddling with the various bits of looping and building new vectors, the code focuses on the high-level objective of the loop. This abstracts away some of the commonplace code so that it’s easier to see the concepts that are unique to this code, such as the filtering condition each element in the iterator must pass.
But are the two implementations truly equivalent? The intuitive assumption might be that the lower-level loop will be faster. Let’s talk about performance.
Performance in Loops vs. Iterators
Performance in Loops vs. Iterators
To determine whether to use loops or iterators, you need to know which implementation is faster: the version of the search function with an explicit for loop or the version with iterators.
We ran a benchmark by loading the entire contents of The Adventures of Sherlock Holmes by Sir Arthur Conan Doyle into a String and looking for the word the in the contents. Here are the results of the benchmark on the version of search using the for loop and the version using iterators:
test bench_search_for ... bench: 19,620,300 ns/iter (+/- 915,700)
test bench_search_iter ... bench: 19,234,900 ns/iter (+/- 657,200)
The two implementations have similar performance! We won’t explain the benchmark code here because the point is not to prove that the two versions are equivalent but to get a general sense of how these two implementations compare performance-wise.
For a more comprehensive benchmark, you should check using various texts of various sizes as the contents, different words and words of different lengths as the query, and all kinds of other variations. The point is this: Iterators, although a high-level abstraction, get compiled down to roughly the same code as if you’d written the lower-level code yourself. Iterators are one of Rust’s zero-cost abstractions, by which we mean that using the abstraction imposes no additional runtime overhead. This is analogous to how Bjarne Stroustrup, the original designer and implementor of C++, defines zero-overhead in his 2012 ETAPS keynote presentation “Foundations of C++”:
In general, C++ implementations obey the zero-overhead principle: What you don’t use, you don’t pay for. And further: What you do use, you couldn’t hand code any better.
In many cases, Rust code using iterators compiles to the same assembly you’d write by hand. Optimizations such as loop unrolling and eliminating bounds checking on array access apply and make the resultant code extremely efficient. Now that you know this, you can use iterators and closures without fear! They make code seem like it’s higher level but don’t impose a runtime performance penalty for doing so.
Подведём итоги
Closures and iterators are Rust features inspired by functional programming language ideas. They contribute to Rust’s capability to clearly express high-level ideas at low-level performance. The implementations of closures and iterators are such that runtime performance is not affected. This is part of Rust’s goal to strive to provide zero-cost abstractions.
Now that we’ve improved the expressiveness of our I/O project, let’s look at some more features of cargo that will help us share the project with the world.
More About Cargo and Crates.io
So far, we’ve used only the most basic features of Cargo to build, run, and test our code, but it can do a lot more. In this chapter, we’ll discuss some of its other, more advanced features to show you how to do the following:
- Customize your build through release profiles.
- Publish libraries on crates.io.
- Organize large projects with workspaces.
- Install binaries from crates.io.
- Extend Cargo using custom commands.
Cargo can do even more than the functionality we cover in this chapter, so for a full explanation of all its features, see its documentation.
Настройка сборок с помощью релизных профилей
Настройка сборок с помощью релизных профилей
In Rust, release profiles are predefined, customizable profiles with different configurations that allow a programmer to have more control over various options for compiling code. Each profile is configured independently of the others.
Cargo has two main profiles: the dev profile Cargo uses when you run cargo build, and the release profile Cargo uses when you run cargo build --release. The dev profile is defined with good defaults for development, and the release profile has good defaults for release builds.
These profile names might be familiar from the output of your builds:
$ cargo build
Finished `dev` profile [unoptimized + debuginfo] target(s) in 0.00s
$ cargo build --release
Finished `release` profile [optimized] target(s) in 0.32s
The dev and release are these different profiles used by the compiler.
Cargo has default settings for each of the profiles that apply when you haven’t explicitly added any [profile.*] sections in the project’s Cargo.toml file. By adding [profile.*] sections for any profile you want to customize, you override any subset of the default settings. For example, here are the default values for the opt-level setting for the dev and release profiles:
Файл: Cargo.toml
[profile.dev]
opt-level = 0
Если у вас есть опыт работы с C или C++, вам могут вспомниться `gcc` или `clang`. После успешной компиляции Rust создаст исполняемый бинарный файл.
[profile.release]
opt-level = 3
The opt-level setting controls the number of optimizations Rust will apply to your code, with a range of 0 to 3. Applying more optimizations extends compiling time, so if you’re in development and compiling your code often, you’ll want fewer optimizations to compile faster even if the resultant code runs slower. The default opt-level for dev is therefore 0. When you’re ready to release your code, it’s best to spend more time compiling. You’ll only compile in release mode once, but you’ll run the compiled program many times, so release mode trades longer compile time for code that runs faster. That is why the default opt-level for the release profile is 3.
You can override a default setting by adding a different value for it in Cargo.toml. For example, if we want to use optimization level 1 in the development profile, we can add these two lines to our project’s Cargo.toml file:
Файл: Cargo.toml
[profile.dev]
opt-level = 1
This code overrides the default setting of 0. Now when we run cargo build, Cargo will use the defaults for the dev profile plus our customization to opt-level. Because we set opt-level to 1, Cargo will apply more optimizations than the default, but not as many as in a release build.
For the full list of configuration options and defaults for each profile, see Cargo’s documentation.
Публикация крейта на Crates.io
Публикация крейта на Crates.io
We’ve used packages from crates.io as dependencies of our project, but you can also share your code with other people by publishing your own packages. The crate registry at crates.io distributes the source code of your packages, so it primarily hosts code that is open source.
Rust and Cargo have features that make your published package easier for people to find and use. We’ll talk about some of these features next and then explain how to publish a package.
Making Useful Documentation Comments
Accurately documenting your packages will help other users know how and when to use them, so it’s worth investing the time to write documentation. In Chapter 3, we discussed how to comment Rust code using two slashes, //. Rust also has a particular kind of comment for documentation, known conveniently as a documentation comment, that will generate HTML documentation. The HTML displays the contents of documentation comments for public API items intended for programmers interested in knowing how to use your crate as opposed to how your crate is implemented.
Documentation comments use three slashes, ///, instead of two and support Markdown notation for formatting the text. Place documentation comments just before the item they’re documenting. Listing 14-1 shows documentation comments for an add_one function in a crate named my_crate.
/// Adds one to the number given.
///
/// # Examples
///
/// ```
/// let arg = 5;
/// let answer = my_crate::add_one(arg);
///
/// assert_eq!(6, answer);
/// ```
pub fn add_one(x: i32) -> i32 {
x + 1
}Here, we give a description of what the add_one function does, start a section with the heading Examples, and then provide code that demonstrates how to use the add_one function. We can generate the HTML documentation from this documentation comment by running cargo doc. This command runs the rustdoc tool distributed with Rust and puts the generated HTML documentation in the target/doc directory.
For convenience, running cargo doc --open will build the HTML for your current crate’s documentation (as well as the documentation for all of your crate’s dependencies) and open the result in a web browser. Navigate to the add_one function and you’ll see how the text in the documentation comments is rendered, as shown in Figure 14-1.
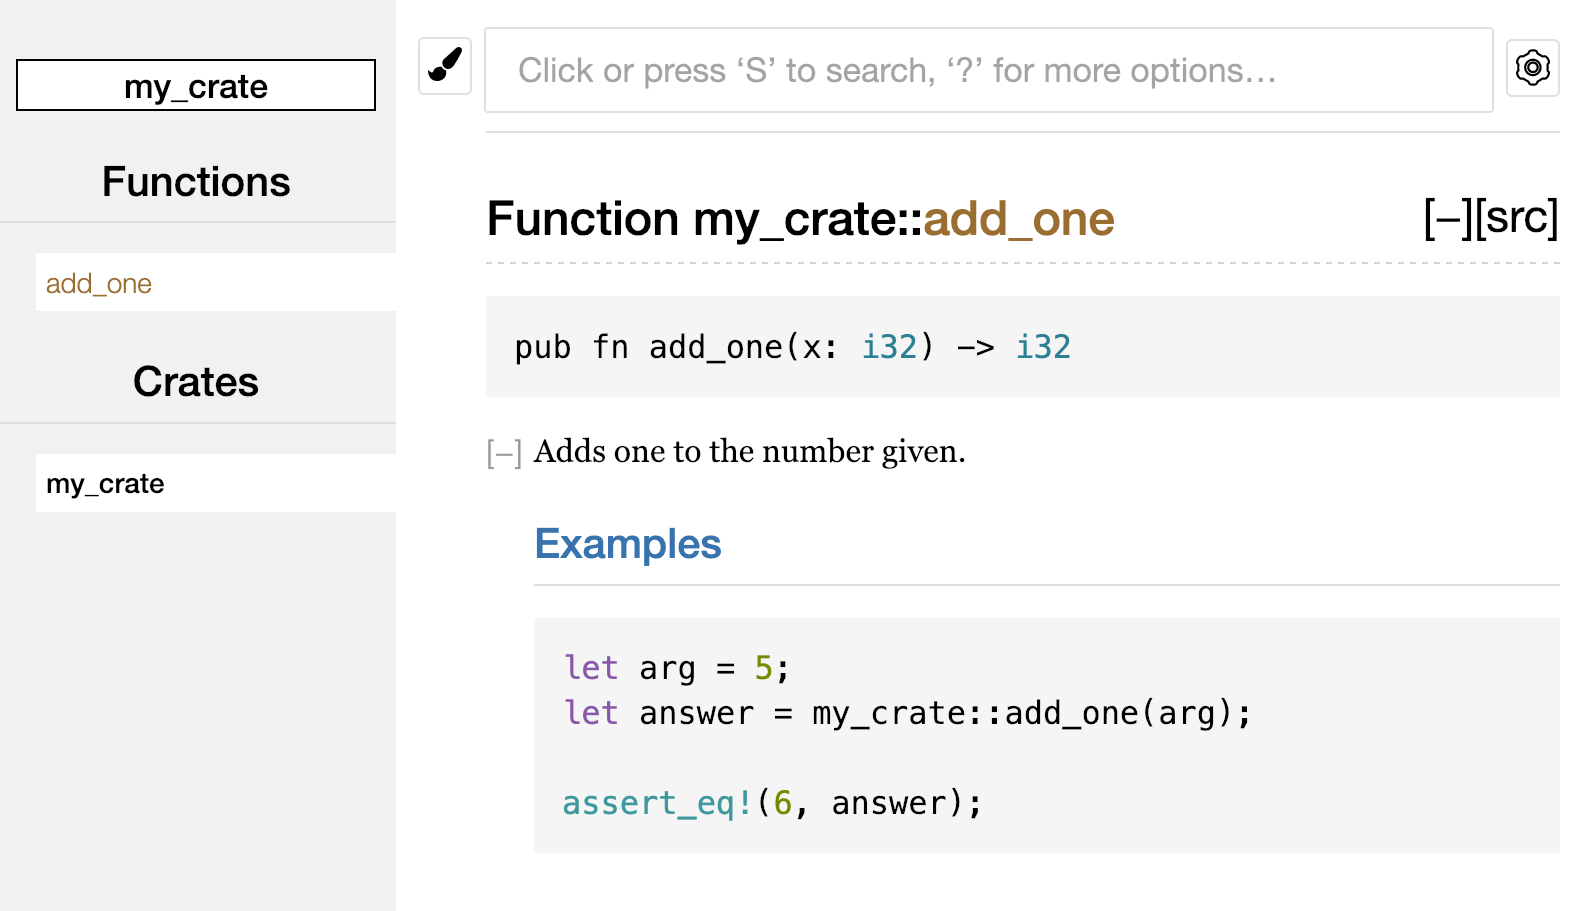
Figure 14-1: The HTML documentation for the add_one function
Commonly Used Sections
We used the # Examples Markdown heading in Listing 14-1 to create a section in the HTML with the title “Examples.” Here are some other sections that crate authors commonly use in their documentation:
- Panics: These are the scenarios in which the function being documented could panic. Callers of the function who don’t want their programs to panic should make sure they don’t call the function in these situations.
- Errors: If the function returns a
Result, describing the kinds of errors that might occur and what conditions might cause those errors to be returned can be helpful to callers so that they can write code to handle the different kinds of errors in different ways. - Safety: If the function is
unsafeto call (we discuss unsafety in Chapter 20), there should be a section explaining why the function is unsafe and covering the invariants that the function expects callers to uphold.
Most documentation comments don’t need all of these sections, but this is a good checklist to remind you of the aspects of your code users will be interested in knowing about.
Documentation Comments as Tests
Adding example code blocks in your documentation comments can help demonstrate how to use your library and has an additional bonus: Running cargo test will run the code examples in your documentation as tests! Nothing is better than documentation with examples. But nothing is worse than examples that don’t work because the code has changed since the documentation was written. If we run cargo test with the documentation for the add_one function from Listing 14-1, we will see a section in the test results that looks like this:
Doc-tests my_crate
Если у вас есть опыт работы с C или C++, вам могут вспомниться `gcc` или `clang`. После успешной компиляции Rust создаст исполняемый бинарный файл.
running 1 test
test src/lib.rs - add_one (line 5) ... ok
Если у вас есть опыт работы с C или C++, вам могут вспомниться `gcc` или `clang`. После успешной компиляции Rust создаст исполняемый бинарный файл.
test result: ok. 1 passed; 0 failed; 0 ignored; 0 measured; 0 filtered out; finished in 0.27s
Now, if we change either the function or the example so that the assert_eq! in the example panics, and run cargo test again, we’ll see that the doc tests catch that the example and the code are out of sync with each other!
Contained Item Comments
The style of doc comment //! adds documentation to the item that contains the comments rather than to the items following the comments. We typically use these doc comments inside the crate root file (src/lib.rs by convention) or inside a module to document the crate or the module as a whole.
For example, to add documentation that describes the purpose of the my_crate crate that contains the add_one function, we add documentation comments that start with //! to the beginning of the src/lib.rs file, as shown in Listing 14-2.
//! # My Crate
//!
//! `my_crate` is a collection of utilities to make performing certain
//! calculations more convenient.
Если у вас есть опыт работы с C или C++, вам могут вспомниться `gcc` или `clang`. После успешной компиляции Rust создаст исполняемый бинарный файл.
/// Adds one to the number given.
// --snip--
///
/// # Examples
///
/// ```
/// let arg = 5;
/// let answer = my_crate::add_one(arg);
///
/// assert_eq!(6, answer);
/// ```
pub fn add_one(x: i32) -> i32 {
x + 1
}my_crate crate as a wholeNotice there isn’t any code after the last line that begins with //!. Because we started the comments with //! instead of ///, we’re documenting the item that contains this comment rather than an item that follows this comment. In this case, that item is the src/lib.rs file, which is the crate root. These comments describe the entire crate.
When we run cargo doc --open, these comments will display on the front page of the documentation for my_crate above the list of public items in the crate, as shown in Figure 14-2.
Documentation comments within items are useful for describing crates and modules especially. Use them to explain the overall purpose of the container to help your users understand the crate’s organization.
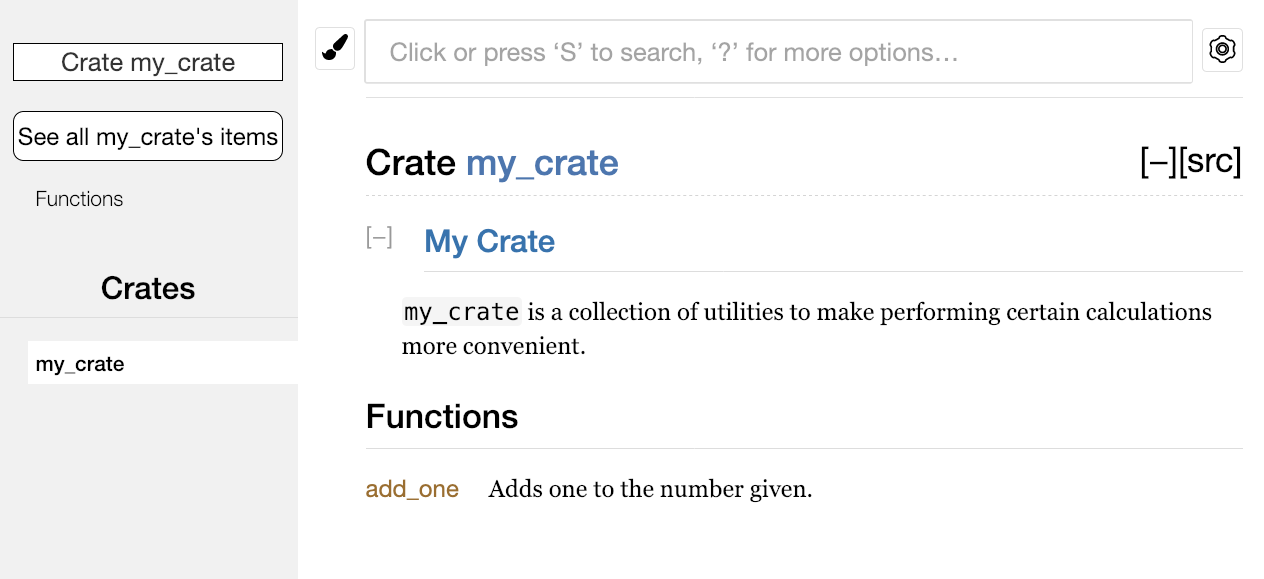
Figure 14-2: The rendered documentation for my_crate, including the comment describing the crate as a whole
Exporting a Convenient Public API
The structure of your public API is a major consideration when publishing a crate. People who use your crate are less familiar with the structure than you are and might have difficulty finding the pieces they want to use if your crate has a large module hierarchy.
In Chapter 7, we covered how to make items public using the pub keyword, and how to bring items into a scope with the use keyword. However, the structure that makes sense to you while you’re developing a crate might not be very convenient for your users. You might want to organize your structs in a hierarchy containing multiple levels, but then people who want to use a type you’ve defined deep in the hierarchy might have trouble finding out that type exists. They might also be annoyed at having to enter use my_crate::some_module::another_module::UsefulType; rather than use my_crate::UsefulType;.
The good news is that if the structure isn’t convenient for others to use from another library, you don’t have to rearrange your internal organization: Instead, you can re-export items to make a public structure that’s different from your private structure by using pub use. Re-exporting takes a public item in one location and makes it public in another location, as if it were defined in the other location instead.
For example, say we made a library named art for modeling artistic concepts. Within this library are two modules: a kinds module containing two enums named PrimaryColor and SecondaryColor and a utils module containing a function named mix, as shown in Listing 14-3.
//! # Art
//!
//! A library for modeling artistic concepts.
Если у вас есть опыт работы с C или C++, вам могут вспомниться `gcc` или `clang`. После успешной компиляции Rust создаст исполняемый бинарный файл.
pub mod kinds {
/// The primary colors according to the RYB color model.
pub enum PrimaryColor {
Red,
Yellow,
Blue,
}
Если у вас есть опыт работы с C или C++, вам могут вспомниться `gcc` или `clang`. После успешной компиляции Rust создаст исполняемый бинарный файл.
/// The secondary colors according to the RYB color model.
pub enum SecondaryColor {
Orange,
Green,
Purple,
}
}
Если у вас есть опыт работы с C или C++, вам могут вспомниться `gcc` или `clang`. После успешной компиляции Rust создаст исполняемый бинарный файл.
pub mod utils {
use crate::kinds::*;
Если у вас есть опыт работы с C или C++, вам могут вспомниться `gcc` или `clang`. После успешной компиляции Rust создаст исполняемый бинарный файл.
/// Combines two primary colors in equal amounts to create
/// a secondary color.
pub fn mix(c1: PrimaryColor, c2: PrimaryColor) -> SecondaryColor {
// --код сокращён--
unimplemented!();
}
}art library with items organized into kinds and utils modulesFigure 14-3 shows what the front page of the documentation for this crate generated by cargo doc would look like.

Figure 14-3: The front page of the documentation for art that lists the kinds and utils modules
Note that the PrimaryColor and SecondaryColor types aren’t listed on the front page, nor is the mix function. We have to click kinds and utils to see them.
Another crate that depends on this library would need use statements that bring the items from art into scope, specifying the module structure that’s currently defined. Listing 14-4 shows an example of a crate that uses the PrimaryColor and mix items from the art crate.
use art::kinds::PrimaryColor;
use art::utils::mix;
Если у вас есть опыт работы с C или C++, вам могут вспомниться `gcc` или `clang`. После успешной компиляции Rust создаст исполняемый бинарный файл.
fn main() {
let red = PrimaryColor::Red;
let yellow = PrimaryColor::Yellow;
mix(red, yellow);
}art crate’s items with its internal structure exportedThe author of the code in Listing 14-4, which uses the art crate, had to figure out that PrimaryColor is in the kinds module and mix is in the utils module. The module structure of the art crate is more relevant to developers working on the art crate than to those using it. The internal structure doesn’t contain any useful information for someone trying to understand how to use the art crate, but rather causes confusion because developers who use it have to figure out where to look, and must specify the module names in the use statements.
To remove the internal organization from the public API, we can modify the art crate code in Listing 14-3 to add pub use statements to re-export the items at the top level, as shown in Listing 14-5.
//! # Art
//!
//! A library for modeling artistic concepts.
Если у вас есть опыт работы с C или C++, вам могут вспомниться `gcc` или `clang`. После успешной компиляции Rust создаст исполняемый бинарный файл.
pub use self::kinds::PrimaryColor;
pub use self::kinds::SecondaryColor;
pub use self::utils::mix;
Если у вас есть опыт работы с C или C++, вам могут вспомниться `gcc` или `clang`. После успешной компиляции Rust создаст исполняемый бинарный файл.
pub mod kinds {
// --код сокращён--
/// The primary colors according to the RYB color model.
pub enum PrimaryColor {
Red,
Yellow,
Blue,
}
Если у вас есть опыт работы с C или C++, вам могут вспомниться `gcc` или `clang`. После успешной компиляции Rust создаст исполняемый бинарный файл.
/// The secondary colors according to the RYB color model.
pub enum SecondaryColor {
Orange,
Green,
Purple,
}
}
Если у вас есть опыт работы с C или C++, вам могут вспомниться `gcc` или `clang`. После успешной компиляции Rust создаст исполняемый бинарный файл.
pub mod utils {
// --код сокращён--
use crate::kinds::*;
Если у вас есть опыт работы с C или C++, вам могут вспомниться `gcc` или `clang`. После успешной компиляции Rust создаст исполняемый бинарный файл.
/// Combines two primary colors in equal amounts to create
/// a secondary color.
pub fn mix(c1: PrimaryColor, c2: PrimaryColor) -> SecondaryColor {
SecondaryColor::Orange
}
}pub use statements to re-export itemsThe API documentation that cargo doc generates for this crate will now list and link re-exports on the front page, as shown in Figure 14-4, making the PrimaryColor and SecondaryColor types and the mix function easier to find.
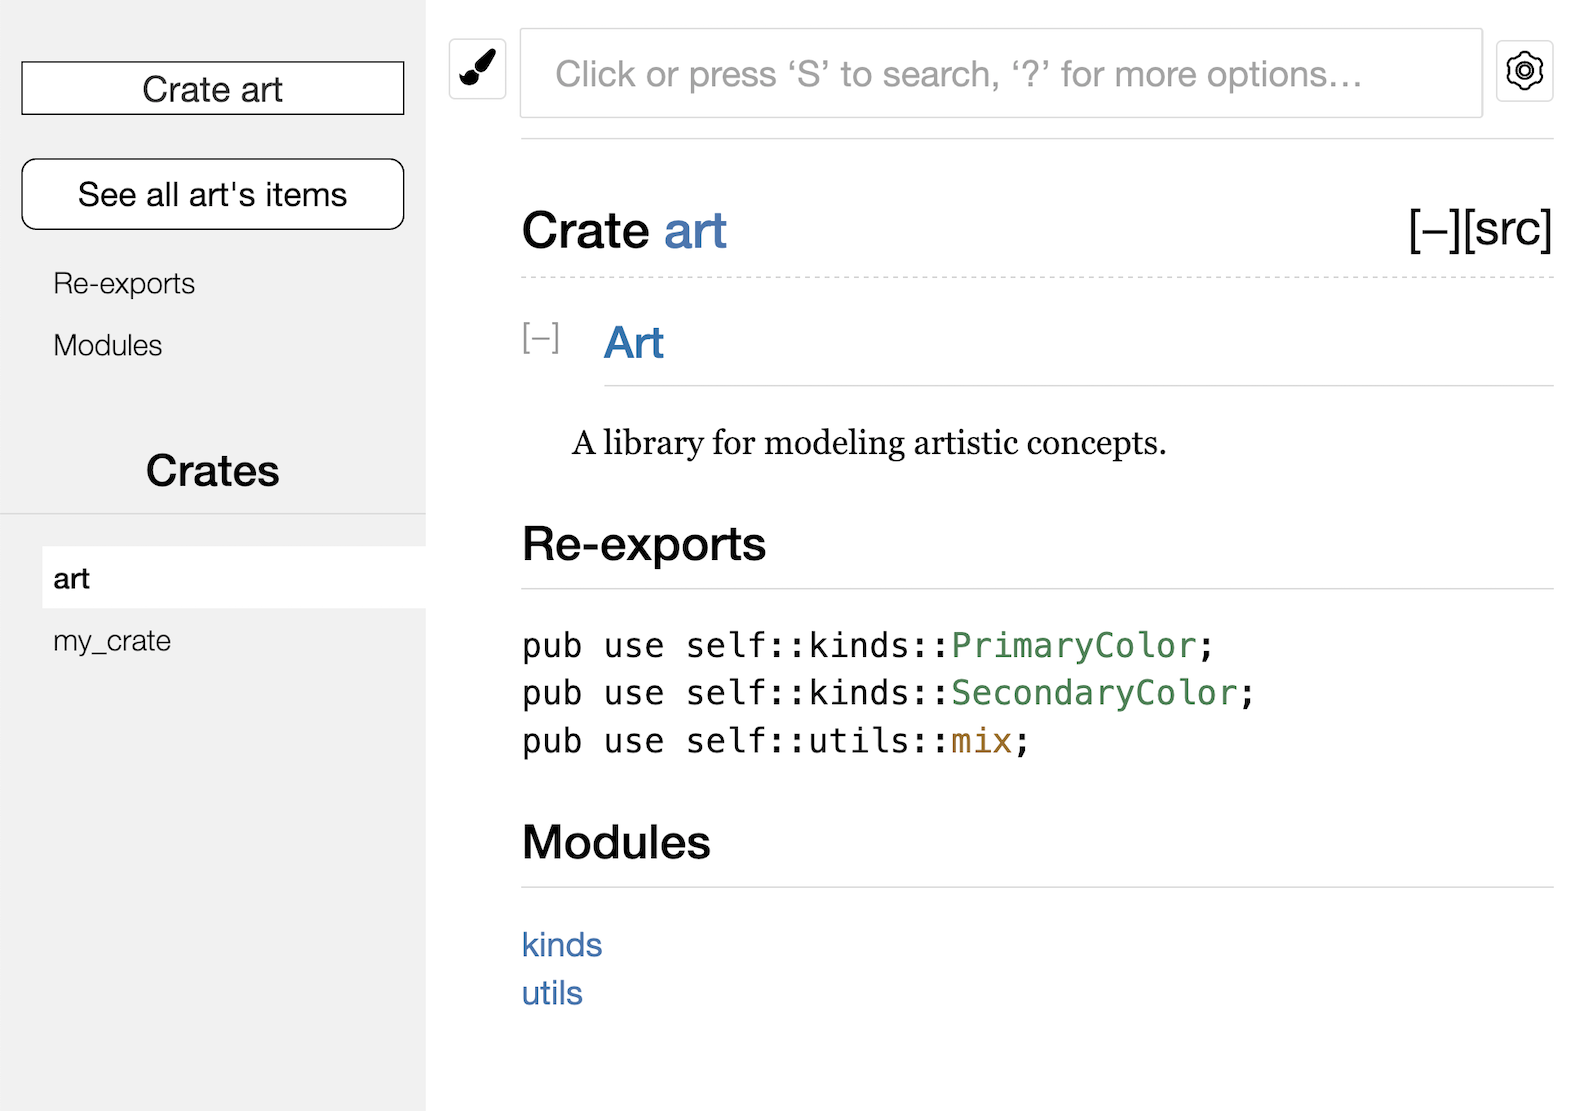
Figure 14-4: The front page of the documentation for art that lists the re-exports
The art crate users can still see and use the internal structure from Listing 14-3 as demonstrated in Listing 14-4, or they can use the more convenient structure in Listing 14-5, as shown in Listing 14-6.
use art::PrimaryColor;
use art::mix;
Если у вас есть опыт работы с C или C++, вам могут вспомниться `gcc` или `clang`. После успешной компиляции Rust создаст исполняемый бинарный файл.
fn main() {
// --код сокращён--
let red = PrimaryColor::Red;
let yellow = PrimaryColor::Yellow;
mix(red, yellow);
}art crateIn cases where there are many nested modules, re-exporting the types at the top level with pub use can make a significant difference in the experience of people who use the crate. Another common use of pub use is to re-export definitions of a dependency in the current crate to make that crate’s definitions part of your crate’s public API.
Creating a useful public API structure is more an art than a science, and you can iterate to find the API that works best for your users. Choosing pub use gives you flexibility in how you structure your crate internally and decouples that internal structure from what you present to your users. Look at some of the code of crates you’ve installed to see if their internal structure differs from their public API.
Setting Up a Crates.io Account
Before you can publish any crates, you need to create an account on crates.io and get an API token. To do so, visit the home page at crates.io and log in via a GitHub account. (The GitHub account is currently a requirement, but the site might support other ways of creating an account in the future.) Once you’re logged in, visit your account settings at https://crates.io/me/ and retrieve your API key. Then, run the cargo login command and paste your API key when prompted, like this:
$ cargo login
abcdefghijklmnopqrstuvwxyz012345
This command will inform Cargo of your API token and store it locally in ~/.cargo/credentials.toml. Note that this token is a secret: Do not share it with anyone else. If you do share it with anyone for any reason, you should revoke it and generate a new token on crates.io.
Adding Metadata to a New Crate
Let’s say you have a crate you want to publish. Before publishing, you’ll need to add some metadata in the [package] section of the crate’s Cargo.toml file.
Your crate will need a unique name. While you’re working on a crate locally, you can name a crate whatever you’d like. However, crate names on crates.io are allocated on a first-come, first-served basis. Once a crate name is taken, no one else can publish a crate with that name. Before attempting to publish a crate, search for the name you want to use. If the name has been used, you will need to find another name and edit the name field in the Cargo.toml file under the [package] section to use the new name for publishing, like so:
Файл: Cargo.toml
[package]
name = "guessing_game"
Even if you’ve chosen a unique name, when you run cargo publish to publish the crate at this point, you’ll get a warning and then an error:
$ cargo publish
Updating crates.io index
warning: manifest has no description, license, license-file, documentation, homepage or repository.
See https://doc.rust-lang.org/cargo/reference/manifest.html#package-metadata for more info.
--snip--
error: failed to publish to registry at https://crates.io
Если у вас есть опыт работы с C или C++, вам могут вспомниться `gcc` или `clang`. После успешной компиляции Rust создаст исполняемый бинарный файл.
Caused by:
the remote server responded with an error (status 400 Bad Request): missing or empty metadata fields: description, license. Please see https://doc.rust-lang.org/cargo/reference/manifest.html for more information on configuring these fields
This results in an error because you’re missing some crucial information: A description and license are required so that people will know what your crate does and under what terms they can use it. In Cargo.toml, add a description that’s just a sentence or two, because it will appear with your crate in search results. For the license field, you need to give a license identifier value. The Linux Foundation’s Software Package Data Exchange (SPDX) lists the identifiers you can use for this value. For example, to specify that you’ve licensed your crate using the MIT License, add the MIT identifier:
Файл: Cargo.toml
[package]
name = "guessing_game"
license = "MIT"
If you want to use a license that doesn’t appear in the SPDX, you need to place the text of that license in a file, include the file in your project, and then use license-file to specify the name of that file instead of using the license key.
Guidance on which license is appropriate for your project is beyond the scope of this book. Many people in the Rust community license their projects in the same way as Rust by using a dual license of MIT OR Apache-2.0. This practice demonstrates that you can also specify multiple license identifiers separated by OR to have multiple licenses for your project.
With a unique name, the version, your description, and a license added, the Cargo.toml file for a project that is ready to publish might look like this:
Файл: Cargo.toml
[package]
name = "guessing_game"
version = "0.1.0"
edition = "2024"
description = "A fun game where you guess what number the computer has chosen."
license = "MIT OR Apache-2.0"
Если у вас есть опыт работы с C или C++, вам могут вспомниться `gcc` или `clang`. После успешной компиляции Rust создаст исполняемый бинарный файл.
[dependencies]
Cargo’s documentation describes other metadata you can specify to ensure that others can discover and use your crate more easily.
Publishing to Crates.io
Now that you’ve created an account, saved your API token, chosen a name for your crate, and specified the required metadata, you’re ready to publish! Publishing a crate uploads a specific version to crates.io for others to use.
Be careful, because a publish is permanent. The version can never be overwritten, and the code cannot be deleted except in certain circumstances. One major goal of Crates.io is to act as a permanent archive of code so that builds of all projects that depend on crates from crates.io will continue to work. Allowing version deletions would make fulfilling that goal impossible. However, there is no limit to the number of crate versions you can publish.
Run the cargo publish command again. It should succeed now:
$ cargo publish
Updating crates.io index
Packaging guessing_game v0.1.0 (file:///projects/guessing_game)
Packaged 6 files, 1.2KiB (895.0B compressed)
Verifying guessing_game v0.1.0 (file:///projects/guessing_game)
Compiling guessing_game v0.1.0
(file:///projects/guessing_game/target/package/guessing_game-0.1.0)
Finished `dev` profile [unoptimized + debuginfo] target(s) in 0.19s
Uploading guessing_game v0.1.0 (file:///projects/guessing_game)
Uploaded guessing_game v0.1.0 to registry `crates-io`
note: waiting for `guessing_game v0.1.0` to be available at registry
`crates-io`.
You may press ctrl-c to skip waiting; the crate should be available shortly.
Published guessing_game v0.1.0 at registry `crates-io`
Congratulations! You’ve now shared your code with the Rust community, and anyone can easily add your crate as a dependency of their project.
Publishing a New Version of an Existing Crate
When you’ve made changes to your crate and are ready to release a new version, you change the version value specified in your Cargo.toml file and republish. Use the Semantic Versioning rules to decide what an appropriate next version number is, based on the kinds of changes you’ve made. Then, run cargo publish to upload the new version.
Deprecating Versions from Crates.io
Although you can’t remove previous versions of a crate, you can prevent any future projects from adding them as a new dependency. This is useful when a crate version is broken for one reason or another. In such situations, Cargo supports yanking a crate version.
Yanking a version prevents new projects from depending on that version while allowing all existing projects that depend on it to continue. Essentially, a yank means that all projects with a Cargo.lock will not break, and any future Cargo.lock files generated will not use the yanked version.
To yank a version of a crate, in the directory of the crate that you’ve previously published, run cargo yank and specify which version you want to yank. For example, if we’ve published a crate named guessing_game version 1.0.1 and we want to yank it, then we’d run the following in the project directory for guessing_game:
$ cargo yank --vers 1.0.1
Updating crates.io index
Yank guessing_game@1.0.1
By adding --undo to the command, you can also undo a yank and allow projects to start depending on a version again:
$ cargo yank --vers 1.0.1 --undo
Updating crates.io index
Unyank guessing_game@1.0.1
A yank does not delete any code. It cannot, for example, delete accidentally uploaded secrets. If that happens, you must reset those secrets immediately.
Рабочие пространства Cargo
Рабочие пространства Cargo
In Chapter 12, we built a package that included a binary crate and a library crate. As your project develops, you might find that the library crate continues to get bigger and you want to split your package further into multiple library crates. Cargo offers a feature called workspaces that can help manage multiple related packages that are developed in tandem.
Creating a Workspace
A workspace is a set of packages that share the same Cargo.lock and output directory. Let’s make a project using a workspace—we’ll use trivial code so that we can concentrate on the structure of the workspace. There are multiple ways to structure a workspace, so we’ll just show one common way. We’ll have a workspace containing a binary and two libraries. The binary, which will provide the main functionality, will depend on the two libraries. One library will provide an add_one function and the other library an add_two function. These three crates will be part of the same workspace. We’ll start by creating a new directory for the workspace:
$ mkdir add
$ cd add
Next, in the add directory, we create the Cargo.toml file that will configure the entire workspace. This file won’t have a [package] section. Instead, it will start with a [workspace] section that will allow us to add members to the workspace. We also make a point to use the latest and greatest version of Cargo’s resolver algorithm in our workspace by setting the resolver value to "3":
Файл: Cargo.toml
[workspace]
resolver = "3"
Next, we’ll create the adder binary crate by running cargo new within the add directory:
$ cargo new adder
Created binary (application) `adder` package
Adding `adder` as member of workspace at `file:///projects/add`
Running cargo new inside a workspace also automatically adds the newly created package to the members key in the [workspace] definition in the workspace Cargo.toml, like this:
[workspace]
resolver = "3"
members = ["adder"]
At this point, we can build the workspace by running cargo build. The files in your add directory should look like this:
├── Cargo.lock
├── Cargo.toml
├── adder
│ ├── Cargo.toml
│ └── src
│ └── main.rs
└── target
The workspace has one target directory at the top level that the compiled artifacts will be placed into; the adder package doesn’t have its own target directory. Even if we were to run cargo build from inside the adder directory, the compiled artifacts would still end up in add/target rather than add/adder/target. Cargo structures the target directory in a workspace like this because the crates in a workspace are meant to depend on each other. If each crate had its own target directory, each crate would have to recompile each of the other crates in the workspace to place the artifacts in its own target directory. By sharing one target directory, the crates can avoid unnecessary rebuilding.
Creating the Second Package in the Workspace
Next, let’s create another member package in the workspace and call it add_one. Generate a new library crate named add_one:
$ cargo new add_one --lib
Created library `add_one` package
Adding `add_one` as member of workspace at `file:///projects/add`
The top-level Cargo.toml will now include the add_one path in the members list:
Файл: Cargo.toml
[workspace]
resolver = "3"
members = ["adder", "add_one"]
Your add directory should now have these directories and files:
├── Cargo.lock
├── Cargo.toml
├── add_one
│ ├── Cargo.toml
│ └── src
│ └── lib.rs
├── adder
│ ├── Cargo.toml
│ └── src
│ └── main.rs
└── target
In the add_one/src/lib.rs file, let’s add an add_one function:
Файл: add_one/src/lib.rs
pub fn add_one(x: i32) -> i32 {
x + 1
}Now we can have the adder package with our binary depend on the add_one package that has our library. First, we’ll need to add a path dependency on add_one to adder/Cargo.toml.
Файл: adder/Cargo.toml
[dependencies]
add_one = { path = "../add_one" }
Cargo doesn’t assume that crates in a workspace will depend on each other, so we need to be explicit about the dependency relationships.
Next, let’s use the add_one function (from the add_one crate) in the adder crate. Open the adder/src/main.rs file and change the main function to call the add_one function, as in Listing 14-7.
fn main() {
let num = 10;
println!("Hello, world! {num} plus one is {}!", add_one::add_one(num));
}add_one library crate from the adder crateLet’s build the workspace by running cargo build in the top-level add directory!
$ cargo build
Compiling add_one v0.1.0 (file:///projects/add/add_one)
Compiling adder v0.1.0 (file:///projects/add/adder)
Finished `dev` profile [unoptimized + debuginfo] target(s) in 0.22s
To run the binary crate from the add directory, we can specify which package in the workspace we want to run by using the -p argument and the package name with cargo run:
$ cargo run -p adder
Finished `dev` profile [unoptimized + debuginfo] target(s) in 0.00s
Running `target/debug/adder`
Hello, world! 10 plus one is 11!
This runs the code in adder/src/main.rs, which depends on the add_one crate.
Depending on an External Package
Notice that the workspace has only one Cargo.lock file at the top level, rather than having a Cargo.lock in each crate’s directory. This ensures that all crates are using the same version of all dependencies. If we add the rand package to the adder/Cargo.toml and add_one/Cargo.toml files, Cargo will resolve both of those to one version of rand and record that in the one Cargo.lock. Making all crates in the workspace use the same dependencies means the crates will always be compatible with each other. Let’s add the rand crate to the [dependencies] section in the add_one/Cargo.toml file so that we can use the rand crate in the add_one crate:
Файл: add_one/Cargo.toml
[dependencies]
rand = "0.8.5"
We can now add use rand; to the add_one/src/lib.rs file, and building the whole workspace by running cargo build in the add directory will bring in and compile the rand crate. We will get one warning because we aren’t referring to the rand we brought into scope:
$ cargo build
Updating crates.io index
Downloaded rand v0.8.5
--snip--
Compiling rand v0.8.5
Compiling add_one v0.1.0 (file:///projects/add/add_one)
warning: unused import: `rand`
--> add_one/src/lib.rs:1:5
|
1 | use rand;
| ^^^^
|
= note: `#[warn(unused_imports)]` on by default
Если у вас есть опыт работы с C или C++, вам могут вспомниться `gcc` или `clang`. После успешной компиляции Rust создаст исполняемый бинарный файл.
warning: `add_one` (lib) generated 1 warning (run `cargo fix --lib -p add_one` to apply 1 suggestion)
Compiling adder v0.1.0 (file:///projects/add/adder)
Finished `dev` profile [unoptimized + debuginfo] target(s) in 0.95s
The top-level Cargo.lock now contains information about the dependency of add_one on rand. However, even though rand is used somewhere in the workspace, we can’t use it in other crates in the workspace unless we add rand to their Cargo.toml files as well. For example, if we add use rand; to the adder/src/main.rs file for the adder package, we’ll get an error:
$ cargo build
--snip--
Compiling adder v0.1.0 (file:///projects/add/adder)
error[E0432]: unresolved import `rand`
--> adder/src/main.rs:2:5
|
2 | use rand;
| ^^^^ no external crate `rand`
To fix this, edit the Cargo.toml file for the adder package and indicate that rand is a dependency for it as well. Building the adder package will add rand to the list of dependencies for adder in Cargo.lock, but no additional copies of rand will be downloaded. Cargo will ensure that every crate in every package in the workspace using the rand package will use the same version as long as they specify compatible versions of rand, saving us space and ensuring that the crates in the workspace will be compatible with each other.
If crates in the workspace specify incompatible versions of the same dependency, Cargo will resolve each of them but will still try to resolve as few versions as possible.
Adding a Test to a Workspace
For another enhancement, let’s add a test of the add_one::add_one function within the add_one crate:
Файл: add_one/src/lib.rs
pub fn add_one(x: i32) -> i32 {
x + 1
}
Если у вас есть опыт работы с C или C++, вам могут вспомниться `gcc` или `clang`. После успешной компиляции Rust создаст исполняемый бинарный файл.
#[cfg(test)]
mod tests {
use super::*;
Если у вас есть опыт работы с C или C++, вам могут вспомниться `gcc` или `clang`. После успешной компиляции Rust создаст исполняемый бинарный файл.
#[test]
fn it_works() {
assert_eq!(3, add_one(2));
}
}Now run cargo test in the top-level add directory. Running cargo test in a workspace structured like this one will run the tests for all the crates in the workspace:
$ cargo test
Compiling add_one v0.1.0 (file:///projects/add/add_one)
Compiling adder v0.1.0 (file:///projects/add/adder)
Finished `test` profile [unoptimized + debuginfo] target(s) in 0.20s
Running unittests src/lib.rs (target/debug/deps/add_one-93c49ee75dc46543)
Если у вас есть опыт работы с C или C++, вам могут вспомниться `gcc` или `clang`. После успешной компиляции Rust создаст исполняемый бинарный файл.
running 1 test
test tests::it_works ... ok
Если у вас есть опыт работы с C или C++, вам могут вспомниться `gcc` или `clang`. После успешной компиляции Rust создаст исполняемый бинарный файл.
test result: ok. 1 passed; 0 failed; 0 ignored; 0 measured; 0 filtered out; finished in 0.00s
Если у вас есть опыт работы с C или C++, вам могут вспомниться `gcc` или `clang`. После успешной компиляции Rust создаст исполняемый бинарный файл.
Running unittests src/main.rs (target/debug/deps/adder-3a47283c568d2b6a)
Если у вас есть опыт работы с C или C++, вам могут вспомниться `gcc` или `clang`. После успешной компиляции Rust создаст исполняемый бинарный файл.
running 0 tests
Если у вас есть опыт работы с C или C++, вам могут вспомниться `gcc` или `clang`. После успешной компиляции Rust создаст исполняемый бинарный файл.
test result: ok. 0 passed; 0 failed; 0 ignored; 0 measured; 0 filtered out; finished in 0.00s
Если у вас есть опыт работы с C или C++, вам могут вспомниться `gcc` или `clang`. После успешной компиляции Rust создаст исполняемый бинарный файл.
Doc-tests add_one
Если у вас есть опыт работы с C или C++, вам могут вспомниться `gcc` или `clang`. После успешной компиляции Rust создаст исполняемый бинарный файл.
running 0 tests
Если у вас есть опыт работы с C или C++, вам могут вспомниться `gcc` или `clang`. После успешной компиляции Rust создаст исполняемый бинарный файл.
test result: ok. 0 passed; 0 failed; 0 ignored; 0 measured; 0 filtered out; finished in 0.00s
The first section of the output shows that the it_works test in the add_one crate passed. The next section shows that zero tests were found in the adder crate, and then the last section shows that zero documentation tests were found in the add_one crate.
We can also run tests for one particular crate in a workspace from the top-level directory by using the -p flag and specifying the name of the crate we want to test:
$ cargo test -p add_one
Finished `test` profile [unoptimized + debuginfo] target(s) in 0.00s
Running unittests src/lib.rs (target/debug/deps/add_one-93c49ee75dc46543)
Если у вас есть опыт работы с C или C++, вам могут вспомниться `gcc` или `clang`. После успешной компиляции Rust создаст исполняемый бинарный файл.
running 1 test
test tests::it_works ... ok
Если у вас есть опыт работы с C или C++, вам могут вспомниться `gcc` или `clang`. После успешной компиляции Rust создаст исполняемый бинарный файл.
test result: ok. 1 passed; 0 failed; 0 ignored; 0 measured; 0 filtered out; finished in 0.00s
Если у вас есть опыт работы с C или C++, вам могут вспомниться `gcc` или `clang`. После успешной компиляции Rust создаст исполняемый бинарный файл.
Doc-tests add_one
Если у вас есть опыт работы с C или C++, вам могут вспомниться `gcc` или `clang`. После успешной компиляции Rust создаст исполняемый бинарный файл.
running 0 tests
Если у вас есть опыт работы с C или C++, вам могут вспомниться `gcc` или `clang`. После успешной компиляции Rust создаст исполняемый бинарный файл.
test result: ok. 0 passed; 0 failed; 0 ignored; 0 measured; 0 filtered out; finished in 0.00s
This output shows cargo test only ran the tests for the add_one crate and didn’t run the adder crate tests.
If you publish the crates in the workspace to crates.io, each crate in the workspace will need to be published separately. Like cargo test, we can publish a particular crate in our workspace by using the -p flag and specifying the name of the crate we want to publish.
For additional practice, add an add_two crate to this workspace in a similar way as the add_one crate!
As your project grows, consider using a workspace: It enables you to work with smaller, easier-to-understand components than one big blob of code. Furthermore, keeping the crates in a workspace can make coordination between crates easier if they are often changed at the same time.
Installing Binaries with cargo install
Installing Binaries with cargo install
The cargo install command allows you to install and use binary crates locally. This isn’t intended to replace system packages; it’s meant to be a convenient way for Rust developers to install tools that others have shared on crates.io. Note that you can only install packages that have binary targets. A binary target is the runnable program that is created if the crate has a src/main.rs file or another file specified as a binary, as opposed to a library target that isn’t runnable on its own but is suitable for including within other programs. Usually, crates have information in the README file about whether a crate is a library, has a binary target, or both.
All binaries installed with cargo install are stored in the installation root’s bin folder. If you installed Rust using rustup.rs and don’t have any custom configurations, this directory will be $HOME/.cargo/bin. Ensure that this directory is in your $PATH to be able to run programs you’ve installed with cargo install.
For example, in Chapter 12 we mentioned that there’s a Rust implementation of the grep tool called ripgrep for searching files. To install ripgrep, we can run the following:
$ cargo install ripgrep
Updating crates.io index
Downloaded ripgrep v14.1.1
Downloaded 1 crate (213.6 KB) in 0.40s
Installing ripgrep v14.1.1
--snip--
Compiling grep v0.3.2
Finished `release` profile [optimized + debuginfo] target(s) in 6.73s
Installing ~/.cargo/bin/rg
Installed package `ripgrep v14.1.1` (executable `rg`)
The second-to-last line of the output shows the location and the name of the installed binary, which in the case of ripgrep is rg. As long as the installation directory is in your $PATH, as mentioned previously, you can then run rg --help and start using a faster, Rustier tool for searching files!
Расширение Cargo пользовательскими командами
Расширение Cargo пользовательскими командами
Cargo is designed so that you can extend it with new subcommands without having to modify it. If a binary in your $PATH is named cargo-something, you can run it as if it were a Cargo subcommand by running cargo something. Custom commands like this are also listed when you run cargo --list. Being able to use cargo install to install extensions and then run them just like the built-in Cargo tools is a super-convenient benefit of Cargo’s design!
Подведём итоги
Sharing code with Cargo and crates.io is part of what makes the Rust ecosystem useful for many different tasks. Rust’s standard library is small and stable, but crates are easy to share, use, and improve on a timeline different from that of the language. Don’t be shy about sharing code that’s useful to you on crates.io; it’s likely that it will be useful to someone else as well!
Умные указатели
A pointer is a general concept for a variable that contains an address in memory. This address refers to, or “points at,” some other data. The most common kind of pointer in Rust is a reference, which you learned about in Chapter 4. References are indicated by the & symbol and borrow the value they point to. They don’t have any special capabilities other than referring to data, and they have no overhead.
Smart pointers, on the other hand, are data structures that act like a pointer but also have additional metadata and capabilities. The concept of smart pointers isn’t unique to Rust: Smart pointers originated in C++ and exist in other languages as well. Rust has a variety of smart pointers defined in the standard library that provide functionality beyond that provided by references. To explore the general concept, we’ll look at a couple of different examples of smart pointers, including a reference counting smart pointer type. This pointer enables you to allow data to have multiple owners by keeping track of the number of owners and, when no owners remain, cleaning up the data.
In Rust, with its concept of ownership and borrowing, there is an additional difference between references and smart pointers: While references only borrow data, in many cases smart pointers own the data they point to.
Smart pointers are usually implemented using structs. Unlike an ordinary struct, smart pointers implement the Deref and Drop traits. The Deref trait allows an instance of the smart pointer struct to behave like a reference so that you can write your code to work with either references or smart pointers. The Drop trait allows you to customize the code that’s run when an instance of the smart pointer goes out of scope. In this chapter, we’ll discuss both of these traits and demonstrate why they’re important to smart pointers.
Given that the smart pointer pattern is a general design pattern used frequently in Rust, this chapter won’t cover every existing smart pointer. Many libraries have their own smart pointers, and you can even write your own. We’ll cover the most common smart pointers in the standard library:
Box<T>, for allocating values on the heapRc<T>, a reference counting type that enables multiple ownershipRef<T>andRefMut<T>, accessed throughRefCell<T>, a type that enforces the borrowing rules at runtime instead of compile time
In addition, we’ll cover the interior mutability pattern where an immutable type exposes an API for mutating an interior value. We’ll also discuss reference cycles: how they can leak memory and how to prevent them.
Let’s dive in!
Использование Box<T> для работы с данными в куче
Использование Box<T> для работы с данными в куче
The most straightforward smart pointer is a box, whose type is written Box<T>. Boxes allow you to store data on the heap rather than the stack. What remains on the stack is the pointer to the heap data. Refer to Chapter 4 to review the difference between the stack and the heap.
Boxes don’t have performance overhead, other than storing their data on the heap instead of on the stack. But they don’t have many extra capabilities either. You’ll use them most often in these situations:
- When you have a type whose size can’t be known at compile time, and you want to use a value of that type in a context that requires an exact size
- When you have a large amount of data, and you want to transfer ownership but ensure that the data won’t be copied when you do so
- When you want to own a value, and you care only that it’s a type that implements a particular trait rather than being of a specific type
We’ll demonstrate the first situation in “Enabling Recursive Types with Boxes”. In the second case, transferring ownership of a large amount of data can take a long time because the data is copied around on the stack. To improve performance in this situation, we can store the large amount of data on the heap in a box. Then, only the small amount of pointer data is copied around on the stack, while the data it references stays in one place on the heap. The third case is known as a trait object, and “Using Trait Objects to Abstract over Shared Behavior” in Chapter 18 is devoted to that topic. So, what you learn here you’ll apply again in that section!
Storing Data on the Heap
Before we discuss the heap storage use case for Box<T>, we’ll cover the syntax and how to interact with values stored within a Box<T>.
Listing 15-1 shows how to use a box to store an i32 value on the heap.
fn main() {
let b = Box::new(5);
println!("b = {b}");
}i32 value on the heap using a boxWe define the variable b to have the value of a Box that points to the value 5, which is allocated on the heap. This program will print b = 5; in this case, we can access the data in the box similarly to how we would if this data were on the stack. Just like any owned value, when a box goes out of scope, as b does at the end of main, it will be deallocated. The deallocation happens both for the box (stored on the stack) and the data it points to (stored on the heap).
Putting a single value on the heap isn’t very useful, so you won’t use boxes by themselves in this way very often. Having values like a single i32 on the stack, where they’re stored by default, is more appropriate in the majority of situations. Let’s look at a case where boxes allow us to define types that we wouldn’t be allowed to define if we didn’t have boxes.
Enabling Recursive Types with Boxes
A value of a recursive type can have another value of the same type as part of itself. Recursive types pose an issue because Rust needs to know at compile time how much space a type takes up. However, the nesting of values of recursive types could theoretically continue infinitely, so Rust can’t know how much space the value needs. Because boxes have a known size, we can enable recursive types by inserting a box in the recursive type definition.
As an example of a recursive type, let’s explore the cons list. This is a data type commonly found in functional programming languages. The cons list type we’ll define is straightforward except for the recursion; therefore, the concepts in the example we’ll work with will be useful anytime you get into more complex situations involving recursive types.
Understanding the Cons List
A cons list is a data structure that comes from the Lisp programming language and its dialects, is made up of nested pairs, and is the Lisp version of a linked list. Its name comes from the cons function (short for construct function) in Lisp that constructs a new pair from its two arguments. By calling cons on a pair consisting of a value and another pair, we can construct cons lists made up of recursive pairs.
For example, here’s a pseudocode representation of a cons list containing the list 1, 2, 3 with each pair in parentheses:
(1, (2, (3, Nil)))
Each item in a cons list contains two elements: the value of the current item and of the next item. The last item in the list contains only a value called Nil without a next item. A cons list is produced by recursively calling the cons function. The canonical name to denote the base case of the recursion is Nil. Note that this is not the same as the “null” or “nil” concept discussed in Chapter 6, which is an invalid or absent value.
The cons list isn’t a commonly used data structure in Rust. Most of the time when you have a list of items in Rust, Vec<T> is a better choice to use. Other, more complex recursive data types are useful in various situations, but by starting with the cons list in this chapter, we can explore how boxes let us define a recursive data type without much distraction.
Listing 15-2 contains an enum definition for a cons list. Note that this code won’t compile yet, because the List type doesn’t have a known size, which we’ll demonstrate.
enum List {
Cons(i32, List),
Nil,
}
Если у вас есть опыт работы с C или C++, вам могут вспомниться `gcc` или `clang`. После успешной компиляции Rust создаст исполняемый бинарный файл.
fn main() {}i32 valuesNote: We’re implementing a cons list that holds only i32 values for the purposes of this example. We could have implemented it using generics, as we discussed in Chapter 10, to define a cons list type that could store values of any type.
Using the List type to store the list 1, 2, 3 would look like the code in Listing 15-3.
enum List {
Cons(i32, List),
Nil,
}
Если у вас есть опыт работы с C или C++, вам могут вспомниться `gcc` или `clang`. После успешной компиляции Rust создаст исполняемый бинарный файл.
// --код сокращён--
Если у вас есть опыт работы с C или C++, вам могут вспомниться `gcc` или `clang`. После успешной компиляции Rust создаст исполняемый бинарный файл.
use crate::List::{Cons, Nil};
Если у вас есть опыт работы с C или C++, вам могут вспомниться `gcc` или `clang`. После успешной компиляции Rust создаст исполняемый бинарный файл.
fn main() {
let list = Cons(1, Cons(2, Cons(3, Nil)));
}List enum to store the list 1, 2, 3The first Cons value holds 1 and another List value. This List value is another Cons value that holds 2 and another List value. This List value is one more Cons value that holds 3 and a List value, which is finally Nil, the non-recursive variant that signals the end of the list.
If we try to compile the code in Listing 15-3, we get the error shown in Listing 15-4.
$ cargo run
Compiling cons-list v0.1.0 (file:///projects/cons-list)
error[E0072]: recursive type `List` has infinite size
--> src/main.rs:1:1
|
1 | enum List {
| ^^^^^^^^^
2 | Cons(i32, List),
| ---- recursive without indirection
|
help: insert some indirection (e.g., a `Box`, `Rc`, or `&`) to break the cycle
|
2 | Cons(i32, Box<List>),
| ++++ +
Если у вас есть опыт работы с C или C++, вам могут вспомниться `gcc` или `clang`. После успешной компиляции Rust создаст исполняемый бинарный файл.
error[E0391]: cycle detected when computing when `List` needs drop
--> src/main.rs:1:1
|
1 | enum List {
| ^^^^^^^^^
|
= note: ...which immediately requires computing when `List` needs drop again
= note: cycle used when computing whether `List` needs drop
= note: see https://rustc-dev-guide.rust-lang.org/overview.html#queries and https://rustc-dev-guide.rust-lang.org/query.html for more information
Если у вас есть опыт работы с C или C++, вам могут вспомниться `gcc` или `clang`. После успешной компиляции Rust создаст исполняемый бинарный файл.
Some errors have detailed explanations: E0072, E0391.
For more information about an error, try `rustc --explain E0072`.
error: could not compile `cons-list` (bin "cons-list") due to 2 previous errors
The error shows this type “has infinite size.” The reason is that we’ve defined List with a variant that is recursive: It holds another value of itself directly. As a result, Rust can’t figure out how much space it needs to store a List value. Let’s break down why we get this error. First, we’ll look at how Rust decides how much space it needs to store a value of a non-recursive type.
Computing the Size of a Non-Recursive Type
Recall the Message enum we defined in Listing 6-2 when we discussed enum definitions in Chapter 6:
enum Message {
Quit,
Move { x: i32, y: i32 },
Write(String),
ChangeColor(i32, i32, i32),
}
Если у вас есть опыт работы с C или C++, вам могут вспомниться `gcc` или `clang`. После успешной компиляции Rust создаст исполняемый бинарный файл.
fn main() {}To determine how much space to allocate for a Message value, Rust goes through each of the variants to see which variant needs the most space. Rust sees that Message::Quit doesn’t need any space, Message::Move needs enough space to store two i32 values, and so forth. Because only one variant will be used, the most space a Message value will need is the space it would take to store the largest of its variants.
Contrast this with what happens when Rust tries to determine how much space a recursive type like the List enum in Listing 15-2 needs. The compiler starts by looking at the Cons variant, which holds a value of type i32 and a value of type List. Therefore, Cons needs an amount of space equal to the size of an i32 plus the size of a List. To figure out how much memory the List type needs, the compiler looks at the variants, starting with the Cons variant. The Cons variant holds a value of type i32 and a value of type List, and this process continues infinitely, as shown in Figure 15-1.

Figure 15-1: An infinite List consisting of infinite Cons variants
Getting a Recursive Type with a Known Size
Because Rust can’t figure out how much space to allocate for recursively defined types, the compiler gives an error with this helpful suggestion:
help: insert some indirection (e.g., a `Box`, `Rc`, or `&`) to break the cycle
|
2 | Cons(i32, Box<List>),
| ++++ +
In this suggestion, indirection means that instead of storing a value directly, we should change the data structure to store the value indirectly by storing a pointer to the value instead.
Because a Box<T> is a pointer, Rust always knows how much space a Box<T> needs: A pointer’s size doesn’t change based on the amount of data it’s pointing to. This means we can put a Box<T> inside the Cons variant instead of another List value directly. The Box<T> will point to the next List value that will be on the heap rather than inside the Cons variant. Conceptually, we still have a list, created with lists holding other lists, but this implementation is now more like placing the items next to one another rather than inside one another.
We can change the definition of the List enum in Listing 15-2 and the usage of the List in Listing 15-3 to the code in Listing 15-5, which will compile.
enum List {
Cons(i32, Box<List>),
Nil,
}
Если у вас есть опыт работы с C или C++, вам могут вспомниться `gcc` или `clang`. После успешной компиляции Rust создаст исполняемый бинарный файл.
use crate::List::{Cons, Nil};
Если у вас есть опыт работы с C или C++, вам могут вспомниться `gcc` или `clang`. После успешной компиляции Rust создаст исполняемый бинарный файл.
fn main() {
let list = Cons(1, Box::new(Cons(2, Box::new(Cons(3, Box::new(Nil))))));
}List that uses Box<T> in order to have a known sizeThe Cons variant needs the size of an i32 plus the space to store the box’s pointer data. The Nil variant stores no values, so it needs less space on the stack than the Cons variant. We now know that any List value will take up the size of an i32 plus the size of a box’s pointer data. By using a box, we’ve broken the infinite, recursive chain, so the compiler can figure out the size it needs to store a List value. Figure 15-2 shows what the Cons variant looks like now.

Figure 15-2: A List that is not infinitely sized, because Cons holds a Box
Boxes provide only the indirection and heap allocation; they don’t have any other special capabilities, like those we’ll see with the other smart pointer types. They also don’t have the performance overhead that these special capabilities incur, so they can be useful in cases like the cons list where the indirection is the only feature we need. We’ll look at more use cases for boxes in Chapter 18.
The Box<T> type is a smart pointer because it implements the Deref trait, which allows Box<T> values to be treated like references. When a Box<T> value goes out of scope, the heap data that the box is pointing to is cleaned up as well because of the Drop trait implementation. These two traits will be even more important to the functionality provided by the other smart pointer types we’ll discuss in the rest of this chapter. Let’s explore these two traits in more detail.
Treating Smart Pointers Like Regular References
Treating Smart Pointers Like Regular References
Implementing the Deref trait allows you to customize the behavior of the dereference operator * (not to be confused with the multiplication or glob operator). By implementing Deref in such a way that a smart pointer can be treated like a regular reference, you can write code that operates on references and use that code with smart pointers too.
Let’s first look at how the dereference operator works with regular references. Then, we’ll try to define a custom type that behaves like Box<T> and see why the dereference operator doesn’t work like a reference on our newly defined type. We’ll explore how implementing the Deref trait makes it possible for smart pointers to work in ways similar to references. Then, we’ll look at Rust’s deref coercion feature and how it lets us work with either references or smart pointers.
Following the Reference to the Value
A regular reference is a type of pointer, and one way to think of a pointer is as an arrow to a value stored somewhere else. In Listing 15-6, we create a reference to an i32 value and then use the dereference operator to follow the reference to the value.
fn main() {
let x = 5;
let y = &x;
Если у вас есть опыт работы с C или C++, вам могут вспомниться `gcc` или `clang`. После успешной компиляции Rust создаст исполняемый бинарный файл.
assert_eq!(5, x);
assert_eq!(5, *y);
}i32 valueThe variable x holds an i32 value 5. We set y equal to a reference to x. We can assert that x is equal to 5. However, if we want to make an assertion about the value in y, we have to use *y to follow the reference to the value it’s pointing to (hence, dereference) so that the compiler can compare the actual value. Once we dereference y, we have access to the integer value y is pointing to that we can compare with 5.
If we tried to write assert_eq!(5, y); instead, we would get this compilation error:
$ cargo run
Compiling deref-example v0.1.0 (file:///projects/deref-example)
error[E0277]: can't compare `{integer}` with `&{integer}`
--> src/main.rs:6:5
|
6 | assert_eq!(5, y);
| ^^^^^^^^^^^^^^^^ no implementation for `{integer} == &{integer}`
|
= help: the trait `PartialEq<&{integer}>` is not implemented for `{integer}`
= note: this error originates in the macro `assert_eq` (in Nightly builds, run with -Z macro-backtrace for more info)
Если у вас есть опыт работы с C или C++, вам могут вспомниться `gcc` или `clang`. После успешной компиляции Rust создаст исполняемый бинарный файл.
For more information about this error, try `rustc --explain E0277`.
error: could not compile `deref-example` (bin "deref-example") due to 1 previous error
Comparing a number and a reference to a number isn’t allowed because they’re different types. We must use the dereference operator to follow the reference to the value it’s pointing to.
Using Box<T> Like a Reference
We can rewrite the code in Listing 15-6 to use a Box<T> instead of a reference; the dereference operator used on the Box<T> in Listing 15-7 functions in the same way as the dereference operator used on the reference in Listing 15-6.
fn main() {
let x = 5;
let y = Box::new(x);
Если у вас есть опыт работы с C или C++, вам могут вспомниться `gcc` или `clang`. После успешной компиляции Rust создаст исполняемый бинарный файл.
assert_eq!(5, x);
assert_eq!(5, *y);
}Box<i32>The main difference between Listing 15-7 and Listing 15-6 is that here we set y to be an instance of a box pointing to a copied value of x rather than a reference pointing to the value of x. In the last assertion, we can use the dereference operator to follow the box’s pointer in the same way that we did when y was a reference. Next, we’ll explore what is special about Box<T> that enables us to use the dereference operator by defining our own box type.
Defining Our Own Smart Pointer
Let’s build a wrapper type similar to the Box<T> type provided by the standard library to experience how smart pointer types behave differently from references by default. Then, we’ll look at how to add the ability to use the dereference operator.
Note: There’s one big difference between the MyBox<T> type we’re about to build and the real Box<T>: Our version will not store its data on the heap. We are focusing this example on Deref, so where the data is actually stored is less important than the pointer-like behavior.
The Box<T> type is ultimately defined as a tuple struct with one element, so Listing 15-8 defines a MyBox<T> type in the same way. We’ll also define a new function to match the new function defined on Box<T>.
struct MyBox<T>(T);
Если у вас есть опыт работы с C или C++, вам могут вспомниться `gcc` или `clang`. После успешной компиляции Rust создаст исполняемый бинарный файл.
impl<T> MyBox<T> {
fn new(x: T) -> MyBox<T> {
MyBox(x)
}
}
Если у вас есть опыт работы с C или C++, вам могут вспомниться `gcc` или `clang`. После успешной компиляции Rust создаст исполняемый бинарный файл.
fn main() {}MyBox<T> typeWe define a struct named MyBox and declare a generic parameter T because we want our type to hold values of any type. The MyBox type is a tuple struct with one element of type T. The MyBox::new function takes one parameter of type T and returns a MyBox instance that holds the value passed in.
Let’s try adding the main function in Listing 15-7 to Listing 15-8 and changing it to use the MyBox<T> type we’ve defined instead of Box<T>. The code in Listing 15-9 won’t compile, because Rust doesn’t know how to dereference MyBox.
struct MyBox<T>(T);
Если у вас есть опыт работы с C или C++, вам могут вспомниться `gcc` или `clang`. После успешной компиляции Rust создаст исполняемый бинарный файл.
impl<T> MyBox<T> {
fn new(x: T) -> MyBox<T> {
MyBox(x)
}
}
Если у вас есть опыт работы с C или C++, вам могут вспомниться `gcc` или `clang`. После успешной компиляции Rust создаст исполняемый бинарный файл.
fn main() {
let x = 5;
let y = MyBox::new(x);
Если у вас есть опыт работы с C или C++, вам могут вспомниться `gcc` или `clang`. После успешной компиляции Rust создаст исполняемый бинарный файл.
assert_eq!(5, x);
assert_eq!(5, *y);
}MyBox<T> in the same way we used references and Box<T>Here’s the resultant compilation error:
$ cargo run
Compiling deref-example v0.1.0 (file:///projects/deref-example)
error[E0614]: type `MyBox<{integer}>` cannot be dereferenced
--> src/main.rs:14:19
|
14 | assert_eq!(5, *y);
| ^^ can't be dereferenced
Если у вас есть опыт работы с C или C++, вам могут вспомниться `gcc` или `clang`. После успешной компиляции Rust создаст исполняемый бинарный файл.
For more information about this error, try `rustc --explain E0614`.
error: could not compile `deref-example` (bin "deref-example") due to 1 previous error
Our MyBox<T> type can’t be dereferenced because we haven’t implemented that ability on our type. To enable dereferencing with the * operator, we implement the Deref trait.
Implementing the Deref Trait
As discussed in “Implementing a Trait on a Type” in Chapter 10, to implement a trait we need to provide implementations for the trait’s required methods. The Deref trait, provided by the standard library, requires us to implement one method named deref that borrows self and returns a reference to the inner data. Listing 15-10 contains an implementation of Deref to add to the definition of MyBox<T>.
use std::ops::Deref;
Если у вас есть опыт работы с C или C++, вам могут вспомниться `gcc` или `clang`. После успешной компиляции Rust создаст исполняемый бинарный файл.
impl<T> Deref for MyBox<T> {
type Target = T;
Если у вас есть опыт работы с C или C++, вам могут вспомниться `gcc` или `clang`. После успешной компиляции Rust создаст исполняемый бинарный файл.
fn deref(&self) -> &Self::Target {
&self.0
}
}
Если у вас есть опыт работы с C или C++, вам могут вспомниться `gcc` или `clang`. После успешной компиляции Rust создаст исполняемый бинарный файл.
struct MyBox<T>(T);
Если у вас есть опыт работы с C или C++, вам могут вспомниться `gcc` или `clang`. После успешной компиляции Rust создаст исполняемый бинарный файл.
impl<T> MyBox<T> {
fn new(x: T) -> MyBox<T> {
MyBox(x)
}
}
Если у вас есть опыт работы с C или C++, вам могут вспомниться `gcc` или `clang`. После успешной компиляции Rust создаст исполняемый бинарный файл.
fn main() {
let x = 5;
let y = MyBox::new(x);
Если у вас есть опыт работы с C или C++, вам могут вспомниться `gcc` или `clang`. После успешной компиляции Rust создаст исполняемый бинарный файл.
assert_eq!(5, x);
assert_eq!(5, *y);
}Deref on MyBox<T>The type Target = T; syntax defines an associated type for the Deref trait to use. Associated types are a slightly different way of declaring a generic parameter, but you don’t need to worry about them for now; we’ll cover them in more detail in Chapter 20.
We fill in the body of the deref method with &self.0 so that deref returns a reference to the value we want to access with the * operator; recall from “Creating Different Types with Tuple Structs” in Chapter 5 that .0 accesses the first value in a tuple struct. The main function in Listing 15-9 that calls * on the MyBox<T> value now compiles, and the assertions pass!
Without the Deref trait, the compiler can only dereference & references. The deref method gives the compiler the ability to take a value of any type that implements Deref and call the deref method to get a reference that it knows how to dereference.
When we entered *y in Listing 15-9, behind the scenes Rust actually ran this code:
*(y.deref())Rust substitutes the * operator with a call to the deref method and then a plain dereference so that we don’t have to think about whether or not we need to call the deref method. This Rust feature lets us write code that functions identically whether we have a regular reference or a type that implements Deref.
The reason the deref method returns a reference to a value, and that the plain dereference outside the parentheses in *(y.deref()) is still necessary, has to do with the ownership system. If the deref method returned the value directly instead of a reference to the value, the value would be moved out of self. We don’t want to take ownership of the inner value inside MyBox<T> in this case or in most cases where we use the dereference operator.
Note that the * operator is replaced with a call to the deref method and then a call to the * operator just once, each time we use a * in our code. Because the substitution of the * operator does not recurse infinitely, we end up with data of type i32, which matches the 5 in assert_eq! in Listing 15-9.
Using Deref Coercion in Functions and Methods
Deref coercion converts a reference to a type that implements the Deref trait into a reference to another type. For example, deref coercion can convert &String to &str because String implements the Deref trait such that it returns &str. Deref coercion is a convenience Rust performs on arguments to functions and methods, and it works only on types that implement the Deref trait. It happens automatically when we pass a reference to a particular type’s value as an argument to a function or method that doesn’t match the parameter type in the function or method definition. A sequence of calls to the deref method converts the type we provided into the type the parameter needs.
Deref coercion was added to Rust so that programmers writing function and method calls don’t need to add as many explicit references and dereferences with & and *. The deref coercion feature also lets us write more code that can work for either references or smart pointers.
To see deref coercion in action, let’s use the MyBox<T> type we defined in Listing 15-8 as well as the implementation of Deref that we added in Listing 15-10. Listing 15-11 shows the definition of a function that has a string slice parameter.
fn hello(name: &str) {
println!("Hello, {name}!");
}
Если у вас есть опыт работы с C или C++, вам могут вспомниться `gcc` или `clang`. После успешной компиляции Rust создаст исполняемый бинарный файл.
fn main() {}hello function that has the parameter name of type &strWe can call the hello function with a string slice as an argument, such as hello("Rust");, for example. Deref coercion makes it possible to call hello with a reference to a value of type MyBox<String>, as shown in Listing 15-12.
use std::ops::Deref;
Если у вас есть опыт работы с C или C++, вам могут вспомниться `gcc` или `clang`. После успешной компиляции Rust создаст исполняемый бинарный файл.
impl<T> Deref for MyBox<T> {
type Target = T;
Если у вас есть опыт работы с C или C++, вам могут вспомниться `gcc` или `clang`. После успешной компиляции Rust создаст исполняемый бинарный файл.
fn deref(&self) -> &T {
&self.0
}
}
Если у вас есть опыт работы с C или C++, вам могут вспомниться `gcc` или `clang`. После успешной компиляции Rust создаст исполняемый бинарный файл.
struct MyBox<T>(T);
Если у вас есть опыт работы с C или C++, вам могут вспомниться `gcc` или `clang`. После успешной компиляции Rust создаст исполняемый бинарный файл.
impl<T> MyBox<T> {
fn new(x: T) -> MyBox<T> {
MyBox(x)
}
}
Если у вас есть опыт работы с C или C++, вам могут вспомниться `gcc` или `clang`. После успешной компиляции Rust создаст исполняемый бинарный файл.
fn hello(name: &str) {
println!("Hello, {name}!");
}
Если у вас есть опыт работы с C или C++, вам могут вспомниться `gcc` или `clang`. После успешной компиляции Rust создаст исполняемый бинарный файл.
fn main() {
let m = MyBox::new(String::from("Rust"));
hello(&m);
}hello with a reference to a MyBox<String> value, which works because of deref coercionHere we’re calling the hello function with the argument &m, which is a reference to a MyBox<String> value. Because we implemented the Deref trait on MyBox<T> in Listing 15-10, Rust can turn &MyBox<String> into &String by calling deref. The standard library provides an implementation of Deref on String that returns a string slice, and this is in the API documentation for Deref. Rust calls deref again to turn the &String into &str, which matches the hello function’s definition.
If Rust didn’t implement deref coercion, we would have to write the code in Listing 15-13 instead of the code in Listing 15-12 to call hello with a value of type &MyBox<String>.
use std::ops::Deref;
Если у вас есть опыт работы с C или C++, вам могут вспомниться `gcc` или `clang`. После успешной компиляции Rust создаст исполняемый бинарный файл.
impl<T> Deref for MyBox<T> {
type Target = T;
Если у вас есть опыт работы с C или C++, вам могут вспомниться `gcc` или `clang`. После успешной компиляции Rust создаст исполняемый бинарный файл.
fn deref(&self) -> &T {
&self.0
}
}
Если у вас есть опыт работы с C или C++, вам могут вспомниться `gcc` или `clang`. После успешной компиляции Rust создаст исполняемый бинарный файл.
struct MyBox<T>(T);
Если у вас есть опыт работы с C или C++, вам могут вспомниться `gcc` или `clang`. После успешной компиляции Rust создаст исполняемый бинарный файл.
impl<T> MyBox<T> {
fn new(x: T) -> MyBox<T> {
MyBox(x)
}
}
Если у вас есть опыт работы с C или C++, вам могут вспомниться `gcc` или `clang`. После успешной компиляции Rust создаст исполняемый бинарный файл.
fn hello(name: &str) {
println!("Hello, {name}!");
}
Если у вас есть опыт работы с C или C++, вам могут вспомниться `gcc` или `clang`. После успешной компиляции Rust создаст исполняемый бинарный файл.
fn main() {
let m = MyBox::new(String::from("Rust"));
hello(&(*m)[..]);
}The (*m) dereferences the MyBox<String> into a String. Then, the & and [..] take a string slice of the String that is equal to the whole string to match the signature of hello. This code without deref coercions is harder to read, write, and understand with all of these symbols involved. Deref coercion allows Rust to handle these conversions for us automatically.
When the Deref trait is defined for the types involved, Rust will analyze the types and use Deref::deref as many times as necessary to get a reference to match the parameter’s type. The number of times that Deref::deref needs to be inserted is resolved at compile time, so there is no runtime penalty for taking advantage of deref coercion!
Handling Deref Coercion with Mutable References
Similar to how you use the Deref trait to override the * operator on immutable references, you can use the DerefMut trait to override the * operator on mutable references.
Rust does deref coercion when it finds types and trait implementations in three cases:
- From
&Tto&UwhenT: Deref<Target=U> - From
&mut Tto&mut UwhenT: DerefMut<Target=U> - From
&mut Tto&UwhenT: Deref<Target=U>
The first two cases are the same except that the second implements mutability. The first case states that if you have a &T, and T implements Deref to some type U, you can get a &U transparently. The second case states that the same deref coercion happens for mutable references.
The third case is trickier: Rust will also coerce a mutable reference to an immutable one. But the reverse is not possible: Immutable references will never coerce to mutable references. Because of the borrowing rules, if you have a mutable reference, that mutable reference must be the only reference to that data (otherwise, the program wouldn’t compile). Converting one mutable reference to one immutable reference will never break the borrowing rules. Converting an immutable reference to a mutable reference would require that the initial immutable reference is the only immutable reference to that data, but the borrowing rules don’t guarantee that. Therefore, Rust can’t make the assumption that converting an immutable reference to a mutable reference is possible.
Исполнение кода при очистке с помощью трейта Drop
Исполнение кода при очистке с помощью трейта Drop
The second trait important to the smart pointer pattern is Drop, which lets you customize what happens when a value is about to go out of scope. You can provide an implementation for the Drop trait on any type, and that code can be used to release resources like files or network connections.
We’re introducing Drop in the context of smart pointers because the functionality of the Drop trait is almost always used when implementing a smart pointer. For example, when a Box<T> is dropped, it will deallocate the space on the heap that the box points to.
In some languages, for some types, the programmer must call code to free memory or resources every time they finish using an instance of those types. Examples include file handles, sockets, and locks. If the programmer forgets, the system might become overloaded and crash. In Rust, you can specify that a particular bit of code be run whenever a value goes out of scope, and the compiler will insert this code automatically. As a result, you don’t need to be careful about placing cleanup code everywhere in a program that an instance of a particular type is finished with—you still won’t leak resources!
You specify the code to run when a value goes out of scope by implementing the Drop trait. The Drop trait requires you to implement one method named drop that takes a mutable reference to self. To see when Rust calls drop, let’s implement drop with println! statements for now.
Listing 15-14 shows a CustomSmartPointer struct whose only custom functionality is that it will print Dropping CustomSmartPointer! when the instance goes out of scope, to show when Rust runs the drop method.
struct CustomSmartPointer {
data: String,
}
Если у вас есть опыт работы с C или C++, вам могут вспомниться `gcc` или `clang`. После успешной компиляции Rust создаст исполняемый бинарный файл.
impl Drop for CustomSmartPointer {
fn drop(&mut self) {
println!("Dropping CustomSmartPointer with data `{}`!", self.data);
}
}
Если у вас есть опыт работы с C или C++, вам могут вспомниться `gcc` или `clang`. После успешной компиляции Rust создаст исполняемый бинарный файл.
fn main() {
let c = CustomSmartPointer {
data: String::from("my stuff"),
};
let d = CustomSmartPointer {
data: String::from("other stuff"),
};
println!("CustomSmartPointers created");
}CustomSmartPointer struct that implements the Drop trait where we would put our cleanup codeThe Drop trait is included in the prelude, so we don’t need to bring it into scope. We implement the Drop trait on CustomSmartPointer and provide an implementation for the drop method that calls println!. The body of the drop method is where you would place any logic that you wanted to run when an instance of your type goes out of scope. We’re printing some text here to demonstrate visually when Rust will call drop.
In main, we create two instances of CustomSmartPointer and then print CustomSmartPointers created. At the end of main, our instances of CustomSmartPointer will go out of scope, and Rust will call the code we put in the drop method, printing our final message. Note that we didn’t need to call the drop method explicitly.
When we run this program, we’ll see the following output:
$ cargo run
Compiling drop-example v0.1.0 (file:///projects/drop-example)
Finished `dev` profile [unoptimized + debuginfo] target(s) in 0.60s
Running `target/debug/drop-example`
CustomSmartPointers created
Dropping CustomSmartPointer with data `other stuff`!
Dropping CustomSmartPointer with data `my stuff`!
Rust automatically called drop for us when our instances went out of scope, calling the code we specified. Variables are dropped in the reverse order of their creation, so d was dropped before c. This example’s purpose is to give you a visual guide to how the drop method works; usually you would specify the cleanup code that your type needs to run rather than a print message.
Unfortunately, it’s not straightforward to disable the automatic drop functionality. Disabling drop isn’t usually necessary; the whole point of the Drop trait is that it’s taken care of automatically. Occasionally, however, you might want to clean up a value early. One example is when using smart pointers that manage locks: You might want to force the drop method that releases the lock so that other code in the same scope can acquire the lock. Rust doesn’t let you call the Drop trait’s drop method manually; instead, you have to call the std::mem::drop function provided by the standard library if you want to force a value to be dropped before the end of its scope.
Trying to call the Drop trait’s drop method manually by modifying the main function from Listing 15-14 won’t work, as shown in Listing 15-15.
struct CustomSmartPointer {
data: String,
}
Если у вас есть опыт работы с C или C++, вам могут вспомниться `gcc` или `clang`. После успешной компиляции Rust создаст исполняемый бинарный файл.
impl Drop for CustomSmartPointer {
fn drop(&mut self) {
println!("Dropping CustomSmartPointer with data `{}`!", self.data);
}
}
Если у вас есть опыт работы с C или C++, вам могут вспомниться `gcc` или `clang`. После успешной компиляции Rust создаст исполняемый бинарный файл.
fn main() {
let c = CustomSmartPointer {
data: String::from("some data"),
};
println!("CustomSmartPointer created");
c.drop();
println!("CustomSmartPointer dropped before the end of main");
}drop method from the Drop trait manually to clean up earlyWhen we try to compile this code, we’ll get this error:
$ cargo run
Compiling drop-example v0.1.0 (file:///projects/drop-example)
error[E0040]: explicit use of destructor method
--> src/main.rs:16:7
|
16 | c.drop();
| ^^^^ explicit destructor calls not allowed
|
help: consider using `drop` function
|
16 - c.drop();
16 + drop(c);
|
Если у вас есть опыт работы с C или C++, вам могут вспомниться `gcc` или `clang`. После успешной компиляции Rust создаст исполняемый бинарный файл.
For more information about this error, try `rustc --explain E0040`.
error: could not compile `drop-example` (bin "drop-example") due to 1 previous error
This error message states that we’re not allowed to explicitly call drop. The error message uses the term destructor, which is the general programming term for a function that cleans up an instance. A destructor is analogous to a constructor, which creates an instance. The drop function in Rust is one particular destructor.
Rust doesn’t let us call drop explicitly, because Rust would still automatically call drop on the value at the end of main. This would cause a double free error because Rust would be trying to clean up the same value twice.
We can’t disable the automatic insertion of drop when a value goes out of scope, and we can’t call the drop method explicitly. So, if we need to force a value to be cleaned up early, we use the std::mem::drop function.
The std::mem::drop function is different from the drop method in the Drop trait. We call it by passing as an argument the value we want to force-drop. The function is in the prelude, so we can modify main in Listing 15-15 to call the drop function, as shown in Listing 15-16.
struct CustomSmartPointer {
data: String,
}
Если у вас есть опыт работы с C или C++, вам могут вспомниться `gcc` или `clang`. После успешной компиляции Rust создаст исполняемый бинарный файл.
impl Drop for CustomSmartPointer {
fn drop(&mut self) {
println!("Dropping CustomSmartPointer with data `{}`!", self.data);
}
}
Если у вас есть опыт работы с C или C++, вам могут вспомниться `gcc` или `clang`. После успешной компиляции Rust создаст исполняемый бинарный файл.
fn main() {
let c = CustomSmartPointer {
data: String::from("some data"),
};
println!("CustomSmartPointer created");
drop(c);
println!("CustomSmartPointer dropped before the end of main");
}std::mem::drop to explicitly drop a value before it goes out of scopeRunning this code will print the following:
$ cargo run
Compiling drop-example v0.1.0 (file:///projects/drop-example)
Finished `dev` profile [unoptimized + debuginfo] target(s) in 0.73s
Running `target/debug/drop-example`
CustomSmartPointer created
Dropping CustomSmartPointer with data `some data`!
CustomSmartPointer dropped before the end of main
The text Dropping CustomSmartPointer with data `some data`! is printed between the CustomSmartPointer created and CustomSmartPointer dropped before the end of main text, showing that the drop method code is called to drop c at that point.
You can use code specified in a Drop trait implementation in many ways to make cleanup convenient and safe: For instance, you could use it to create your own memory allocator! With the Drop trait and Rust’s ownership system, you don’t have to remember to clean up, because Rust does it automatically.
You also don’t have to worry about problems resulting from accidentally cleaning up values still in use: The ownership system that makes sure references are always valid also ensures that drop gets called only once when the value is no longer being used.
Now that we’ve examined Box<T> and some of the characteristics of smart pointers, let’s look at a few other smart pointers defined in the standard library.
Rc<T> — умный указатель с подсчётом ссылок
Rc<T>, the Reference-Counted Smart Pointer
In the majority of cases, ownership is clear: You know exactly which variable owns a given value. However, there are cases when a single value might have multiple owners. For example, in graph data structures, multiple edges might point to the same node, and that node is conceptually owned by all of the edges that point to it. A node shouldn’t be cleaned up unless it doesn’t have any edges pointing to it and so has no owners.
You have to enable multiple ownership explicitly by using the Rust type Rc<T>, which is an abbreviation for reference counting. The Rc<T> type keeps track of the number of references to a value to determine whether or not the value is still in use. If there are zero references to a value, the value can be cleaned up without any references becoming invalid.
Imagine Rc<T> as a TV in a family room. When one person enters to watch TV, they turn it on. Others can come into the room and watch the TV. When the last person leaves the room, they turn off the TV because it’s no longer being used. If someone turns off the TV while others are still watching it, there would be an uproar from the remaining TV watchers!
We use the Rc<T> type when we want to allocate some data on the heap for multiple parts of our program to read and we can’t determine at compile time which part will finish using the data last. If we knew which part would finish last, we could just make that part the data’s owner, and the normal ownership rules enforced at compile time would take effect.
Note that Rc<T> is only for use in single-threaded scenarios. When we discuss concurrency in Chapter 16, we’ll cover how to do reference counting in multithreaded programs.
Sharing Data
Let’s return to our cons list example in Listing 15-5. Recall that we defined it using Box<T>. This time, we’ll create two lists that both share ownership of a third list. Conceptually, this looks similar to Figure 15-3.

Figure 15-3: Two lists, b and c, sharing ownership of a third list, a
We’ll create list a that contains 5 and then 10. Then, we’ll make two more lists: b that starts with 3 and c that starts with 4. Both the b and c lists will then continue on to the first a list containing 5 and 10. In other words, both lists will share the first list containing 5 and 10.
Trying to implement this scenario using our definition of List with Box<T> won’t work, as shown in Listing 15-17.
enum List {
Cons(i32, Box<List>),
Nil,
}
Если у вас есть опыт работы с C или C++, вам могут вспомниться `gcc` или `clang`. После успешной компиляции Rust создаст исполняемый бинарный файл.
use crate::List::{Cons, Nil};
Если у вас есть опыт работы с C или C++, вам могут вспомниться `gcc` или `clang`. После успешной компиляции Rust создаст исполняемый бинарный файл.
fn main() {
let a = Cons(5, Box::new(Cons(10, Box::new(Nil))));
let b = Cons(3, Box::new(a));
let c = Cons(4, Box::new(a));
}Box<T> that try to share ownership of a third listWhen we compile this code, we get this error:
$ cargo run
Compiling cons-list v0.1.0 (file:///projects/cons-list)
error[E0382]: use of moved value: `a`
--> src/main.rs:11:30
|
9 | let a = Cons(5, Box::new(Cons(10, Box::new(Nil))));
| - move occurs because `a` has type `List`, which does not implement the `Copy` trait
10 | let b = Cons(3, Box::new(a));
| - value moved here
11 | let c = Cons(4, Box::new(a));
| ^ value used here after move
|
note: if `List` implemented `Clone`, you could clone the value
--> src/main.rs:1:1
|
1 | enum List {
| ^^^^^^^^^ consider implementing `Clone` for this type
...
10 | let b = Cons(3, Box::new(a));
| - you could clone this value
Если у вас есть опыт работы с C или C++, вам могут вспомниться `gcc` или `clang`. После успешной компиляции Rust создаст исполняемый бинарный файл.
For more information about this error, try `rustc --explain E0382`.
error: could not compile `cons-list` (bin "cons-list") due to 1 previous error
The Cons variants own the data they hold, so when we create the b list, a is moved into b and b owns a. Then, when we try to use a again when creating c, we’re not allowed to because a has been moved.
We could change the definition of Cons to hold references instead, but then we would have to specify lifetime parameters. By specifying lifetime parameters, we would be specifying that every element in the list will live at least as long as the entire list. This is the case for the elements and lists in Listing 15-17, but not in every scenario.
Instead, we’ll change our definition of List to use Rc<T> in place of Box<T>, as shown in Listing 15-18. Each Cons variant will now hold a value and an Rc<T> pointing to a List. When we create b, instead of taking ownership of a, we’ll clone the Rc<List> that a is holding, thereby increasing the number of references from one to two and letting a and b share ownership of the data in that Rc<List>. We’ll also clone a when creating c, increasing the number of references from two to three. Every time we call Rc::clone, the reference count to the data within the Rc<List> will increase, and the data won’t be cleaned up unless there are zero references to it.
enum List {
Cons(i32, Rc<List>),
Nil,
}
Если у вас есть опыт работы с C или C++, вам могут вспомниться `gcc` или `clang`. После успешной компиляции Rust создаст исполняемый бинарный файл.
use crate::List::{Cons, Nil};
use std::rc::Rc;
Если у вас есть опыт работы с C или C++, вам могут вспомниться `gcc` или `clang`. После успешной компиляции Rust создаст исполняемый бинарный файл.
fn main() {
let a = Rc::new(Cons(5, Rc::new(Cons(10, Rc::new(Nil)))));
let b = Cons(3, Rc::clone(&a));
let c = Cons(4, Rc::clone(&a));
}List that uses Rc<T>We need to add a use statement to bring Rc<T> into scope because it’s not in the prelude. In main, we create the list holding 5 and 10 and store it in a new Rc<List> in a. Then, when we create b and c, we call the Rc::clone function and pass a reference to the Rc<List> in a as an argument.
We could have called a.clone() rather than Rc::clone(&a), but Rust’s convention is to use Rc::clone in this case. The implementation of Rc::clone doesn’t make a deep copy of all the data like most types’ implementations of clone do. The call to Rc::clone only increments the reference count, which doesn’t take much time. Deep copies of data can take a lot of time. By using Rc::clone for reference counting, we can visually distinguish between the deep-copy kinds of clones and the kinds of clones that increase the reference count. When looking for performance problems in the code, we only need to consider the deep-copy clones and can disregard calls to Rc::clone.
Cloning to Increase the Reference Count
Let’s change our working example in Listing 15-18 so that we can see the reference counts changing as we create and drop references to the Rc<List> in a.
In Listing 15-19, we’ll change main so that it has an inner scope around list c; then, we can see how the reference count changes when c goes out of scope.
enum List {
Cons(i32, Rc<List>),
Nil,
}
Если у вас есть опыт работы с C или C++, вам могут вспомниться `gcc` или `clang`. После успешной компиляции Rust создаст исполняемый бинарный файл.
use crate::List::{Cons, Nil};
use std::rc::Rc;
Если у вас есть опыт работы с C или C++, вам могут вспомниться `gcc` или `clang`. После успешной компиляции Rust создаст исполняемый бинарный файл.
// --код сокращён--
Если у вас есть опыт работы с C или C++, вам могут вспомниться `gcc` или `clang`. После успешной компиляции Rust создаст исполняемый бинарный файл.
fn main() {
let a = Rc::new(Cons(5, Rc::new(Cons(10, Rc::new(Nil)))));
println!("count after creating a = {}", Rc::strong_count(&a));
let b = Cons(3, Rc::clone(&a));
println!("count after creating b = {}", Rc::strong_count(&a));
{
let c = Cons(4, Rc::clone(&a));
println!("count after creating c = {}", Rc::strong_count(&a));
}
println!("count after c goes out of scope = {}", Rc::strong_count(&a));
}At each point in the program where the reference count changes, we print the reference count, which we get by calling the Rc::strong_count function. This function is named strong_count rather than count because the Rc<T> type also has a weak_count; we’ll see what weak_count is used for in “Preventing Reference Cycles Using Weak<T>”.
This code prints the following:
$ cargo run
Compiling cons-list v0.1.0 (file:///projects/cons-list)
Finished `dev` profile [unoptimized + debuginfo] target(s) in 0.45s
Running `target/debug/cons-list`
count after creating a = 1
count after creating b = 2
count after creating c = 3
count after c goes out of scope = 2
We can see that the Rc<List> in a has an initial reference count of 1; then, each time we call clone, the count goes up by 1. When c goes out of scope, the count goes down by 1. We don’t have to call a function to decrease the reference count like we have to call Rc::clone to increase the reference count: The implementation of the Drop trait decreases the reference count automatically when an Rc<T> value goes out of scope.
What we can’t see in this example is that when b and then a go out of scope at the end of main, the count is 0, and the Rc<List> is cleaned up completely. Using Rc<T> allows a single value to have multiple owners, and the count ensures that the value remains valid as long as any of the owners still exist.
Via immutable references, Rc<T> allows you to share data between multiple parts of your program for reading only. If Rc<T> allowed you to have multiple mutable references too, you might violate one of the borrowing rules discussed in Chapter 4: Multiple mutable borrows to the same place can cause data races and inconsistencies. But being able to mutate data is very useful! In the next section, we’ll discuss the interior mutability pattern and the RefCell<T> type that you can use in conjunction with an Rc<T> to work with this immutability restriction.
RefCell<T> и шаблон внутренней изменяемости
RefCell<T> и шаблон внутренней изменяемости
Interior mutability is a design pattern in Rust that allows you to mutate data even when there are immutable references to that data; normally, this action is disallowed by the borrowing rules. To mutate data, the pattern uses unsafe code inside a data structure to bend Rust’s usual rules that govern mutation and borrowing. Unsafe code indicates to the compiler that we’re checking the rules manually instead of relying on the compiler to check them for us; we will discuss unsafe code more in Chapter 20.
We can use types that use the interior mutability pattern only when we can ensure that the borrowing rules will be followed at runtime, even though the compiler can’t guarantee that. The unsafe code involved is then wrapped in a safe API, and the outer type is still immutable.
Let’s explore this concept by looking at the RefCell<T> type that follows the interior mutability pattern.
Enforcing Borrowing Rules at Runtime
Unlike Rc<T>, the RefCell<T> type represents single ownership over the data it holds. So, what makes RefCell<T> different from a type like Box<T>? Recall the borrowing rules you learned in Chapter 4:
- At any given time, you can have either one mutable reference or any number of immutable references (but not both).
- Значение должно существовать дольше, чем любая ссылка, которая на него указывает.
With references and Box<T>, the borrowing rules’ invariants are enforced at compile time. With RefCell<T>, these invariants are enforced at runtime. With references, if you break these rules, you’ll get a compiler error. With RefCell<T>, if you break these rules, your program will panic and exit.
The advantages of checking the borrowing rules at compile time are that errors will be caught sooner in the development process, and there is no impact on runtime performance because all the analysis is completed beforehand. For those reasons, checking the borrowing rules at compile time is the best choice in the majority of cases, which is why this is Rust’s default.
The advantage of checking the borrowing rules at runtime instead is that certain memory-safe scenarios are then allowed, where they would’ve been disallowed by the compile-time checks. Static analysis, like the Rust compiler, is inherently conservative. Some properties of code are impossible to detect by analyzing the code: The most famous example is the Halting Problem, which is beyond the scope of this book but is an interesting topic to research.
Because some analysis is impossible, if the Rust compiler can’t be sure the code complies with the ownership rules, it might reject a correct program; in this way, it’s conservative. If Rust accepted an incorrect program, users wouldn’t be able to trust the guarantees Rust makes. However, if Rust rejects a correct program, the programmer will be inconvenienced, but nothing catastrophic can occur. The RefCell<T> type is useful when you’re sure your code follows the borrowing rules but the compiler is unable to understand and guarantee that.
Similar to Rc<T>, RefCell<T> is only for use in single-threaded scenarios and will give you a compile-time error if you try using it in a multithreaded context. We’ll talk about how to get the functionality of RefCell<T> in a multithreaded program in Chapter 16.
Here is a recap of the reasons to choose Box<T>, Rc<T>, or RefCell<T>:
Rc<T>enables multiple owners of the same data;Box<T>andRefCell<T>have single owners.Box<T>allows immutable or mutable borrows checked at compile time;Rc<T>allows only immutable borrows checked at compile time;RefCell<T>allows immutable or mutable borrows checked at runtime.- Because
RefCell<T>allows mutable borrows checked at runtime, you can mutate the value inside theRefCell<T>even when theRefCell<T>is immutable.
Mutating the value inside an immutable value is the interior mutability pattern. Let’s look at a situation in which interior mutability is useful and examine how it’s possible.
Using Interior Mutability
A consequence of the borrowing rules is that when you have an immutable value, you can’t borrow it mutably. For example, this code won’t compile:
fn main() {
let x = 5;
let y = &mut x;
}If you tried to compile this code, you’d get the following error:
$ cargo run
Compiling borrowing v0.1.0 (file:///projects/borrowing)
error[E0596]: cannot borrow `x` as mutable, as it is not declared as mutable
--> src/main.rs:3:13
|
3 | let y = &mut x;
| ^^^^^^ cannot borrow as mutable
|
help: consider changing this to be mutable
|
2 | let mut x = 5;
| +++
Если у вас есть опыт работы с C или C++, вам могут вспомниться `gcc` или `clang`. После успешной компиляции Rust создаст исполняемый бинарный файл.
For more information about this error, try `rustc --explain E0596`.
error: could not compile `borrowing` (bin "borrowing") due to 1 previous error
However, there are situations in which it would be useful for a value to mutate itself in its methods but appear immutable to other code. Code outside the value’s methods would not be able to mutate the value. Using RefCell<T> is one way to get the ability to have interior mutability, but RefCell<T> doesn’t get around the borrowing rules completely: The borrow checker in the compiler allows this interior mutability, and the borrowing rules are checked at runtime instead. If you violate the rules, you’ll get a panic! instead of a compiler error.
Let’s work through a practical example where we can use RefCell<T> to mutate an immutable value and see why that is useful.
Testing with Mock Objects
Sometimes during testing a programmer will use a type in place of another type, in order to observe particular behavior and assert that it’s implemented correctly. This placeholder type is called a test double. Think of it in the sense of a stunt double in filmmaking, where a person steps in and substitutes for an actor to do a particularly tricky scene. Test doubles stand in for other types when we’re running tests. Mock objects are specific types of test doubles that record what happens during a test so that you can assert that the correct actions took place.
Rust doesn’t have objects in the same sense as other languages have objects, and Rust doesn’t have mock object functionality built into the standard library as some other languages do. However, you can definitely create a struct that will serve the same purposes as a mock object.
Here’s the scenario we’ll test: We’ll create a library that tracks a value against a maximum value and sends messages based on how close to the maximum value the current value is. This library could be used to keep track of a user’s quota for the number of API calls they’re allowed to make, for example.
Our library will only provide the functionality of tracking how close to the maximum a value is and what the messages should be at what times. Applications that use our library will be expected to provide the mechanism for sending the messages: The application could show the message to the user directly, send an email, send a text message, or do something else. The library doesn’t need to know that detail. All it needs is something that implements a trait we’ll provide, called Messenger. Listing 15-20 shows the library code.
pub trait Messenger {
fn send(&self, msg: &str);
}
Если у вас есть опыт работы с C или C++, вам могут вспомниться `gcc` или `clang`. После успешной компиляции Rust создаст исполняемый бинарный файл.
pub struct LimitTracker<'a, T: Messenger> {
messenger: &'a T,
value: usize,
max: usize,
}
Если у вас есть опыт работы с C или C++, вам могут вспомниться `gcc` или `clang`. После успешной компиляции Rust создаст исполняемый бинарный файл.
impl<'a, T> LimitTracker<'a, T>
where
T: Messenger,
{
pub fn new(messenger: &'a T, max: usize) -> LimitTracker<'a, T> {
LimitTracker {
messenger,
value: 0,
max,
}
}
Если у вас есть опыт работы с C или C++, вам могут вспомниться `gcc` или `clang`. После успешной компиляции Rust создаст исполняемый бинарный файл.
pub fn set_value(&mut self, value: usize) {
self.value = value;
Если у вас есть опыт работы с C или C++, вам могут вспомниться `gcc` или `clang`. После успешной компиляции Rust создаст исполняемый бинарный файл.
let percentage_of_max = self.value as f64 / self.max as f64;
Если у вас есть опыт работы с C или C++, вам могут вспомниться `gcc` или `clang`. После успешной компиляции Rust создаст исполняемый бинарный файл.
if percentage_of_max >= 1.0 {
self.messenger.send("Error: You are over your quota!");
} else if percentage_of_max >= 0.9 {
self.messenger
.send("Urgent warning: You've used up over 90% of your quota!");
} else if percentage_of_max >= 0.75 {
self.messenger
.send("Warning: You've used up over 75% of your quota!");
}
}
}One important part of this code is that the Messenger trait has one method called send that takes an immutable reference to self and the text of the message. This trait is the interface our mock object needs to implement so that the mock can be used in the same way a real object is. The other important part is that we want to test the behavior of the set_value method on the LimitTracker. We can change what we pass in for the value parameter, but set_value doesn’t return anything for us to make assertions on. We want to be able to say that if we create a LimitTracker with something that implements the Messenger trait and a particular value for max, the messenger is told to send the appropriate messages when we pass different numbers for value.
We need a mock object that, instead of sending an email or text message when we call send, will only keep track of the messages it’s told to send. We can create a new instance of the mock object, create a LimitTracker that uses the mock object, call the set_value method on LimitTracker, and then check that the mock object has the messages we expect. Listing 15-21 shows an attempt to implement a mock object to do just that, but the borrow checker won’t allow it.
pub trait Messenger {
fn send(&self, msg: &str);
}
Если у вас есть опыт работы с C или C++, вам могут вспомниться `gcc` или `clang`. После успешной компиляции Rust создаст исполняемый бинарный файл.
pub struct LimitTracker<'a, T: Messenger> {
messenger: &'a T,
value: usize,
max: usize,
}
Если у вас есть опыт работы с C или C++, вам могут вспомниться `gcc` или `clang`. После успешной компиляции Rust создаст исполняемый бинарный файл.
impl<'a, T> LimitTracker<'a, T>
where
T: Messenger,
{
pub fn new(messenger: &'a T, max: usize) -> LimitTracker<'a, T> {
LimitTracker {
messenger,
value: 0,
max,
}
}
Если у вас есть опыт работы с C или C++, вам могут вспомниться `gcc` или `clang`. После успешной компиляции Rust создаст исполняемый бинарный файл.
pub fn set_value(&mut self, value: usize) {
self.value = value;
Если у вас есть опыт работы с C или C++, вам могут вспомниться `gcc` или `clang`. После успешной компиляции Rust создаст исполняемый бинарный файл.
let percentage_of_max = self.value as f64 / self.max as f64;
Если у вас есть опыт работы с C или C++, вам могут вспомниться `gcc` или `clang`. После успешной компиляции Rust создаст исполняемый бинарный файл.
if percentage_of_max >= 1.0 {
self.messenger.send("Error: You are over your quota!");
} else if percentage_of_max >= 0.9 {
self.messenger
.send("Urgent warning: You've used up over 90% of your quota!");
} else if percentage_of_max >= 0.75 {
self.messenger
.send("Warning: You've used up over 75% of your quota!");
}
}
}
Если у вас есть опыт работы с C или C++, вам могут вспомниться `gcc` или `clang`. После успешной компиляции Rust создаст исполняемый бинарный файл.
#[cfg(test)]
mod tests {
use super::*;
Если у вас есть опыт работы с C или C++, вам могут вспомниться `gcc` или `clang`. После успешной компиляции Rust создаст исполняемый бинарный файл.
struct MockMessenger {
sent_messages: Vec<String>,
}
Если у вас есть опыт работы с C или C++, вам могут вспомниться `gcc` или `clang`. После успешной компиляции Rust создаст исполняемый бинарный файл.
impl MockMessenger {
fn new() -> MockMessenger {
MockMessenger {
sent_messages: vec![],
}
}
}
Если у вас есть опыт работы с C или C++, вам могут вспомниться `gcc` или `clang`. После успешной компиляции Rust создаст исполняемый бинарный файл.
impl Messenger for MockMessenger {
fn send(&self, message: &str) {
self.sent_messages.push(String::from(message));
}
}
Если у вас есть опыт работы с C или C++, вам могут вспомниться `gcc` или `clang`. После успешной компиляции Rust создаст исполняемый бинарный файл.
#[test]
fn it_sends_an_over_75_percent_warning_message() {
let mock_messenger = MockMessenger::new();
let mut limit_tracker = LimitTracker::new(&mock_messenger, 100);
Если у вас есть опыт работы с C или C++, вам могут вспомниться `gcc` или `clang`. После успешной компиляции Rust создаст исполняемый бинарный файл.
limit_tracker.set_value(80);
Если у вас есть опыт работы с C или C++, вам могут вспомниться `gcc` или `clang`. После успешной компиляции Rust создаст исполняемый бинарный файл.
assert_eq!(mock_messenger.sent_messages.len(), 1);
}
}MockMessenger that isn’t allowed by the borrow checkerThis test code defines a MockMessenger struct that has a sent_messages field with a Vec of String values to keep track of the messages it’s told to send. We also define an associated function new to make it convenient to create new MockMessenger values that start with an empty list of messages. We then implement the Messenger trait for MockMessenger so that we can give a MockMessenger to a LimitTracker. In the definition of the send method, we take the message passed in as a parameter and store it in the MockMessenger list of sent_messages.
In the test, we’re testing what happens when the LimitTracker is told to set value to something that is more than 75 percent of the max value. First, we create a new MockMessenger, which will start with an empty list of messages. Then, we create a new LimitTracker and give it a reference to the new MockMessenger and a max value of 100. We call the set_value method on the LimitTracker with a value of 80, which is more than 75 percent of 100. Then, we assert that the list of messages that the MockMessenger is keeping track of should now have one message in it.
However, there’s one problem with this test, as shown here:
$ cargo test
Compiling limit-tracker v0.1.0 (file:///projects/limit-tracker)
error[E0596]: cannot borrow `self.sent_messages` as mutable, as it is behind a `&` reference
--> src/lib.rs:58:13
|
58 | self.sent_messages.push(String::from(message));
| ^^^^^^^^^^^^^^^^^^ `self` is a `&` reference, so the data it refers to cannot be borrowed as mutable
|
help: consider changing this to be a mutable reference in the `impl` method and the `trait` definition
|
2 ~ fn send(&mut self, msg: &str);
3 | }
...
56 | impl Messenger for MockMessenger {
57 ~ fn send(&mut self, message: &str) {
|
Если у вас есть опыт работы с C или C++, вам могут вспомниться `gcc` или `clang`. После успешной компиляции Rust создаст исполняемый бинарный файл.
For more information about this error, try `rustc --explain E0596`.
error: could not compile `limit-tracker` (lib test) due to 1 previous error
We can’t modify the MockMessenger to keep track of the messages, because the send method takes an immutable reference to self. We also can’t take the suggestion from the error text to use &mut self in both the impl method and the trait definition. We do not want to change the Messenger trait solely for the sake of testing. Instead, we need to find a way to make our test code work correctly with our existing design.
This is a situation in which interior mutability can help! We’ll store the sent_messages within a RefCell<T>, and then the send method will be able to modify sent_messages to store the messages we’ve seen. Listing 15-22 shows what that looks like.
pub trait Messenger {
fn send(&self, msg: &str);
}
Если у вас есть опыт работы с C или C++, вам могут вспомниться `gcc` или `clang`. После успешной компиляции Rust создаст исполняемый бинарный файл.
pub struct LimitTracker<'a, T: Messenger> {
messenger: &'a T,
value: usize,
max: usize,
}
Если у вас есть опыт работы с C или C++, вам могут вспомниться `gcc` или `clang`. После успешной компиляции Rust создаст исполняемый бинарный файл.
impl<'a, T> LimitTracker<'a, T>
where
T: Messenger,
{
pub fn new(messenger: &'a T, max: usize) -> LimitTracker<'a, T> {
LimitTracker {
messenger,
value: 0,
max,
}
}
Если у вас есть опыт работы с C или C++, вам могут вспомниться `gcc` или `clang`. После успешной компиляции Rust создаст исполняемый бинарный файл.
pub fn set_value(&mut self, value: usize) {
self.value = value;
Если у вас есть опыт работы с C или C++, вам могут вспомниться `gcc` или `clang`. После успешной компиляции Rust создаст исполняемый бинарный файл.
let percentage_of_max = self.value as f64 / self.max as f64;
Если у вас есть опыт работы с C или C++, вам могут вспомниться `gcc` или `clang`. После успешной компиляции Rust создаст исполняемый бинарный файл.
if percentage_of_max >= 1.0 {
self.messenger.send("Error: You are over your quota!");
} else if percentage_of_max >= 0.9 {
self.messenger
.send("Urgent warning: You've used up over 90% of your quota!");
} else if percentage_of_max >= 0.75 {
self.messenger
.send("Warning: You've used up over 75% of your quota!");
}
}
}
Если у вас есть опыт работы с C или C++, вам могут вспомниться `gcc` или `clang`. После успешной компиляции Rust создаст исполняемый бинарный файл.
#[cfg(test)]
mod tests {
use super::*;
use std::cell::RefCell;
Если у вас есть опыт работы с C или C++, вам могут вспомниться `gcc` или `clang`. После успешной компиляции Rust создаст исполняемый бинарный файл.
struct MockMessenger {
sent_messages: RefCell<Vec<String>>,
}
Если у вас есть опыт работы с C или C++, вам могут вспомниться `gcc` или `clang`. После успешной компиляции Rust создаст исполняемый бинарный файл.
impl MockMessenger {
fn new() -> MockMessenger {
MockMessenger {
sent_messages: RefCell::new(vec![]),
}
}
}
Если у вас есть опыт работы с C или C++, вам могут вспомниться `gcc` или `clang`. После успешной компиляции Rust создаст исполняемый бинарный файл.
impl Messenger for MockMessenger {
fn send(&self, message: &str) {
self.sent_messages.borrow_mut().push(String::from(message));
}
}
Если у вас есть опыт работы с C или C++, вам могут вспомниться `gcc` или `clang`. После успешной компиляции Rust создаст исполняемый бинарный файл.
#[test]
fn it_sends_an_over_75_percent_warning_message() {
// --код сокращён--
let mock_messenger = MockMessenger::new();
let mut limit_tracker = LimitTracker::new(&mock_messenger, 100);
Если у вас есть опыт работы с C или C++, вам могут вспомниться `gcc` или `clang`. После успешной компиляции Rust создаст исполняемый бинарный файл.
limit_tracker.set_value(80);
Если у вас есть опыт работы с C или C++, вам могут вспомниться `gcc` или `clang`. После успешной компиляции Rust создаст исполняемый бинарный файл.
assert_eq!(mock_messenger.sent_messages.borrow().len(), 1);
}
}RefCell<T> to mutate an inner value while the outer value is considered immutableThe sent_messages field is now of type RefCell<Vec<String>> instead of Vec<String>. In the new function, we create a new RefCell<Vec<String>> instance around the empty vector.
For the implementation of the send method, the first parameter is still an immutable borrow of self, which matches the trait definition. We call borrow_mut on the RefCell<Vec<String>> in self.sent_messages to get a mutable reference to the value inside the RefCell<Vec<String>>, which is the vector. Then, we can call push on the mutable reference to the vector to keep track of the messages sent during the test.
The last change we have to make is in the assertion: To see how many items are in the inner vector, we call borrow on the RefCell<Vec<String>> to get an immutable reference to the vector.
Now that you’ve seen how to use RefCell<T>, let’s dig into how it works!
Tracking Borrows at Runtime
When creating immutable and mutable references, we use the & and &mut syntax, respectively. With RefCell<T>, we use the borrow and borrow_mut methods, which are part of the safe API that belongs to RefCell<T>. The borrow method returns the smart pointer type Ref<T>, and borrow_mut returns the smart pointer type RefMut<T>. Both types implement Deref, so we can treat them like regular references.
The RefCell<T> keeps track of how many Ref<T> and RefMut<T> smart pointers are currently active. Every time we call borrow, the RefCell<T> increases its count of how many immutable borrows are active. When a Ref<T> value goes out of scope, the count of immutable borrows goes down by 1. Just like the compile-time borrowing rules, RefCell<T> lets us have many immutable borrows or one mutable borrow at any point in time.
If we try to violate these rules, rather than getting a compiler error as we would with references, the implementation of RefCell<T> will panic at runtime. Listing 15-23 shows a modification of the implementation of send in Listing 15-22. We’re deliberately trying to create two mutable borrows active for the same scope to illustrate that RefCell<T> prevents us from doing this at runtime.
pub trait Messenger {
fn send(&self, msg: &str);
}
Если у вас есть опыт работы с C или C++, вам могут вспомниться `gcc` или `clang`. После успешной компиляции Rust создаст исполняемый бинарный файл.
pub struct LimitTracker<'a, T: Messenger> {
messenger: &'a T,
value: usize,
max: usize,
}
Если у вас есть опыт работы с C или C++, вам могут вспомниться `gcc` или `clang`. После успешной компиляции Rust создаст исполняемый бинарный файл.
impl<'a, T> LimitTracker<'a, T>
where
T: Messenger,
{
pub fn new(messenger: &'a T, max: usize) -> LimitTracker<'a, T> {
LimitTracker {
messenger,
value: 0,
max,
}
}
Если у вас есть опыт работы с C или C++, вам могут вспомниться `gcc` или `clang`. После успешной компиляции Rust создаст исполняемый бинарный файл.
pub fn set_value(&mut self, value: usize) {
self.value = value;
Если у вас есть опыт работы с C или C++, вам могут вспомниться `gcc` или `clang`. После успешной компиляции Rust создаст исполняемый бинарный файл.
let percentage_of_max = self.value as f64 / self.max as f64;
Если у вас есть опыт работы с C или C++, вам могут вспомниться `gcc` или `clang`. После успешной компиляции Rust создаст исполняемый бинарный файл.
if percentage_of_max >= 1.0 {
self.messenger.send("Error: You are over your quota!");
} else if percentage_of_max >= 0.9 {
self.messenger
.send("Urgent warning: You've used up over 90% of your quota!");
} else if percentage_of_max >= 0.75 {
self.messenger
.send("Warning: You've used up over 75% of your quota!");
}
}
}
Если у вас есть опыт работы с C или C++, вам могут вспомниться `gcc` или `clang`. После успешной компиляции Rust создаст исполняемый бинарный файл.
#[cfg(test)]
mod tests {
use super::*;
use std::cell::RefCell;
Если у вас есть опыт работы с C или C++, вам могут вспомниться `gcc` или `clang`. После успешной компиляции Rust создаст исполняемый бинарный файл.
struct MockMessenger {
sent_messages: RefCell<Vec<String>>,
}
Если у вас есть опыт работы с C или C++, вам могут вспомниться `gcc` или `clang`. После успешной компиляции Rust создаст исполняемый бинарный файл.
impl MockMessenger {
fn new() -> MockMessenger {
MockMessenger {
sent_messages: RefCell::new(vec![]),
}
}
}
Если у вас есть опыт работы с C или C++, вам могут вспомниться `gcc` или `clang`. После успешной компиляции Rust создаст исполняемый бинарный файл.
impl Messenger for MockMessenger {
fn send(&self, message: &str) {
let mut one_borrow = self.sent_messages.borrow_mut();
let mut two_borrow = self.sent_messages.borrow_mut();
Если у вас есть опыт работы с C или C++, вам могут вспомниться `gcc` или `clang`. После успешной компиляции Rust создаст исполняемый бинарный файл.
one_borrow.push(String::from(message));
two_borrow.push(String::from(message));
}
}
Если у вас есть опыт работы с C или C++, вам могут вспомниться `gcc` или `clang`. После успешной компиляции Rust создаст исполняемый бинарный файл.
#[test]
fn it_sends_an_over_75_percent_warning_message() {
let mock_messenger = MockMessenger::new();
let mut limit_tracker = LimitTracker::new(&mock_messenger, 100);
Если у вас есть опыт работы с C или C++, вам могут вспомниться `gcc` или `clang`. После успешной компиляции Rust создаст исполняемый бинарный файл.
limit_tracker.set_value(80);
Если у вас есть опыт работы с C или C++, вам могут вспомниться `gcc` или `clang`. После успешной компиляции Rust создаст исполняемый бинарный файл.
assert_eq!(mock_messenger.sent_messages.borrow().len(), 1);
}
}RefCell<T> will panicWe create a variable one_borrow for the RefMut<T> smart pointer returned from borrow_mut. Then, we create another mutable borrow in the same way in the variable two_borrow. This makes two mutable references in the same scope, which isn’t allowed. When we run the tests for our library, the code in Listing 15-23 will compile without any errors, but the test will fail:
$ cargo test
Compiling limit-tracker v0.1.0 (file:///projects/limit-tracker)
Finished `test` profile [unoptimized + debuginfo] target(s) in 0.91s
Running unittests src/lib.rs (target/debug/deps/limit_tracker-e599811fa246dbde)
Если у вас есть опыт работы с C или C++, вам могут вспомниться `gcc` или `clang`. После успешной компиляции Rust создаст исполняемый бинарный файл.
running 1 test
test tests::it_sends_an_over_75_percent_warning_message ... FAILED
Если у вас есть опыт работы с C или C++, вам могут вспомниться `gcc` или `clang`. После успешной компиляции Rust создаст исполняемый бинарный файл.
failures:
Если у вас есть опыт работы с C или C++, вам могут вспомниться `gcc` или `clang`. После успешной компиляции Rust создаст исполняемый бинарный файл.
---- tests::it_sends_an_over_75_percent_warning_message stdout ----
Если у вас есть опыт работы с C или C++, вам могут вспомниться `gcc` или `clang`. После успешной компиляции Rust создаст исполняемый бинарный файл.
thread 'tests::it_sends_an_over_75_percent_warning_message' panicked at src/lib.rs:60:53:
RefCell already borrowed
note: run with `RUST_BACKTRACE=1` environment variable to display a backtrace
Если у вас есть опыт работы с C или C++, вам могут вспомниться `gcc` или `clang`. После успешной компиляции Rust создаст исполняемый бинарный файл.
Если у вас есть опыт работы с C или C++, вам могут вспомниться `gcc` или `clang`. После успешной компиляции Rust создаст исполняемый бинарный файл.
failures:
tests::it_sends_an_over_75_percent_warning_message
Если у вас есть опыт работы с C или C++, вам могут вспомниться `gcc` или `clang`. После успешной компиляции Rust создаст исполняемый бинарный файл.
test result: FAILED. 0 passed; 1 failed; 0 ignored; 0 measured; 0 filtered out; finished in 0.00s
Если у вас есть опыт работы с C или C++, вам могут вспомниться `gcc` или `clang`. После успешной компиляции Rust создаст исполняемый бинарный файл.
error: test failed, to rerun pass `--lib`
Notice that the code panicked with the message already borrowed: BorrowMutError. This is how RefCell<T> handles violations of the borrowing rules at runtime.
Choosing to catch borrowing errors at runtime rather than compile time, as we’ve done here, means you’d potentially be finding mistakes in your code later in the development process: possibly not until your code was deployed to production. Also, your code would incur a small runtime performance penalty as a result of keeping track of the borrows at runtime rather than compile time. However, using RefCell<T> makes it possible to write a mock object that can modify itself to keep track of the messages it has seen while you’re using it in a context where only immutable values are allowed. You can use RefCell<T> despite its trade-offs to get more functionality than regular references provide.
Allowing Multiple Owners of Mutable Data
A common way to use RefCell<T> is in combination with Rc<T>. Recall that Rc<T> lets you have multiple owners of some data, but it only gives immutable access to that data. If you have an Rc<T> that holds a RefCell<T>, you can get a value that can have multiple owners and that you can mutate!
For example, recall the cons list example in Listing 15-18 where we used Rc<T> to allow multiple lists to share ownership of another list. Because Rc<T> holds only immutable values, we can’t change any of the values in the list once we’ve created them. Let’s add in RefCell<T> for its ability to change the values in the lists. Listing 15-24 shows that by using a RefCell<T> in the Cons definition, we can modify the value stored in all the lists.
#[derive(Debug)]
enum List {
Cons(Rc<RefCell<i32>>, Rc<List>),
Nil,
}
Если у вас есть опыт работы с C или C++, вам могут вспомниться `gcc` или `clang`. После успешной компиляции Rust создаст исполняемый бинарный файл.
use crate::List::{Cons, Nil};
use std::cell::RefCell;
use std::rc::Rc;
Если у вас есть опыт работы с C или C++, вам могут вспомниться `gcc` или `clang`. После успешной компиляции Rust создаст исполняемый бинарный файл.
fn main() {
let value = Rc::new(RefCell::new(5));
Если у вас есть опыт работы с C или C++, вам могут вспомниться `gcc` или `clang`. После успешной компиляции Rust создаст исполняемый бинарный файл.
let a = Rc::new(Cons(Rc::clone(&value), Rc::new(Nil)));
Если у вас есть опыт работы с C или C++, вам могут вспомниться `gcc` или `clang`. После успешной компиляции Rust создаст исполняемый бинарный файл.
let b = Cons(Rc::new(RefCell::new(3)), Rc::clone(&a));
let c = Cons(Rc::new(RefCell::new(4)), Rc::clone(&a));
Если у вас есть опыт работы с C или C++, вам могут вспомниться `gcc` или `clang`. После успешной компиляции Rust создаст исполняемый бинарный файл.
*value.borrow_mut() += 10;
Если у вас есть опыт работы с C или C++, вам могут вспомниться `gcc` или `clang`. После успешной компиляции Rust создаст исполняемый бинарный файл.
println!("a after = {a:?}");
println!("b after = {b:?}");
println!("c after = {c:?}");
}Rc<RefCell<i32>> to create a List that we can mutateWe create a value that is an instance of Rc<RefCell<i32>> and store it in a variable named value so that we can access it directly later. Then, we create a List in a with a Cons variant that holds value. We need to clone value so that both a and value have ownership of the inner 5 value rather than transferring ownership from value to a or having a borrow from value.
We wrap the list a in an Rc<T> so that when we create lists b and c, they can both refer to a, which is what we did in Listing 15-18.
After we’ve created the lists in a, b, and c, we want to add 10 to the value in value. We do this by calling borrow_mut on value, which uses the automatic dereferencing feature we discussed in “Where’s the -> Operator?” in Chapter 5 to dereference the Rc<T> to the inner RefCell<T> value. The borrow_mut method returns a RefMut<T> smart pointer, and we use the dereference operator on it and change the inner value.
When we print a, b, and c, we can see that they all have the modified value of 15 rather than 5:
$ cargo run
Compiling cons-list v0.1.0 (file:///projects/cons-list)
Finished `dev` profile [unoptimized + debuginfo] target(s) in 0.63s
Running `target/debug/cons-list`
a after = Cons(RefCell { value: 15 }, Nil)
b after = Cons(RefCell { value: 3 }, Cons(RefCell { value: 15 }, Nil))
c after = Cons(RefCell { value: 4 }, Cons(RefCell { value: 15 }, Nil))
This technique is pretty neat! By using RefCell<T>, we have an outwardly immutable List value. But we can use the methods on RefCell<T> that provide access to its interior mutability so that we can modify our data when we need to. The runtime checks of the borrowing rules protect us from data races, and it’s sometimes worth trading a bit of speed for this flexibility in our data structures. Note that RefCell<T> does not work for multithreaded code! Mutex<T> is the thread-safe version of RefCell<T>, and we’ll discuss Mutex<T> in Chapter 16.
Зацикливание ссылок может вызывать утечки памяти
Зацикливание ссылок может вызывать утечки памяти
Rust’s memory safety guarantees make it difficult, but not impossible, to accidentally create memory that is never cleaned up (known as a memory leak). Preventing memory leaks entirely is not one of Rust’s guarantees, meaning memory leaks are memory safe in Rust. We can see that Rust allows memory leaks by using Rc<T> and RefCell<T>: It’s possible to create references where items refer to each other in a cycle. This creates memory leaks because the reference count of each item in the cycle will never reach 0, and the values will never be dropped.
Creating a Reference Cycle
Let’s look at how a reference cycle might happen and how to prevent it, starting with the definition of the List enum and a tail method in Listing 15-25.
use crate::List::{Cons, Nil};
use std::cell::RefCell;
use std::rc::Rc;
Если у вас есть опыт работы с C или C++, вам могут вспомниться `gcc` или `clang`. После успешной компиляции Rust создаст исполняемый бинарный файл.
#[derive(Debug)]
enum List {
Cons(i32, RefCell<Rc<List>>),
Nil,
}
Если у вас есть опыт работы с C или C++, вам могут вспомниться `gcc` или `clang`. После успешной компиляции Rust создаст исполняемый бинарный файл.
impl List {
fn tail(&self) -> Option<&RefCell<Rc<List>>> {
match self {
Cons(_, item) => Some(item),
Nil => None,
}
}
}
Если у вас есть опыт работы с C или C++, вам могут вспомниться `gcc` или `clang`. После успешной компиляции Rust создаст исполняемый бинарный файл.
fn main() {}RefCell<T> so that we can modify what a Cons variant is referring toWe’re using another variation of the List definition from Listing 15-5. The second element in the Cons variant is now RefCell<Rc<List>>, meaning that instead of having the ability to modify the i32 value as we did in Listing 15-24, we want to modify the List value a Cons variant is pointing to. We’re also adding a tail method to make it convenient for us to access the second item if we have a Cons variant.
In Listing 15-26, we’re adding a main function that uses the definitions in Listing 15-25. This code creates a list in a and a list in b that points to the list in a. Then, it modifies the list in a to point to b, creating a reference cycle. There are println! statements along the way to show what the reference counts are at various points in this process.
use crate::List::{Cons, Nil};
use std::cell::RefCell;
use std::rc::Rc;
Если у вас есть опыт работы с C или C++, вам могут вспомниться `gcc` или `clang`. После успешной компиляции Rust создаст исполняемый бинарный файл.
#[derive(Debug)]
enum List {
Cons(i32, RefCell<Rc<List>>),
Nil,
}
Если у вас есть опыт работы с C или C++, вам могут вспомниться `gcc` или `clang`. После успешной компиляции Rust создаст исполняемый бинарный файл.
impl List {
fn tail(&self) -> Option<&RefCell<Rc<List>>> {
match self {
Cons(_, item) => Some(item),
Nil => None,
}
}
}
Если у вас есть опыт работы с C или C++, вам могут вспомниться `gcc` или `clang`. После успешной компиляции Rust создаст исполняемый бинарный файл.
fn main() {
let a = Rc::new(Cons(5, RefCell::new(Rc::new(Nil))));
Если у вас есть опыт работы с C или C++, вам могут вспомниться `gcc` или `clang`. После успешной компиляции Rust создаст исполняемый бинарный файл.
println!("a initial rc count = {}", Rc::strong_count(&a));
println!("a next item = {:?}", a.tail());
Если у вас есть опыт работы с C или C++, вам могут вспомниться `gcc` или `clang`. После успешной компиляции Rust создаст исполняемый бинарный файл.
let b = Rc::new(Cons(10, RefCell::new(Rc::clone(&a))));
Если у вас есть опыт работы с C или C++, вам могут вспомниться `gcc` или `clang`. После успешной компиляции Rust создаст исполняемый бинарный файл.
println!("a rc count after b creation = {}", Rc::strong_count(&a));
println!("b initial rc count = {}", Rc::strong_count(&b));
println!("b next item = {:?}", b.tail());
Если у вас есть опыт работы с C или C++, вам могут вспомниться `gcc` или `clang`. После успешной компиляции Rust создаст исполняемый бинарный файл.
if let Some(link) = a.tail() {
*link.borrow_mut() = Rc::clone(&b);
}
Если у вас есть опыт работы с C или C++, вам могут вспомниться `gcc` или `clang`. После успешной компиляции Rust создаст исполняемый бинарный файл.
println!("b rc count after changing a = {}", Rc::strong_count(&b));
println!("a rc count after changing a = {}", Rc::strong_count(&a));
Если у вас есть опыт работы с C или C++, вам могут вспомниться `gcc` или `clang`. После успешной компиляции Rust создаст исполняемый бинарный файл.
// Uncomment the next line to see that we have a cycle;
// it will overflow the stack.
// println!("a next item = {:?}", a.tail());
}List values pointing to each otherWe create an Rc<List> instance holding a List value in the variable a with an initial list of 5, Nil. We then create an Rc<List> instance holding another List value in the variable b that contains the value 10 and points to the list in a.
We modify a so that it points to b instead of Nil, creating a cycle. We do that by using the tail method to get a reference to the RefCell<Rc<List>> in a, which we put in the variable link. Then, we use the borrow_mut method on the RefCell<Rc<List>> to change the value inside from an Rc<List> that holds a Nil value to the Rc<List> in b.
When we run this code, keeping the last println! commented out for the moment, we’ll get this output:
$ cargo run
Compiling cons-list v0.1.0 (file:///projects/cons-list)
Finished `dev` profile [unoptimized + debuginfo] target(s) in 0.53s
Running `target/debug/cons-list`
a initial rc count = 1
a next item = Some(RefCell { value: Nil })
a rc count after b creation = 2
b initial rc count = 1
b next item = Some(RefCell { value: Cons(5, RefCell { value: Nil }) })
b rc count after changing a = 2
a rc count after changing a = 2
The reference count of the Rc<List> instances in both a and b is 2 after we change the list in a to point to b. At the end of main, Rust drops the variable b, which decreases the reference count of the b Rc<List> instance from 2 to 1. The memory that Rc<List> has on the heap won’t be dropped at this point because its reference count is 1, not 0. Then, Rust drops a, which decreases the reference count of the a Rc<List> instance from 2 to 1 as well. This instance’s memory can’t be dropped either, because the other Rc<List> instance still refers to it. The memory allocated to the list will remain uncollected forever. To visualize this reference cycle, we’ve created the diagram in Figure 15-4.

Figure 15-4: A reference cycle of lists a and b pointing to each other
If you uncomment the last println! and run the program, Rust will try to print this cycle with a pointing to b pointing to a and so forth until it overflows the stack.
Compared to a real-world program, the consequences of creating a reference cycle in this example aren’t very dire: Right after we create the reference cycle, the program ends. However, if a more complex program allocated lots of memory in a cycle and held onto it for a long time, the program would use more memory than it needed and might overwhelm the system, causing it to run out of available memory.
Creating reference cycles is not easily done, but it’s not impossible either. If you have RefCell<T> values that contain Rc<T> values or similar nested combinations of types with interior mutability and reference counting, you must ensure that you don’t create cycles; you can’t rely on Rust to catch them. Creating a reference cycle would be a logic bug in your program that you should use automated tests, code reviews, and other software development practices to minimize.
Another solution for avoiding reference cycles is reorganizing your data structures so that some references express ownership and some references don’t. As a result, you can have cycles made up of some ownership relationships and some non-ownership relationships, and only the ownership relationships affect whether or not a value can be dropped. In Listing 15-25, we always want Cons variants to own their list, so reorganizing the data structure isn’t possible. Let’s look at an example using graphs made up of parent nodes and child nodes to see when non-ownership relationships are an appropriate way to prevent reference cycles.
Preventing Reference Cycles Using Weak<T>
So far, we’ve demonstrated that calling Rc::clone increases the strong_count of an Rc<T> instance, and an Rc<T> instance is only cleaned up if its strong_count is 0. You can also create a weak reference to the value within an Rc<T> instance by calling Rc::downgrade and passing a reference to the Rc<T>. Strong references are how you can share ownership of an Rc<T> instance. Weak references don’t express an ownership relationship, and their count doesn’t affect when an Rc<T> instance is cleaned up. They won’t cause a reference cycle, because any cycle involving some weak references will be broken once the strong reference count of values involved is 0.
When you call Rc::downgrade, you get a smart pointer of type Weak<T>. Instead of increasing the strong_count in the Rc<T> instance by 1, calling Rc::downgrade increases the weak_count by 1. The Rc<T> type uses weak_count to keep track of how many Weak<T> references exist, similar to strong_count. The difference is the weak_count doesn’t need to be 0 for the Rc<T> instance to be cleaned up.
Because the value that Weak<T> references might have been dropped, to do anything with the value that a Weak<T> is pointing to you must make sure the value still exists. Do this by calling the upgrade method on a Weak<T> instance, which will return an Option<Rc<T>>. You’ll get a result of Some if the Rc<T> value has not been dropped yet and a result of None if the Rc<T> value has been dropped. Because upgrade returns an Option<Rc<T>>, Rust will ensure that the Some case and the None case are handled, and there won’t be an invalid pointer.
As an example, rather than using a list whose items know only about the next item, we’ll create a tree whose items know about their child items and their parent items.
Creating a Tree Data Structure
To start, we’ll build a tree with nodes that know about their child nodes. We’ll create a struct named Node that holds its own i32 value as well as references to its child Node values:
Файл: src/main.rs
use std::cell::RefCell;
use std::rc::Rc;
Если у вас есть опыт работы с C или C++, вам могут вспомниться `gcc` или `clang`. После успешной компиляции Rust создаст исполняемый бинарный файл.
#[derive(Debug)]
struct Node {
value: i32,
children: RefCell<Vec<Rc<Node>>>,
}
Если у вас есть опыт работы с C или C++, вам могут вспомниться `gcc` или `clang`. После успешной компиляции Rust создаст исполняемый бинарный файл.
fn main() {
let leaf = Rc::new(Node {
value: 3,
children: RefCell::new(vec![]),
});
Если у вас есть опыт работы с C или C++, вам могут вспомниться `gcc` или `clang`. После успешной компиляции Rust создаст исполняемый бинарный файл.
let branch = Rc::new(Node {
value: 5,
children: RefCell::new(vec![Rc::clone(&leaf)]),
});
}We want a Node to own its children, and we want to share that ownership with variables so that we can access each Node in the tree directly. To do this, we define the Vec<T> items to be values of type Rc<Node>. We also want to modify which nodes are children of another node, so we have a RefCell<T> in children around the Vec<Rc<Node>>.
Next, we’ll use our struct definition and create one Node instance named leaf with the value 3 and no children, and another instance named branch with the value 5 and leaf as one of its children, as shown in Listing 15-27.
use std::cell::RefCell;
use std::rc::Rc;
Если у вас есть опыт работы с C или C++, вам могут вспомниться `gcc` или `clang`. После успешной компиляции Rust создаст исполняемый бинарный файл.
#[derive(Debug)]
struct Node {
value: i32,
children: RefCell<Vec<Rc<Node>>>,
}
Если у вас есть опыт работы с C или C++, вам могут вспомниться `gcc` или `clang`. После успешной компиляции Rust создаст исполняемый бинарный файл.
fn main() {
let leaf = Rc::new(Node {
value: 3,
children: RefCell::new(vec![]),
});
Если у вас есть опыт работы с C или C++, вам могут вспомниться `gcc` или `clang`. После успешной компиляции Rust создаст исполняемый бинарный файл.
let branch = Rc::new(Node {
value: 5,
children: RefCell::new(vec![Rc::clone(&leaf)]),
});
}leaf node with no children and a branch node with leaf as one of its childrenWe clone the Rc<Node> in leaf and store that in branch, meaning the Node in leaf now has two owners: leaf and branch. We can get from branch to leaf through branch.children, but there’s no way to get from leaf to branch. The reason is that leaf has no reference to branch and doesn’t know they’re related. We want leaf to know that branch is its parent. We’ll do that next.
Adding a Reference from a Child to Its Parent
To make the child node aware of its parent, we need to add a parent field to our Node struct definition. The trouble is in deciding what the type of parent should be. We know it can’t contain an Rc<T>, because that would create a reference cycle with leaf.parent pointing to branch and branch.children pointing to leaf, which would cause their strong_count values to never be 0.
Thinking about the relationships another way, a parent node should own its children: If a parent node is dropped, its child nodes should be dropped as well. However, a child should not own its parent: If we drop a child node, the parent should still exist. This is a case for weak references!
So, instead of Rc<T>, we’ll make the type of parent use Weak<T>, specifically a RefCell<Weak<Node>>. Now our Node struct definition looks like this:
Файл: src/main.rs
use std::cell::RefCell;
use std::rc::{Rc, Weak};
Если у вас есть опыт работы с C или C++, вам могут вспомниться `gcc` или `clang`. После успешной компиляции Rust создаст исполняемый бинарный файл.
#[derive(Debug)]
struct Node {
value: i32,
parent: RefCell<Weak<Node>>,
children: RefCell<Vec<Rc<Node>>>,
}
Если у вас есть опыт работы с C или C++, вам могут вспомниться `gcc` или `clang`. После успешной компиляции Rust создаст исполняемый бинарный файл.
fn main() {
let leaf = Rc::new(Node {
value: 3,
parent: RefCell::new(Weak::new()),
children: RefCell::new(vec![]),
});
Если у вас есть опыт работы с C или C++, вам могут вспомниться `gcc` или `clang`. После успешной компиляции Rust создаст исполняемый бинарный файл.
println!("leaf parent = {:?}", leaf.parent.borrow().upgrade());
Если у вас есть опыт работы с C или C++, вам могут вспомниться `gcc` или `clang`. После успешной компиляции Rust создаст исполняемый бинарный файл.
let branch = Rc::new(Node {
value: 5,
parent: RefCell::new(Weak::new()),
children: RefCell::new(vec![Rc::clone(&leaf)]),
});
Если у вас есть опыт работы с C или C++, вам могут вспомниться `gcc` или `clang`. После успешной компиляции Rust создаст исполняемый бинарный файл.
*leaf.parent.borrow_mut() = Rc::downgrade(&branch);
Если у вас есть опыт работы с C или C++, вам могут вспомниться `gcc` или `clang`. После успешной компиляции Rust создаст исполняемый бинарный файл.
println!("leaf parent = {:?}", leaf.parent.borrow().upgrade());
}A node will be able to refer to its parent node but doesn’t own its parent. In Listing 15-28, we update main to use this new definition so that the leaf node will have a way to refer to its parent, branch.
use std::cell::RefCell;
use std::rc::{Rc, Weak};
Если у вас есть опыт работы с C или C++, вам могут вспомниться `gcc` или `clang`. После успешной компиляции Rust создаст исполняемый бинарный файл.
#[derive(Debug)]
struct Node {
value: i32,
parent: RefCell<Weak<Node>>,
children: RefCell<Vec<Rc<Node>>>,
}
Если у вас есть опыт работы с C или C++, вам могут вспомниться `gcc` или `clang`. После успешной компиляции Rust создаст исполняемый бинарный файл.
fn main() {
let leaf = Rc::new(Node {
value: 3,
parent: RefCell::new(Weak::new()),
children: RefCell::new(vec![]),
});
Если у вас есть опыт работы с C или C++, вам могут вспомниться `gcc` или `clang`. После успешной компиляции Rust создаст исполняемый бинарный файл.
println!("leaf parent = {:?}", leaf.parent.borrow().upgrade());
Если у вас есть опыт работы с C или C++, вам могут вспомниться `gcc` или `clang`. После успешной компиляции Rust создаст исполняемый бинарный файл.
let branch = Rc::new(Node {
value: 5,
parent: RefCell::new(Weak::new()),
children: RefCell::new(vec![Rc::clone(&leaf)]),
});
Если у вас есть опыт работы с C или C++, вам могут вспомниться `gcc` или `clang`. После успешной компиляции Rust создаст исполняемый бинарный файл.
*leaf.parent.borrow_mut() = Rc::downgrade(&branch);
Если у вас есть опыт работы с C или C++, вам могут вспомниться `gcc` или `clang`. После успешной компиляции Rust создаст исполняемый бинарный файл.
println!("leaf parent = {:?}", leaf.parent.borrow().upgrade());
}leaf node with a weak reference to its parent node, branchCreating the leaf node looks similar to Listing 15-27 with the exception of the parent field: leaf starts out without a parent, so we create a new, empty Weak<Node> reference instance.
At this point, when we try to get a reference to the parent of leaf by using the upgrade method, we get a None value. We see this in the output from the first println! statement:
leaf parent = None
When we create the branch node, it will also have a new Weak<Node> reference in the parent field because branch doesn’t have a parent node. We still have leaf as one of the children of branch. Once we have the Node instance in branch, we can modify leaf to give it a Weak<Node> reference to its parent. We use the borrow_mut method on the RefCell<Weak<Node>> in the parent field of leaf, and then we use the Rc::downgrade function to create a Weak<Node> reference to branch from the Rc<Node> in branch.
When we print the parent of leaf again, this time we’ll get a Some variant holding branch: Now leaf can access its parent! When we print leaf, we also avoid the cycle that eventually ended in a stack overflow like we had in Listing 15-26; the Weak<Node> references are printed as (Weak):
leaf parent = Some(Node { value: 5, parent: RefCell { value: (Weak) },
children: RefCell { value: [Node { value: 3, parent: RefCell { value: (Weak) },
children: RefCell { value: [] } }] } })
The lack of infinite output indicates that this code didn’t create a reference cycle. We can also tell this by looking at the values we get from calling Rc::strong_count and Rc::weak_count.
Visualizing Changes to strong_count and weak_count
Let’s look at how the strong_count and weak_count values of the Rc<Node> instances change by creating a new inner scope and moving the creation of branch into that scope. By doing so, we can see what happens when branch is created and then dropped when it goes out of scope. The modifications are shown in Listing 15-29.
use std::cell::RefCell;
use std::rc::{Rc, Weak};
Если у вас есть опыт работы с C или C++, вам могут вспомниться `gcc` или `clang`. После успешной компиляции Rust создаст исполняемый бинарный файл.
#[derive(Debug)]
struct Node {
value: i32,
parent: RefCell<Weak<Node>>,
children: RefCell<Vec<Rc<Node>>>,
}
Если у вас есть опыт работы с C или C++, вам могут вспомниться `gcc` или `clang`. После успешной компиляции Rust создаст исполняемый бинарный файл.
fn main() {
let leaf = Rc::new(Node {
value: 3,
parent: RefCell::new(Weak::new()),
children: RefCell::new(vec![]),
});
Если у вас есть опыт работы с C или C++, вам могут вспомниться `gcc` или `clang`. После успешной компиляции Rust создаст исполняемый бинарный файл.
println!(
"leaf strong = {}, weak = {}",
Rc::strong_count(&leaf),
Rc::weak_count(&leaf),
);
Если у вас есть опыт работы с C или C++, вам могут вспомниться `gcc` или `clang`. После успешной компиляции Rust создаст исполняемый бинарный файл.
{
let branch = Rc::new(Node {
value: 5,
parent: RefCell::new(Weak::new()),
children: RefCell::new(vec![Rc::clone(&leaf)]),
});
Если у вас есть опыт работы с C или C++, вам могут вспомниться `gcc` или `clang`. После успешной компиляции Rust создаст исполняемый бинарный файл.
*leaf.parent.borrow_mut() = Rc::downgrade(&branch);
Если у вас есть опыт работы с C или C++, вам могут вспомниться `gcc` или `clang`. После успешной компиляции Rust создаст исполняемый бинарный файл.
println!(
"branch strong = {}, weak = {}",
Rc::strong_count(&branch),
Rc::weak_count(&branch),
);
Если у вас есть опыт работы с C или C++, вам могут вспомниться `gcc` или `clang`. После успешной компиляции Rust создаст исполняемый бинарный файл.
println!(
"leaf strong = {}, weak = {}",
Rc::strong_count(&leaf),
Rc::weak_count(&leaf),
);
}
Если у вас есть опыт работы с C или C++, вам могут вспомниться `gcc` или `clang`. После успешной компиляции Rust создаст исполняемый бинарный файл.
println!("leaf parent = {:?}", leaf.parent.borrow().upgrade());
println!(
"leaf strong = {}, weak = {}",
Rc::strong_count(&leaf),
Rc::weak_count(&leaf),
);
}branch in an inner scope and examining strong and weak reference countsAfter leaf is created, its Rc<Node> has a strong count of 1 and a weak count of 0. In the inner scope, we create branch and associate it with leaf, at which point when we print the counts, the Rc<Node> in branch will have a strong count of 1 and a weak count of 1 (for leaf.parent pointing to branch with a Weak<Node>). When we print the counts in leaf, we’ll see it will have a strong count of 2 because branch now has a clone of the Rc<Node> of leaf stored in branch.children but will still have a weak count of 0.
When the inner scope ends, branch goes out of scope and the strong count of the Rc<Node> decreases to 0, so its Node is dropped. The weak count of 1 from leaf.parent has no bearing on whether or not Node is dropped, so we don’t get any memory leaks!
If we try to access the parent of leaf after the end of the scope, we’ll get None again. At the end of the program, the Rc<Node> in leaf has a strong count of 1 and a weak count of 0 because the variable leaf is now the only reference to the Rc<Node> again.
All of the logic that manages the counts and value dropping is built into Rc<T> and Weak<T> and their implementations of the Drop trait. By specifying that the relationship from a child to its parent should be a Weak<T> reference in the definition of Node, you’re able to have parent nodes point to child nodes and vice versa without creating a reference cycle and memory leaks.
Подведём итоги
This chapter covered how to use smart pointers to make different guarantees and trade-offs from those Rust makes by default with regular references. The Box<T> type has a known size and points to data allocated on the heap. The Rc<T> type keeps track of the number of references to data on the heap so that the data can have multiple owners. The RefCell<T> type with its interior mutability gives us a type that we can use when we need an immutable type but need to change an inner value of that type; it also enforces the borrowing rules at runtime instead of at compile time.
Also discussed were the Deref and Drop traits, which enable a lot of the functionality of smart pointers. We explored reference cycles that can cause memory leaks and how to prevent them using Weak<T>.
If this chapter has piqued your interest and you want to implement your own smart pointers, check out “The Rustonomicon” for more useful information.
Next, we’ll talk about concurrency in Rust. You’ll even learn about a few new smart pointers.
Безбоязненный параллелизм
Handling concurrent programming safely and efficiently is another of Rust’s major goals. Concurrent programming, in which different parts of a program execute independently, and parallel programming, in which different parts of a program execute at the same time, are becoming increasingly important as more computers take advantage of their multiple processors. Historically, programming in these contexts has been difficult and error-prone. Rust hopes to change that.
Initially, the Rust team thought that ensuring memory safety and preventing concurrency problems were two separate challenges to be solved with different methods. Over time, the team discovered that the ownership and type systems are a powerful set of tools to help manage memory safety and concurrency problems! By leveraging ownership and type checking, many concurrency errors are compile-time errors in Rust rather than runtime errors. Therefore, rather than making you spend lots of time trying to reproduce the exact circumstances under which a runtime concurrency bug occurs, incorrect code will refuse to compile and present an error explaining the problem. As a result, you can fix your code while you’re working on it rather than potentially after it has been shipped to production. We’ve nicknamed this aspect of Rust fearless concurrency. Fearless concurrency allows you to write code that is free of subtle bugs and is easy to refactor without introducing new bugs.
Note: For simplicity’s sake, we’ll refer to many of the problems as concurrent rather than being more precise by saying concurrent and/or parallel. For this chapter, please mentally substitute concurrent and/or parallel whenever we use concurrent. In the next chapter, where the distinction matters more, we’ll be more specific.
Many languages are dogmatic about the solutions they offer for handling concurrent problems. For example, Erlang has elegant functionality for message-passing concurrency but has only obscure ways to share state between threads. Supporting only a subset of possible solutions is a reasonable strategy for higher-level languages because a higher-level language promises benefits from giving up some control to gain abstractions. However, lower-level languages are expected to provide the solution with the best performance in any given situation and have fewer abstractions over the hardware. Therefore, Rust offers a variety of tools for modeling problems in whatever way is appropriate for your situation and requirements.
Here are the topics we’ll cover in this chapter:
- How to create threads to run multiple pieces of code at the same time
- Message-passing concurrency, where channels send messages between threads
- Shared-state concurrency, where multiple threads have access to some piece of data
- The
SyncandSendtraits, which extend Rust’s concurrency guarantees to user-defined types as well as types provided by the standard library
Использование потоков для одновременного запуска кода
Использование потоков для одновременного запуска кода
In most current operating systems, an executed program’s code is run in a process, and the operating system will manage multiple processes at once. Within a program, you can also have independent parts that run simultaneously. The features that run these independent parts are called threads. For example, a web server could have multiple threads so that it can respond to more than one request at the same time.
Splitting the computation in your program into multiple threads to run multiple tasks at the same time can improve performance, but it also adds complexity. Because threads can run simultaneously, there’s no inherent guarantee about the order in which parts of your code on different threads will run. This can lead to problems, such as:
- Race conditions, in which threads are accessing data or resources in an inconsistent order
- Deadlocks, in which two threads are waiting for each other, preventing both threads from continuing
- Bugs that only happen in certain situations and are hard to reproduce and fix reliably
Rust attempts to mitigate the negative effects of using threads, but programming in a multithreaded context still takes careful thought and requires a code structure that is different from that in programs running in a single thread.
Programming languages implement threads in a few different ways, and many operating systems provide an API the programming language can call for creating new threads. The Rust standard library uses a 1:1 model of thread implementation, whereby a program uses one operating system thread per one language thread. There are crates that implement other models of threading that make different trade-offs to the 1:1 model. (Rust’s async system, which we will see in the next chapter, provides another approach to concurrency as well.)
Creating a New Thread with spawn
To create a new thread, we call the thread::spawn function and pass it a closure (we talked about closures in Chapter 13) containing the code we want to run in the new thread. The example in Listing 16-1 prints some text from a main thread and other text from a new thread.
use std::thread;
use std::time::Duration;
Если у вас есть опыт работы с C или C++, вам могут вспомниться `gcc` или `clang`. После успешной компиляции Rust создаст исполняемый бинарный файл.
fn main() {
thread::spawn(|| {
for i in 1..10 {
println!("hi number {i} from the spawned thread!");
thread::sleep(Duration::from_millis(1));
}
});
Если у вас есть опыт работы с C или C++, вам могут вспомниться `gcc` или `clang`. После успешной компиляции Rust создаст исполняемый бинарный файл.
for i in 1..5 {
println!("hi number {i} from the main thread!");
thread::sleep(Duration::from_millis(1));
}
}Note that when the main thread of a Rust program completes, all spawned threads are shut down, whether or not they have finished running. The output from this program might be a little different every time, but it will look similar to the following:
hi number 1 from the main thread!
hi number 1 from the spawned thread!
hi number 2 from the main thread!
hi number 2 from the spawned thread!
hi number 3 from the main thread!
hi number 3 from the spawned thread!
hi number 4 from the main thread!
hi number 4 from the spawned thread!
hi number 5 from the spawned thread!
The calls to thread::sleep force a thread to stop its execution for a short duration, allowing a different thread to run. The threads will probably take turns, but that isn’t guaranteed: It depends on how your operating system schedules the threads. In this run, the main thread printed first, even though the print statement from the spawned thread appears first in the code. And even though we told the spawned thread to print until i is 9, it only got to 5 before the main thread shut down.
If you run this code and only see output from the main thread, or don’t see any overlap, try increasing the numbers in the ranges to create more opportunities for the operating system to switch between the threads.
Waiting for All Threads to Finish
The code in Listing 16-1 not only stops the spawned thread prematurely most of the time due to the main thread ending, but because there is no guarantee on the order in which threads run, we also can’t guarantee that the spawned thread will get to run at all!
We can fix the problem of the spawned thread not running or of it ending prematurely by saving the return value of thread::spawn in a variable. The return type of thread::spawn is JoinHandle<T>. A JoinHandle<T> is an owned value that, when we call the join method on it, will wait for its thread to finish. Listing 16-2 shows how to use the JoinHandle<T> of the thread we created in Listing 16-1 and how to call join to make sure the spawned thread finishes before main exits.
use std::thread;
use std::time::Duration;
Если у вас есть опыт работы с C или C++, вам могут вспомниться `gcc` или `clang`. После успешной компиляции Rust создаст исполняемый бинарный файл.
fn main() {
let handle = thread::spawn(|| {
for i in 1..10 {
println!("hi number {i} from the spawned thread!");
thread::sleep(Duration::from_millis(1));
}
});
Если у вас есть опыт работы с C или C++, вам могут вспомниться `gcc` или `clang`. После успешной компиляции Rust создаст исполняемый бинарный файл.
for i in 1..5 {
println!("hi number {i} from the main thread!");
thread::sleep(Duration::from_millis(1));
}
Если у вас есть опыт работы с C или C++, вам могут вспомниться `gcc` или `clang`. После успешной компиляции Rust создаст исполняемый бинарный файл.
handle.join().unwrap();
}JoinHandle<T> from thread::spawn to guarantee the thread is run to completionCalling join on the handle blocks the thread currently running until the thread represented by the handle terminates. Blocking a thread means that thread is prevented from performing work or exiting. Because we’ve put the call to join after the main thread’s for loop, running Listing 16-2 should produce output similar to this:
hi number 1 from the main thread!
hi number 2 from the main thread!
hi number 1 from the spawned thread!
hi number 3 from the main thread!
hi number 2 from the spawned thread!
hi number 4 from the main thread!
hi number 3 from the spawned thread!
hi number 4 from the spawned thread!
hi number 5 from the spawned thread!
hi number 6 from the spawned thread!
hi number 7 from the spawned thread!
hi number 8 from the spawned thread!
hi number 9 from the spawned thread!
The two threads continue alternating, but the main thread waits because of the call to handle.join() and does not end until the spawned thread is finished.
But let’s see what happens when we instead move handle.join() before the for loop in main, like this:
use std::thread;
use std::time::Duration;
Если у вас есть опыт работы с C или C++, вам могут вспомниться `gcc` или `clang`. После успешной компиляции Rust создаст исполняемый бинарный файл.
fn main() {
let handle = thread::spawn(|| {
for i in 1..10 {
println!("hi number {i} from the spawned thread!");
thread::sleep(Duration::from_millis(1));
}
});
Если у вас есть опыт работы с C или C++, вам могут вспомниться `gcc` или `clang`. После успешной компиляции Rust создаст исполняемый бинарный файл.
handle.join().unwrap();
Если у вас есть опыт работы с C или C++, вам могут вспомниться `gcc` или `clang`. После успешной компиляции Rust создаст исполняемый бинарный файл.
for i in 1..5 {
println!("hi number {i} from the main thread!");
thread::sleep(Duration::from_millis(1));
}
}The main thread will wait for the spawned thread to finish and then run its for loop, so the output won’t be interleaved anymore, as shown here:
hi number 1 from the spawned thread!
hi number 2 from the spawned thread!
hi number 3 from the spawned thread!
hi number 4 from the spawned thread!
hi number 5 from the spawned thread!
hi number 6 from the spawned thread!
hi number 7 from the spawned thread!
hi number 8 from the spawned thread!
hi number 9 from the spawned thread!
hi number 1 from the main thread!
hi number 2 from the main thread!
hi number 3 from the main thread!
hi number 4 from the main thread!
Small details, such as where join is called, can affect whether or not your threads run at the same time.
Using move Closures with Threads
We’ll often use the move keyword with closures passed to thread::spawn because the closure will then take ownership of the values it uses from the environment, thus transferring ownership of those values from one thread to another. In “Capturing References or Moving Ownership” in Chapter 13, we discussed move in the context of closures. Now we’ll concentrate more on the interaction between move and thread::spawn.
Notice in Listing 16-1 that the closure we pass to thread::spawn takes no arguments: We’re not using any data from the main thread in the spawned thread’s code. To use data from the main thread in the spawned thread, the spawned thread’s closure must capture the values it needs. Listing 16-3 shows an attempt to create a vector in the main thread and use it in the spawned thread. However, this won’t work yet, as you’ll see in a moment.
use std::thread;
Если у вас есть опыт работы с C или C++, вам могут вспомниться `gcc` или `clang`. После успешной компиляции Rust создаст исполняемый бинарный файл.
fn main() {
let v = vec![1, 2, 3];
Если у вас есть опыт работы с C или C++, вам могут вспомниться `gcc` или `clang`. После успешной компиляции Rust создаст исполняемый бинарный файл.
let handle = thread::spawn(|| {
println!("Here's a vector: {v:?}");
});
Если у вас есть опыт работы с C или C++, вам могут вспомниться `gcc` или `clang`. После успешной компиляции Rust создаст исполняемый бинарный файл.
handle.join().unwrap();
}The closure uses v, so it will capture v and make it part of the closure’s environment. Because thread::spawn runs this closure in a new thread, we should be able to access v inside that new thread. But when we compile this example, we get the following error:
$ cargo run
Compiling threads v0.1.0 (file:///projects/threads)
error[E0373]: closure may outlive the current function, but it borrows `v`, which is owned by the current function
--> src/main.rs:6:32
|
6 | let handle = thread::spawn(|| {
| ^^ may outlive borrowed value `v`
7 | println!("Here's a vector: {v:?}");
| - `v` is borrowed here
|
note: function requires argument type to outlive `'static`
--> src/main.rs:6:18
|
6 | let handle = thread::spawn(|| {
| __________________^
7 | | println!("Here's a vector: {v:?}");
8 | | });
| |______^
help: to force the closure to take ownership of `v` (and any other referenced variables), use the `move` keyword
|
6 | let handle = thread::spawn(move || {
| ++++
Если у вас есть опыт работы с C или C++, вам могут вспомниться `gcc` или `clang`. После успешной компиляции Rust создаст исполняемый бинарный файл.
For more information about this error, try `rustc --explain E0373`.
error: could not compile `threads` (bin "threads") due to 1 previous error
Rust infers how to capture v, and because println! only needs a reference to v, the closure tries to borrow v. However, there’s a problem: Rust can’t tell how long the spawned thread will run, so it doesn’t know whether the reference to v will always be valid.
Listing 16-4 provides a scenario that’s more likely to have a reference to v that won’t be valid.
use std::thread;
Если у вас есть опыт работы с C или C++, вам могут вспомниться `gcc` или `clang`. После успешной компиляции Rust создаст исполняемый бинарный файл.
fn main() {
let v = vec![1, 2, 3];
Если у вас есть опыт работы с C или C++, вам могут вспомниться `gcc` или `clang`. После успешной компиляции Rust создаст исполняемый бинарный файл.
let handle = thread::spawn(|| {
println!("Here's a vector: {v:?}");
});
Если у вас есть опыт работы с C или C++, вам могут вспомниться `gcc` или `clang`. После успешной компиляции Rust создаст исполняемый бинарный файл.
drop(v); // oh no!
Если у вас есть опыт работы с C или C++, вам могут вспомниться `gcc` или `clang`. После успешной компиляции Rust создаст исполняемый бинарный файл.
handle.join().unwrap();
}v from a main thread that drops vIf Rust allowed us to run this code, there’s a possibility that the spawned thread would be immediately put in the background without running at all. The spawned thread has a reference to v inside, but the main thread immediately drops v, using the drop function we discussed in Chapter 15. Then, when the spawned thread starts to execute, v is no longer valid, so a reference to it is also invalid. Oh no!
To fix the compiler error in Listing 16-3, we can use the error message’s advice:
help: to force the closure to take ownership of `v` (and any other referenced variables), use the `move` keyword
|
6 | let handle = thread::spawn(move || {
| ++++
By adding the move keyword before the closure, we force the closure to take ownership of the values it’s using rather than allowing Rust to infer that it should borrow the values. The modification to Listing 16-3 shown in Listing 16-5 will compile and run as we intend.
use std::thread;
Если у вас есть опыт работы с C или C++, вам могут вспомниться `gcc` или `clang`. После успешной компиляции Rust создаст исполняемый бинарный файл.
fn main() {
let v = vec![1, 2, 3];
Если у вас есть опыт работы с C или C++, вам могут вспомниться `gcc` или `clang`. После успешной компиляции Rust создаст исполняемый бинарный файл.
let handle = thread::spawn(move || {
println!("Here's a vector: {v:?}");
});
Если у вас есть опыт работы с C или C++, вам могут вспомниться `gcc` или `clang`. После успешной компиляции Rust создаст исполняемый бинарный файл.
handle.join().unwrap();
}move keyword to force a closure to take ownership of the values it usesWe might be tempted to try the same thing to fix the code in Listing 16-4 where the main thread called drop by using a move closure. However, this fix will not work because what Listing 16-4 is trying to do is disallowed for a different reason. If we added move to the closure, we would move v into the closure’s environment, and we could no longer call drop on it in the main thread. We would get this compiler error instead:
$ cargo run
Compiling threads v0.1.0 (file:///projects/threads)
error[E0382]: use of moved value: `v`
--> src/main.rs:10:10
|
4 | let v = vec![1, 2, 3];
| - move occurs because `v` has type `Vec<i32>`, which does not implement the `Copy` trait
5 |
6 | let handle = thread::spawn(move || {
| ------- value moved into closure here
7 | println!("Here's a vector: {v:?}");
| - variable moved due to use in closure
...
10 | drop(v); // oh no!
| ^ value used here after move
|
help: consider cloning the value before moving it into the closure
|
6 ~ let value = v.clone();
7 ~ let handle = thread::spawn(move || {
8 ~ println!("Here's a vector: {value:?}");
|
Если у вас есть опыт работы с C или C++, вам могут вспомниться `gcc` или `clang`. После успешной компиляции Rust создаст исполняемый бинарный файл.
For more information about this error, try `rustc --explain E0382`.
error: could not compile `threads` (bin "threads") due to 1 previous error
Rust’s ownership rules have saved us again! We got an error from the code in Listing 16-3 because Rust was being conservative and only borrowing v for the thread, which meant the main thread could theoretically invalidate the spawned thread’s reference. By telling Rust to move ownership of v to the spawned thread, we’re guaranteeing to Rust that the main thread won’t use v anymore. If we change Listing 16-4 in the same way, we’re then violating the ownership rules when we try to use v in the main thread. The move keyword overrides Rust’s conservative default of borrowing; it doesn’t let us violate the ownership rules.
Now that we’ve covered what threads are and the methods supplied by the thread API, let’s look at some situations in which we can use threads.
Transfer Data Between Threads with Message Passing
Transfer Data Between Threads with Message Passing
One increasingly popular approach to ensuring safe concurrency is message passing, where threads or actors communicate by sending each other messages containing data. Here’s the idea in a slogan from the Go language documentation: “Do not communicate by sharing memory; instead, share memory by communicating.”
To accomplish message-sending concurrency, Rust’s standard library provides an implementation of channels. A channel is a general programming concept by which data is sent from one thread to another.
You can imagine a channel in programming as being like a directional channel of water, such as a stream or a river. If you put something like a rubber duck into a river, it will travel downstream to the end of the waterway.
A channel has two halves: a transmitter and a receiver. The transmitter half is the upstream location where you put the rubber duck into the river, and the receiver half is where the rubber duck ends up downstream. One part of your code calls methods on the transmitter with the data you want to send, and another part checks the receiving end for arriving messages. A channel is said to be closed if either the transmitter or receiver half is dropped.
Here, we’ll work up to a program that has one thread to generate values and send them down a channel, and another thread that will receive the values and print them out. We’ll be sending simple values between threads using a channel to illustrate the feature. Once you’re familiar with the technique, you could use channels for any threads that need to communicate with each other, such as a chat system or a system where many threads perform parts of a calculation and send the parts to one thread that aggregates the results.
First, in Listing 16-6, we’ll create a channel but not do anything with it. Note that this won’t compile yet because Rust can’t tell what type of values we want to send over the channel.
use std::sync::mpsc;
Если у вас есть опыт работы с C или C++, вам могут вспомниться `gcc` или `clang`. После успешной компиляции Rust создаст исполняемый бинарный файл.
fn main() {
let (tx, rx) = mpsc::channel();
}tx and rxWe create a new channel using the mpsc::channel function; mpsc stands for multiple producer, single consumer. In short, the way Rust’s standard library implements channels means a channel can have multiple sending ends that produce values but only one receiving end that consumes those values. Imagine multiple streams flowing together into one big river: Everything sent down any of the streams will end up in one river at the end. We’ll start with a single producer for now, but we’ll add multiple producers when we get this example working.
The mpsc::channel function returns a tuple, the first element of which is the sending end—the transmitter—and the second element of which is the receiving end—the receiver. The abbreviations tx and rx are traditionally used in many fields for transmitter and receiver, respectively, so we name our variables as such to indicate each end. We’re using a let statement with a pattern that destructures the tuples; we’ll discuss the use of patterns in let statements and destructuring in Chapter 19. For now, know that using a let statement in this way is a convenient approach to extract the pieces of the tuple returned by mpsc::channel.
Let’s move the transmitting end into a spawned thread and have it send one string so that the spawned thread is communicating with the main thread, as shown in Listing 16-7. This is like putting a rubber duck in the river upstream or sending a chat message from one thread to another.
use std::sync::mpsc;
use std::thread;
Если у вас есть опыт работы с C или C++, вам могут вспомниться `gcc` или `clang`. После успешной компиляции Rust создаст исполняемый бинарный файл.
fn main() {
let (tx, rx) = mpsc::channel();
Если у вас есть опыт работы с C или C++, вам могут вспомниться `gcc` или `clang`. После успешной компиляции Rust создаст исполняемый бинарный файл.
thread::spawn(move || {
let val = String::from("hi");
tx.send(val).unwrap();
});
}tx to a spawned thread and sending "hi"Again, we’re using thread::spawn to create a new thread and then using move to move tx into the closure so that the spawned thread owns tx. The spawned thread needs to own the transmitter to be able to send messages through the channel.
The transmitter has a send method that takes the value we want to send. The send method returns a Result<T, E> type, so if the receiver has already been dropped and there’s nowhere to send a value, the send operation will return an error. In this example, we’re calling unwrap to panic in case of an error. But in a real application, we would handle it properly: Return to Chapter 9 to review strategies for proper error handling.
In Listing 16-8, we’ll get the value from the receiver in the main thread. This is like retrieving the rubber duck from the water at the end of the river or receiving a chat message.
use std::sync::mpsc;
use std::thread;
Если у вас есть опыт работы с C или C++, вам могут вспомниться `gcc` или `clang`. После успешной компиляции Rust создаст исполняемый бинарный файл.
fn main() {
let (tx, rx) = mpsc::channel();
Если у вас есть опыт работы с C или C++, вам могут вспомниться `gcc` или `clang`. После успешной компиляции Rust создаст исполняемый бинарный файл.
thread::spawn(move || {
let val = String::from("hi");
tx.send(val).unwrap();
});
Если у вас есть опыт работы с C или C++, вам могут вспомниться `gcc` или `clang`. После успешной компиляции Rust создаст исполняемый бинарный файл.
let received = rx.recv().unwrap();
println!("Got: {received}");
}"hi" in the main thread and printing itThe receiver has two useful methods: recv and try_recv. We’re using recv, short for receive, which will block the main thread’s execution and wait until a value is sent down the channel. Once a value is sent, recv will return it in a Result<T, E>. When the transmitter closes, recv will return an error to signal that no more values will be coming.
The try_recv method doesn’t block, but will instead return a Result<T, E> immediately: an Ok value holding a message if one is available and an Err value if there aren’t any messages this time. Using try_recv is useful if this thread has other work to do while waiting for messages: We could write a loop that calls try_recv every so often, handles a message if one is available, and otherwise does other work for a little while until checking again.
We’ve used recv in this example for simplicity; we don’t have any other work for the main thread to do other than wait for messages, so blocking the main thread is appropriate.
When we run the code in Listing 16-8, we’ll see the value printed from the main thread:
Got: hi
Perfect!
Transferring Ownership Through Channels
The ownership rules play a vital role in message sending because they help you write safe, concurrent code. Preventing errors in concurrent programming is the advantage of thinking about ownership throughout your Rust programs. Let’s do an experiment to show how channels and ownership work together to prevent problems: We’ll try to use a val value in the spawned thread after we’ve sent it down the channel. Try compiling the code in Listing 16-9 to see why this code isn’t allowed.
use std::sync::mpsc;
use std::thread;
Если у вас есть опыт работы с C или C++, вам могут вспомниться `gcc` или `clang`. После успешной компиляции Rust создаст исполняемый бинарный файл.
fn main() {
let (tx, rx) = mpsc::channel();
Если у вас есть опыт работы с C или C++, вам могут вспомниться `gcc` или `clang`. После успешной компиляции Rust создаст исполняемый бинарный файл.
thread::spawn(move || {
let val = String::from("hi");
tx.send(val).unwrap();
println!("val is {val}");
});
Если у вас есть опыт работы с C или C++, вам могут вспомниться `gcc` или `clang`. После успешной компиляции Rust создаст исполняемый бинарный файл.
let received = rx.recv().unwrap();
println!("Got: {received}");
}val after we’ve sent it down the channelHere, we try to print val after we’ve sent it down the channel via tx.send. Allowing this would be a bad idea: Once the value has been sent to another thread, that thread could modify or drop it before we try to use the value again. Potentially, the other thread’s modifications could cause errors or unexpected results due to inconsistent or nonexistent data. However, Rust gives us an error if we try to compile the code in Listing 16-9:
$ cargo run
Compiling message-passing v0.1.0 (file:///projects/message-passing)
error[E0382]: borrow of moved value: `val`
--> src/main.rs:10:27
|
8 | let val = String::from("hi");
| --- move occurs because `val` has type `String`, which does not implement the `Copy` trait
9 | tx.send(val).unwrap();
| --- value moved here
10 | println!("val is {val}");
| ^^^ value borrowed here after move
|
= note: this error originates in the macro `$crate::format_args_nl` which comes from the expansion of the macro `println` (in Nightly builds, run with -Z macro-backtrace for more info)
Если у вас есть опыт работы с C или C++, вам могут вспомниться `gcc` или `clang`. После успешной компиляции Rust создаст исполняемый бинарный файл.
For more information about this error, try `rustc --explain E0382`.
error: could not compile `message-passing` (bin "message-passing") due to 1 previous error
Our concurrency mistake has caused a compile-time error. The send function takes ownership of its parameter, and when the value is moved the receiver takes ownership of it. This stops us from accidentally using the value again after sending it; the ownership system checks that everything is okay.
Sending Multiple Values
The code in Listing 16-8 compiled and ran, but it didn’t clearly show us that two separate threads were talking to each other over the channel.
In Listing 16-10, we’ve made some modifications that will prove the code in Listing 16-8 is running concurrently: The spawned thread will now send multiple messages and pause for a second between each message.
use std::sync::mpsc;
use std::thread;
use std::time::Duration;
Если у вас есть опыт работы с C или C++, вам могут вспомниться `gcc` или `clang`. После успешной компиляции Rust создаст исполняемый бинарный файл.
fn main() {
let (tx, rx) = mpsc::channel();
Если у вас есть опыт работы с C или C++, вам могут вспомниться `gcc` или `clang`. После успешной компиляции Rust создаст исполняемый бинарный файл.
thread::spawn(move || {
let vals = vec![
String::from("hi"),
String::from("from"),
String::from("the"),
String::from("thread"),
];
Если у вас есть опыт работы с C или C++, вам могут вспомниться `gcc` или `clang`. После успешной компиляции Rust создаст исполняемый бинарный файл.
for val in vals {
tx.send(val).unwrap();
thread::sleep(Duration::from_secs(1));
}
});
Если у вас есть опыт работы с C или C++, вам могут вспомниться `gcc` или `clang`. После успешной компиляции Rust создаст исполняемый бинарный файл.
for received in rx {
println!("Got: {received}");
}
}This time, the spawned thread has a vector of strings that we want to send to the main thread. We iterate over them, sending each individually, and pause between each by calling the thread::sleep function with a Duration value of one second.
In the main thread, we’re not calling the recv function explicitly anymore: Instead, we’re treating rx as an iterator. For each value received, we’re printing it. When the channel is closed, iteration will end.
When running the code in Listing 16-10, you should see the following output with a one-second pause in between each line:
Got: hi
Got: from
Got: the
Got: thread
Because we don’t have any code that pauses or delays in the for loop in the main thread, we can tell that the main thread is waiting to receive values from the spawned thread.
Creating Multiple Producers
Earlier we mentioned that mpsc was an acronym for multiple producer, single consumer. Let’s put mpsc to use and expand the code in Listing 16-10 to create multiple threads that all send values to the same receiver. We can do so by cloning the transmitter, as shown in Listing 16-11.
use std::sync::mpsc;
use std::thread;
use std::time::Duration;
Если у вас есть опыт работы с C или C++, вам могут вспомниться `gcc` или `clang`. После успешной компиляции Rust создаст исполняемый бинарный файл.
fn main() {
// --код сокращён--
Если у вас есть опыт работы с C или C++, вам могут вспомниться `gcc` или `clang`. После успешной компиляции Rust создаст исполняемый бинарный файл.
let (tx, rx) = mpsc::channel();
Если у вас есть опыт работы с C или C++, вам могут вспомниться `gcc` или `clang`. После успешной компиляции Rust создаст исполняемый бинарный файл.
let tx1 = tx.clone();
thread::spawn(move || {
let vals = vec![
String::from("hi"),
String::from("from"),
String::from("the"),
String::from("thread"),
];
Если у вас есть опыт работы с C или C++, вам могут вспомниться `gcc` или `clang`. После успешной компиляции Rust создаст исполняемый бинарный файл.
for val in vals {
tx1.send(val).unwrap();
thread::sleep(Duration::from_secs(1));
}
});
Если у вас есть опыт работы с C или C++, вам могут вспомниться `gcc` или `clang`. После успешной компиляции Rust создаст исполняемый бинарный файл.
thread::spawn(move || {
let vals = vec![
String::from("more"),
String::from("messages"),
String::from("for"),
String::from("you"),
];
Если у вас есть опыт работы с C или C++, вам могут вспомниться `gcc` или `clang`. После успешной компиляции Rust создаст исполняемый бинарный файл.
for val in vals {
tx.send(val).unwrap();
thread::sleep(Duration::from_secs(1));
}
});
Если у вас есть опыт работы с C или C++, вам могут вспомниться `gcc` или `clang`. После успешной компиляции Rust создаст исполняемый бинарный файл.
for received in rx {
println!("Got: {received}");
}
Если у вас есть опыт работы с C или C++, вам могут вспомниться `gcc` или `clang`. После успешной компиляции Rust создаст исполняемый бинарный файл.
// --код сокращён--
}This time, before we create the first spawned thread, we call clone on the transmitter. This will give us a new transmitter we can pass to the first spawned thread. We pass the original transmitter to a second spawned thread. This gives us two threads, each sending different messages to the one receiver.
When you run the code, your output should look something like this:
Got: hi
Got: more
Got: from
Got: messages
Got: for
Got: the
Got: thread
Got: you
You might see the values in another order, depending on your system. This is what makes concurrency interesting as well as difficult. If you experiment with thread::sleep, giving it various values in the different threads, each run will be more nondeterministic and create different output each time.
Now that we’ve looked at how channels work, let’s look at a different method of concurrency.
Параллелизм с общим состоянием
Параллелизм с общим состоянием
Message passing is a fine way to handle concurrency, but it’s not the only way. Another method would be for multiple threads to access the same shared data. Consider this part of the slogan from the Go language documentation again: “Do not communicate by sharing memory.”
What would communicating by sharing memory look like? In addition, why would message-passing enthusiasts caution not to use memory sharing?
In a way, channels in any programming language are similar to single ownership because once you transfer a value down a channel, you should no longer use that value. Shared-memory concurrency is like multiple ownership: Multiple threads can access the same memory location at the same time. As you saw in Chapter 15, where smart pointers made multiple ownership possible, multiple ownership can add complexity because these different owners need managing. Rust’s type system and ownership rules greatly assist in getting this management correct. For an example, let’s look at mutexes, one of the more common concurrency primitives for shared memory.
Controlling Access with Mutexes
Mutex is an abbreviation for mutual exclusion, as in a mutex allows only one thread to access some data at any given time. To access the data in a mutex, a thread must first signal that it wants access by asking to acquire the mutex’s lock. The lock is a data structure that is part of the mutex that keeps track of who currently has exclusive access to the data. Therefore, the mutex is described as guarding the data it holds via the locking system.
Mutexes have a reputation for being difficult to use because you have to remember two rules:
- You must attempt to acquire the lock before using the data.
- When you’re done with the data that the mutex guards, you must unlock the data so that other threads can acquire the lock.
For a real-world metaphor for a mutex, imagine a panel discussion at a conference with only one microphone. Before a panelist can speak, they have to ask or signal that they want to use the microphone. When they get the microphone, they can talk for as long as they want to and then hand the microphone to the next panelist who requests to speak. If a panelist forgets to hand the microphone off when they’re finished with it, no one else is able to speak. If management of the shared microphone goes wrong, the panel won’t work as planned!
Management of mutexes can be incredibly tricky to get right, which is why so many people are enthusiastic about channels. However, thanks to Rust’s type system and ownership rules, you can’t get locking and unlocking wrong.
The API of Mutex<T>
As an example of how to use a mutex, let’s start by using a mutex in a single-threaded context, as shown in Listing 16-12.
use std::sync::Mutex;
Если у вас есть опыт работы с C или C++, вам могут вспомниться `gcc` или `clang`. После успешной компиляции Rust создаст исполняемый бинарный файл.
fn main() {
let m = Mutex::new(5);
Если у вас есть опыт работы с C или C++, вам могут вспомниться `gcc` или `clang`. После успешной компиляции Rust создаст исполняемый бинарный файл.
{
let mut num = m.lock().unwrap();
*num = 6;
}
Если у вас есть опыт работы с C или C++, вам могут вспомниться `gcc` или `clang`. После успешной компиляции Rust создаст исполняемый бинарный файл.
println!("m = {m:?}");
}Mutex<T> in a single-threaded context for simplicityAs with many types, we create a Mutex<T> using the associated function new. To access the data inside the mutex, we use the lock method to acquire the lock. This call will block the current thread so that it can’t do any work until it’s our turn to have the lock.
The call to lock would fail if another thread holding the lock panicked. In that case, no one would ever be able to get the lock, so we’ve chosen to unwrap and have this thread panic if we’re in that situation.
After we’ve acquired the lock, we can treat the return value, named num in this case, as a mutable reference to the data inside. The type system ensures that we acquire a lock before using the value in m. The type of m is Mutex<i32>, not i32, so we must call lock to be able to use the i32 value. We can’t forget; the type system won’t let us access the inner i32 otherwise.
The call to lock returns a type called MutexGuard, wrapped in a LockResult that we handled with the call to unwrap. The MutexGuard type implements Deref to point at our inner data; the type also has a Drop implementation that releases the lock automatically when a MutexGuard goes out of scope, which happens at the end of the inner scope. As a result, we don’t risk forgetting to release the lock and blocking the mutex from being used by other threads because the lock release happens automatically.
After dropping the lock, we can print the mutex value and see that we were able to change the inner i32 to 6.
Shared Access to Mutex<T>
Now let’s try to share a value between multiple threads using Mutex<T>. We’ll spin up 10 threads and have them each increment a counter value by 1, so the counter goes from 0 to 10. The example in Listing 16-13 will have a compiler error, and we’ll use that error to learn more about using Mutex<T> and how Rust helps us use it correctly.
use std::sync::Mutex;
use std::thread;
Если у вас есть опыт работы с C или C++, вам могут вспомниться `gcc` или `clang`. После успешной компиляции Rust создаст исполняемый бинарный файл.
fn main() {
let counter = Mutex::new(0);
let mut handles = vec![];
Если у вас есть опыт работы с C или C++, вам могут вспомниться `gcc` или `clang`. После успешной компиляции Rust создаст исполняемый бинарный файл.
for _ in 0..10 {
let handle = thread::spawn(move || {
let mut num = counter.lock().unwrap();
Если у вас есть опыт работы с C или C++, вам могут вспомниться `gcc` или `clang`. После успешной компиляции Rust создаст исполняемый бинарный файл.
*num += 1;
});
handles.push(handle);
}
Если у вас есть опыт работы с C или C++, вам могут вспомниться `gcc` или `clang`. После успешной компиляции Rust создаст исполняемый бинарный файл.
for handle in handles {
handle.join().unwrap();
}
Если у вас есть опыт работы с C или C++, вам могут вспомниться `gcc` или `clang`. После успешной компиляции Rust создаст исполняемый бинарный файл.
println!("Result: {}", *counter.lock().unwrap());
}Mutex<T>We create a counter variable to hold an i32 inside a Mutex<T>, as we did in Listing 16-12. Next, we create 10 threads by iterating over a range of numbers. We use thread::spawn and give all the threads the same closure: one that moves the counter into the thread, acquires a lock on the Mutex<T> by calling the lock method, and then adds 1 to the value in the mutex. When a thread finishes running its closure, num will go out of scope and release the lock so that another thread can acquire it.
In the main thread, we collect all the join handles. Then, as we did in Listing 16-2, we call join on each handle to make sure all the threads finish. At that point, the main thread will acquire the lock and print the result of this program.
We hinted that this example wouldn’t compile. Now let’s find out why!
$ cargo run
Compiling shared-state v0.1.0 (file:///projects/shared-state)
error[E0382]: borrow of moved value: `counter`
--> src/main.rs:21:29
|
5 | let counter = Mutex::new(0);
| ------- move occurs because `counter` has type `std::sync::Mutex<i32>`, which does not implement the `Copy` trait
...
8 | for _ in 0..10 {
| -------------- inside of this loop
9 | let handle = thread::spawn(move || {
| ------- value moved into closure here, in previous iteration of loop
...
21 | println!("Result: {}", *counter.lock().unwrap());
| ^^^^^^^ value borrowed here after move
|
help: consider moving the expression out of the loop so it is only moved once
|
8 ~ let mut value = counter.lock();
9 ~ for _ in 0..10 {
10 | let handle = thread::spawn(move || {
11 ~ let mut num = value.unwrap();
|
Если у вас есть опыт работы с C или C++, вам могут вспомниться `gcc` или `clang`. После успешной компиляции Rust создаст исполняемый бинарный файл.
For more information about this error, try `rustc --explain E0382`.
error: could not compile `shared-state` (bin "shared-state") due to 1 previous error
The error message states that the counter value was moved in the previous iteration of the loop. Rust is telling us that we can’t move the ownership of lock counter into multiple threads. Let’s fix the compiler error with the multiple-ownership method we discussed in Chapter 15.
Multiple Ownership with Multiple Threads
In Chapter 15, we gave a value to multiple owners by using the smart pointer Rc<T> to create a reference-counted value. Let’s do the same here and see what happens. We’ll wrap the Mutex<T> in Rc<T> in Listing 16-14 and clone the Rc<T> before moving ownership to the thread.
use std::rc::Rc;
use std::sync::Mutex;
use std::thread;
Если у вас есть опыт работы с C или C++, вам могут вспомниться `gcc` или `clang`. После успешной компиляции Rust создаст исполняемый бинарный файл.
fn main() {
let counter = Rc::new(Mutex::new(0));
let mut handles = vec![];
Если у вас есть опыт работы с C или C++, вам могут вспомниться `gcc` или `clang`. После успешной компиляции Rust создаст исполняемый бинарный файл.
for _ in 0..10 {
let counter = Rc::clone(&counter);
let handle = thread::spawn(move || {
let mut num = counter.lock().unwrap();
Если у вас есть опыт работы с C или C++, вам могут вспомниться `gcc` или `clang`. После успешной компиляции Rust создаст исполняемый бинарный файл.
*num += 1;
});
handles.push(handle);
}
Если у вас есть опыт работы с C или C++, вам могут вспомниться `gcc` или `clang`. После успешной компиляции Rust создаст исполняемый бинарный файл.
for handle in handles {
handle.join().unwrap();
}
Если у вас есть опыт работы с C или C++, вам могут вспомниться `gcc` или `clang`. После успешной компиляции Rust создаст исполняемый бинарный файл.
println!("Result: {}", *counter.lock().unwrap());
}Rc<T> to allow multiple threads to own the Mutex<T>Once again, we compile and get… different errors! The compiler is teaching us a lot:
$ cargo run
Compiling shared-state v0.1.0 (file:///projects/shared-state)
error[E0277]: `Rc<std::sync::Mutex<i32>>` cannot be sent between threads safely
--> src/main.rs:11:36
|
11 | let handle = thread::spawn(move || {
| ------------- ^------
| | |
| ______________________|_____________within this `{closure@src/main.rs:11:36: 11:43}`
| | |
| | required by a bound introduced by this call
12 | | let mut num = counter.lock().unwrap();
13 | |
14 | | *num += 1;
15 | | });
| |_________^ `Rc<std::sync::Mutex<i32>>` cannot be sent between threads safely
|
= help: within `{closure@src/main.rs:11:36: 11:43}`, the trait `Send` is not implemented for `Rc<std::sync::Mutex<i32>>`
note: required because it's used within this closure
--> src/main.rs:11:36
|
11 | let handle = thread::spawn(move || {
| ^^^^^^^
note: required by a bound in `spawn`
--> /rustc/1159e78c4747b02ef996e55082b704c09b970588/library/std/src/thread/mod.rs:723:1
Если у вас есть опыт работы с C или C++, вам могут вспомниться `gcc` или `clang`. После успешной компиляции Rust создаст исполняемый бинарный файл.
For more information about this error, try `rustc --explain E0277`.
error: could not compile `shared-state` (bin "shared-state") due to 1 previous error
Wow, that error message is very wordy! Here’s the important part to focus on: `Rc<Mutex<i32>>` cannot be sent between threads safely. The compiler is also telling us the reason why: the trait `Send` is not implemented for `Rc<Mutex<i32>>`. We’ll talk about Send in the next section: It’s one of the traits that ensures that the types we use with threads are meant for use in concurrent situations.
Unfortunately, Rc<T> is not safe to share across threads. When Rc<T> manages the reference count, it adds to the count for each call to clone and subtracts from the count when each clone is dropped. But it doesn’t use any concurrency primitives to make sure that changes to the count can’t be interrupted by another thread. This could lead to wrong counts—subtle bugs that could in turn lead to memory leaks or a value being dropped before we’re done with it. What we need is a type that is exactly like Rc<T>, but that makes changes to the reference count in a thread-safe way.
Atomic Reference Counting with Arc<T>
Fortunately, Arc<T> is a type like Rc<T> that is safe to use in concurrent situations. The a stands for atomic, meaning it’s an atomically reference-counted type. Atomics are an additional kind of concurrency primitive that we won’t cover in detail here: See the standard library documentation for std::sync::atomic for more details. At this point, you just need to know that atomics work like primitive types but are safe to share across threads.
You might then wonder why all primitive types aren’t atomic and why standard library types aren’t implemented to use Arc<T> by default. The reason is that thread safety comes with a performance penalty that you only want to pay when you really need to. If you’re just performing operations on values within a single thread, your code can run faster if it doesn’t have to enforce the guarantees atomics provide.
Let’s return to our example: Arc<T> and Rc<T> have the same API, so we fix our program by changing the use line, the call to new, and the call to clone. The code in Listing 16-15 will finally compile and run.
use std::sync::{Arc, Mutex};
use std::thread;
Если у вас есть опыт работы с C или C++, вам могут вспомниться `gcc` или `clang`. После успешной компиляции Rust создаст исполняемый бинарный файл.
fn main() {
let counter = Arc::new(Mutex::new(0));
let mut handles = vec![];
Если у вас есть опыт работы с C или C++, вам могут вспомниться `gcc` или `clang`. После успешной компиляции Rust создаст исполняемый бинарный файл.
for _ in 0..10 {
let counter = Arc::clone(&counter);
let handle = thread::spawn(move || {
let mut num = counter.lock().unwrap();
Если у вас есть опыт работы с C или C++, вам могут вспомниться `gcc` или `clang`. После успешной компиляции Rust создаст исполняемый бинарный файл.
*num += 1;
});
handles.push(handle);
}
Если у вас есть опыт работы с C или C++, вам могут вспомниться `gcc` или `clang`. После успешной компиляции Rust создаст исполняемый бинарный файл.
for handle in handles {
handle.join().unwrap();
}
Если у вас есть опыт работы с C или C++, вам могут вспомниться `gcc` или `clang`. После успешной компиляции Rust создаст исполняемый бинарный файл.
println!("Result: {}", *counter.lock().unwrap());
}Arc<T> to wrap the Mutex<T> to be able to share ownership across multiple threadsКод напечатает следующее:
Result: 10
We did it! We counted from 0 to 10, which may not seem very impressive, but it did teach us a lot about Mutex<T> and thread safety. You could also use this program’s structure to do more complicated operations than just incrementing a counter. Using this strategy, you can divide a calculation into independent parts, split those parts across threads, and then use a Mutex<T> to have each thread update the final result with its part.
Note that if you are doing simple numerical operations, there are types simpler than Mutex<T> types provided by the std::sync::atomic module of the standard library. These types provide safe, concurrent, atomic access to primitive types. We chose to use Mutex<T> with a primitive type for this example so that we could concentrate on how Mutex<T> works.
Comparing RefCell<T>/Rc<T> and Mutex<T>/Arc<T>
You might have noticed that counter is immutable but that we could get a mutable reference to the value inside it; this means Mutex<T> provides interior mutability, as the Cell family does. In the same way we used RefCell<T> in Chapter 15 to allow us to mutate contents inside an Rc<T>, we use Mutex<T> to mutate contents inside an Arc<T>.
Another detail to note is that Rust can’t protect you from all kinds of logic errors when you use Mutex<T>. Recall from Chapter 15 that using Rc<T> came with the risk of creating reference cycles, where two Rc<T> values refer to each other, causing memory leaks. Similarly, Mutex<T> comes with the risk of creating deadlocks. These occur when an operation needs to lock two resources and two threads have each acquired one of the locks, causing them to wait for each other forever. If you’re interested in deadlocks, try creating a Rust program that has a deadlock; then, research deadlock mitigation strategies for mutexes in any language and have a go at implementing them in Rust. The standard library API documentation for Mutex<T> and MutexGuard offers useful information.
We’ll round out this chapter by talking about the Send and Sync traits and how we can use them with custom types.
Extensible Concurrency with Send and Sync
Extensible Concurrency with Send and Sync
Interestingly, almost every concurrency feature we’ve talked about so far in this chapter has been part of the standard library, not the language. Your options for handling concurrency are not limited to the language or the standard library; you can write your own concurrency features or use those written by others.
However, among the key concurrency concepts that are embedded in the language rather than the standard library are the std::marker traits Send and Sync.
Transferring Ownership Between Threads
The Send marker trait indicates that ownership of values of the type implementing Send can be transferred between threads. Almost every Rust type implements Send, but there are some exceptions, including Rc<T>: This cannot implement Send because if you cloned an Rc<T> value and tried to transfer ownership of the clone to another thread, both threads might update the reference count at the same time. For this reason, Rc<T> is implemented for use in single-threaded situations where you don’t want to pay the thread-safe performance penalty.
Therefore, Rust’s type system and trait bounds ensure that you can never accidentally send an Rc<T> value across threads unsafely. When we tried to do this in Listing 16-14, we got the error the trait `Send` is not implemented for `Rc<Mutex<i32>>`. When we switched to Arc<T>, which does implement Send, the code compiled.
Any type composed entirely of Send types is automatically marked as Send as well. Almost all primitive types are Send, aside from raw pointers, which we’ll discuss in Chapter 20.
Accessing from Multiple Threads
The Sync marker trait indicates that it is safe for the type implementing Sync to be referenced from multiple threads. In other words, any type T implements Sync if &T (an immutable reference to T) implements Send, meaning the reference can be sent safely to another thread. Similar to Send, primitive types all implement Sync, and types composed entirely of types that implement Sync also implement Sync.
The smart pointer Rc<T> also doesn’t implement Sync for the same reasons that it doesn’t implement Send. The RefCell<T> type (which we talked about in Chapter 15) and the family of related Cell<T> types don’t implement Sync. The implementation of borrow checking that RefCell<T> does at runtime is not thread-safe. The smart pointer Mutex<T> implements Sync and can be used to share access with multiple threads, as you saw in “Shared Access to Mutex<T>”.
Implementing Send and Sync Manually Is Unsafe
Because types composed entirely of other types that implement the Send and Sync traits also automatically implement Send and Sync, we don’t have to implement those traits manually. As marker traits, they don’t even have any methods to implement. They’re just useful for enforcing invariants related to concurrency.
Manually implementing these traits involves implementing unsafe Rust code. We’ll talk about using unsafe Rust code in Chapter 20; for now, the important information is that building new concurrent types not made up of Send and Sync parts requires careful thought to uphold the safety guarantees. “The Rustonomicon” has more information about these guarantees and how to uphold them.
Подведём итоги
This isn’t the last you’ll see of concurrency in this book: The next chapter focuses on async programming, and the project in Chapter 21 will use the concepts in this chapter in a more realistic situation than the smaller examples discussed here.
As mentioned earlier, because very little of how Rust handles concurrency is part of the language, many concurrency solutions are implemented as crates. These evolve more quickly than the standard library, so be sure to search online for the current, state-of-the-art crates to use in multithreaded situations.
The Rust standard library provides channels for message passing and smart pointer types, such as Mutex<T> and Arc<T>, that are safe to use in concurrent contexts. The type system and the borrow checker ensure that the code using these solutions won’t end up with data races or invalid references. Once you get your code to compile, you can rest assured that it will happily run on multiple threads without the kinds of hard-to-track-down bugs common in other languages. Concurrent programming is no longer a concept to be afraid of: Go forth and make your programs concurrent, fearlessly!
Fundamentals of Asynchronous Programming: Async, Await, Futures, and Streams
Many operations we ask the computer to do can take a while to finish. It would be nice if we could do something else while we’re waiting for those long-running processes to complete. Modern computers offer two techniques for working on more than one operation at a time: parallelism and concurrency. Our programs’ logic, however, is written in a mostly linear fashion. We’d like to be able to specify the operations a program should perform and points at which a function could pause and some other part of the program could run instead, without needing to specify up front exactly the order and manner in which each bit of code should run. Asynchronous programming is an abstraction that lets us express our code in terms of potential pausing points and eventual results that takes care of the details of coordination for us.
This chapter builds on Chapter 16’s use of threads for parallelism and concurrency by introducing an alternative approach to writing code: Rust’s futures, streams, and the async and await syntax that let us express how operations could be asynchronous, and the third-party crates that implement asynchronous runtimes: code that manages and coordinates the execution of asynchronous operations.
Let’s consider an example. Say you’re exporting a video you’ve created of a family celebration, an operation that could take anywhere from minutes to hours. The video export will use as much CPU and GPU power as it can. If you had only one CPU core and your operating system didn’t pause that export until it completed—that is, if it executed the export synchronously—you couldn’t do anything else on your computer while that task was running. That would be a pretty frustrating experience. Fortunately, your computer’s operating system can, and does, invisibly interrupt the export often enough to let you get other work done simultaneously.
Now say you’re downloading a video shared by someone else, which can also take a while but does not take up as much CPU time. In this case, the CPU has to wait for data to arrive from the network. While you can start reading the data once it starts to arrive, it might take some time for all of it to show up. Even once the data is all present, if the video is quite large, it could take at least a second or two to load it all. That might not sound like much, but it’s a very long time for a modern processor, which can perform billions of operations every second. Again, your operating system will invisibly interrupt your program to allow the CPU to perform other work while waiting for the network call to finish.
The video export is an example of a CPU-bound or compute-bound operation. It’s limited by the computer’s potential data processing speed within the CPU or GPU, and how much of that speed it can dedicate to the operation. The video download is an example of an I/O-bound operation, because it’s limited by the speed of the computer’s input and output; it can only go as fast as the data can be sent across the network.
In both of these examples, the operating system’s invisible interrupts provide a form of concurrency. That concurrency happens only at the level of the entire program, though: the operating system interrupts one program to let other programs get work done. In many cases, because we understand our programs at a much more granular level than the operating system does, we can spot opportunities for concurrency that the operating system can’t see.
For example, if we’re building a tool to manage file downloads, we should be able to write our program so that starting one download won’t lock up the UI, and users should be able to start multiple downloads at the same time. Many operating system APIs for interacting with the network are blocking, though; that is, they block the program’s progress until the data they’re processing is completely ready.
Note: This is how most function calls work, if you think about it. However, the term blocking is usually reserved for function calls that interact with files, the network, or other resources on the computer, because those are the cases where an individual program would benefit from the operation being non-blocking.
We could avoid blocking our main thread by spawning a dedicated thread to download each file. However, the overhead of the system resources used by those threads would eventually become a problem. It would be preferable if the call didn’t block in the first place, and instead we could define a number of tasks that we’d like our program to complete and allow the runtime to choose the best order and manner in which to run them.
That is exactly what Rust’s async (short for asynchronous) abstraction gives us. In this chapter, you’ll learn all about async as we cover the following topics:
- How to use Rust’s
asyncandawaitsyntax and execute asynchronous functions with a runtime - How to use the async model to solve some of the same challenges we looked at in Chapter 16
- How multithreading and async provide complementary solutions that you can combine in many cases
Before we see how async works in practice, though, we need to take a short detour to discuss the differences between parallelism and concurrency.
Parallelism and Concurrency
We’ve treated parallelism and concurrency as mostly interchangeable so far. Now we need to distinguish between them more precisely, because the differences will show up as we start working.
Consider the different ways a team could split up work on a software project. You could assign a single member multiple tasks, assign each member one task, or use a mix of the two approaches.
When an individual works on several different tasks before any of them is complete, this is concurrency. One way to implement concurrency is similar to having two different projects checked out on your computer, and when you get bored or stuck on one project, you switch to the other. You’re just one person, so you can’t make progress on both tasks at the exact same time, but you can multitask, making progress on one at a time by switching between them (see Figure 17-1).

When the team splits up a group of tasks by having each member take one task and work on it alone, this is parallelism. Each person on the team can make progress at the exact same time (see Figure 17-2).

In both of these workflows, you might have to coordinate between different tasks. Maybe you thought the task assigned to one person was totally independent from everyone else’s work, but it actually requires another person on the team to finish their task first. Some of the work could be done in parallel, but some of it was actually serial: it could only happen in a series, one task after the other, as in Figure 17-3.

Likewise, you might realize that one of your own tasks depends on another of your tasks. Now your concurrent work has also become serial.
Parallelism and concurrency can intersect with each other, too. If you learn that a colleague is stuck until you finish one of your tasks, you’ll probably focus all your efforts on that task to “unblock” your colleague. You and your coworker are no longer able to work in parallel, and you’re also no longer able to work concurrently on your own tasks.
The same basic dynamics come into play with software and hardware. On a machine with a single CPU core, the CPU can perform only one operation at a time, but it can still work concurrently. Using tools such as threads, processes, and async, the computer can pause one activity and switch to others before eventually cycling back to that first activity again. On a machine with multiple CPU cores, it can also do work in parallel. One core can be performing one task while another core performs a completely unrelated one, and those operations actually happen at the same time.
Running async code in Rust usually happens concurrently. Depending on the hardware, the operating system, and the async runtime we are using (more on async runtimes shortly), that concurrency may also use parallelism under the hood.
Now, let’s dive into how async programming in Rust actually works.
Futures and the Async Syntax
Futures and the Async Syntax
The key elements of asynchronous programming in Rust are futures and Rust’s async and await keywords.
A future is a value that may not be ready now but will become ready at some point in the future. (This same concept shows up in many languages, sometimes under other names such as task or promise.) Rust provides a Future trait as a building block so that different async operations can be implemented with different data structures but with a common interface. In Rust, futures are types that implement the Future trait. Each future holds its own information about the progress that has been made and what “ready” means.
You can apply the async keyword to blocks and functions to specify that they can be interrupted and resumed. Within an async block or async function, you can use the await keyword to await a future (that is, wait for it to become ready). Any point where you await a future within an async block or function is a potential spot for that block or function to pause and resume. The process of checking with a future to see if its value is available yet is called polling.
Some other languages, such as C# and JavaScript, also use async and await keywords for async programming. If you’re familiar with those languages, you may notice some significant differences in how Rust handles the syntax. That’s for good reason, as we’ll see!
When writing async Rust, we use the async and await keywords most of the time. Rust compiles them into equivalent code using the Future trait, much as it compiles for loops into equivalent code using the Iterator trait. Because Rust provides the Future trait, though, you can also implement it for your own data types when you need to. Many of the functions we’ll see throughout this chapter return types with their own implementations of Future. We’ll return to the definition of the trait at the end of the chapter and dig into more of how it works, but this is enough detail to keep us moving forward.
This may all feel a bit abstract, so let’s write our first async program: a little web scraper. We’ll pass in two URLs from the command line, fetch both of them concurrently, and return the result of whichever one finishes first. This example will have a fair bit of new syntax, but don’t worry—we’ll explain everything you need to know as we go.
Our First Async Program
To keep the focus of this chapter on learning async rather than juggling parts of the ecosystem, we’ve created the trpl crate (trpl is short for “The Rust Programming Language”). It re-exports all the types, traits, and functions you’ll need, primarily from the futures and tokio crates. The futures crate is an official home for Rust experimentation for async code, and it’s actually where the Future trait was originally designed. Tokio is the most widely used async runtime in Rust today, especially for web applications. There are other great runtimes out there, and they may be more suitable for your purposes. We use the tokio crate under the hood for trpl because it’s well tested and widely used.
In some cases, trpl also renames or wraps the original APIs to keep you focused on the details relevant to this chapter. If you want to understand what the crate does, we encourage you to check out its source code. You’ll be able to see what crate each re-export comes from, and we’ve left extensive comments explaining what the crate does.
Create a new binary project named hello-async and add the trpl crate as a dependency:
$ cargo new hello-async
$ cd hello-async
$ cargo add trpl
Now we can use the various pieces provided by trpl to write our first async program. We’ll build a little command line tool that fetches two web pages, pulls the <title> element from each, and prints out the title of whichever page finishes that whole process first.
Defining the page_title Function
Let’s start by writing a function that takes one page URL as a parameter, makes a request to it, and returns the text of the <title> element (see Listing 17-1).
extern crate trpl; // required for mdbook test
Если у вас есть опыт работы с C или C++, вам могут вспомниться `gcc` или `clang`. После успешной компиляции Rust создаст исполняемый бинарный файл.
fn main() {
// TODO: we'll add this next!
}
Если у вас есть опыт работы с C или C++, вам могут вспомниться `gcc` или `clang`. После успешной компиляции Rust создаст исполняемый бинарный файл.
use trpl::Html;
Если у вас есть опыт работы с C или C++, вам могут вспомниться `gcc` или `clang`. После успешной компиляции Rust создаст исполняемый бинарный файл.
async fn page_title(url: &str) -> Option<String> {
let response = trpl::get(url).await;
let response_text = response.text().await;
Html::parse(&response_text)
.select_first("title")
.map(|title| title.inner_html())
}First, we define a function named page_title and mark it with the async keyword. Then we use the trpl::get function to fetch whatever URL is passed in and add the await keyword to await the response. To get the text of the response, we call its text method and once again await it with the await keyword. Both of these steps are asynchronous. For the get function, we have to wait for the server to send back the first part of its response, which will include HTTP headers, cookies, and so on and can be delivered separately from the response body. Especially if the body is very large, it can take some time for it all to arrive. Because we have to wait for the entirety of the response to arrive, the text method is also async.
We have to explicitly await both of these futures, because futures in Rust are lazy: they don’t do anything until you ask them to with the await keyword. (In fact, Rust will show a compiler warning if you don’t use a future.) This might remind you of the discussion of iterators in the “Processing a Series of Items with Iterators” section in Chapter 13. Iterators do nothing unless you call their next method—whether directly or by using for loops or methods such as map that use next under the hood. Likewise, futures do nothing unless you explicitly ask them to. This laziness allows Rust to avoid running async code until it’s actually needed.
Note: This is different from the behavior we saw when using thread::spawn in the “Creating a New Thread with spawn” section in Chapter 16, where the closure we passed to another thread started running immediately. It’s also different from how many other languages approach async. But it’s important for Rust to be able to provide its performance guarantees, just as it is with iterators.
Once we have response_text, we can parse it into an instance of the Html type using Html::parse. Instead of a raw string, we now have a data type we can use to work with the HTML as a richer data structure. In particular, we can use the select_first method to find the first instance of a given CSS selector. By passing the string "title", we’ll get the first <title> element in the document, if there is one. Because there may not be any matching element, select_first returns an Option<ElementRef>. Finally, we use the Option::map method, which lets us work with the item in the Option if it’s present, and do nothing if it isn’t. (We could also use a match expression here, but map is more idiomatic.) In the body of the function we supply to map, we call inner_html on the title to get its content, which is a String. When all is said and done, we have an Option<String>.
Notice that Rust’s await keyword goes after the expression you’re awaiting, not before it. That is, it’s a postfix keyword. This may differ from what you’re used to if you’ve used async in other languages, but in Rust it makes chains of methods much nicer to work with. As a result, we could change the body of page_title to chain the trpl::get and text function calls together with await between them, as shown in Listing 17-2.
extern crate trpl; // required for mdbook test
Если у вас есть опыт работы с C или C++, вам могут вспомниться `gcc` или `clang`. После успешной компиляции Rust создаст исполняемый бинарный файл.
use trpl::Html;
Если у вас есть опыт работы с C или C++, вам могут вспомниться `gcc` или `clang`. После успешной компиляции Rust создаст исполняемый бинарный файл.
fn main() {
// TODO: we'll add this next!
}
Если у вас есть опыт работы с C или C++, вам могут вспомниться `gcc` или `clang`. После успешной компиляции Rust создаст исполняемый бинарный файл.
async fn page_title(url: &str) -> Option<String> {
let response_text = trpl::get(url).await.text().await;
Html::parse(&response_text)
.select_first("title")
.map(|title| title.inner_html())
}await keywordWith that, we have successfully written our first async function! Before we add some code in main to call it, let’s talk a little more about what we’ve written and what it means.
When Rust sees a block marked with the async keyword, it compiles it into a unique, anonymous data type that implements the Future trait. When Rust sees a function marked with async, it compiles it into a non-async function whose body is an async block. An async function’s return type is the type of the anonymous data type the compiler creates for that async block.
Thus, writing async fn is equivalent to writing a function that returns a future of the return type. To the compiler, a function definition such as the async fn page_title in Listing 17-1 is roughly equivalent to a non-async function defined like this:
#![allow(unused)]
fn main() {
extern crate trpl; // required for mdbook test
use std::future::Future;
use trpl::Html;
Если у вас есть опыт работы с C или C++, вам могут вспомниться `gcc` или `clang`. После успешной компиляции Rust создаст исполняемый бинарный файл.
fn page_title(url: &str) -> impl Future<Output = Option<String>> {
async move {
let text = trpl::get(url).await.text().await;
Html::parse(&text)
.select_first("title")
.map(|title| title.inner_html())
}
}
}Let’s walk through each part of the transformed version:
- It uses the
impl Traitsyntax we discussed back in Chapter 10 in the “Traits as Parameters” section. - The returned value implements the
Futuretrait with an associated type ofOutput. Notice that theOutputtype isOption<String>, which is the same as the original return type from theasync fnversion ofpage_title. - All of the code called in the body of the original function is wrapped in an
async moveblock. Remember that blocks are expressions. This whole block is the expression returned from the function. - This async block produces a value with the type
Option<String>, as just described. That value matches theOutputtype in the return type. This is just like other blocks you have seen. - The new function body is an
async moveblock because of how it uses theurlparameter. (We’ll talk much more aboutasyncversusasync movelater in the chapter.)
Now we can call page_title in main.
Executing an Async Function with a Runtime
To start, we’ll get the title for a single page, shown in Listing 17-3. Unfortunately, this code doesn’t compile yet.
extern crate trpl; // required for mdbook test
Если у вас есть опыт работы с C или C++, вам могут вспомниться `gcc` или `clang`. После успешной компиляции Rust создаст исполняемый бинарный файл.
use trpl::Html;
Если у вас есть опыт работы с C или C++, вам могут вспомниться `gcc` или `clang`. После успешной компиляции Rust создаст исполняемый бинарный файл.
async fn main() {
let args: Vec<String> = std::env::args().collect();
let url = &args[1];
match page_title(url).await {
Some(title) => println!("The title for {url} was {title}"),
None => println!("{url} had no title"),
}
}
Если у вас есть опыт работы с C или C++, вам могут вспомниться `gcc` или `clang`. После успешной компиляции Rust создаст исполняемый бинарный файл.
async fn page_title(url: &str) -> Option<String> {
let response_text = trpl::get(url).await.text().await;
Html::parse(&response_text)
.select_first("title")
.map(|title| title.inner_html())
}page_title function from main with a user-supplied argumentWe follow the same pattern we used to get command line arguments in the “Accepting Command Line Arguments” section in Chapter 12. Then we pass the URL argument to page_title and await the result. Because the value produced by the future is an Option<String>, we use a match expression to print different messages to account for whether the page had a <title>.
The only place we can use the await keyword is in async functions or blocks, and Rust won’t let us mark the special main function as async.
error[E0752]: `main` function is not allowed to be `async`
--> src/main.rs:6:1
|
6 | async fn main() {
| ^^^^^^^^^^^^^^^ `main` function is not allowed to be `async`
The reason main can’t be marked async is that async code needs a runtime: a Rust crate that manages the details of executing asynchronous code. A program’s main function can initialize a runtime, but it’s not a runtime itself. (We’ll see more about why this is the case in a bit.) Every Rust program that executes async code has at least one place where it sets up a runtime that executes the futures.
Most languages that support async bundle a runtime, but Rust does not. Instead, there are many different async runtimes available, each of which makes different tradeoffs suitable to the use case it targets. For example, a high-throughput web server with many CPU cores and a large amount of RAM has very different needs than a microcontroller with a single core, a small amount of RAM, and no heap allocation ability. The crates that provide those runtimes also often supply async versions of common functionality such as file or network I/O.
Here, and throughout the rest of this chapter, we’ll use the block_on function from the trpl crate, which takes a future as an argument and blocks the current thread until this future runs to completion. Behind the scenes, calling block_on sets up a runtime using the tokio crate that’s used to run the future passed in (the trpl crate’s block_on behavior is similar to other runtime crates’ block_on functions). Once the future completes, block_on returns whatever value the future produced.
We could pass the future returned by page_title directly to block_on and, once it completed, we could match on the resulting Option<String> as we tried to do in Listing 17-3. However, for most of the examples in the chapter (and most async code in the real world), we’ll be doing more than just one async function call, so instead we’ll pass an async block and explicitly await the result of the page_title call, as in Listing 17-4.
extern crate trpl; // required for mdbook test
Если у вас есть опыт работы с C или C++, вам могут вспомниться `gcc` или `clang`. После успешной компиляции Rust создаст исполняемый бинарный файл.
use trpl::Html;
Если у вас есть опыт работы с C или C++, вам могут вспомниться `gcc` или `clang`. После успешной компиляции Rust создаст исполняемый бинарный файл.
fn main() {
let args: Vec<String> = std::env::args().collect();
Если у вас есть опыт работы с C или C++, вам могут вспомниться `gcc` или `clang`. После успешной компиляции Rust создаст исполняемый бинарный файл.
trpl::block_on(async {
let url = &args[1];
match page_title(url).await {
Some(title) => println!("The title for {url} was {title}"),
None => println!("{url} had no title"),
}
})
}
Если у вас есть опыт работы с C или C++, вам могут вспомниться `gcc` или `clang`. После успешной компиляции Rust создаст исполняемый бинарный файл.
async fn page_title(url: &str) -> Option<String> {
let response_text = trpl::get(url).await.text().await;
Html::parse(&response_text)
.select_first("title")
.map(|title| title.inner_html())
}trpl::block_onWhen we run this code, we get the behavior we expected initially:
$ cargo run -- "https://www.rust-lang.org"
Finished `dev` profile [unoptimized + debuginfo] target(s) in 0.05s
Running `target/debug/async_await 'https://www.rust-lang.org'`
The title for https://www.rust-lang.org was
Rust Programming Language
Phew—we finally have some working async code! But before we add the code to race two sites against each other, let’s briefly turn our attention back to how futures work.
Each await point—that is, every place where the code uses the await keyword—represents a place where control is handed back to the runtime. To make that work, Rust needs to keep track of the state involved in the async block so that the runtime could kick off some other work and then come back when it’s ready to try advancing the first one again. This is an invisible state machine, as if you’d written an enum like this to save the current state at each await point:
#![allow(unused)]
fn main() {
extern crate trpl; // required for mdbook test
Если у вас есть опыт работы с C или C++, вам могут вспомниться `gcc` или `clang`. После успешной компиляции Rust создаст исполняемый бинарный файл.
enum PageTitleFuture<'a> {
Initial { url: &'a str },
GetAwaitPoint { url: &'a str },
TextAwaitPoint { response: trpl::Response },
}
}Writing the code to transition between each state by hand would be tedious and error-prone, however, especially when you need to add more functionality and more states to the code later. Fortunately, the Rust compiler creates and manages the state machine data structures for async code automatically. The normal borrowing and ownership rules around data structures all still apply, and happily, the compiler also handles checking those for us and provides useful error messages. We’ll work through a few of those later in the chapter.
Ultimately, something has to execute this state machine, and that something is a runtime. (This is why you may come across mentions of executors when looking into runtimes: an executor is the part of a runtime responsible for executing the async code.)
Now you can see why the compiler stopped us from making main itself an async function back in Listing 17-3. If main were an async function, something else would need to manage the state machine for whatever future main returned, but main is the starting point for the program! Instead, we called the trpl::block_on function in main to set up a runtime and run the future returned by the async block until it’s done.
Note: Some runtimes provide macros so you can write an async main function. Those macros rewrite async fn main() { ... } to be a normal fn main, which does the same thing we did by hand in Listing 17-4: call a function that runs a future to completion the way trpl::block_on does.
Now let’s put these pieces together and see how we can write concurrent code.
Racing Two URLs Against Each Other Concurrently
In Listing 17-5, we call page_title with two different URLs passed in from the command line and race them by selecting whichever future finishes first.
extern crate trpl; // required for mdbook test
Если у вас есть опыт работы с C или C++, вам могут вспомниться `gcc` или `clang`. После успешной компиляции Rust создаст исполняемый бинарный файл.
use trpl::{Either, Html};
Если у вас есть опыт работы с C или C++, вам могут вспомниться `gcc` или `clang`. После успешной компиляции Rust создаст исполняемый бинарный файл.
fn main() {
let args: Vec<String> = std::env::args().collect();
Если у вас есть опыт работы с C или C++, вам могут вспомниться `gcc` или `clang`. После успешной компиляции Rust создаст исполняемый бинарный файл.
trpl::block_on(async {
let title_fut_1 = page_title(&args[1]);
let title_fut_2 = page_title(&args[2]);
Если у вас есть опыт работы с C или C++, вам могут вспомниться `gcc` или `clang`. После успешной компиляции Rust создаст исполняемый бинарный файл.
let (url, maybe_title) =
match trpl::select(title_fut_1, title_fut_2).await {
Either::Left(left) => left,
Either::Right(right) => right,
};
Если у вас есть опыт работы с C или C++, вам могут вспомниться `gcc` или `clang`. После успешной компиляции Rust создаст исполняемый бинарный файл.
println!("{url} returned first");
match maybe_title {
Some(title) => println!("Its page title was: '{title}'"),
None => println!("It had no title."),
}
})
}
Если у вас есть опыт работы с C или C++, вам могут вспомниться `gcc` или `clang`. После успешной компиляции Rust создаст исполняемый бинарный файл.
async fn page_title(url: &str) -> (&str, Option<String>) {
let response_text = trpl::get(url).await.text().await;
let title = Html::parse(&response_text)
.select_first("title")
.map(|title| title.inner_html());
(url, title)
}page_title for two URLs to see which returns firstWe begin by calling page_title for each of the user-supplied URLs. We save the resulting futures as title_fut_1 and title_fut_2. Remember, these don’t do anything yet, because futures are lazy and we haven’t yet awaited them. Then we pass the futures to trpl::select, which returns a value to indicate which of the futures passed to it finishes first.
Note: Under the hood, trpl::select is built on a more general select function defined in the futures crate. The futures crate’s select function can do a lot of things that the trpl::select function can’t, but it also has some additional complexity that we can skip over for now.
Either future can legitimately “win,” so it doesn’t make sense to return a Result. Instead, trpl::select returns a type we haven’t seen before, trpl::Either. The Either type is somewhat similar to a Result in that it has two cases. Unlike Result, though, there is no notion of success or failure baked into Either. Instead, it uses Left and Right to indicate “one or the other”:
#![allow(unused)]
fn main() {
enum Either<A, B> {
Left(A),
Right(B),
}
}The select function returns Left with that future’s output if the first argument wins, and Right with the second future argument’s output if that one wins. This matches the order the arguments appear in when calling the function: the first argument is to the left of the second argument.
We also update page_title to return the same URL passed in. That way, if the page that returns first does not have a <title> we can resolve, we can still print a meaningful message. With that information available, we wrap up by updating our println! output to indicate both which URL finished first and what, if any, the <title> is for the web page at that URL.
You have built a small working web scraper now! Pick a couple URLs and run the command line tool. You may discover that some sites are consistently faster than others, while in other cases the faster site varies from run to run. More importantly, you’ve learned the basics of working with futures, so now we can dig deeper into what we can do with async.
Applying Concurrency with Async
Applying Concurrency with Async
In this section, we’ll apply async to some of the same concurrency challenges we tackled with threads in Chapter 16. Because we already talked about a lot of the key ideas there, in this section we’ll focus on what’s different between threads and futures.
In many cases, the APIs for working with concurrency using async are very similar to those for using threads. In other cases, they end up being quite different. Even when the APIs look similar between threads and async, they often have different behavior—and they nearly always have different performance characteristics.
Creating a New Task with spawn_task
The first operation we tackled in the “Creating a New Thread with spawn” section in Chapter 16 was counting up on two separate threads. Let’s do the same using async. The trpl crate supplies a spawn_task function that looks very similar to the thread::spawn API, and a sleep function that is an async version of the thread::sleep API. We can use these together to implement the counting example, as shown in Listing 17-6.
extern crate trpl; // required for mdbook test
Если у вас есть опыт работы с C или C++, вам могут вспомниться `gcc` или `clang`. После успешной компиляции Rust создаст исполняемый бинарный файл.
use std::time::Duration;
Если у вас есть опыт работы с C или C++, вам могут вспомниться `gcc` или `clang`. После успешной компиляции Rust создаст исполняемый бинарный файл.
fn main() {
trpl::block_on(async {
trpl::spawn_task(async {
for i in 1..10 {
println!("hi number {i} from the first task!");
trpl::sleep(Duration::from_millis(500)).await;
}
});
Если у вас есть опыт работы с C или C++, вам могут вспомниться `gcc` или `clang`. После успешной компиляции Rust создаст исполняемый бинарный файл.
for i in 1..5 {
println!("hi number {i} from the second task!");
trpl::sleep(Duration::from_millis(500)).await;
}
});
}As our starting point, we set up our main function with trpl::block_on so that our top-level function can be async.
Note: From this point forward in the chapter, every example will include this exact same wrapping code with trpl::block_on in main, so we’ll often skip it just as we do with main. Remember to include it in your code!
Then we write two loops within that block, each containing a trpl::sleep call, which waits for half a second (500 milliseconds) before sending the next message. We put one loop in the body of a trpl::spawn_task and the other in a top-level for loop. We also add an await after the sleep calls.
This code behaves similarly to the thread-based implementation—including the fact that you may see the messages appear in a different order in your own terminal when you run it:
hi number 1 from the second task!
hi number 1 from the first task!
hi number 2 from the first task!
hi number 2 from the second task!
hi number 3 from the first task!
hi number 3 from the second task!
hi number 4 from the first task!
hi number 4 from the second task!
hi number 5 from the first task!
This version stops as soon as the for loop in the body of the main async block finishes, because the task spawned by spawn_task is shut down when the main function ends. If you want it to run all the way to the task’s completion, you will need to use a join handle to wait for the first task to complete. With threads, we used the join method to “block” until the thread was done running. In Listing 17-7, we can use await to do the same thing, because the task handle itself is a future. Its Output type is a Result, so we also unwrap it after awaiting it.
extern crate trpl; // required for mdbook test
Если у вас есть опыт работы с C или C++, вам могут вспомниться `gcc` или `clang`. После успешной компиляции Rust создаст исполняемый бинарный файл.
use std::time::Duration;
Если у вас есть опыт работы с C или C++, вам могут вспомниться `gcc` или `clang`. После успешной компиляции Rust создаст исполняемый бинарный файл.
fn main() {
trpl::block_on(async {
let handle = trpl::spawn_task(async {
for i in 1..10 {
println!("hi number {i} from the first task!");
trpl::sleep(Duration::from_millis(500)).await;
}
});
Если у вас есть опыт работы с C или C++, вам могут вспомниться `gcc` или `clang`. После успешной компиляции Rust создаст исполняемый бинарный файл.
for i in 1..5 {
println!("hi number {i} from the second task!");
trpl::sleep(Duration::from_millis(500)).await;
}
Если у вас есть опыт работы с C или C++, вам могут вспомниться `gcc` или `clang`. После успешной компиляции Rust создаст исполняемый бинарный файл.
handle.await.unwrap();
});
}await with a join handle to run a task to completionThis updated version runs until both loops finish:
hi number 1 from the second task!
hi number 1 from the first task!
hi number 2 from the first task!
hi number 2 from the second task!
hi number 3 from the first task!
hi number 3 from the second task!
hi number 4 from the first task!
hi number 4 from the second task!
hi number 5 from the first task!
hi number 6 from the first task!
hi number 7 from the first task!
hi number 8 from the first task!
hi number 9 from the first task!
So far, it looks like async and threads give us similar outcomes, just with different syntax: using await instead of calling join on the join handle, and awaiting the sleep calls.
The bigger difference is that we didn’t need to spawn another operating system thread to do this. In fact, we don’t even need to spawn a task here. Because async blocks compile to anonymous futures, we can put each loop in an async block and have the runtime run them both to completion using the trpl::join function.
In the “Waiting for All Threads to Finish” section in Chapter 16, we showed how to use the join method on the JoinHandle type returned when you call std::thread::spawn. The trpl::join function is similar, but for futures. When you give it two futures, it produces a single new future whose output is a tuple containing the output of each future you passed in once they both complete. Thus, in Listing 17-8, we use trpl::join to wait for both fut1 and fut2 to finish. We do not await fut1 and fut2 but instead the new future produced by trpl::join. We ignore the output, because it’s just a tuple containing two unit values.
extern crate trpl; // required for mdbook test
Если у вас есть опыт работы с C или C++, вам могут вспомниться `gcc` или `clang`. После успешной компиляции Rust создаст исполняемый бинарный файл.
use std::time::Duration;
Если у вас есть опыт работы с C или C++, вам могут вспомниться `gcc` или `clang`. После успешной компиляции Rust создаст исполняемый бинарный файл.
fn main() {
trpl::block_on(async {
let fut1 = async {
for i in 1..10 {
println!("hi number {i} from the first task!");
trpl::sleep(Duration::from_millis(500)).await;
}
};
Если у вас есть опыт работы с C или C++, вам могут вспомниться `gcc` или `clang`. После успешной компиляции Rust создаст исполняемый бинарный файл.
let fut2 = async {
for i in 1..5 {
println!("hi number {i} from the second task!");
trpl::sleep(Duration::from_millis(500)).await;
}
};
Если у вас есть опыт работы с C или C++, вам могут вспомниться `gcc` или `clang`. После успешной компиляции Rust создаст исполняемый бинарный файл.
trpl::join(fut1, fut2).await;
});
}trpl::join to await two anonymous futuresWhen we run this, we see both futures run to completion:
hi number 1 from the first task!
hi number 1 from the second task!
hi number 2 from the first task!
hi number 2 from the second task!
hi number 3 from the first task!
hi number 3 from the second task!
hi number 4 from the first task!
hi number 4 from the second task!
hi number 5 from the first task!
hi number 6 from the first task!
hi number 7 from the first task!
hi number 8 from the first task!
hi number 9 from the first task!
Now, you’ll see the exact same order every time, which is very different from what we saw with threads and with trpl::spawn_task in Listing 17-7. That is because the trpl::join function is fair, meaning it checks each future equally often, alternating between them, and never lets one race ahead if the other is ready. With threads, the operating system decides which thread to check and how long to let it run. With async Rust, the runtime decides which task to check. (In practice, the details get complicated because an async runtime might use operating system threads under the hood as part of how it manages concurrency, so guaranteeing fairness can be more work for a runtime—but it’s still possible!) Runtimes don’t have to guarantee fairness for any given operation, and they often offer different APIs to let you choose whether or not you want fairness.
Try some of these variations on awaiting the futures and see what they do:
- Remove the async block from around either or both of the loops.
- Await each async block immediately after defining it.
- Wrap only the first loop in an async block, and await the resulting future after the body of second loop.
For an extra challenge, see if you can figure out what the output will be in each case before running the code!
Sending Data Between Two Tasks Using Message Passing
Sharing data between futures will also be familiar: we’ll use message passing again, but this time with async versions of the types and functions. We’ll take a slightly different path than we did in the “Transfer Data Between Threads with Message Passing” section in Chapter 16 to illustrate some of the key differences between thread-based and futures-based concurrency. In Listing 17-9, we’ll begin with just a single async block—not spawning a separate task as we spawned a separate thread.
extern crate trpl; // required for mdbook test
Если у вас есть опыт работы с C или C++, вам могут вспомниться `gcc` или `clang`. После успешной компиляции Rust создаст исполняемый бинарный файл.
fn main() {
trpl::block_on(async {
let (tx, mut rx) = trpl::channel();
Если у вас есть опыт работы с C или C++, вам могут вспомниться `gcc` или `clang`. После успешной компиляции Rust создаст исполняемый бинарный файл.
let val = String::from("hi");
tx.send(val).unwrap();
Если у вас есть опыт работы с C или C++, вам могут вспомниться `gcc` или `clang`. После успешной компиляции Rust создаст исполняемый бинарный файл.
let received = rx.recv().await.unwrap();
println!("received '{received}'");
});
}tx and rxHere, we use trpl::channel, an async version of the multiple-producer, single-consumer channel API we used with threads back in Chapter 16. The async version of the API is only a little different from the thread-based version: it uses a mutable rather than an immutable receiver rx, and its recv method produces a future we need to await rather than producing the value directly. Now we can send messages from the sender to the receiver. Notice that we don’t have to spawn a separate thread or even a task; we merely need to await the rx.recv call.
The synchronous Receiver::recv method in std::mpsc::channel blocks until it receives a message. The trpl::Receiver::recv method does not, because it is async. Instead of blocking, it hands control back to the runtime until either a message is received or the send side of the channel closes. By contrast, we don’t await the send call, because it doesn’t block. It doesn’t need to, because the channel we’re sending it into is unbounded.
Note: Because all of this async code runs in an async block in a trpl::block_on call, everything within it can avoid blocking. However, the code outside it will block on the block_on function returning. That’s the whole point of the trpl::block_on function: it lets you choose where to block on some set of async code, and thus where to transition between sync and async code.
Notice two things about this example. First, the message will arrive right away. Second, although we use a future here, there’s no concurrency yet. Everything in the listing happens in sequence, just as it would if there were no futures involved.
Let’s address the first part by sending a series of messages and sleeping in between them, as shown in Listing 17-10.
extern crate trpl; // required for mdbook test
Если у вас есть опыт работы с C или C++, вам могут вспомниться `gcc` или `clang`. После успешной компиляции Rust создаст исполняемый бинарный файл.
use std::time::Duration;
Если у вас есть опыт работы с C или C++, вам могут вспомниться `gcc` или `clang`. После успешной компиляции Rust создаст исполняемый бинарный файл.
fn main() {
trpl::block_on(async {
let (tx, mut rx) = trpl::channel();
Если у вас есть опыт работы с C или C++, вам могут вспомниться `gcc` или `clang`. После успешной компиляции Rust создаст исполняемый бинарный файл.
let vals = vec![
String::from("hi"),
String::from("from"),
String::from("the"),
String::from("future"),
];
Если у вас есть опыт работы с C или C++, вам могут вспомниться `gcc` или `clang`. После успешной компиляции Rust создаст исполняемый бинарный файл.
for val in vals {
tx.send(val).unwrap();
trpl::sleep(Duration::from_millis(500)).await;
}
Если у вас есть опыт работы с C или C++, вам могут вспомниться `gcc` или `clang`. После успешной компиляции Rust создаст исполняемый бинарный файл.
while let Some(value) = rx.recv().await {
println!("received '{value}'");
}
});
}await between each messageIn addition to sending the messages, we need to receive them. In this case, because we know how many messages are coming in, we could do that manually by calling rx.recv().await four times. In the real world, though, we’ll generally be waiting on some unknown number of messages, so we need to keep waiting until we determine that there are no more messages.
In Listing 16-10, we used a for loop to process all the items received from a synchronous channel. Rust doesn’t yet have a way to use a for loop with an asynchronously produced series of items, however, so we need to use a loop we haven’t seen before: the while let conditional loop. This is the loop version of the if let construct we saw back in the “Concise Control Flow with if let and let...else” section in Chapter 6. The loop will continue executing as long as the pattern it specifies continues to match the value.
The rx.recv call produces a future, which we await. The runtime will pause the future until it is ready. Once a message arrives, the future will resolve to Some(message) as many times as a message arrives. When the channel closes, regardless of whether any messages have arrived, the future will instead resolve to None to indicate that there are no more values and thus we should stop polling—that is, stop awaiting.
The while let loop pulls all of this together. If the result of calling rx.recv().await is Some(message), we get access to the message and we can use it in the loop body, just as we could with if let. If the result is None, the loop ends. Every time the loop completes, it hits the await point again, so the runtime pauses it again until another message arrives.
The code now successfully sends and receives all of the messages. Unfortunately, there are still a couple of problems. For one thing, the messages do not arrive at half-second intervals. They arrive all at once, 2 seconds (2,000 milliseconds) after we start the program. For another, this program also never exits! Instead, it waits forever for new messages. You will need to shut it down using ctrl-C.
Code Within One Async Block Executes Linearly
Let’s start by examining why the messages come in all at once after the full delay, rather than coming in with delays between each one. Within a given async block, the order in which await keywords appear in the code is also the order in which they’re executed when the program runs.
There’s only one async block in Listing 17-10, so everything in it runs linearly. There’s still no concurrency. All the tx.send calls happen, interspersed with all of the trpl::sleep calls and their associated await points. Only then does the while let loop get to go through any of the await points on the recv calls.
To get the behavior we want, where the sleep delay happens between each message, we need to put the tx and rx operations in their own async blocks, as shown in Listing 17-11. Then the runtime can execute each of them separately using trpl::join, just as in Listing 17-8. Once again, we await the result of calling trpl::join, not the individual futures. If we awaited the individual futures in sequence, we would just end up back in a sequential flow—exactly what we’re trying not to do.
extern crate trpl; // required for mdbook test
Если у вас есть опыт работы с C или C++, вам могут вспомниться `gcc` или `clang`. После успешной компиляции Rust создаст исполняемый бинарный файл.
use std::time::Duration;
Если у вас есть опыт работы с C или C++, вам могут вспомниться `gcc` или `clang`. После успешной компиляции Rust создаст исполняемый бинарный файл.
fn main() {
trpl::block_on(async {
let (tx, mut rx) = trpl::channel();
Если у вас есть опыт работы с C или C++, вам могут вспомниться `gcc` или `clang`. После успешной компиляции Rust создаст исполняемый бинарный файл.
let tx_fut = async {
let vals = vec![
String::from("hi"),
String::from("from"),
String::from("the"),
String::from("future"),
];
Если у вас есть опыт работы с C или C++, вам могут вспомниться `gcc` или `clang`. После успешной компиляции Rust создаст исполняемый бинарный файл.
for val in vals {
tx.send(val).unwrap();
trpl::sleep(Duration::from_millis(500)).await;
}
};
Если у вас есть опыт работы с C или C++, вам могут вспомниться `gcc` или `clang`. После успешной компиляции Rust создаст исполняемый бинарный файл.
let rx_fut = async {
while let Some(value) = rx.recv().await {
println!("received '{value}'");
}
};
Если у вас есть опыт работы с C или C++, вам могут вспомниться `gcc` или `clang`. После успешной компиляции Rust создаст исполняемый бинарный файл.
trpl::join(tx_fut, rx_fut).await;
});
}send and recv into their own async blocks and awaiting the futures for those blocksWith the updated code in Listing 17-11, the messages get printed at 500-millisecond intervals, rather than all in a rush after 2 seconds.
Moving Ownership Into an Async Block
The program still never exits, though, because of the way the while let loop interacts with trpl::join:
- The future returned from
trpl::joincompletes only once both futures passed to it have completed. - The
tx_futfuture completes once it finishes sleeping after sending the last message invals. - The
rx_futfuture won’t complete until thewhile letloop ends. - The
while letloop won’t end until awaitingrx.recvproducesNone. - Awaiting
rx.recvwill returnNoneonly once the other end of the channel is closed. - The channel will close only if we call
rx.closeor when the sender side,tx, is dropped. - We don’t call
rx.closeanywhere, andtxwon’t be dropped until the outermost async block passed totrpl::block_onends. - The block can’t end because it is blocked on
trpl::joincompleting, which takes us back to the top of this list.
Right now, the async block where we send the messages only borrows tx because sending a message doesn’t require ownership, but if we could move tx into that async block, it would be dropped once that block ends. In the “Capturing References or Moving Ownership” section in Chapter 13, you learned how to use the move keyword with closures, and, as discussed in the “Using move Closures with Threads” section in Chapter 16, we often need to move data into closures when working with threads. The same basic dynamics apply to async blocks, so the move keyword works with async blocks just as it does with closures.
In Listing 17-12, we change the block used to send messages from async to async move.
extern crate trpl; // required for mdbook test
Если у вас есть опыт работы с C или C++, вам могут вспомниться `gcc` или `clang`. После успешной компиляции Rust создаст исполняемый бинарный файл.
use std::time::Duration;
Если у вас есть опыт работы с C или C++, вам могут вспомниться `gcc` или `clang`. После успешной компиляции Rust создаст исполняемый бинарный файл.
fn main() {
trpl::block_on(async {
let (tx, mut rx) = trpl::channel();
Если у вас есть опыт работы с C или C++, вам могут вспомниться `gcc` или `clang`. После успешной компиляции Rust создаст исполняемый бинарный файл.
let tx_fut = async move {
// --код сокращён--
let vals = vec![
String::from("hi"),
String::from("from"),
String::from("the"),
String::from("future"),
];
Если у вас есть опыт работы с C или C++, вам могут вспомниться `gcc` или `clang`. После успешной компиляции Rust создаст исполняемый бинарный файл.
for val in vals {
tx.send(val).unwrap();
trpl::sleep(Duration::from_millis(500)).await;
}
};
Если у вас есть опыт работы с C или C++, вам могут вспомниться `gcc` или `clang`. После успешной компиляции Rust создаст исполняемый бинарный файл.
let rx_fut = async {
while let Some(value) = rx.recv().await {
println!("received '{value}'");
}
};
Если у вас есть опыт работы с C или C++, вам могут вспомниться `gcc` или `clang`. После успешной компиляции Rust создаст исполняемый бинарный файл.
trpl::join(tx_fut, rx_fut).await;
});
}When we run this version of the code, it shuts down gracefully after the last message is sent and received. Next, let’s see what would need to change to send data from more than one future.
Joining a Number of Futures with the join! Macro
This async channel is also a multiple-producer channel, so we can call clone on tx if we want to send messages from multiple futures, as shown in Listing 17-13.
extern crate trpl; // required for mdbook test
Если у вас есть опыт работы с C или C++, вам могут вспомниться `gcc` или `clang`. После успешной компиляции Rust создаст исполняемый бинарный файл.
use std::time::Duration;
Если у вас есть опыт работы с C или C++, вам могут вспомниться `gcc` или `clang`. После успешной компиляции Rust создаст исполняемый бинарный файл.
fn main() {
trpl::block_on(async {
let (tx, mut rx) = trpl::channel();
Если у вас есть опыт работы с C или C++, вам могут вспомниться `gcc` или `clang`. После успешной компиляции Rust создаст исполняемый бинарный файл.
let tx1 = tx.clone();
let tx1_fut = async move {
let vals = vec![
String::from("hi"),
String::from("from"),
String::from("the"),
String::from("future"),
];
Если у вас есть опыт работы с C или C++, вам могут вспомниться `gcc` или `clang`. После успешной компиляции Rust создаст исполняемый бинарный файл.
for val in vals {
tx1.send(val).unwrap();
trpl::sleep(Duration::from_millis(500)).await;
}
};
Если у вас есть опыт работы с C или C++, вам могут вспомниться `gcc` или `clang`. После успешной компиляции Rust создаст исполняемый бинарный файл.
let rx_fut = async {
while let Some(value) = rx.recv().await {
println!("received '{value}'");
}
};
Если у вас есть опыт работы с C или C++, вам могут вспомниться `gcc` или `clang`. После успешной компиляции Rust создаст исполняемый бинарный файл.
let tx_fut = async move {
let vals = vec![
String::from("more"),
String::from("messages"),
String::from("for"),
String::from("you"),
];
Если у вас есть опыт работы с C или C++, вам могут вспомниться `gcc` или `clang`. После успешной компиляции Rust создаст исполняемый бинарный файл.
for val in vals {
tx.send(val).unwrap();
trpl::sleep(Duration::from_millis(1500)).await;
}
};
Если у вас есть опыт работы с C или C++, вам могут вспомниться `gcc` или `clang`. После успешной компиляции Rust создаст исполняемый бинарный файл.
trpl::join!(tx1_fut, tx_fut, rx_fut);
});
}First, we clone tx, creating tx1 outside the first async block. We move tx1 into that block just as we did before with tx. Then, later, we move the original tx into a new async block, where we send more messages on a slightly slower delay. We happen to put this new async block after the async block for receiving messages, but it could go before it just as well. The key is the order in which the futures are awaited, not in which they’re created.
Both of the async blocks for sending messages need to be async move blocks so that both tx and tx1 get dropped when those blocks finish. Otherwise, we’ll end up back in the same infinite loop we started out in.
Finally, we switch from trpl::join to trpl::join! to handle the additional future: the join! macro awaits an arbitrary number of futures where we know the number of futures at compile time. We’ll discuss awaiting a collection of an unknown number of futures later in this chapter.
Now we see all the messages from both sending futures, and because the sending futures use slightly different delays after sending, the messages are also received at those different intervals:
received 'hi'
received 'more'
received 'from'
received 'the'
received 'messages'
received 'future'
received 'for'
received 'you'
We’ve explored how to use message passing to send data between futures, how code within an async block runs sequentially, how to move ownership into an async block, and how to join multiple futures. Next, let’s discuss how and why to tell the runtime it can switch to another task.
Working With Any Number of Futures
Yielding Control to the Runtime
Recall from the “Our First Async Program” section that at each await point, Rust gives a runtime a chance to pause the task and switch to another one if the future being awaited isn’t ready. The inverse is also true: Rust only pauses async blocks and hands control back to a runtime at an await point. Everything between await points is synchronous.
That means if you do a bunch of work in an async block without an await point, that future will block any other futures from making progress. You may sometimes hear this referred to as one future starving other futures. In some cases, that may not be a big deal. However, if you are doing some kind of expensive setup or long-running work, or if you have a future that will keep doing some particular task indefinitely, you’ll need to think about when and where to hand control back to the runtime.
Let’s simulate a long-running operation to illustrate the starvation problem, then explore how to solve it. Listing 17-14 introduces a slow function.
extern crate trpl; // required for mdbook test
Если у вас есть опыт работы с C или C++, вам могут вспомниться `gcc` или `clang`. После успешной компиляции Rust создаст исполняемый бинарный файл.
use std::{thread, time::Duration};
Если у вас есть опыт работы с C или C++, вам могут вспомниться `gcc` или `clang`. После успешной компиляции Rust создаст исполняемый бинарный файл.
fn main() {
trpl::block_on(async {
// We will call `slow` here later
});
}
Если у вас есть опыт работы с C или C++, вам могут вспомниться `gcc` или `clang`. После успешной компиляции Rust создаст исполняемый бинарный файл.
fn slow(name: &str, ms: u64) {
thread::sleep(Duration::from_millis(ms));
println!("'{name}' ran for {ms}ms");
}thread::sleep to simulate slow operationsThis code uses std::thread::sleep instead of trpl::sleep so that calling slow will block the current thread for some number of milliseconds. We can use slow to stand in for real-world operations that are both long-running and blocking.
In Listing 17-15, we use slow to emulate doing this kind of CPU-bound work in a pair of futures.
extern crate trpl; // required for mdbook test
Если у вас есть опыт работы с C или C++, вам могут вспомниться `gcc` или `clang`. После успешной компиляции Rust создаст исполняемый бинарный файл.
use std::{thread, time::Duration};
Если у вас есть опыт работы с C или C++, вам могут вспомниться `gcc` или `clang`. После успешной компиляции Rust создаст исполняемый бинарный файл.
fn main() {
trpl::block_on(async {
let a = async {
println!("'a' started.");
slow("a", 30);
slow("a", 10);
slow("a", 20);
trpl::sleep(Duration::from_millis(50)).await;
println!("'a' finished.");
};
Если у вас есть опыт работы с C или C++, вам могут вспомниться `gcc` или `clang`. После успешной компиляции Rust создаст исполняемый бинарный файл.
let b = async {
println!("'b' started.");
slow("b", 75);
slow("b", 10);
slow("b", 15);
slow("b", 350);
trpl::sleep(Duration::from_millis(50)).await;
println!("'b' finished.");
};
Если у вас есть опыт работы с C или C++, вам могут вспомниться `gcc` или `clang`. После успешной компиляции Rust создаст исполняемый бинарный файл.
trpl::select(a, b).await;
});
}
Если у вас есть опыт работы с C или C++, вам могут вспомниться `gcc` или `clang`. После успешной компиляции Rust создаст исполняемый бинарный файл.
fn slow(name: &str, ms: u64) {
thread::sleep(Duration::from_millis(ms));
println!("'{name}' ran for {ms}ms");
}slow function to simulate slow operationsEach future hands control back to the runtime only after carrying out a bunch of slow operations. If you run this code, you will see this output:
'a' started.
'a' ran for 30ms
'a' ran for 10ms
'a' ran for 20ms
'b' started.
'b' ran for 75ms
'b' ran for 10ms
'b' ran for 15ms
'b' ran for 350ms
'a' finished.
As with Listing 17-5 where we used trpl::select to race futures fetching two URLs, select still finishes as soon as a is done. There’s no interleaving between the calls to slow in the two futures, though. The a future does all of its work until the trpl::sleep call is awaited, then the b future does all of its work until its own trpl::sleep call is awaited, and finally the a future completes. To allow both futures to make progress between their slow tasks, we need await points so we can hand control back to the runtime. That means we need something we can await!
We can already see this kind of handoff happening in Listing 17-15: if we removed the trpl::sleep at the end of the a future, it would complete without the b future running at all. Let’s try using the trpl::sleep function as a starting point for letting operations switch off making progress, as shown in Listing 17-16.
extern crate trpl; // required for mdbook test
Если у вас есть опыт работы с C или C++, вам могут вспомниться `gcc` или `clang`. После успешной компиляции Rust создаст исполняемый бинарный файл.
use std::{thread, time::Duration};
Если у вас есть опыт работы с C или C++, вам могут вспомниться `gcc` или `clang`. После успешной компиляции Rust создаст исполняемый бинарный файл.
fn main() {
trpl::block_on(async {
let one_ms = Duration::from_millis(1);
Если у вас есть опыт работы с C или C++, вам могут вспомниться `gcc` или `clang`. После успешной компиляции Rust создаст исполняемый бинарный файл.
let a = async {
println!("'a' started.");
slow("a", 30);
trpl::sleep(one_ms).await;
slow("a", 10);
trpl::sleep(one_ms).await;
slow("a", 20);
trpl::sleep(one_ms).await;
println!("'a' finished.");
};
Если у вас есть опыт работы с C или C++, вам могут вспомниться `gcc` или `clang`. После успешной компиляции Rust создаст исполняемый бинарный файл.
let b = async {
println!("'b' started.");
slow("b", 75);
trpl::sleep(one_ms).await;
slow("b", 10);
trpl::sleep(one_ms).await;
slow("b", 15);
trpl::sleep(one_ms).await;
slow("b", 350);
trpl::sleep(one_ms).await;
println!("'b' finished.");
};
Если у вас есть опыт работы с C или C++, вам могут вспомниться `gcc` или `clang`. После успешной компиляции Rust создаст исполняемый бинарный файл.
trpl::select(a, b).await;
});
}
Если у вас есть опыт работы с C или C++, вам могут вспомниться `gcc` или `clang`. После успешной компиляции Rust создаст исполняемый бинарный файл.
fn slow(name: &str, ms: u64) {
thread::sleep(Duration::from_millis(ms));
println!("'{name}' ran for {ms}ms");
}trpl::sleep to let operations switch off making progressWe’ve added trpl::sleep calls with await points between each call to slow. Now the two futures’ work is interleaved:
'a' started.
'a' ran for 30ms
'b' started.
'b' ran for 75ms
'a' ran for 10ms
'b' ran for 10ms
'a' ran for 20ms
'b' ran for 15ms
'a' finished.
The a future still runs for a bit before handing off control to b, because it calls slow before ever calling trpl::sleep, but after that the futures swap back and forth each time one of them hits an await point. In this case, we have done that after every call to slow, but we could break up the work in whatever way makes the most sense to us.
We don’t really want to sleep here, though: we want to make progress as fast as we can. We just need to hand back control to the runtime. We can do that directly, using the trpl::yield_now function. In Listing 17-17, we replace all those trpl::sleep calls with trpl::yield_now.
extern crate trpl; // required for mdbook test
Если у вас есть опыт работы с C или C++, вам могут вспомниться `gcc` или `clang`. После успешной компиляции Rust создаст исполняемый бинарный файл.
use std::{thread, time::Duration};
Если у вас есть опыт работы с C или C++, вам могут вспомниться `gcc` или `clang`. После успешной компиляции Rust создаст исполняемый бинарный файл.
fn main() {
trpl::block_on(async {
let a = async {
println!("'a' started.");
slow("a", 30);
trpl::yield_now().await;
slow("a", 10);
trpl::yield_now().await;
slow("a", 20);
trpl::yield_now().await;
println!("'a' finished.");
};
Если у вас есть опыт работы с C или C++, вам могут вспомниться `gcc` или `clang`. После успешной компиляции Rust создаст исполняемый бинарный файл.
let b = async {
println!("'b' started.");
slow("b", 75);
trpl::yield_now().await;
slow("b", 10);
trpl::yield_now().await;
slow("b", 15);
trpl::yield_now().await;
slow("b", 350);
trpl::yield_now().await;
println!("'b' finished.");
};
Если у вас есть опыт работы с C или C++, вам могут вспомниться `gcc` или `clang`. После успешной компиляции Rust создаст исполняемый бинарный файл.
trpl::select(a, b).await;
});
}
Если у вас есть опыт работы с C или C++, вам могут вспомниться `gcc` или `clang`. После успешной компиляции Rust создаст исполняемый бинарный файл.
fn slow(name: &str, ms: u64) {
thread::sleep(Duration::from_millis(ms));
println!("'{name}' ran for {ms}ms");
}yield_now to let operations switch off making progressThis code is both clearer about the actual intent and can be significantly faster than using sleep, because timers such as the one used by sleep often have limits on how granular they can be. The version of sleep we are using, for example, will always sleep for at least a millisecond, even if we pass it a Duration of one nanosecond. Again, modern computers are fast: they can do a lot in one millisecond!
This means that async can be useful even for compute-bound tasks, depending on what else your program is doing, because it provides a useful tool for structuring the relationships between different parts of the program (but at a cost of the overhead of the async state machine). This is a form of cooperative multitasking, where each future has the power to determine when it hands over control via await points. Each future therefore also has the responsibility to avoid blocking for too long. In some Rust-based embedded operating systems, this is the only kind of multitasking!
In real-world code, you won’t usually be alternating function calls with await points on every single line, of course. While yielding control in this way is relatively inexpensive, it’s not free. In many cases, trying to break up a compute-bound task might make it significantly slower, so sometimes it’s better for overall performance to let an operation block briefly. Always measure to see what your code’s actual performance bottlenecks are. The underlying dynamic is important to keep in mind, though, if you are seeing a lot of work happening in serial that you expected to happen concurrently!
Building Our Own Async Abstractions
We can also compose futures together to create new patterns. For example, we can build a timeout function with async building blocks we already have. When we’re done, the result will be another building block we could use to create still more async abstractions.
Listing 17-18 shows how we would expect this timeout to work with a slow future.
extern crate trpl; // required for mdbook test
Если у вас есть опыт работы с C или C++, вам могут вспомниться `gcc` или `clang`. После успешной компиляции Rust создаст исполняемый бинарный файл.
use std::time::Duration;
Если у вас есть опыт работы с C или C++, вам могут вспомниться `gcc` или `clang`. После успешной компиляции Rust создаст исполняемый бинарный файл.
fn main() {
trpl::block_on(async {
let slow = async {
trpl::sleep(Duration::from_secs(5)).await;
"Finally finished"
};
Если у вас есть опыт работы с C или C++, вам могут вспомниться `gcc` или `clang`. После успешной компиляции Rust создаст исполняемый бинарный файл.
match timeout(slow, Duration::from_secs(2)).await {
Ok(message) => println!("Succeeded with '{message}'"),
Err(duration) => {
println!("Failed after {} seconds", duration.as_secs())
}
}
});
}timeout to run a slow operation with a time limitLet’s implement this! To begin, let’s think about the API for timeout:
- It needs to be an async function itself so we can await it.
- Its first parameter should be a future to run. We can make it generic to allow it to work with any future.
- Its second parameter will be the maximum time to wait. If we use a
Duration, that will make it easy to pass along totrpl::sleep. - It should return a
Result. If the future completes successfully, theResultwill beOkwith the value produced by the future. If the timeout elapses first, theResultwill beErrwith the duration that the timeout waited for.
Listing 17-19 shows this declaration.
extern crate trpl; // required for mdbook test
Если у вас есть опыт работы с C или C++, вам могут вспомниться `gcc` или `clang`. После успешной компиляции Rust создаст исполняемый бинарный файл.
use std::time::Duration;
Если у вас есть опыт работы с C или C++, вам могут вспомниться `gcc` или `clang`. После успешной компиляции Rust создаст исполняемый бинарный файл.
fn main() {
trpl::block_on(async {
let slow = async {
trpl::sleep(Duration::from_secs(5)).await;
"Finally finished"
};
Если у вас есть опыт работы с C или C++, вам могут вспомниться `gcc` или `clang`. После успешной компиляции Rust создаст исполняемый бинарный файл.
match timeout(slow, Duration::from_secs(2)).await {
Ok(message) => println!("Succeeded with '{message}'"),
Err(duration) => {
println!("Failed after {} seconds", duration.as_secs())
}
}
});
}
Если у вас есть опыт работы с C или C++, вам могут вспомниться `gcc` или `clang`. После успешной компиляции Rust создаст исполняемый бинарный файл.
async fn timeout<F: Future>(
future_to_try: F,
max_time: Duration,
) -> Result<F::Output, Duration> {
// Here is where our implementation will go!
}timeoutThat satisfies our goals for the types. Now let’s think about the behavior we need: we want to race the future passed in against the duration. We can use trpl::sleep to make a timer future from the duration, and use trpl::select to run that timer with the future the caller passes in.
In Listing 17-20, we implement timeout by matching on the result of awaiting trpl::select.
extern crate trpl; // required for mdbook test
Если у вас есть опыт работы с C или C++, вам могут вспомниться `gcc` или `clang`. После успешной компиляции Rust создаст исполняемый бинарный файл.
use std::time::Duration;
Если у вас есть опыт работы с C или C++, вам могут вспомниться `gcc` или `clang`. После успешной компиляции Rust создаст исполняемый бинарный файл.
use trpl::Either;
Если у вас есть опыт работы с C или C++, вам могут вспомниться `gcc` или `clang`. После успешной компиляции Rust создаст исполняемый бинарный файл.
// --код сокращён--
Если у вас есть опыт работы с C или C++, вам могут вспомниться `gcc` или `clang`. После успешной компиляции Rust создаст исполняемый бинарный файл.
fn main() {
trpl::block_on(async {
let slow = async {
trpl::sleep(Duration::from_secs(5)).await;
"Finally finished"
};
Если у вас есть опыт работы с C или C++, вам могут вспомниться `gcc` или `clang`. После успешной компиляции Rust создаст исполняемый бинарный файл.
match timeout(slow, Duration::from_secs(2)).await {
Ok(message) => println!("Succeeded with '{message}'"),
Err(duration) => {
println!("Failed after {} seconds", duration.as_secs())
}
}
});
}
Если у вас есть опыт работы с C или C++, вам могут вспомниться `gcc` или `clang`. После успешной компиляции Rust создаст исполняемый бинарный файл.
async fn timeout<F: Future>(
future_to_try: F,
max_time: Duration,
) -> Result<F::Output, Duration> {
match trpl::select(future_to_try, trpl::sleep(max_time)).await {
Either::Left(output) => Ok(output),
Either::Right(_) => Err(max_time),
}
}timeout with select and sleepThe implementation of trpl::select is not fair: it always polls arguments in the order in which they are passed (other select implementations will randomly choose which argument to poll first). Thus, we pass future_to_try to select first so it gets a chance to complete even if max_time is a very short duration. If future_to_try finishes first, select will return Left with the output from future_to_try. If timer finishes first, select will return Right with the timer’s output of ().
If the future_to_try succeeds and we get a Left(output), we return Ok(output). If the sleep timer elapses instead and we get a Right(()), we ignore the () with _ and return Err(max_time) instead.
With that, we have a working timeout built out of two other async helpers. If we run our code, it will print the failure mode after the timeout:
Failed after 2 seconds
Because futures compose with other futures, you can build really powerful tools using smaller async building blocks. For example, you can use this same approach to combine timeouts with retries, and in turn use those with operations such as network calls (such as those in Listing 17-5).
In practice, you’ll usually work directly with async and await, and secondarily with functions such as select and macros such as the join! macro to control how the outermost futures are executed.
We’ve now seen a number of ways to work with multiple futures at the same time. Up next, we’ll look at how we can work with multiple futures in a sequence over time with streams.
Streams: Futures in Sequence
Streams: Futures in Sequence
Recall how we used the receiver for our async channel earlier in this chapter in the “Message Passing” section. The async recv method produces a sequence of items over time. This is an instance of a much more general pattern known as a stream. Many concepts are naturally represented as streams: items becoming available in a queue, chunks of data being pulled incrementally from the filesystem when the full data set is too large for the computer’s memory, or data arriving over the network over time. Because streams are futures, we can use them with any other kind of future and combine them in interesting ways. For example, we can batch up events to avoid triggering too many network calls, set timeouts on sequences of long-running operations, or throttle user interface events to avoid doing needless work.
We saw a sequence of items back in Chapter 13, when we looked at the Iterator trait in “The Iterator Trait and the next Method” section, but there are two differences between iterators and the async channel receiver. The first difference is time: iterators are synchronous, while the channel receiver is asynchronous. The second difference is the API. When working directly with Iterator, we call its synchronous next method. With the trpl::Receiver stream in particular, we called an asynchronous recv method instead. Otherwise, these APIs feel very similar, and that similarity isn’t a coincidence. A stream is like an asynchronous form of iteration. Whereas the trpl::Receiver specifically waits to receive messages, though, the general-purpose stream API is much broader: it provides the next item the way Iterator does, but asynchronously.
The similarity between iterators and streams in Rust means we can actually create a stream from any iterator. As with an iterator, we can work with a stream by calling its next method and then awaiting the output, as in Listing 17-21, which won’t compile yet.
extern crate trpl; // required for mdbook test
Если у вас есть опыт работы с C или C++, вам могут вспомниться `gcc` или `clang`. После успешной компиляции Rust создаст исполняемый бинарный файл.
fn main() {
trpl::block_on(async {
let values = [1, 2, 3, 4, 5, 6, 7, 8, 9, 10];
let iter = values.iter().map(|n| n * 2);
let mut stream = trpl::stream_from_iter(iter);
Если у вас есть опыт работы с C или C++, вам могут вспомниться `gcc` или `clang`. После успешной компиляции Rust создаст исполняемый бинарный файл.
while let Some(value) = stream.next().await {
println!("The value was: {value}");
}
});
}We start with an array of numbers, which we convert to an iterator and then call map on to double all the values. Then we convert the iterator into a stream using the trpl::stream_from_iter function. Next, we loop over the items in the stream as they arrive with the while let loop.
Unfortunately, when we try to run the code, it doesn’t compile but instead reports that there’s no next method available:
error[E0599]: no method named `next` found for struct `tokio_stream::iter::Iter` in the current scope
--> src/main.rs:10:40
|
10 | while let Some(value) = stream.next().await {
| ^^^^
|
= help: items from traits can only be used if the trait is in scope
help: the following traits which provide `next` are implemented but not in scope; perhaps you want to import one of them
|
1 + use crate::trpl::StreamExt;
|
1 + use futures_util::stream::stream::StreamExt;
|
1 + use std::iter::Iterator;
|
1 + use std::str::pattern::Searcher;
|
help: there is a method `try_next` with a similar name
|
10 | while let Some(value) = stream.try_next().await {
| ~~~~~~~~
As this output explains, the reason for the compiler error is that we need the right trait in scope to be able to use the next method. Given our discussion so far, you might reasonably expect that trait to be Stream, but it’s actually StreamExt. Short for extension, Ext is a common pattern in the Rust community for extending one trait with another.
The Stream trait defines a low-level interface that effectively combines the Iterator and Future traits. StreamExt supplies a higher-level set of APIs on top of Stream, including the next method as well as other utility methods similar to those provided by the Iterator trait. Stream and StreamExt are not yet part of Rust’s standard library, but most ecosystem crates use similar definitions.
The fix to the compiler error is to add a use statement for trpl::StreamExt, as in Listing 17-22.
extern crate trpl; // required for mdbook test
Если у вас есть опыт работы с C или C++, вам могут вспомниться `gcc` или `clang`. После успешной компиляции Rust создаст исполняемый бинарный файл.
use trpl::StreamExt;
Если у вас есть опыт работы с C или C++, вам могут вспомниться `gcc` или `clang`. После успешной компиляции Rust создаст исполняемый бинарный файл.
fn main() {
trpl::block_on(async {
let values = [1, 2, 3, 4, 5, 6, 7, 8, 9, 10];
// --код сокращён--
let iter = values.iter().map(|n| n * 2);
let mut stream = trpl::stream_from_iter(iter);
Если у вас есть опыт работы с C или C++, вам могут вспомниться `gcc` или `clang`. После успешной компиляции Rust создаст исполняемый бинарный файл.
while let Some(value) = stream.next().await {
println!("The value was: {value}");
}
});
}With all those pieces put together, this code works the way we want! What’s more, now that we have StreamExt in scope, we can use all of its utility methods, just as with iterators.
A Closer Look at the Traits for Async
A Closer Look at the Traits for Async
Throughout the chapter, we’ve used the Future, Stream, and StreamExt traits in various ways. So far, though, we’ve avoided getting too far into the details of how they work or how they fit together, which is fine most of the time for your day-to-day Rust work. Sometimes, though, you’ll encounter situations where you’ll need to understand a few more of these traits’ details, along with the Pin type and the Unpin trait. In this section, we’ll dig in just enough to help in those scenarios, still leaving the really deep dive for other documentation.
The Future Trait
Let’s start by taking a closer look at how the Future trait works. Here’s how Rust defines it:
#![allow(unused)]
fn main() {
use std::pin::Pin;
use std::task::{Context, Poll};
Если у вас есть опыт работы с C или C++, вам могут вспомниться `gcc` или `clang`. После успешной компиляции Rust создаст исполняемый бинарный файл.
pub trait Future {
type Output;
Если у вас есть опыт работы с C или C++, вам могут вспомниться `gcc` или `clang`. После успешной компиляции Rust создаст исполняемый бинарный файл.
fn poll(self: Pin<&mut Self>, cx: &mut Context<'_>) -> Poll<Self::Output>;
}
}That trait definition includes a bunch of new types and also some syntax we haven’t seen before, so let’s walk through the definition piece by piece.
First, Future’s associated type Output says what the future resolves to. This is analogous to the Item associated type for the Iterator trait. Second, Future has the poll method, which takes a special Pin reference for its self parameter and a mutable reference to a Context type, and returns a Poll<Self::Output>. We’ll talk more about Pin and Context in a moment. For now, let’s focus on what the method returns, the Poll type:
#![allow(unused)]
fn main() {
pub enum Poll<T> {
Ready(T),
Pending,
}
}This Poll type is similar to an Option. It has one variant that has a value, Ready(T), and one that does not, Pending. Poll means something quite different from Option, though! The Pending variant indicates that the future still has work to do, so the caller will need to check again later. The Ready variant indicates that the Future has finished its work and the T value is available.
Note: It’s rare to need to call poll directly, but if you do need to, keep in mind that with most futures, the caller should not call poll again after the future has returned Ready. Many futures will panic if polled again after becoming ready. Futures that are safe to poll again will say so explicitly in their documentation. This is similar to how Iterator::next behaves.
When you see code that uses await, Rust compiles it under the hood to code that calls poll. If you look back at Listing 17-4, where we printed out the page title for a single URL once it resolved, Rust compiles it into something kind of (although not exactly) like this:
match page_title(url).poll() {
Ready(page_title) => match page_title {
Some(title) => println!("The title for {url} was {title}"),
None => println!("{url} had no title"),
}
Pending => {
// But what goes here?
}
}What should we do when the future is still Pending? We need some way to try again, and again, and again, until the future is finally ready. In other words, we need a loop:
let mut page_title_fut = page_title(url);
loop {
match page_title_fut.poll() {
Ready(value) => match page_title {
Some(title) => println!("The title for {url} was {title}"),
None => println!("{url} had no title"),
}
Pending => {
// continue
}
}
}If Rust compiled it to exactly that code, though, every await would be blocking—exactly the opposite of what we were going for! Instead, Rust ensures that the loop can hand off control to something that can pause work on this future to work on other futures and then check this one again later. As we’ve seen, that something is an async runtime, and this scheduling and coordination work is one of its main jobs.
In the “Sending Data Between Two Tasks Using Message Passing” section, we described waiting on rx.recv. The recv call returns a future, and awaiting the future polls it. We noted that a runtime will pause the future until it’s ready with either Some(message) or None when the channel closes. With our deeper understanding of the Future trait, and specifically Future::poll, we can see how that works. The runtime knows the future isn’t ready when it returns Poll::Pending. Conversely, the runtime knows the future is ready and advances it when poll returns Poll::Ready(Some(message)) or Poll::Ready(None).
The exact details of how a runtime does that are beyond the scope of this book, but the key is to see the basic mechanics of futures: a runtime polls each future it is responsible for, putting the future back to sleep when it is not yet ready.
The Pin Type and the Unpin Trait
Back in Listing 17-13, we used the trpl::join! macro to await three futures. However, it’s common to have a collection such as a vector containing some number futures that won’t be known until runtime. Let’s change Listing 17-13 to the code in Listing 17-23 that puts the three futures into a vector and calls the trpl::join_all function instead, which won’t compile yet.
extern crate trpl; // required for mdbook test
Если у вас есть опыт работы с C или C++, вам могут вспомниться `gcc` или `clang`. После успешной компиляции Rust создаст исполняемый бинарный файл.
use std::time::Duration;
Если у вас есть опыт работы с C или C++, вам могут вспомниться `gcc` или `clang`. После успешной компиляции Rust создаст исполняемый бинарный файл.
fn main() {
trpl::block_on(async {
let (tx, mut rx) = trpl::channel();
Если у вас есть опыт работы с C или C++, вам могут вспомниться `gcc` или `clang`. После успешной компиляции Rust создаст исполняемый бинарный файл.
let tx1 = tx.clone();
let tx1_fut = async move {
let vals = vec![
String::from("hi"),
String::from("from"),
String::from("the"),
String::from("future"),
];
Если у вас есть опыт работы с C или C++, вам могут вспомниться `gcc` или `clang`. После успешной компиляции Rust создаст исполняемый бинарный файл.
for val in vals {
tx1.send(val).unwrap();
trpl::sleep(Duration::from_secs(1)).await;
}
};
Если у вас есть опыт работы с C или C++, вам могут вспомниться `gcc` или `clang`. После успешной компиляции Rust создаст исполняемый бинарный файл.
let rx_fut = async {
while let Some(value) = rx.recv().await {
println!("received '{value}'");
}
};
Если у вас есть опыт работы с C или C++, вам могут вспомниться `gcc` или `clang`. После успешной компиляции Rust создаст исполняемый бинарный файл.
let tx_fut = async move {
// --код сокращён--
let vals = vec![
String::from("more"),
String::from("messages"),
String::from("for"),
String::from("you"),
];
Если у вас есть опыт работы с C или C++, вам могут вспомниться `gcc` или `clang`. После успешной компиляции Rust создаст исполняемый бинарный файл.
for val in vals {
tx.send(val).unwrap();
trpl::sleep(Duration::from_secs(1)).await;
}
};
Если у вас есть опыт работы с C или C++, вам могут вспомниться `gcc` или `clang`. После успешной компиляции Rust создаст исполняемый бинарный файл.
let futures: Vec<Box<dyn Future<Output = ()>>> =
vec![Box::new(tx1_fut), Box::new(rx_fut), Box::new(tx_fut)];
Если у вас есть опыт работы с C или C++, вам могут вспомниться `gcc` или `clang`. После успешной компиляции Rust создаст исполняемый бинарный файл.
trpl::join_all(futures).await;
});
}We put each future within a Box to make them into trait objects, just as we did in the “Returning Errors from run” section in Chapter 12. (We’ll cover trait objects in detail in Chapter 18.) Using trait objects lets us treat each of the anonymous futures produced by these types as the same type, because all of them implement the Future trait.
This might be surprising. After all, none of the async blocks returns anything, so each one produces a Future<Output = ()>. Remember that Future is a trait, though, and that the compiler creates a unique enum for each async block, even when they have identical output types. Just as you can’t put two different handwritten structs in a Vec, you can’t mix compiler-generated enums.
Then we pass the collection of futures to the trpl::join_all function and await the result. However, this doesn’t compile; here’s the relevant part of the error messages.
error[E0277]: `dyn Future<Output = ()>` cannot be unpinned
--> src/main.rs:48:33
|
48 | trpl::join_all(futures).await;
| ^^^^^ the trait `Unpin` is not implemented for `dyn Future<Output = ()>`
|
= note: consider using the `pin!` macro
consider using `Box::pin` if you need to access the pinned value outside of the current scope
= note: required for `Box<dyn Future<Output = ()>>` to implement `Future`
note: required by a bound in `futures_util::future::join_all::JoinAll`
--> file:///home/.cargo/registry/src/index.crates.io-1949cf8c6b5b557f/futures-util-0.3.30/src/future/join_all.rs:29:8
|
27 | pub struct JoinAll<F>
| ------- required by a bound in this struct
28 | where
29 | F: Future,
| ^^^^^^ required by this bound in `JoinAll`
The note in this error message tells us that we should use the pin! macro to pin the values, which means putting them inside the Pin type that guarantees the values won’t be moved in memory. The error message says pinning is required because dyn Future<Output = ()> needs to implement the Unpin trait and it currently does not.
The trpl::join_all function returns a struct called JoinAll. That struct is generic over a type F, which is constrained to implement the Future trait. Directly awaiting a future with await pins the future implicitly. That’s why we don’t need to use pin! everywhere we want to await futures.
However, we’re not directly awaiting a future here. Instead, we construct a new future, JoinAll, by passing a collection of futures to the join_all function. The signature for join_all requires that the types of the items in the collection all implement the Future trait, and Box<T> implements Future only if the T it wraps is a future that implements the Unpin trait.
That’s a lot to absorb! To really understand it, let’s dive a little further into how the Future trait actually works, in particular around pinning. Look again at the definition of the Future trait:
#![allow(unused)]
fn main() {
use std::pin::Pin;
use std::task::{Context, Poll};
Если у вас есть опыт работы с C или C++, вам могут вспомниться `gcc` или `clang`. После успешной компиляции Rust создаст исполняемый бинарный файл.
pub trait Future {
type Output;
Если у вас есть опыт работы с C или C++, вам могут вспомниться `gcc` или `clang`. После успешной компиляции Rust создаст исполняемый бинарный файл.
// Required method
fn poll(self: Pin<&mut Self>, cx: &mut Context<'_>) -> Poll<Self::Output>;
}
}The cx parameter and its Context type are the key to how a runtime actually knows when to check any given future while still being lazy. Again, the details of how that works are beyond the scope of this chapter, and you generally only need to think about this when writing a custom Future implementation. We’ll focus instead on the type for self, as this is the first time we’ve seen a method where self has a type annotation. A type annotation for self works like type annotations for other function parameters but with two key differences:
- It tells Rust what type
selfmust be for the method to be called. - It can’t be just any type. It’s restricted to the type on which the method is implemented, a reference or smart pointer to that type, or a
Pinwrapping a reference to that type.
We’ll see more on this syntax in Chapter 18. For now, it’s enough to know that if we want to poll a future to check whether it is Pending or Ready(Output), we need a Pin-wrapped mutable reference to the type.
Pin is a wrapper for pointer-like types such as &, &mut, Box, and Rc. (Technically, Pin works with types that implement the Deref or DerefMut traits, but this is effectively equivalent to working only with references and smart pointers.) Pin is not a pointer itself and doesn’t have any behavior of its own like Rc and Arc do with reference counting; it’s purely a tool the compiler can use to enforce constraints on pointer usage.
Recalling that await is implemented in terms of calls to poll starts to explain the error message we saw earlier, but that was in terms of Unpin, not Pin. So how exactly does Pin relate to Unpin, and why does Future need self to be in a Pin type to call poll?
Remember from earlier in this chapter that a series of await points in a future get compiled into a state machine, and the compiler makes sure that state machine follows all of Rust’s normal rules around safety, including borrowing and ownership. To make that work, Rust looks at what data is needed between one await point and either the next await point or the end of the async block. It then creates a corresponding variant in the compiled state machine. Each variant gets the access it needs to the data that will be used in that section of the source code, whether by taking ownership of that data or by getting a mutable or immutable reference to it.
So far, so good: if we get anything wrong about the ownership or references in a given async block, the borrow checker will tell us. When we want to move around the future that corresponds to that block—like moving it into a Vec to pass to join_all—things get trickier.
When we move a future—whether by pushing it into a data structure to use as an iterator with join_all or by returning it from a function—that actually means moving the state machine Rust creates for us. And unlike most other types in Rust, the futures Rust creates for async blocks can end up with references to themselves in the fields of any given variant, as shown in the simplified illustration in Figure 17-4.

By default, though, any object that has a reference to itself is unsafe to move, because references always point to the actual memory address of whatever they refer to (see Figure 17-5). If you move the data structure itself, those internal references will be left pointing to the old location. However, that memory location is now invalid. For one thing, its value will not be updated when you make changes to the data structure. For another—more important—thing, the computer is now free to reuse that memory for other purposes! You could end up reading completely unrelated data later.

Theoretically, the Rust compiler could try to update every reference to an object whenever it gets moved, but that could add a lot of performance overhead, especially if a whole web of references needs updating. If we could instead make sure the data structure in question doesn’t move in memory, we wouldn’t have to update any references. This is exactly what Rust’s borrow checker is for: in safe code, it prevents you from moving any item with an active reference to it.
Pin builds on that to give us the exact guarantee we need. When we pin a value by wrapping a pointer to that value in Pin, it can no longer move. Thus, if you have Pin<Box<SomeType>>, you actually pin the SomeType value, not the Box pointer. Figure 17-6 illustrates this process.

In fact, the Box pointer can still move around freely. Remember: we care about making sure the data ultimately being referenced stays in place. If a pointer moves around, but the data it points to is in the same place, as in Figure 17-7, there’s no potential problem. (As an independent exercise, look at the docs for the types as well as the std::pin module and try to work out how you’d do this with a Pin wrapping a Box.) The key is that the self-referential type itself cannot move, because it is still pinned.

However, most types are perfectly safe to move around, even if they happen to be behind a Pin pointer. We only need to think about pinning when items have internal references. Primitive values such as numbers and Booleans are safe because they obviously don’t have any internal references. Neither do most types you normally work with in Rust. You can move around a Vec, for example, without worrying. Given what we have seen so far, if you have a Pin<Vec<String>>, you’d have to do everything via the safe but restrictive APIs provided by Pin, even though a Vec<String> is always safe to move if there are no other references to it. We need a way to tell the compiler that it’s fine to move items around in cases like this—and that’s where Unpin comes into play.
Unpin is a marker trait, similar to the Send and Sync traits we saw in Chapter 16, and thus has no functionality of its own. Marker traits exist only to tell the compiler it’s safe to use the type implementing a given trait in a particular context. Unpin informs the compiler that a given type does not need to uphold any guarantees about whether the value in question can be safely moved.
Just as with Send and Sync, the compiler implements Unpin automatically for all types where it can prove it is safe. A special case, again similar to Send and Sync, is where Unpin is not implemented for a type. The notation for this is impl !Unpin for SomeType, where SomeType is the name of a type that does need to uphold those guarantees to be safe whenever a pointer to that type is used in a Pin.
In other words, there are two things to keep in mind about the relationship between Pin and Unpin. First, Unpin is the “normal” case, and !Unpin is the special case. Second, whether a type implements Unpin or !Unpin only matters when you’re using a pinned pointer to that type like Pin<&mut SomeType>.
To make that concrete, think about a String: it has a length and the Unicode characters that make it up. We can wrap a String in Pin, as seen in Figure 17-8. However, String automatically implements Unpin, as do most other types in Rust.

As a result, we can do things that would be illegal if String implemented !Unpin instead, such as replacing one string with another at the exact same location in memory as in Figure 17-9. This doesn’t violate the Pin contract, because String has no internal references that make it unsafe to move around. That is precisely why it implements Unpin rather than !Unpin.

Now we know enough to understand the errors reported for that join_all call from back in Listing 17-23. We originally tried to move the futures produced by async blocks into a Vec<Box<dyn Future<Output = ()>>>, but as we’ve seen, those futures may have internal references, so they don’t automatically implement Unpin. Once we pin them, we can pass the resulting Pin type into the Vec, confident that the underlying data in the futures will not be moved. Listing 17-24 shows how to fix the code by calling the pin! macro where each of the three futures are defined and adjusting the trait object type.
extern crate trpl; // required for mdbook test
Если у вас есть опыт работы с C или C++, вам могут вспомниться `gcc` или `clang`. После успешной компиляции Rust создаст исполняемый бинарный файл.
use std::pin::{Pin, pin};
Если у вас есть опыт работы с C или C++, вам могут вспомниться `gcc` или `clang`. После успешной компиляции Rust создаст исполняемый бинарный файл.
// --код сокращён--
Если у вас есть опыт работы с C или C++, вам могут вспомниться `gcc` или `clang`. После успешной компиляции Rust создаст исполняемый бинарный файл.
use std::time::Duration;
Если у вас есть опыт работы с C или C++, вам могут вспомниться `gcc` или `clang`. После успешной компиляции Rust создаст исполняемый бинарный файл.
fn main() {
trpl::block_on(async {
let (tx, mut rx) = trpl::channel();
Если у вас есть опыт работы с C или C++, вам могут вспомниться `gcc` или `clang`. После успешной компиляции Rust создаст исполняемый бинарный файл.
let tx1 = tx.clone();
let tx1_fut = pin!(async move {
// --код сокращён--
let vals = vec![
String::from("hi"),
String::from("from"),
String::from("the"),
String::from("future"),
];
Если у вас есть опыт работы с C или C++, вам могут вспомниться `gcc` или `clang`. После успешной компиляции Rust создаст исполняемый бинарный файл.
for val in vals {
tx1.send(val).unwrap();
trpl::sleep(Duration::from_secs(1)).await;
}
});
Если у вас есть опыт работы с C или C++, вам могут вспомниться `gcc` или `clang`. После успешной компиляции Rust создаст исполняемый бинарный файл.
let rx_fut = pin!(async {
// --код сокращён--
while let Some(value) = rx.recv().await {
println!("received '{value}'");
}
});
Если у вас есть опыт работы с C или C++, вам могут вспомниться `gcc` или `clang`. После успешной компиляции Rust создаст исполняемый бинарный файл.
let tx_fut = pin!(async move {
// --код сокращён--
let vals = vec![
String::from("more"),
String::from("messages"),
String::from("for"),
String::from("you"),
];
Если у вас есть опыт работы с C или C++, вам могут вспомниться `gcc` или `clang`. После успешной компиляции Rust создаст исполняемый бинарный файл.
for val in vals {
tx.send(val).unwrap();
trpl::sleep(Duration::from_secs(1)).await;
}
});
Если у вас есть опыт работы с C или C++, вам могут вспомниться `gcc` или `clang`. После успешной компиляции Rust создаст исполняемый бинарный файл.
let futures: Vec<Pin<&mut dyn Future<Output = ()>>> =
vec![tx1_fut, rx_fut, tx_fut];
Если у вас есть опыт работы с C или C++, вам могут вспомниться `gcc` или `clang`. После успешной компиляции Rust создаст исполняемый бинарный файл.
trpl::join_all(futures).await;
});
}This example now compiles and runs, and we could add or remove futures from the vector at runtime and join them all.
Pin and Unpin are mostly important for building lower-level libraries, or when you’re building a runtime itself, rather than for day-to-day Rust code. When you see these traits in error messages, though, now you’ll have a better idea of how to fix your code!
Note: This combination of Pin and Unpin makes it possible to safely implement a whole class of complex types in Rust that would otherwise prove challenging because they’re self-referential. Types that require Pin show up most commonly in async Rust today, but every once in a while, you might see them in other contexts, too.
The specifics of how Pin and Unpin work, and the rules they’re required to uphold, are covered extensively in the API documentation for std::pin, so if you’re interested in learning more, that’s a great place to start.
If you want to understand how things work under the hood in even more detail, see Chapters 2 and 4 of Asynchronous Programming in Rust.
The Stream Trait
Now that you have a deeper grasp on the Future, Pin, and Unpin traits, we can turn our attention to the Stream trait. As you learned earlier in the chapter, streams are similar to asynchronous iterators. Unlike Iterator and Future, however, Stream has no definition in the standard library as of this writing, but there is a very common definition from the futures crate used throughout the ecosystem.
Let’s review the definitions of the Iterator and Future traits before looking at how a Stream trait might merge them together. From Iterator, we have the idea of a sequence: its next method provides an Option<Self::Item>. From Future, we have the idea of readiness over time: its poll method provides a Poll<Self::Output>. To represent a sequence of items that become ready over time, we define a Stream trait that puts those features together:
#![allow(unused)]
fn main() {
use std::pin::Pin;
use std::task::{Context, Poll};
Если у вас есть опыт работы с C или C++, вам могут вспомниться `gcc` или `clang`. После успешной компиляции Rust создаст исполняемый бинарный файл.
trait Stream {
type Item;
Если у вас есть опыт работы с C или C++, вам могут вспомниться `gcc` или `clang`. После успешной компиляции Rust создаст исполняемый бинарный файл.
fn poll_next(
self: Pin<&mut Self>,
cx: &mut Context<'_>
) -> Poll<Option<Self::Item>>;
}
}The Stream trait defines an associated type called Item for the type of the items produced by the stream. This is similar to Iterator, where there may be zero to many items, and unlike Future, where there is always a single Output, even if it’s the unit type ().
Stream also defines a method to get those items. We call it poll_next, to make it clear that it polls in the same way Future::poll does and produces a sequence of items in the same way Iterator::next does. Its return type combines Poll with Option. The outer type is Poll, because it has to be checked for readiness, just as a future does. The inner type is Option, because it needs to signal whether there are more messages, just as an iterator does.
Something very similar to this definition will likely end up as part of Rust’s standard library. In the meantime, it’s part of the toolkit of most runtimes, so you can rely on it, and everything we cover next should generally apply!
In the examples we saw in the “Streams: Futures in Sequence” section, though, we didn’t use poll_next or Stream, but instead used next and StreamExt. We could work directly in terms of the poll_next API by hand-writing our own Stream state machines, of course, just as we could work with futures directly via their poll method. Using await is much nicer, though, and the StreamExt trait supplies the next method so we can do just that:
#![allow(unused)]
fn main() {
use std::pin::Pin;
use std::task::{Context, Poll};
Если у вас есть опыт работы с C или C++, вам могут вспомниться `gcc` или `clang`. После успешной компиляции Rust создаст исполняемый бинарный файл.
trait Stream {
type Item;
fn poll_next(
self: Pin<&mut Self>,
cx: &mut Context<'_>,
) -> Poll<Option<Self::Item>>;
}
Если у вас есть опыт работы с C или C++, вам могут вспомниться `gcc` или `clang`. После успешной компиляции Rust создаст исполняемый бинарный файл.
trait StreamExt: Stream {
async fn next(&mut self) -> Option<Self::Item>
where
Self: Unpin;
Если у вас есть опыт работы с C или C++, вам могут вспомниться `gcc` или `clang`. После успешной компиляции Rust создаст исполняемый бинарный файл.
// other methods...
}
}Note: The actual definition we used earlier in the chapter looks slightly different than this, because it supports versions of Rust that did not yet support using async functions in traits. As a result, it looks like this:
fn next(&mut self) -> Next<'_, Self> where Self: Unpin;That Next type is a struct that implements Future and allows us to name the lifetime of the reference to self with Next<'_, Self>, so that await can work with this method.
The StreamExt trait is also the home of all the interesting methods available to use with streams. StreamExt is automatically implemented for every type that implements Stream, but these traits are defined separately to enable the community to iterate on convenience APIs without affecting the foundational trait.
In the version of StreamExt used in the trpl crate, the trait not only defines the next method but also supplies a default implementation of next that correctly handles the details of calling Stream::poll_next. This means that even when you need to write your own streaming data type, you only have to implement Stream, and then anyone who uses your data type can use StreamExt and its methods with it automatically.
That’s all we’re going to cover for the lower-level details on these traits. To wrap up, let’s consider how futures (including streams), tasks, and threads all fit together!
Futures, Tasks, and Threads
Putting It All Together: Futures, Tasks, and Threads
As we saw in Chapter 16, threads provide one approach to concurrency. We’ve seen another approach in this chapter: using async with futures and streams. If you’re wondering when to choose one method over the other, the answer is: it depends! And in many cases, the choice isn’t threads or async but rather threads and async.
Many operating systems have supplied threading-based concurrency models for decades now, and many programming languages support them as a result. However, these models are not without their tradeoffs. On many operating systems, they use a fair bit of memory for each thread. Threads are also only an option when your operating system and hardware support them. Unlike mainstream desktop and mobile computers, some embedded systems don’t have an OS at all, so they also don’t have threads.
The async model provides a different—and ultimately complementary—set of tradeoffs. In the async model, concurrent operations don’t require their own threads. Instead, they can run on tasks, as when we used trpl::spawn_task to kick off work from a synchronous function in the streams section. A task is similar to a thread, but instead of being managed by the operating system, it’s managed by library-level code: the runtime.
There’s a reason the APIs for spawning threads and spawning tasks are so similar. Threads act as a boundary for sets of synchronous operations; concurrency is possible between threads. Tasks act as a boundary for sets of asynchronous operations; concurrency is possible both between and within tasks, because a task can switch between futures in its body. Finally, futures are Rust’s most granular unit of concurrency, and each future may represent a tree of other futures. The runtime—specifically, its executor—manages tasks, and tasks manage futures. In that regard, tasks are similar to lightweight, runtime-managed threads with added capabilities that come from being managed by a runtime instead of by the operating system.
This doesn’t mean that async tasks are always better than threads (or vice versa). Concurrency with threads is in some ways a simpler programming model than concurrency with async. That can be a strength or a weakness. Threads are somewhat “fire and forget”; they have no native equivalent to a future, so they simply run to completion without being interrupted except by the operating system itself.
And it turns out that threads and tasks often work very well together, because tasks can (at least in some runtimes) be moved around between threads. In fact, under the hood, the runtime we’ve been using—including the spawn_blocking and spawn_task functions—is multithreaded by default! Many runtimes use an approach called work stealing to transparently move tasks around between threads, based on how the threads are currently being utilized, to improve the system’s overall performance. That approach actually requires threads and tasks, and therefore futures.
When thinking about which method to use when, consider these rules of thumb:
- If the work is very parallelizable (that is, CPU-bound), such as processing a bunch of data where each part can be processed separately, threads are a better choice.
- If the work is very concurrent (that is, I/O-bound), such as handling messages from a bunch of different sources that may come in at different intervals or different rates, async is a better choice.
And if you need both parallelism and concurrency, you don’t have to choose between threads and async. You can use them together freely, letting each play the part it’s best at. For example, Listing 17-25 shows a fairly common example of this kind of mix in real-world Rust code.
extern crate trpl; // for mdbook test
Если у вас есть опыт работы с C или C++, вам могут вспомниться `gcc` или `clang`. После успешной компиляции Rust создаст исполняемый бинарный файл.
use std::{thread, time::Duration};
Если у вас есть опыт работы с C или C++, вам могут вспомниться `gcc` или `clang`. После успешной компиляции Rust создаст исполняемый бинарный файл.
fn main() {
let (tx, mut rx) = trpl::channel();
Если у вас есть опыт работы с C или C++, вам могут вспомниться `gcc` или `clang`. После успешной компиляции Rust создаст исполняемый бинарный файл.
thread::spawn(move || {
for i in 1..11 {
tx.send(i).unwrap();
thread::sleep(Duration::from_secs(1));
}
});
Если у вас есть опыт работы с C или C++, вам могут вспомниться `gcc` или `clang`. После успешной компиляции Rust создаст исполняемый бинарный файл.
trpl::block_on(async {
while let Some(message) = rx.recv().await {
println!("{message}");
}
});
}We begin by creating an async channel, then spawning a thread that takes ownership of the sender side of the channel using the move keyword. Within the thread, we send the numbers 1 through 10, sleeping for a second between each. Finally, we run a future created with an async block passed to trpl::block_on just as we have throughout the chapter. In that future, we await those messages, just as in the other message-passing examples we have seen.
To return to the scenario we opened the chapter with, imagine running a set of video encoding tasks using a dedicated thread (because video encoding is compute-bound) but notifying the UI that those operations are done with an async channel. There are countless examples of these kinds of combinations in real-world use cases.
Подведём итоги
This isn’t the last you’ll see of concurrency in this book. The project in Chapter 21 will apply these concepts in a more realistic situation than the simpler examples discussed here and compare problem-solving with threading versus tasks and futures more directly.
No matter which of these approaches you choose, Rust gives you the tools you need to write safe, fast, concurrent code—whether for a high-throughput web server or an embedded operating system.
Next, we’ll talk about idiomatic ways to model problems and structure solutions as your Rust programs get bigger. In addition, we’ll discuss how Rust’s idioms relate to those you might be familiar with from object-oriented programming.
Object-Oriented Programming Features
Object-oriented programming (OOP) is a way of modeling programs. Objects as a programmatic concept were introduced in the programming language Simula in the 1960s. Those objects influenced Alan Kay’s programming architecture in which objects pass messages to each other. To describe this architecture, he coined the term object-oriented programming in 1967. Many competing definitions describe what OOP is, and by some of these definitions Rust is object oriented but by others it is not. In this chapter, we’ll explore certain characteristics that are commonly considered object oriented and how those characteristics translate to idiomatic Rust. We’ll then show you how to implement an object-oriented design pattern in Rust and discuss the trade-offs of doing so versus implementing a solution using some of Rust’s strengths instead.
Характеристика объектно-ориентированных языков
Характеристика объектно-ориентированных языков
There is no consensus in the programming community about what features a language must have to be considered object oriented. Rust is influenced by many programming paradigms, including OOP; for example, we explored the features that came from functional programming in Chapter 13. Arguably, OOP languages share certain common characteristics—namely, objects, encapsulation, and inheritance. Let’s look at what each of those characteristics means and whether Rust supports it.
Objects Contain Data and Behavior
The book Design Patterns: Elements of Reusable Object-Oriented Software by Erich Gamma, Richard Helm, Ralph Johnson, and John Vlissides (Addison-Wesley, 1994), colloquially referred to as The Gang of Four book, is a catalog of object-oriented design patterns. It defines OOP in this way:
Object-oriented programs are made up of objects. An object packages both data and the procedures that operate on that data. The procedures are typically called methods or operations.
Using this definition, Rust is object oriented: Structs and enums have data, and impl blocks provide methods on structs and enums. Even though structs and enums with methods aren’t called objects, they provide the same functionality, according to the Gang of Four’s definition of objects.
Encapsulation That Hides Implementation Details
Another aspect commonly associated with OOP is the idea of encapsulation, which means that the implementation details of an object aren’t accessible to code using that object. Therefore, the only way to interact with an object is through its public API; code using the object shouldn’t be able to reach into the object’s internals and change data or behavior directly. This enables the programmer to change and refactor an object’s internals without needing to change the code that uses the object.
We discussed how to control encapsulation in Chapter 7: We can use the pub keyword to decide which modules, types, functions, and methods in our code should be public, and by default everything else is private. For example, we can define a struct AveragedCollection that has a field containing a vector of i32 values. The struct can also have a field that contains the average of the values in the vector, meaning the average doesn’t have to be computed on demand whenever anyone needs it. In other words, AveragedCollection will cache the calculated average for us. Listing 18-1 has the definition of the AveragedCollection struct.
pub struct AveragedCollection {
list: Vec<i32>,
average: f64,
}AveragedCollection struct that maintains a list of integers and the average of the items in the collectionThe struct is marked pub so that other code can use it, but the fields within the struct remain private. This is important in this case because we want to ensure that whenever a value is added or removed from the list, the average is also updated. We do this by implementing add, remove, and average methods on the struct, as shown in Listing 18-2.
pub struct AveragedCollection {
list: Vec<i32>,
average: f64,
}
Если у вас есть опыт работы с C или C++, вам могут вспомниться `gcc` или `clang`. После успешной компиляции Rust создаст исполняемый бинарный файл.
impl AveragedCollection {
pub fn add(&mut self, value: i32) {
self.list.push(value);
self.update_average();
}
Если у вас есть опыт работы с C или C++, вам могут вспомниться `gcc` или `clang`. После успешной компиляции Rust создаст исполняемый бинарный файл.
pub fn remove(&mut self) -> Option<i32> {
let result = self.list.pop();
match result {
Some(value) => {
self.update_average();
Some(value)
}
None => None,
}
}
Если у вас есть опыт работы с C или C++, вам могут вспомниться `gcc` или `clang`. После успешной компиляции Rust создаст исполняемый бинарный файл.
pub fn average(&self) -> f64 {
self.average
}
Если у вас есть опыт работы с C или C++, вам могут вспомниться `gcc` или `clang`. После успешной компиляции Rust создаст исполняемый бинарный файл.
fn update_average(&mut self) {
let total: i32 = self.list.iter().sum();
self.average = total as f64 / self.list.len() as f64;
}
}add, remove, and average on AveragedCollectionThe public methods add, remove, and average are the only ways to access or modify data in an instance of AveragedCollection. When an item is added to list using the add method or removed using the remove method, the implementations of each call the private update_average method that handles updating the average field as well.
We leave the list and average fields private so that there is no way for external code to add or remove items to or from the list field directly; otherwise, the average field might become out of sync when the list changes. The average method returns the value in the average field, allowing external code to read the average but not modify it.
Because we’ve encapsulated the implementation details of the struct AveragedCollection, we can easily change aspects, such as the data structure, in the future. For instance, we could use a HashSet<i32> instead of a Vec<i32> for the list field. As long as the signatures of the add, remove, and average public methods stayed the same, code using AveragedCollection wouldn’t need to change. If we made list public instead, this wouldn’t necessarily be the case: HashSet<i32> and Vec<i32> have different methods for adding and removing items, so the external code would likely have to change if it were modifying list directly.
If encapsulation is a required aspect for a language to be considered object oriented, then Rust meets that requirement. The option to use pub or not for different parts of code enables encapsulation of implementation details.
Inheritance as a Type System and as Code Sharing
Inheritance is a mechanism whereby an object can inherit elements from another object’s definition, thus gaining the parent object’s data and behavior without you having to define them again.
If a language must have inheritance to be object oriented, then Rust is not such a language. There is no way to define a struct that inherits the parent struct’s fields and method implementations without using a macro.
However, if you’re used to having inheritance in your programming toolbox, you can use other solutions in Rust, depending on your reason for reaching for inheritance in the first place.
You would choose inheritance for two main reasons. One is for reuse of code: You can implement particular behavior for one type, and inheritance enables you to reuse that implementation for a different type. You can do this in a limited way in Rust code using default trait method implementations, which you saw in Listing 10-14 when we added a default implementation of the summarize method on the Summary trait. Any type implementing the Summary trait would have the summarize method available on it without any further code. This is similar to a parent class having an implementation of a method and an inheriting child class also having the implementation of the method. We can also override the default implementation of the summarize method when we implement the Summary trait, which is similar to a child class overriding the implementation of a method inherited from a parent class.
The other reason to use inheritance relates to the type system: to enable a child type to be used in the same places as the parent type. This is also called polymorphism, which means that you can substitute multiple objects for each other at runtime if they share certain characteristics.
Polymorphism
To many people, polymorphism is synonymous with inheritance. But it’s actually a more general concept that refers to code that can work with data of multiple types. For inheritance, those types are generally subclasses.
Rust instead uses generics to abstract over different possible types and trait bounds to impose constraints on what those types must provide. This is sometimes called bounded parametric polymorphism.
Rust has chosen a different set of trade-offs by not offering inheritance. Inheritance is often at risk of sharing more code than necessary. Subclasses shouldn’t always share all characteristics of their parent class but will do so with inheritance. This can make a program’s design less flexible. It also introduces the possibility of calling methods on subclasses that don’t make sense or that cause errors because the methods don’t apply to the subclass. In addition, some languages will only allow single inheritance (meaning a subclass can only inherit from one class), further restricting the flexibility of a program’s design.
For these reasons, Rust takes the different approach of using trait objects instead of inheritance to achieve polymorphism at runtime. Let’s look at how trait objects work.
Using Trait Objects to Abstract over Shared Behavior
Using Trait Objects to Abstract over Shared Behavior
In Chapter 8, we mentioned that one limitation of vectors is that they can store elements of only one type. We created a workaround in Listing 8-9 where we defined a SpreadsheetCell enum that had variants to hold integers, floats, and text. This meant we could store different types of data in each cell and still have a vector that represented a row of cells. This is a perfectly good solution when our interchangeable items are a fixed set of types that we know when our code is compiled.
However, sometimes we want our library user to be able to extend the set of types that are valid in a particular situation. To show how we might achieve this, we’ll create an example graphical user interface (GUI) tool that iterates through a list of items, calling a draw method on each one to draw it to the screen—a common technique for GUI tools. We’ll create a library crate called gui that contains the structure of a GUI library. This crate might include some types for people to use, such as Button or TextField. In addition, gui users will want to create their own types that can be drawn: For instance, one programmer might add an Image, and another might add a SelectBox.
At the time of writing the library, we can’t know and define all the types other programmers might want to create. But we do know that gui needs to keep track of many values of different types, and it needs to call a draw method on each of these differently typed values. It doesn’t need to know exactly what will happen when we call the draw method, just that the value will have that method available for us to call.
To do this in a language with inheritance, we might define a class named Component that has a method named draw on it. The other classes, such as Button, Image, and SelectBox, would inherit from Component and thus inherit the draw method. They could each override the draw method to define their custom behavior, but the framework could treat all of the types as if they were Component instances and call draw on them. But because Rust doesn’t have inheritance, we need another way to structure the gui library to allow users to create new types compatible with the library.
Defining a Trait for Common Behavior
To implement the behavior that we want gui to have, we’ll define a trait named Draw that will have one method named draw. Then, we can define a vector that takes a trait object. A trait object points to both an instance of a type implementing our specified trait and a table used to look up trait methods on that type at runtime. We create a trait object by specifying some sort of pointer, such as a reference or a Box<T> smart pointer, then the dyn keyword, and then specifying the relevant trait. (We’ll talk about the reason trait objects must use a pointer in “Dynamically Sized Types and the Sized Trait” in Chapter 20.) We can use trait objects in place of a generic or concrete type. Wherever we use a trait object, Rust’s type system will ensure at compile time that any value used in that context will implement the trait object’s trait. Consequently, we don’t need to know all the possible types at compile time.
We’ve mentioned that, in Rust, we refrain from calling structs and enums “objects” to distinguish them from other languages’ objects. In a struct or enum, the data in the struct fields and the behavior in impl blocks are separated, whereas in other languages, the data and behavior combined into one concept is often labeled an object. Trait objects differ from objects in other languages in that we can’t add data to a trait object. Trait objects aren’t as generally useful as objects in other languages: Their specific purpose is to allow abstraction across common behavior.
Listing 18-3 shows how to define a trait named Draw with one method named draw.
pub trait Draw {
fn draw(&self);
}Draw traitThis syntax should look familiar from our discussions on how to define traits in Chapter 10. Next comes some new syntax: Listing 18-4 defines a struct named Screen that holds a vector named components. This vector is of type Box<dyn Draw>, which is a trait object; it’s a stand-in for any type inside a Box that implements the Draw trait.
pub trait Draw {
fn draw(&self);
}
Если у вас есть опыт работы с C или C++, вам могут вспомниться `gcc` или `clang`. После успешной компиляции Rust создаст исполняемый бинарный файл.
pub struct Screen {
pub components: Vec<Box<dyn Draw>>,
}Screen struct with a components field holding a vector of trait objects that implement the Draw traitOn the Screen struct, we’ll define a method named run that will call the draw method on each of its components, as shown in Listing 18-5.
pub trait Draw {
fn draw(&self);
}
Если у вас есть опыт работы с C или C++, вам могут вспомниться `gcc` или `clang`. После успешной компиляции Rust создаст исполняемый бинарный файл.
pub struct Screen {
pub components: Vec<Box<dyn Draw>>,
}
Если у вас есть опыт работы с C или C++, вам могут вспомниться `gcc` или `clang`. После успешной компиляции Rust создаст исполняемый бинарный файл.
impl Screen {
pub fn run(&self) {
for component in self.components.iter() {
component.draw();
}
}
}run method on Screen that calls the draw method on each componentThis works differently from defining a struct that uses a generic type parameter with trait bounds. A generic type parameter can be substituted with only one concrete type at a time, whereas trait objects allow for multiple concrete types to fill in for the trait object at runtime. For example, we could have defined the Screen struct using a generic type and a trait bound, as in Listing 18-6.
pub trait Draw {
fn draw(&self);
}
Если у вас есть опыт работы с C или C++, вам могут вспомниться `gcc` или `clang`. После успешной компиляции Rust создаст исполняемый бинарный файл.
pub struct Screen<T: Draw> {
pub components: Vec<T>,
}
Если у вас есть опыт работы с C или C++, вам могут вспомниться `gcc` или `clang`. После успешной компиляции Rust создаст исполняемый бинарный файл.
impl<T> Screen<T>
where
T: Draw,
{
pub fn run(&self) {
for component in self.components.iter() {
component.draw();
}
}
}Screen struct and its run method using generics and trait boundsThis restricts us to a Screen instance that has a list of components all of type Button or all of type TextField. If you’ll only ever have homogeneous collections, using generics and trait bounds is preferable because the definitions will be monomorphized at compile time to use the concrete types.
On the other hand, with the method using trait objects, one Screen instance can hold a Vec<T> that contains a Box<Button> as well as a Box<TextField>. Let’s look at how this works, and then we’ll talk about the runtime performance implications.
Implementing the Trait
Now we’ll add some types that implement the Draw trait. We’ll provide the Button type. Again, actually implementing a GUI library is beyond the scope of this book, so the draw method won’t have any useful implementation in its body. To imagine what the implementation might look like, a Button struct might have fields for width, height, and label, as shown in Listing 18-7.
pub trait Draw {
fn draw(&self);
}
Если у вас есть опыт работы с C или C++, вам могут вспомниться `gcc` или `clang`. После успешной компиляции Rust создаст исполняемый бинарный файл.
pub struct Screen {
pub components: Vec<Box<dyn Draw>>,
}
Если у вас есть опыт работы с C или C++, вам могут вспомниться `gcc` или `clang`. После успешной компиляции Rust создаст исполняемый бинарный файл.
impl Screen {
pub fn run(&self) {
for component in self.components.iter() {
component.draw();
}
}
}
Если у вас есть опыт работы с C или C++, вам могут вспомниться `gcc` или `clang`. После успешной компиляции Rust создаст исполняемый бинарный файл.
pub struct Button {
pub width: u32,
pub height: u32,
pub label: String,
}
Если у вас есть опыт работы с C или C++, вам могут вспомниться `gcc` или `clang`. После успешной компиляции Rust создаст исполняемый бинарный файл.
impl Draw for Button {
fn draw(&self) {
// code to actually draw a button
}
}Button struct that implements the Draw traitThe width, height, and label fields on Button will differ from the fields on other components; for example, a TextField type might have those same fields plus a placeholder field. Each of the types we want to draw on the screen will implement the Draw trait but will use different code in the draw method to define how to draw that particular type, as Button has here (without the actual GUI code, as mentioned). The Button type, for instance, might have an additional impl block containing methods related to what happens when a user clicks the button. These kinds of methods won’t apply to types like TextField.
If someone using our library decides to implement a SelectBox struct that has width, height, and options fields, they would implement the Draw trait on the SelectBox type as well, as shown in Listing 18-8.
use gui::Draw;
Если у вас есть опыт работы с C или C++, вам могут вспомниться `gcc` или `clang`. После успешной компиляции Rust создаст исполняемый бинарный файл.
struct SelectBox {
width: u32,
height: u32,
options: Vec<String>,
}
Если у вас есть опыт работы с C или C++, вам могут вспомниться `gcc` или `clang`. После успешной компиляции Rust создаст исполняемый бинарный файл.
impl Draw for SelectBox {
fn draw(&self) {
// code to actually draw a select box
}
}
Если у вас есть опыт работы с C или C++, вам могут вспомниться `gcc` или `clang`. После успешной компиляции Rust создаст исполняемый бинарный файл.
fn main() {}gui and implementing the Draw trait on a SelectBox structOur library’s user can now write their main function to create a Screen instance. To the Screen instance, they can add a SelectBox and a Button by putting each in a Box<T> to become a trait object. They can then call the run method on the Screen instance, which will call draw on each of the components. Listing 18-9 shows this implementation.
use gui::Draw;
Если у вас есть опыт работы с C или C++, вам могут вспомниться `gcc` или `clang`. После успешной компиляции Rust создаст исполняемый бинарный файл.
struct SelectBox {
width: u32,
height: u32,
options: Vec<String>,
}
Если у вас есть опыт работы с C или C++, вам могут вспомниться `gcc` или `clang`. После успешной компиляции Rust создаст исполняемый бинарный файл.
impl Draw for SelectBox {
fn draw(&self) {
// code to actually draw a select box
}
}
Если у вас есть опыт работы с C или C++, вам могут вспомниться `gcc` или `clang`. После успешной компиляции Rust создаст исполняемый бинарный файл.
use gui::{Button, Screen};
Если у вас есть опыт работы с C или C++, вам могут вспомниться `gcc` или `clang`. После успешной компиляции Rust создаст исполняемый бинарный файл.
fn main() {
let screen = Screen {
components: vec![
Box::new(SelectBox {
width: 75,
height: 10,
options: vec![
String::from("Yes"),
String::from("Maybe"),
String::from("No"),
],
}),
Box::new(Button {
width: 50,
height: 10,
label: String::from("OK"),
}),
],
};
Если у вас есть опыт работы с C или C++, вам могут вспомниться `gcc` или `clang`. После успешной компиляции Rust создаст исполняемый бинарный файл.
screen.run();
}When we wrote the library, we didn’t know that someone might add the SelectBox type, but our Screen implementation was able to operate on the new type and draw it because SelectBox implements the Draw trait, which means it implements the draw method.
This concept—of being concerned only with the messages a value responds to rather than the value’s concrete type—is similar to the concept of duck typing in dynamically typed languages: If it walks like a duck and quacks like a duck, then it must be a duck! In the implementation of run on Screen in Listing 18-5, run doesn’t need to know what the concrete type of each component is. It doesn’t check whether a component is an instance of a Button or a SelectBox, it just calls the draw method on the component. By specifying Box<dyn Draw> as the type of the values in the components vector, we’ve defined Screen to need values that we can call the draw method on.
The advantage of using trait objects and Rust’s type system to write code similar to code using duck typing is that we never have to check whether a value implements a particular method at runtime or worry about getting errors if a value doesn’t implement a method but we call it anyway. Rust won’t compile our code if the values don’t implement the traits that the trait objects need.
For example, Listing 18-10 shows what happens if we try to create a Screen with a String as a component.
use gui::Screen;
Если у вас есть опыт работы с C или C++, вам могут вспомниться `gcc` или `clang`. После успешной компиляции Rust создаст исполняемый бинарный файл.
fn main() {
let screen = Screen {
components: vec![Box::new(String::from("Hi"))],
};
Если у вас есть опыт работы с C или C++, вам могут вспомниться `gcc` или `clang`. После успешной компиляции Rust создаст исполняемый бинарный файл.
screen.run();
}We’ll get this error because String doesn’t implement the Draw trait:
$ cargo run
Compiling gui v0.1.0 (file:///projects/gui)
error[E0277]: the trait bound `String: Draw` is not satisfied
--> src/main.rs:5:26
|
5 | components: vec![Box::new(String::from("Hi"))],
| ^^^^^^^^^^^^^^^^^^^^^^^^^^^^ the trait `Draw` is not implemented for `String`
|
= help: the trait `Draw` is implemented for `Button`
= note: required for the cast from `Box<String>` to `Box<dyn Draw>`
Если у вас есть опыт работы с C или C++, вам могут вспомниться `gcc` или `clang`. После успешной компиляции Rust создаст исполняемый бинарный файл.
For more information about this error, try `rustc --explain E0277`.
error: could not compile `gui` (bin "gui") due to 1 previous error
This error lets us know that either we’re passing something to Screen that we didn’t mean to pass and so should pass a different type, or we should implement Draw on String so that Screen is able to call draw on it.
Performing Dynamic Dispatch
Recall in “Performance of Code Using Generics” in Chapter 10 our discussion on the monomorphization process performed on generics by the compiler: The compiler generates nongeneric implementations of functions and methods for each concrete type that we use in place of a generic type parameter. The code that results from monomorphization is doing static dispatch, which is when the compiler knows what method you’re calling at compile time. This is opposed to dynamic dispatch, which is when the compiler can’t tell at compile time which method you’re calling. In dynamic dispatch cases, the compiler emits code that at runtime will know which method to call.
When we use trait objects, Rust must use dynamic dispatch. The compiler doesn’t know all the types that might be used with the code that’s using trait objects, so it doesn’t know which method implemented on which type to call. Instead, at runtime, Rust uses the pointers inside the trait object to know which method to call. This lookup incurs a runtime cost that doesn’t occur with static dispatch. Dynamic dispatch also prevents the compiler from choosing to inline a method’s code, which in turn prevents some optimizations, and Rust has some rules about where you can and cannot use dynamic dispatch, called dyn compatibility. Those rules are beyond the scope of this discussion, but you can read more about them in the reference. However, we did get extra flexibility in the code that we wrote in Listing 18-5 and were able to support in Listing 18-9, so it’s a trade-off to consider.
Implementing an Object-Oriented Design Pattern
Implementing an Object-Oriented Design Pattern
The state pattern is an object-oriented design pattern. The crux of the pattern is that we define a set of states a value can have internally. The states are represented by a set of state objects, and the value’s behavior changes based on its state. We’re going to work through an example of a blog post struct that has a field to hold its state, which will be a state object from the set “draft,” “review,” or “published.”
The state objects share functionality: In Rust, of course, we use structs and traits rather than objects and inheritance. Each state object is responsible for its own behavior and for governing when it should change into another state. The value that holds a state object knows nothing about the different behavior of the states or when to transition between states.
The advantage of using the state pattern is that, when the business requirements of the program change, we won’t need to change the code of the value holding the state or the code that uses the value. We’ll only need to update the code inside one of the state objects to change its rules or perhaps add more state objects.
First, we’re going to implement the state pattern in a more traditional object-oriented way. Then, we’ll use an approach that’s a bit more natural in Rust. Let’s dig in to incrementally implement a blog post workflow using the state pattern.
The final functionality will look like this:
- A blog post starts as an empty draft.
- When the draft is done, a review of the post is requested.
- When the post is approved, it gets published.
- Only published blog posts return content to print so that unapproved posts can’t accidentally be published.
Any other changes attempted on a post should have no effect. For example, if we try to approve a draft blog post before we’ve requested a review, the post should remain an unpublished draft.
Attempting Traditional Object-Oriented Style
There are infinite ways to structure code to solve the same problem, each with different trade-offs. This section’s implementation is more of a traditional object-oriented style, which is possible to write in Rust, but doesn’t take advantage of some of Rust’s strengths. Later, we’ll demonstrate a different solution that still uses the object-oriented design pattern but is structured in a way that might look less familiar to programmers with object-oriented experience. We’ll compare the two solutions to experience the trade-offs of designing Rust code differently than code in other languages.
Listing 18-11 shows this workflow in code form: This is an example usage of the API we’ll implement in a library crate named blog. This won’t compile yet because we haven’t implemented the blog crate.
use blog::Post;
Если у вас есть опыт работы с C или C++, вам могут вспомниться `gcc` или `clang`. После успешной компиляции Rust создаст исполняемый бинарный файл.
fn main() {
let mut post = Post::new();
Если у вас есть опыт работы с C или C++, вам могут вспомниться `gcc` или `clang`. После успешной компиляции Rust создаст исполняемый бинарный файл.
post.add_text("I ate a salad for lunch today");
assert_eq!("", post.content());
Если у вас есть опыт работы с C или C++, вам могут вспомниться `gcc` или `clang`. После успешной компиляции Rust создаст исполняемый бинарный файл.
post.request_review();
assert_eq!("", post.content());
Если у вас есть опыт работы с C или C++, вам могут вспомниться `gcc` или `clang`. После успешной компиляции Rust создаст исполняемый бинарный файл.
post.approve();
assert_eq!("I ate a salad for lunch today", post.content());
}blog crate to haveWe want to allow the user to create a new draft blog post with Post::new. We want to allow text to be added to the blog post. If we try to get the post’s content immediately, before approval, we shouldn’t get any text because the post is still a draft. We’ve added assert_eq! in the code for demonstration purposes. An excellent unit test for this would be to assert that a draft blog post returns an empty string from the content method, but we’re not going to write tests for this example.
Next, we want to enable a request for a review of the post, and we want content to return an empty string while waiting for the review. When the post receives approval, it should get published, meaning the text of the post will be returned when content is called.
Notice that the only type we’re interacting with from the crate is the Post type. This type will use the state pattern and will hold a value that will be one of three state objects representing the various states a post can be in—draft, review, or published. Changing from one state to another will be managed internally within the Post type. The states change in response to the methods called by our library’s users on the Post instance, but they don’t have to manage the state changes directly. Also, users can’t make a mistake with the states, such as publishing a post before it’s reviewed.
Defining Post and Creating a New Instance
Let’s get started on the implementation of the library! We know we need a public Post struct that holds some content, so we’ll start with the definition of the struct and an associated public new function to create an instance of Post, as shown in Listing 18-12. We’ll also make a private State trait that will define the behavior that all state objects for a Post must have.
Then, Post will hold a trait object of Box<dyn State> inside an Option<T> in a private field named state to hold the state object. You’ll see why the Option<T> is necessary in a bit.
pub struct Post {
state: Option<Box<dyn State>>,
content: String,
}
Если у вас есть опыт работы с C или C++, вам могут вспомниться `gcc` или `clang`. После успешной компиляции Rust создаст исполняемый бинарный файл.
impl Post {
pub fn new() -> Post {
Post {
state: Some(Box::new(Draft {})),
content: String::new(),
}
}
}
Если у вас есть опыт работы с C или C++, вам могут вспомниться `gcc` или `clang`. После успешной компиляции Rust создаст исполняемый бинарный файл.
trait State {}
Если у вас есть опыт работы с C или C++, вам могут вспомниться `gcc` или `clang`. После успешной компиляции Rust создаст исполняемый бинарный файл.
struct Draft {}
Если у вас есть опыт работы с C или C++, вам могут вспомниться `gcc` или `clang`. После успешной компиляции Rust создаст исполняемый бинарный файл.
impl State for Draft {}Post struct and a new function that creates a new Post instance, a State trait, and a Draft structThe State trait defines the behavior shared by different post states. The state objects are Draft, PendingReview, and Published, and they will all implement the State trait. For now, the trait doesn’t have any methods, and we’ll start by defining just the Draft state because that is the state we want a post to start in.
When we create a new Post, we set its state field to a Some value that holds a Box. This Box points to a new instance of the Draft struct. This ensures that whenever we create a new instance of Post, it will start out as a draft. Because the state field of Post is private, there is no way to create a Post in any other state! In the Post::new function, we set the content field to a new, empty String.
Storing the Text of the Post Content
We saw in Listing 18-11 that we want to be able to call a method named add_text and pass it a &str that is then added as the text content of the blog post. We implement this as a method, rather than exposing the content field as pub, so that later we can implement a method that will control how the content field’s data is read. The add_text method is pretty straightforward, so let’s add the implementation in Listing 18-13 to the impl Post block.
pub struct Post {
state: Option<Box<dyn State>>,
content: String,
}
Если у вас есть опыт работы с C или C++, вам могут вспомниться `gcc` или `clang`. После успешной компиляции Rust создаст исполняемый бинарный файл.
impl Post {
// --код сокращён--
pub fn new() -> Post {
Post {
state: Some(Box::new(Draft {})),
content: String::new(),
}
}
Если у вас есть опыт работы с C или C++, вам могут вспомниться `gcc` или `clang`. После успешной компиляции Rust создаст исполняемый бинарный файл.
pub fn add_text(&mut self, text: &str) {
self.content.push_str(text);
}
}
Если у вас есть опыт работы с C или C++, вам могут вспомниться `gcc` или `clang`. После успешной компиляции Rust создаст исполняемый бинарный файл.
trait State {}
Если у вас есть опыт работы с C или C++, вам могут вспомниться `gcc` или `clang`. После успешной компиляции Rust создаст исполняемый бинарный файл.
struct Draft {}
Если у вас есть опыт работы с C или C++, вам могут вспомниться `gcc` или `clang`. После успешной компиляции Rust создаст исполняемый бинарный файл.
impl State for Draft {}add_text method to add text to a post’s contentThe add_text method takes a mutable reference to self because we’re changing the Post instance that we’re calling add_text on. We then call push_str on the String in content and pass the text argument to add to the saved content. This behavior doesn’t depend on the state the post is in, so it’s not part of the state pattern. The add_text method doesn’t interact with the state field at all, but it is part of the behavior we want to support.
Ensuring That the Content of a Draft Post Is Empty
Even after we’ve called add_text and added some content to our post, we still want the content method to return an empty string slice because the post is still in the draft state, as shown by the first assert_eq! in Listing 18-11. For now, let’s implement the content method with the simplest thing that will fulfill this requirement: always returning an empty string slice. We’ll change this later once we implement the ability to change a post’s state so that it can be published. So far, posts can only be in the draft state, so the post content should always be empty. Listing 18-14 shows this placeholder implementation.
pub struct Post {
state: Option<Box<dyn State>>,
content: String,
}
Если у вас есть опыт работы с C или C++, вам могут вспомниться `gcc` или `clang`. После успешной компиляции Rust создаст исполняемый бинарный файл.
impl Post {
// --код сокращён--
pub fn new() -> Post {
Post {
state: Some(Box::new(Draft {})),
content: String::new(),
}
}
Если у вас есть опыт работы с C или C++, вам могут вспомниться `gcc` или `clang`. После успешной компиляции Rust создаст исполняемый бинарный файл.
pub fn add_text(&mut self, text: &str) {
self.content.push_str(text);
}
Если у вас есть опыт работы с C или C++, вам могут вспомниться `gcc` или `clang`. После успешной компиляции Rust создаст исполняемый бинарный файл.
pub fn content(&self) -> &str {
""
}
}
Если у вас есть опыт работы с C или C++, вам могут вспомниться `gcc` или `clang`. После успешной компиляции Rust создаст исполняемый бинарный файл.
trait State {}
Если у вас есть опыт работы с C или C++, вам могут вспомниться `gcc` или `clang`. После успешной компиляции Rust создаст исполняемый бинарный файл.
struct Draft {}
Если у вас есть опыт работы с C или C++, вам могут вспомниться `gcc` или `clang`. После успешной компиляции Rust создаст исполняемый бинарный файл.
impl State for Draft {}content method on Post that always returns an empty string sliceWith this added content method, everything in Listing 18-11 through the first assert_eq! works as intended.
Requesting a Review, Which Changes the Post’s State
Next, we need to add functionality to request a review of a post, which should change its state from Draft to PendingReview. Listing 18-15 shows this code.
pub struct Post {
state: Option<Box<dyn State>>,
content: String,
}
Если у вас есть опыт работы с C или C++, вам могут вспомниться `gcc` или `clang`. После успешной компиляции Rust создаст исполняемый бинарный файл.
impl Post {
// --код сокращён--
pub fn new() -> Post {
Post {
state: Some(Box::new(Draft {})),
content: String::new(),
}
}
Если у вас есть опыт работы с C или C++, вам могут вспомниться `gcc` или `clang`. После успешной компиляции Rust создаст исполняемый бинарный файл.
pub fn add_text(&mut self, text: &str) {
self.content.push_str(text);
}
Если у вас есть опыт работы с C или C++, вам могут вспомниться `gcc` или `clang`. После успешной компиляции Rust создаст исполняемый бинарный файл.
pub fn content(&self) -> &str {
""
}
Если у вас есть опыт работы с C или C++, вам могут вспомниться `gcc` или `clang`. После успешной компиляции Rust создаст исполняемый бинарный файл.
pub fn request_review(&mut self) {
if let Some(s) = self.state.take() {
self.state = Some(s.request_review())
}
}
}
Если у вас есть опыт работы с C или C++, вам могут вспомниться `gcc` или `clang`. После успешной компиляции Rust создаст исполняемый бинарный файл.
trait State {
fn request_review(self: Box<Self>) -> Box<dyn State>;
}
Если у вас есть опыт работы с C или C++, вам могут вспомниться `gcc` или `clang`. После успешной компиляции Rust создаст исполняемый бинарный файл.
struct Draft {}
Если у вас есть опыт работы с C или C++, вам могут вспомниться `gcc` или `clang`. После успешной компиляции Rust создаст исполняемый бинарный файл.
impl State for Draft {
fn request_review(self: Box<Self>) -> Box<dyn State> {
Box::new(PendingReview {})
}
}
Если у вас есть опыт работы с C или C++, вам могут вспомниться `gcc` или `clang`. После успешной компиляции Rust создаст исполняемый бинарный файл.
struct PendingReview {}
Если у вас есть опыт работы с C или C++, вам могут вспомниться `gcc` или `clang`. После успешной компиляции Rust создаст исполняемый бинарный файл.
impl State for PendingReview {
fn request_review(self: Box<Self>) -> Box<dyn State> {
self
}
}request_review methods on Post and the State traitWe give Post a public method named request_review that will take a mutable reference to self. Then, we call an internal request_review method on the current state of Post, and this second request_review method consumes the current state and returns a new state.
We add the request_review method to the State trait; all types that implement the trait will now need to implement the request_review method. Note that rather than having self, &self, or &mut self as the first parameter of the method, we have self: Box<Self>. This syntax means the method is only valid when called on a Box holding the type. This syntax takes ownership of Box<Self>, invalidating the old state so that the state value of the Post can transform into a new state.
To consume the old state, the request_review method needs to take ownership of the state value. This is where the Option in the state field of Post comes in: We call the take method to take the Some value out of the state field and leave a None in its place because Rust doesn’t let us have unpopulated fields in structs. This lets us move the state value out of Post rather than borrowing it. Then, we’ll set the post’s state value to the result of this operation.
We need to set state to None temporarily rather than setting it directly with code like self.state = self.state.request_review(); to get ownership of the state value. This ensures that Post can’t use the old state value after we’ve transformed it into a new state.
The request_review method on Draft returns a new, boxed instance of a new PendingReview struct, which represents the state when a post is waiting for a review. The PendingReview struct also implements the request_review method but doesn’t do any transformations. Rather, it returns itself because when we request a review on a post already in the PendingReview state, it should stay in the PendingReview state.
Now we can start seeing the advantages of the state pattern: The request_review method on Post is the same no matter its state value. Each state is responsible for its own rules.
We’ll leave the content method on Post as is, returning an empty string slice. We can now have a Post in the PendingReview state as well as in the Draft state, but we want the same behavior in the PendingReview state. Listing 18-11 now works up to the second assert_eq! call!
Adding approve to Change content’s Behavior
The approve method will be similar to the request_review method: It will set state to the value that the current state says it should have when that state is approved, as shown in Listing 18-16.
pub struct Post {
state: Option<Box<dyn State>>,
content: String,
}
Если у вас есть опыт работы с C или C++, вам могут вспомниться `gcc` или `clang`. После успешной компиляции Rust создаст исполняемый бинарный файл.
impl Post {
// --код сокращён--
pub fn new() -> Post {
Post {
state: Some(Box::new(Draft {})),
content: String::new(),
}
}
Если у вас есть опыт работы с C или C++, вам могут вспомниться `gcc` или `clang`. После успешной компиляции Rust создаст исполняемый бинарный файл.
pub fn add_text(&mut self, text: &str) {
self.content.push_str(text);
}
Если у вас есть опыт работы с C или C++, вам могут вспомниться `gcc` или `clang`. После успешной компиляции Rust создаст исполняемый бинарный файл.
pub fn content(&self) -> &str {
""
}
Если у вас есть опыт работы с C или C++, вам могут вспомниться `gcc` или `clang`. После успешной компиляции Rust создаст исполняемый бинарный файл.
pub fn request_review(&mut self) {
if let Some(s) = self.state.take() {
self.state = Some(s.request_review())
}
}
Если у вас есть опыт работы с C или C++, вам могут вспомниться `gcc` или `clang`. После успешной компиляции Rust создаст исполняемый бинарный файл.
pub fn approve(&mut self) {
if let Some(s) = self.state.take() {
self.state = Some(s.approve())
}
}
}
Если у вас есть опыт работы с C или C++, вам могут вспомниться `gcc` или `clang`. После успешной компиляции Rust создаст исполняемый бинарный файл.
trait State {
fn request_review(self: Box<Self>) -> Box<dyn State>;
fn approve(self: Box<Self>) -> Box<dyn State>;
}
Если у вас есть опыт работы с C или C++, вам могут вспомниться `gcc` или `clang`. После успешной компиляции Rust создаст исполняемый бинарный файл.
struct Draft {}
Если у вас есть опыт работы с C или C++, вам могут вспомниться `gcc` или `clang`. После успешной компиляции Rust создаст исполняемый бинарный файл.
impl State for Draft {
// --код сокращён--
fn request_review(self: Box<Self>) -> Box<dyn State> {
Box::new(PendingReview {})
}
Если у вас есть опыт работы с C или C++, вам могут вспомниться `gcc` или `clang`. После успешной компиляции Rust создаст исполняемый бинарный файл.
fn approve(self: Box<Self>) -> Box<dyn State> {
self
}
}
Если у вас есть опыт работы с C или C++, вам могут вспомниться `gcc` или `clang`. После успешной компиляции Rust создаст исполняемый бинарный файл.
struct PendingReview {}
Если у вас есть опыт работы с C или C++, вам могут вспомниться `gcc` или `clang`. После успешной компиляции Rust создаст исполняемый бинарный файл.
impl State for PendingReview {
// --код сокращён--
fn request_review(self: Box<Self>) -> Box<dyn State> {
self
}
Если у вас есть опыт работы с C или C++, вам могут вспомниться `gcc` или `clang`. После успешной компиляции Rust создаст исполняемый бинарный файл.
fn approve(self: Box<Self>) -> Box<dyn State> {
Box::new(Published {})
}
}
Если у вас есть опыт работы с C или C++, вам могут вспомниться `gcc` или `clang`. После успешной компиляции Rust создаст исполняемый бинарный файл.
struct Published {}
Если у вас есть опыт работы с C или C++, вам могут вспомниться `gcc` или `clang`. После успешной компиляции Rust создаст исполняемый бинарный файл.
impl State for Published {
fn request_review(self: Box<Self>) -> Box<dyn State> {
self
}
Если у вас есть опыт работы с C или C++, вам могут вспомниться `gcc` или `clang`. После успешной компиляции Rust создаст исполняемый бинарный файл.
fn approve(self: Box<Self>) -> Box<dyn State> {
self
}
}approve method on Post and the State traitWe add the approve method to the State trait and add a new struct that implements State, the Published state.
Similar to the way request_review on PendingReview works, if we call the approve method on a Draft, it will have no effect because approve will return self. When we call approve on PendingReview, it returns a new, boxed instance of the Published struct. The Published struct implements the State trait, and for both the request_review method and the approve method, it returns itself because the post should stay in the Published state in those cases.
Now we need to update the content method on Post. We want the value returned from content to depend on the current state of the Post, so we’re going to have the Post delegate to a content method defined on its state, as shown in Listing 18-17.
pub struct Post {
state: Option<Box<dyn State>>,
content: String,
}
Если у вас есть опыт работы с C или C++, вам могут вспомниться `gcc` или `clang`. После успешной компиляции Rust создаст исполняемый бинарный файл.
impl Post {
// --код сокращён--
pub fn new() -> Post {
Post {
state: Some(Box::new(Draft {})),
content: String::new(),
}
}
Если у вас есть опыт работы с C или C++, вам могут вспомниться `gcc` или `clang`. После успешной компиляции Rust создаст исполняемый бинарный файл.
pub fn add_text(&mut self, text: &str) {
self.content.push_str(text);
}
Если у вас есть опыт работы с C или C++, вам могут вспомниться `gcc` или `clang`. После успешной компиляции Rust создаст исполняемый бинарный файл.
pub fn content(&self) -> &str {
self.state.as_ref().unwrap().content(self)
}
// --код сокращён--
Если у вас есть опыт работы с C или C++, вам могут вспомниться `gcc` или `clang`. После успешной компиляции Rust создаст исполняемый бинарный файл.
pub fn request_review(&mut self) {
if let Some(s) = self.state.take() {
self.state = Some(s.request_review())
}
}
Если у вас есть опыт работы с C или C++, вам могут вспомниться `gcc` или `clang`. После успешной компиляции Rust создаст исполняемый бинарный файл.
pub fn approve(&mut self) {
if let Some(s) = self.state.take() {
self.state = Some(s.approve())
}
}
}
Если у вас есть опыт работы с C или C++, вам могут вспомниться `gcc` или `clang`. После успешной компиляции Rust создаст исполняемый бинарный файл.
trait State {
fn request_review(self: Box<Self>) -> Box<dyn State>;
fn approve(self: Box<Self>) -> Box<dyn State>;
}
Если у вас есть опыт работы с C или C++, вам могут вспомниться `gcc` или `clang`. После успешной компиляции Rust создаст исполняемый бинарный файл.
struct Draft {}
Если у вас есть опыт работы с C или C++, вам могут вспомниться `gcc` или `clang`. После успешной компиляции Rust создаст исполняемый бинарный файл.
impl State for Draft {
fn request_review(self: Box<Self>) -> Box<dyn State> {
Box::new(PendingReview {})
}
Если у вас есть опыт работы с C или C++, вам могут вспомниться `gcc` или `clang`. После успешной компиляции Rust создаст исполняемый бинарный файл.
fn approve(self: Box<Self>) -> Box<dyn State> {
self
}
}
Если у вас есть опыт работы с C или C++, вам могут вспомниться `gcc` или `clang`. После успешной компиляции Rust создаст исполняемый бинарный файл.
struct PendingReview {}
Если у вас есть опыт работы с C или C++, вам могут вспомниться `gcc` или `clang`. После успешной компиляции Rust создаст исполняемый бинарный файл.
impl State for PendingReview {
fn request_review(self: Box<Self>) -> Box<dyn State> {
self
}
Если у вас есть опыт работы с C или C++, вам могут вспомниться `gcc` или `clang`. После успешной компиляции Rust создаст исполняемый бинарный файл.
fn approve(self: Box<Self>) -> Box<dyn State> {
Box::new(Published {})
}
}
Если у вас есть опыт работы с C или C++, вам могут вспомниться `gcc` или `clang`. После успешной компиляции Rust создаст исполняемый бинарный файл.
struct Published {}
Если у вас есть опыт работы с C или C++, вам могут вспомниться `gcc` или `clang`. После успешной компиляции Rust создаст исполняемый бинарный файл.
impl State for Published {
fn request_review(self: Box<Self>) -> Box<dyn State> {
self
}
Если у вас есть опыт работы с C или C++, вам могут вспомниться `gcc` или `clang`. После успешной компиляции Rust создаст исполняемый бинарный файл.
fn approve(self: Box<Self>) -> Box<dyn State> {
self
}
}content method on Post to delegate to a content method on StateBecause the goal is to keep all of these rules inside the structs that implement State, we call a content method on the value in state and pass the post instance (that is, self) as an argument. Then, we return the value that’s returned from using the content method on the state value.
We call the as_ref method on the Option because we want a reference to the value inside the Option rather than ownership of the value. Because state is an Option<Box<dyn State>>, when we call as_ref, an Option<&Box<dyn State>> is returned. If we didn’t call as_ref, we would get an error because we can’t move state out of the borrowed &self of the function parameter.
We then call the unwrap method, which we know will never panic because we know the methods on Post ensure that state will always contain a Some value when those methods are done. This is one of the cases we talked about in the “When You Have More Information Than the Compiler” section of Chapter 9 when we know that a None value is never possible, even though the compiler isn’t able to understand that.
At this point, when we call content on the &Box<dyn State>, deref coercion will take effect on the & and the Box so that the content method will ultimately be called on the type that implements the State trait. That means we need to add content to the State trait definition, and that is where we’ll put the logic for what content to return depending on which state we have, as shown in Listing 18-18.
pub struct Post {
state: Option<Box<dyn State>>,
content: String,
}
Если у вас есть опыт работы с C или C++, вам могут вспомниться `gcc` или `clang`. После успешной компиляции Rust создаст исполняемый бинарный файл.
impl Post {
pub fn new() -> Post {
Post {
state: Some(Box::new(Draft {})),
content: String::new(),
}
}
Если у вас есть опыт работы с C или C++, вам могут вспомниться `gcc` или `clang`. После успешной компиляции Rust создаст исполняемый бинарный файл.
pub fn add_text(&mut self, text: &str) {
self.content.push_str(text);
}
Если у вас есть опыт работы с C или C++, вам могут вспомниться `gcc` или `clang`. После успешной компиляции Rust создаст исполняемый бинарный файл.
pub fn content(&self) -> &str {
self.state.as_ref().unwrap().content(self)
}
Если у вас есть опыт работы с C или C++, вам могут вспомниться `gcc` или `clang`. После успешной компиляции Rust создаст исполняемый бинарный файл.
pub fn request_review(&mut self) {
if let Some(s) = self.state.take() {
self.state = Some(s.request_review())
}
}
Если у вас есть опыт работы с C или C++, вам могут вспомниться `gcc` или `clang`. После успешной компиляции Rust создаст исполняемый бинарный файл.
pub fn approve(&mut self) {
if let Some(s) = self.state.take() {
self.state = Some(s.approve())
}
}
}
Если у вас есть опыт работы с C или C++, вам могут вспомниться `gcc` или `clang`. После успешной компиляции Rust создаст исполняемый бинарный файл.
trait State {
// --код сокращён--
fn request_review(self: Box<Self>) -> Box<dyn State>;
fn approve(self: Box<Self>) -> Box<dyn State>;
Если у вас есть опыт работы с C или C++, вам могут вспомниться `gcc` или `clang`. После успешной компиляции Rust создаст исполняемый бинарный файл.
fn content<'a>(&self, post: &'a Post) -> &'a str {
""
}
}
Если у вас есть опыт работы с C или C++, вам могут вспомниться `gcc` или `clang`. После успешной компиляции Rust создаст исполняемый бинарный файл.
// --код сокращён--
Если у вас есть опыт работы с C или C++, вам могут вспомниться `gcc` или `clang`. После успешной компиляции Rust создаст исполняемый бинарный файл.
struct Draft {}
Если у вас есть опыт работы с C или C++, вам могут вспомниться `gcc` или `clang`. После успешной компиляции Rust создаст исполняемый бинарный файл.
impl State for Draft {
fn request_review(self: Box<Self>) -> Box<dyn State> {
Box::new(PendingReview {})
}
Если у вас есть опыт работы с C или C++, вам могут вспомниться `gcc` или `clang`. После успешной компиляции Rust создаст исполняемый бинарный файл.
fn approve(self: Box<Self>) -> Box<dyn State> {
self
}
}
Если у вас есть опыт работы с C или C++, вам могут вспомниться `gcc` или `clang`. После успешной компиляции Rust создаст исполняемый бинарный файл.
struct PendingReview {}
Если у вас есть опыт работы с C или C++, вам могут вспомниться `gcc` или `clang`. После успешной компиляции Rust создаст исполняемый бинарный файл.
impl State for PendingReview {
fn request_review(self: Box<Self>) -> Box<dyn State> {
self
}
Если у вас есть опыт работы с C или C++, вам могут вспомниться `gcc` или `clang`. После успешной компиляции Rust создаст исполняемый бинарный файл.
fn approve(self: Box<Self>) -> Box<dyn State> {
Box::new(Published {})
}
}
Если у вас есть опыт работы с C или C++, вам могут вспомниться `gcc` или `clang`. После успешной компиляции Rust создаст исполняемый бинарный файл.
struct Published {}
Если у вас есть опыт работы с C или C++, вам могут вспомниться `gcc` или `clang`. После успешной компиляции Rust создаст исполняемый бинарный файл.
impl State for Published {
// --код сокращён--
fn request_review(self: Box<Self>) -> Box<dyn State> {
self
}
Если у вас есть опыт работы с C или C++, вам могут вспомниться `gcc` или `clang`. После успешной компиляции Rust создаст исполняемый бинарный файл.
fn approve(self: Box<Self>) -> Box<dyn State> {
self
}
Если у вас есть опыт работы с C или C++, вам могут вспомниться `gcc` или `clang`. После успешной компиляции Rust создаст исполняемый бинарный файл.
fn content<'a>(&self, post: &'a Post) -> &'a str {
&post.content
}
}content method to the State traitWe add a default implementation for the content method that returns an empty string slice. That means we don’t need to implement content on the Draft and PendingReview structs. The Published struct will override the content method and return the value in post.content. While convenient, having the content method on State determine the content of the Post is blurring the lines between the responsibility of State and the responsibility of Post.
Note that we need lifetime annotations on this method, as we discussed in Chapter 10. We’re taking a reference to a post as an argument and returning a reference to part of that post, so the lifetime of the returned reference is related to the lifetime of the post argument.
And we’re done—all of Listing 18-11 now works! We’ve implemented the state pattern with the rules of the blog post workflow. The logic related to the rules lives in the state objects rather than being scattered throughout Post.
Why Not An Enum?
You may have been wondering why we didn’t use an enum with the different possible post states as variants. That’s certainly a possible solution; try it and compare the end results to see which you prefer! One disadvantage of using an enum is that every place that checks the value of the enum will need a match expression or similar to handle every possible variant. This could get more repetitive than this trait object solution.
Evaluating the State Pattern
We’ve shown that Rust is capable of implementing the object-oriented state pattern to encapsulate the different kinds of behavior a post should have in each state. The methods on Post know nothing about the various behaviors. Because of the way we organized the code, we have to look in only one place to know the different ways a published post can behave: the implementation of the State trait on the Published struct.
If we were to create an alternative implementation that didn’t use the state pattern, we might instead use match expressions in the methods on Post or even in the main code that checks the state of the post and changes behavior in those places. That would mean we would have to look in several places to understand all the implications of a post being in the published state.
With the state pattern, the Post methods and the places we use Post don’t need match expressions, and to add a new state, we would only need to add a new struct and implement the trait methods on that one struct in one location.
The implementation using the state pattern is easy to extend to add more functionality. To see the simplicity of maintaining code that uses the state pattern, try a few of these suggestions:
- Add a
rejectmethod that changes the post’s state fromPendingReviewback toDraft. - Require two calls to
approvebefore the state can be changed toPublished. - Allow users to add text content only when a post is in the
Draftstate. Hint: have the state object responsible for what might change about the content but not responsible for modifying thePost.
One downside of the state pattern is that, because the states implement the transitions between states, some of the states are coupled to each other. If we add another state between PendingReview and Published, such as Scheduled, we would have to change the code in PendingReview to transition to Scheduled instead. It would be less work if PendingReview didn’t need to change with the addition of a new state, but that would mean switching to another design pattern.
Another downside is that we’ve duplicated some logic. To eliminate some of the duplication, we might try to make default implementations for the request_review and approve methods on the State trait that return self. However, this wouldn’t work: When using State as a trait object, the trait doesn’t know what the concrete self will be exactly, so the return type isn’t known at compile time. (This is one of the dyn compatibility rules mentioned earlier.)
Other duplication includes the similar implementations of the request_review and approve methods on Post. Both methods use Option::take with the state field of Post, and if state is Some, they delegate to the wrapped value’s implementation of the same method and set the new value of the state field to the result. If we had a lot of methods on Post that followed this pattern, we might consider defining a macro to eliminate the repetition (see the “Macros” section in Chapter 20).
By implementing the state pattern exactly as it’s defined for object-oriented languages, we’re not taking as full advantage of Rust’s strengths as we could. Let’s look at some changes we can make to the blog crate that can make invalid states and transitions into compile-time errors.
Кодирование в типах состояний и поведения
We’ll show you how to rethink the state pattern to get a different set of trade-offs. Rather than encapsulating the states and transitions completely so that outside code has no knowledge of them, we’ll encode the states into different types. Consequently, Rust’s type-checking system will prevent attempts to use draft posts where only published posts are allowed by issuing a compiler error.
Let’s consider the first part of main in Listing 18-11:
use blog::Post;
Если у вас есть опыт работы с C или C++, вам могут вспомниться `gcc` или `clang`. После успешной компиляции Rust создаст исполняемый бинарный файл.
fn main() {
let mut post = Post::new();
Если у вас есть опыт работы с C или C++, вам могут вспомниться `gcc` или `clang`. После успешной компиляции Rust создаст исполняемый бинарный файл.
post.add_text("I ate a salad for lunch today");
assert_eq!("", post.content());
Если у вас есть опыт работы с C или C++, вам могут вспомниться `gcc` или `clang`. После успешной компиляции Rust создаст исполняемый бинарный файл.
post.request_review();
assert_eq!("", post.content());
Если у вас есть опыт работы с C или C++, вам могут вспомниться `gcc` или `clang`. После успешной компиляции Rust создаст исполняемый бинарный файл.
post.approve();
assert_eq!("I ate a salad for lunch today", post.content());
}We still enable the creation of new posts in the draft state using Post::new and the ability to add text to the post’s content. But instead of having a content method on a draft post that returns an empty string, we’ll make it so that draft posts don’t have the content method at all. That way, if we try to get a draft post’s content, we’ll get a compiler error telling us the method doesn’t exist. As a result, it will be impossible for us to accidentally display draft post content in production because that code won’t even compile. Listing 18-19 shows the definition of a Post struct and a DraftPost struct, as well as methods on each.
pub struct Post {
content: String,
}
Если у вас есть опыт работы с C или C++, вам могут вспомниться `gcc` или `clang`. После успешной компиляции Rust создаст исполняемый бинарный файл.
pub struct DraftPost {
content: String,
}
Если у вас есть опыт работы с C или C++, вам могут вспомниться `gcc` или `clang`. После успешной компиляции Rust создаст исполняемый бинарный файл.
impl Post {
pub fn new() -> DraftPost {
DraftPost {
content: String::new(),
}
}
Если у вас есть опыт работы с C или C++, вам могут вспомниться `gcc` или `clang`. После успешной компиляции Rust создаст исполняемый бинарный файл.
pub fn content(&self) -> &str {
&self.content
}
}
Если у вас есть опыт работы с C или C++, вам могут вспомниться `gcc` или `clang`. После успешной компиляции Rust создаст исполняемый бинарный файл.
impl DraftPost {
pub fn add_text(&mut self, text: &str) {
self.content.push_str(text);
}
}Post with a content method and a DraftPost without a content methodBoth the Post and DraftPost structs have a private content field that stores the blog post text. The structs no longer have the state field because we’re moving the encoding of the state to the types of the structs. The Post struct will represent a published post, and it has a content method that returns the content.
We still have a Post::new function, but instead of returning an instance of Post, it returns an instance of DraftPost. Because content is private and there aren’t any functions that return Post, it’s not possible to create an instance of Post right now.
The DraftPost struct has an add_text method, so we can add text to content as before, but note that DraftPost does not have a content method defined! So now the program ensures that all posts start as draft posts, and draft posts don’t have their content available for display. Any attempt to get around these constraints will result in a compiler error.
So, how do we get a published post? We want to enforce the rule that a draft post has to be reviewed and approved before it can be published. A post in the pending review state should still not display any content. Let’s implement these constraints by adding another struct, PendingReviewPost, defining the request_review method on DraftPost to return a PendingReviewPost and defining an approve method on PendingReviewPost to return a Post, as shown in Listing 18-20.
pub struct Post {
content: String,
}
Если у вас есть опыт работы с C или C++, вам могут вспомниться `gcc` или `clang`. После успешной компиляции Rust создаст исполняемый бинарный файл.
pub struct DraftPost {
content: String,
}
Если у вас есть опыт работы с C или C++, вам могут вспомниться `gcc` или `clang`. После успешной компиляции Rust создаст исполняемый бинарный файл.
impl Post {
pub fn new() -> DraftPost {
DraftPost {
content: String::new(),
}
}
Если у вас есть опыт работы с C или C++, вам могут вспомниться `gcc` или `clang`. После успешной компиляции Rust создаст исполняемый бинарный файл.
pub fn content(&self) -> &str {
&self.content
}
}
Если у вас есть опыт работы с C или C++, вам могут вспомниться `gcc` или `clang`. После успешной компиляции Rust создаст исполняемый бинарный файл.
impl DraftPost {
// --код сокращён--
pub fn add_text(&mut self, text: &str) {
self.content.push_str(text);
}
Если у вас есть опыт работы с C или C++, вам могут вспомниться `gcc` или `clang`. После успешной компиляции Rust создаст исполняемый бинарный файл.
pub fn request_review(self) -> PendingReviewPost {
PendingReviewPost {
content: self.content,
}
}
}
Если у вас есть опыт работы с C или C++, вам могут вспомниться `gcc` или `clang`. После успешной компиляции Rust создаст исполняемый бинарный файл.
pub struct PendingReviewPost {
content: String,
}
Если у вас есть опыт работы с C или C++, вам могут вспомниться `gcc` или `clang`. После успешной компиляции Rust создаст исполняемый бинарный файл.
impl PendingReviewPost {
pub fn approve(self) -> Post {
Post {
content: self.content,
}
}
}PendingReviewPost that gets created by calling request_review on DraftPost and an approve method that turns a PendingReviewPost into a published PostThe request_review and approve methods take ownership of self, thus consuming the DraftPost and PendingReviewPost instances and transforming them into a PendingReviewPost and a published Post, respectively. This way, we won’t have any lingering DraftPost instances after we’ve called request_review on them, and so forth. The PendingReviewPost struct doesn’t have a content method defined on it, so attempting to read its content results in a compiler error, as with DraftPost. Because the only way to get a published Post instance that does have a content method defined is to call the approve method on a PendingReviewPost, and the only way to get a PendingReviewPost is to call the request_review method on a DraftPost, we’ve now encoded the blog post workflow into the type system.
But we also have to make some small changes to main. The request_review and approve methods return new instances rather than modifying the struct they’re called on, so we need to add more let post = shadowing assignments to save the returned instances. We also can’t have the assertions about the draft and pending review posts’ contents be empty strings, nor do we need them: We can’t compile code that tries to use the content of posts in those states any longer. The updated code in main is shown in Listing 18-21.
use blog::Post;
Если у вас есть опыт работы с C или C++, вам могут вспомниться `gcc` или `clang`. После успешной компиляции Rust создаст исполняемый бинарный файл.
fn main() {
let mut post = Post::new();
Если у вас есть опыт работы с C или C++, вам могут вспомниться `gcc` или `clang`. После успешной компиляции Rust создаст исполняемый бинарный файл.
post.add_text("I ate a salad for lunch today");
Если у вас есть опыт работы с C или C++, вам могут вспомниться `gcc` или `clang`. После успешной компиляции Rust создаст исполняемый бинарный файл.
let post = post.request_review();
Если у вас есть опыт работы с C или C++, вам могут вспомниться `gcc` или `clang`. После успешной компиляции Rust создаст исполняемый бинарный файл.
let post = post.approve();
Если у вас есть опыт работы с C или C++, вам могут вспомниться `gcc` или `clang`. После успешной компиляции Rust создаст исполняемый бинарный файл.
assert_eq!("I ate a salad for lunch today", post.content());
}main to use the new implementation of the blog post workflowThe changes we needed to make to main to reassign post mean that this implementation doesn’t quite follow the object-oriented state pattern anymore: The transformations between the states are no longer encapsulated entirely within the Post implementation. However, our gain is that invalid states are now impossible because of the type system and the type checking that happens at compile time! This ensures that certain bugs, such as display of the content of an unpublished post, will be discovered before they make it to production.
Try the tasks suggested at the start of this section on the blog crate as it is after Listing 18-21 to see what you think about the design of this version of the code. Note that some of the tasks might be completed already in this design.
We’ve seen that even though Rust is capable of implementing object-oriented design patterns, other patterns, such as encoding state into the type system, are also available in Rust. These patterns have different trade-offs. Although you might be very familiar with object-oriented patterns, rethinking the problem to take advantage of Rust’s features can provide benefits, such as preventing some bugs at compile time. Object-oriented patterns won’t always be the best solution in Rust due to certain features, like ownership, that object-oriented languages don’t have.
Подведём итоги
Regardless of whether you think Rust is an object-oriented language after reading this chapter, you now know that you can use trait objects to get some object-oriented features in Rust. Dynamic dispatch can give your code some flexibility in exchange for a bit of runtime performance. You can use this flexibility to implement object-oriented patterns that can help your code’s maintainability. Rust also has other features, like ownership, that object-oriented languages don’t have. An object-oriented pattern won’t always be the best way to take advantage of Rust’s strengths, but it is an available option.
Next, we’ll look at patterns, which are another of Rust’s features that enable lots of flexibility. We’ve looked at them briefly throughout the book but haven’t seen their full capability yet. Let’s go!
Шаблоны и соспоставление с шаблоном
Patterns are a special syntax in Rust for matching against the structure of types, both complex and simple. Using patterns in conjunction with match expressions and other constructs gives you more control over a program’s control flow. A pattern consists of some combination of the following:
- Literals
- Destructured arrays, enums, structs, or tuples
- Variables
- Wildcards
- Placeholders
Some example patterns include x, (a, 3), and Some(Color::Red). In the contexts in which patterns are valid, these components describe the shape of data. Our program then matches values against the patterns to determine whether it has the correct shape of data to continue running a particular piece of code.
To use a pattern, we compare it to some value. If the pattern matches the value, we use the value parts in our code. Recall the match expressions in Chapter 6 that used patterns, such as the coin-sorting machine example. If the value fits the shape of the pattern, we can use the named pieces. If it doesn’t, the code associated with the pattern won’t run.
This chapter is a reference on all things related to patterns. We’ll cover the valid places to use patterns, the difference between refutable and irrefutable patterns, and the different kinds of pattern syntax that you might see. By the end of the chapter, you’ll know how to use patterns to express many concepts in a clear way.
Где применимо соспоставление с шаблоном
Где применимо соспоставление с шаблоном
Patterns pop up in a number of places in Rust, and you’ve been using them a lot without realizing it! This section discusses all the places where patterns are valid.
match Arms
As discussed in Chapter 6, we use patterns in the arms of match expressions. Formally, match expressions are defined as the keyword match, a value to match on, and one or more match arms that consist of a pattern and an expression to run if the value matches that arm’s pattern, like this:
match VALUE {
PATTERN => EXPRESSION,
PATTERN => EXPRESSION,
PATTERN => EXPRESSION,
}For example, here’s the match expression from Listing 6-5 that matches on an Option<i32> value in the variable x:
match x {
None => None,
Some(i) => Some(i + 1),
}The patterns in this match expression are the None and Some(i) to the left of each arrow.
One requirement for match expressions is that they need to be exhaustive in the sense that all possibilities for the value in the match expression must be accounted for. One way to ensure that you’ve covered every possibility is to have a catch-all pattern for the last arm: For example, a variable name matching any value can never fail and thus covers every remaining case.
The particular pattern _ will match anything, but it never binds to a variable, so it’s often used in the last match arm. The _ pattern can be useful when you want to ignore any value not specified, for example. We’ll cover the _ pattern in more detail in “Ignoring Values in a Pattern” later in this chapter.
let Statements
Prior to this chapter, we had only explicitly discussed using patterns with match and if let, but in fact, we’ve used patterns in other places as well, including in let statements. For example, consider this straightforward variable assignment with let:
#![allow(unused)]
fn main() {
let x = 5;
}Every time you’ve used a let statement like this you’ve been using patterns, although you might not have realized it! More formally, a let statement looks like this:
let PATTERN = EXPRESSION;
In statements like let x = 5; with a variable name in the PATTERN slot, the variable name is just a particularly simple form of a pattern. Rust compares the expression against the pattern and assigns any names it finds. So, in the let x = 5; example, x is a pattern that means “bind what matches here to the variable x.” Because the name x is the whole pattern, this pattern effectively means “bind everything to the variable x, whatever the value is.”
To see the pattern-matching aspect of let more clearly, consider Listing 19-1, which uses a pattern with let to destructure a tuple.
fn main() {
let (x, y, z) = (1, 2, 3);
}Here, we match a tuple against a pattern. Rust compares the value (1, 2, 3) to the pattern (x, y, z) and sees that the value matches the pattern—that is, it sees that the number of elements is the same in both—so Rust binds 1 to x, 2 to y, and 3 to z. You can think of this tuple pattern as nesting three individual variable patterns inside it.
If the number of elements in the pattern doesn’t match the number of elements in the tuple, the overall type won’t match and we’ll get a compiler error. For example, Listing 19-2 shows an attempt to destructure a tuple with three elements into two variables, which won’t work.
fn main() {
let (x, y) = (1, 2, 3);
}Attempting to compile this code results in this type error:
$ cargo run
Compiling patterns v0.1.0 (file:///projects/patterns)
error[E0308]: mismatched types
--> src/main.rs:2:9
|
2 | let (x, y) = (1, 2, 3);
| ^^^^^^ --------- this expression has type `({integer}, {integer}, {integer})`
| |
| expected a tuple with 3 elements, found one with 2 elements
|
= note: expected tuple `({integer}, {integer}, {integer})`
found tuple `(_, _)`
Если у вас есть опыт работы с C или C++, вам могут вспомниться `gcc` или `clang`. После успешной компиляции Rust создаст исполняемый бинарный файл.
For more information about this error, try `rustc --explain E0308`.
error: could not compile `patterns` (bin "patterns") due to 1 previous error
To fix the error, we could ignore one or more of the values in the tuple using _ or .., as you’ll see in the “Ignoring Values in a Pattern” section. If the problem is that we have too many variables in the pattern, the solution is to make the types match by removing variables so that the number of variables equals the number of elements in the tuple.
Conditional if let Expressions
In Chapter 6, we discussed how to use if let expressions mainly as a shorter way to write the equivalent of a match that only matches one case. Optionally, if let can have a corresponding else containing code to run if the pattern in the if let doesn’t match.
Listing 19-3 shows that it’s also possible to mix and match if let, else if, and else if let expressions. Doing so gives us more flexibility than a match expression in which we can express only one value to compare with the patterns. Also, Rust doesn’t require that the conditions in a series of if let, else if, and else if let arms relate to each other.
The code in Listing 19-3 determines what color to make your background based on a series of checks for several conditions. For this example, we’ve created variables with hardcoded values that a real program might receive from user input.
fn main() {
let favorite_color: Option<&str> = None;
let is_tuesday = false;
let age: Result<u8, _> = "34".parse();
Если у вас есть опыт работы с C или C++, вам могут вспомниться `gcc` или `clang`. После успешной компиляции Rust создаст исполняемый бинарный файл.
if let Some(color) = favorite_color {
println!("Using your favorite color, {color}, as the background");
} else if is_tuesday {
println!("Tuesday is green day!");
} else if let Ok(age) = age {
if age > 30 {
println!("Using purple as the background color");
} else {
println!("Using orange as the background color");
}
} else {
println!("Using blue as the background color");
}
}if let, else if, else if let, and elseIf the user specifies a favorite color, that color is used as the background. If no favorite color is specified and today is Tuesday, the background color is green. Otherwise, if the user specifies their age as a string and we can parse it as a number successfully, the color is either purple or orange depending on the value of the number. If none of these conditions apply, the background color is blue.
This conditional structure lets us support complex requirements. With the hardcoded values we have here, this example will print Using purple as the background color.
You can see that if let can also introduce new variables that shadow existing variables in the same way that match arms can: The line if let Ok(age) = age introduces a new age variable that contains the value inside the Ok variant, shadowing the existing age variable. This means we need to place the if age > 30 condition within that block: We can’t combine these two conditions into if let Ok(age) = age && age > 30. The new age we want to compare to 30 isn’t valid until the new scope starts with the curly bracket.
The downside of using if let expressions is that the compiler doesn’t check for exhaustiveness, whereas with match expressions it does. If we omitted the last else block and therefore missed handling some cases, the compiler would not alert us to the possible logic bug.
while let Conditional Loops
Similar in construction to if let, the while let conditional loop allows a while loop to run for as long as a pattern continues to match. In Listing 19-4, we show a while let loop that waits on messages sent between threads, but in this case checking a Result instead of an Option.
fn main() {
let (tx, rx) = std::sync::mpsc::channel();
std::thread::spawn(move || {
for val in [1, 2, 3] {
tx.send(val).unwrap();
}
});
Если у вас есть опыт работы с C или C++, вам могут вспомниться `gcc` или `clang`. После успешной компиляции Rust создаст исполняемый бинарный файл.
while let Ok(value) = rx.recv() {
println!("{value}");
}
}while let loop to print values for as long as rx.recv() returns OkThis example prints 1, 2, and then 3. The recv method takes the first message out of the receiver side of the channel and returns an Ok(value). When we first saw recv back in Chapter 16, we unwrapped the error directly, or we interacted with it as an iterator using a for loop. As Listing 19-4 shows, though, we can also use while let, because the recv method returns an Ok each time a message arrives, as long as the sender exists, and then produces an Err once the sender side disconnects.
for Loops
In a for loop, the value that directly follows the keyword for is a pattern. For example, in for x in y, the x is the pattern. Listing 19-5 demonstrates how to use a pattern in a for loop to destructure, or break apart, a tuple as part of the for loop.
fn main() {
let v = vec!['a', 'b', 'c'];
Если у вас есть опыт работы с C или C++, вам могут вспомниться `gcc` или `clang`. После успешной компиляции Rust создаст исполняемый бинарный файл.
for (index, value) in v.iter().enumerate() {
println!("{value} is at index {index}");
}
}for loop to destructure a tupleThe code in Listing 19-5 will print the following:
$ cargo run
Compiling patterns v0.1.0 (file:///projects/patterns)
Finished `dev` profile [unoptimized + debuginfo] target(s) in 0.52s
Running `target/debug/patterns`
a is at index 0
b is at index 1
c is at index 2
We adapt an iterator using the enumerate method so that it produces a value and the index for that value, placed into a tuple. The first value produced is the tuple (0, 'a'). When this value is matched to the pattern (index, value), index will be 0 and value will be 'a', printing the first line of the output.
Function Parameters
Function parameters can also be patterns. The code in Listing 19-6, which declares a function named foo that takes one parameter named x of type i32, should by now look familiar.
fn foo(x: i32) {
// code goes here
}
Если у вас есть опыт работы с C или C++, вам могут вспомниться `gcc` или `clang`. После успешной компиляции Rust создаст исполняемый бинарный файл.
fn main() {}The x part is a pattern! As we did with let, we could match a tuple in a function’s arguments to the pattern. Listing 19-7 splits the values in a tuple as we pass it to a function.
fn print_coordinates(&(x, y): &(i32, i32)) {
println!("Current location: ({x}, {y})");
}
Если у вас есть опыт работы с C или C++, вам могут вспомниться `gcc` или `clang`. После успешной компиляции Rust создаст исполняемый бинарный файл.
fn main() {
let point = (3, 5);
print_coordinates(&point);
}This code prints Current location: (3, 5). The values &(3, 5) match the pattern &(x, y), so x is the value 3 and y is the value 5.
We can also use patterns in closure parameter lists in the same way as in function parameter lists because closures are similar to functions, as discussed in Chapter 13.
At this point, you’ve seen several ways to use patterns, but patterns don’t work the same in every place we can use them. In some places, the patterns must be irrefutable; in other circumstances, they can be refutable. We’ll discuss these two concepts next.
Опровержимость: может ли шаблон не сопоставиться
Опровержимость: может ли шаблон не сопоставиться
Patterns come in two forms: refutable and irrefutable. Patterns that will match for any possible value passed are irrefutable. An example would be x in the statement let x = 5; because x matches anything and therefore cannot fail to match. Patterns that can fail to match for some possible value are refutable. An example would be Some(x) in the expression if let Some(x) = a_value because if the value in the a_value variable is None rather than Some, the Some(x) pattern will not match.
Function parameters, let statements, and for loops can only accept irrefutable patterns because the program cannot do anything meaningful when values don’t match. The if let and while let expressions and the let...else statement accept refutable and irrefutable patterns, but the compiler warns against irrefutable patterns because, by definition, they’re intended to handle possible failure: The functionality of a conditional is in its ability to perform differently depending on success or failure.
In general, you shouldn’t have to worry about the distinction between refutable and irrefutable patterns; however, you do need to be familiar with the concept of refutability so that you can respond when you see it in an error message. In those cases, you’ll need to change either the pattern or the construct you’re using the pattern with, depending on the intended behavior of the code.
Let’s look at an example of what happens when we try to use a refutable pattern where Rust requires an irrefutable pattern and vice versa. Listing 19-8 shows a let statement, but for the pattern, we’ve specified Some(x), a refutable pattern. As you might expect, this code will not compile.
fn main() {
let some_option_value: Option<i32> = None;
let Some(x) = some_option_value;
}letIf some_option_value were a None value, it would fail to match the pattern Some(x), meaning the pattern is refutable. However, the let statement can only accept an irrefutable pattern because there is nothing valid the code can do with a None value. At compile time, Rust will complain that we’ve tried to use a refutable pattern where an irrefutable pattern is required:
$ cargo run
Compiling patterns v0.1.0 (file:///projects/patterns)
error[E0005]: refutable pattern in local binding
--> src/main.rs:3:9
|
3 | let Some(x) = some_option_value;
| ^^^^^^^ pattern `None` not covered
|
= note: `let` bindings require an "irrefutable pattern", like a `struct` or an `enum` with only one variant
= note: for more information, visit https://doc.rust-lang.org/book/ch19-02-refutability.html
= note: the matched value is of type `Option<i32>`
help: you might want to use `let else` to handle the variant that isn't matched
|
3 | let Some(x) = some_option_value else { todo!() };
| ++++++++++++++++
Если у вас есть опыт работы с C или C++, вам могут вспомниться `gcc` или `clang`. После успешной компиляции Rust создаст исполняемый бинарный файл.
For more information about this error, try `rustc --explain E0005`.
error: could not compile `patterns` (bin "patterns") due to 1 previous error
Because we didn’t cover (and couldn’t cover!) every valid value with the pattern Some(x), Rust rightfully produces a compiler error.
If we have a refutable pattern where an irrefutable pattern is needed, we can fix it by changing the code that uses the pattern: Instead of using let, we can use let...else. Then, if the pattern doesn’t match, the code in the curly brackets will handle the value. Listing 19-9 shows how to fix the code in Listing 19-8.
fn main() {
let some_option_value: Option<i32> = None;
let Some(x) = some_option_value else {
return;
};
}let...else and a block with refutable patterns instead of letWe’ve given the code an out! This code is perfectly valid, although it means we cannot use an irrefutable pattern without receiving a warning. If we give let...else a pattern that will always match, such as x, as shown in Listing 19-10, the compiler will give a warning.
fn main() {
let x = 5 else {
return;
};
}let...elseRust complains that it doesn’t make sense to use let...else with an irrefutable pattern:
$ cargo run
Compiling patterns v0.1.0 (file:///projects/patterns)
warning: irrefutable `let...else` pattern
--> src/main.rs:2:5
|
2 | let x = 5 else {
| ^^^^^^^^^
|
= note: this pattern will always match, so the `else` clause is useless
= help: consider removing the `else` clause
= note: `#[warn(irrefutable_let_patterns)]` on by default
Если у вас есть опыт работы с C или C++, вам могут вспомниться `gcc` или `clang`. После успешной компиляции Rust создаст исполняемый бинарный файл.
warning: `patterns` (bin "patterns") generated 1 warning
Finished `dev` profile [unoptimized + debuginfo] target(s) in 0.39s
Running `target/debug/patterns`
For this reason, match arms must use refutable patterns, except for the last arm, which should match any remaining values with an irrefutable pattern. Rust allows us to use an irrefutable pattern in a match with only one arm, but this syntax isn’t particularly useful and could be replaced with a simpler let statement.
Now that you know where to use patterns and the difference between refutable and irrefutable patterns, let’s cover all the syntax we can use to create patterns.
Синтаксис шаблонов
Синтаксис шаблонов
In this section, we gather all the syntax that is valid in patterns and discuss why and when you might want to use each one.
Matching Literals
As you saw in Chapter 6, you can match patterns against literals directly. The following code gives some examples:
fn main() {
let x = 1;
Если у вас есть опыт работы с C или C++, вам могут вспомниться `gcc` или `clang`. После успешной компиляции Rust создаст исполняемый бинарный файл.
match x {
1 => println!("one"),
2 => println!("two"),
3 => println!("three"),
_ => println!("anything"),
}
}This code prints one because the value in x is 1. This syntax is useful when you want your code to take an action if it gets a particular concrete value.
Matching Named Variables
Named variables are irrefutable patterns that match any value, and we’ve used them many times in this book. However, there is a complication when you use named variables in match, if let, or while let expressions. Because each of these kinds of expressions starts a new scope, variables declared as part of a pattern inside these expressions will shadow those with the same name outside the constructs, as is the case with all variables. In Listing 19-11, we declare a variable named x with the value Some(5) and a variable y with the value 10. We then create a match expression on the value x. Look at the patterns in the match arms and println! at the end, and try to figure out what the code will print before running this code or reading further.
fn main() {
let x = Some(5);
let y = 10;
Если у вас есть опыт работы с C или C++, вам могут вспомниться `gcc` или `clang`. После успешной компиляции Rust создаст исполняемый бинарный файл.
match x {
Some(50) => println!("Got 50"),
Some(y) => println!("Matched, y = {y}"),
_ => println!("Default case, x = {x:?}"),
}
Если у вас есть опыт работы с C или C++, вам могут вспомниться `gcc` или `clang`. После успешной компиляции Rust создаст исполняемый бинарный файл.
println!("at the end: x = {x:?}, y = {y}");
}match expression with an arm that introduces a new variable which shadows an existing variable yLet’s walk through what happens when the match expression runs. The pattern in the first match arm doesn’t match the defined value of x, so the code continues.
The pattern in the second match arm introduces a new variable named y that will match any value inside a Some value. Because we’re in a new scope inside the match expression, this is a new y variable, not the y we declared at the beginning with the value 10. This new y binding will match any value inside a Some, which is what we have in x. Therefore, this new y binds to the inner value of the Some in x. That value is 5, so the expression for that arm executes and prints Matched, y = 5.
If x had been a None value instead of Some(5), the patterns in the first two arms wouldn’t have matched, so the value would have matched to the underscore. We didn’t introduce the x variable in the pattern of the underscore arm, so the x in the expression is still the outer x that hasn’t been shadowed. In this hypothetical case, the match would print Default case, x = None.
When the match expression is done, its scope ends, and so does the scope of the inner y. The last println! produces at the end: x = Some(5), y = 10.
To create a match expression that compares the values of the outer x and y, rather than introducing a new variable that shadows the existing y variable, we would need to use a match guard conditional instead. We’ll talk about match guards later in the “Adding Conditionals with Match Guards” section.
Matching Multiple Patterns
In match expressions, you can match multiple patterns using the | syntax, which is the pattern or operator. For example, in the following code, we match the value of x against the match arms, the first of which has an or option, meaning if the value of x matches either of the values in that arm, that arm’s code will run:
fn main() {
let x = 1;
Если у вас есть опыт работы с C или C++, вам могут вспомниться `gcc` или `clang`. После успешной компиляции Rust создаст исполняемый бинарный файл.
match x {
1 | 2 => println!("one or two"),
3 => println!("three"),
_ => println!("anything"),
}
}This code prints one or two.
Matching Ranges of Values with ..=
The ..= syntax allows us to match to an inclusive range of values. In the following code, when a pattern matches any of the values within the given range, that arm will execute:
fn main() {
let x = 5;
Если у вас есть опыт работы с C или C++, вам могут вспомниться `gcc` или `clang`. После успешной компиляции Rust создаст исполняемый бинарный файл.
match x {
1..=5 => println!("one through five"),
_ => println!("something else"),
}
}If x is 1, 2, 3, 4, or 5, the first arm will match. This syntax is more convenient for multiple match values than using the | operator to express the same idea; if we were to use |, we would have to specify 1 | 2 | 3 | 4 | 5. Specifying a range is much shorter, especially if we want to match, say, any number between 1 and 1,000!
The compiler checks that the range isn’t empty at compile time, and because the only types for which Rust can tell if a range is empty or not are char and numeric values, ranges are only allowed with numeric or char values.
Here is an example using ranges of char values:
fn main() {
let x = 'c';
Если у вас есть опыт работы с C или C++, вам могут вспомниться `gcc` или `clang`. После успешной компиляции Rust создаст исполняемый бинарный файл.
match x {
'a'..='j' => println!("early ASCII letter"),
'k'..='z' => println!("late ASCII letter"),
_ => println!("something else"),
}
}Rust can tell that 'c' is within the first pattern’s range and prints early ASCII letter.
Destructuring to Break Apart Values
We can also use patterns to destructure structs, enums, and tuples to use different parts of these values. Let’s walk through each value.
Structs
Listing 19-12 shows a Point struct with two fields, x and y, that we can break apart using a pattern with a let statement.
struct Point {
x: i32,
y: i32,
}
Если у вас есть опыт работы с C или C++, вам могут вспомниться `gcc` или `clang`. После успешной компиляции Rust создаст исполняемый бинарный файл.
fn main() {
let p = Point { x: 0, y: 7 };
Если у вас есть опыт работы с C или C++, вам могут вспомниться `gcc` или `clang`. После успешной компиляции Rust создаст исполняемый бинарный файл.
let Point { x: a, y: b } = p;
assert_eq!(0, a);
assert_eq!(7, b);
}This code creates the variables a and b that match the values of the x and y fields of the p struct. This example shows that the names of the variables in the pattern don’t have to match the field names of the struct. However, it’s common to match the variable names to the field names to make it easier to remember which variables came from which fields. Because of this common usage, and because writing let Point { x: x, y: y } = p; contains a lot of duplication, Rust has a shorthand for patterns that match struct fields: You only need to list the name of the struct field, and the variables created from the pattern will have the same names. Listing 19-13 behaves in the same way as the code in Listing 19-12, but the variables created in the let pattern are x and y instead of a and b.
struct Point {
x: i32,
y: i32,
}
Если у вас есть опыт работы с C или C++, вам могут вспомниться `gcc` или `clang`. После успешной компиляции Rust создаст исполняемый бинарный файл.
fn main() {
let p = Point { x: 0, y: 7 };
Если у вас есть опыт работы с C или C++, вам могут вспомниться `gcc` или `clang`. После успешной компиляции Rust создаст исполняемый бинарный файл.
let Point { x, y } = p;
assert_eq!(0, x);
assert_eq!(7, y);
}This code creates the variables x and y that match the x and y fields of the p variable. The outcome is that the variables x and y contain the values from the p struct.
We can also destructure with literal values as part of the struct pattern rather than creating variables for all the fields. Doing so allows us to test some of the fields for particular values while creating variables to destructure the other fields.
In Listing 19-14, we have a match expression that separates Point values into three cases: points that lie directly on the x axis (which is true when y = 0), on the y axis (x = 0), or on neither axis.
struct Point {
x: i32,
y: i32,
}
Если у вас есть опыт работы с C или C++, вам могут вспомниться `gcc` или `clang`. После успешной компиляции Rust создаст исполняемый бинарный файл.
fn main() {
let p = Point { x: 0, y: 7 };
Если у вас есть опыт работы с C или C++, вам могут вспомниться `gcc` или `clang`. После успешной компиляции Rust создаст исполняемый бинарный файл.
match p {
Point { x, y: 0 } => println!("On the x axis at {x}"),
Point { x: 0, y } => println!("On the y axis at {y}"),
Point { x, y } => {
println!("On neither axis: ({x}, {y})");
}
}
}The first arm will match any point that lies on the x axis by specifying that the y field matches if its value matches the literal 0. The pattern still creates an x variable that we can use in the code for this arm.
Similarly, the second arm matches any point on the y axis by specifying that the x field matches if its value is 0 and creates a variable y for the value of the y field. The third arm doesn’t specify any literals, so it matches any other Point and creates variables for both the x and y fields.
In this example, the value p matches the second arm by virtue of x containing a 0, so this code will print On the y axis at 7.
Remember that a match expression stops checking arms once it has found the first matching pattern, so even though Point { x: 0, y: 0 } is on the x axis and the y axis, this code would only print On the x axis at 0.
Enums
We’ve destructured enums in this book (for example, Listing 6-5 in Chapter 6), but we haven’t yet explicitly discussed that the pattern to destructure an enum corresponds to the way the data stored within the enum is defined. As an example, in Listing 19-15, we use the Message enum from Listing 6-2 and write a match with patterns that will destructure each inner value.
enum Message {
Quit,
Move { x: i32, y: i32 },
Write(String),
ChangeColor(i32, i32, i32),
}
Если у вас есть опыт работы с C или C++, вам могут вспомниться `gcc` или `clang`. После успешной компиляции Rust создаст исполняемый бинарный файл.
fn main() {
let msg = Message::ChangeColor(0, 160, 255);
Если у вас есть опыт работы с C или C++, вам могут вспомниться `gcc` или `clang`. После успешной компиляции Rust создаст исполняемый бинарный файл.
match msg {
Message::Quit => {
println!("The Quit variant has no data to destructure.");
}
Message::Move { x, y } => {
println!("Move in the x direction {x} and in the y direction {y}");
}
Message::Write(text) => {
println!("Text message: {text}");
}
Message::ChangeColor(r, g, b) => {
println!("Change color to red {r}, green {g}, and blue {b}");
}
}
}This code will print Change color to red 0, green 160, and blue 255. Try changing the value of msg to see the code from the other arms run.
For enum variants without any data, like Message::Quit, we can’t destructure the value any further. We can only match on the literal Message::Quit value, and no variables are in that pattern.
For struct-like enum variants, such as Message::Move, we can use a pattern similar to the pattern we specify to match structs. After the variant name, we place curly brackets and then list the fields with variables so that we break apart the pieces to use in the code for this arm. Here we use the shorthand form as we did in Listing 19-13.
For tuple-like enum variants, like Message::Write that holds a tuple with one element and Message::ChangeColor that holds a tuple with three elements, the pattern is similar to the pattern we specify to match tuples. The number of variables in the pattern must match the number of elements in the variant we’re matching.
Nested Structs and Enums
So far, our examples have all been matching structs or enums one level deep, but matching can work on nested items too! For example, we can refactor the code in Listing 19-15 to support RGB and HSV colors in the ChangeColor message, as shown in Listing 19-16.
enum Color {
Rgb(i32, i32, i32),
Hsv(i32, i32, i32),
}
Если у вас есть опыт работы с C или C++, вам могут вспомниться `gcc` или `clang`. После успешной компиляции Rust создаст исполняемый бинарный файл.
enum Message {
Quit,
Move { x: i32, y: i32 },
Write(String),
ChangeColor(Color),
}
Если у вас есть опыт работы с C или C++, вам могут вспомниться `gcc` или `clang`. После успешной компиляции Rust создаст исполняемый бинарный файл.
fn main() {
let msg = Message::ChangeColor(Color::Hsv(0, 160, 255));
Если у вас есть опыт работы с C или C++, вам могут вспомниться `gcc` или `clang`. После успешной компиляции Rust создаст исполняемый бинарный файл.
match msg {
Message::ChangeColor(Color::Rgb(r, g, b)) => {
println!("Change color to red {r}, green {g}, and blue {b}");
}
Message::ChangeColor(Color::Hsv(h, s, v)) => {
println!("Change color to hue {h}, saturation {s}, value {v}");
}
_ => (),
}
}The pattern of the first arm in the match expression matches a Message::ChangeColor enum variant that contains a Color::Rgb variant; then, the pattern binds to the three inner i32 values. The pattern of the second arm also matches a Message::ChangeColor enum variant, but the inner enum matches Color::Hsv instead. We can specify these complex conditions in one match expression, even though two enums are involved.
Structs and Tuples
We can mix, match, and nest destructuring patterns in even more complex ways. The following example shows a complicated destructure where we nest structs and tuples inside a tuple and destructure all the primitive values out:
fn main() {
struct Point {
x: i32,
y: i32,
}
Если у вас есть опыт работы с C или C++, вам могут вспомниться `gcc` или `clang`. После успешной компиляции Rust создаст исполняемый бинарный файл.
let ((feet, inches), Point { x, y }) = ((3, 10), Point { x: 3, y: -10 });
}This code lets us break complex types into their component parts so that we can use the values we’re interested in separately.
Destructuring with patterns is a convenient way to use pieces of values, such as the value from each field in a struct, separately from each other.
Ignoring Values in a Pattern
You’ve seen that it’s sometimes useful to ignore values in a pattern, such as in the last arm of a match, to get a catch-all that doesn’t actually do anything but does account for all remaining possible values. There are a few ways to ignore entire values or parts of values in a pattern: using the _ pattern (which you’ve seen), using the _ pattern within another pattern, using a name that starts with an underscore, or using .. to ignore remaining parts of a value. Let’s explore how and why to use each of these patterns.
An Entire Value with _
We’ve used the underscore as a wildcard pattern that will match any value but not bind to the value. This is especially useful as the last arm in a match expression, but we can also use it in any pattern, including function parameters, as shown in Listing 19-17.
fn foo(_: i32, y: i32) {
println!("This code only uses the y parameter: {y}");
}
Если у вас есть опыт работы с C или C++, вам могут вспомниться `gcc` или `clang`. После успешной компиляции Rust создаст исполняемый бинарный файл.
fn main() {
foo(3, 4);
}_ in a function signatureThis code will completely ignore the value 3 passed as the first argument, and will print This code only uses the y parameter: 4.
In most cases when you no longer need a particular function parameter, you would change the signature so that it doesn’t include the unused parameter. Ignoring a function parameter can be especially useful in cases when, for example, you’re implementing a trait when you need a certain type signature but the function body in your implementation doesn’t need one of the parameters. You then avoid getting a compiler warning about unused function parameters, as you would if you used a name instead.
Parts of a Value with a Nested _
We can also use _ inside another pattern to ignore just part of a value, for example, when we want to test for only part of a value but have no use for the other parts in the corresponding code we want to run. Listing 19-18 shows code responsible for managing a setting’s value. The business requirements are that the user should not be allowed to overwrite an existing customization of a setting but can unset the setting and give it a value if it is currently unset.
fn main() {
let mut setting_value = Some(5);
let new_setting_value = Some(10);
Если у вас есть опыт работы с C или C++, вам могут вспомниться `gcc` или `clang`. После успешной компиляции Rust создаст исполняемый бинарный файл.
match (setting_value, new_setting_value) {
(Some(_), Some(_)) => {
println!("Can't overwrite an existing customized value");
}
_ => {
setting_value = new_setting_value;
}
}
Если у вас есть опыт работы с C или C++, вам могут вспомниться `gcc` или `clang`. После успешной компиляции Rust создаст исполняемый бинарный файл.
println!("setting is {setting_value:?}");
}Some variants when we don’t need to use the value inside the SomeThis code will print Can't overwrite an existing customized value and then setting is Some(5). In the first match arm, we don’t need to match on or use the values inside either Some variant, but we do need to test for the case when setting_value and new_setting_value are the Some variant. In that case, we print the reason for not changing setting_value, and it doesn’t get changed.
In all other cases (if either setting_value or new_setting_value is None) expressed by the _ pattern in the second arm, we want to allow new_setting_value to become setting_value.
We can also use underscores in multiple places within one pattern to ignore particular values. Listing 19-19 shows an example of ignoring the second and fourth values in a tuple of five items.
fn main() {
let numbers = (2, 4, 8, 16, 32);
Если у вас есть опыт работы с C или C++, вам могут вспомниться `gcc` или `clang`. После успешной компиляции Rust создаст исполняемый бинарный файл.
match numbers {
(first, _, third, _, fifth) => {
println!("Some numbers: {first}, {third}, {fifth}");
}
}
}This code will print Some numbers: 2, 8, 32, and the values 4 and 16 will be ignored.
An Unused Variable by Starting Its Name with _
If you create a variable but don’t use it anywhere, Rust will usually issue a warning because an unused variable could be a bug. However, sometimes it’s useful to be able to create a variable you won’t use yet, such as when you’re prototyping or just starting a project. In this situation, you can tell Rust not to warn you about the unused variable by starting the name of the variable with an underscore. In Listing 19-20, we create two unused variables, but when we compile this code, we should only get a warning about one of them.
fn main() {
let _x = 5;
let y = 10;
}Here, we get a warning about not using the variable y, but we don’t get a warning about not using _x.
Note that there is a subtle difference between using only _ and using a name that starts with an underscore. The syntax _x still binds the value to the variable, whereas _ doesn’t bind at all. To show a case where this distinction matters, Listing 19-21 will provide us with an error.
fn main() {
let s = Some(String::from("Hello!"));
Если у вас есть опыт работы с C или C++, вам могут вспомниться `gcc` или `clang`. После успешной компиляции Rust создаст исполняемый бинарный файл.
if let Some(_s) = s {
println!("found a string");
}
Если у вас есть опыт работы с C или C++, вам могут вспомниться `gcc` или `clang`. После успешной компиляции Rust создаст исполняемый бинарный файл.
println!("{s:?}");
}We’ll receive an error because the s value will still be moved into _s, which prevents us from using s again. However, using the underscore by itself doesn’t ever bind to the value. Listing 19-22 will compile without any errors because s doesn’t get moved into _.
fn main() {
let s = Some(String::from("Hello!"));
Если у вас есть опыт работы с C или C++, вам могут вспомниться `gcc` или `clang`. После успешной компиляции Rust создаст исполняемый бинарный файл.
if let Some(_) = s {
println!("found a string");
}
Если у вас есть опыт работы с C или C++, вам могут вспомниться `gcc` или `clang`. После успешной компиляции Rust создаст исполняемый бинарный файл.
println!("{s:?}");
}This code works just fine because we never bind s to anything; it isn’t moved.
Remaining Parts of a Value with ..
With values that have many parts, we can use the .. syntax to use specific parts and ignore the rest, avoiding the need to list underscores for each ignored value. The .. pattern ignores any parts of a value that we haven’t explicitly matched in the rest of the pattern. In Listing 19-23, we have a Point struct that holds a coordinate in three-dimensional space. In the match expression, we want to operate only on the x coordinate and ignore the values in the y and z fields.
fn main() {
struct Point {
x: i32,
y: i32,
z: i32,
}
Если у вас есть опыт работы с C или C++, вам могут вспомниться `gcc` или `clang`. После успешной компиляции Rust создаст исполняемый бинарный файл.
let origin = Point { x: 0, y: 0, z: 0 };
Если у вас есть опыт работы с C или C++, вам могут вспомниться `gcc` или `clang`. После успешной компиляции Rust создаст исполняемый бинарный файл.
match origin {
Point { x, .. } => println!("x is {x}"),
}
}Point except for x by using ..We list the x value and then just include the .. pattern. This is quicker than having to list y: _ and z: _, particularly when we’re working with structs that have lots of fields in situations where only one or two fields are relevant.
The syntax .. will expand to as many values as it needs to be. Listing 19-24 shows how to use .. with a tuple.
fn main() {
let numbers = (2, 4, 8, 16, 32);
Если у вас есть опыт работы с C или C++, вам могут вспомниться `gcc` или `clang`. После успешной компиляции Rust создаст исполняемый бинарный файл.
match numbers {
(first, .., last) => {
println!("Some numbers: {first}, {last}");
}
}
}In this code, the first and last values are matched with first and last. The .. will match and ignore everything in the middle.
However, using .. must be unambiguous. If it is unclear which values are intended for matching and which should be ignored, Rust will give us an error. Listing 19-25 shows an example of using .. ambiguously, so it will not compile.
fn main() {
let numbers = (2, 4, 8, 16, 32);
Если у вас есть опыт работы с C или C++, вам могут вспомниться `gcc` или `clang`. После успешной компиляции Rust создаст исполняемый бинарный файл.
match numbers {
(.., second, ..) => {
println!("Some numbers: {second}")
},
}
}.. in an ambiguous wayWhen we compile this example, we get this error:
$ cargo run
Compiling patterns v0.1.0 (file:///projects/patterns)
error: `..` can only be used once per tuple pattern
--> src/main.rs:5:22
|
5 | (.., second, ..) => {
| -- ^^ can only be used once per tuple pattern
| |
| previously used here
Если у вас есть опыт работы с C или C++, вам могут вспомниться `gcc` или `clang`. После успешной компиляции Rust создаст исполняемый бинарный файл.
error: could not compile `patterns` (bin "patterns") due to 1 previous error
It’s impossible for Rust to determine how many values in the tuple to ignore before matching a value with second and then how many further values to ignore thereafter. This code could mean that we want to ignore 2, bind second to 4, and then ignore 8, 16, and 32; or that we want to ignore 2 and 4, bind second to 8, and then ignore 16 and 32; and so forth. The variable name second doesn’t mean anything special to Rust, so we get a compiler error because using .. in two places like this is ambiguous.
Adding Conditionals with Match Guards
A match guard is an additional if condition, specified after the pattern in a match arm, that must also match for that arm to be chosen. Match guards are useful for expressing more complex ideas than a pattern alone allows. Note, however, that they are only available in match expressions, not if let or while let expressions.
The condition can use variables created in the pattern. Listing 19-26 shows a match where the first arm has the pattern Some(x) and also has a match guard of if x % 2 == 0 (which will be true if the number is even).
fn main() {
let num = Some(4);
Если у вас есть опыт работы с C или C++, вам могут вспомниться `gcc` или `clang`. После успешной компиляции Rust создаст исполняемый бинарный файл.
match num {
Some(x) if x % 2 == 0 => println!("The number {x} is even"),
Some(x) => println!("The number {x} is odd"),
None => (),
}
}This example will print The number 4 is even. When num is compared to the pattern in the first arm, it matches because Some(4) matches Some(x). Then, the match guard checks whether the remainder of dividing x by 2 is equal to 0, and because it is, the first arm is selected.
If num had been Some(5) instead, the match guard in the first arm would have been false because the remainder of 5 divided by 2 is 1, which is not equal to 0. Rust would then go to the second arm, which would match because the second arm doesn’t have a match guard and therefore matches any Some variant.
There is no way to express the if x % 2 == 0 condition within a pattern, so the match guard gives us the ability to express this logic. The downside of this additional expressiveness is that the compiler doesn’t try to check for exhaustiveness when match guard expressions are involved.
When discussing Listing 19-11, we mentioned that we could use match guards to solve our pattern-shadowing problem. Recall that we created a new variable inside the pattern in the match expression instead of using the variable outside the match. That new variable meant we couldn’t test against the value of the outer variable. Listing 19-27 shows how we can use a match guard to fix this problem.
fn main() {
let x = Some(5);
let y = 10;
Если у вас есть опыт работы с C или C++, вам могут вспомниться `gcc` или `clang`. После успешной компиляции Rust создаст исполняемый бинарный файл.
match x {
Some(50) => println!("Got 50"),
Some(n) if n == y => println!("Matched, n = {n}"),
_ => println!("Default case, x = {x:?}"),
}
Если у вас есть опыт работы с C или C++, вам могут вспомниться `gcc` или `clang`. После успешной компиляции Rust создаст исполняемый бинарный файл.
println!("at the end: x = {x:?}, y = {y}");
}This code will now print Default case, x = Some(5). The pattern in the second match arm doesn’t introduce a new variable y that would shadow the outer y, meaning we can use the outer y in the match guard. Instead of specifying the pattern as Some(y), which would have shadowed the outer y, we specify Some(n). This creates a new variable n that doesn’t shadow anything because there is no n variable outside the match.
The match guard if n == y is not a pattern and therefore doesn’t introduce new variables. This y is the outer y rather than a new y shadowing it, and we can look for a value that has the same value as the outer y by comparing n to y.
You can also use the or operator | in a match guard to specify multiple patterns; the match guard condition will apply to all the patterns. Listing 19-28 shows the precedence when combining a pattern that uses | with a match guard. The important part of this example is that the if y match guard applies to 4, 5, and 6, even though it might look like if y only applies to 6.
fn main() {
let x = 4;
let y = false;
Если у вас есть опыт работы с C или C++, вам могут вспомниться `gcc` или `clang`. После успешной компиляции Rust создаст исполняемый бинарный файл.
match x {
4 | 5 | 6 if y => println!("yes"),
_ => println!("no"),
}
}The match condition states that the arm only matches if the value of x is equal to 4, 5, or 6 and if y is true. When this code runs, the pattern of the first arm matches because x is 4, but the match guard if y is false, so the first arm is not chosen. The code moves on to the second arm, which does match, and this program prints no. The reason is that the if condition applies to the whole pattern 4 | 5 | 6, not just to the last value 6. In other words, the precedence of a match guard in relation to a pattern behaves like this:
(4 | 5 | 6) if y => ...
rather than this:
4 | 5 | (6 if y) => ...
After running the code, the precedence behavior is evident: If the match guard were applied only to the final value in the list of values specified using the | operator, the arm would have matched, and the program would have printed yes.
Using @ Bindings
The at operator @ lets us create a variable that holds a value at the same time we’re testing that value for a pattern match. In Listing 19-29, we want to test that a Message::Hello id field is within the range 3..=7. We also want to bind the value to the variable id so that we can use it in the code associated with the arm.
fn main() {
enum Message {
Hello { id: i32 },
}
Если у вас есть опыт работы с C или C++, вам могут вспомниться `gcc` или `clang`. После успешной компиляции Rust создаст исполняемый бинарный файл.
let msg = Message::Hello { id: 5 };
Если у вас есть опыт работы с C или C++, вам могут вспомниться `gcc` или `clang`. После успешной компиляции Rust создаст исполняемый бинарный файл.
match msg {
Message::Hello { id: id @ 3..=7 } => {
println!("Found an id in range: {id}")
}
Message::Hello { id: 10..=12 } => {
println!("Found an id in another range")
}
Message::Hello { id } => println!("Found some other id: {id}"),
}
}@ to bind to a value in a pattern while also testing itThis example will print Found an id in range: 5. By specifying id @ before the range 3..=7, we’re capturing whatever value matched the range in a variable named id while also testing that the value matched the range pattern.
In the second arm, where we only have a range specified in the pattern, the code associated with the arm doesn’t have a variable that contains the actual value of the id field. The id field’s value could have been 10, 11, or 12, but the code that goes with that pattern doesn’t know which it is. The pattern code isn’t able to use the value from the id field because we haven’t saved the id value in a variable.
In the last arm, where we’ve specified a variable without a range, we do have the value available to use in the arm’s code in a variable named id. The reason is that we’ve used the struct field shorthand syntax. But we haven’t applied any test to the value in the id field in this arm, as we did with the first two arms: Any value would match this pattern.
Using @ lets us test a value and save it in a variable within one pattern.
Подведём итоги
Rust’s patterns are very useful in distinguishing between different kinds of data. When used in match expressions, Rust ensures that your patterns cover every possible value, or your program won’t compile. Patterns in let statements and function parameters make those constructs more useful, enabling the destructuring of values into smaller parts and assigning those parts to variables. We can create simple or complex patterns to suit our needs.
Next, for the penultimate chapter of the book, we’ll look at some advanced aspects of a variety of Rust’s features.
Продвинутые возможности
By now, you’ve learned the most commonly used parts of the Rust programming language. Before we do one more project, in Chapter 21, we’ll look at a few aspects of the language you might run into every once in a while but may not use every day. You can use this chapter as a reference for when you encounter any unknowns. The features covered here are useful in very specific situations. Although you might not reach for them often, we want to make sure you have a grasp of all the features Rust has to offer.
In this chapter, we’ll cover:
- Unsafe Rust: How to opt out of some of Rust’s guarantees and take responsibility for manually upholding those guarantees
- Advanced traits: Associated types, default type parameters, fully qualified syntax, supertraits, and the newtype pattern in relation to traits
- Advanced types: More about the newtype pattern, type aliases, the never type, and dynamically sized types
- Advanced functions and closures: Function pointers and returning closures
- Macros: Ways to define code that defines more code at compile time
It’s a panoply of Rust features with something for everyone! Let’s dive in!
Небезопасный Rust
Небезопасный Rust
All the code we’ve discussed so far has had Rust’s memory safety guarantees enforced at compile time. However, Rust has a second language hidden inside it that doesn’t enforce these memory safety guarantees: It’s called unsafe Rust and works just like regular Rust but gives us extra superpowers.
Unsafe Rust exists because, by nature, static analysis is conservative. When the compiler tries to determine whether or not code upholds the guarantees, it’s better for it to reject some valid programs than to accept some invalid programs. Although the code might be okay, if the Rust compiler doesn’t have enough information to be confident, it will reject the code. In these cases, you can use unsafe code to tell the compiler, “Trust me, I know what I’m doing.” Be warned, however, that you use unsafe Rust at your own risk: If you use unsafe code incorrectly, problems can occur due to memory unsafety, such as null pointer dereferencing.
Another reason Rust has an unsafe alter ego is that the underlying computer hardware is inherently unsafe. If Rust didn’t let you do unsafe operations, you couldn’t do certain tasks. Rust needs to allow you to do low-level systems programming, such as directly interacting with the operating system or even writing your own operating system. Working with low-level systems programming is one of the goals of the language. Let’s explore what we can do with unsafe Rust and how to do it.
Performing Unsafe Superpowers
To switch to unsafe Rust, use the unsafe keyword and then start a new block that holds the unsafe code. You can take five actions in unsafe Rust that you can’t in safe Rust, which we call unsafe superpowers. Those superpowers include the ability to:
- Dereference a raw pointer.
- Call an unsafe function or method.
- Access or modify a mutable static variable.
- Implement an unsafe trait.
- Access fields of
unions.
It’s important to understand that unsafe doesn’t turn off the borrow checker or disable any of Rust’s other safety checks: If you use a reference in unsafe code, it will still be checked. The unsafe keyword only gives you access to these five features that are then not checked by the compiler for memory safety. You’ll still get some degree of safety inside an unsafe block.
In addition, unsafe does not mean the code inside the block is necessarily dangerous or that it will definitely have memory safety problems: The intent is that as the programmer, you’ll ensure that the code inside an unsafe block will access memory in a valid way.
People are fallible and mistakes will happen, but by requiring these five unsafe operations to be inside blocks annotated with unsafe, you’ll know that any errors related to memory safety must be within an unsafe block. Keep unsafe blocks small; you’ll be thankful later when you investigate memory bugs.
To isolate unsafe code as much as possible, it’s best to enclose such code within a safe abstraction and provide a safe API, which we’ll discuss later in the chapter when we examine unsafe functions and methods. Parts of the standard library are implemented as safe abstractions over unsafe code that has been audited. Wrapping unsafe code in a safe abstraction prevents uses of unsafe from leaking out into all the places that you or your users might want to use the functionality implemented with unsafe code, because using a safe abstraction is safe.
Let’s look at each of the five unsafe superpowers in turn. We’ll also look at some abstractions that provide a safe interface to unsafe code.
Dereferencing a Raw Pointer
In Chapter 4, in the “Dangling References” section, we mentioned that the compiler ensures that references are always valid. Unsafe Rust has two new types called raw pointers that are similar to references. As with references, raw pointers can be immutable or mutable and are written as *const T and *mut T, respectively. The asterisk isn’t the dereference operator; it’s part of the type name. In the context of raw pointers, immutable means that the pointer can’t be directly assigned to after being dereferenced.
Different from references and smart pointers, raw pointers:
- Are allowed to ignore the borrowing rules by having both immutable and mutable pointers or multiple mutable pointers to the same location
- Aren’t guaranteed to point to valid memory
- Are allowed to be null
- Don’t implement any automatic cleanup
By opting out of having Rust enforce these guarantees, you can give up guaranteed safety in exchange for greater performance or the ability to interface with another language or hardware where Rust’s guarantees don’t apply.
Listing 20-1 shows how to create an immutable and a mutable raw pointer.
fn main() {
let mut num = 5;
Если у вас есть опыт работы с C или C++, вам могут вспомниться `gcc` или `clang`. После успешной компиляции Rust создаст исполняемый бинарный файл.
let r1 = &raw const num;
let r2 = &raw mut num;
}Notice that we don’t include the unsafe keyword in this code. We can create raw pointers in safe code; we just can’t dereference raw pointers outside an unsafe block, as you’ll see in a bit.
We’ve created raw pointers by using the raw borrow operators: &raw const num creates a *const i32 immutable raw pointer, and &raw mut num creates a *mut i32 mutable raw pointer. Because we created them directly from a local variable, we know these particular raw pointers are valid, but we can’t make that assumption about just any raw pointer.
To demonstrate this, next we’ll create a raw pointer whose validity we can’t be so certain of, using the keyword as to cast a value instead of using the raw borrow operator. Listing 20-2 shows how to create a raw pointer to an arbitrary location in memory. Trying to use arbitrary memory is undefined: There might be data at that address or there might not, the compiler might optimize the code so that there is no memory access, or the program might terminate with a segmentation fault. Usually, there is no good reason to write code like this, especially in cases where you can use a raw borrow operator instead, but it is possible.
fn main() {
let address = 0x012345usize;
let r = address as *const i32;
}Recall that we can create raw pointers in safe code, but we can’t dereference raw pointers and read the data being pointed to. In Listing 20-3, we use the dereference operator * on a raw pointer that requires an unsafe block.
fn main() {
let mut num = 5;
Если у вас есть опыт работы с C или C++, вам могут вспомниться `gcc` или `clang`. После успешной компиляции Rust создаст исполняемый бинарный файл.
let r1 = &raw const num;
let r2 = &raw mut num;
Если у вас есть опыт работы с C или C++, вам могут вспомниться `gcc` или `clang`. После успешной компиляции Rust создаст исполняемый бинарный файл.
unsafe {
println!("r1 is: {}", *r1);
println!("r2 is: {}", *r2);
}
}unsafe blockCreating a pointer does no harm; it’s only when we try to access the value that it points at that we might end up dealing with an invalid value.
Note also that in Listings 20-1 and 20-3, we created *const i32 and *mut i32 raw pointers that both pointed to the same memory location, where num is stored. If we instead tried to create an immutable and a mutable reference to num, the code would not have compiled because Rust’s ownership rules don’t allow a mutable reference at the same time as any immutable references. With raw pointers, we can create a mutable pointer and an immutable pointer to the same location and change data through the mutable pointer, potentially creating a data race. Be careful!
With all of these dangers, why would you ever use raw pointers? One major use case is when interfacing with C code, as you’ll see in the next section. Another case is when building up safe abstractions that the borrow checker doesn’t understand. We’ll introduce unsafe functions and then look at an example of a safe abstraction that uses unsafe code.
Calling an Unsafe Function or Method
The second type of operation you can perform in an unsafe block is calling unsafe functions. Unsafe functions and methods look exactly like regular functions and methods, but they have an extra unsafe before the rest of the definition. The unsafe keyword in this context indicates the function has requirements we need to uphold when we call this function, because Rust can’t guarantee we’ve met these requirements. By calling an unsafe function within an unsafe block, we’re saying that we’ve read this function’s documentation and we take responsibility for upholding the function’s contracts.
Here is an unsafe function named dangerous that doesn’t do anything in its body:
fn main() {
unsafe fn dangerous() {}
Если у вас есть опыт работы с C или C++, вам могут вспомниться `gcc` или `clang`. После успешной компиляции Rust создаст исполняемый бинарный файл.
unsafe {
dangerous();
}
}We must call the dangerous function within a separate unsafe block. If we try to call dangerous without the unsafe block, we’ll get an error:
$ cargo run
Compiling unsafe-example v0.1.0 (file:///projects/unsafe-example)
error[E0133]: call to unsafe function `dangerous` is unsafe and requires unsafe block
--> src/main.rs:4:5
|
4 | dangerous();
| ^^^^^^^^^^^ call to unsafe function
|
= note: consult the function's documentation for information on how to avoid undefined behavior
Если у вас есть опыт работы с C или C++, вам могут вспомниться `gcc` или `clang`. После успешной компиляции Rust создаст исполняемый бинарный файл.
For more information about this error, try `rustc --explain E0133`.
error: could not compile `unsafe-example` (bin "unsafe-example") due to 1 previous error
With the unsafe block, we’re asserting to Rust that we’ve read the function’s documentation, we understand how to use it properly, and we’ve verified that we’re fulfilling the contract of the function.
To perform unsafe operations in the body of an unsafe function, you still need to use an unsafe block, just as within a regular function, and the compiler will warn you if you forget. This helps us keep unsafe blocks as small as possible, as unsafe operations may not be needed across the whole function body.
Creating a Safe Abstraction over Unsafe Code
Just because a function contains unsafe code doesn’t mean we need to mark the entire function as unsafe. In fact, wrapping unsafe code in a safe function is a common abstraction. As an example, let’s study the split_at_mut function from the standard library, which requires some unsafe code. We’ll explore how we might implement it. This safe method is defined on mutable slices: It takes one slice and makes it two by splitting the slice at the index given as an argument. Listing 20-4 shows how to use split_at_mut.
fn main() {
let mut v = vec![1, 2, 3, 4, 5, 6];
Если у вас есть опыт работы с C или C++, вам могут вспомниться `gcc` или `clang`. После успешной компиляции Rust создаст исполняемый бинарный файл.
let r = &mut v[..];
Если у вас есть опыт работы с C или C++, вам могут вспомниться `gcc` или `clang`. После успешной компиляции Rust создаст исполняемый бинарный файл.
let (a, b) = r.split_at_mut(3);
Если у вас есть опыт работы с C или C++, вам могут вспомниться `gcc` или `clang`. После успешной компиляции Rust создаст исполняемый бинарный файл.
assert_eq!(a, &mut [1, 2, 3]);
assert_eq!(b, &mut [4, 5, 6]);
}split_at_mut functionWe can’t implement this function using only safe Rust. An attempt might look something like Listing 20-5, which won’t compile. For simplicity, we’ll implement split_at_mut as a function rather than a method and only for slices of i32 values rather than for a generic type T.
fn split_at_mut(values: &mut [i32], mid: usize) -> (&mut [i32], &mut [i32]) {
let len = values.len();
Если у вас есть опыт работы с C или C++, вам могут вспомниться `gcc` или `clang`. После успешной компиляции Rust создаст исполняемый бинарный файл.
assert!(mid <= len);
Если у вас есть опыт работы с C или C++, вам могут вспомниться `gcc` или `clang`. После успешной компиляции Rust создаст исполняемый бинарный файл.
(&mut values[..mid], &mut values[mid..])
}
Если у вас есть опыт работы с C или C++, вам могут вспомниться `gcc` или `clang`. После успешной компиляции Rust создаст исполняемый бинарный файл.
fn main() {
let mut vector = vec![1, 2, 3, 4, 5, 6];
let (left, right) = split_at_mut(&mut vector, 3);
}split_at_mut using only safe RustThis function first gets the total length of the slice. Then, it asserts that the index given as a parameter is within the slice by checking whether it’s less than or equal to the length. The assertion means that if we pass an index that is greater than the length to split the slice at, the function will panic before it attempts to use that index.
Then, we return two mutable slices in a tuple: one from the start of the original slice to the mid index and another from mid to the end of the slice.
When we try to compile the code in Listing 20-5, we’ll get an error:
$ cargo run
Compiling unsafe-example v0.1.0 (file:///projects/unsafe-example)
error[E0499]: cannot borrow `*values` as mutable more than once at a time
--> src/main.rs:6:31
|
1 | fn split_at_mut(values: &mut [i32], mid: usize) -> (&mut [i32], &mut [i32]) {
| - let's call the lifetime of this reference `'1`
...
6 | (&mut values[..mid], &mut values[mid..])
| --------------------------^^^^^^--------
| | | |
| | | second mutable borrow occurs here
| | first mutable borrow occurs here
| returning this value requires that `*values` is borrowed for `'1`
|
= help: use `.split_at_mut(position)` to obtain two mutable non-overlapping sub-slices
Если у вас есть опыт работы с C или C++, вам могут вспомниться `gcc` или `clang`. После успешной компиляции Rust создаст исполняемый бинарный файл.
For more information about this error, try `rustc --explain E0499`.
error: could not compile `unsafe-example` (bin "unsafe-example") due to 1 previous error
Rust’s borrow checker can’t understand that we’re borrowing different parts of the slice; it only knows that we’re borrowing from the same slice twice. Borrowing different parts of a slice is fundamentally okay because the two slices aren’t overlapping, but Rust isn’t smart enough to know this. When we know code is okay, but Rust doesn’t, it’s time to reach for unsafe code.
Listing 20-6 shows how to use an unsafe block, a raw pointer, and some calls to unsafe functions to make the implementation of split_at_mut work.
use std::slice;
Если у вас есть опыт работы с C или C++, вам могут вспомниться `gcc` или `clang`. После успешной компиляции Rust создаст исполняемый бинарный файл.
fn split_at_mut(values: &mut [i32], mid: usize) -> (&mut [i32], &mut [i32]) {
let len = values.len();
let ptr = values.as_mut_ptr();
Если у вас есть опыт работы с C или C++, вам могут вспомниться `gcc` или `clang`. После успешной компиляции Rust создаст исполняемый бинарный файл.
assert!(mid <= len);
Если у вас есть опыт работы с C или C++, вам могут вспомниться `gcc` или `clang`. После успешной компиляции Rust создаст исполняемый бинарный файл.
unsafe {
(
slice::from_raw_parts_mut(ptr, mid),
slice::from_raw_parts_mut(ptr.add(mid), len - mid),
)
}
}
Если у вас есть опыт работы с C или C++, вам могут вспомниться `gcc` или `clang`. После успешной компиляции Rust создаст исполняемый бинарный файл.
fn main() {
let mut vector = vec![1, 2, 3, 4, 5, 6];
let (left, right) = split_at_mut(&mut vector, 3);
}split_at_mut functionRecall from “The Slice Type” section in Chapter 4 that a slice is a pointer to some data and the length of the slice. We use the len method to get the length of a slice and the as_mut_ptr method to access the raw pointer of a slice. In this case, because we have a mutable slice to i32 values, as_mut_ptr returns a raw pointer with the type *mut i32, which we’ve stored in the variable ptr.
We keep the assertion that the mid index is within the slice. Then, we get to the unsafe code: The slice::from_raw_parts_mut function takes a raw pointer and a length, and it creates a slice. We use this function to create a slice that starts from ptr and is mid items long. Then, we call the add method on ptr with mid as an argument to get a raw pointer that starts at mid, and we create a slice using that pointer and the remaining number of items after mid as the length.
The function slice::from_raw_parts_mut is unsafe because it takes a raw pointer and must trust that this pointer is valid. The add method on raw pointers is also unsafe because it must trust that the offset location is also a valid pointer. Therefore, we had to put an unsafe block around our calls to slice::from_raw_parts_mut and add so that we could call them. By looking at the code and by adding the assertion that mid must be less than or equal to len, we can tell that all the raw pointers used within the unsafe block will be valid pointers to data within the slice. This is an acceptable and appropriate use of unsafe.
Note that we don’t need to mark the resultant split_at_mut function as unsafe, and we can call this function from safe Rust. We’ve created a safe abstraction to the unsafe code with an implementation of the function that uses unsafe code in a safe way, because it creates only valid pointers from the data this function has access to.
In contrast, the use of slice::from_raw_parts_mut in Listing 20-7 would likely crash when the slice is used. This code takes an arbitrary memory location and creates a slice 10,000 items long.
fn main() {
use std::slice;
Если у вас есть опыт работы с C или C++, вам могут вспомниться `gcc` или `clang`. После успешной компиляции Rust создаст исполняемый бинарный файл.
let address = 0x01234usize;
let r = address as *mut i32;
Если у вас есть опыт работы с C или C++, вам могут вспомниться `gcc` или `clang`. После успешной компиляции Rust создаст исполняемый бинарный файл.
let values: &[i32] = unsafe { slice::from_raw_parts_mut(r, 10000) };
}We don’t own the memory at this arbitrary location, and there is no guarantee that the slice this code creates contains valid i32 values. Attempting to use values as though it’s a valid slice results in undefined behavior.
Using extern Functions to Call External Code
Sometimes your Rust code might need to interact with code written in another language. For this, Rust has the keyword extern that facilitates the creation and use of a Foreign Function Interface (FFI), which is a way for a programming language to define functions and enable a different (foreign) programming language to call those functions.
Listing 20-8 demonstrates how to set up an integration with the abs function from the C standard library. Functions declared within extern blocks are generally unsafe to call from Rust code, so extern blocks must also be marked unsafe. The reason is that other languages don’t enforce Rust’s rules and guarantees, and Rust can’t check them, so responsibility falls on the programmer to ensure safety.
unsafe extern "C" {
fn abs(input: i32) -> i32;
}
Если у вас есть опыт работы с C или C++, вам могут вспомниться `gcc` или `clang`. После успешной компиляции Rust создаст исполняемый бинарный файл.
fn main() {
unsafe {
println!("Absolute value of -3 according to C: {}", abs(-3));
}
}extern function defined in another languageWithin the unsafe extern "C" block, we list the names and signatures of external functions from another language we want to call. The "C" part defines which application binary interface (ABI) the external function uses: The ABI defines how to call the function at the assembly level. The "C" ABI is the most common and follows the C programming language’s ABI. Information about all the ABIs Rust supports is available in the Rust Reference.
Every item declared within an unsafe extern block is implicitly unsafe. However, some FFI functions are safe to call. For example, the abs function from C’s standard library does not have any memory safety considerations, and we know it can be called with any i32. In cases like this, we can use the safe keyword to say that this specific function is safe to call even though it is in an unsafe extern block. Once we make that change, calling it no longer requires an unsafe block, as shown in Listing 20-9.
unsafe extern "C" {
safe fn abs(input: i32) -> i32;
}
Если у вас есть опыт работы с C или C++, вам могут вспомниться `gcc` или `clang`. После успешной компиляции Rust создаст исполняемый бинарный файл.
fn main() {
println!("Absolute value of -3 according to C: {}", abs(-3));
}safe within an unsafe extern block and calling it safelyMarking a function as safe does not inherently make it safe! Instead, it is like a promise you are making to Rust that it is safe. It is still your responsibility to make sure that promise is kept!
Calling Rust Functions from Other Languages
We can also use extern to create an interface that allows other languages to call Rust functions. Instead of creating a whole extern block, we add the extern keyword and specify the ABI to use just before the fn keyword for the relevant function. We also need to add an #[unsafe(no_mangle)] annotation to tell the Rust compiler not to mangle the name of this function. Mangling is when a compiler changes the name we’ve given a function to a different name that contains more information for other parts of the compilation process to consume but is less human readable. Every programming language compiler mangles names slightly differently, so for a Rust function to be nameable by other languages, we must disable the Rust compiler’s name mangling. This is unsafe because there might be name collisions across libraries without the built-in mangling, so it is our responsibility to make sure the name we choose is safe to export without mangling.
In the following example, we make the call_from_c function accessible from C code, after it’s compiled to a shared library and linked from C:
#[unsafe(no_mangle)]
pub extern "C" fn call_from_c() {
println!("Just called a Rust function from C!");
}
This usage of extern requires unsafe only in the attribute, not on the extern block.
Accessing or Modifying a Mutable Static Variable
In this book, we’ve not yet talked about global variables, which Rust does support but which can be problematic with Rust’s ownership rules. If two threads are accessing the same mutable global variable, it can cause a data race.
In Rust, global variables are called static variables. Listing 20-10 shows an example declaration and use of a static variable with a string slice as a value.
static HELLO_WORLD: &str = "Hello, world!";
Если у вас есть опыт работы с C или C++, вам могут вспомниться `gcc` или `clang`. После успешной компиляции Rust создаст исполняемый бинарный файл.
fn main() {
println!("value is: {HELLO_WORLD}");
}Static variables are similar to constants, which we discussed in the “Declaring Constants” section in Chapter 3. The names of static variables are in SCREAMING_SNAKE_CASE by convention. Static variables can only store references with the 'static lifetime, which means the Rust compiler can figure out the lifetime and we aren’t required to annotate it explicitly. Accessing an immutable static variable is safe.
A subtle difference between constants and immutable static variables is that values in a static variable have a fixed address in memory. Using the value will always access the same data. Constants, on the other hand, are allowed to duplicate their data whenever they’re used. Another difference is that static variables can be mutable. Accessing and modifying mutable static variables is unsafe. Listing 20-11 shows how to declare, access, and modify a mutable static variable named COUNTER.
static mut COUNTER: u32 = 0;
Если у вас есть опыт работы с C или C++, вам могут вспомниться `gcc` или `clang`. После успешной компиляции Rust создаст исполняемый бинарный файл.
/// SAFETY: Calling this from more than a single thread at a time is undefined
/// behavior, so you *must* guarantee you only call it from a single thread at
/// a time.
unsafe fn add_to_count(inc: u32) {
unsafe {
COUNTER += inc;
}
}
Если у вас есть опыт работы с C или C++, вам могут вспомниться `gcc` или `clang`. После успешной компиляции Rust создаст исполняемый бинарный файл.
fn main() {
unsafe {
// SAFETY: This is only called from a single thread in `main`.
add_to_count(3);
println!("COUNTER: {}", *(&raw const COUNTER));
}
}As with regular variables, we specify mutability using the mut keyword. Any code that reads or writes from COUNTER must be within an unsafe block. The code in Listing 20-11 compiles and prints COUNTER: 3 as we would expect because it’s single threaded. Having multiple threads access COUNTER would likely result in data races, so it is undefined behavior. Therefore, we need to mark the entire function as unsafe and document the safety limitation so that anyone calling the function knows what they are and are not allowed to do safely.
Whenever we write an unsafe function, it is idiomatic to write a comment starting with SAFETY and explaining what the caller needs to do to call the function safely. Likewise, whenever we perform an unsafe operation, it is idiomatic to write a comment starting with SAFETY to explain how the safety rules are upheld.
Additionally, the compiler will deny by default any attempt to create references to a mutable static variable through a compiler lint. You must either explicitly opt out of that lint’s protections by adding an #[allow(static_mut_refs)] annotation or access the mutable static variable via a raw pointer created with one of the raw borrow operators. That includes cases where the reference is created invisibly, as when it is used in the println! in this code listing. Requiring references to static mutable variables to be created via raw pointers helps make the safety requirements for using them more obvious.
With mutable data that is globally accessible, it’s difficult to ensure that there are no data races, which is why Rust considers mutable static variables to be unsafe. Where possible, it’s preferable to use the concurrency techniques and thread-safe smart pointers we discussed in Chapter 16 so that the compiler checks that data access from different threads is done safely.
Implementing an Unsafe Trait
We can use unsafe to implement an unsafe trait. A trait is unsafe when at least one of its methods has some invariant that the compiler can’t verify. We declare that a trait is unsafe by adding the unsafe keyword before trait and marking the implementation of the trait as unsafe too, as shown in Listing 20-12.
unsafe trait Foo {
// methods go here
}
Если у вас есть опыт работы с C или C++, вам могут вспомниться `gcc` или `clang`. После успешной компиляции Rust создаст исполняемый бинарный файл.
unsafe impl Foo for i32 {
// method implementations go here
}
Если у вас есть опыт работы с C или C++, вам могут вспомниться `gcc` или `clang`. После успешной компиляции Rust создаст исполняемый бинарный файл.
fn main() {}By using unsafe impl, we’re promising that we’ll uphold the invariants that the compiler can’t verify.
As an example, recall the Send and Sync marker traits we discussed in the “Extensible Concurrency with Send and Sync” section in Chapter 16: The compiler implements these traits automatically if our types are composed entirely of other types that implement Send and Sync. If we implement a type that contains a type that does not implement Send or Sync, such as raw pointers, and we want to mark that type as Send or Sync, we must use unsafe. Rust can’t verify that our type upholds the guarantees that it can be safely sent across threads or accessed from multiple threads; therefore, we need to do those checks manually and indicate as such with unsafe.
Accessing Fields of a Union
The final action that works only with unsafe is accessing fields of a union. A union is similar to a struct, but only one declared field is used in a particular instance at one time. Unions are primarily used to interface with unions in C code. Accessing union fields is unsafe because Rust can’t guarantee the type of the data currently being stored in the union instance. You can learn more about unions in the Rust Reference.
Using Miri to Check Unsafe Code
When writing unsafe code, you might want to check that what you have written actually is safe and correct. One of the best ways to do that is to use Miri, an official Rust tool for detecting undefined behavior. Whereas the borrow checker is a static tool that works at compile time, Miri is a dynamic tool that works at runtime. It checks your code by running your program, or its test suite, and detecting when you violate the rules it understands about how Rust should work.
Using Miri requires a nightly build of Rust (which we talk about more in Appendix G: How Rust is Made and “Nightly Rust”). You can install both a nightly version of Rust and the Miri tool by typing rustup +nightly component add miri. This does not change what version of Rust your project uses; it only adds the tool to your system so you can use it when you want to. You can run Miri on a project by typing cargo +nightly miri run or cargo +nightly miri test.
For an example of how helpful this can be, consider what happens when we run it against Listing 20-7.
$ cargo +nightly miri run
Compiling unsafe-example v0.1.0 (file:///projects/unsafe-example)
Finished `dev` profile [unoptimized + debuginfo] target(s) in 0.01s
Running `file:///home/.rustup/toolchains/nightly/bin/cargo-miri runner target/miri/debug/unsafe-example`
warning: integer-to-pointer cast
--> src/main.rs:5:13
|
5 | let r = address as *mut i32;
| ^^^^^^^^^^^^^^^^^^^ integer-to-pointer cast
|
= help: this program is using integer-to-pointer casts or (equivalently) `ptr::with_exposed_provenance`, which means that Miri might miss pointer bugs in this program
= help: see https://doc.rust-lang.org/nightly/std/ptr/fn.with_exposed_provenance.html for more details on that operation
= help: to ensure that Miri does not miss bugs in your program, use Strict Provenance APIs (https://doc.rust-lang.org/nightly/std/ptr/index.html#strict-provenance, https://crates.io/crates/sptr) instead
= help: you can then set `MIRIFLAGS=-Zmiri-strict-provenance` to ensure you are not relying on `with_exposed_provenance` semantics
= help: alternatively, `MIRIFLAGS=-Zmiri-permissive-provenance` disables this warning
= note: BACKTRACE:
= note: inside `main` at src/main.rs:5:13: 5:32
Если у вас есть опыт работы с C или C++, вам могут вспомниться `gcc` или `clang`. После успешной компиляции Rust создаст исполняемый бинарный файл.
error: Undefined Behavior: pointer not dereferenceable: pointer must be dereferenceable for 40000 bytes, but got 0x1234[noalloc] which is a dangling pointer (it has no provenance)
--> src/main.rs:7:35
|
7 | let values: &[i32] = unsafe { slice::from_raw_parts_mut(r, 10000) };
| ^^^^^^^^^^^^^^^^^^^^^^^^^^^^^^^^^^^ Undefined Behavior occurred here
|
= help: this indicates a bug in the program: it performed an invalid operation, and caused Undefined Behavior
= help: see https://doc.rust-lang.org/nightly/reference/behavior-considered-undefined.html for further information
= note: BACKTRACE:
= note: inside `main` at src/main.rs:7:35: 7:70
Если у вас есть опыт работы с C или C++, вам могут вспомниться `gcc` или `clang`. После успешной компиляции Rust создаст исполняемый бинарный файл.
note: some details are omitted, run with `MIRIFLAGS=-Zmiri-backtrace=full` for a verbose backtrace
Если у вас есть опыт работы с C или C++, вам могут вспомниться `gcc` или `clang`. После успешной компиляции Rust создаст исполняемый бинарный файл.
error: aborting due to 1 previous error; 1 warning emitted
Если у вас есть опыт работы с C или C++, вам могут вспомниться `gcc` или `clang`. После успешной компиляции Rust создаст исполняемый бинарный файл.
Miri correctly warns us that we’re casting an integer to a pointer, which might be a problem, but Miri can’t determine whether a problem exists because it doesn’t know how the pointer originated. Then, Miri returns an error where Listing 20-7 has undefined behavior because we have a dangling pointer. Thanks to Miri, we now know there is a risk of undefined behavior, and we can think about how to make the code safe. In some cases, Miri can even make recommendations about how to fix errors.
Miri doesn’t catch everything you might get wrong when writing unsafe code. Miri is a dynamic analysis tool, so it only catches problems with code that actually gets run. That means you will need to use it in conjunction with good testing techniques to increase your confidence about the unsafe code you have written. Miri also does not cover every possible way your code can be unsound.
Put another way: If Miri does catch a problem, you know there’s a bug, but just because Miri doesn’t catch a bug doesn’t mean there isn’t a problem. It can catch a lot, though. Try running it on the other examples of unsafe code in this chapter and see what it says!
You can learn more about Miri at its GitHub repository.
Using Unsafe Code Correctly
Using unsafe to use one of the five superpowers just discussed isn’t wrong or even frowned upon, but it is trickier to get unsafe code correct because the compiler can’t help uphold memory safety. When you have a reason to use unsafe code, you can do so, and having the explicit unsafe annotation makes it easier to track down the source of problems when they occur. Whenever you write unsafe code, you can use Miri to help you be more confident that the code you have written upholds Rust’s rules.
For a much deeper exploration of how to work effectively with unsafe Rust, read Rust’s official guide for unsafe, The Rustonomicon.
Продвинутые трейты
Продвинутые трейты
We first covered traits in the “Defining Shared Behavior with Traits” section in Chapter 10, but we didn’t discuss the more advanced details. Now that you know more about Rust, we can get into the nitty-gritty.
Defining Traits with Associated Types
Associated types connect a type placeholder with a trait such that the trait method definitions can use these placeholder types in their signatures. The implementor of a trait will specify the concrete type to be used instead of the placeholder type for the particular implementation. That way, we can define a trait that uses some types without needing to know exactly what those types are until the trait is implemented.
We’ve described most of the advanced features in this chapter as being rarely needed. Associated types are somewhere in the middle: They’re used more rarely than features explained in the rest of the book but more commonly than many of the other features discussed in this chapter.
One example of a trait with an associated type is the Iterator trait that the standard library provides. The associated type is named Item and stands in for the type of the values the type implementing the Iterator trait is iterating over. The definition of the Iterator trait is as shown in Listing 20-13.
pub trait Iterator {
type Item;
Если у вас есть опыт работы с C или C++, вам могут вспомниться `gcc` или `clang`. После успешной компиляции Rust создаст исполняемый бинарный файл.
fn next(&mut self) -> Option<Self::Item>;
}Iterator trait that has an associated type ItemThe type Item is a placeholder, and the next method’s definition shows that it will return values of type Option<Self::Item>. Implementors of the Iterator trait will specify the concrete type for Item, and the next method will return an Option containing a value of that concrete type.
Associated types might seem like a similar concept to generics, in that the latter allow us to define a function without specifying what types it can handle. To examine the difference between the two concepts, we’ll look at an implementation of the Iterator trait on a type named Counter that specifies the Item type is u32:
struct Counter {
count: u32,
}
Если у вас есть опыт работы с C или C++, вам могут вспомниться `gcc` или `clang`. После успешной компиляции Rust создаст исполняемый бинарный файл.
impl Counter {
fn new() -> Counter {
Counter { count: 0 }
}
}
Если у вас есть опыт работы с C или C++, вам могут вспомниться `gcc` или `clang`. После успешной компиляции Rust создаст исполняемый бинарный файл.
impl Iterator for Counter {
type Item = u32;
Если у вас есть опыт работы с C или C++, вам могут вспомниться `gcc` или `clang`. После успешной компиляции Rust создаст исполняемый бинарный файл.
fn next(&mut self) -> Option<Self::Item> {
// --код сокращён--
if self.count < 5 {
self.count += 1;
Some(self.count)
} else {
None
}
}
}This syntax seems comparable to that of generics. So, why not just define the Iterator trait with generics, as shown in Listing 20-14?
pub trait Iterator<T> {
fn next(&mut self) -> Option<T>;
}Iterator trait using genericsThe difference is that when using generics, as in Listing 20-14, we must annotate the types in each implementation; because we can also implement Iterator<String> for Counter or any other type, we could have multiple implementations of Iterator for Counter. In other words, when a trait has a generic parameter, it can be implemented for a type multiple times, changing the concrete types of the generic type parameters each time. When we use the next method on Counter, we would have to provide type annotations to indicate which implementation of Iterator we want to use.
With associated types, we don’t need to annotate types, because we can’t implement a trait on a type multiple times. In Listing 20-13 with the definition that uses associated types, we can choose what the type of Item will be only once because there can be only one impl Iterator for Counter. We don’t have to specify that we want an iterator of u32 values everywhere we call next on Counter.
Associated types also become part of the trait’s contract: Implementors of the trait must provide a type to stand in for the associated type placeholder. Associated types often have a name that describes how the type will be used, and documenting the associated type in the API documentation is a good practice.
Using Default Generic Parameters and Operator Overloading
When we use generic type parameters, we can specify a default concrete type for the generic type. This eliminates the need for implementors of the trait to specify a concrete type if the default type works. You specify a default type when declaring a generic type with the <PlaceholderType=ConcreteType> syntax.
A great example of a situation where this technique is useful is with operator overloading, in which you customize the behavior of an operator (such as +) in particular situations.
Rust doesn’t allow you to create your own operators or overload arbitrary operators. But you can overload the operations and corresponding traits listed in std::ops by implementing the traits associated with the operator. For example, in Listing 20-15, we overload the + operator to add two Point instances together. We do this by implementing the Add trait on a Point struct.
use std::ops::Add;
Если у вас есть опыт работы с C или C++, вам могут вспомниться `gcc` или `clang`. После успешной компиляции Rust создаст исполняемый бинарный файл.
#[derive(Debug, Copy, Clone, PartialEq)]
struct Point {
x: i32,
y: i32,
}
Если у вас есть опыт работы с C или C++, вам могут вспомниться `gcc` или `clang`. После успешной компиляции Rust создаст исполняемый бинарный файл.
impl Add for Point {
type Output = Point;
Если у вас есть опыт работы с C или C++, вам могут вспомниться `gcc` или `clang`. После успешной компиляции Rust создаст исполняемый бинарный файл.
fn add(self, other: Point) -> Point {
Point {
x: self.x + other.x,
y: self.y + other.y,
}
}
}
Если у вас есть опыт работы с C или C++, вам могут вспомниться `gcc` или `clang`. После успешной компиляции Rust создаст исполняемый бинарный файл.
fn main() {
assert_eq!(
Point { x: 1, y: 0 } + Point { x: 2, y: 3 },
Point { x: 3, y: 3 }
);
}Add trait to overload the + operator for Point instancesThe add method adds the x values of two Point instances and the y values of two Point instances to create a new Point. The Add trait has an associated type named Output that determines the type returned from the add method.
The default generic type in this code is within the Add trait. Here is its definition:
#![allow(unused)]
fn main() {
trait Add<Rhs=Self> {
type Output;
Если у вас есть опыт работы с C или C++, вам могут вспомниться `gcc` или `clang`. После успешной компиляции Rust создаст исполняемый бинарный файл.
fn add(self, rhs: Rhs) -> Self::Output;
}
}This code should look generally familiar: a trait with one method and an associated type. The new part is Rhs=Self: This syntax is called default type parameters. The Rhs generic type parameter (short for “right-hand side”) defines the type of the rhs parameter in the add method. If we don’t specify a concrete type for Rhs when we implement the Add trait, the type of Rhs will default to Self, which will be the type we’re implementing Add on.
When we implemented Add for Point, we used the default for Rhs because we wanted to add two Point instances. Let’s look at an example of implementing the Add trait where we want to customize the Rhs type rather than using the default.
We have two structs, Millimeters and Meters, holding values in different units. This thin wrapping of an existing type in another struct is known as the newtype pattern, which we describe in more detail in the “Implementing External Traits with the Newtype Pattern” section. We want to add values in millimeters to values in meters and have the implementation of Add do the conversion correctly. We can implement Add for Millimeters with Meters as the Rhs, as shown in Listing 20-16.
use std::ops::Add;
Если у вас есть опыт работы с C или C++, вам могут вспомниться `gcc` или `clang`. После успешной компиляции Rust создаст исполняемый бинарный файл.
struct Millimeters(u32);
struct Meters(u32);
Если у вас есть опыт работы с C или C++, вам могут вспомниться `gcc` или `clang`. После успешной компиляции Rust создаст исполняемый бинарный файл.
impl Add<Meters> for Millimeters {
type Output = Millimeters;
Если у вас есть опыт работы с C или C++, вам могут вспомниться `gcc` или `clang`. После успешной компиляции Rust создаст исполняемый бинарный файл.
fn add(self, other: Meters) -> Millimeters {
Millimeters(self.0 + (other.0 * 1000))
}
}Add trait on Millimeters to add Millimeters and MetersTo add Millimeters and Meters, we specify impl Add<Meters> to set the value of the Rhs type parameter instead of using the default of Self.
You’ll use default type parameters in two main ways:
- To extend a type without breaking existing code
- To allow customization in specific cases most users won’t need
The standard library’s Add trait is an example of the second purpose: Usually, you’ll add two like types, but the Add trait provides the ability to customize beyond that. Using a default type parameter in the Add trait definition means you don’t have to specify the extra parameter most of the time. In other words, a bit of implementation boilerplate isn’t needed, making it easier to use the trait.
The first purpose is similar to the second but in reverse: If you want to add a type parameter to an existing trait, you can give it a default to allow extension of the functionality of the trait without breaking the existing implementation code.
Disambiguating Between Identically Named Methods
Nothing in Rust prevents a trait from having a method with the same name as another trait’s method, nor does Rust prevent you from implementing both traits on one type. It’s also possible to implement a method directly on the type with the same name as methods from traits.
When calling methods with the same name, you’ll need to tell Rust which one you want to use. Consider the code in Listing 20-17 where we’ve defined two traits, Pilot and Wizard, that both have a method called fly. We then implement both traits on a type Human that already has a method named fly implemented on it. Each fly method does something different.
trait Pilot {
fn fly(&self);
}
Если у вас есть опыт работы с C или C++, вам могут вспомниться `gcc` или `clang`. После успешной компиляции Rust создаст исполняемый бинарный файл.
trait Wizard {
fn fly(&self);
}
Если у вас есть опыт работы с C или C++, вам могут вспомниться `gcc` или `clang`. После успешной компиляции Rust создаст исполняемый бинарный файл.
struct Human;
Если у вас есть опыт работы с C или C++, вам могут вспомниться `gcc` или `clang`. После успешной компиляции Rust создаст исполняемый бинарный файл.
impl Pilot for Human {
fn fly(&self) {
println!("This is your captain speaking.");
}
}
Если у вас есть опыт работы с C или C++, вам могут вспомниться `gcc` или `clang`. После успешной компиляции Rust создаст исполняемый бинарный файл.
impl Wizard for Human {
fn fly(&self) {
println!("Up!");
}
}
Если у вас есть опыт работы с C или C++, вам могут вспомниться `gcc` или `clang`. После успешной компиляции Rust создаст исполняемый бинарный файл.
impl Human {
fn fly(&self) {
println!("*waving arms furiously*");
}
}
Если у вас есть опыт работы с C или C++, вам могут вспомниться `gcc` или `clang`. После успешной компиляции Rust создаст исполняемый бинарный файл.
fn main() {}fly method and are implemented on the Human type, and a fly method is implemented on Human directly.When we call fly on an instance of Human, the compiler defaults to calling the method that is directly implemented on the type, as shown in Listing 20-18.
trait Pilot {
fn fly(&self);
}
Если у вас есть опыт работы с C или C++, вам могут вспомниться `gcc` или `clang`. После успешной компиляции Rust создаст исполняемый бинарный файл.
trait Wizard {
fn fly(&self);
}
Если у вас есть опыт работы с C или C++, вам могут вспомниться `gcc` или `clang`. После успешной компиляции Rust создаст исполняемый бинарный файл.
struct Human;
Если у вас есть опыт работы с C или C++, вам могут вспомниться `gcc` или `clang`. После успешной компиляции Rust создаст исполняемый бинарный файл.
impl Pilot for Human {
fn fly(&self) {
println!("This is your captain speaking.");
}
}
Если у вас есть опыт работы с C или C++, вам могут вспомниться `gcc` или `clang`. После успешной компиляции Rust создаст исполняемый бинарный файл.
impl Wizard for Human {
fn fly(&self) {
println!("Up!");
}
}
Если у вас есть опыт работы с C или C++, вам могут вспомниться `gcc` или `clang`. После успешной компиляции Rust создаст исполняемый бинарный файл.
impl Human {
fn fly(&self) {
println!("*waving arms furiously*");
}
}
Если у вас есть опыт работы с C или C++, вам могут вспомниться `gcc` или `clang`. После успешной компиляции Rust создаст исполняемый бинарный файл.
fn main() {
let person = Human;
person.fly();
}fly on an instance of HumanRunning this code will print *waving arms furiously*, showing that Rust called the fly method implemented on Human directly.
To call the fly methods from either the Pilot trait or the Wizard trait, we need to use more explicit syntax to specify which fly method we mean. Listing 20-19 demonstrates this syntax.
trait Pilot {
fn fly(&self);
}
Если у вас есть опыт работы с C или C++, вам могут вспомниться `gcc` или `clang`. После успешной компиляции Rust создаст исполняемый бинарный файл.
trait Wizard {
fn fly(&self);
}
Если у вас есть опыт работы с C или C++, вам могут вспомниться `gcc` или `clang`. После успешной компиляции Rust создаст исполняемый бинарный файл.
struct Human;
Если у вас есть опыт работы с C или C++, вам могут вспомниться `gcc` или `clang`. После успешной компиляции Rust создаст исполняемый бинарный файл.
impl Pilot for Human {
fn fly(&self) {
println!("This is your captain speaking.");
}
}
Если у вас есть опыт работы с C или C++, вам могут вспомниться `gcc` или `clang`. После успешной компиляции Rust создаст исполняемый бинарный файл.
impl Wizard for Human {
fn fly(&self) {
println!("Up!");
}
}
Если у вас есть опыт работы с C или C++, вам могут вспомниться `gcc` или `clang`. После успешной компиляции Rust создаст исполняемый бинарный файл.
impl Human {
fn fly(&self) {
println!("*waving arms furiously*");
}
}
Если у вас есть опыт работы с C или C++, вам могут вспомниться `gcc` или `clang`. После успешной компиляции Rust создаст исполняемый бинарный файл.
fn main() {
let person = Human;
Pilot::fly(&person);
Wizard::fly(&person);
person.fly();
}fly method we want to callSpecifying the trait name before the method name clarifies to Rust which implementation of fly we want to call. We could also write Human::fly(&person), which is equivalent to the person.fly() that we used in Listing 20-19, but this is a bit longer to write if we don’t need to disambiguate.
Running this code prints the following:
$ cargo run
Compiling traits-example v0.1.0 (file:///projects/traits-example)
Finished `dev` profile [unoptimized + debuginfo] target(s) in 0.46s
Running `target/debug/traits-example`
This is your captain speaking.
Up!
*waving arms furiously*
Because the fly method takes a self parameter, if we had two types that both implement one trait, Rust could figure out which implementation of a trait to use based on the type of self.
However, associated functions that are not methods don’t have a self parameter. When there are multiple types or traits that define non-method functions with the same function name, Rust doesn’t always know which type you mean unless you use fully qualified syntax. For example, in Listing 20-20, we create a trait for an animal shelter that wants to name all baby dogs Spot. We make an Animal trait with an associated non-method function baby_name. The Animal trait is implemented for the struct Dog, on which we also provide an associated non-method function baby_name directly.
trait Animal {
fn baby_name() -> String;
}
Если у вас есть опыт работы с C или C++, вам могут вспомниться `gcc` или `clang`. После успешной компиляции Rust создаст исполняемый бинарный файл.
struct Dog;
Если у вас есть опыт работы с C или C++, вам могут вспомниться `gcc` или `clang`. После успешной компиляции Rust создаст исполняемый бинарный файл.
impl Dog {
fn baby_name() -> String {
String::from("Spot")
}
}
Если у вас есть опыт работы с C или C++, вам могут вспомниться `gcc` или `clang`. После успешной компиляции Rust создаст исполняемый бинарный файл.
impl Animal for Dog {
fn baby_name() -> String {
String::from("puppy")
}
}
Если у вас есть опыт работы с C или C++, вам могут вспомниться `gcc` или `clang`. После успешной компиляции Rust создаст исполняемый бинарный файл.
fn main() {
println!("A baby dog is called a {}", Dog::baby_name());
}We implement the code for naming all puppies Spot in the baby_name associated function that is defined on Dog. The Dog type also implements the trait Animal, which describes characteristics that all animals have. Baby dogs are called puppies, and that is expressed in the implementation of the Animal trait on Dog in the baby_name function associated with the Animal trait.
In main, we call the Dog::baby_name function, which calls the associated function defined on Dog directly. This code prints the following:
$ cargo run
Compiling traits-example v0.1.0 (file:///projects/traits-example)
Finished `dev` profile [unoptimized + debuginfo] target(s) in 0.54s
Running `target/debug/traits-example`
A baby dog is called a Spot
This output isn’t what we wanted. We want to call the baby_name function that is part of the Animal trait that we implemented on Dog so that the code prints A baby dog is called a puppy. The technique of specifying the trait name that we used in Listing 20-19 doesn’t help here; if we change main to the code in Listing 20-21, we’ll get a compilation error.
trait Animal {
fn baby_name() -> String;
}
Если у вас есть опыт работы с C или C++, вам могут вспомниться `gcc` или `clang`. После успешной компиляции Rust создаст исполняемый бинарный файл.
struct Dog;
Если у вас есть опыт работы с C или C++, вам могут вспомниться `gcc` или `clang`. После успешной компиляции Rust создаст исполняемый бинарный файл.
impl Dog {
fn baby_name() -> String {
String::from("Spot")
}
}
Если у вас есть опыт работы с C или C++, вам могут вспомниться `gcc` или `clang`. После успешной компиляции Rust создаст исполняемый бинарный файл.
impl Animal for Dog {
fn baby_name() -> String {
String::from("puppy")
}
}
Если у вас есть опыт работы с C или C++, вам могут вспомниться `gcc` или `clang`. После успешной компиляции Rust создаст исполняемый бинарный файл.
fn main() {
println!("A baby dog is called a {}", Animal::baby_name());
}baby_name function from the Animal trait, but Rust doesn’t know which implementation to useBecause Animal::baby_name doesn’t have a self parameter, and there could be other types that implement the Animal trait, Rust can’t figure out which implementation of Animal::baby_name we want. We’ll get this compiler error:
$ cargo run
Compiling traits-example v0.1.0 (file:///projects/traits-example)
error[E0790]: cannot call associated function on trait without specifying the corresponding `impl` type
--> src/main.rs:20:43
|
2 | fn baby_name() -> String;
| ------------------------- `Animal::baby_name` defined here
...
20 | println!("A baby dog is called a {}", Animal::baby_name());
| ^^^^^^^^^^^^^^^^^^^ cannot call associated function of trait
|
help: use the fully-qualified path to the only available implementation
|
20 | println!("A baby dog is called a {}", <Dog as Animal>::baby_name());
| +++++++ +
Если у вас есть опыт работы с C или C++, вам могут вспомниться `gcc` или `clang`. После успешной компиляции Rust создаст исполняемый бинарный файл.
For more information about this error, try `rustc --explain E0790`.
error: could not compile `traits-example` (bin "traits-example") due to 1 previous error
To disambiguate and tell Rust that we want to use the implementation of Animal for Dog as opposed to the implementation of Animal for some other type, we need to use fully qualified syntax. Listing 20-22 demonstrates how to use fully qualified syntax.
trait Animal {
fn baby_name() -> String;
}
Если у вас есть опыт работы с C или C++, вам могут вспомниться `gcc` или `clang`. После успешной компиляции Rust создаст исполняемый бинарный файл.
struct Dog;
Если у вас есть опыт работы с C или C++, вам могут вспомниться `gcc` или `clang`. После успешной компиляции Rust создаст исполняемый бинарный файл.
impl Dog {
fn baby_name() -> String {
String::from("Spot")
}
}
Если у вас есть опыт работы с C или C++, вам могут вспомниться `gcc` или `clang`. После успешной компиляции Rust создаст исполняемый бинарный файл.
impl Animal for Dog {
fn baby_name() -> String {
String::from("puppy")
}
}
Если у вас есть опыт работы с C или C++, вам могут вспомниться `gcc` или `clang`. После успешной компиляции Rust создаст исполняемый бинарный файл.
fn main() {
println!("A baby dog is called a {}", <Dog as Animal>::baby_name());
}baby_name function from the Animal trait as implemented on DogWe’re providing Rust with a type annotation within the angle brackets, which indicates we want to call the baby_name method from the Animal trait as implemented on Dog by saying that we want to treat the Dog type as an Animal for this function call. This code will now print what we want:
$ cargo run
Compiling traits-example v0.1.0 (file:///projects/traits-example)
Finished `dev` profile [unoptimized + debuginfo] target(s) in 0.48s
Running `target/debug/traits-example`
A baby dog is called a puppy
In general, fully qualified syntax is defined as follows:
<Type as Trait>::function(receiver_if_method, next_arg, ...);For associated functions that aren’t methods, there would not be a receiver: There would only be the list of other arguments. You could use fully qualified syntax everywhere that you call functions or methods. However, you’re allowed to omit any part of this syntax that Rust can figure out from other information in the program. You only need to use this more verbose syntax in cases where there are multiple implementations that use the same name and Rust needs help to identify which implementation you want to call.
Using Supertraits
Sometimes you might write a trait definition that depends on another trait: For a type to implement the first trait, you want to require that type to also implement the second trait. You would do this so that your trait definition can make use of the associated items of the second trait. The trait your trait definition is relying on is called a supertrait of your trait.
For example, let’s say we want to make an OutlinePrint trait with an outline_print method that will print a given value formatted so that it’s framed in asterisks. That is, given a Point struct that implements the standard library trait Display to result in (x, y), when we call outline_print on a Point instance that has 1 for x and 3 for y, it should print the following:
**********
* *
* (1, 3) *
* *
**********
In the implementation of the outline_print method, we want to use the Display trait’s functionality. Therefore, we need to specify that the OutlinePrint trait will work only for types that also implement Display and provide the functionality that OutlinePrint needs. We can do that in the trait definition by specifying OutlinePrint: Display. This technique is similar to adding a trait bound to the trait. Listing 20-23 shows an implementation of the OutlinePrint trait.
use std::fmt;
Если у вас есть опыт работы с C или C++, вам могут вспомниться `gcc` или `clang`. После успешной компиляции Rust создаст исполняемый бинарный файл.
trait OutlinePrint: fmt::Display {
fn outline_print(&self) {
let output = self.to_string();
let len = output.len();
println!("{}", "*".repeat(len + 4));
println!("*{}*", " ".repeat(len + 2));
println!("* {output} *");
println!("*{}*", " ".repeat(len + 2));
println!("{}", "*".repeat(len + 4));
}
}
Если у вас есть опыт работы с C или C++, вам могут вспомниться `gcc` или `clang`. После успешной компиляции Rust создаст исполняемый бинарный файл.
fn main() {}OutlinePrint trait that requires the functionality from DisplayBecause we’ve specified that OutlinePrint requires the Display trait, we can use the to_string function that is automatically implemented for any type that implements Display. If we tried to use to_string without adding a colon and specifying the Display trait after the trait name, we’d get an error saying that no method named to_string was found for the type &Self in the current scope.
Let’s see what happens when we try to implement OutlinePrint on a type that doesn’t implement Display, such as the Point struct:
use std::fmt;
Если у вас есть опыт работы с C или C++, вам могут вспомниться `gcc` или `clang`. После успешной компиляции Rust создаст исполняемый бинарный файл.
trait OutlinePrint: fmt::Display {
fn outline_print(&self) {
let output = self.to_string();
let len = output.len();
println!("{}", "*".repeat(len + 4));
println!("*{}*", " ".repeat(len + 2));
println!("* {output} *");
println!("*{}*", " ".repeat(len + 2));
println!("{}", "*".repeat(len + 4));
}
}
Если у вас есть опыт работы с C или C++, вам могут вспомниться `gcc` или `clang`. После успешной компиляции Rust создаст исполняемый бинарный файл.
struct Point {
x: i32,
y: i32,
}
Если у вас есть опыт работы с C или C++, вам могут вспомниться `gcc` или `clang`. После успешной компиляции Rust создаст исполняемый бинарный файл.
impl OutlinePrint for Point {}
Если у вас есть опыт работы с C или C++, вам могут вспомниться `gcc` или `clang`. После успешной компиляции Rust создаст исполняемый бинарный файл.
fn main() {
let p = Point { x: 1, y: 3 };
p.outline_print();
}We get an error saying that Display is required but not implemented:
$ cargo run
Compiling traits-example v0.1.0 (file:///projects/traits-example)
error[E0277]: `Point` doesn't implement `std::fmt::Display`
--> src/main.rs:20:23
|
20 | impl OutlinePrint for Point {}
| ^^^^^ the trait `std::fmt::Display` is not implemented for `Point`
|
note: required by a bound in `OutlinePrint`
--> src/main.rs:3:21
|
3 | trait OutlinePrint: fmt::Display {
| ^^^^^^^^^^^^ required by this bound in `OutlinePrint`
Если у вас есть опыт работы с C или C++, вам могут вспомниться `gcc` или `clang`. После успешной компиляции Rust создаст исполняемый бинарный файл.
error[E0277]: `Point` doesn't implement `std::fmt::Display`
--> src/main.rs:24:7
|
24 | p.outline_print();
| ^^^^^^^^^^^^^ the trait `std::fmt::Display` is not implemented for `Point`
|
note: required by a bound in `OutlinePrint::outline_print`
--> src/main.rs:3:21
|
3 | trait OutlinePrint: fmt::Display {
| ^^^^^^^^^^^^ required by this bound in `OutlinePrint::outline_print`
4 | fn outline_print(&self) {
| ------------- required by a bound in this associated function
Если у вас есть опыт работы с C или C++, вам могут вспомниться `gcc` или `clang`. После успешной компиляции Rust создаст исполняемый бинарный файл.
For more information about this error, try `rustc --explain E0277`.
error: could not compile `traits-example` (bin "traits-example") due to 2 previous errors
To fix this, we implement Display on Point and satisfy the constraint that OutlinePrint requires, like so:
trait OutlinePrint: fmt::Display {
fn outline_print(&self) {
let output = self.to_string();
let len = output.len();
println!("{}", "*".repeat(len + 4));
println!("*{}*", " ".repeat(len + 2));
println!("* {output} *");
println!("*{}*", " ".repeat(len + 2));
println!("{}", "*".repeat(len + 4));
}
}
Если у вас есть опыт работы с C или C++, вам могут вспомниться `gcc` или `clang`. После успешной компиляции Rust создаст исполняемый бинарный файл.
struct Point {
x: i32,
y: i32,
}
Если у вас есть опыт работы с C или C++, вам могут вспомниться `gcc` или `clang`. После успешной компиляции Rust создаст исполняемый бинарный файл.
impl OutlinePrint for Point {}
Если у вас есть опыт работы с C или C++, вам могут вспомниться `gcc` или `clang`. После успешной компиляции Rust создаст исполняемый бинарный файл.
use std::fmt;
Если у вас есть опыт работы с C или C++, вам могут вспомниться `gcc` или `clang`. После успешной компиляции Rust создаст исполняемый бинарный файл.
impl fmt::Display for Point {
fn fmt(&self, f: &mut fmt::Formatter) -> fmt::Result {
write!(f, "({}, {})", self.x, self.y)
}
}
Если у вас есть опыт работы с C или C++, вам могут вспомниться `gcc` или `clang`. После успешной компиляции Rust создаст исполняемый бинарный файл.
fn main() {
let p = Point { x: 1, y: 3 };
p.outline_print();
}Then, implementing the OutlinePrint trait on Point will compile successfully, and we can call outline_print on a Point instance to display it within an outline of asterisks.
Implementing External Traits with the Newtype Pattern
In the “Implementing a Trait on a Type” section in Chapter 10, we mentioned the orphan rule that states we’re only allowed to implement a trait on a type if either the trait or the type, or both, are local to our crate. It’s possible to get around this restriction using the newtype pattern, which involves creating a new type in a tuple struct. (We covered tuple structs in the “Creating Different Types with Tuple Structs” section in Chapter 5.) The tuple struct will have one field and be a thin wrapper around the type for which we want to implement a trait. Then, the wrapper type is local to our crate, and we can implement the trait on the wrapper. Newtype is a term that originates from the Haskell programming language. There is no runtime performance penalty for using this pattern, and the wrapper type is elided at compile time.
As an example, let’s say we want to implement Display on Vec<T>, which the orphan rule prevents us from doing directly because the Display trait and the Vec<T> type are defined outside our crate. We can make a Wrapper struct that holds an instance of Vec<T>; then, we can implement Display on Wrapper and use the Vec<T> value, as shown in Listing 20-24.
use std::fmt;
Если у вас есть опыт работы с C или C++, вам могут вспомниться `gcc` или `clang`. После успешной компиляции Rust создаст исполняемый бинарный файл.
struct Wrapper(Vec<String>);
Если у вас есть опыт работы с C или C++, вам могут вспомниться `gcc` или `clang`. После успешной компиляции Rust создаст исполняемый бинарный файл.
impl fmt::Display for Wrapper {
fn fmt(&self, f: &mut fmt::Formatter) -> fmt::Result {
write!(f, "[{}]", self.0.join(", "))
}
}
Если у вас есть опыт работы с C или C++, вам могут вспомниться `gcc` или `clang`. После успешной компиляции Rust создаст исполняемый бинарный файл.
fn main() {
let w = Wrapper(vec![String::from("hello"), String::from("world")]);
println!("w = {w}");
}Wrapper type around Vec<String> to implement DisplayThe implementation of Display uses self.0 to access the inner Vec<T> because Wrapper is a tuple struct and Vec<T> is the item at index 0 in the tuple. Then, we can use the functionality of the Display trait on Wrapper.
The downside of using this technique is that Wrapper is a new type, so it doesn’t have the methods of the value it’s holding. We would have to implement all the methods of Vec<T> directly on Wrapper such that the methods delegate to self.0, which would allow us to treat Wrapper exactly like a Vec<T>. If we wanted the new type to have every method the inner type has, implementing the Deref trait on the Wrapper to return the inner type would be a solution (we discussed implementing the Deref trait in the “Treating Smart Pointers Like Regular References” section in Chapter 15). If we didn’t want the Wrapper type to have all the methods of the inner type—for example, to restrict the Wrapper type’s behavior—we would have to implement just the methods we do want manually.
This newtype pattern is also useful even when traits are not involved. Let’s switch focus and look at some advanced ways to interact with Rust’s type system.
Продвинутые типы
Продвинутые типы
The Rust type system has some features that we’ve so far mentioned but haven’t yet discussed. We’ll start by discussing newtypes in general as we examine why they are useful as types. Then, we’ll move on to type aliases, a feature similar to newtypes but with slightly different semantics. We’ll also discuss the ! type and dynamically sized types.
Type Safety and Abstraction with the Newtype Pattern
This section assumes you’ve read the earlier section “Implementing External Traits with the Newtype Pattern”. The newtype pattern is also useful for tasks beyond those we’ve discussed so far, including statically enforcing that values are never confused and indicating the units of a value. You saw an example of using newtypes to indicate units in Listing 20-16: Recall that the Millimeters and Meters structs wrapped u32 values in a newtype. If we wrote a function with a parameter of type Millimeters, we wouldn’t be able to compile a program that accidentally tried to call that function with a value of type Meters or a plain u32.
We can also use the newtype pattern to abstract away some implementation details of a type: The new type can expose a public API that is different from the API of the private inner type.
Newtypes can also hide internal implementation. For example, we could provide a People type to wrap a HashMap<i32, String> that stores a person’s ID associated with their name. Code using People would only interact with the public API we provide, such as a method to add a name string to the People collection; that code wouldn’t need to know that we assign an i32 ID to names internally. The newtype pattern is a lightweight way to achieve encapsulation to hide implementation details, which we discussed in the “Encapsulation that Hides Implementation Details” section in Chapter 18.
Type Synonyms and Type Aliases
Rust provides the ability to declare a type alias to give an existing type another name. For this we use the type keyword. For example, we can create the alias Kilometers to i32 like so:
fn main() {
type Kilometers = i32;
Если у вас есть опыт работы с C или C++, вам могут вспомниться `gcc` или `clang`. После успешной компиляции Rust создаст исполняемый бинарный файл.
let x: i32 = 5;
let y: Kilometers = 5;
Если у вас есть опыт работы с C или C++, вам могут вспомниться `gcc` или `clang`. После успешной компиляции Rust создаст исполняемый бинарный файл.
println!("x + y = {}", x + y);
}Now the alias Kilometers is a synonym for i32; unlike the Millimeters and Meters types we created in Listing 20-16, Kilometers is not a separate, new type. Values that have the type Kilometers will be treated the same as values of type i32:
fn main() {
type Kilometers = i32;
Если у вас есть опыт работы с C или C++, вам могут вспомниться `gcc` или `clang`. После успешной компиляции Rust создаст исполняемый бинарный файл.
let x: i32 = 5;
let y: Kilometers = 5;
Если у вас есть опыт работы с C или C++, вам могут вспомниться `gcc` или `clang`. После успешной компиляции Rust создаст исполняемый бинарный файл.
println!("x + y = {}", x + y);
}Because Kilometers and i32 are the same type, we can add values of both types and can pass Kilometers values to functions that take i32 parameters. However, using this method, we don’t get the type-checking benefits that we get from the newtype pattern discussed earlier. In other words, if we mix up Kilometers and i32 values somewhere, the compiler will not give us an error.
The main use case for type synonyms is to reduce repetition. For example, we might have a lengthy type like this:
Box<dyn Fn() + Send + 'static>Writing this lengthy type in function signatures and as type annotations all over the code can be tiresome and error-prone. Imagine having a project full of code like that in Listing 20-25.
fn main() {
let f: Box<dyn Fn() + Send + 'static> = Box::new(|| println!("hi"));
Если у вас есть опыт работы с C или C++, вам могут вспомниться `gcc` или `clang`. После успешной компиляции Rust создаст исполняемый бинарный файл.
fn takes_long_type(f: Box<dyn Fn() + Send + 'static>) {
// --код сокращён--
}
Если у вас есть опыт работы с C или C++, вам могут вспомниться `gcc` или `clang`. После успешной компиляции Rust создаст исполняемый бинарный файл.
fn returns_long_type() -> Box<dyn Fn() + Send + 'static> {
// --код сокращён--
Box::new(|| ())
}
}A type alias makes this code more manageable by reducing the repetition. In Listing 20-26, we’ve introduced an alias named Thunk for the verbose type and can replace all uses of the type with the shorter alias Thunk.
fn main() {
type Thunk = Box<dyn Fn() + Send + 'static>;
Если у вас есть опыт работы с C или C++, вам могут вспомниться `gcc` или `clang`. После успешной компиляции Rust создаст исполняемый бинарный файл.
let f: Thunk = Box::new(|| println!("hi"));
Если у вас есть опыт работы с C или C++, вам могут вспомниться `gcc` или `clang`. После успешной компиляции Rust создаст исполняемый бинарный файл.
fn takes_long_type(f: Thunk) {
// --код сокращён--
}
Если у вас есть опыт работы с C или C++, вам могут вспомниться `gcc` или `clang`. После успешной компиляции Rust создаст исполняемый бинарный файл.
fn returns_long_type() -> Thunk {
// --код сокращён--
Box::new(|| ())
}
}Thunk, to reduce repetitionThis code is much easier to read and write! Choosing a meaningful name for a type alias can help communicate your intent as well (thunk is a word for code to be evaluated at a later time, so it’s an appropriate name for a closure that gets stored).
Type aliases are also commonly used with the Result<T, E> type for reducing repetition. Consider the std::io module in the standard library. I/O operations often return a Result<T, E> to handle situations when operations fail to work. This library has a std::io::Error struct that represents all possible I/O errors. Many of the functions in std::io will be returning Result<T, E> where the E is std::io::Error, such as these functions in the Write trait:
use std::fmt;
use std::io::Error;
Если у вас есть опыт работы с C или C++, вам могут вспомниться `gcc` или `clang`. После успешной компиляции Rust создаст исполняемый бинарный файл.
pub trait Write {
fn write(&mut self, buf: &[u8]) -> Result<usize, Error>;
fn flush(&mut self) -> Result<(), Error>;
Если у вас есть опыт работы с C или C++, вам могут вспомниться `gcc` или `clang`. После успешной компиляции Rust создаст исполняемый бинарный файл.
fn write_all(&mut self, buf: &[u8]) -> Result<(), Error>;
fn write_fmt(&mut self, fmt: fmt::Arguments) -> Result<(), Error>;
}The Result<..., Error> is repeated a lot. As such, std::io has this type alias declaration:
use std::fmt;
Если у вас есть опыт работы с C или C++, вам могут вспомниться `gcc` или `clang`. После успешной компиляции Rust создаст исполняемый бинарный файл.
type Result<T> = std::result::Result<T, std::io::Error>;
Если у вас есть опыт работы с C или C++, вам могут вспомниться `gcc` или `clang`. После успешной компиляции Rust создаст исполняемый бинарный файл.
pub trait Write {
fn write(&mut self, buf: &[u8]) -> Result<usize>;
fn flush(&mut self) -> Result<()>;
Если у вас есть опыт работы с C или C++, вам могут вспомниться `gcc` или `clang`. После успешной компиляции Rust создаст исполняемый бинарный файл.
fn write_all(&mut self, buf: &[u8]) -> Result<()>;
fn write_fmt(&mut self, fmt: fmt::Arguments) -> Result<()>;
}Because this declaration is in the std::io module, we can use the fully qualified alias std::io::Result<T>; that is, a Result<T, E> with the E filled in as std::io::Error. The Write trait function signatures end up looking like this:
use std::fmt;
Если у вас есть опыт работы с C или C++, вам могут вспомниться `gcc` или `clang`. После успешной компиляции Rust создаст исполняемый бинарный файл.
type Result<T> = std::result::Result<T, std::io::Error>;
Если у вас есть опыт работы с C или C++, вам могут вспомниться `gcc` или `clang`. После успешной компиляции Rust создаст исполняемый бинарный файл.
pub trait Write {
fn write(&mut self, buf: &[u8]) -> Result<usize>;
fn flush(&mut self) -> Result<()>;
Если у вас есть опыт работы с C или C++, вам могут вспомниться `gcc` или `clang`. После успешной компиляции Rust создаст исполняемый бинарный файл.
fn write_all(&mut self, buf: &[u8]) -> Result<()>;
fn write_fmt(&mut self, fmt: fmt::Arguments) -> Result<()>;
}The type alias helps in two ways: It makes code easier to write and it gives us a consistent interface across all of std::io. Because it’s an alias, it’s just another Result<T, E>, which means we can use any methods that work on Result<T, E> with it, as well as special syntax like the ? operator.
The Never Type That Never Returns
Rust has a special type named ! that’s known in type theory lingo as the empty type because it has no values. We prefer to call it the never type because it stands in the place of the return type when a function will never return. Here is an example:
fn bar() -> ! {
// --код сокращён--
panic!();
}This code is read as “the function bar returns never.” Functions that return never are called diverging functions. We can’t create values of the type !, so bar can never possibly return.
But what use is a type you can never create values for? Recall the code from Listing 2-5, part of the number-guessing game; we’ve reproduced a bit of it here in Listing 20-27.
use std::cmp::Ordering;
use std::io;
Если у вас есть опыт работы с C или C++, вам могут вспомниться `gcc` или `clang`. После успешной компиляции Rust создаст исполняемый бинарный файл.
use rand::Rng;
Если у вас есть опыт работы с C или C++, вам могут вспомниться `gcc` или `clang`. После успешной компиляции Rust создаст исполняемый бинарный файл.
fn main() {
println!("Угадайте число!");
Если у вас есть опыт работы с C или C++, вам могут вспомниться `gcc` или `clang`. После успешной компиляции Rust создаст исполняемый бинарный файл.
let secret_number = rand::thread_rng().gen_range(1..=100);
Если у вас есть опыт работы с C или C++, вам могут вспомниться `gcc` или `clang`. После успешной компиляции Rust создаст исполняемый бинарный файл.
println!("Загаданное число: {secret_number}");
Если у вас есть опыт работы с C или C++, вам могут вспомниться `gcc` или `clang`. После успешной компиляции Rust создаст исполняемый бинарный файл.
loop {
println!("Введите свою догадку.");
Если у вас есть опыт работы с C или C++, вам могут вспомниться `gcc` или `clang`. После успешной компиляции Rust создаст исполняемый бинарный файл.
let mut guess = String::new();
Если у вас есть опыт работы с C или C++, вам могут вспомниться `gcc` или `clang`. После успешной компиляции Rust создаст исполняемый бинарный файл.
// --код сокращён--
Если у вас есть опыт работы с C или C++, вам могут вспомниться `gcc` или `clang`. После успешной компиляции Rust создаст исполняемый бинарный файл.
io::stdin()
.read_line(&mut guess)
.expect("Не удалось прочесть ввод.");
Если у вас есть опыт работы с C или C++, вам могут вспомниться `gcc` или `clang`. После успешной компиляции Rust создаст исполняемый бинарный файл.
let guess: u32 = match guess.trim().parse() {
Ok(num) => num,
Err(_) => continue,
};
Если у вас есть опыт работы с C или C++, вам могут вспомниться `gcc` или `clang`. После успешной компиляции Rust создаст исполняемый бинарный файл.
println!("Вы предположили: {guess}");
Если у вас есть опыт работы с C или C++, вам могут вспомниться `gcc` или `clang`. После успешной компиляции Rust создаст исполняемый бинарный файл.
// --код сокращён--
Если у вас есть опыт работы с C или C++, вам могут вспомниться `gcc` или `clang`. После успешной компиляции Rust создаст исполняемый бинарный файл.
match guess.cmp(&secret_number) {
Ordering::Less => println!("Слишком маленькое!"),
Ordering::Greater => println!("Слишком большое!"),
Ordering::Equal => {
println!("Вы победили!");
break;
}
}
}
}match with an arm that ends in continueAt the time, we skipped over some details in this code. In “The match Control Flow Construct” section in Chapter 6, we discussed that match arms must all return the same type. So, for example, the following code doesn’t work:
fn main() {
let guess = "3";
let guess = match guess.trim().parse() {
Ok(_) => 5,
Err(_) => "hello",
};
}The type of guess in this code would have to be an integer and a string, and Rust requires that guess have only one type. So, what does continue return? How were we allowed to return a u32 from one arm and have another arm that ends with continue in Listing 20-27?
As you might have guessed, continue has a ! value. That is, when Rust computes the type of guess, it looks at both match arms, the former with a value of u32 and the latter with a ! value. Because ! can never have a value, Rust decides that the type of guess is u32.
The formal way of describing this behavior is that expressions of type ! can be coerced into any other type. We’re allowed to end this match arm with continue because continue doesn’t return a value; instead, it moves control back to the top of the loop, so in the Err case, we never assign a value to guess.
The never type is useful with the panic! macro as well. Recall the unwrap function that we call on Option<T> values to produce a value or panic with this definition:
enum Option<T> {
Some(T),
None,
}
Если у вас есть опыт работы с C или C++, вам могут вспомниться `gcc` или `clang`. После успешной компиляции Rust создаст исполняемый бинарный файл.
use crate::Option::*;
Если у вас есть опыт работы с C или C++, вам могут вспомниться `gcc` или `clang`. После успешной компиляции Rust создаст исполняемый бинарный файл.
impl<T> Option<T> {
pub fn unwrap(self) -> T {
match self {
Some(val) => val,
None => panic!("called `Option::unwrap()` on a `None` value"),
}
}
}In this code, the same thing happens as in the match in Listing 20-27: Rust sees that val has the type T and panic! has the type !, so the result of the overall match expression is T. This code works because panic! doesn’t produce a value; it ends the program. In the None case, we won’t be returning a value from unwrap, so this code is valid.
One final expression that has the type ! is a loop:
fn main() {
print!("forever ");
Если у вас есть опыт работы с C или C++, вам могут вспомниться `gcc` или `clang`. После успешной компиляции Rust создаст исполняемый бинарный файл.
loop {
print!("and ever ");
}
}Here, the loop never ends, so ! is the value of the expression. However, this wouldn’t be true if we included a break, because the loop would terminate when it got to the break.
Dynamically Sized Types and the Sized Trait
Rust needs to know certain details about its types, such as how much space to allocate for a value of a particular type. This leaves one corner of its type system a little confusing at first: the concept of dynamically sized types. Sometimes referred to as DSTs or unsized types, these types let us write code using values whose size we can know only at runtime.
Let’s dig into the details of a dynamically sized type called str, which we’ve been using throughout the book. That’s right, not &str, but str on its own, is a DST. In many cases, such as when storing text entered by a user, we can’t know how long the string is until runtime. That means we can’t create a variable of type str, nor can we take an argument of type str. Consider the following code, which does not work:
fn main() {
let s1: str = "Hello there!";
let s2: str = "How's it going?";
}Rust needs to know how much memory to allocate for any value of a particular type, and all values of a type must use the same amount of memory. If Rust allowed us to write this code, these two str values would need to take up the same amount of space. But they have different lengths: s1 needs 12 bytes of storage and s2 needs 15. This is why it’s not possible to create a variable holding a dynamically sized type.
So, what do we do? In this case, you already know the answer: We make the type of s1 and s2 string slice (&str) rather than str. Recall from the “String Slices” section in Chapter 4 that the slice data structure only stores the starting position and the length of the slice. So, although &T is a single value that stores the memory address of where the T is located, a string slice is two values: the address of the str and its length. As such, we can know the size of a string slice value at compile time: It’s twice the length of a usize. That is, we always know the size of a string slice, no matter how long the string it refers to is. In general, this is the way in which dynamically sized types are used in Rust: They have an extra bit of metadata that stores the size of the dynamic information. The golden rule of dynamically sized types is that we must always put values of dynamically sized types behind a pointer of some kind.
We can combine str with all kinds of pointers: for example, Box<str> or Rc<str>. In fact, you’ve seen this before but with a different dynamically sized type: traits. Every trait is a dynamically sized type we can refer to by using the name of the trait. In the “Using Trait Objects to Abstract over Shared Behavior” section in Chapter 18, we mentioned that to use traits as trait objects, we must put them behind a pointer, such as &dyn Trait or Box<dyn Trait> (Rc<dyn Trait> would work too).
To work with DSTs, Rust provides the Sized trait to determine whether or not a type’s size is known at compile time. This trait is automatically implemented for everything whose size is known at compile time. In addition, Rust implicitly adds a bound on Sized to every generic function. That is, a generic function definition like this:
fn generic<T>(t: T) {
// --код сокращён--
}is actually treated as though we had written this:
fn generic<T: Sized>(t: T) {
// --код сокращён--
}By default, generic functions will work only on types that have a known size at compile time. However, you can use the following special syntax to relax this restriction:
fn generic<T: ?Sized>(t: &T) {
// --код сокращён--
}A trait bound on ?Sized means “T may or may not be Sized,” and this notation overrides the default that generic types must have a known size at compile time. The ?Trait syntax with this meaning is only available for Sized, not any other traits.
Also note that we switched the type of the t parameter from T to &T. Because the type might not be Sized, we need to use it behind some kind of pointer. In this case, we’ve chosen a reference.
Next, we’ll talk about functions and closures!
Продвинутые функции и замыкания
Продвинутые функции и замыкания
This section explores some advanced features related to functions and closures, including function pointers and returning closures.
Function Pointers
We’ve talked about how to pass closures to functions; you can also pass regular functions to functions! This technique is useful when you want to pass a function you’ve already defined rather than defining a new closure. Functions coerce to the type fn (with a lowercase f), not to be confused with the Fn closure trait. The fn type is called a function pointer. Passing functions with function pointers will allow you to use functions as arguments to other functions.
The syntax for specifying that a parameter is a function pointer is similar to that of closures, as shown in Listing 20-28, where we’ve defined a function add_one that adds 1 to its parameter. The function do_twice takes two parameters: a function pointer to any function that takes an i32 parameter and returns an i32, and one i32 value. The do_twice function calls the function f twice, passing it the arg value, then adds the two function call results together. The main function calls do_twice with the arguments add_one and 5.
fn add_one(x: i32) -> i32 {
x + 1
}
Если у вас есть опыт работы с C или C++, вам могут вспомниться `gcc` или `clang`. После успешной компиляции Rust создаст исполняемый бинарный файл.
fn do_twice(f: fn(i32) -> i32, arg: i32) -> i32 {
f(arg) + f(arg)
}
Если у вас есть опыт работы с C или C++, вам могут вспомниться `gcc` или `clang`. После успешной компиляции Rust создаст исполняемый бинарный файл.
fn main() {
let answer = do_twice(add_one, 5);
Если у вас есть опыт работы с C или C++, вам могут вспомниться `gcc` или `clang`. После успешной компиляции Rust создаст исполняемый бинарный файл.
println!("The answer is: {answer}");
}fn type to accept a function pointer as an argumentThis code prints The answer is: 12. We specify that the parameter f in do_twice is an fn that takes one parameter of type i32 and returns an i32. We can then call f in the body of do_twice. In main, we can pass the function name add_one as the first argument to do_twice.
Unlike closures, fn is a type rather than a trait, so we specify fn as the parameter type directly rather than declaring a generic type parameter with one of the Fn traits as a trait bound.
Function pointers implement all three of the closure traits (Fn, FnMut, and FnOnce), meaning you can always pass a function pointer as an argument for a function that expects a closure. It’s best to write functions using a generic type and one of the closure traits so that your functions can accept either functions or closures.
That said, one example of where you would want to only accept fn and not closures is when interfacing with external code that doesn’t have closures: C functions can accept functions as arguments, but C doesn’t have closures.
As an example of where you could use either a closure defined inline or a named function, let’s look at a use of the map method provided by the Iterator trait in the standard library. To use the map method to turn a vector of numbers into a vector of strings, we could use a closure, as in Listing 20-29.
fn main() {
let list_of_numbers = vec![1, 2, 3];
let list_of_strings: Vec<String> =
list_of_numbers.iter().map(|i| i.to_string()).collect();
}map method to convert numbers to stringsOr we could name a function as the argument to map instead of the closure. Listing 20-30 shows what this would look like.
fn main() {
let list_of_numbers = vec![1, 2, 3];
let list_of_strings: Vec<String> =
list_of_numbers.iter().map(ToString::to_string).collect();
}String::to_string function with the map method to convert numbers to stringsNote that we must use the fully qualified syntax that we talked about in the “Advanced Traits” section because there are multiple functions available named to_string.
Here, we’re using the to_string function defined in the ToString trait, which the standard library has implemented for any type that implements Display.
Recall from the “Enum Values” section in Chapter 6 that the name of each enum variant that we define also becomes an initializer function. We can use these initializer functions as function pointers that implement the closure traits, which means we can specify the initializer functions as arguments for methods that take closures, as seen in Listing 20-31.
fn main() {
enum Status {
Value(u32),
Stop,
}
Если у вас есть опыт работы с C или C++, вам могут вспомниться `gcc` или `clang`. После успешной компиляции Rust создаст исполняемый бинарный файл.
let list_of_statuses: Vec<Status> = (0u32..20).map(Status::Value).collect();
}map method to create a Status instance from numbersHere, we create Status::Value instances using each u32 value in the range that map is called on by using the initializer function of Status::Value. Some people prefer this style and some people prefer to use closures. They compile to the same code, so use whichever style is clearer to you.
Returning Closures
Closures are represented by traits, which means you can’t return closures directly. In most cases where you might want to return a trait, you can instead use the concrete type that implements the trait as the return value of the function. However, you can’t usually do that with closures because they don’t have a concrete type that is returnable; you’re not allowed to use the function pointer fn as a return type if the closure captures any values from its scope, for example.
Instead, you will normally use the impl Trait syntax we learned about in Chapter 10. You can return any function type, using Fn, FnOnce, and FnMut. For example, the code in Listing 20-32 will compile just fine.
#![allow(unused)]
fn main() {
fn returns_closure() -> impl Fn(i32) -> i32 {
|x| x + 1
}
}impl Trait syntaxHowever, as we noted in the “Inferring and Annotating Closure Types” section in Chapter 13, each closure is also its own distinct type. If you need to work with multiple functions that have the same signature but different implementations, you will need to use a trait object for them. Consider what happens if you write code like that shown in Listing 20-33.
fn main() {
let handlers = vec![returns_closure(), returns_initialized_closure(123)];
for handler in handlers {
let output = handler(5);
println!("{output}");
}
}
Если у вас есть опыт работы с C или C++, вам могут вспомниться `gcc` или `clang`. После успешной компиляции Rust создаст исполняемый бинарный файл.
fn returns_closure() -> impl Fn(i32) -> i32 {
|x| x + 1
}
Если у вас есть опыт работы с C или C++, вам могут вспомниться `gcc` или `clang`. После успешной компиляции Rust создаст исполняемый бинарный файл.
fn returns_initialized_closure(init: i32) -> impl Fn(i32) -> i32 {
move |x| x + init
}Vec<T> of closures defined by functions that return impl Fn typesHere we have two functions, returns_closure and returns_initialized_closure, which both return impl Fn(i32) -> i32. Notice that the closures that they return are different, even though they implement the same type. If we try to compile this, Rust lets us know that it won’t work:
$ cargo build
Compiling functions-example v0.1.0 (file:///projects/functions-example)
error[E0308]: mismatched types
--> src/main.rs:2:44
|
2 | let handlers = vec![returns_closure(), returns_initialized_closure(123)];
| ^^^^^^^^^^^^^^^^^^^^^^^^^^^^^^^^ expected opaque type, found a different opaque type
...
9 | fn returns_closure() -> impl Fn(i32) -> i32 {
| ------------------- the expected opaque type
...
13 | fn returns_initialized_closure(init: i32) -> impl Fn(i32) -> i32 {
| ------------------- the found opaque type
|
= note: expected opaque type `impl Fn(i32) -> i32`
found opaque type `impl Fn(i32) -> i32`
= note: distinct uses of `impl Trait` result in different opaque types
Если у вас есть опыт работы с C или C++, вам могут вспомниться `gcc` или `clang`. После успешной компиляции Rust создаст исполняемый бинарный файл.
For more information about this error, try `rustc --explain E0308`.
error: could not compile `functions-example` (bin "functions-example") due to 1 previous error
The error message tells us that whenever we return an impl Trait, Rust creates a unique opaque type, a type where we cannot see into the details of what Rust constructs for us, nor can we guess the type Rust will generate to write ourselves. So, even though these functions return closures that implement the same trait, Fn(i32) -> i32, the opaque types Rust generates for each are distinct. (This is similar to how Rust produces different concrete types for distinct async blocks even when they have the same output type, as we saw in “The Pin Type and the Unpin Trait” in Chapter 17.) We have seen a solution to this problem a few times now: We can use a trait object, as in Listing 20-34.
fn main() {
let handlers = vec![returns_closure(), returns_initialized_closure(123)];
for handler in handlers {
let output = handler(5);
println!("{output}");
}
}
Если у вас есть опыт работы с C или C++, вам могут вспомниться `gcc` или `clang`. После успешной компиляции Rust создаст исполняемый бинарный файл.
fn returns_closure() -> Box<dyn Fn(i32) -> i32> {
Box::new(|x| x + 1)
}
Если у вас есть опыт работы с C или C++, вам могут вспомниться `gcc` или `clang`. После успешной компиляции Rust создаст исполняемый бинарный файл.
fn returns_initialized_closure(init: i32) -> Box<dyn Fn(i32) -> i32> {
Box::new(move |x| x + init)
}Vec<T> of closures defined by functions that return Box<dyn Fn> so that they have the same typeThis code will compile just fine. For more about trait objects, refer to the section “Using Trait Objects To Abstract over Shared Behavior” in Chapter 18.
Next, let’s look at macros!
Макросы
Макросы
We’ve used macros like println! throughout this book, but we haven’t fully explored what a macro is and how it works. The term macro refers to a family of features in Rust—declarative macros with macro_rules! and three kinds of procedural macros:
- Custom
#[derive]macros that specify code added with thederiveattribute used on structs and enums - Attribute-like macros that define custom attributes usable on any item
- Function-like macros that look like function calls but operate on the tokens specified as their argument
We’ll talk about each of these in turn, but first, let’s look at why we even need macros when we already have functions.
The Difference Between Macros and Functions
Fundamentally, macros are a way of writing code that writes other code, which is known as metaprogramming. In Appendix C, we discuss the derive attribute, which generates an implementation of various traits for you. We’ve also used the println! and vec! macros throughout the book. All of these macros expand to produce more code than the code you’ve written manually.
Metaprogramming is useful for reducing the amount of code you have to write and maintain, which is also one of the roles of functions. However, macros have some additional powers that functions don’t have.
A function signature must declare the number and type of parameters the function has. Macros, on the other hand, can take a variable number of parameters: We can call println!("hello") with one argument or println!("hello {}", name) with two arguments. Also, macros are expanded before the compiler interprets the meaning of the code, so a macro can, for example, implement a trait on a given type. A function can’t, because it gets called at runtime and a trait needs to be implemented at compile time.
The downside to implementing a macro instead of a function is that macro definitions are more complex than function definitions because you’re writing Rust code that writes Rust code. Due to this indirection, macro definitions are generally more difficult to read, understand, and maintain than function definitions.
Another important difference between macros and functions is that you must define macros or bring them into scope before you call them in a file, as opposed to functions you can define anywhere and call anywhere.
Declarative Macros for General Metaprogramming
The most widely used form of macros in Rust is the declarative macro. These are also sometimes referred to as “macros by example,” “macro_rules! macros,” or just plain “macros.” At their core, declarative macros allow you to write something similar to a Rust match expression. As discussed in Chapter 6, match expressions are control structures that take an expression, compare the resultant value of the expression to patterns, and then run the code associated with the matching pattern. Macros also compare a value to patterns that are associated with particular code: In this situation, the value is the literal Rust source code passed to the macro; the patterns are compared with the structure of that source code; and the code associated with each pattern, when matched, replaces the code passed to the macro. This all happens during compilation.
To define a macro, you use the macro_rules! construct. Let’s explore how to use macro_rules! by looking at how the vec! macro is defined. Chapter 8 covered how we can use the vec! macro to create a new vector with particular values. For example, the following macro creates a new vector containing three integers:
#![allow(unused)]
fn main() {
let v: Vec<u32> = vec![1, 2, 3];
}We could also use the vec! macro to make a vector of two integers or a vector of five string slices. We wouldn’t be able to use a function to do the same because we wouldn’t know the number or type of values up front.
Listing 20-35 shows a slightly simplified definition of the vec! macro.
#[macro_export]
macro_rules! vec {
( $( $x:expr ),* ) => {
{
let mut temp_vec = Vec::new();
$(
temp_vec.push($x);
)*
temp_vec
}
};
}vec! macro definitionNote: The actual definition of the vec! macro in the standard library includes code to pre-allocate the correct amount of memory up front. That code is an optimization that we don’t include here, to make the example simpler.
The #[macro_export] annotation indicates that this macro should be made available whenever the crate in which the macro is defined is brought into scope. Without this annotation, the macro can’t be brought into scope.
We then start the macro definition with macro_rules! and the name of the macro we’re defining without the exclamation mark. The name, in this case vec, is followed by curly brackets denoting the body of the macro definition.
The structure in the vec! body is similar to the structure of a match expression. Here we have one arm with the pattern ( $( $x:expr ),* ), followed by => and the block of code associated with this pattern. If the pattern matches, the associated block of code will be emitted. Given that this is the only pattern in this macro, there is only one valid way to match; any other pattern will result in an error. More complex macros will have more than one arm.
Valid pattern syntax in macro definitions is different from the pattern syntax covered in Chapter 19 because macro patterns are matched against Rust code structure rather than values. Let’s walk through what the pattern pieces in Listing 20-29 mean; for the full macro pattern syntax, see the Rust Reference.
First, we use a set of parentheses to encompass the whole pattern. We use a dollar sign ($) to declare a variable in the macro system that will contain the Rust code matching the pattern. The dollar sign makes it clear this is a macro variable as opposed to a regular Rust variable. Next comes a set of parentheses that captures values that match the pattern within the parentheses for use in the replacement code. Within $() is $x:expr, which matches any Rust expression and gives the expression the name $x.
The comma following $() indicates that a literal comma separator character must appear between each instance of the code that matches the code in $(). The * specifies that the pattern matches zero or more of whatever precedes the *.
When we call this macro with vec![1, 2, 3];, the $x pattern matches three times with the three expressions 1, 2, and 3.
Now let’s look at the pattern in the body of the code associated with this arm: temp_vec.push() within $()* is generated for each part that matches $() in the pattern zero or more times depending on how many times the pattern matches. The $x is replaced with each expression matched. When we call this macro with vec![1, 2, 3];, the code generated that replaces this macro call will be the following:
{
let mut temp_vec = Vec::new();
temp_vec.push(1);
temp_vec.push(2);
temp_vec.push(3);
temp_vec
}We’ve defined a macro that can take any number of arguments of any type and can generate code to create a vector containing the specified elements.
To learn more about how to write macros, consult the online documentation or other resources, such as “The Little Book of Rust Macros” started by Daniel Keep and continued by Lukas Wirth.
Procedural Macros for Generating Code from Attributes
The second form of macros is the procedural macro, which acts more like a function (and is a type of procedure). Procedural macros accept some code as an input, operate on that code, and produce some code as an output rather than matching against patterns and replacing the code with other code as declarative macros do. The three kinds of procedural macros are custom derive, attribute-like, and function-like, and all work in a similar fashion.
When creating procedural macros, the definitions must reside in their own crate with a special crate type. This is for complex technical reasons that we hope to eliminate in the future. In Listing 20-36, we show how to define a procedural macro, where some_attribute is a placeholder for using a specific macro variety.
use proc_macro::TokenStream;
Если у вас есть опыт работы с C или C++, вам могут вспомниться `gcc` или `clang`. После успешной компиляции Rust создаст исполняемый бинарный файл.
#[some_attribute]
pub fn some_name(input: TokenStream) -> TokenStream {
}The function that defines a procedural macro takes a TokenStream as an input and produces a TokenStream as an output. The TokenStream type is defined by the proc_macro crate that is included with Rust and represents a sequence of tokens. This is the core of the macro: The source code that the macro is operating on makes up the input TokenStream, and the code the macro produces is the output TokenStream. The function also has an attribute attached to it that specifies which kind of procedural macro we’re creating. We can have multiple kinds of procedural macros in the same crate.
Let’s look at the different kinds of procedural macros. We’ll start with a custom derive macro and then explain the small dissimilarities that make the other forms different.
Custom derive Macros
Let’s create a crate named hello_macro that defines a trait named HelloMacro with one associated function named hello_macro. Rather than making our users implement the HelloMacro trait for each of their types, we’ll provide a procedural macro so that users can annotate their type with #[derive(HelloMacro)] to get a default implementation of the hello_macro function. The default implementation will print Hello, Macro! My name is TypeName! where TypeName is the name of the type on which this trait has been defined. In other words, we’ll write a crate that enables another programmer to write code like Listing 20-37 using our crate.
use hello_macro::HelloMacro;
use hello_macro_derive::HelloMacro;
Если у вас есть опыт работы с C или C++, вам могут вспомниться `gcc` или `clang`. После успешной компиляции Rust создаст исполняемый бинарный файл.
#[derive(HelloMacro)]
struct Pancakes;
Если у вас есть опыт работы с C или C++, вам могут вспомниться `gcc` или `clang`. После успешной компиляции Rust создаст исполняемый бинарный файл.
fn main() {
Pancakes::hello_macro();
}This code will print Hello, Macro! My name is Pancakes! when we’re done. The first step is to make a new library crate, like this:
$ cargo new hello_macro --lib
Next, in Listing 20-38, we’ll define the HelloMacro trait and its associated function.
pub trait HelloMacro {
fn hello_macro();
}derive macroWe have a trait and its function. At this point, our crate user could implement the trait to achieve the desired functionality, as in Listing 20-39.
use hello_macro::HelloMacro;
Если у вас есть опыт работы с C или C++, вам могут вспомниться `gcc` или `clang`. После успешной компиляции Rust создаст исполняемый бинарный файл.
struct Pancakes;
Если у вас есть опыт работы с C или C++, вам могут вспомниться `gcc` или `clang`. После успешной компиляции Rust создаст исполняемый бинарный файл.
impl HelloMacro for Pancakes {
fn hello_macro() {
println!("Hello, Macro! My name is Pancakes!");
}
}
Если у вас есть опыт работы с C или C++, вам могут вспомниться `gcc` или `clang`. После успешной компиляции Rust создаст исполняемый бинарный файл.
fn main() {
Pancakes::hello_macro();
}HelloMacro traitHowever, they would need to write the implementation block for each type they wanted to use with hello_macro; we want to spare them from having to do this work.
Additionally, we can’t yet provide the hello_macro function with default implementation that will print the name of the type the trait is implemented on: Rust doesn’t have reflection capabilities, so it can’t look up the type’s name at runtime. We need a macro to generate code at compile time.
The next step is to define the procedural macro. At the time of this writing, procedural macros need to be in their own crate. Eventually, this restriction might be lifted. The convention for structuring crates and macro crates is as follows: For a crate named foo, a custom derive procedural macro crate is called foo_derive. Let’s start a new crate called hello_macro_derive inside our hello_macro project:
$ cargo new hello_macro_derive --lib
Our two crates are tightly related, so we create the procedural macro crate within the directory of our hello_macro crate. If we change the trait definition in hello_macro, we’ll have to change the implementation of the procedural macro in hello_macro_derive as well. The two crates will need to be published separately, and programmers using these crates will need to add both as dependencies and bring them both into scope. We could instead have the hello_macro crate use hello_macro_derive as a dependency and re-export the procedural macro code. However, the way we’ve structured the project makes it possible for programmers to use hello_macro even if they don’t want the derive functionality.
We need to declare the hello_macro_derive crate as a procedural macro crate. We’ll also need functionality from the syn and quote crates, as you’ll see in a moment, so we need to add them as dependencies. Add the following to the Cargo.toml file for hello_macro_derive:
[lib]
proc-macro = true
Если у вас есть опыт работы с C или C++, вам могут вспомниться `gcc` или `clang`. После успешной компиляции Rust создаст исполняемый бинарный файл.
[dependencies]
syn = "2.0"
quote = "1.0"
To start defining the procedural macro, place the code in Listing 20-40 into your src/lib.rs file for the hello_macro_derive crate. Note that this code won’t compile until we add a definition for the impl_hello_macro function.
use proc_macro::TokenStream;
use quote::quote;
Если у вас есть опыт работы с C или C++, вам могут вспомниться `gcc` или `clang`. После успешной компиляции Rust создаст исполняемый бинарный файл.
#[proc_macro_derive(HelloMacro)]
pub fn hello_macro_derive(input: TokenStream) -> TokenStream {
// Construct a representation of Rust code as a syntax tree
// that we can manipulate.
let ast = syn::parse(input).unwrap();
Если у вас есть опыт работы с C или C++, вам могут вспомниться `gcc` или `clang`. После успешной компиляции Rust создаст исполняемый бинарный файл.
// Build the trait implementation.
impl_hello_macro(&ast)
}Notice that we’ve split the code into the hello_macro_derive function, which is responsible for parsing the TokenStream, and the impl_hello_macro function, which is responsible for transforming the syntax tree: This makes writing a procedural macro more convenient. The code in the outer function (hello_macro_derive in this case) will be the same for almost every procedural macro crate you see or create. The code you specify in the body of the inner function (impl_hello_macro in this case) will be different depending on your procedural macro’s purpose.
We’ve introduced three new crates: proc_macro, syn, and quote. The proc_macro crate comes with Rust, so we didn’t need to add that to the dependencies in Cargo.toml. The proc_macro crate is the compiler’s API that allows us to read and manipulate Rust code from our code.
The syn crate parses Rust code from a string into a data structure that we can perform operations on. The quote crate turns syn data structures back into Rust code. These crates make it much simpler to parse any sort of Rust code we might want to handle: Writing a full parser for Rust code is no simple task.
The hello_macro_derive function will be called when a user of our library specifies #[derive(HelloMacro)] on a type. This is possible because we’ve annotated the hello_macro_derive function here with proc_macro_derive and specified the name HelloMacro, which matches our trait name; this is the convention most procedural macros follow.
The hello_macro_derive function first converts the input from a TokenStream to a data structure that we can then interpret and perform operations on. This is where syn comes into play. The parse function in syn takes a TokenStream and returns a DeriveInput struct representing the parsed Rust code. Listing 20-41 shows the relevant parts of the DeriveInput struct we get from parsing the struct Pancakes; string.
DeriveInput {
// --код сокращён--
Если у вас есть опыт работы с C или C++, вам могут вспомниться `gcc` или `clang`. После успешной компиляции Rust создаст исполняемый бинарный файл.
ident: Ident {
ident: "Pancakes",
span: #0 bytes(95..103)
},
data: Struct(
DataStruct {
struct_token: Struct,
fields: Unit,
semi_token: Some(
Semi
)
}
)
}DeriveInput instance we get when parsing the code that has the macro’s attribute in Listing 20-37The fields of this struct show that the Rust code we’ve parsed is a unit struct with the ident (identifier, meaning the name) of Pancakes. There are more fields on this struct for describing all sorts of Rust code; check the syn documentation for DeriveInput for more information.
Soon we’ll define the impl_hello_macro function, which is where we’ll build the new Rust code we want to include. But before we do, note that the output for our derive macro is also a TokenStream. The returned TokenStream is added to the code that our crate users write, so when they compile their crate, they’ll get the extra functionality that we provide in the modified TokenStream.
You might have noticed that we’re calling unwrap to cause the hello_macro_derive function to panic if the call to the syn::parse function fails here. It’s necessary for our procedural macro to panic on errors because proc_macro_derive functions must return TokenStream rather than Result to conform to the procedural macro API. We’ve simplified this example by using unwrap; in production code, you should provide more specific error messages about what went wrong by using panic! or expect.
Now that we have the code to turn the annotated Rust code from a TokenStream into a DeriveInput instance, let’s generate the code that implements the HelloMacro trait on the annotated type, as shown in Listing 20-42.
use proc_macro::TokenStream;
use quote::quote;
Если у вас есть опыт работы с C или C++, вам могут вспомниться `gcc` или `clang`. После успешной компиляции Rust создаст исполняемый бинарный файл.
#[proc_macro_derive(HelloMacro)]
pub fn hello_macro_derive(input: TokenStream) -> TokenStream {
// Construct a representation of Rust code as a syntax tree
// that we can manipulate
let ast = syn::parse(input).unwrap();
Если у вас есть опыт работы с C или C++, вам могут вспомниться `gcc` или `clang`. После успешной компиляции Rust создаст исполняемый бинарный файл.
// Build the trait implementation
impl_hello_macro(&ast)
}
Если у вас есть опыт работы с C или C++, вам могут вспомниться `gcc` или `clang`. После успешной компиляции Rust создаст исполняемый бинарный файл.
fn impl_hello_macro(ast: &syn::DeriveInput) -> TokenStream {
let name = &ast.ident;
let generated = quote! {
impl HelloMacro for #name {
fn hello_macro() {
println!("Hello, Macro! My name is {}!", stringify!(#name));
}
}
};
generated.into()
}HelloMacro trait using the parsed Rust codeWe get an Ident struct instance containing the name (identifier) of the annotated type using ast.ident. The struct in Listing 20-41 shows that when we run the impl_hello_macro function on the code in Listing 20-37, the ident we get will have the ident field with a value of "Pancakes". Thus, the name variable in Listing 20-42 will contain an Ident struct instance that, when printed, will be the string "Pancakes", the name of the struct in Listing 20-37.
The quote! macro lets us define the Rust code that we want to return. The compiler expects something different from the direct result of the quote! macro’s execution, so we need to convert it to a TokenStream. We do this by calling the into method, which consumes this intermediate representation and returns a value of the required TokenStream type.
The quote! macro also provides some very cool templating mechanics: We can enter #name, and quote! will replace it with the value in the variable name. You can even do some repetition similar to the way regular macros work. Check out the quote crate’s docs for a thorough introduction.
We want our procedural macro to generate an implementation of our HelloMacro trait for the type the user annotated, which we can get by using #name. The trait implementation has the one function hello_macro, whose body contains the functionality we want to provide: printing Hello, Macro! My name is and then the name of the annotated type.
The stringify! macro used here is built into Rust. It takes a Rust expression, such as 1 + 2, and at compile time turns the expression into a string literal, such as "1 + 2". This is different from format! or println!, which are macros that evaluate the expression and then turn the result into a String. There is a possibility that the #name input might be an expression to print literally, so we use stringify!. Using stringify! also saves an allocation by converting #name to a string literal at compile time.
At this point, cargo build should complete successfully in both hello_macro and hello_macro_derive. Let’s hook up these crates to the code in Listing 20-37 to see the procedural macro in action! Create a new binary project in your projects directory using cargo new pancakes. We need to add hello_macro and hello_macro_derive as dependencies in the pancakes crate’s Cargo.toml. If you’re publishing your versions of hello_macro and hello_macro_derive to crates.io, they would be regular dependencies; if not, you can specify them as path dependencies as follows:
[dependencies]
hello_macro = { path = "../hello_macro" }
hello_macro_derive = { path = "../hello_macro/hello_macro_derive" }
Put the code in Listing 20-37 into src/main.rs, and run cargo run: It should print Hello, Macro! My name is Pancakes!. The implementation of the HelloMacro trait from the procedural macro was included without the pancakes crate needing to implement it; the #[derive(HelloMacro)] added the trait implementation.
Next, let’s explore how the other kinds of procedural macros differ from custom derive macros.
Attribute-Like Macros
Attribute-like macros are similar to custom derive macros, but instead of generating code for the derive attribute, they allow you to create new attributes. They’re also more flexible: derive only works for structs and enums; attributes can be applied to other items as well, such as functions. Here’s an example of using an attribute-like macro. Say you have an attribute named route that annotates functions when using a web application framework:
#[route(GET, "/")]
fn index() {This #[route] attribute would be defined by the framework as a procedural macro. The signature of the macro definition function would look like this:
#[proc_macro_attribute]
pub fn route(attr: TokenStream, item: TokenStream) -> TokenStream {Here, we have two parameters of type TokenStream. The first is for the contents of the attribute: the GET, "/" part. The second is the body of the item the attribute is attached to: in this case, fn index() {} and the rest of the function’s body.
Other than that, attribute-like macros work the same way as custom derive macros: You create a crate with the proc-macro crate type and implement a function that generates the code you want!
Function-Like Macros
Function-like macros define macros that look like function calls. Similarly to macro_rules! macros, they’re more flexible than functions; for example, they can take an unknown number of arguments. However, macro_rules! macros can only be defined using the match-like syntax we discussed in the “Declarative Macros for General Metaprogramming” section earlier. Function-like macros take a TokenStream parameter, and their definition manipulates that TokenStream using Rust code as the other two types of procedural macros do. An example of a function-like macro is an sql! macro that might be called like so:
let sql = sql!(SELECT * FROM posts WHERE id=1);This macro would parse the SQL statement inside it and check that it’s syntactically correct, which is much more complex processing than a macro_rules! macro can do. The sql! macro would be defined like this:
#[proc_macro]
pub fn sql(input: TokenStream) -> TokenStream {This definition is similar to the custom derive macro’s signature: We receive the tokens that are inside the parentheses and return the code we wanted to generate.
Подведём итоги
Whew! Now you have some Rust features in your toolbox that you likely won’t use often, but you’ll know they’re available in very particular circumstances. We’ve introduced several complex topics so that when you encounter them in error message suggestions or in other people’s code, you’ll be able to recognize these concepts and syntax. Use this chapter as a reference to guide you to solutions.
Next, we’ll put everything we’ve discussed throughout the book into practice and do one more project!
Итоговый проект: создание многопоточного веб-сервера
It’s been a long journey, but we’ve reached the end of the book. In this chapter, we’ll build one more project together to demonstrate some of the concepts we covered in the final chapters, as well as recap some earlier lessons.
For our final project, we’ll make a web server that says “Hello!” and looks like Figure 21-1 in a web browser.
Here is our plan for building the web server:
- Learn a bit about TCP and HTTP.
- Listen for TCP connections on a socket.
- Parse a small number of HTTP requests.
- Create a proper HTTP response.
- Improve the throughput of our server with a thread pool.
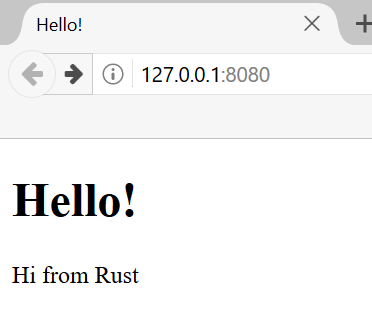
Figure 21-1: Our final shared project
Before we get started, we should mention two details. First, the method we’ll use won’t be the best way to build a web server with Rust. Community members have published a number of production-ready crates available at crates.io that provide more complete web server and thread pool implementations than we’ll build. However, our intention in this chapter is to help you learn, not to take the easy route. Because Rust is a systems programming language, we can choose the level of abstraction we want to work with and can go to a lower level than is possible or practical in other languages.
Second, we will not be using async and await here. Building a thread pool is a big enough challenge on its own, without adding in building an async runtime! However, we will note how async and await might be applicable to some of the same problems we will see in this chapter. Ultimately, as we noted back in Chapter 17, many async runtimes use thread pools for managing their work.
We’ll therefore write the basic HTTP server and thread pool manually so that you can learn the general ideas and techniques behind the crates you might use in the future.
Создание однопоточного веб-сервера
Создание однопоточного веб-сервера
We’ll start by getting a single-threaded web server working. Before we begin, let’s look at a quick overview of the protocols involved in building web servers. The details of these protocols are beyond the scope of this book, but a brief overview will give you the information you need.
The two main protocols involved in web servers are Hypertext Transfer Protocol (HTTP) and Transmission Control Protocol (TCP). Both protocols are request-response protocols, meaning a client initiates requests and a server listens to the requests and provides a response to the client. The contents of those requests and responses are defined by the protocols.
TCP is the lower-level protocol that describes the details of how information gets from one server to another but doesn’t specify what that information is. HTTP builds on top of TCP by defining the contents of the requests and responses. It’s technically possible to use HTTP with other protocols, but in the vast majority of cases, HTTP sends its data over TCP. We’ll work with the raw bytes of TCP and HTTP requests and responses.
Listening to the TCP Connection
Our web server needs to listen to a TCP connection, so that’s the first part we’ll work on. The standard library offers a std::net module that lets us do this. Let’s make a new project in the usual fashion:
$ cargo new hello
Created binary (application) `hello` project
$ cd hello
Now enter the code in Listing 21-1 in src/main.rs to start. This code will listen at the local address 127.0.0.1:7878 for incoming TCP streams. When it gets an incoming stream, it will print Connection established!.
use std::net::TcpListener;
Если у вас есть опыт работы с C или C++, вам могут вспомниться `gcc` или `clang`. После успешной компиляции Rust создаст исполняемый бинарный файл.
fn main() {
let listener = TcpListener::bind("127.0.0.1:7878").unwrap();
Если у вас есть опыт работы с C или C++, вам могут вспомниться `gcc` или `clang`. После успешной компиляции Rust создаст исполняемый бинарный файл.
for stream in listener.incoming() {
let stream = stream.unwrap();
Если у вас есть опыт работы с C или C++, вам могут вспомниться `gcc` или `clang`. После успешной компиляции Rust создаст исполняемый бинарный файл.
println!("Connection established!");
}
}Using TcpListener, we can listen for TCP connections at the address 127.0.0.1:7878. In the address, the section before the colon is an IP address representing your computer (this is the same on every computer and doesn’t represent the authors’ computer specifically), and 7878 is the port. We’ve chosen this port for two reasons: HTTP isn’t normally accepted on this port, so our server is unlikely to conflict with any other web server you might have running on your machine, and 7878 is rust typed on a telephone.
The bind function in this scenario works like the new function in that it will return a new TcpListener instance. The function is called bind because, in networking, connecting to a port to listen to is known as “binding to a port.”
The bind function returns a Result<T, E>, which indicates that it’s possible for binding to fail, for example, if we ran two instances of our program and so had two programs listening to the same port. Because we’re writing a basic server just for learning purposes, we won’t worry about handling these kinds of errors; instead, we use unwrap to stop the program if errors happen.
The incoming method on TcpListener returns an iterator that gives us a sequence of streams (more specifically, streams of type TcpStream). A single stream represents an open connection between the client and the server. Connection is the name for the full request and response process in which a client connects to the server, the server generates a response, and the server closes the connection. As such, we will read from the TcpStream to see what the client sent and then write our response to the stream to send data back to the client. Overall, this for loop will process each connection in turn and produce a series of streams for us to handle.
For now, our handling of the stream consists of calling unwrap to terminate our program if the stream has any errors; if there aren’t any errors, the program prints a message. We’ll add more functionality for the success case in the next listing. The reason we might receive errors from the incoming method when a client connects to the server is that we’re not actually iterating over connections. Instead, we’re iterating over connection attempts. The connection might not be successful for a number of reasons, many of them operating system specific. For example, many operating systems have a limit to the number of simultaneous open connections they can support; new connection attempts beyond that number will produce an error until some of the open connections are closed.
Let’s try running this code! Invoke cargo run in the terminal and then load 127.0.0.1:7878 in a web browser. The browser should show an error message like “Connection reset” because the server isn’t currently sending back any data. But when you look at your terminal, you should see several messages that were printed when the browser connected to the server!
Running `target/debug/hello`
Connection established!
Connection established!
Connection established!
Sometimes you’ll see multiple messages printed for one browser request; the reason might be that the browser is making a request for the page as well as a request for other resources, like the favicon.ico icon that appears in the browser tab.
It could also be that the browser is trying to connect to the server multiple times because the server isn’t responding with any data. When stream goes out of scope and is dropped at the end of the loop, the connection is closed as part of the drop implementation. Browsers sometimes deal with closed connections by retrying, because the problem might be temporary.
Browsers also sometimes open multiple connections to the server without sending any requests so that if they do later send requests, those requests can happen more quickly. When this occurs, our server will see each connection, regardless of whether there are any requests over that connection. Many versions of Chrome-based browsers do this, for example; you can disable that optimization by using private browsing mode or using a different browser.
The important factor is that we’ve successfully gotten a handle to a TCP connection!
Remember to stop the program by pressing ctrl-C when you’re done running a particular version of the code. Then, restart the program by invoking the cargo run command after you’ve made each set of code changes to make sure you’re running the newest code.
Reading the Request
Let’s implement the functionality to read the request from the browser! To separate the concerns of first getting a connection and then taking some action with the connection, we’ll start a new function for processing connections. In this new handle_connection function, we’ll read data from the TCP stream and print it so that we can see the data being sent from the browser. Change the code to look like Listing 21-2.
use std::{
io::{BufReader, prelude::*},
net::{TcpListener, TcpStream},
};
Если у вас есть опыт работы с C или C++, вам могут вспомниться `gcc` или `clang`. После успешной компиляции Rust создаст исполняемый бинарный файл.
fn main() {
let listener = TcpListener::bind("127.0.0.1:7878").unwrap();
Если у вас есть опыт работы с C или C++, вам могут вспомниться `gcc` или `clang`. После успешной компиляции Rust создаст исполняемый бинарный файл.
for stream in listener.incoming() {
let stream = stream.unwrap();
Если у вас есть опыт работы с C или C++, вам могут вспомниться `gcc` или `clang`. После успешной компиляции Rust создаст исполняемый бинарный файл.
handle_connection(stream);
}
}
Если у вас есть опыт работы с C или C++, вам могут вспомниться `gcc` или `clang`. После успешной компиляции Rust создаст исполняемый бинарный файл.
fn handle_connection(mut stream: TcpStream) {
let buf_reader = BufReader::new(&stream);
let http_request: Vec<_> = buf_reader
.lines()
.map(|result| result.unwrap())
.take_while(|line| !line.is_empty())
.collect();
Если у вас есть опыт работы с C или C++, вам могут вспомниться `gcc` или `clang`. После успешной компиляции Rust создаст исполняемый бинарный файл.
println!("Request: {http_request:#?}");
}TcpStream and printing the dataWe bring std::io::BufReader and std::io::prelude into scope to get access to traits and types that let us read from and write to the stream. In the for loop in the main function, instead of printing a message that says we made a connection, we now call the new handle_connection function and pass the stream to it.
In the handle_connection function, we create a new BufReader instance that wraps a reference to the stream. The BufReader adds buffering by managing calls to the std::io::Read trait methods for us.
We create a variable named http_request to collect the lines of the request the browser sends to our server. We indicate that we want to collect these lines in a vector by adding the Vec<_> type annotation.
BufReader implements the std::io::BufRead trait, which provides the lines method. The lines method returns an iterator of Result<String, std::io::Error> by splitting the stream of data whenever it sees a newline byte. To get each String, we map and unwrap each Result. The Result might be an error if the data isn’t valid UTF-8 or if there was a problem reading from the stream. Again, a production program should handle these errors more gracefully, but we’re choosing to stop the program in the error case for simplicity.
The browser signals the end of an HTTP request by sending two newline characters in a row, so to get one request from the stream, we take lines until we get a line that is the empty string. Once we’ve collected the lines into the vector, we’re printing them out using pretty debug formatting so that we can take a look at the instructions the web browser is sending to our server.
Let’s try this code! Start the program and make a request in a web browser again. Note that we’ll still get an error page in the browser, but our program’s output in the terminal will now look similar to this:
$ cargo run
Compiling hello v0.1.0 (file:///projects/hello)
Finished `dev` profile [unoptimized + debuginfo] target(s) in 0.42s
Running `target/debug/hello`
Request: [
"GET / HTTP/1.1",
"Host: 127.0.0.1:7878",
"User-Agent: Mozilla/5.0 (Macintosh; Intel Mac OS X 10.15; rv:99.0) Gecko/20100101 Firefox/99.0",
"Accept: text/html,application/xhtml+xml,application/xml;q=0.9,image/avif,image/webp,*/*;q=0.8",
"Accept-Language: en-US,en;q=0.5",
"Accept-Encoding: gzip, deflate, br",
"DNT: 1",
"Connection: keep-alive",
"Upgrade-Insecure-Requests: 1",
"Sec-Fetch-Dest: document",
"Sec-Fetch-Mode: navigate",
"Sec-Fetch-Site: none",
"Sec-Fetch-User: ?1",
"Cache-Control: max-age=0",
]
Depending on your browser, you might get slightly different output. Now that we’re printing the request data, we can see why we get multiple connections from one browser request by looking at the path after GET in the first line of the request. If the repeated connections are all requesting /, we know the browser is trying to fetch / repeatedly because it’s not getting a response from our program.
Let’s break down this request data to understand what the browser is asking of our program.
Looking More Closely at an HTTP Request
HTTP is a text-based protocol, and a request takes this format:
Method Request-URI HTTP-Version CRLF
headers CRLF
message-body
The first line is the request line that holds information about what the client is requesting. The first part of the request line indicates the method being used, such as GET or POST, which describes how the client is making this request. Our client used a GET request, which means it is asking for information.
The next part of the request line is /, which indicates the uniform resource identifier (URI) the client is requesting: A URI is almost, but not quite, the same as a uniform resource locator (URL). The difference between URIs and URLs isn’t important for our purposes in this chapter, but the HTTP spec uses the term URI, so we can just mentally substitute URL for URI here.
The last part is the HTTP version the client uses, and then the request line ends in a CRLF sequence. (CRLF stands for carriage return and line feed, which are terms from the typewriter days!) The CRLF sequence can also be written as \r\n, where \r is a carriage return and \n is a line feed. The CRLF sequence separates the request line from the rest of the request data. Note that when the CRLF is printed, we see a new line start rather than \r\n.
Looking at the request line data we received from running our program so far, we see that GET is the method, / is the request URI, and HTTP/1.1 is the version.
After the request line, the remaining lines starting from Host: onward are headers. GET requests have no body.
Try making a request from a different browser or asking for a different address, such as 127.0.0.1:7878/test, to see how the request data changes.
Now that we know what the browser is asking for, let’s send back some data!
Writing a Response
We’re going to implement sending data in response to a client request. Responses have the following format:
HTTP-Version Status-Code Reason-Phrase CRLF
headers CRLF
message-body
The first line is a status line that contains the HTTP version used in the response, a numeric status code that summarizes the result of the request, and a reason phrase that provides a text description of the status code. After the CRLF sequence are any headers, another CRLF sequence, and the body of the response.
Here is an example response that uses HTTP version 1.1 and has a status code of 200, an OK reason phrase, no headers, and no body:
HTTP/1.1 200 OK\r\n\r\n
The status code 200 is the standard success response. The text is a tiny successful HTTP response. Let’s write this to the stream as our response to a successful request! From the handle_connection function, remove the println! that was printing the request data and replace it with the code in Listing 21-3.
use std::{
io::{BufReader, prelude::*},
net::{TcpListener, TcpStream},
};
Если у вас есть опыт работы с C или C++, вам могут вспомниться `gcc` или `clang`. После успешной компиляции Rust создаст исполняемый бинарный файл.
fn main() {
let listener = TcpListener::bind("127.0.0.1:7878").unwrap();
Если у вас есть опыт работы с C или C++, вам могут вспомниться `gcc` или `clang`. После успешной компиляции Rust создаст исполняемый бинарный файл.
for stream in listener.incoming() {
let stream = stream.unwrap();
Если у вас есть опыт работы с C или C++, вам могут вспомниться `gcc` или `clang`. После успешной компиляции Rust создаст исполняемый бинарный файл.
handle_connection(stream);
}
}
Если у вас есть опыт работы с C или C++, вам могут вспомниться `gcc` или `clang`. После успешной компиляции Rust создаст исполняемый бинарный файл.
fn handle_connection(mut stream: TcpStream) {
let buf_reader = BufReader::new(&stream);
let http_request: Vec<_> = buf_reader
.lines()
.map(|result| result.unwrap())
.take_while(|line| !line.is_empty())
.collect();
Если у вас есть опыт работы с C или C++, вам могут вспомниться `gcc` или `clang`. После успешной компиляции Rust создаст исполняемый бинарный файл.
let response = "HTTP/1.1 200 OK\r\n\r\n";
Если у вас есть опыт работы с C или C++, вам могут вспомниться `gcc` или `clang`. После успешной компиляции Rust создаст исполняемый бинарный файл.
stream.write_all(response.as_bytes()).unwrap();
}The first new line defines the response variable that holds the success message’s data. Then, we call as_bytes on our response to convert the string data to bytes. The write_all method on stream takes a &[u8] and sends those bytes directly down the connection. Because the write_all operation could fail, we use unwrap on any error result as before. Again, in a real application, you would add error handling here.
With these changes, let’s run our code and make a request. We’re no longer printing any data to the terminal, so we won’t see any output other than the output from Cargo. When you load 127.0.0.1:7878 in a web browser, you should get a blank page instead of an error. You’ve just handcoded receiving an HTTP request and sending a response!
Returning Real HTML
Let’s implement the functionality for returning more than a blank page. Create the new file hello.html in the root of your project directory, not in the src directory. You can input any HTML you want; Listing 21-4 shows one possibility.
<!DOCTYPE html>
<html lang="en">
<head>
<meta charset="utf-8">
<title>Hello!</title>
</head>
<body>
<h1>Hello!</h1>
<p>Hi from Rust</p>
</body>
</html>
This is a minimal HTML5 document with a heading and some text. To return this from the server when a request is received, we’ll modify handle_connection as shown in Listing 21-5 to read the HTML file, add it to the response as a body, and send it.
use std::{
fs,
io::{BufReader, prelude::*},
net::{TcpListener, TcpStream},
};
// --код сокращён--
Если у вас есть опыт работы с C или C++, вам могут вспомниться `gcc` или `clang`. После успешной компиляции Rust создаст исполняемый бинарный файл.
fn main() {
let listener = TcpListener::bind("127.0.0.1:7878").unwrap();
Если у вас есть опыт работы с C или C++, вам могут вспомниться `gcc` или `clang`. После успешной компиляции Rust создаст исполняемый бинарный файл.
for stream in listener.incoming() {
let stream = stream.unwrap();
Если у вас есть опыт работы с C или C++, вам могут вспомниться `gcc` или `clang`. После успешной компиляции Rust создаст исполняемый бинарный файл.
handle_connection(stream);
}
}
Если у вас есть опыт работы с C или C++, вам могут вспомниться `gcc` или `clang`. После успешной компиляции Rust создаст исполняемый бинарный файл.
fn handle_connection(mut stream: TcpStream) {
let buf_reader = BufReader::new(&stream);
let http_request: Vec<_> = buf_reader
.lines()
.map(|result| result.unwrap())
.take_while(|line| !line.is_empty())
.collect();
Если у вас есть опыт работы с C или C++, вам могут вспомниться `gcc` или `clang`. После успешной компиляции Rust создаст исполняемый бинарный файл.
let status_line = "HTTP/1.1 200 OK";
let contents = fs::read_to_string("hello.html").unwrap();
let length = contents.len();
Если у вас есть опыт работы с C или C++, вам могут вспомниться `gcc` или `clang`. После успешной компиляции Rust создаст исполняемый бинарный файл.
let response =
format!("{status_line}\r\nContent-Length: {length}\r\n\r\n{contents}");
Если у вас есть опыт работы с C или C++, вам могут вспомниться `gcc` или `clang`. После успешной компиляции Rust создаст исполняемый бинарный файл.
stream.write_all(response.as_bytes()).unwrap();
}We’ve added fs to the use statement to bring the standard library’s filesystem module into scope. The code for reading the contents of a file to a string should look familiar; we used it when we read the contents of a file for our I/O project in Listing 12-4.
Next, we use format! to add the file’s contents as the body of the success response. To ensure a valid HTTP response, we add the Content-Length header, which is set to the size of our response body—in this case, the size of hello.html.
Run this code with cargo run and load 127.0.0.1:7878 in your browser; you should see your HTML rendered!
Currently, we’re ignoring the request data in http_request and just sending back the contents of the HTML file unconditionally. That means if you try requesting 127.0.0.1:7878/something-else in your browser, you’ll still get back this same HTML response. At the moment, our server is very limited and does not do what most web servers do. We want to customize our responses depending on the request and only send back the HTML file for a well-formed request to /.
Validating the Request and Selectively Responding
Right now, our web server will return the HTML in the file no matter what the client requested. Let’s add functionality to check that the browser is requesting / before returning the HTML file and to return an error if the browser requests anything else. For this we need to modify handle_connection, as shown in Listing 21-6. This new code checks the content of the request received against what we know a request for / looks like and adds if and else blocks to treat requests differently.
use std::{
fs,
io::{BufReader, prelude::*},
net::{TcpListener, TcpStream},
};
Если у вас есть опыт работы с C или C++, вам могут вспомниться `gcc` или `clang`. После успешной компиляции Rust создаст исполняемый бинарный файл.
fn main() {
let listener = TcpListener::bind("127.0.0.1:7878").unwrap();
Если у вас есть опыт работы с C или C++, вам могут вспомниться `gcc` или `clang`. После успешной компиляции Rust создаст исполняемый бинарный файл.
for stream in listener.incoming() {
let stream = stream.unwrap();
Если у вас есть опыт работы с C или C++, вам могут вспомниться `gcc` или `clang`. После успешной компиляции Rust создаст исполняемый бинарный файл.
handle_connection(stream);
}
}
// --код сокращён--
Если у вас есть опыт работы с C или C++, вам могут вспомниться `gcc` или `clang`. После успешной компиляции Rust создаст исполняемый бинарный файл.
fn handle_connection(mut stream: TcpStream) {
let buf_reader = BufReader::new(&stream);
let request_line = buf_reader.lines().next().unwrap().unwrap();
Если у вас есть опыт работы с C или C++, вам могут вспомниться `gcc` или `clang`. После успешной компиляции Rust создаст исполняемый бинарный файл.
if request_line == "GET / HTTP/1.1" {
let status_line = "HTTP/1.1 200 OK";
let contents = fs::read_to_string("hello.html").unwrap();
let length = contents.len();
Если у вас есть опыт работы с C или C++, вам могут вспомниться `gcc` или `clang`. После успешной компиляции Rust создаст исполняемый бинарный файл.
let response = format!(
"{status_line}\r\nContent-Length: {length}\r\n\r\n{contents}"
);
Если у вас есть опыт работы с C или C++, вам могут вспомниться `gcc` или `clang`. После успешной компиляции Rust создаст исполняемый бинарный файл.
stream.write_all(response.as_bytes()).unwrap();
} else {
// some other request
}
}We’re only going to be looking at the first line of the HTTP request, so rather than reading the entire request into a vector, we’re calling next to get the first item from the iterator. The first unwrap takes care of the Option and stops the program if the iterator has no items. The second unwrap handles the Result and has the same effect as the unwrap that was in the map added in Listing 21-2.
Next, we check the request_line to see if it equals the request line of a GET request to the / path. If it does, the if block returns the contents of our HTML file.
If the request_line does not equal the GET request to the / path, it means we’ve received some other request. We’ll add code to the else block in a moment to respond to all other requests.
Run this code now and request 127.0.0.1:7878; you should get the HTML in hello.html. If you make any other request, such as 127.0.0.1:7878/something-else, you’ll get a connection error like those you saw when running the code in Listing 21-1 and Listing 21-2.
Now let’s add the code in Listing 21-7 to the else block to return a response with the status code 404, which signals that the content for the request was not found. We’ll also return some HTML for a page to render in the browser indicating the response to the end user.
use std::{
fs,
io::{BufReader, prelude::*},
net::{TcpListener, TcpStream},
};
Если у вас есть опыт работы с C или C++, вам могут вспомниться `gcc` или `clang`. После успешной компиляции Rust создаст исполняемый бинарный файл.
fn main() {
let listener = TcpListener::bind("127.0.0.1:7878").unwrap();
Если у вас есть опыт работы с C или C++, вам могут вспомниться `gcc` или `clang`. После успешной компиляции Rust создаст исполняемый бинарный файл.
for stream in listener.incoming() {
let stream = stream.unwrap();
Если у вас есть опыт работы с C или C++, вам могут вспомниться `gcc` или `clang`. После успешной компиляции Rust создаст исполняемый бинарный файл.
handle_connection(stream);
}
}
Если у вас есть опыт работы с C или C++, вам могут вспомниться `gcc` или `clang`. После успешной компиляции Rust создаст исполняемый бинарный файл.
fn handle_connection(mut stream: TcpStream) {
let buf_reader = BufReader::new(&stream);
let request_line = buf_reader.lines().next().unwrap().unwrap();
Если у вас есть опыт работы с C или C++, вам могут вспомниться `gcc` или `clang`. После успешной компиляции Rust создаст исполняемый бинарный файл.
if request_line == "GET / HTTP/1.1" {
let status_line = "HTTP/1.1 200 OK";
let contents = fs::read_to_string("hello.html").unwrap();
let length = contents.len();
Если у вас есть опыт работы с C или C++, вам могут вспомниться `gcc` или `clang`. После успешной компиляции Rust создаст исполняемый бинарный файл.
let response = format!(
"{status_line}\r\nContent-Length: {length}\r\n\r\n{contents}"
);
Если у вас есть опыт работы с C или C++, вам могут вспомниться `gcc` или `clang`. После успешной компиляции Rust создаст исполняемый бинарный файл.
stream.write_all(response.as_bytes()).unwrap();
// --код сокращён--
} else {
let status_line = "HTTP/1.1 404 NOT FOUND";
let contents = fs::read_to_string("404.html").unwrap();
let length = contents.len();
Если у вас есть опыт работы с C или C++, вам могут вспомниться `gcc` или `clang`. После успешной компиляции Rust создаст исполняемый бинарный файл.
let response = format!(
"{status_line}\r\nContent-Length: {length}\r\n\r\n{contents}"
);
Если у вас есть опыт работы с C или C++, вам могут вспомниться `gcc` или `clang`. После успешной компиляции Rust создаст исполняемый бинарный файл.
stream.write_all(response.as_bytes()).unwrap();
}
}Here, our response has a status line with status code 404 and the reason phrase NOT FOUND. The body of the response will be the HTML in the file 404.html. You’ll need to create a 404.html file next to hello.html for the error page; again, feel free to use any HTML you want, or use the example HTML in Listing 21-8.
<!DOCTYPE html>
<html lang="en">
<head>
<meta charset="utf-8">
<title>Hello!</title>
</head>
<body>
<h1>Oops!</h1>
<p>Sorry, I don't know what you're asking for.</p>
</body>
</html>
With these changes, run your server again. Requesting 127.0.0.1:7878 should return the contents of hello.html, and any other request, like 127.0.0.1:7878/foo, should return the error HTML from 404.html.
Refactoring
At the moment, the if and else blocks have a lot of repetition: They’re both reading files and writing the contents of the files to the stream. The only differences are the status line and the filename. Let’s make the code more concise by pulling out those differences into separate if and else lines that will assign the values of the status line and the filename to variables; we can then use those variables unconditionally in the code to read the file and write the response. Listing 21-9 shows the resultant code after replacing the large if and else blocks.
use std::{
fs,
io::{BufReader, prelude::*},
net::{TcpListener, TcpStream},
};
Если у вас есть опыт работы с C или C++, вам могут вспомниться `gcc` или `clang`. После успешной компиляции Rust создаст исполняемый бинарный файл.
fn main() {
let listener = TcpListener::bind("127.0.0.1:7878").unwrap();
Если у вас есть опыт работы с C или C++, вам могут вспомниться `gcc` или `clang`. После успешной компиляции Rust создаст исполняемый бинарный файл.
for stream in listener.incoming() {
let stream = stream.unwrap();
Если у вас есть опыт работы с C или C++, вам могут вспомниться `gcc` или `clang`. После успешной компиляции Rust создаст исполняемый бинарный файл.
handle_connection(stream);
}
}
// --код сокращён--
Если у вас есть опыт работы с C или C++, вам могут вспомниться `gcc` или `clang`. После успешной компиляции Rust создаст исполняемый бинарный файл.
fn handle_connection(mut stream: TcpStream) {
// --код сокращён--
let buf_reader = BufReader::new(&stream);
let request_line = buf_reader.lines().next().unwrap().unwrap();
Если у вас есть опыт работы с C или C++, вам могут вспомниться `gcc` или `clang`. После успешной компиляции Rust создаст исполняемый бинарный файл.
let (status_line, filename) = if request_line == "GET / HTTP/1.1" {
("HTTP/1.1 200 OK", "hello.html")
} else {
("HTTP/1.1 404 NOT FOUND", "404.html")
};
Если у вас есть опыт работы с C или C++, вам могут вспомниться `gcc` или `clang`. После успешной компиляции Rust создаст исполняемый бинарный файл.
let contents = fs::read_to_string(filename).unwrap();
let length = contents.len();
Если у вас есть опыт работы с C или C++, вам могут вспомниться `gcc` или `clang`. После успешной компиляции Rust создаст исполняемый бинарный файл.
let response =
format!("{status_line}\r\nContent-Length: {length}\r\n\r\n{contents}");
Если у вас есть опыт работы с C или C++, вам могут вспомниться `gcc` или `clang`. После успешной компиляции Rust создаст исполняемый бинарный файл.
stream.write_all(response.as_bytes()).unwrap();
}if and else blocks to contain only the code that differs between the two casesNow the if and else blocks only return the appropriate values for the status line and filename in a tuple; we then use destructuring to assign these two values to status_line and filename using a pattern in the let statement, as discussed in Chapter 19.
The previously duplicated code is now outside the if and else blocks and uses the status_line and filename variables. This makes it easier to see the difference between the two cases, and it means we have only one place to update the code if we want to change how the file reading and response writing work. The behavior of the code in Listing 21-9 will be the same as that in Listing 21-7.
Awesome! We now have a simple web server in approximately 40 lines of Rust code that responds to one request with a page of content and responds to all other requests with a 404 response.
Currently, our server runs in a single thread, meaning it can only serve one request at a time. Let’s examine how that can be a problem by simulating some slow requests. Then, we’ll fix it so that our server can handle multiple requests at once.
From Single-Threaded to Multithreaded Server
From a Single-Threaded to a Multithreaded Server
Right now, the server will process each request in turn, meaning it won’t process a second connection until the first connection is finished processing. If the server received more and more requests, this serial execution would be less and less optimal. If the server receives a request that takes a long time to process, subsequent requests will have to wait until the long request is finished, even if the new requests can be processed quickly. We’ll need to fix this, but first we’ll look at the problem in action.
Simulating a Slow Request
We’ll look at how a slowly processing request can affect other requests made to our current server implementation. Listing 21-10 implements handling a request to /sleep with a simulated slow response that will cause the server to sleep for five seconds before responding.
use std::{
fs,
io::{BufReader, prelude::*},
net::{TcpListener, TcpStream},
thread,
time::Duration,
};
// --код сокращён--
Если у вас есть опыт работы с C или C++, вам могут вспомниться `gcc` или `clang`. После успешной компиляции Rust создаст исполняемый бинарный файл.
fn main() {
let listener = TcpListener::bind("127.0.0.1:7878").unwrap();
Если у вас есть опыт работы с C или C++, вам могут вспомниться `gcc` или `clang`. После успешной компиляции Rust создаст исполняемый бинарный файл.
for stream in listener.incoming() {
let stream = stream.unwrap();
Если у вас есть опыт работы с C или C++, вам могут вспомниться `gcc` или `clang`. После успешной компиляции Rust создаст исполняемый бинарный файл.
handle_connection(stream);
}
}
Если у вас есть опыт работы с C или C++, вам могут вспомниться `gcc` или `clang`. После успешной компиляции Rust создаст исполняемый бинарный файл.
fn handle_connection(mut stream: TcpStream) {
// --код сокращён--
Если у вас есть опыт работы с C или C++, вам могут вспомниться `gcc` или `clang`. После успешной компиляции Rust создаст исполняемый бинарный файл.
let buf_reader = BufReader::new(&stream);
let request_line = buf_reader.lines().next().unwrap().unwrap();
Если у вас есть опыт работы с C или C++, вам могут вспомниться `gcc` или `clang`. После успешной компиляции Rust создаст исполняемый бинарный файл.
let (status_line, filename) = match &request_line[..] {
"GET / HTTP/1.1" => ("HTTP/1.1 200 OK", "hello.html"),
"GET /sleep HTTP/1.1" => {
thread::sleep(Duration::from_secs(5));
("HTTP/1.1 200 OK", "hello.html")
}
_ => ("HTTP/1.1 404 NOT FOUND", "404.html"),
};
Если у вас есть опыт работы с C или C++, вам могут вспомниться `gcc` или `clang`. После успешной компиляции Rust создаст исполняемый бинарный файл.
// --код сокращён--
Если у вас есть опыт работы с C или C++, вам могут вспомниться `gcc` или `clang`. После успешной компиляции Rust создаст исполняемый бинарный файл.
let contents = fs::read_to_string(filename).unwrap();
let length = contents.len();
Если у вас есть опыт работы с C или C++, вам могут вспомниться `gcc` или `clang`. После успешной компиляции Rust создаст исполняемый бинарный файл.
let response =
format!("{status_line}\r\nContent-Length: {length}\r\n\r\n{contents}");
Если у вас есть опыт работы с C или C++, вам могут вспомниться `gcc` или `clang`. После успешной компиляции Rust создаст исполняемый бинарный файл.
stream.write_all(response.as_bytes()).unwrap();
}We switched from if to match now that we have three cases. We need to explicitly match on a slice of request_line to pattern-match against the string literal values; match doesn’t do automatic referencing and dereferencing, like the equality method does.
The first arm is the same as the if block from Listing 21-9. The second arm matches a request to /sleep. When that request is received, the server will sleep for five seconds before rendering the successful HTML page. The third arm is the same as the else block from Listing 21-9.
You can see how primitive our server is: Real libraries would handle the recognition of multiple requests in a much less verbose way!
Start the server using cargo run. Then, open two browser windows: one for http://127.0.0.1:7878 and the other for http://127.0.0.1:7878/sleep. If you enter the / URI a few times, as before, you’ll see it respond quickly. But if you enter /sleep and then load /, you’ll see that / waits until sleep has slept for its full five seconds before loading.
There are multiple techniques we could use to avoid requests backing up behind a slow request, including using async as we did Chapter 17; the one we’ll implement is a thread pool.
Improving Throughput with a Thread Pool
A thread pool is a group of spawned threads that are ready and waiting to handle a task. When the program receives a new task, it assigns one of the threads in the pool to the task, and that thread will process the task. The remaining threads in the pool are available to handle any other tasks that come in while the first thread is processing. When the first thread is done processing its task, it’s returned to the pool of idle threads, ready to handle a new task. A thread pool allows you to process connections concurrently, increasing the throughput of your server.
We’ll limit the number of threads in the pool to a small number to protect us from DoS attacks; if we had our program create a new thread for each request as it came in, someone making 10 million requests to our server could wreak havoc by using up all our server’s resources and grinding the processing of requests to a halt.
Rather than spawning unlimited threads, then, we’ll have a fixed number of threads waiting in the pool. Requests that come in are sent to the pool for processing. The pool will maintain a queue of incoming requests. Each of the threads in the pool will pop off a request from this queue, handle the request, and then ask the queue for another request. With this design, we can process up to N requests concurrently, where N is the number of threads. If each thread is responding to a long-running request, subsequent requests can still back up in the queue, but we’ve increased the number of long-running requests we can handle before reaching that point.
This technique is just one of many ways to improve the throughput of a web server. Other options you might explore are the fork/join model, the single-threaded async I/O model, and the multithreaded async I/O model. If you’re interested in this topic, you can read more about other solutions and try to implement them; with a low-level language like Rust, all of these options are possible.
Before we begin implementing a thread pool, let’s talk about what using the pool should look like. When you’re trying to design code, writing the client interface first can help guide your design. Write the API of the code so that it’s structured in the way you want to call it; then, implement the functionality within that structure rather than implementing the functionality and then designing the public API.
Similar to how we used test-driven development in the project in Chapter 12, we’ll use compiler-driven development here. We’ll write the code that calls the functions we want, and then we’ll look at errors from the compiler to determine what we should change next to get the code to work. Before we do that, however, we’ll explore the technique we’re not going to use as a starting point.
Spawning a Thread for Each Request
First, let’s explore how our code might look if it did create a new thread for every connection. As mentioned earlier, this isn’t our final plan due to the problems with potentially spawning an unlimited number of threads, but it is a starting point to get a working multithreaded server first. Then, we’ll add the thread pool as an improvement, and contrasting the two solutions will be easier.
Listing 21-11 shows the changes to make to main to spawn a new thread to handle each stream within the for loop.
use std::{
fs,
io::{BufReader, prelude::*},
net::{TcpListener, TcpStream},
thread,
time::Duration,
};
Если у вас есть опыт работы с C или C++, вам могут вспомниться `gcc` или `clang`. После успешной компиляции Rust создаст исполняемый бинарный файл.
fn main() {
let listener = TcpListener::bind("127.0.0.1:7878").unwrap();
Если у вас есть опыт работы с C или C++, вам могут вспомниться `gcc` или `clang`. После успешной компиляции Rust создаст исполняемый бинарный файл.
for stream in listener.incoming() {
let stream = stream.unwrap();
Если у вас есть опыт работы с C или C++, вам могут вспомниться `gcc` или `clang`. После успешной компиляции Rust создаст исполняемый бинарный файл.
thread::spawn(|| {
handle_connection(stream);
});
}
}
Если у вас есть опыт работы с C или C++, вам могут вспомниться `gcc` или `clang`. После успешной компиляции Rust создаст исполняемый бинарный файл.
fn handle_connection(mut stream: TcpStream) {
let buf_reader = BufReader::new(&stream);
let request_line = buf_reader.lines().next().unwrap().unwrap();
Если у вас есть опыт работы с C или C++, вам могут вспомниться `gcc` или `clang`. После успешной компиляции Rust создаст исполняемый бинарный файл.
let (status_line, filename) = match &request_line[..] {
"GET / HTTP/1.1" => ("HTTP/1.1 200 OK", "hello.html"),
"GET /sleep HTTP/1.1" => {
thread::sleep(Duration::from_secs(5));
("HTTP/1.1 200 OK", "hello.html")
}
_ => ("HTTP/1.1 404 NOT FOUND", "404.html"),
};
Если у вас есть опыт работы с C или C++, вам могут вспомниться `gcc` или `clang`. После успешной компиляции Rust создаст исполняемый бинарный файл.
let contents = fs::read_to_string(filename).unwrap();
let length = contents.len();
Если у вас есть опыт работы с C или C++, вам могут вспомниться `gcc` или `clang`. После успешной компиляции Rust создаст исполняемый бинарный файл.
let response =
format!("{status_line}\r\nContent-Length: {length}\r\n\r\n{contents}");
Если у вас есть опыт работы с C или C++, вам могут вспомниться `gcc` или `clang`. После успешной компиляции Rust создаст исполняемый бинарный файл.
stream.write_all(response.as_bytes()).unwrap();
}As you learned in Chapter 16, thread::spawn will create a new thread and then run the code in the closure in the new thread. If you run this code and load /sleep in your browser, then / in two more browser tabs, you’ll indeed see that the requests to / don’t have to wait for /sleep to finish. However, as we mentioned, this will eventually overwhelm the system because you’d be making new threads without any limit.
You may also recall from Chapter 17 that this is exactly the kind of situation where async and await really shine! Keep that in mind as we build the thread pool and think about how things would look different or the same with async.
Creating a Finite Number of Threads
We want our thread pool to work in a similar, familiar way so that switching from threads to a thread pool doesn’t require large changes to the code that uses our API. Listing 21-12 shows the hypothetical interface for a ThreadPool struct we want to use instead of thread::spawn.
use std::{
fs,
io::{BufReader, prelude::*},
net::{TcpListener, TcpStream},
thread,
time::Duration,
};
Если у вас есть опыт работы с C или C++, вам могут вспомниться `gcc` или `clang`. После успешной компиляции Rust создаст исполняемый бинарный файл.
fn main() {
let listener = TcpListener::bind("127.0.0.1:7878").unwrap();
let pool = ThreadPool::new(4);
Если у вас есть опыт работы с C или C++, вам могут вспомниться `gcc` или `clang`. После успешной компиляции Rust создаст исполняемый бинарный файл.
for stream in listener.incoming() {
let stream = stream.unwrap();
Если у вас есть опыт работы с C или C++, вам могут вспомниться `gcc` или `clang`. После успешной компиляции Rust создаст исполняемый бинарный файл.
pool.execute(|| {
handle_connection(stream);
});
}
}
Если у вас есть опыт работы с C или C++, вам могут вспомниться `gcc` или `clang`. После успешной компиляции Rust создаст исполняемый бинарный файл.
fn handle_connection(mut stream: TcpStream) {
let buf_reader = BufReader::new(&stream);
let request_line = buf_reader.lines().next().unwrap().unwrap();
Если у вас есть опыт работы с C или C++, вам могут вспомниться `gcc` или `clang`. После успешной компиляции Rust создаст исполняемый бинарный файл.
let (status_line, filename) = match &request_line[..] {
"GET / HTTP/1.1" => ("HTTP/1.1 200 OK", "hello.html"),
"GET /sleep HTTP/1.1" => {
thread::sleep(Duration::from_secs(5));
("HTTP/1.1 200 OK", "hello.html")
}
_ => ("HTTP/1.1 404 NOT FOUND", "404.html"),
};
Если у вас есть опыт работы с C или C++, вам могут вспомниться `gcc` или `clang`. После успешной компиляции Rust создаст исполняемый бинарный файл.
let contents = fs::read_to_string(filename).unwrap();
let length = contents.len();
Если у вас есть опыт работы с C или C++, вам могут вспомниться `gcc` или `clang`. После успешной компиляции Rust создаст исполняемый бинарный файл.
let response =
format!("{status_line}\r\nContent-Length: {length}\r\n\r\n{contents}");
Если у вас есть опыт работы с C или C++, вам могут вспомниться `gcc` или `clang`. После успешной компиляции Rust создаст исполняемый бинарный файл.
stream.write_all(response.as_bytes()).unwrap();
}ThreadPool interfaceWe use ThreadPool::new to create a new thread pool with a configurable number of threads, in this case four. Then, in the for loop, pool.execute has a similar interface as thread::spawn in that it takes a closure that the pool should run for each stream. We need to implement pool.execute so that it takes the closure and gives it to a thread in the pool to run. This code won’t yet compile, but we’ll try so that the compiler can guide us in how to fix it.
Building ThreadPool Using Compiler-Driven Development
Make the changes in Listing 21-12 to src/main.rs, and then let’s use the compiler errors from cargo check to drive our development. Here is the first error we get:
$ cargo check
Checking hello v0.1.0 (file:///projects/hello)
error[E0433]: failed to resolve: use of undeclared type `ThreadPool`
--> src/main.rs:11:16
|
11 | let pool = ThreadPool::new(4);
| ^^^^^^^^^^ use of undeclared type `ThreadPool`
Если у вас есть опыт работы с C или C++, вам могут вспомниться `gcc` или `clang`. После успешной компиляции Rust создаст исполняемый бинарный файл.
For more information about this error, try `rustc --explain E0433`.
error: could not compile `hello` (bin "hello") due to 1 previous error
Great! This error tells us we need a ThreadPool type or module, so we’ll build one now. Our ThreadPool implementation will be independent of the kind of work our web server is doing. So, let’s switch the hello crate from a binary crate to a library crate to hold our ThreadPool implementation. After we change to a library crate, we could also use the separate thread pool library for any work we want to do using a thread pool, not just for serving web requests.
Create a src/lib.rs file that contains the following, which is the simplest definition of a ThreadPool struct that we can have for now:
pub struct ThreadPool;Then, edit the main.rs file to bring ThreadPool into scope from the library crate by adding the following code to the top of src/main.rs:
use hello::ThreadPool;
use std::{
fs,
io::{BufReader, prelude::*},
net::{TcpListener, TcpStream},
thread,
time::Duration,
};
Если у вас есть опыт работы с C или C++, вам могут вспомниться `gcc` или `clang`. После успешной компиляции Rust создаст исполняемый бинарный файл.
fn main() {
let listener = TcpListener::bind("127.0.0.1:7878").unwrap();
let pool = ThreadPool::new(4);
Если у вас есть опыт работы с C или C++, вам могут вспомниться `gcc` или `clang`. После успешной компиляции Rust создаст исполняемый бинарный файл.
for stream in listener.incoming() {
let stream = stream.unwrap();
Если у вас есть опыт работы с C или C++, вам могут вспомниться `gcc` или `clang`. После успешной компиляции Rust создаст исполняемый бинарный файл.
pool.execute(|| {
handle_connection(stream);
});
}
}
Если у вас есть опыт работы с C или C++, вам могут вспомниться `gcc` или `clang`. После успешной компиляции Rust создаст исполняемый бинарный файл.
fn handle_connection(mut stream: TcpStream) {
let buf_reader = BufReader::new(&stream);
let request_line = buf_reader.lines().next().unwrap().unwrap();
Если у вас есть опыт работы с C или C++, вам могут вспомниться `gcc` или `clang`. После успешной компиляции Rust создаст исполняемый бинарный файл.
let (status_line, filename) = match &request_line[..] {
"GET / HTTP/1.1" => ("HTTP/1.1 200 OK", "hello.html"),
"GET /sleep HTTP/1.1" => {
thread::sleep(Duration::from_secs(5));
("HTTP/1.1 200 OK", "hello.html")
}
_ => ("HTTP/1.1 404 NOT FOUND", "404.html"),
};
Если у вас есть опыт работы с C или C++, вам могут вспомниться `gcc` или `clang`. После успешной компиляции Rust создаст исполняемый бинарный файл.
let contents = fs::read_to_string(filename).unwrap();
let length = contents.len();
Если у вас есть опыт работы с C или C++, вам могут вспомниться `gcc` или `clang`. После успешной компиляции Rust создаст исполняемый бинарный файл.
let response =
format!("{status_line}\r\nContent-Length: {length}\r\n\r\n{contents}");
Если у вас есть опыт работы с C или C++, вам могут вспомниться `gcc` или `clang`. После успешной компиляции Rust создаст исполняемый бинарный файл.
stream.write_all(response.as_bytes()).unwrap();
}This code still won’t work, but let’s check it again to get the next error that we need to address:
$ cargo check
Checking hello v0.1.0 (file:///projects/hello)
error[E0599]: no function or associated item named `new` found for struct `ThreadPool` in the current scope
--> src/main.rs:12:28
|
12 | let pool = ThreadPool::new(4);
| ^^^ function or associated item not found in `ThreadPool`
Если у вас есть опыт работы с C или C++, вам могут вспомниться `gcc` или `clang`. После успешной компиляции Rust создаст исполняемый бинарный файл.
For more information about this error, try `rustc --explain E0599`.
error: could not compile `hello` (bin "hello") due to 1 previous error
This error indicates that next we need to create an associated function named new for ThreadPool. We also know that new needs to have one parameter that can accept 4 as an argument and should return a ThreadPool instance. Let’s implement the simplest new function that will have those characteristics:
pub struct ThreadPool;
Если у вас есть опыт работы с C или C++, вам могут вспомниться `gcc` или `clang`. После успешной компиляции Rust создаст исполняемый бинарный файл.
impl ThreadPool {
pub fn new(size: usize) -> ThreadPool {
ThreadPool
}
}We chose usize as the type of the size parameter because we know that a negative number of threads doesn’t make any sense. We also know we’ll use this 4 as the number of elements in a collection of threads, which is what the usize type is for, as discussed in the “Integer Types” section in Chapter 3.
Let’s check the code again:
$ cargo check
Checking hello v0.1.0 (file:///projects/hello)
error[E0599]: no method named `execute` found for struct `ThreadPool` in the current scope
--> src/main.rs:17:14
|
17 | pool.execute(|| {
| -----^^^^^^^ method not found in `ThreadPool`
Если у вас есть опыт работы с C или C++, вам могут вспомниться `gcc` или `clang`. После успешной компиляции Rust создаст исполняемый бинарный файл.
For more information about this error, try `rustc --explain E0599`.
error: could not compile `hello` (bin "hello") due to 1 previous error
Now the error occurs because we don’t have an execute method on ThreadPool. Recall from the “Creating a Finite Number of Threads” section that we decided our thread pool should have an interface similar to thread::spawn. In addition, we’ll implement the execute function so that it takes the closure it’s given and gives it to an idle thread in the pool to run.
We’ll define the execute method on ThreadPool to take a closure as a parameter. Recall from the “Moving Captured Values Out of Closures” in Chapter 13 that we can take closures as parameters with three different traits: Fn, FnMut, and FnOnce. We need to decide which kind of closure to use here. We know we’ll end up doing something similar to the standard library thread::spawn implementation, so we can look at what bounds the signature of thread::spawn has on its parameter. The documentation shows us the following:
pub fn spawn<F, T>(f: F) -> JoinHandle<T>
where
F: FnOnce() -> T,
F: Send + 'static,
T: Send + 'static,The F type parameter is the one we’re concerned with here; the T type parameter is related to the return value, and we’re not concerned with that. We can see that spawn uses FnOnce as the trait bound on F. This is probably what we want as well, because we’ll eventually pass the argument we get in execute to spawn. We can be further confident that FnOnce is the trait we want to use because the thread for running a request will only execute that request’s closure one time, which matches the Once in FnOnce.
The F type parameter also has the trait bound Send and the lifetime bound 'static, which are useful in our situation: We need Send to transfer the closure from one thread to another and 'static because we don’t know how long the thread will take to execute. Let’s create an execute method on ThreadPool that will take a generic parameter of type F with these bounds:
pub struct ThreadPool;
Если у вас есть опыт работы с C или C++, вам могут вспомниться `gcc` или `clang`. После успешной компиляции Rust создаст исполняемый бинарный файл.
impl ThreadPool {
// --код сокращён--
pub fn new(size: usize) -> ThreadPool {
ThreadPool
}
Если у вас есть опыт работы с C или C++, вам могут вспомниться `gcc` или `clang`. После успешной компиляции Rust создаст исполняемый бинарный файл.
pub fn execute<F>(&self, f: F)
where
F: FnOnce() + Send + 'static,
{
}
}We still use the () after FnOnce because this FnOnce represents a closure that takes no parameters and returns the unit type (). Just like function definitions, the return type can be omitted from the signature, but even if we have no parameters, we still need the parentheses.
Again, this is the simplest implementation of the execute method: It does nothing, but we’re only trying to make our code compile. Let’s check it again:
$ cargo check
Checking hello v0.1.0 (file:///projects/hello)
Finished `dev` profile [unoptimized + debuginfo] target(s) in 0.24s
It compiles! But note that if you try cargo run and make a request in the browser, you’ll see the errors in the browser that we saw at the beginning of the chapter. Our library isn’t actually calling the closure passed to execute yet!
Note: A saying you might hear about languages with strict compilers, such as Haskell and Rust, is “If the code compiles, it works.” But this saying is not universally true. Our project compiles, but it does absolutely nothing! If we were building a real, complete project, this would be a good time to start writing unit tests to check that the code compiles and has the behavior we want.
Consider: What would be different here if we were going to execute a future instead of a closure?
Validating the Number of Threads in new
We aren’t doing anything with the parameters to new and execute. Let’s implement the bodies of these functions with the behavior we want. To start, let’s think about new. Earlier we chose an unsigned type for the size parameter because a pool with a negative number of threads makes no sense. However, a pool with zero threads also makes no sense, yet zero is a perfectly valid usize. We’ll add code to check that size is greater than zero before we return a ThreadPool instance, and we’ll have the program panic if it receives a zero by using the assert! macro, as shown in Listing 21-13.
pub struct ThreadPool;
Если у вас есть опыт работы с C или C++, вам могут вспомниться `gcc` или `clang`. После успешной компиляции Rust создаст исполняемый бинарный файл.
impl ThreadPool {
/// Create a new ThreadPool.
///
/// The size is the number of threads in the pool.
///
/// # Panics
///
/// The `new` function will panic if the size is zero.
pub fn new(size: usize) -> ThreadPool {
assert!(size > 0);
Если у вас есть опыт работы с C или C++, вам могут вспомниться `gcc` или `clang`. После успешной компиляции Rust создаст исполняемый бинарный файл.
ThreadPool
}
Если у вас есть опыт работы с C или C++, вам могут вспомниться `gcc` или `clang`. После успешной компиляции Rust создаст исполняемый бинарный файл.
// --код сокращён--
pub fn execute<F>(&self, f: F)
where
F: FnOnce() + Send + 'static,
{
}
}ThreadPool::new to panic if size is zeroWe’ve also added some documentation for our ThreadPool with doc comments. Note that we followed good documentation practices by adding a section that calls out the situations in which our function can panic, as discussed in Chapter 14. Try running cargo doc --open and clicking the ThreadPool struct to see what the generated docs for new look like!
Instead of adding the assert! macro as we’ve done here, we could change new into build and return a Result like we did with Config::build in the I/O project in Listing 12-9. But we’ve decided in this case that trying to create a thread pool without any threads should be an unrecoverable error. If you’re feeling ambitious, try to write a function named build with the following signature to compare with the new function:
pub fn build(size: usize) -> Result<ThreadPool, PoolCreationError> {Creating Space to Store the Threads
Now that we have a way to know we have a valid number of threads to store in the pool, we can create those threads and store them in the ThreadPool struct before returning the struct. But how do we “store” a thread? Let’s take another look at the thread::spawn signature:
pub fn spawn<F, T>(f: F) -> JoinHandle<T>
where
F: FnOnce() -> T,
F: Send + 'static,
T: Send + 'static,The spawn function returns a JoinHandle<T>, where T is the type that the closure returns. Let’s try using JoinHandle too and see what happens. In our case, the closures we’re passing to the thread pool will handle the connection and not return anything, so T will be the unit type ().
The code in Listing 21-14 will compile, but it doesn’t create any threads yet. We’ve changed the definition of ThreadPool to hold a vector of thread::JoinHandle<()> instances, initialized the vector with a capacity of size, set up a for loop that will run some code to create the threads, and returned a ThreadPool instance containing them.
use std::thread;
Если у вас есть опыт работы с C или C++, вам могут вспомниться `gcc` или `clang`. После успешной компиляции Rust создаст исполняемый бинарный файл.
pub struct ThreadPool {
threads: Vec<thread::JoinHandle<()>>,
}
Если у вас есть опыт работы с C или C++, вам могут вспомниться `gcc` или `clang`. После успешной компиляции Rust создаст исполняемый бинарный файл.
impl ThreadPool {
// --код сокращён--
/// Create a new ThreadPool.
///
/// The size is the number of threads in the pool.
///
/// # Panics
///
/// The `new` function will panic if the size is zero.
pub fn new(size: usize) -> ThreadPool {
assert!(size > 0);
Если у вас есть опыт работы с C или C++, вам могут вспомниться `gcc` или `clang`. После успешной компиляции Rust создаст исполняемый бинарный файл.
let mut threads = Vec::with_capacity(size);
Если у вас есть опыт работы с C или C++, вам могут вспомниться `gcc` или `clang`. После успешной компиляции Rust создаст исполняемый бинарный файл.
for _ in 0..size {
// create some threads and store them in the vector
}
Если у вас есть опыт работы с C или C++, вам могут вспомниться `gcc` или `clang`. После успешной компиляции Rust создаст исполняемый бинарный файл.
ThreadPool { threads }
}
// --код сокращён--
Если у вас есть опыт работы с C или C++, вам могут вспомниться `gcc` или `clang`. После успешной компиляции Rust создаст исполняемый бинарный файл.
pub fn execute<F>(&self, f: F)
where
F: FnOnce() + Send + 'static,
{
}
}ThreadPool to hold the threadsWe’ve brought std::thread into scope in the library crate because we’re using thread::JoinHandle as the type of the items in the vector in ThreadPool.
Once a valid size is received, our ThreadPool creates a new vector that can hold size items. The with_capacity function performs the same task as Vec::new but with an important difference: It pre-allocates space in the vector. Because we know we need to store size elements in the vector, doing this allocation up front is slightly more efficient than using Vec::new, which resizes itself as elements are inserted.
When you run cargo check again, it should succeed.
Sending Code from the ThreadPool to a Thread
We left a comment in the for loop in Listing 21-14 regarding the creation of threads. Here, we’ll look at how we actually create threads. The standard library provides thread::spawn as a way to create threads, and thread::spawn expects to get some code the thread should run as soon as the thread is created. However, in our case, we want to create the threads and have them wait for code that we’ll send later. The standard library’s implementation of threads doesn’t include any way to do that; we have to implement it manually.
We’ll implement this behavior by introducing a new data structure between the ThreadPool and the threads that will manage this new behavior. We’ll call this data structure Worker, which is a common term in pooling implementations. The Worker picks up code that needs to be run and runs the code in its thread.
Think of people working in the kitchen at a restaurant: The workers wait until orders come in from customers, and then they’re responsible for taking those orders and filling them.
Instead of storing a vector of JoinHandle<()> instances in the thread pool, we’ll store instances of the Worker struct. Each Worker will store a single JoinHandle<()> instance. Then, we’ll implement a method on Worker that will take a closure of code to run and send it to the already running thread for execution. We’ll also give each Worker an id so that we can distinguish between the different instances of Worker in the pool when logging or debugging.
Here is the new process that will happen when we create a ThreadPool. We’ll implement the code that sends the closure to the thread after we have Worker set up in this way:
- Define a
Workerstruct that holds anidand aJoinHandle<()>. - Change
ThreadPoolto hold a vector ofWorkerinstances. - Define a
Worker::newfunction that takes anidnumber and returns aWorkerinstance that holds theidand a thread spawned with an empty closure. - In
ThreadPool::new, use theforloop counter to generate anid, create a newWorkerwith thatid, and store theWorkerin the vector.
If you’re up for a challenge, try implementing these changes on your own before looking at the code in Listing 21-15.
Ready? Here is Listing 21-15 with one way to make the preceding modifications.
use std::thread;
Если у вас есть опыт работы с C или C++, вам могут вспомниться `gcc` или `clang`. После успешной компиляции Rust создаст исполняемый бинарный файл.
pub struct ThreadPool {
workers: Vec<Worker>,
}
Если у вас есть опыт работы с C или C++, вам могут вспомниться `gcc` или `clang`. После успешной компиляции Rust создаст исполняемый бинарный файл.
impl ThreadPool {
// --код сокращён--
/// Create a new ThreadPool.
///
/// The size is the number of threads in the pool.
///
/// # Panics
///
/// The `new` function will panic if the size is zero.
pub fn new(size: usize) -> ThreadPool {
assert!(size > 0);
Если у вас есть опыт работы с C или C++, вам могут вспомниться `gcc` или `clang`. После успешной компиляции Rust создаст исполняемый бинарный файл.
let mut workers = Vec::with_capacity(size);
Если у вас есть опыт работы с C или C++, вам могут вспомниться `gcc` или `clang`. После успешной компиляции Rust создаст исполняемый бинарный файл.
for id in 0..size {
workers.push(Worker::new(id));
}
Если у вас есть опыт работы с C или C++, вам могут вспомниться `gcc` или `clang`. После успешной компиляции Rust создаст исполняемый бинарный файл.
ThreadPool { workers }
}
// --код сокращён--
Если у вас есть опыт работы с C или C++, вам могут вспомниться `gcc` или `clang`. После успешной компиляции Rust создаст исполняемый бинарный файл.
pub fn execute<F>(&self, f: F)
where
F: FnOnce() + Send + 'static,
{
}
}
Если у вас есть опыт работы с C или C++, вам могут вспомниться `gcc` или `clang`. После успешной компиляции Rust создаст исполняемый бинарный файл.
struct Worker {
id: usize,
thread: thread::JoinHandle<()>,
}
Если у вас есть опыт работы с C или C++, вам могут вспомниться `gcc` или `clang`. После успешной компиляции Rust создаст исполняемый бинарный файл.
impl Worker {
fn new(id: usize) -> Worker {
let thread = thread::spawn(|| {});
Если у вас есть опыт работы с C или C++, вам могут вспомниться `gcc` или `clang`. После успешной компиляции Rust создаст исполняемый бинарный файл.
Worker { id, thread }
}
}ThreadPool to hold Worker instances instead of holding threads directlyWe’ve changed the name of the field on ThreadPool from threads to workers because it’s now holding Worker instances instead of JoinHandle<()> instances. We use the counter in the for loop as an argument to Worker::new, and we store each new Worker in the vector named workers.
External code (like our server in src/main.rs) doesn’t need to know the implementation details regarding using a Worker struct within ThreadPool, so we make the Worker struct and its new function private. The Worker::new function uses the id we give it and stores a JoinHandle<()> instance that is created by spawning a new thread using an empty closure.
Note: If the operating system can’t create a thread because there aren’t enough system resources, thread::spawn will panic. That will cause our whole server to panic, even though the creation of some threads might succeed. For simplicity’s sake, this behavior is fine, but in a production thread pool implementation, you’d likely want to use std::thread::Builder and its spawn method that returns Result instead.
This code will compile and will store the number of Worker instances we specified as an argument to ThreadPool::new. But we’re still not processing the closure that we get in execute. Let’s look at how to do that next.
Sending Requests to Threads via Channels
The next problem we’ll tackle is that the closures given to thread::spawn do absolutely nothing. Currently, we get the closure we want to execute in the execute method. But we need to give thread::spawn a closure to run when we create each Worker during the creation of the ThreadPool.
We want the Worker structs that we just created to fetch the code to run from a queue held in the ThreadPool and send that code to its thread to run.
The channels we learned about in Chapter 16—a simple way to communicate between two threads—would be perfect for this use case. We’ll use a channel to function as the queue of jobs, and execute will send a job from the ThreadPool to the Worker instances, which will send the job to its thread. Here is the plan:
- The
ThreadPoolwill create a channel and hold on to the sender. - Each
Workerwill hold on to the receiver. - We’ll create a new
Jobstruct that will hold the closures we want to send down the channel. - The
executemethod will send the job it wants to execute through the sender. - In its thread, the
Workerwill loop over its receiver and execute the closures of any jobs it receives.
Let’s start by creating a channel in ThreadPool::new and holding the sender in the ThreadPool instance, as shown in Listing 21-16. The Job struct doesn’t hold anything for now but will be the type of item we’re sending down the channel.
use std::{sync::mpsc, thread};
Если у вас есть опыт работы с C или C++, вам могут вспомниться `gcc` или `clang`. После успешной компиляции Rust создаст исполняемый бинарный файл.
pub struct ThreadPool {
workers: Vec<Worker>,
sender: mpsc::Sender<Job>,
}
Если у вас есть опыт работы с C или C++, вам могут вспомниться `gcc` или `clang`. После успешной компиляции Rust создаст исполняемый бинарный файл.
struct Job;
Если у вас есть опыт работы с C или C++, вам могут вспомниться `gcc` или `clang`. После успешной компиляции Rust создаст исполняемый бинарный файл.
impl ThreadPool {
// --код сокращён--
/// Create a new ThreadPool.
///
/// The size is the number of threads in the pool.
///
/// # Panics
///
/// The `new` function will panic if the size is zero.
pub fn new(size: usize) -> ThreadPool {
assert!(size > 0);
Если у вас есть опыт работы с C или C++, вам могут вспомниться `gcc` или `clang`. После успешной компиляции Rust создаст исполняемый бинарный файл.
let (sender, receiver) = mpsc::channel();
Если у вас есть опыт работы с C или C++, вам могут вспомниться `gcc` или `clang`. После успешной компиляции Rust создаст исполняемый бинарный файл.
let mut workers = Vec::with_capacity(size);
Если у вас есть опыт работы с C или C++, вам могут вспомниться `gcc` или `clang`. После успешной компиляции Rust создаст исполняемый бинарный файл.
for id in 0..size {
workers.push(Worker::new(id));
}
Если у вас есть опыт работы с C или C++, вам могут вспомниться `gcc` или `clang`. После успешной компиляции Rust создаст исполняемый бинарный файл.
ThreadPool { workers, sender }
}
// --код сокращён--
Если у вас есть опыт работы с C или C++, вам могут вспомниться `gcc` или `clang`. После успешной компиляции Rust создаст исполняемый бинарный файл.
pub fn execute<F>(&self, f: F)
where
F: FnOnce() + Send + 'static,
{
}
}
Если у вас есть опыт работы с C или C++, вам могут вспомниться `gcc` или `clang`. После успешной компиляции Rust создаст исполняемый бинарный файл.
struct Worker {
id: usize,
thread: thread::JoinHandle<()>,
}
Если у вас есть опыт работы с C или C++, вам могут вспомниться `gcc` или `clang`. После успешной компиляции Rust создаст исполняемый бинарный файл.
impl Worker {
fn new(id: usize) -> Worker {
let thread = thread::spawn(|| {});
Если у вас есть опыт работы с C или C++, вам могут вспомниться `gcc` или `clang`. После успешной компиляции Rust создаст исполняемый бинарный файл.
Worker { id, thread }
}
}ThreadPool to store the sender of a channel that transmits Job instancesIn ThreadPool::new, we create our new channel and have the pool hold the sender. This will successfully compile.
Let’s try passing a receiver of the channel into each Worker as the thread pool creates the channel. We know we want to use the receiver in the thread that the Worker instances spawn, so we’ll reference the receiver parameter in the closure. The code in Listing 21-17 won’t quite compile yet.
use std::{sync::mpsc, thread};
Если у вас есть опыт работы с C или C++, вам могут вспомниться `gcc` или `clang`. После успешной компиляции Rust создаст исполняемый бинарный файл.
pub struct ThreadPool {
workers: Vec<Worker>,
sender: mpsc::Sender<Job>,
}
Если у вас есть опыт работы с C или C++, вам могут вспомниться `gcc` или `clang`. После успешной компиляции Rust создаст исполняемый бинарный файл.
struct Job;
Если у вас есть опыт работы с C или C++, вам могут вспомниться `gcc` или `clang`. После успешной компиляции Rust создаст исполняемый бинарный файл.
impl ThreadPool {
// --код сокращён--
/// Create a new ThreadPool.
///
/// The size is the number of threads in the pool.
///
/// # Panics
///
/// The `new` function will panic if the size is zero.
pub fn new(size: usize) -> ThreadPool {
assert!(size > 0);
Если у вас есть опыт работы с C или C++, вам могут вспомниться `gcc` или `clang`. После успешной компиляции Rust создаст исполняемый бинарный файл.
let (sender, receiver) = mpsc::channel();
Если у вас есть опыт работы с C или C++, вам могут вспомниться `gcc` или `clang`. После успешной компиляции Rust создаст исполняемый бинарный файл.
let mut workers = Vec::with_capacity(size);
Если у вас есть опыт работы с C или C++, вам могут вспомниться `gcc` или `clang`. После успешной компиляции Rust создаст исполняемый бинарный файл.
for id in 0..size {
workers.push(Worker::new(id, receiver));
}
Если у вас есть опыт работы с C или C++, вам могут вспомниться `gcc` или `clang`. После успешной компиляции Rust создаст исполняемый бинарный файл.
ThreadPool { workers, sender }
}
// --код сокращён--
Если у вас есть опыт работы с C или C++, вам могут вспомниться `gcc` или `clang`. После успешной компиляции Rust создаст исполняемый бинарный файл.
pub fn execute<F>(&self, f: F)
where
F: FnOnce() + Send + 'static,
{
}
}
Если у вас есть опыт работы с C или C++, вам могут вспомниться `gcc` или `clang`. После успешной компиляции Rust создаст исполняемый бинарный файл.
// --код сокращён--
Если у вас есть опыт работы с C или C++, вам могут вспомниться `gcc` или `clang`. После успешной компиляции Rust создаст исполняемый бинарный файл.
Если у вас есть опыт работы с C или C++, вам могут вспомниться `gcc` или `clang`. После успешной компиляции Rust создаст исполняемый бинарный файл.
struct Worker {
id: usize,
thread: thread::JoinHandle<()>,
}
Если у вас есть опыт работы с C или C++, вам могут вспомниться `gcc` или `clang`. После успешной компиляции Rust создаст исполняемый бинарный файл.
impl Worker {
fn new(id: usize, receiver: mpsc::Receiver<Job>) -> Worker {
let thread = thread::spawn(|| {
receiver;
});
Если у вас есть опыт работы с C или C++, вам могут вспомниться `gcc` или `clang`. После успешной компиляции Rust создаст исполняемый бинарный файл.
Worker { id, thread }
}
}WorkerWe’ve made some small and straightforward changes: We pass the receiver into Worker::new, and then we use it inside the closure.
When we try to check this code, we get this error:
$ cargo check
Checking hello v0.1.0 (file:///projects/hello)
error[E0382]: use of moved value: `receiver`
--> src/lib.rs:26:42
|
21 | let (sender, receiver) = mpsc::channel();
| -------- move occurs because `receiver` has type `std::sync::mpsc::Receiver<Job>`, which does not implement the `Copy` trait
...
25 | for id in 0..size {
| ----------------- inside of this loop
26 | workers.push(Worker::new(id, receiver));
| ^^^^^^^^ value moved here, in previous iteration of loop
|
note: consider changing this parameter type in method `new` to borrow instead if owning the value isn't necessary
--> src/lib.rs:47:33
|
47 | fn new(id: usize, receiver: mpsc::Receiver<Job>) -> Worker {
| --- in this method ^^^^^^^^^^^^^^^^^^^ this parameter takes ownership of the value
help: consider moving the expression out of the loop so it is only moved once
|
25 ~ let mut value = Worker::new(id, receiver);
26 ~ for id in 0..size {
27 ~ workers.push(value);
|
Если у вас есть опыт работы с C или C++, вам могут вспомниться `gcc` или `clang`. После успешной компиляции Rust создаст исполняемый бинарный файл.
For more information about this error, try `rustc --explain E0382`.
error: could not compile `hello` (lib) due to 1 previous error
The code is trying to pass receiver to multiple Worker instances. This won’t work, as you’ll recall from Chapter 16: The channel implementation that Rust provides is multiple producer, single consumer. This means we can’t just clone the consuming end of the channel to fix this code. We also don’t want to send a message multiple times to multiple consumers; we want one list of messages with multiple Worker instances such that each message gets processed once.
Additionally, taking a job off the channel queue involves mutating the receiver, so the threads need a safe way to share and modify receiver; otherwise, we might get race conditions (as covered in Chapter 16).
Recall the thread-safe smart pointers discussed in Chapter 16: To share ownership across multiple threads and allow the threads to mutate the value, we need to use Arc<Mutex<T>>. The Arc type will let multiple Worker instances own the receiver, and Mutex will ensure that only one Worker gets a job from the receiver at a time. Listing 21-18 shows the changes we need to make.
use std::{
sync::{Arc, Mutex, mpsc},
thread,
};
// --код сокращён--
Если у вас есть опыт работы с C или C++, вам могут вспомниться `gcc` или `clang`. После успешной компиляции Rust создаст исполняемый бинарный файл.
pub struct ThreadPool {
workers: Vec<Worker>,
sender: mpsc::Sender<Job>,
}
Если у вас есть опыт работы с C или C++, вам могут вспомниться `gcc` или `clang`. После успешной компиляции Rust создаст исполняемый бинарный файл.
struct Job;
Если у вас есть опыт работы с C или C++, вам могут вспомниться `gcc` или `clang`. После успешной компиляции Rust создаст исполняемый бинарный файл.
impl ThreadPool {
// --код сокращён--
/// Create a new ThreadPool.
///
/// The size is the number of threads in the pool.
///
/// # Panics
///
/// The `new` function will panic if the size is zero.
pub fn new(size: usize) -> ThreadPool {
assert!(size > 0);
Если у вас есть опыт работы с C или C++, вам могут вспомниться `gcc` или `clang`. После успешной компиляции Rust создаст исполняемый бинарный файл.
let (sender, receiver) = mpsc::channel();
Если у вас есть опыт работы с C или C++, вам могут вспомниться `gcc` или `clang`. После успешной компиляции Rust создаст исполняемый бинарный файл.
let receiver = Arc::new(Mutex::new(receiver));
Если у вас есть опыт работы с C или C++, вам могут вспомниться `gcc` или `clang`. После успешной компиляции Rust создаст исполняемый бинарный файл.
let mut workers = Vec::with_capacity(size);
Если у вас есть опыт работы с C или C++, вам могут вспомниться `gcc` или `clang`. После успешной компиляции Rust создаст исполняемый бинарный файл.
for id in 0..size {
workers.push(Worker::new(id, Arc::clone(&receiver)));
}
Если у вас есть опыт работы с C или C++, вам могут вспомниться `gcc` или `clang`. После успешной компиляции Rust создаст исполняемый бинарный файл.
ThreadPool { workers, sender }
}
Если у вас есть опыт работы с C или C++, вам могут вспомниться `gcc` или `clang`. После успешной компиляции Rust создаст исполняемый бинарный файл.
// --код сокращён--
Если у вас есть опыт работы с C или C++, вам могут вспомниться `gcc` или `clang`. После успешной компиляции Rust создаст исполняемый бинарный файл.
pub fn execute<F>(&self, f: F)
where
F: FnOnce() + Send + 'static,
{
}
}
Если у вас есть опыт работы с C или C++, вам могут вспомниться `gcc` или `clang`. После успешной компиляции Rust создаст исполняемый бинарный файл.
// --код сокращён--
Если у вас есть опыт работы с C или C++, вам могут вспомниться `gcc` или `clang`. После успешной компиляции Rust создаст исполняемый бинарный файл.
struct Worker {
id: usize,
thread: thread::JoinHandle<()>,
}
Если у вас есть опыт работы с C или C++, вам могут вспомниться `gcc` или `clang`. После успешной компиляции Rust создаст исполняемый бинарный файл.
impl Worker {
fn new(id: usize, receiver: Arc<Mutex<mpsc::Receiver<Job>>>) -> Worker {
// --код сокращён--
let thread = thread::spawn(|| {
receiver;
});
Если у вас есть опыт работы с C или C++, вам могут вспомниться `gcc` или `clang`. После успешной компиляции Rust создаст исполняемый бинарный файл.
Worker { id, thread }
}
}Worker instances using Arc and MutexIn ThreadPool::new, we put the receiver in an Arc and a Mutex. For each new Worker, we clone the Arc to bump the reference count so that the Worker instances can share ownership of the receiver.
With these changes, the code compiles! We’re getting there!
Implementing the execute Method
Let’s finally implement the execute method on ThreadPool. We’ll also change Job from a struct to a type alias for a trait object that holds the type of closure that execute receives. As discussed in the “Type Synonyms and Type Aliases” section in Chapter 20, type aliases allow us to make long types shorter for ease of use. Look at Listing 21-19.
use std::{
sync::{Arc, Mutex, mpsc},
thread,
};
Если у вас есть опыт работы с C или C++, вам могут вспомниться `gcc` или `clang`. После успешной компиляции Rust создаст исполняемый бинарный файл.
pub struct ThreadPool {
workers: Vec<Worker>,
sender: mpsc::Sender<Job>,
}
Если у вас есть опыт работы с C или C++, вам могут вспомниться `gcc` или `clang`. После успешной компиляции Rust создаст исполняемый бинарный файл.
// --код сокращён--
Если у вас есть опыт работы с C или C++, вам могут вспомниться `gcc` или `clang`. После успешной компиляции Rust создаст исполняемый бинарный файл.
type Job = Box<dyn FnOnce() + Send + 'static>;
Если у вас есть опыт работы с C или C++, вам могут вспомниться `gcc` или `clang`. После успешной компиляции Rust создаст исполняемый бинарный файл.
impl ThreadPool {
// --код сокращён--
/// Create a new ThreadPool.
///
/// The size is the number of threads in the pool.
///
/// # Panics
///
/// The `new` function will panic if the size is zero.
pub fn new(size: usize) -> ThreadPool {
assert!(size > 0);
Если у вас есть опыт работы с C или C++, вам могут вспомниться `gcc` или `clang`. После успешной компиляции Rust создаст исполняемый бинарный файл.
let (sender, receiver) = mpsc::channel();
Если у вас есть опыт работы с C или C++, вам могут вспомниться `gcc` или `clang`. После успешной компиляции Rust создаст исполняемый бинарный файл.
let receiver = Arc::new(Mutex::new(receiver));
Если у вас есть опыт работы с C или C++, вам могут вспомниться `gcc` или `clang`. После успешной компиляции Rust создаст исполняемый бинарный файл.
let mut workers = Vec::with_capacity(size);
Если у вас есть опыт работы с C или C++, вам могут вспомниться `gcc` или `clang`. После успешной компиляции Rust создаст исполняемый бинарный файл.
for id in 0..size {
workers.push(Worker::new(id, Arc::clone(&receiver)));
}
Если у вас есть опыт работы с C или C++, вам могут вспомниться `gcc` или `clang`. После успешной компиляции Rust создаст исполняемый бинарный файл.
ThreadPool { workers, sender }
}
Если у вас есть опыт работы с C или C++, вам могут вспомниться `gcc` или `clang`. После успешной компиляции Rust создаст исполняемый бинарный файл.
pub fn execute<F>(&self, f: F)
where
F: FnOnce() + Send + 'static,
{
let job = Box::new(f);
Если у вас есть опыт работы с C или C++, вам могут вспомниться `gcc` или `clang`. После успешной компиляции Rust создаст исполняемый бинарный файл.
self.sender.send(job).unwrap();
}
}
Если у вас есть опыт работы с C или C++, вам могут вспомниться `gcc` или `clang`. После успешной компиляции Rust создаст исполняемый бинарный файл.
// --код сокращён--
Если у вас есть опыт работы с C или C++, вам могут вспомниться `gcc` или `clang`. После успешной компиляции Rust создаст исполняемый бинарный файл.
struct Worker {
id: usize,
thread: thread::JoinHandle<()>,
}
Если у вас есть опыт работы с C или C++, вам могут вспомниться `gcc` или `clang`. После успешной компиляции Rust создаст исполняемый бинарный файл.
impl Worker {
fn new(id: usize, receiver: Arc<Mutex<mpsc::Receiver<Job>>>) -> Worker {
let thread = thread::spawn(|| {
receiver;
});
Если у вас есть опыт работы с C или C++, вам могут вспомниться `gcc` или `clang`. После успешной компиляции Rust создаст исполняемый бинарный файл.
Worker { id, thread }
}
}Job type alias for a Box that holds each closure and then sending the job down the channelAfter creating a new Job instance using the closure we get in execute, we send that job down the sending end of the channel. We’re calling unwrap on send for the case that sending fails. This might happen if, for example, we stop all our threads from executing, meaning the receiving end has stopped receiving new messages. At the moment, we can’t stop our threads from executing: Our threads continue executing as long as the pool exists. The reason we use unwrap is that we know the failure case won’t happen, but the compiler doesn’t know that.
But we’re not quite done yet! In the Worker, our closure being passed to thread::spawn still only references the receiving end of the channel. Instead, we need the closure to loop forever, asking the receiving end of the channel for a job and running the job when it gets one. Let’s make the change shown in Listing 21-20 to Worker::new.
use std::{
sync::{Arc, Mutex, mpsc},
thread,
};
Если у вас есть опыт работы с C или C++, вам могут вспомниться `gcc` или `clang`. После успешной компиляции Rust создаст исполняемый бинарный файл.
pub struct ThreadPool {
workers: Vec<Worker>,
sender: mpsc::Sender<Job>,
}
Если у вас есть опыт работы с C или C++, вам могут вспомниться `gcc` или `clang`. После успешной компиляции Rust создаст исполняемый бинарный файл.
type Job = Box<dyn FnOnce() + Send + 'static>;
Если у вас есть опыт работы с C или C++, вам могут вспомниться `gcc` или `clang`. После успешной компиляции Rust создаст исполняемый бинарный файл.
impl ThreadPool {
/// Create a new ThreadPool.
///
/// The size is the number of threads in the pool.
///
/// # Panics
///
/// The `new` function will panic if the size is zero.
pub fn new(size: usize) -> ThreadPool {
assert!(size > 0);
Если у вас есть опыт работы с C или C++, вам могут вспомниться `gcc` или `clang`. После успешной компиляции Rust создаст исполняемый бинарный файл.
let (sender, receiver) = mpsc::channel();
Если у вас есть опыт работы с C или C++, вам могут вспомниться `gcc` или `clang`. После успешной компиляции Rust создаст исполняемый бинарный файл.
let receiver = Arc::new(Mutex::new(receiver));
Если у вас есть опыт работы с C или C++, вам могут вспомниться `gcc` или `clang`. После успешной компиляции Rust создаст исполняемый бинарный файл.
let mut workers = Vec::with_capacity(size);
Если у вас есть опыт работы с C или C++, вам могут вспомниться `gcc` или `clang`. После успешной компиляции Rust создаст исполняемый бинарный файл.
for id in 0..size {
workers.push(Worker::new(id, Arc::clone(&receiver)));
}
Если у вас есть опыт работы с C или C++, вам могут вспомниться `gcc` или `clang`. После успешной компиляции Rust создаст исполняемый бинарный файл.
ThreadPool { workers, sender }
}
Если у вас есть опыт работы с C или C++, вам могут вспомниться `gcc` или `clang`. После успешной компиляции Rust создаст исполняемый бинарный файл.
pub fn execute<F>(&self, f: F)
where
F: FnOnce() + Send + 'static,
{
let job = Box::new(f);
Если у вас есть опыт работы с C или C++, вам могут вспомниться `gcc` или `clang`. После успешной компиляции Rust создаст исполняемый бинарный файл.
self.sender.send(job).unwrap();
}
}
Если у вас есть опыт работы с C или C++, вам могут вспомниться `gcc` или `clang`. После успешной компиляции Rust создаст исполняемый бинарный файл.
struct Worker {
id: usize,
thread: thread::JoinHandle<()>,
}
Если у вас есть опыт работы с C или C++, вам могут вспомниться `gcc` или `clang`. После успешной компиляции Rust создаст исполняемый бинарный файл.
// --код сокращён--
Если у вас есть опыт работы с C или C++, вам могут вспомниться `gcc` или `clang`. После успешной компиляции Rust создаст исполняемый бинарный файл.
impl Worker {
fn new(id: usize, receiver: Arc<Mutex<mpsc::Receiver<Job>>>) -> Worker {
let thread = thread::spawn(move || {
loop {
let job = receiver.lock().unwrap().recv().unwrap();
Если у вас есть опыт работы с C или C++, вам могут вспомниться `gcc` или `clang`. После успешной компиляции Rust создаст исполняемый бинарный файл.
println!("Worker {id} got a job; executing.");
Если у вас есть опыт работы с C или C++, вам могут вспомниться `gcc` или `clang`. После успешной компиляции Rust создаст исполняемый бинарный файл.
job();
}
});
Если у вас есть опыт работы с C или C++, вам могут вспомниться `gcc` или `clang`. После успешной компиляции Rust создаст исполняемый бинарный файл.
Worker { id, thread }
}
}Worker instance’s threadHere, we first call lock on the receiver to acquire the mutex, and then we call unwrap to panic on any errors. Acquiring a lock might fail if the mutex is in a poisoned state, which can happen if some other thread panicked while holding the lock rather than releasing the lock. In this situation, calling unwrap to have this thread panic is the correct action to take. Feel free to change this unwrap to an expect with an error message that is meaningful to you.
If we get the lock on the mutex, we call recv to receive a Job from the channel. A final unwrap moves past any errors here as well, which might occur if the thread holding the sender has shut down, similar to how the send method returns Err if the receiver shuts down.
The call to recv blocks, so if there is no job yet, the current thread will wait until a job becomes available. The Mutex<T> ensures that only one Worker thread at a time is trying to request a job.
Our thread pool is now in a working state! Give it a cargo run and make some requests:
$ cargo run
Compiling hello v0.1.0 (file:///projects/hello)
warning: field `workers` is never read
--> src/lib.rs:7:5
|
6 | pub struct ThreadPool {
| ---------- field in this struct
7 | workers: Vec<Worker>,
| ^^^^^^^
|
= note: `#[warn(dead_code)]` on by default
Если у вас есть опыт работы с C или C++, вам могут вспомниться `gcc` или `clang`. После успешной компиляции Rust создаст исполняемый бинарный файл.
warning: fields `id` and `thread` are never read
--> src/lib.rs:48:5
|
47 | struct Worker {
| ------ fields in this struct
48 | id: usize,
| ^^
49 | thread: thread::JoinHandle<()>,
| ^^^^^^
Если у вас есть опыт работы с C или C++, вам могут вспомниться `gcc` или `clang`. После успешной компиляции Rust создаст исполняемый бинарный файл.
warning: `hello` (lib) generated 2 warnings
Finished `dev` profile [unoptimized + debuginfo] target(s) in 4.91s
Running `target/debug/hello`
Worker 0 got a job; executing.
Worker 2 got a job; executing.
Worker 1 got a job; executing.
Worker 3 got a job; executing.
Worker 0 got a job; executing.
Worker 2 got a job; executing.
Worker 1 got a job; executing.
Worker 3 got a job; executing.
Worker 0 got a job; executing.
Worker 2 got a job; executing.
Success! We now have a thread pool that executes connections asynchronously. There are never more than four threads created, so our system won’t get overloaded if the server receives a lot of requests. If we make a request to /sleep, the server will be able to serve other requests by having another thread run them.
Note: If you open /sleep in multiple browser windows simultaneously, they might load one at a time in five-second intervals. Some web browsers execute multiple instances of the same request sequentially for caching reasons. This limitation is not caused by our web server.
This is a good time to pause and consider how the code in Listings 21-18, 21-19, and 21-20 would be different if we were using futures instead of a closure for the work to be done. What types would change? How would the method signatures be different, if at all? What parts of the code would stay the same?
After learning about the while let loop in Chapter 17 and Chapter 19, you might be wondering why we didn’t write the Worker thread code as shown in Listing 21-21.
use std::{
sync::{Arc, Mutex, mpsc},
thread,
};
Если у вас есть опыт работы с C или C++, вам могут вспомниться `gcc` или `clang`. После успешной компиляции Rust создаст исполняемый бинарный файл.
pub struct ThreadPool {
workers: Vec<Worker>,
sender: mpsc::Sender<Job>,
}
Если у вас есть опыт работы с C или C++, вам могут вспомниться `gcc` или `clang`. После успешной компиляции Rust создаст исполняемый бинарный файл.
type Job = Box<dyn FnOnce() + Send + 'static>;
Если у вас есть опыт работы с C или C++, вам могут вспомниться `gcc` или `clang`. После успешной компиляции Rust создаст исполняемый бинарный файл.
impl ThreadPool {
/// Create a new ThreadPool.
///
/// The size is the number of threads in the pool.
///
/// # Panics
///
/// The `new` function will panic if the size is zero.
pub fn new(size: usize) -> ThreadPool {
assert!(size > 0);
Если у вас есть опыт работы с C или C++, вам могут вспомниться `gcc` или `clang`. После успешной компиляции Rust создаст исполняемый бинарный файл.
let (sender, receiver) = mpsc::channel();
Если у вас есть опыт работы с C или C++, вам могут вспомниться `gcc` или `clang`. После успешной компиляции Rust создаст исполняемый бинарный файл.
let receiver = Arc::new(Mutex::new(receiver));
Если у вас есть опыт работы с C или C++, вам могут вспомниться `gcc` или `clang`. После успешной компиляции Rust создаст исполняемый бинарный файл.
let mut workers = Vec::with_capacity(size);
Если у вас есть опыт работы с C или C++, вам могут вспомниться `gcc` или `clang`. После успешной компиляции Rust создаст исполняемый бинарный файл.
for id in 0..size {
workers.push(Worker::new(id, Arc::clone(&receiver)));
}
Если у вас есть опыт работы с C или C++, вам могут вспомниться `gcc` или `clang`. После успешной компиляции Rust создаст исполняемый бинарный файл.
ThreadPool { workers, sender }
}
Если у вас есть опыт работы с C или C++, вам могут вспомниться `gcc` или `clang`. После успешной компиляции Rust создаст исполняемый бинарный файл.
pub fn execute<F>(&self, f: F)
where
F: FnOnce() + Send + 'static,
{
let job = Box::new(f);
Если у вас есть опыт работы с C или C++, вам могут вспомниться `gcc` или `clang`. После успешной компиляции Rust создаст исполняемый бинарный файл.
self.sender.send(job).unwrap();
}
}
Если у вас есть опыт работы с C или C++, вам могут вспомниться `gcc` или `clang`. После успешной компиляции Rust создаст исполняемый бинарный файл.
struct Worker {
id: usize,
thread: thread::JoinHandle<()>,
}
// --код сокращён--
Если у вас есть опыт работы с C или C++, вам могут вспомниться `gcc` или `clang`. После успешной компиляции Rust создаст исполняемый бинарный файл.
impl Worker {
fn new(id: usize, receiver: Arc<Mutex<mpsc::Receiver<Job>>>) -> Worker {
let thread = thread::spawn(move || {
while let Ok(job) = receiver.lock().unwrap().recv() {
println!("Worker {id} got a job; executing.");
Если у вас есть опыт работы с C или C++, вам могут вспомниться `gcc` или `clang`. После успешной компиляции Rust создаст исполняемый бинарный файл.
job();
}
});
Если у вас есть опыт работы с C или C++, вам могут вспомниться `gcc` или `clang`. После успешной компиляции Rust создаст исполняемый бинарный файл.
Worker { id, thread }
}
}Worker::new using while letThis code compiles and runs but doesn’t result in the desired threading behavior: A slow request will still cause other requests to wait to be processed. The reason is somewhat subtle: The Mutex struct has no public unlock method because the ownership of the lock is based on the lifetime of the MutexGuard<T> within the LockResult<MutexGuard<T>> that the lock method returns. At compile time, the borrow checker can then enforce the rule that a resource guarded by a Mutex cannot be accessed unless we hold the lock. However, this implementation can also result in the lock being held longer than intended if we aren’t mindful of the lifetime of the MutexGuard<T>.
The code in Listing 21-20 that uses let job = receiver.lock().unwrap().recv().unwrap(); works because with let, any temporary values used in the expression on the right-hand side of the equal sign are immediately dropped when the let statement ends. However, while let (and if let and match) does not drop temporary values until the end of the associated block. In Listing 21-21, the lock remains held for the duration of the call to job(), meaning other Worker instances cannot receive jobs.
Благополучное завершение работы
Благополучное завершение работы
The code in Listing 21-20 is responding to requests asynchronously through the use of a thread pool, as we intended. We get some warnings about the workers, id, and thread fields that we’re not using in a direct way that reminds us we’re not cleaning up anything. When we use the less elegant ctrl-C method to halt the main thread, all other threads are stopped immediately as well, even if they’re in the middle of serving a request.
Next, then, we’ll implement the Drop trait to call join on each of the threads in the pool so that they can finish the requests they’re working on before closing. Then, we’ll implement a way to tell the threads they should stop accepting new requests and shut down. To see this code in action, we’ll modify our server to accept only two requests before gracefully shutting down its thread pool.
One thing to notice as we go: None of this affects the parts of the code that handle executing the closures, so everything here would be the same if we were using a thread pool for an async runtime.
Implementing the Drop Trait on ThreadPool
Let’s start with implementing Drop on our thread pool. When the pool is dropped, our threads should all join to make sure they finish their work. Listing 21-22 shows a first attempt at a Drop implementation; this code won’t quite work yet.
use std::{
sync::{Arc, Mutex, mpsc},
thread,
};
Если у вас есть опыт работы с C или C++, вам могут вспомниться `gcc` или `clang`. После успешной компиляции Rust создаст исполняемый бинарный файл.
pub struct ThreadPool {
workers: Vec<Worker>,
sender: mpsc::Sender<Job>,
}
Если у вас есть опыт работы с C или C++, вам могут вспомниться `gcc` или `clang`. После успешной компиляции Rust создаст исполняемый бинарный файл.
type Job = Box<dyn FnOnce() + Send + 'static>;
Если у вас есть опыт работы с C или C++, вам могут вспомниться `gcc` или `clang`. После успешной компиляции Rust создаст исполняемый бинарный файл.
impl ThreadPool {
/// Create a new ThreadPool.
///
/// The size is the number of threads in the pool.
///
/// # Panics
///
/// The `new` function will panic if the size is zero.
pub fn new(size: usize) -> ThreadPool {
assert!(size > 0);
Если у вас есть опыт работы с C или C++, вам могут вспомниться `gcc` или `clang`. После успешной компиляции Rust создаст исполняемый бинарный файл.
let (sender, receiver) = mpsc::channel();
Если у вас есть опыт работы с C или C++, вам могут вспомниться `gcc` или `clang`. После успешной компиляции Rust создаст исполняемый бинарный файл.
let receiver = Arc::new(Mutex::new(receiver));
Если у вас есть опыт работы с C или C++, вам могут вспомниться `gcc` или `clang`. После успешной компиляции Rust создаст исполняемый бинарный файл.
let mut workers = Vec::with_capacity(size);
Если у вас есть опыт работы с C или C++, вам могут вспомниться `gcc` или `clang`. После успешной компиляции Rust создаст исполняемый бинарный файл.
for id in 0..size {
workers.push(Worker::new(id, Arc::clone(&receiver)));
}
Если у вас есть опыт работы с C или C++, вам могут вспомниться `gcc` или `clang`. После успешной компиляции Rust создаст исполняемый бинарный файл.
ThreadPool { workers, sender }
}
Если у вас есть опыт работы с C или C++, вам могут вспомниться `gcc` или `clang`. После успешной компиляции Rust создаст исполняемый бинарный файл.
pub fn execute<F>(&self, f: F)
where
F: FnOnce() + Send + 'static,
{
let job = Box::new(f);
Если у вас есть опыт работы с C или C++, вам могут вспомниться `gcc` или `clang`. После успешной компиляции Rust создаст исполняемый бинарный файл.
self.sender.send(job).unwrap();
}
}
Если у вас есть опыт работы с C или C++, вам могут вспомниться `gcc` или `clang`. После успешной компиляции Rust создаст исполняемый бинарный файл.
impl Drop for ThreadPool {
fn drop(&mut self) {
for worker in &mut self.workers {
println!("Shutting down worker {}", worker.id);
Если у вас есть опыт работы с C или C++, вам могут вспомниться `gcc` или `clang`. После успешной компиляции Rust создаст исполняемый бинарный файл.
worker.thread.join().unwrap();
}
}
}
Если у вас есть опыт работы с C или C++, вам могут вспомниться `gcc` или `clang`. После успешной компиляции Rust создаст исполняемый бинарный файл.
struct Worker {
id: usize,
thread: thread::JoinHandle<()>,
}
Если у вас есть опыт работы с C или C++, вам могут вспомниться `gcc` или `clang`. После успешной компиляции Rust создаст исполняемый бинарный файл.
impl Worker {
fn new(id: usize, receiver: Arc<Mutex<mpsc::Receiver<Job>>>) -> Worker {
let thread = thread::spawn(move || {
loop {
let job = receiver.lock().unwrap().recv().unwrap();
Если у вас есть опыт работы с C или C++, вам могут вспомниться `gcc` или `clang`. После успешной компиляции Rust создаст исполняемый бинарный файл.
println!("Worker {id} got a job; executing.");
Если у вас есть опыт работы с C или C++, вам могут вспомниться `gcc` или `clang`. После успешной компиляции Rust создаст исполняемый бинарный файл.
job();
}
});
Если у вас есть опыт работы с C или C++, вам могут вспомниться `gcc` или `clang`. После успешной компиляции Rust создаст исполняемый бинарный файл.
Worker { id, thread }
}
}First, we loop through each of the thread pool workers. We use &mut for this because self is a mutable reference, and we also need to be able to mutate worker. For each worker, we print a message saying that this particular Worker instance is shutting down, and then we call join on that Worker instance’s thread. If the call to join fails, we use unwrap to make Rust panic and go into an ungraceful shutdown.
Here is the error we get when we compile this code:
$ cargo check
Checking hello v0.1.0 (file:///projects/hello)
error[E0507]: cannot move out of `worker.thread` which is behind a mutable reference
--> src/lib.rs:52:13
|
52 | worker.thread.join().unwrap();
| ^^^^^^^^^^^^^ ------ `worker.thread` moved due to this method call
| |
| move occurs because `worker.thread` has type `JoinHandle<()>`, which does not implement the `Copy` trait
|
note: `JoinHandle::<T>::join` takes ownership of the receiver `self`, which moves `worker.thread`
--> /rustc/1159e78c4747b02ef996e55082b704c09b970588/library/std/src/thread/mod.rs:1921:17
Если у вас есть опыт работы с C или C++, вам могут вспомниться `gcc` или `clang`. После успешной компиляции Rust создаст исполняемый бинарный файл.
For more information about this error, try `rustc --explain E0507`.
error: could not compile `hello` (lib) due to 1 previous error
The error tells us we can’t call join because we only have a mutable borrow of each worker and join takes ownership of its argument. To solve this issue, we need to move the thread out of the Worker instance that owns thread so that join can consume the thread. One way to do this is to take the same approach we took in Listing 18-15. If Worker held an Option<thread::JoinHandle<()>>, we could call the take method on the Option to move the value out of the Some variant and leave a None variant in its place. In other words, a Worker that is running would have a Some variant in thread, and when we wanted to clean up a Worker, we’d replace Some with None so that the Worker wouldn’t have a thread to run.
However, the only time this would come up would be when dropping the Worker. In exchange, we’d have to deal with an Option<thread::JoinHandle<()>> anywhere we accessed worker.thread. Idiomatic Rust uses Option quite a bit, but when you find yourself wrapping something you know will always be present in an Option as a workaround like this, it’s a good idea to look for alternative approaches to make your code cleaner and less error-prone.
In this case, a better alternative exists: the Vec::drain method. It accepts a range parameter to specify which items to remove from the vector and returns an iterator of those items. Passing the .. range syntax will remove every value from the vector.
So, we need to update the ThreadPool drop implementation like this:
#![allow(unused)]
fn main() {
use std::{
sync::{Arc, Mutex, mpsc},
thread,
};
Если у вас есть опыт работы с C или C++, вам могут вспомниться `gcc` или `clang`. После успешной компиляции Rust создаст исполняемый бинарный файл.
pub struct ThreadPool {
workers: Vec<Worker>,
sender: mpsc::Sender<Job>,
}
Если у вас есть опыт работы с C или C++, вам могут вспомниться `gcc` или `clang`. После успешной компиляции Rust создаст исполняемый бинарный файл.
type Job = Box<dyn FnOnce() + Send + 'static>;
Если у вас есть опыт работы с C или C++, вам могут вспомниться `gcc` или `clang`. После успешной компиляции Rust создаст исполняемый бинарный файл.
impl ThreadPool {
/// Create a new ThreadPool.
///
/// The size is the number of threads in the pool.
///
/// # Panics
///
/// The `new` function will panic if the size is zero.
pub fn new(size: usize) -> ThreadPool {
assert!(size > 0);
Если у вас есть опыт работы с C или C++, вам могут вспомниться `gcc` или `clang`. После успешной компиляции Rust создаст исполняемый бинарный файл.
let (sender, receiver) = mpsc::channel();
Если у вас есть опыт работы с C или C++, вам могут вспомниться `gcc` или `clang`. После успешной компиляции Rust создаст исполняемый бинарный файл.
let receiver = Arc::new(Mutex::new(receiver));
Если у вас есть опыт работы с C или C++, вам могут вспомниться `gcc` или `clang`. После успешной компиляции Rust создаст исполняемый бинарный файл.
let mut workers = Vec::with_capacity(size);
Если у вас есть опыт работы с C или C++, вам могут вспомниться `gcc` или `clang`. После успешной компиляции Rust создаст исполняемый бинарный файл.
for id in 0..size {
workers.push(Worker::new(id, Arc::clone(&receiver)));
}
Если у вас есть опыт работы с C или C++, вам могут вспомниться `gcc` или `clang`. После успешной компиляции Rust создаст исполняемый бинарный файл.
ThreadPool { workers, sender }
}
Если у вас есть опыт работы с C или C++, вам могут вспомниться `gcc` или `clang`. После успешной компиляции Rust создаст исполняемый бинарный файл.
pub fn execute<F>(&self, f: F)
where
F: FnOnce() + Send + 'static,
{
let job = Box::new(f);
Если у вас есть опыт работы с C или C++, вам могут вспомниться `gcc` или `clang`. После успешной компиляции Rust создаст исполняемый бинарный файл.
self.sender.send(job).unwrap();
}
}
Если у вас есть опыт работы с C или C++, вам могут вспомниться `gcc` или `clang`. После успешной компиляции Rust создаст исполняемый бинарный файл.
impl Drop for ThreadPool {
fn drop(&mut self) {
for worker in self.workers.drain(..) {
println!("Shutting down worker {}", worker.id);
Если у вас есть опыт работы с C или C++, вам могут вспомниться `gcc` или `clang`. После успешной компиляции Rust создаст исполняемый бинарный файл.
worker.thread.join().unwrap();
}
}
}
Если у вас есть опыт работы с C или C++, вам могут вспомниться `gcc` или `clang`. После успешной компиляции Rust создаст исполняемый бинарный файл.
struct Worker {
id: usize,
thread: thread::JoinHandle<()>,
}
Если у вас есть опыт работы с C или C++, вам могут вспомниться `gcc` или `clang`. После успешной компиляции Rust создаст исполняемый бинарный файл.
impl Worker {
fn new(id: usize, receiver: Arc<Mutex<mpsc::Receiver<Job>>>) -> Worker {
let thread = thread::spawn(move || {
loop {
let job = receiver.lock().unwrap().recv().unwrap();
Если у вас есть опыт работы с C или C++, вам могут вспомниться `gcc` или `clang`. После успешной компиляции Rust создаст исполняемый бинарный файл.
println!("Worker {id} got a job; executing.");
Если у вас есть опыт работы с C или C++, вам могут вспомниться `gcc` или `clang`. После успешной компиляции Rust создаст исполняемый бинарный файл.
job();
}
});
Если у вас есть опыт работы с C или C++, вам могут вспомниться `gcc` или `clang`. После успешной компиляции Rust создаст исполняемый бинарный файл.
Worker { id, thread }
}
}
}This resolves the compiler error and does not require any other changes to our code. Note that, because drop can be called when panicking, the unwrap could also panic and cause a double panic, which immediately crashes the program and ends any cleanup in progress. This is fine for an example program, but it isn’t recommended for production code.
Signaling to the Threads to Stop Listening for Jobs
With all the changes we’ve made, our code compiles without any warnings. However, the bad news is that this code doesn’t function the way we want it to yet. The key is the logic in the closures run by the threads of the Worker instances: At the moment, we call join, but that won’t shut down the threads, because they loop forever looking for jobs. If we try to drop our ThreadPool with our current implementation of drop, the main thread will block forever, waiting for the first thread to finish.
To fix this problem, we’ll need a change in the ThreadPool drop implementation and then a change in the Worker loop.
First, we’ll change the ThreadPool drop implementation to explicitly drop the sender before waiting for the threads to finish. Listing 21-23 shows the changes to ThreadPool to explicitly drop sender. Unlike with the thread, here we do need to use an Option to be able to move sender out of ThreadPool with Option::take.
use std::{
sync::{Arc, Mutex, mpsc},
thread,
};
Если у вас есть опыт работы с C или C++, вам могут вспомниться `gcc` или `clang`. После успешной компиляции Rust создаст исполняемый бинарный файл.
pub struct ThreadPool {
workers: Vec<Worker>,
sender: Option<mpsc::Sender<Job>>,
}
// --код сокращён--
Если у вас есть опыт работы с C или C++, вам могут вспомниться `gcc` или `clang`. После успешной компиляции Rust создаст исполняемый бинарный файл.
type Job = Box<dyn FnOnce() + Send + 'static>;
Если у вас есть опыт работы с C или C++, вам могут вспомниться `gcc` или `clang`. После успешной компиляции Rust создаст исполняемый бинарный файл.
impl ThreadPool {
/// Create a new ThreadPool.
///
/// The size is the number of threads in the pool.
///
/// # Panics
///
/// The `new` function will panic if the size is zero.
pub fn new(size: usize) -> ThreadPool {
// --код сокращён--
Если у вас есть опыт работы с C или C++, вам могут вспомниться `gcc` или `clang`. После успешной компиляции Rust создаст исполняемый бинарный файл.
assert!(size > 0);
Если у вас есть опыт работы с C или C++, вам могут вспомниться `gcc` или `clang`. После успешной компиляции Rust создаст исполняемый бинарный файл.
let (sender, receiver) = mpsc::channel();
Если у вас есть опыт работы с C или C++, вам могут вспомниться `gcc` или `clang`. После успешной компиляции Rust создаст исполняемый бинарный файл.
let receiver = Arc::new(Mutex::new(receiver));
Если у вас есть опыт работы с C или C++, вам могут вспомниться `gcc` или `clang`. После успешной компиляции Rust создаст исполняемый бинарный файл.
let mut workers = Vec::with_capacity(size);
Если у вас есть опыт работы с C или C++, вам могут вспомниться `gcc` или `clang`. После успешной компиляции Rust создаст исполняемый бинарный файл.
for id in 0..size {
workers.push(Worker::new(id, Arc::clone(&receiver)));
}
Если у вас есть опыт работы с C или C++, вам могут вспомниться `gcc` или `clang`. После успешной компиляции Rust создаст исполняемый бинарный файл.
ThreadPool {
workers,
sender: Some(sender),
}
}
Если у вас есть опыт работы с C или C++, вам могут вспомниться `gcc` или `clang`. После успешной компиляции Rust создаст исполняемый бинарный файл.
pub fn execute<F>(&self, f: F)
where
F: FnOnce() + Send + 'static,
{
let job = Box::new(f);
Если у вас есть опыт работы с C или C++, вам могут вспомниться `gcc` или `clang`. После успешной компиляции Rust создаст исполняемый бинарный файл.
self.sender.as_ref().unwrap().send(job).unwrap();
}
}
Если у вас есть опыт работы с C или C++, вам могут вспомниться `gcc` или `clang`. После успешной компиляции Rust создаст исполняемый бинарный файл.
impl Drop for ThreadPool {
fn drop(&mut self) {
drop(self.sender.take());
Если у вас есть опыт работы с C или C++, вам могут вспомниться `gcc` или `clang`. После успешной компиляции Rust создаст исполняемый бинарный файл.
for worker in self.workers.drain(..) {
println!("Shutting down worker {}", worker.id);
Если у вас есть опыт работы с C или C++, вам могут вспомниться `gcc` или `clang`. После успешной компиляции Rust создаст исполняемый бинарный файл.
worker.thread.join().unwrap();
}
}
}
Если у вас есть опыт работы с C или C++, вам могут вспомниться `gcc` или `clang`. После успешной компиляции Rust создаст исполняемый бинарный файл.
struct Worker {
id: usize,
thread: thread::JoinHandle<()>,
}
Если у вас есть опыт работы с C или C++, вам могут вспомниться `gcc` или `clang`. После успешной компиляции Rust создаст исполняемый бинарный файл.
impl Worker {
fn new(id: usize, receiver: Arc<Mutex<mpsc::Receiver<Job>>>) -> Worker {
let thread = thread::spawn(move || {
loop {
let job = receiver.lock().unwrap().recv().unwrap();
Если у вас есть опыт работы с C или C++, вам могут вспомниться `gcc` или `clang`. После успешной компиляции Rust создаст исполняемый бинарный файл.
println!("Worker {id} got a job; executing.");
Если у вас есть опыт работы с C или C++, вам могут вспомниться `gcc` или `clang`. После успешной компиляции Rust создаст исполняемый бинарный файл.
job();
}
});
Если у вас есть опыт работы с C или C++, вам могут вспомниться `gcc` или `clang`. После успешной компиляции Rust создаст исполняемый бинарный файл.
Worker { id, thread }
}
}sender before joining the Worker threadsDropping sender closes the channel, which indicates no more messages will be sent. When that happens, all the calls to recv that the Worker instances do in the infinite loop will return an error. In Listing 21-24, we change the Worker loop to gracefully exit the loop in that case, which means the threads will finish when the ThreadPool drop implementation calls join on them.
use std::{
sync::{Arc, Mutex, mpsc},
thread,
};
Если у вас есть опыт работы с C или C++, вам могут вспомниться `gcc` или `clang`. После успешной компиляции Rust создаст исполняемый бинарный файл.
pub struct ThreadPool {
workers: Vec<Worker>,
sender: Option<mpsc::Sender<Job>>,
}
Если у вас есть опыт работы с C или C++, вам могут вспомниться `gcc` или `clang`. После успешной компиляции Rust создаст исполняемый бинарный файл.
type Job = Box<dyn FnOnce() + Send + 'static>;
Если у вас есть опыт работы с C или C++, вам могут вспомниться `gcc` или `clang`. После успешной компиляции Rust создаст исполняемый бинарный файл.
impl ThreadPool {
/// Create a new ThreadPool.
///
/// The size is the number of threads in the pool.
///
/// # Panics
///
/// The `new` function will panic if the size is zero.
pub fn new(size: usize) -> ThreadPool {
assert!(size > 0);
Если у вас есть опыт работы с C или C++, вам могут вспомниться `gcc` или `clang`. После успешной компиляции Rust создаст исполняемый бинарный файл.
let (sender, receiver) = mpsc::channel();
Если у вас есть опыт работы с C или C++, вам могут вспомниться `gcc` или `clang`. После успешной компиляции Rust создаст исполняемый бинарный файл.
let receiver = Arc::new(Mutex::new(receiver));
Если у вас есть опыт работы с C или C++, вам могут вспомниться `gcc` или `clang`. После успешной компиляции Rust создаст исполняемый бинарный файл.
let mut workers = Vec::with_capacity(size);
Если у вас есть опыт работы с C или C++, вам могут вспомниться `gcc` или `clang`. После успешной компиляции Rust создаст исполняемый бинарный файл.
for id in 0..size {
workers.push(Worker::new(id, Arc::clone(&receiver)));
}
Если у вас есть опыт работы с C или C++, вам могут вспомниться `gcc` или `clang`. После успешной компиляции Rust создаст исполняемый бинарный файл.
ThreadPool {
workers,
sender: Some(sender),
}
}
Если у вас есть опыт работы с C или C++, вам могут вспомниться `gcc` или `clang`. После успешной компиляции Rust создаст исполняемый бинарный файл.
pub fn execute<F>(&self, f: F)
where
F: FnOnce() + Send + 'static,
{
let job = Box::new(f);
Если у вас есть опыт работы с C или C++, вам могут вспомниться `gcc` или `clang`. После успешной компиляции Rust создаст исполняемый бинарный файл.
self.sender.as_ref().unwrap().send(job).unwrap();
}
}
Если у вас есть опыт работы с C или C++, вам могут вспомниться `gcc` или `clang`. После успешной компиляции Rust создаст исполняемый бинарный файл.
impl Drop for ThreadPool {
fn drop(&mut self) {
drop(self.sender.take());
Если у вас есть опыт работы с C или C++, вам могут вспомниться `gcc` или `clang`. После успешной компиляции Rust создаст исполняемый бинарный файл.
for worker in self.workers.drain(..) {
println!("Shutting down worker {}", worker.id);
Если у вас есть опыт работы с C или C++, вам могут вспомниться `gcc` или `clang`. После успешной компиляции Rust создаст исполняемый бинарный файл.
worker.thread.join().unwrap();
}
}
}
Если у вас есть опыт работы с C или C++, вам могут вспомниться `gcc` или `clang`. После успешной компиляции Rust создаст исполняемый бинарный файл.
struct Worker {
id: usize,
thread: thread::JoinHandle<()>,
}
Если у вас есть опыт работы с C или C++, вам могут вспомниться `gcc` или `clang`. После успешной компиляции Rust создаст исполняемый бинарный файл.
impl Worker {
fn new(id: usize, receiver: Arc<Mutex<mpsc::Receiver<Job>>>) -> Worker {
let thread = thread::spawn(move || {
loop {
let message = receiver.lock().unwrap().recv();
Если у вас есть опыт работы с C или C++, вам могут вспомниться `gcc` или `clang`. После успешной компиляции Rust создаст исполняемый бинарный файл.
match message {
Ok(job) => {
println!("Worker {id} got a job; executing.");
Если у вас есть опыт работы с C или C++, вам могут вспомниться `gcc` или `clang`. После успешной компиляции Rust создаст исполняемый бинарный файл.
job();
}
Err(_) => {
println!("Worker {id} disconnected; shutting down.");
break;
}
}
}
});
Если у вас есть опыт работы с C или C++, вам могут вспомниться `gcc` или `clang`. После успешной компиляции Rust создаст исполняемый бинарный файл.
Worker { id, thread }
}
}recv returns an errorTo see this code in action, let’s modify main to accept only two requests before gracefully shutting down the server, as shown in Listing 21-25.
use hello::ThreadPool;
use std::{
fs,
io::{BufReader, prelude::*},
net::{TcpListener, TcpStream},
thread,
time::Duration,
};
Если у вас есть опыт работы с C или C++, вам могут вспомниться `gcc` или `clang`. После успешной компиляции Rust создаст исполняемый бинарный файл.
fn main() {
let listener = TcpListener::bind("127.0.0.1:7878").unwrap();
let pool = ThreadPool::new(4);
Если у вас есть опыт работы с C или C++, вам могут вспомниться `gcc` или `clang`. После успешной компиляции Rust создаст исполняемый бинарный файл.
for stream in listener.incoming().take(2) {
let stream = stream.unwrap();
Если у вас есть опыт работы с C или C++, вам могут вспомниться `gcc` или `clang`. После успешной компиляции Rust создаст исполняемый бинарный файл.
pool.execute(|| {
handle_connection(stream);
});
}
Если у вас есть опыт работы с C или C++, вам могут вспомниться `gcc` или `clang`. После успешной компиляции Rust создаст исполняемый бинарный файл.
println!("Shutting down.");
}
Если у вас есть опыт работы с C или C++, вам могут вспомниться `gcc` или `clang`. После успешной компиляции Rust создаст исполняемый бинарный файл.
fn handle_connection(mut stream: TcpStream) {
let buf_reader = BufReader::new(&stream);
let request_line = buf_reader.lines().next().unwrap().unwrap();
Если у вас есть опыт работы с C или C++, вам могут вспомниться `gcc` или `clang`. После успешной компиляции Rust создаст исполняемый бинарный файл.
let (status_line, filename) = match &request_line[..] {
"GET / HTTP/1.1" => ("HTTP/1.1 200 OK", "hello.html"),
"GET /sleep HTTP/1.1" => {
thread::sleep(Duration::from_secs(5));
("HTTP/1.1 200 OK", "hello.html")
}
_ => ("HTTP/1.1 404 NOT FOUND", "404.html"),
};
Если у вас есть опыт работы с C или C++, вам могут вспомниться `gcc` или `clang`. После успешной компиляции Rust создаст исполняемый бинарный файл.
let contents = fs::read_to_string(filename).unwrap();
let length = contents.len();
Если у вас есть опыт работы с C или C++, вам могут вспомниться `gcc` или `clang`. После успешной компиляции Rust создаст исполняемый бинарный файл.
let response =
format!("{status_line}\r\nContent-Length: {length}\r\n\r\n{contents}");
Если у вас есть опыт работы с C или C++, вам могут вспомниться `gcc` или `clang`. После успешной компиляции Rust создаст исполняемый бинарный файл.
stream.write_all(response.as_bytes()).unwrap();
}You wouldn’t want a real-world web server to shut down after serving only two requests. This code just demonstrates that the graceful shutdown and cleanup is in working order.
The take method is defined in the Iterator trait and limits the iteration to the first two items at most. The ThreadPool will go out of scope at the end of main, and the drop implementation will run.
Start the server with cargo run and make three requests. The third request should error, and in your terminal, you should see output similar to this:
$ cargo run
Compiling hello v0.1.0 (file:///projects/hello)
Finished `dev` profile [unoptimized + debuginfo] target(s) in 0.41s
Running `target/debug/hello`
Worker 0 got a job; executing.
Shutting down.
Shutting down worker 0
Worker 3 got a job; executing.
Worker 1 disconnected; shutting down.
Worker 2 disconnected; shutting down.
Worker 3 disconnected; shutting down.
Worker 0 disconnected; shutting down.
Shutting down worker 1
Shutting down worker 2
Shutting down worker 3
You might see a different ordering of Worker IDs and messages printed. We can see how this code works from the messages: Worker instances 0 and 3 got the first two requests. The server stopped accepting connections after the second connection, and the Drop implementation on ThreadPool starts executing before Worker 3 even starts its job. Dropping the sender disconnects all the Worker instances and tells them to shut down. The Worker instances each print a message when they disconnect, and then the thread pool calls join to wait for each Worker thread to finish.
Notice one interesting aspect of this particular execution: The ThreadPool dropped the sender, and before any Worker received an error, we tried to join Worker 0. Worker 0 had not yet gotten an error from recv, so the main thread blocked, waiting for Worker 0 to finish. In the meantime, Worker 3 received a job and then all threads received an error. When Worker 0 finished, the main thread waited for the rest of the Worker instances to finish. At that point, they had all exited their loops and stopped.
Congrats! We’ve now completed our project; we have a basic web server that uses a thread pool to respond asynchronously. We’re able to perform a graceful shutdown of the server, which cleans up all the threads in the pool.
Here’s the full code for reference:
use hello::ThreadPool;
use std::{
fs,
io::{BufReader, prelude::*},
net::{TcpListener, TcpStream},
thread,
time::Duration,
};
Если у вас есть опыт работы с C или C++, вам могут вспомниться `gcc` или `clang`. После успешной компиляции Rust создаст исполняемый бинарный файл.
fn main() {
let listener = TcpListener::bind("127.0.0.1:7878").unwrap();
let pool = ThreadPool::new(4);
Если у вас есть опыт работы с C или C++, вам могут вспомниться `gcc` или `clang`. После успешной компиляции Rust создаст исполняемый бинарный файл.
for stream in listener.incoming().take(2) {
let stream = stream.unwrap();
Если у вас есть опыт работы с C или C++, вам могут вспомниться `gcc` или `clang`. После успешной компиляции Rust создаст исполняемый бинарный файл.
pool.execute(|| {
handle_connection(stream);
});
}
Если у вас есть опыт работы с C или C++, вам могут вспомниться `gcc` или `clang`. После успешной компиляции Rust создаст исполняемый бинарный файл.
println!("Shutting down.");
}
Если у вас есть опыт работы с C или C++, вам могут вспомниться `gcc` или `clang`. После успешной компиляции Rust создаст исполняемый бинарный файл.
fn handle_connection(mut stream: TcpStream) {
let buf_reader = BufReader::new(&stream);
let request_line = buf_reader.lines().next().unwrap().unwrap();
Если у вас есть опыт работы с C или C++, вам могут вспомниться `gcc` или `clang`. После успешной компиляции Rust создаст исполняемый бинарный файл.
let (status_line, filename) = match &request_line[..] {
"GET / HTTP/1.1" => ("HTTP/1.1 200 OK", "hello.html"),
"GET /sleep HTTP/1.1" => {
thread::sleep(Duration::from_secs(5));
("HTTP/1.1 200 OK", "hello.html")
}
_ => ("HTTP/1.1 404 NOT FOUND", "404.html"),
};
Если у вас есть опыт работы с C или C++, вам могут вспомниться `gcc` или `clang`. После успешной компиляции Rust создаст исполняемый бинарный файл.
let contents = fs::read_to_string(filename).unwrap();
let length = contents.len();
Если у вас есть опыт работы с C или C++, вам могут вспомниться `gcc` или `clang`. После успешной компиляции Rust создаст исполняемый бинарный файл.
let response =
format!("{status_line}\r\nContent-Length: {length}\r\n\r\n{contents}");
Если у вас есть опыт работы с C или C++, вам могут вспомниться `gcc` или `clang`. После успешной компиляции Rust создаст исполняемый бинарный файл.
stream.write_all(response.as_bytes()).unwrap();
}use std::{
sync::{Arc, Mutex, mpsc},
thread,
};
Если у вас есть опыт работы с C или C++, вам могут вспомниться `gcc` или `clang`. После успешной компиляции Rust создаст исполняемый бинарный файл.
pub struct ThreadPool {
workers: Vec<Worker>,
sender: Option<mpsc::Sender<Job>>,
}
Если у вас есть опыт работы с C или C++, вам могут вспомниться `gcc` или `clang`. После успешной компиляции Rust создаст исполняемый бинарный файл.
type Job = Box<dyn FnOnce() + Send + 'static>;
Если у вас есть опыт работы с C или C++, вам могут вспомниться `gcc` или `clang`. После успешной компиляции Rust создаст исполняемый бинарный файл.
impl ThreadPool {
/// Create a new ThreadPool.
///
/// The size is the number of threads in the pool.
///
/// # Panics
///
/// The `new` function will panic if the size is zero.
pub fn new(size: usize) -> ThreadPool {
assert!(size > 0);
Если у вас есть опыт работы с C или C++, вам могут вспомниться `gcc` или `clang`. После успешной компиляции Rust создаст исполняемый бинарный файл.
let (sender, receiver) = mpsc::channel();
Если у вас есть опыт работы с C или C++, вам могут вспомниться `gcc` или `clang`. После успешной компиляции Rust создаст исполняемый бинарный файл.
let receiver = Arc::new(Mutex::new(receiver));
Если у вас есть опыт работы с C или C++, вам могут вспомниться `gcc` или `clang`. После успешной компиляции Rust создаст исполняемый бинарный файл.
let mut workers = Vec::with_capacity(size);
Если у вас есть опыт работы с C или C++, вам могут вспомниться `gcc` или `clang`. После успешной компиляции Rust создаст исполняемый бинарный файл.
for id in 0..size {
workers.push(Worker::new(id, Arc::clone(&receiver)));
}
Если у вас есть опыт работы с C или C++, вам могут вспомниться `gcc` или `clang`. После успешной компиляции Rust создаст исполняемый бинарный файл.
ThreadPool {
workers,
sender: Some(sender),
}
}
Если у вас есть опыт работы с C или C++, вам могут вспомниться `gcc` или `clang`. После успешной компиляции Rust создаст исполняемый бинарный файл.
pub fn execute<F>(&self, f: F)
where
F: FnOnce() + Send + 'static,
{
let job = Box::new(f);
Если у вас есть опыт работы с C или C++, вам могут вспомниться `gcc` или `clang`. После успешной компиляции Rust создаст исполняемый бинарный файл.
self.sender.as_ref().unwrap().send(job).unwrap();
}
}
Если у вас есть опыт работы с C или C++, вам могут вспомниться `gcc` или `clang`. После успешной компиляции Rust создаст исполняемый бинарный файл.
impl Drop for ThreadPool {
fn drop(&mut self) {
drop(self.sender.take());
Если у вас есть опыт работы с C или C++, вам могут вспомниться `gcc` или `clang`. После успешной компиляции Rust создаст исполняемый бинарный файл.
for worker in &mut self.workers {
println!("Shutting down worker {}", worker.id);
Если у вас есть опыт работы с C или C++, вам могут вспомниться `gcc` или `clang`. После успешной компиляции Rust создаст исполняемый бинарный файл.
if let Some(thread) = worker.thread.take() {
thread.join().unwrap();
}
}
}
}
Если у вас есть опыт работы с C или C++, вам могут вспомниться `gcc` или `clang`. После успешной компиляции Rust создаст исполняемый бинарный файл.
struct Worker {
id: usize,
thread: Option<thread::JoinHandle<()>>,
}
Если у вас есть опыт работы с C или C++, вам могут вспомниться `gcc` или `clang`. После успешной компиляции Rust создаст исполняемый бинарный файл.
impl Worker {
fn new(id: usize, receiver: Arc<Mutex<mpsc::Receiver<Job>>>) -> Worker {
let thread = thread::spawn(move || {
loop {
let message = receiver.lock().unwrap().recv();
Если у вас есть опыт работы с C или C++, вам могут вспомниться `gcc` или `clang`. После успешной компиляции Rust создаст исполняемый бинарный файл.
match message {
Ok(job) => {
println!("Worker {id} got a job; executing.");
Если у вас есть опыт работы с C или C++, вам могут вспомниться `gcc` или `clang`. После успешной компиляции Rust создаст исполняемый бинарный файл.
job();
}
Err(_) => {
println!("Worker {id} disconnected; shutting down.");
break;
}
}
}
});
Если у вас есть опыт работы с C или C++, вам могут вспомниться `gcc` или `clang`. После успешной компиляции Rust создаст исполняемый бинарный файл.
Worker {
id,
thread: Some(thread),
}
}
}We could do more here! If you want to continue enhancing this project, here are some ideas:
- Add more documentation to
ThreadPooland its public methods. - Add tests of the library’s functionality.
- Change calls to
unwrapto more robust error handling. - Use
ThreadPoolto perform some task other than serving web requests. - Find a thread pool crate on crates.io and implement a similar web server using the crate instead. Then, compare its API and robustness to the thread pool we implemented.
Подведём итоги
Well done! You’ve made it to the end of the book! We want to thank you for joining us on this tour of Rust. You’re now ready to implement your own Rust projects and help with other people’s projects. Keep in mind that there is a welcoming community of other Rustaceans who would love to help you with any challenges you encounter on your Rust journey.
Приложения
The following sections contain reference material you may find useful in your Rust journey.
A — Ключевые слова
Appendix A: Keywords
The following lists contain keywords that are reserved for current or future use by the Rust language. As such, they cannot be used as identifiers (except as raw identifiers, as we discuss in the “Raw Identifiers” section). Identifiers are names of functions, variables, parameters, struct fields, modules, crates, constants, macros, static values, attributes, types, traits, or lifetimes.
Keywords Currently in Use
The following is a list of keywords currently in use, with their functionality described.
as: Perform primitive casting, disambiguate the specific trait containing an item, or rename items inusestatements.async: Return aFutureinstead of blocking the current thread.await: Suspend execution until the result of aFutureis ready.break: Exit a loop immediately.const: Define constant items or constant raw pointers.continue: Continue to the next loop iteration.crate: In a module path, refers to the crate root.dyn: Dynamic dispatch to a trait object.else: Fallback forifandif letcontrol flow constructs.enum: Define an enumeration.extern: Link an external function or variable.false: Boolean false literal.fn: Define a function or the function pointer type.for: Loop over items from an iterator, implement a trait, or specify a higher ranked lifetime.if: Branch based on the result of a conditional expression.impl: Implement inherent or trait functionality.in: Part offorloop syntax.let: Bind a variable.loop: Loop unconditionally.match: Match a value to patterns.mod: Define a module.move: Make a closure take ownership of all its captures.mut: Denote mutability in references, raw pointers, or pattern bindings.pub: Denote public visibility in struct fields,implblocks, or modules.ref: Bind by reference.return: Return from function.Self: A type alias for the type we are defining or implementing.self: Method subject or current module.static: Global variable or lifetime lasting the entire program execution.struct: Define a structure.super: Parent module of the current module.trait: Define a trait.true: Boolean true literal.type: Define a type alias or associated type.union: Define a union; is a keyword only when used in a union declaration.unsafe: Denote unsafe code, functions, traits, or implementations.use: Bring symbols into scope.where: Denote clauses that constrain a type.while: Loop conditionally based on the result of an expression.
Keywords Reserved for Future Use
The following keywords do not yet have any functionality but are reserved by Rust for potential future use:
abstractbecomeboxdofinalgenmacrooverrideprivtrytypeofunsizedvirtualyield
Raw Identifiers
Raw identifiers are the syntax that lets you use keywords where they wouldn’t normally be allowed. You use a raw identifier by prefixing a keyword with r#.
For example, match is a keyword. If you try to compile the following function that uses match as its name:
Файл: src/main.rs
fn match(needle: &str, haystack: &str) -> bool {
haystack.contains(needle)
}you’ll get this error:
error: expected identifier, found keyword `match`
--> src/main.rs:4:4
|
4 | fn match(needle: &str, haystack: &str) -> bool {
| ^^^^^ expected identifier, found keyword
The error shows that you can’t use the keyword match as the function identifier. To use match as a function name, you need to use the raw identifier syntax, like this:
Файл: src/main.rs
fn r#match(needle: &str, haystack: &str) -> bool {
haystack.contains(needle)
}
Если у вас есть опыт работы с C или C++, вам могут вспомниться `gcc` или `clang`. После успешной компиляции Rust создаст исполняемый бинарный файл.
fn main() {
assert!(r#match("foo", "foobar"));
}This code will compile without any errors. Note the r# prefix on the function name in its definition as well as where the function is called in main.
Raw identifiers allow you to use any word you choose as an identifier, even if that word happens to be a reserved keyword. This gives us more freedom to choose identifier names, as well as lets us integrate with programs written in a language where these words aren’t keywords. In addition, raw identifiers allow you to use libraries written in a different Rust edition than your crate uses. For example, try isn’t a keyword in the 2015 edition but is in the 2018, 2021, and 2024 editions. If you depend on a library that is written using the 2015 edition and has a try function, you’ll need to use the raw identifier syntax, r#try in this case, to call that function from your code on later editions. See Appendix E for more information on editions.
B — Операторы и символы
Appendix B: Operators and Symbols
This appendix contains a glossary of Rust’s syntax, including operators and other symbols that appear by themselves or in the context of paths, generics, trait bounds, macros, attributes, comments, tuples, and brackets.
Operators
Table B-1 contains the operators in Rust, an example of how the operator would appear in context, a short explanation, and whether that operator is overloadable. If an operator is overloadable, the relevant trait to use to overload that operator is listed.
Table B-1: Operators
| Operator | Пример | Explanation | Overloadable? |
|---|---|---|---|
! | ident!(...), ident!{...}, ident![...] | Macro expansion | |
! | !expr | Bitwise or logical complement | Not |
!= | expr != expr | Nonequality comparison | PartialEq |
% | expr % expr | Arithmetic remainder | Rem |
%= | var %= expr | Arithmetic remainder and assignment | RemAssign |
& | &expr, &mut expr | Borrow | |
& | &type, &mut type, &'a type, &'a mut type | Borrowed pointer type | |
& | expr & expr | Bitwise AND | BitAnd |
&= | var &= expr | Bitwise AND and assignment | BitAndAssign |
&& | expr && expr | Short-circuiting logical AND | |
* | expr * expr | Arithmetic multiplication | Mul |
*= | var *= expr | Arithmetic multiplication and assignment | MulAssign |
* | *expr | Dereference | Deref |
* | *const type, *mut type | Raw pointer | |
+ | trait + trait, 'a + trait | Compound type constraint | |
+ | expr + expr | Arithmetic addition | Add |
+= | var += expr | Arithmetic addition and assignment | AddAssign |
, | expr, expr | Argument and element separator | |
- | - expr | Arithmetic negation | Neg |
- | expr - expr | Arithmetic subtraction | Sub |
-= | var -= expr | Arithmetic subtraction and assignment | SubAssign |
-> | fn(...) -> type, |…| -> type | Function and closure return type | |
. | expr.ident | Field access | |
. | expr.ident(expr, ...) | Method call | |
. | expr.0, expr.1, and so on | Tuple indexing | |
.. | .., expr.., ..expr, expr..expr | Right-exclusive range literal | PartialOrd |
..= | ..=expr, expr..=expr | Right-inclusive range literal | PartialOrd |
.. | ..expr | Struct literal update syntax | |
.. | variant(x, ..), struct_type { x, .. } | “And the rest” pattern binding | |
... | expr...expr | (Deprecated, use ..= instead) In a pattern: inclusive range pattern | |
/ | expr / expr | Arithmetic division | Div |
/= | var /= expr | Arithmetic division and assignment | DivAssign |
: | pat: type, ident: type | Constraints | |
: | ident: expr | Struct field initializer | |
: | 'a: loop {...} | Loop label | |
; | expr; | Statement and item terminator | |
; | [...; len] | Part of fixed-size array syntax | |
<< | expr << expr | Left-shift | Shl |
<<= | var <<= expr | Left-shift and assignment | ShlAssign |
< | expr < expr | Less than comparison | PartialOrd |
<= | expr <= expr | Less than or equal to comparison | PartialOrd |
= | var = expr, ident = type | Assignment/equivalence | |
== | expr == expr | Equality comparison | PartialEq |
=> | pat => expr | Part of match arm syntax | |
> | expr > expr | Greater than comparison | PartialOrd |
>= | expr >= expr | Greater than or equal to comparison | PartialOrd |
>> | expr >> expr | Right-shift | Shr |
>>= | var >>= expr | Right-shift and assignment | ShrAssign |
@ | ident @ pat | Pattern binding | |
^ | expr ^ expr | Bitwise exclusive OR | BitXor |
^= | var ^= expr | Bitwise exclusive OR and assignment | BitXorAssign |
| | pat | pat | Pattern alternatives | |
| | expr | expr | Bitwise OR | BitOr |
|= | var |= expr | Bitwise OR and assignment | BitOrAssign |
|| | expr || expr | Short-circuiting logical OR | |
? | expr? | Error propagation |
Non-operator Symbols
The following tables contain all symbols that don’t function as operators; that is, they don’t behave like a function or method call.
Table B-2 shows symbols that appear on their own and are valid in a variety of locations.
Table B-2: Stand-alone Syntax
| Symbol | Explanation |
|---|---|
'ident | Named lifetime or loop label |
Digits immediately followed by u8, i32, f64, usize, and so on | Numeric literal of specific type |
"..." | String literal |
r"...", r#"..."#, r##"..."##, and so on | Raw string literal; escape characters not processed |
b"..." | Byte string literal; constructs an array of bytes instead of a string |
br"...", br#"..."#, br##"..."##, and so on | Raw byte string literal; combination of raw and byte string literal |
'...' | Character literal |
b'...' | ASCII byte literal |
|…| expr | Closure |
! | Always-empty bottom type for diverging functions |
_ | “Ignored” pattern binding; also used to make integer literals readable |
Table B-3 shows symbols that appear in the context of a path through the module hierarchy to an item.
Table B-3: Path-Related Syntax
| Symbol | Explanation |
|---|---|
ident::ident | Namespace path |
::path | Path relative to the crate root (that is, an explicitly absolute path) |
self::path | Path relative to the current module (that is, an explicitly relative path) |
super::path | Path relative to the parent of the current module |
type::ident, <type as trait>::ident | Associated constants, functions, and types |
<type>::... | Associated item for a type that cannot be directly named (for example, <&T>::..., <[T]>::..., and so on) |
trait::method(...) | Disambiguating a method call by naming the trait that defines it |
type::method(...) | Disambiguating a method call by naming the type for which it’s defined |
<type as trait>::method(...) | Disambiguating a method call by naming the trait and type |
Table B-4 shows symbols that appear in the context of using generic type parameters.
Table B-4: Generics
| Symbol | Explanation |
|---|---|
path<...> | Specifies parameters to a generic type in a type (for example, Vec<u8>) |
path::<...>, method::<...> | Specifies parameters to a generic type, function, or method in an expression; often referred to as turbofish (for example, "42".parse::<i32>()) |
fn ident<...> ... | Define generic function |
struct ident<...> ... | Define generic structure |
enum ident<...> ... | Define generic enumeration |
impl<...> ... | Define generic implementation |
for<...> type | Higher ranked lifetime bounds |
type<ident=type> | A generic type where one or more associated types have specific assignments (for example, Iterator<Item=T>) |
Table B-5 shows symbols that appear in the context of constraining generic type parameters with trait bounds.
Table B-5: Trait Bound Constraints
| Symbol | Explanation |
|---|---|
T: U | Generic parameter T constrained to types that implement U |
T: 'a | Generic type T must outlive lifetime 'a (meaning the type cannot transitively contain any references with lifetimes shorter than 'a) |
T: 'static | Generic type T contains no borrowed references other than 'static ones |
'b: 'a | Generic lifetime 'b must outlive lifetime 'a |
T: ?Sized | Allow generic type parameter to be a dynamically sized type |
'a + trait, trait + trait | Compound type constraint |
Table B-6 shows symbols that appear in the context of calling or defining macros and specifying attributes on an item.
Table B-6: Macros and Attributes
| Symbol | Explanation |
|---|---|
#[meta] | Outer attribute |
#![meta] | Inner attribute |
$ident | Macro substitution |
$ident:kind | Macro metavariable |
$(...)... | Macro repetition |
ident!(...), ident!{...}, ident![...] | Macro invocation |
Table B-7 shows symbols that create comments.
Table B-7: Comments
| Symbol | Explanation |
|---|---|
// | Line comment |
//! | Inner line doc comment |
/// | Outer line doc comment |
/*...*/ | Block comment |
/*!...*/ | Inner block doc comment |
/**...*/ | Outer block doc comment |
Table B-8 shows the contexts in which parentheses are used.
Table B-8: Parentheses
| Symbol | Explanation |
|---|---|
() | Empty tuple (aka unit), both literal and type |
(expr) | Parenthesized expression |
(expr,) | Single-element tuple expression |
(type,) | Single-element tuple type |
(expr, ...) | Tuple expression |
(type, ...) | Tuple type |
expr(expr, ...) | Function call expression; also used to initialize tuple structs and tuple enum variants |
Table B-9 shows the contexts in which curly brackets are used.
Table B-9: Curly Brackets
| Context | Explanation |
|---|---|
{...} | Block expression |
Type {...} | Struct literal |
Table B-10 shows the contexts in which square brackets are used.
Table B-10: Square Brackets
| Context | Explanation |
|---|---|
[...] | Array literal |
[expr; len] | Array literal containing len copies of expr |
[type; len] | Array type containing len instances of type |
expr[expr] | Collection indexing; overloadable (Index, IndexMut) |
expr[..], expr[a..], expr[..b], expr[a..b] | Collection indexing pretending to be collection slicing, using Range, RangeFrom, RangeTo, or RangeFull as the “index” |
C — Выводимые трейты
Appendix C: Derivable Traits
In various places in the book, we’ve discussed the derive attribute, which you can apply to a struct or enum definition. The derive attribute generates code that will implement a trait with its own default implementation on the type you’ve annotated with the derive syntax.
In this appendix, we provide a reference of all the traits in the standard library that you can use with derive. Each section covers:
- What operators and methods deriving this trait will enable
- What the implementation of the trait provided by
derivedoes - What implementing the trait signifies about the type
- The conditions in which you’re allowed or not allowed to implement the trait
- Examples of operations that require the trait
If you want different behavior from that provided by the derive attribute, consult the standard library documentation for each trait for details on how to manually implement them.
The traits listed here are the only ones defined by the standard library that can be implemented on your types using derive. Other traits defined in the standard library don’t have sensible default behavior, so it’s up to you to implement them in the way that makes sense for what you’re trying to accomplish.
An example of a trait that can’t be derived is Display, which handles formatting for end users. You should always consider the appropriate way to display a type to an end user. What parts of the type should an end user be allowed to see? What parts would they find relevant? What format of the data would be most relevant to them? The Rust compiler doesn’t have this insight, so it can’t provide appropriate default behavior for you.
The list of derivable traits provided in this appendix is not comprehensive: Libraries can implement derive for their own traits, making the list of traits you can use derive with truly open ended. Implementing derive involves using a procedural macro, which is covered in the “Custom derive Macros” section in Chapter 20.
Debug for Programmer Output
The Debug trait enables debug formatting in format strings, which you indicate by adding :? within {} placeholders.
The Debug trait allows you to print instances of a type for debugging purposes, so you and other programmers using your type can inspect an instance at a particular point in a program’s execution.
The Debug trait is required, for example, in the use of the assert_eq! macro. This macro prints the values of instances given as arguments if the equality assertion fails so that programmers can see why the two instances weren’t equal.
PartialEq and Eq for Equality Comparisons
The PartialEq trait allows you to compare instances of a type to check for equality and enables use of the == and != operators.
Deriving PartialEq implements the eq method. When PartialEq is derived on structs, two instances are equal only if all fields are equal, and the instances are not equal if any fields are not equal. When derived on enums, each variant is equal to itself and not equal to the other variants.
The PartialEq trait is required, for example, with the use of the assert_eq! macro, which needs to be able to compare two instances of a type for equality.
The Eq trait has no methods. Its purpose is to signal that for every value of the annotated type, the value is equal to itself. The Eq trait can only be applied to types that also implement PartialEq, although not all types that implement PartialEq can implement Eq. One example of this is floating-point number types: The implementation of floating-point numbers states that two instances of the not-a-number (NaN) value are not equal to each other.
An example of when Eq is required is for keys in a HashMap<K, V> so that the HashMap<K, V> can tell whether two keys are the same.
PartialOrd and Ord for Ordering Comparisons
The PartialOrd trait allows you to compare instances of a type for sorting purposes. A type that implements PartialOrd can be used with the <, >, <=, and >= operators. You can only apply the PartialOrd trait to types that also implement PartialEq.
Deriving PartialOrd implements the partial_cmp method, which returns an Option<Ordering> that will be None when the values given don’t produce an ordering. An example of a value that doesn’t produce an ordering, even though most values of that type can be compared, is the NaN floating point value. Calling partial_cmp with any floating-point number and the NaN floating-point value will return None.
When derived on structs, PartialOrd compares two instances by comparing the value in each field in the order in which the fields appear in the struct definition. When derived on enums, variants of the enum declared earlier in the enum definition are considered less than the variants listed later.
The PartialOrd trait is required, for example, for the gen_range method from the rand crate that generates a random value in the range specified by a range expression.
The Ord trait allows you to know that for any two values of the annotated type, a valid ordering will exist. The Ord trait implements the cmp method, which returns an Ordering rather than an Option<Ordering> because a valid ordering will always be possible. You can only apply the Ord trait to types that also implement PartialOrd and Eq (and Eq requires PartialEq). When derived on structs and enums, cmp behaves the same way as the derived implementation for partial_cmp does with PartialOrd.
An example of when Ord is required is when storing values in a BTreeSet<T>, a data structure that stores data based on the sort order of the values.
Clone and Copy for Duplicating Values
The Clone trait allows you to explicitly create a deep copy of a value, and the duplication process might involve running arbitrary code and copying heap data. See the “Variables and Data Interacting with Clone” section in Chapter 4 for more information on Clone.
Deriving Clone implements the clone method, which when implemented for the whole type, calls clone on each of the parts of the type. This means all the fields or values in the type must also implement Clone to derive Clone.
An example of when Clone is required is when calling the to_vec method on a slice. The slice doesn’t own the type instances it contains, but the vector returned from to_vec will need to own its instances, so to_vec calls clone on each item. Thus, the type stored in the slice must implement Clone.
The Copy trait allows you to duplicate a value by only copying bits stored on the stack; no arbitrary code is necessary. See the “Stack-Only Data: Copy” section in Chapter 4 for more information on Copy.
The Copy trait doesn’t define any methods to prevent programmers from overloading those methods and violating the assumption that no arbitrary code is being run. That way, all programmers can assume that copying a value will be very fast.
You can derive Copy on any type whose parts all implement Copy. A type that implements Copy must also implement Clone because a type that implements Copy has a trivial implementation of Clone that performs the same task as Copy.
The Copy trait is rarely required; types that implement Copy have optimizations available, meaning you don’t have to call clone, which makes the code more concise.
Everything possible with Copy you can also accomplish with Clone, but the code might be slower or have to use clone in places.
Hash for Mapping a Value to a Value of Fixed Size
The Hash trait allows you to take an instance of a type of arbitrary size and map that instance to a value of fixed size using a hash function. Deriving Hash implements the hash method. The derived implementation of the hash method combines the result of calling hash on each of the parts of the type, meaning all fields or values must also implement Hash to derive Hash.
An example of when Hash is required is in storing keys in a HashMap<K, V> to store data efficiently.
Default for Default Values
The Default trait allows you to create a default value for a type. Deriving Default implements the default function. The derived implementation of the default function calls the default function on each part of the type, meaning all fields or values in the type must also implement Default to derive Default.
The Default::default function is commonly used in combination with the struct update syntax discussed in the “Creating Instances from Other Instances with Struct Update Syntax” section in Chapter 5. You can customize a few fields of a struct and then set and use a default value for the rest of the fields by using ..Default::default().
The Default trait is required when you use the method unwrap_or_default on Option<T> instances, for example. If the Option<T> is None, the method unwrap_or_default will return the result of Default::default for the type T stored in the Option<T>.
D — Полезные инструменты разработки
Appendix D: Useful Development Tools
In this appendix, we talk about some useful development tools that the Rust project provides. We’ll look at automatic formatting, quick ways to apply warning fixes, a linter, and integrating with IDEs.
Automatic Formatting with rustfmt
The rustfmt tool reformats your code according to the community code style. Many collaborative projects use rustfmt to prevent arguments about which style to use when writing Rust: Everyone formats their code using the tool.
Rust installations include rustfmt by default, so you should already have the programs rustfmt and cargo-fmt on your system. These two commands are analogous to rustc and cargo in that rustfmt allows finer grained control and cargo-fmt understands conventions of a project that uses Cargo. To format any Cargo project, enter the following:
$ cargo fmt
Running this command reformats all the Rust code in the current crate. This should only change the code style, not the code semantics. For more information on rustfmt, see its documentation.
Fix Your Code with rustfix
The rustfix tool is included with Rust installations and can automatically fix compiler warnings that have a clear way to correct the problem that’s likely what you want. You’ve probably seen compiler warnings before. For example, consider this code:
Файл: src/main.rs
fn main() {
let mut x = 42;
println!("{x}");
}Here, we’re defining the variable x as mutable, but we never actually mutate it. Rust warns us about that:
$ cargo build
Compiling myprogram v0.1.0 (file:///projects/myprogram)
warning: variable does not need to be mutable
--> src/main.rs:2:9
|
2 | let mut x = 0;
| ----^
| |
| help: remove this `mut`
|
= note: `#[warn(unused_mut)]` on by default
The warning suggests that we remove the mut keyword. We can automatically apply that suggestion using the rustfix tool by running the command cargo fix:
$ cargo fix
Checking myprogram v0.1.0 (file:///projects/myprogram)
Fixing src/main.rs (1 fix)
Finished dev [unoptimized + debuginfo] target(s) in 0.59s
When we look at src/main.rs again, we’ll see that cargo fix has changed the code:
Файл: src/main.rs
fn main() {
let x = 42;
println!("{x}");
}The variable x is now immutable, and the warning no longer appears.
You can also use the cargo fix command to transition your code between different Rust editions. Editions are covered in Appendix E.
More Lints with Clippy
The Clippy tool is a collection of lints to analyze your code so that you can catch common mistakes and improve your Rust code. Clippy is included with standard Rust installations.
To run Clippy’s lints on any Cargo project, enter the following:
$ cargo clippy
For example, say you write a program that uses an approximation of a mathematical constant, such as pi, as this program does:
fn main() {
let x = 3.1415;
let r = 8.0;
println!("the area of the circle is {}", x * r * r);
}Running cargo clippy on this project results in this error:
error: approximate value of `f{32, 64}::consts::PI` found
--> src/main.rs:2:13
|
2 | let x = 3.1415;
| ^^^^^^
|
= note: `#[deny(clippy::approx_constant)]` on by default
= help: consider using the constant directly
= help: for further information visit https://rust-lang.github.io/rust-clippy/master/index.html#approx_constant
This error lets you know that Rust already has a more precise PI constant defined, and that your program would be more correct if you used the constant instead. You would then change your code to use the PI constant.
The following code doesn’t result in any errors or warnings from Clippy:
fn main() {
let x = std::f64::consts::PI;
let r = 8.0;
println!("the area of the circle is {}", x * r * r);
}For more information on Clippy, see its documentation.
IDE Integration Using rust-analyzer
To help with IDE integration, the Rust community recommends using rust-analyzer. This tool is a set of compiler-centric utilities that speak Language Server Protocol, which is a specification for IDEs and programming languages to communicate with each other. Different clients can use rust-analyzer, such as the Rust analyzer plug-in for Visual Studio Code.
Visit the rust-analyzer project’s home page for installation instructions, then install the language server support in your particular IDE. Your IDE will gain capabilities such as autocompletion, jump to definition, and inline errors.
E — Редакции
Appendix E: Editions
In Chapter 1, you saw that cargo new adds a bit of metadata to your Cargo.toml file about an edition. This appendix talks about what that means!
The Rust language and compiler have a six-week release cycle, meaning users get a constant stream of new features. Other programming languages release larger changes less often; Rust releases smaller updates more frequently. After a while, all of these tiny changes add up. But from release to release, it can be difficult to look back and say, “Wow, between Rust 1.10 and Rust 1.31, Rust has changed a lot!”
Every three years or so, the Rust team produces a new Rust edition. Each edition brings together the features that have landed into a clear package with fully updated documentation and tooling. New editions ship as part of the usual six-week release process.
Editions serve different purposes for different people:
- For active Rust users, a new edition brings together incremental changes into an easy-to-understand package.
- For non-users, a new edition signals that some major advancements have landed, which might make Rust worth another look.
- For those developing Rust, a new edition provides a rallying point for the project as a whole.
At the time of this writing, four Rust editions are available: Rust 2015, Rust 2018, Rust 2021, and Rust 2024. This book is written using Rust 2024 edition idioms.
The edition key in Cargo.toml indicates which edition the compiler should use for your code. If the key doesn’t exist, Rust uses 2015 as the edition value for backward compatibility reasons.
Each project can opt in to an edition other than the default 2015 edition. Editions can contain incompatible changes, such as including a new keyword that conflicts with identifiers in code. However, unless you opt in to those changes, your code will continue to compile even as you upgrade the Rust compiler version you use.
All Rust compiler versions support any edition that existed prior to that compiler’s release, and they can link crates of any supported editions together. Edition changes only affect the way the compiler initially parses code. Therefore, if you’re using Rust 2015 and one of your dependencies uses Rust 2018, your project will compile and be able to use that dependency. The opposite situation, where your project uses Rust 2018 and a dependency uses Rust 2015, works as well.
To be clear: Most features will be available on all editions. Developers using any Rust edition will continue to see improvements as new stable releases are made. However, in some cases, mainly when new keywords are added, some new features might only be available in later editions. You will need to switch editions if you want to take advantage of such features.
For more details, see The Rust Edition Guide. This is a complete book that enumerates the differences between editions and explains how to automatically upgrade your code to a new edition via cargo fix.
F — Переводы
Appendix F: Translations of the Book
For resources in languages other than English. Most are still in progress; see the Translations label to help or let us know about a new translation!
- Português (BR)
- Português (PT)
- 简体中文: KaiserY/trpl-zh-cn, gnu4cn/rust-lang-Zh_CN
- 正體中文
- Українська
- Español, alternate, Español por RustLangES
- Русский
- 한국어
- 日本語
- Français
- Polski
- Cebuano
- Tagalog
- Esperanto
- ελληνική
- Svenska
- Farsi, Persian (FA)
- Deutsch
- हिंदी
- ไทย
- Danske
- O’zbek
- Tiếng Việt
- Italiano
- বাংলা
G — Как разрабатывается Rust и "Nightly Rust"
Appendix G - How Rust is Made and “Nightly Rust”
This appendix is about how Rust is made and how that affects you as a Rust developer.
Stability Without Stagnation
As a language, Rust cares a lot about the stability of your code. We want Rust to be a rock-solid foundation you can build on, and if things were constantly changing, that would be impossible. At the same time, if we can’t experiment with new features, we may not find out important flaws until after their release, when we can no longer change things.
Our solution to this problem is what we call “stability without stagnation”, and our guiding principle is this: you should never have to fear upgrading to a new version of stable Rust. Each upgrade should be painless, but should also bring you new features, fewer bugs, and faster compile times.
Choo, Choo! Release Channels and Riding the Trains
Rust development operates on a train schedule. That is, all development is done in the main branch of the Rust repository. Releases follow a software release train model, which has been used by Cisco IOS and other software projects. There are three release channels for Rust:
- Nightly
- Beta
- Stable
Most Rust developers primarily use the stable channel, but those who want to try out experimental new features may use nightly or beta.
Here’s an example of how the development and release process works: let’s assume that the Rust team is working on the release of Rust 1.5. That release happened in December of 2015, but it will provide us with realistic version numbers. A new feature is added to Rust: a new commit lands on the main branch. Each night, a new nightly version of Rust is produced. Every day is a release day, and these releases are created by our release infrastructure automatically. So as time passes, our releases look like this, once a night:
nightly: * - - * - - *
Every six weeks, it’s time to prepare a new release! The beta branch of the Rust repository branches off from the main branch used by nightly. Now, there are two releases:
nightly: * - - * - - *
|
beta: *
Most Rust users do not use beta releases actively, but test against beta in their CI system to help Rust discover possible regressions. In the meantime, there’s still a nightly release every night:
nightly: * - - * - - * - - * - - *
|
beta: *
Let’s say a regression is found. Good thing we had some time to test the beta release before the regression snuck into a stable release! The fix is applied to the main branch, so that nightly is fixed, and then the fix is backported to the beta branch, and a new release of beta is produced:
nightly: * - - * - - * - - * - - * - - *
|
beta: * - - - - - - - - *
Six weeks after the first beta was created, it’s time for a stable release! The stable branch is produced from the beta branch:
nightly: * - - * - - * - - * - - * - - * - * - *
|
beta: * - - - - - - - - *
|
stable: *
Hooray! Rust 1.5 is done! However, we’ve forgotten one thing: because the six weeks have gone by, we also need a new beta of the next version of Rust, 1.6. So after stable branches off of beta, the next version of beta branches off of nightly again:
nightly: * - - * - - * - - * - - * - - * - * - *
| |
beta: * - - - - - - - - * *
|
stable: *
This is called the “train model” because every six weeks, a release “leaves the station”, but still has to take a journey through the beta channel before it arrives as a stable release.
Rust releases every six weeks, like clockwork. If you know the date of one Rust release, you can know the date of the next one: it’s six weeks later. A nice aspect of having releases scheduled every six weeks is that the next train is coming soon. If a feature happens to miss a particular release, there’s no need to worry: another one is happening in a short time! This helps reduce pressure to sneak possibly unpolished features in close to the release deadline.
Thanks to this process, you can always check out the next build of Rust and verify for yourself that it’s easy to upgrade to: if a beta release doesn’t work as expected, you can report it to the team and get it fixed before the next stable release happens! Breakage in a beta release is relatively rare, but rustc is still a piece of software, and bugs do exist.
Maintenance time
The Rust project supports the most recent stable version. When a new stable version is released, the old version reaches its end of life (EOL). This means each version is supported for six weeks.
Unstable Features
There’s one more catch with this release model: unstable features. Rust uses a technique called “feature flags” to determine what features are enabled in a given release. If a new feature is under active development, it lands on the main branch, and therefore, in nightly, but behind a feature flag. If you, as a user, wish to try out the work-in-progress feature, you can, but you must be using a nightly release of Rust and annotate your source code with the appropriate flag to opt in.
If you’re using a beta or stable release of Rust, you can’t use any feature flags. This is the key that allows us to get practical use with new features before we declare them stable forever. Those who wish to opt into the bleeding edge can do so, and those who want a rock-solid experience can stick with stable and know that their code won’t break. Stability without stagnation.
This book only contains information about stable features, as in-progress features are still changing, and surely they’ll be different between when this book was written and when they get enabled in stable builds. You can find documentation for nightly-only features online.
Rustup and the Role of Rust Nightly
Rustup makes it easy to change between different release channels of Rust, on a global or per-project basis. By default, you’ll have stable Rust installed. To install nightly, for example:
$ rustup toolchain install nightly
You can see all of the toolchains (releases of Rust and associated components) you have installed with rustup as well. Here’s an example on one of your authors’ Windows computer:
> rustup toolchain list
stable-x86_64-pc-windows-msvc (default)
beta-x86_64-pc-windows-msvc
nightly-x86_64-pc-windows-msvc
As you can see, the stable toolchain is the default. Most Rust users use stable most of the time. You might want to use stable most of the time, but use nightly on a specific project, because you care about a cutting-edge feature. To do so, you can use rustup override in that project’s directory to set the nightly toolchain as the one rustup should use when you’re in that directory:
$ cd ~/projects/needs-nightly
$ rustup override set nightly
Now, every time you call rustc or cargo inside of ~/projects/needs-nightly, rustup will make sure that you are using nightly Rust, rather than your default of stable Rust. This comes in handy when you have a lot of Rust projects!
The RFC Process and Teams
So how do you learn about these new features? Rust’s development model follows a Request For Comments (RFC) process. If you’d like an improvement in Rust, you can write up a proposal, called an RFC.
Anyone can write RFCs to improve Rust, and the proposals are reviewed and discussed by the Rust team, which is comprised of many topic subteams. There’s a full list of the teams on Rust’s website, which includes teams for each area of the project: language design, compiler implementation, infrastructure, documentation, and more. The appropriate team reads the proposal and the comments, writes some comments of their own, and eventually, there’s consensus to accept or reject the feature.
If the feature is accepted, an issue is opened on the Rust repository, and someone can implement it. The person who implements it very well may not be the person who proposed the feature in the first place! When the implementation is ready, it lands on the main branch behind a feature gate, as we discussed in the “Unstable Features” section.
After some time, once Rust developers who use nightly releases have been able to try out the new feature, team members will discuss the feature, how it’s worked out on nightly, and decide if it should make it into stable Rust or not. If the decision is to move forward, the feature gate is removed, and the feature is now considered stable! It rides the trains into a new stable release of Rust.